|
|
|
Porsche, and the Porsche crest are registered trademarks of Dr. Ing. h.c. F. Porsche AG.
This site is not affiliated with Porsche in any way. Its only purpose is to provide an online forum for car enthusiasts. All other trademarks are property of their respective owners. |
|
|


| didenpx |
 Oct 5 2024, 02:06 PM Oct 5 2024, 02:06 PM
Post
#1
|
|
Newbie  Group: Members Posts: 44 Joined: 1-September 23 From: Usa Member No.: 27,556 Region Association: North East States |
I’m a newcomer to the air cooled world. I picked up a 1975 914 1.8 project car last Fall that I’m just now beginning to work on. It seems to be mechanically stock and structurally sound and has ~120K miles on what appears to be the original engine (it doesn’t look to me as if it’s ever been pulled).
I found it on Craiglist in Maine where it was in the hands of a VW bus/bug enthusiast who was the third owner and had decided to focus his energies on a bus restoration instead. It was last registered an on the road in 2017 when the second owner had it. When I bought it it lot drove and came with an assortment of Restoration Design repair panels, several spare doors from earlier cars, some foglight front bumpers, spare seats, etc.. In a first for me when it comes to project cars the electrics all function properly and appear never to have been monkeyed with. Lights, blinkers, engine heater fan, hazards, everything. Photos below tell the story but the worst of the rust appears to be in the aft section of the LH outer longitudinal. I haven’t pulled the battery and ECU out yet, but from what I can see underneath the car, inside the engine bay, and between the quarter panel and the engine compartment tin the hell hole appears solid (but I’m prepared to find surprises). The rear of the car seems worst off with rot from the foam above the tail lights partially cut out and partially corrected (I’ll be cutting that all back out and starting the job fresh). It was also hit from behind on the LH side and although I haven’t measured everything out yet, from what I can see underneath things don’t seem to be out of whack (maybe wishful thinking as the panel gaps for the rear trunk are uneven). The trunk lid itself somehow didn’t rust out along the rear edge, but it’s suffered a lot of abuse in the form of a now missing luggage rack and a black fiberglass spoiler that had been attached with wood screws. The front of the car doesn’t show any signs of impact damage but the trunk lid sits high when latched on the LH side. My plans are to do a driver quality restoration (between a Hagerty 2 and 3) and get it on the road where I can enjoy it; I’ll cut out and weld the rusty sections, do as much of the body work myself as possible (thankfully it is very straight and the paint meter indicates there shouldn’t be a lot of bondo hiding under the old re-spray) and get a professional re-spray at a local body shop. I’ll either farm out or attempt to DIY the engine work myself. Since I’m assuming the engine will need a rebuild (see below) I’d definitely like to increase the displacement while staying with the stock FI setup. I just started assessing the car in the last couple of weeks and have focused on the health of the engine. It’s still got the original L-jet FI (which I intend to keep). When I got it, it fired up easily but was extremely lumpy and stumbled badly coming off idle. After fixing vacuum hose routing (mostly anyways), adjusting points, doing timing, and adjusting valves it idles well at 850 rpm, sounds much healthier, and revs up from idle nicely (all this is based on stationary testing as the car is not on the road). Today I warmed the engine up and did compression test (throttle propped open with screwdriver) followed by a leak down test. I think the results tell me that I have a tired engine needing rebuilding: Cylinder Compression Leakdown 1 105 15% 2 105 20% 3 105 21% 4 105 23% I didn’t crawl around under the car to listen for leaking valves, but for each the cylinders I could hear hissing in the crankcase as soon as I pressurized the cylinders, which I assume is a bad thing. I’m going to discuss rebuild options at a local multi-generation family garage that started out as a VW shop; if they can do the work within my budget then I’ll probably go that route. I plan to drop the engine sometime late this month. One thing I need help on at this point is figuring out the remaining vacuum lines. I have a large inlet on the air box that looks from the diagrams as if it should go to the charcoal canister but there was no hose on it when I got the car and I don’t know where it should be routed, or even where the canister is (is it that plastic contraption sitting on top of the fuel tank!?). And just yesterday I noticed there is another nipple on the metal thing that the coil bracket attaches to…what’s that supposed to go to?? Looking forward to sharing my progress. This is a great forum that I’ve already learned a lot from! 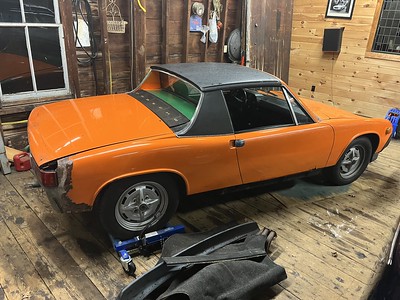 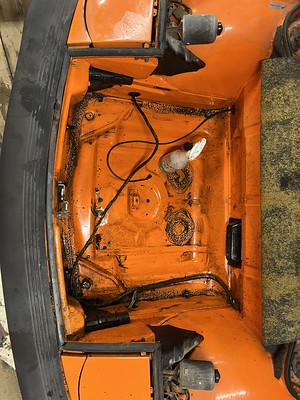 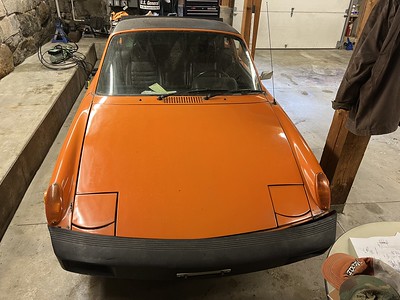 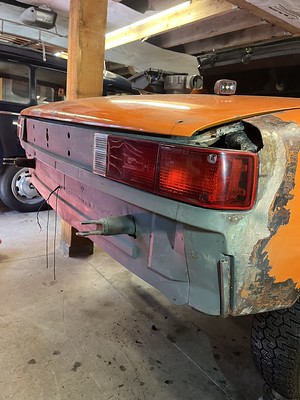 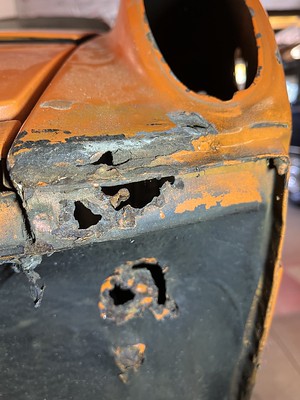 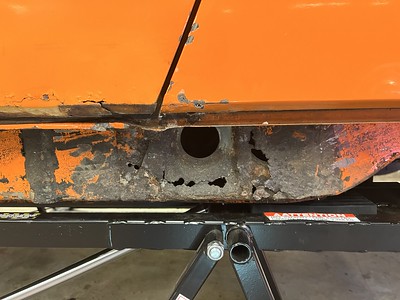 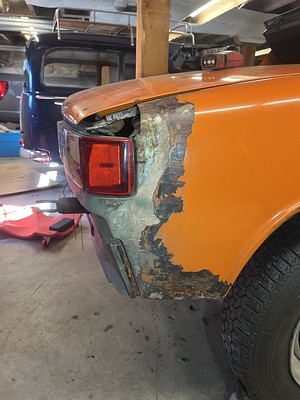 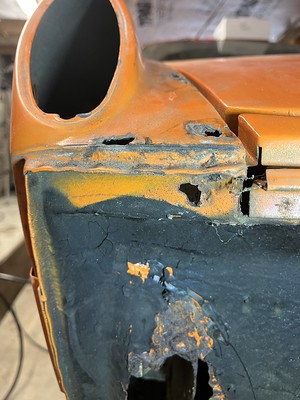 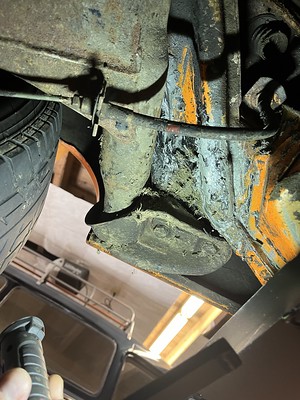 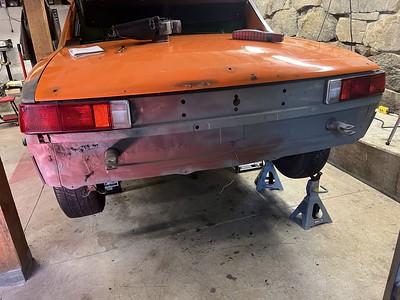 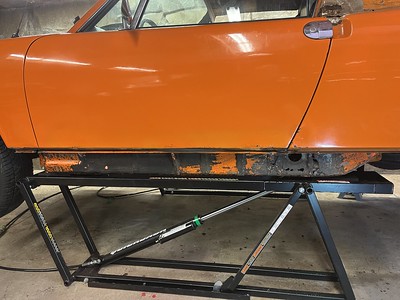 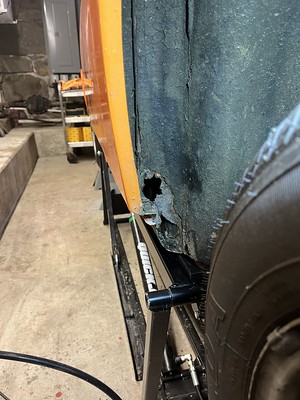 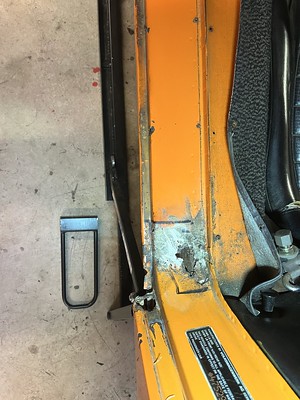 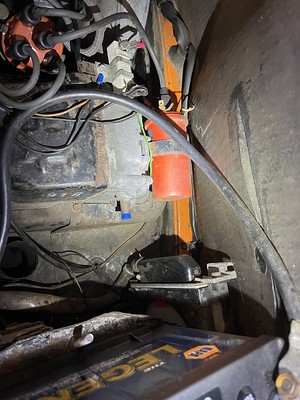 Attached image(s) 
|
   |

 
|
  |
Replies
| didenpx |
Jan 4 2025, 09:37 AM
Post
#2
|
|
Newbie Group: Members Posts: 44 Joined: 1-September 23 From: Usa Member No.: 27,556 Region Association: North East States |
An update on the project….but first an admission that my description of the work at hand as “trivial” in comparison to a previous Volvo project was a bit optimistic.
Nevertheless the car is structurally sound, though needing a lot of attention in LOTS AND LOTS of different places. I re-awakened my welding “skills” by concentrating on the nose section first and that’s done-ish until body work begins. 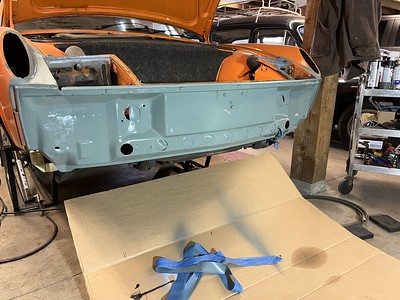 Next I dug in on the LH longitudinal. Initially I was thinking I could get away with simply patching, but after cutting it open a bit and getting a better look at the inside I decided to open it up from aft of the A-pillar backwards. I used Tangerine Racing chassis braces to stabilize the structure. Sections of the inner rocker, especially the section behind where the jacking point used to be, were badly compromised, but inside the inner long section was not too bad. there was some surface rust and scale on the bottom of this section which I cleaned up and then sealed. 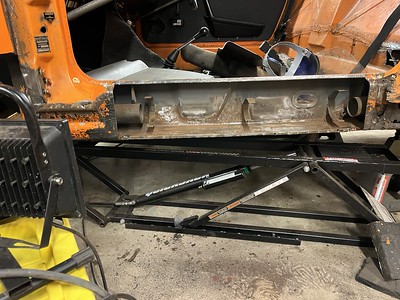 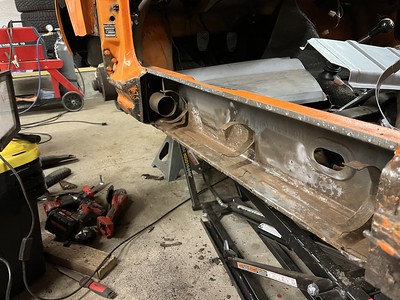 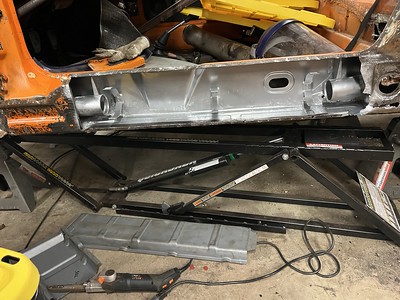 After I got the middle part of the long sorted out I sectioned out the piece that goes behind the jack point (the part with the two circular holes, into one of which the jacking box section protrudes). This was weak/rotted away on the lower section below the holes so I patched it up with 16 gauge material. I also found some rot on the interior the part of the long that starts kicking up and inward toward the engine, so I fabricated a stiffening piece and welded that in before priming everything. I also used Eastwood frame sealer to treat the upper portions of the interior of the long in the trunk/engine bay area. Hopefully this will stabilize things for as long as it will be relevant to me. Once this was done I welded back in the patched section that reinforces the area behind the jacking point and then welded in the aft section of the inner rocker. The most time consuming part came next; fabricating a patch for the inner rocker skin over the rear part of the long where it starts to kick up/in and covering the area where the jacking point attaches. I ultimately used 20 gauge steel which I cut and formed to fit the shape of the area. Where the jacking box section goes through the skin I spot welded in a piece of 16 gauge backer. This repair section was plug welded to the pieced behind and spot welded to the flange of the inner long section. 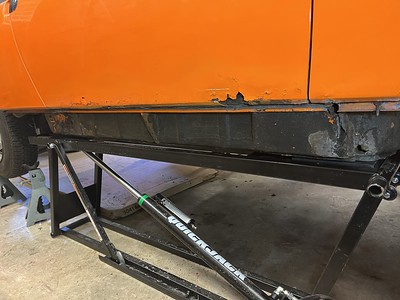  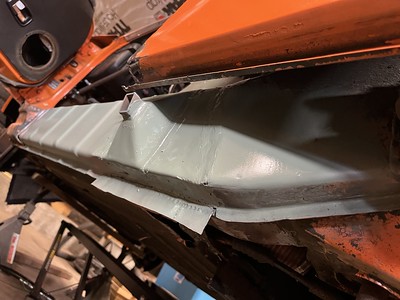 Now I’m moving on to the front section of the long including the bottom part of the A-pillar. Got that all peeled apart and the inner part of the long here looks solid with just surface rust and scale which I will Ospho and then seal before closing things back up. 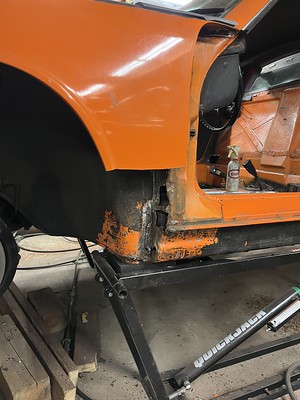 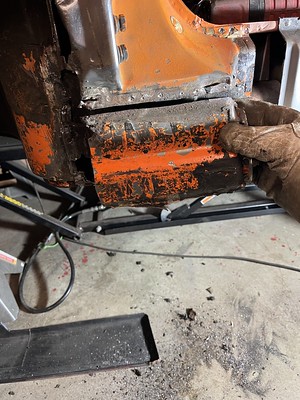 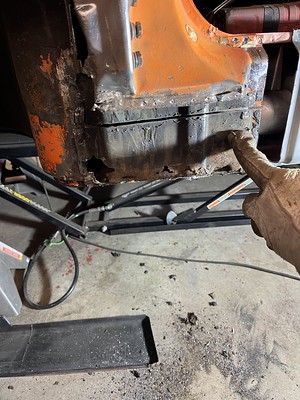 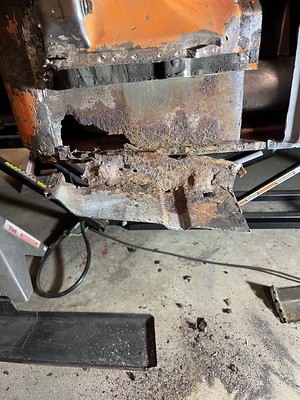  After this it’s on to patching up the front fender and then back to the sail panel rot and replacing the LH door jamb. There’s so much more yet to do that it seems pretty daunting….thank goodness for all of the Porsche resurrection videos on Youtube! When it all seems to much I watch one of those and think to myself “one patch at a time.” Still hoping to have all welding done and (stretch goal) body work complete by the time the salt is off the roads in New England. |
|
|
|
Posts in this topic
 didenpx 1975 1.8 Driver Restoration Oct 5 2024, 02:06 PM
 Montreal914 :wttc:
Best place for anything 914! :trophy... Oct 5 2024, 02:21 PM
Montreal914 :wttc:
Best place for anything 914! :trophy... Oct 5 2024, 02:21 PM
 didenpx
:wttc:
Best place for anything 914! :troph... Oct 5 2024, 02:45 PM technicalninja :wttc:
You have a running engine...
And you goi... Oct 5 2024, 03:41 PM fiacra Welcome. Looks like you have some work ahead of y... Oct 5 2024, 03:48 PM 930cabman :wttc:
Welcome to the madness. Great looking exa... Oct 5 2024, 04:54 PM didenpx This is encouraging and unexpected feedback; I was... Oct 5 2024, 05:18 PM wonkipop
This is encouraging and unexpected feedback; I wa... Oct 5 2024, 07:22 PM Montreal914 I hate to break the news to you but I can see a fu... Oct 5 2024, 05:23 PM didenpx
I hate to break the news to you but I can see a f... Oct 5 2024, 06:26 PM technicalninja You have enough engine to get it through the resur... Oct 5 2024, 06:52 PM fiacra @[url=http://www.914world.com/bbs2/index.php?showu... Oct 7 2024, 06:40 PM bkrantz Welcome! And good luck. I agree with others ... Oct 7 2024, 07:09 PM didenpx @fiacra thanks again for the offer of photos but ... Oct 8 2024, 09:55 AM dr914@autoatlanta.com we are doing a bunch of metal restoration on a 74 ... Oct 8 2024, 10:18 AM didenpx Been plugging away on the right hand wing rot betw... Oct 9 2024, 04:04 PM didenpx Nearing completion on rust work in the right front... Oct 26 2024, 01:07 PM friethmiller Hey @didenpx! Welcome to the fun :D
I like... Oct 26 2024, 05:56 PM didenpx Fred,
It's been a number of years since I did... Oct 27 2024, 02:23 PM 930cabman " Again - it doesn't look very concerning... Oct 27 2024, 02:47 PM seanpaulmc There’s more there to cut out and replace than y... Oct 27 2024, 04:28 PM didenpx Sean, I've referenced your thread a few times ... Oct 27 2024, 05:18 PM friethmiller @didenpx - yep gotya! Thanks for the additio... Oct 27 2024, 06:41 PM didenpx OK, the dream of a quick refresh and recommissioni... Apr 28 2025, 05:55 AM Geezer914 Welcome to 914 World! That's the problem ... Apr 28 2025, 06:25 AM friethmiller You are the owner of this car. If you want to bac... Apr 28 2025, 07:38 AM didenpx @geezer914 the rust isn't as bad as you might... Apr 29 2025, 06:41 AM friethmiller
[b]@[url=http://www.914world.com/bbs2/index.php?s... Apr 29 2025, 07:03 AM burton73 @didenpx
You have a lot on you plate and it look... Apr 29 2025, 01:16 PM didenpx Thanks @burton73 . I have found a few very small ... Apr 29 2025, 03:06 PM
didenpx
:wttc:
Best place for anything 914! :troph... Oct 5 2024, 02:45 PM technicalninja :wttc:
You have a running engine...
And you goi... Oct 5 2024, 03:41 PM fiacra Welcome. Looks like you have some work ahead of y... Oct 5 2024, 03:48 PM 930cabman :wttc:
Welcome to the madness. Great looking exa... Oct 5 2024, 04:54 PM didenpx This is encouraging and unexpected feedback; I was... Oct 5 2024, 05:18 PM wonkipop
This is encouraging and unexpected feedback; I wa... Oct 5 2024, 07:22 PM Montreal914 I hate to break the news to you but I can see a fu... Oct 5 2024, 05:23 PM didenpx
I hate to break the news to you but I can see a f... Oct 5 2024, 06:26 PM technicalninja You have enough engine to get it through the resur... Oct 5 2024, 06:52 PM fiacra @[url=http://www.914world.com/bbs2/index.php?showu... Oct 7 2024, 06:40 PM bkrantz Welcome! And good luck. I agree with others ... Oct 7 2024, 07:09 PM didenpx @fiacra thanks again for the offer of photos but ... Oct 8 2024, 09:55 AM dr914@autoatlanta.com we are doing a bunch of metal restoration on a 74 ... Oct 8 2024, 10:18 AM didenpx Been plugging away on the right hand wing rot betw... Oct 9 2024, 04:04 PM didenpx Nearing completion on rust work in the right front... Oct 26 2024, 01:07 PM friethmiller Hey @didenpx! Welcome to the fun :D
I like... Oct 26 2024, 05:56 PM didenpx Fred,
It's been a number of years since I did... Oct 27 2024, 02:23 PM 930cabman " Again - it doesn't look very concerning... Oct 27 2024, 02:47 PM seanpaulmc There’s more there to cut out and replace than y... Oct 27 2024, 04:28 PM didenpx Sean, I've referenced your thread a few times ... Oct 27 2024, 05:18 PM friethmiller @didenpx - yep gotya! Thanks for the additio... Oct 27 2024, 06:41 PM didenpx OK, the dream of a quick refresh and recommissioni... Apr 28 2025, 05:55 AM Geezer914 Welcome to 914 World! That's the problem ... Apr 28 2025, 06:25 AM friethmiller You are the owner of this car. If you want to bac... Apr 28 2025, 07:38 AM didenpx @geezer914 the rust isn't as bad as you might... Apr 29 2025, 06:41 AM friethmiller
[b]@[url=http://www.914world.com/bbs2/index.php?s... Apr 29 2025, 07:03 AM burton73 @didenpx
You have a lot on you plate and it look... Apr 29 2025, 01:16 PM didenpx Thanks @burton73 . I have found a few very small ... Apr 29 2025, 03:06 PM |
6 User(s) are reading this topic (6 Guests and 0 Anonymous Users)
0 Members:

|
Lo-Fi Version | Time is now: 30th April 2025 - 06:57 AM |
Invision Power Board
v9.1.4 © 2025 IPS, Inc.