|
|
|
Monday, 7 April 2025 |

|
Porsche, and the Porsche crest are registered trademarks of Dr. Ing. h.c. F. Porsche AG.
This site is not affiliated with Porsche in any way. Its only purpose is to provide an online forum for car enthusiasts. All other trademarks are property of their respective owners. |
|
|
| watsonrx13 |
 Dec 14 2005, 07:34 PM Dec 14 2005, 07:34 PM
Post
#1
|
|
Advanced Member     Group: Members Posts: 2,735 Joined: 18-February 03 From: Plant City, FL Member No.: 312 Region Association: South East States |
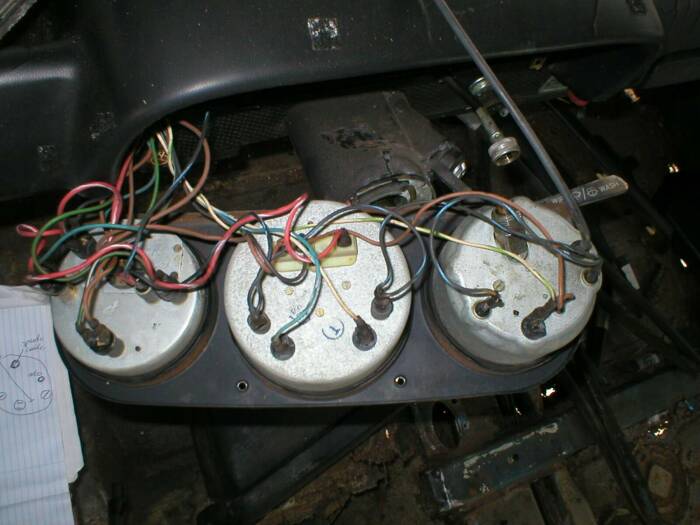
Well, I'm in the process of dismantling one of my parts car and I've decided to document the steps used to remove the dash top.
I began removing the top dash pad by removing the instrument cluster. If you haven't removed the steering wheel and knee pad, do that now. Next, remove the 4 screws that hold the cluster to the dash. Now, just pull the cluster forward, without removing the electrical connections. I have removed the cluster completely from the car because I'm stripping it. You don't have to do this to remove the dash top. This post has been edited by watsonrx13: Dec 14 2005, 08:08 PM Attached image(s) 
|
  |
Replies
| watsonrx13 |
 Dec 14 2005, 07:36 PM Dec 14 2005, 07:36 PM
Post
#2
|
|
Advanced Member     Group: Members Posts: 2,735 Joined: 18-February 03 From: Plant City, FL Member No.: 312 Region Association: South East States |
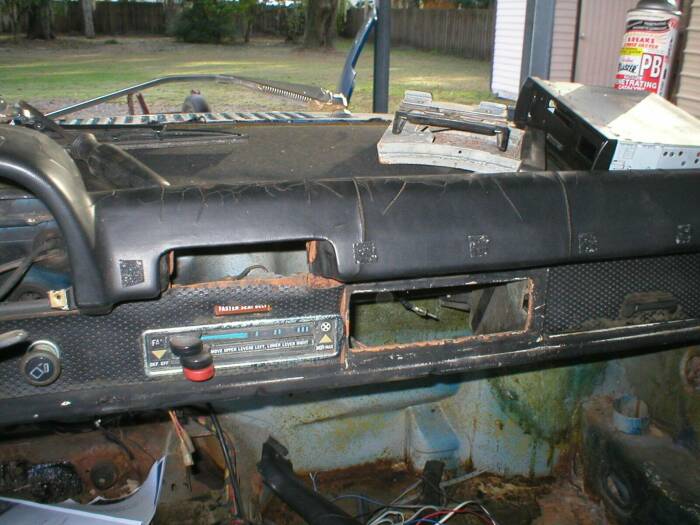
Next I removed the ashtray. This isn't necessary, but since I'm stripping the car I just wanted it out of the way. I also removed the radio.
Attached image(s) 
|
Posts in this topic
 watsonrx13 Remove dash top Dec 14 2005, 07:34 PM
 watsonrx13 This shows the steering wheel and instrumentation ... Dec 14 2005, 07:34 PM
 watsonrx13 Once the cluster is out of the way, you can remove... Dec 14 2005, 07:34 PM
 watsonrx13 There are 2 nuts that need to be removed from this... Dec 14 2005, 07:35 PM
 watsonrx13 The next one is between the 'hump' and the... Dec 14 2005, 07:35 PM
 watsonrx13 This shows the next 2 nuts. There is one directly ... Dec 14 2005, 07:36 PM
 watsonrx13 Next I removed the glove box. Begin by removing th... Dec 14 2005, 07:36 PM
 watsonrx13 Before removing the glove box, remove the spring, ... Dec 14 2005, 07:37 PM
 watsonrx13 The last 2 nuts can now be removed. Both are direc... Dec 14 2005, 07:37 PM
 watsonrx13 Now, carefully pull the dash top up. There are 9 n... Dec 14 2005, 07:38 PM
 watsonrx13 This shows the plastic bolts on the passenger side... Dec 14 2005, 07:38 PM
 watsonrx13 This shows the bolts around the ash tray. Dec 14 2005, 07:38 PM
 watsonrx13 This shows the bolts on the driver's side. Dec 14 2005, 07:39 PM
 boxstr Looks like a valiant effort to document the proced... Dec 14 2005, 07:41 PM
 grasshopper cool, i needed to know how to take that off! <... Dec 14 2005, 07:44 PM
 watsonrx13 Dec 14 2005, 07:48 PM
 tat2dphreak I used a ratchet that can be actuateed by turning ... Dec 14 2005, 08:35 PM
 r_towle ok, great, put it in the tech articles at the top ... Dec 14 2005, 08:41 PM
 grasshopper <... Dec 14 2005, 09:39 PM
 bondo What if you have an early car with no dash side ve... Dec 14 2005, 09:41 PM
 markb You can get to them, it's just a little toughe... Dec 14 2005, 10:01 PM
 boxstr One thing you will find is that some of the nuts a... Dec 14 2005, 10:40 PM
 jfort thanks for the documentation and especially the pi... Dec 15 2005, 07:36 AM
 Bartlett 914 Great thread! I was getting ready to do this m... Dec 15 2005, 08:02 AM
 tat2dphreak Dec 15 2005, 12:02 PM
 Jeffs9146 Dec 15 2005, 12:14 PM
 grasshopper well, i used this thread, and it worked great... Dec 18 2005, 06:52 PM
 grasshopper next, remove the fresh air control unit in the das... Dec 18 2005, 06:57 PM
 grasshopper with the nuts out Dec 18 2005, 06:58 PM
 grasshopper disconnect the universal joint: 13mm bolt, and 14m... Dec 18 2005, 07:00 PM
 grasshopper with it removed: Dec 18 2005, 07:02 PM
 grasshopper next, remove the two upped dash vents. They sepera... Dec 18 2005, 07:06 PM
 grasshopper next, remove the two screws on each side of the da... Dec 18 2005, 07:08 PM
 grasshopper now your dash should look like this, you need to r... Dec 18 2005, 07:10 PM
 grasshopper remove the 10mm nut under the dash, connecting the... Dec 18 2005, 07:12 PM
 grasshopper now there are only four more nuts holding the dash... Dec 18 2005, 07:17 PM
 grasshopper the next nut is about 8-10 more inches down the da... Dec 18 2005, 07:20 PM
 michel richard Are'nt there 6 screws that hold the instrument... Dec 18 2005, 07:21 PM
 grasshopper the other two nuts are in the same places on the o... Dec 18 2005, 07:22 PM
 grasshopper thanks for reminding me about that michel, those w... Dec 18 2005, 07:25 PM
 grasshopper still a few things on the frame itself Dec 18 2005, 07:27 PM
 grasshopper the stripped dash frame Dec 18 2005, 07:28 PM
 grasshopper thats all http://www.914world.com/b... Dec 18 2005, 07:28 PM
 partwerks I know there are four clips on each of the side ve... Jun 13 2021, 02:04 PM
 mitchdiego1 I just did mine this weekend, Jun 14 2021, 02:36 PM
 partwerks This article helped me to get the glove box, and l... Jun 14 2021, 08:29 PM
  |
1 User(s) are reading this topic (1 Guests and 0 Anonymous Users)
0 Members:

|
Lo-Fi Version | Time is now: 6th April 2025 - 08:44 PM |
Invision Power Board
v9.1.4 © 2025 IPS, Inc.
| All rights reserved 914World.com © since 2002 |
|
914World.com is the fastest growing online 914 community! We have it all, classifieds, events, forums, vendors, parts, autocross, racing, technical articles, events calendar, newsletter, restoration, gallery, archives, history and more for your Porsche 914 ... |


