|
|

|
Porsche, and the Porsche crest are registered trademarks of Dr. Ing. h.c. F. Porsche AG.
This site is not affiliated with Porsche in any way. Its only purpose is to provide an online forum for car enthusiasts. All other trademarks are property of their respective owners. |
|
|
| racunniff |
 Aug 5 2007, 11:48 PM Aug 5 2007, 11:48 PM
Post
#1
|
|
volt914   Group: Members Posts: 172 Joined: 21-August 06 From: Fort Collins, CO Member No.: 6,705 Region Association: Rocky Mountains |
Spent the day installing my windshield. Started with new windshield clips from Pelican Parts (you will need 19 of them):
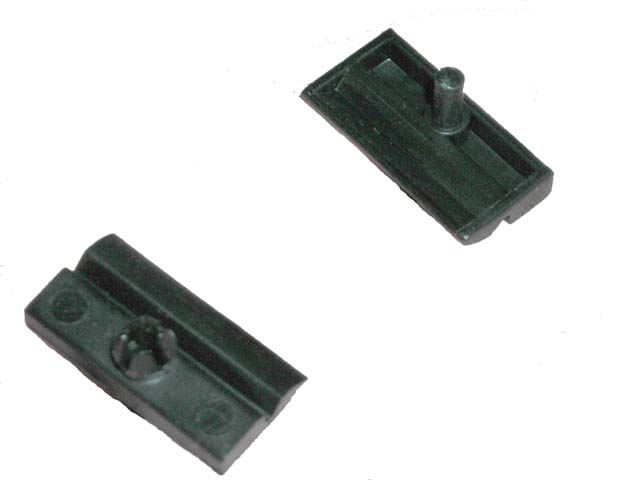 This picture shows the "top" and "bottom" of the clip. The "bottom" of the clip pushes into the windshield frame and also has the notch to capture the trim (see picture below for how this works). The "top" of the clip has the rivet that you'll need to drive in to permanently attach the clip. You'll also need some of this, Butyl Tape (I got mine at NAPA) - 1/4 inch is the recommended size: 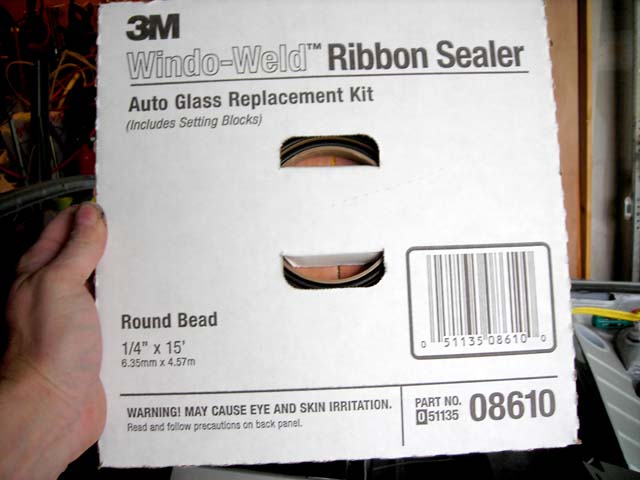 Note the warning about eye and skin irritation. I don't know if it's true, but I did the final cleaning and install wearing gloves, so I would not know. I do know that it is extremely sticky, and would likely be a lot of fun to get off your skin without evil chemicals like acetone. You'll also need these - window spacers (also available from Pelican Parts - you need 2): 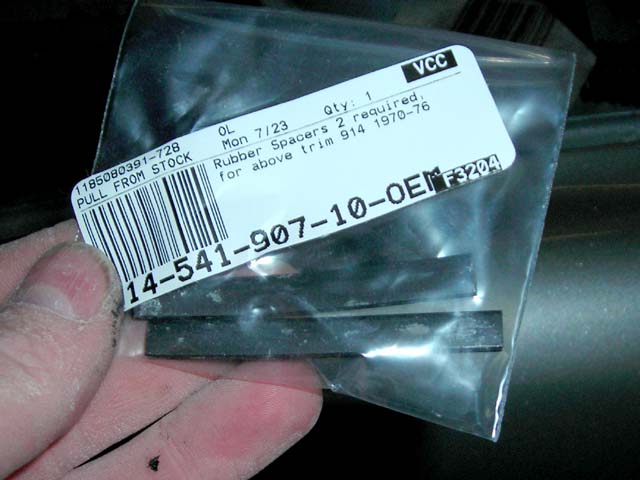 The butyl I bought also came with spacers, but they are not the same shape/size, so I do not trust them. Now for the clips. I dry-fit them on my trim to verify the orientation I wanted when I installed them: 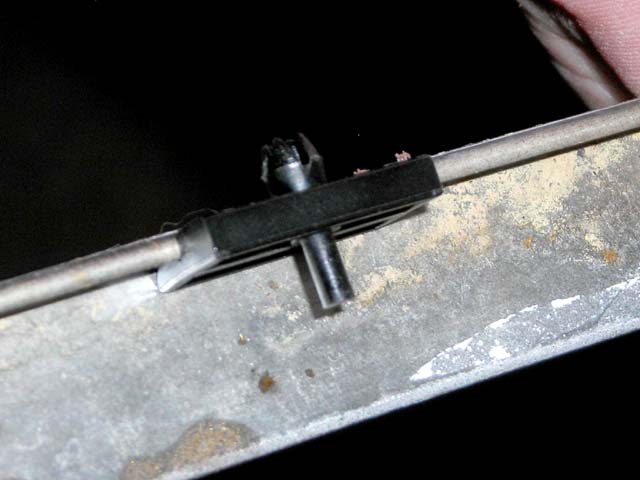 Installing the clips is pretty straightforward. You put a clip in a mounting hole: 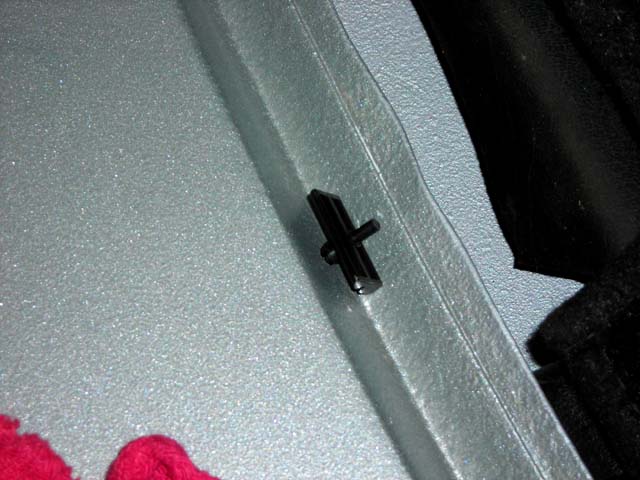 and then you push the clip in with your thumbs as far as you can: 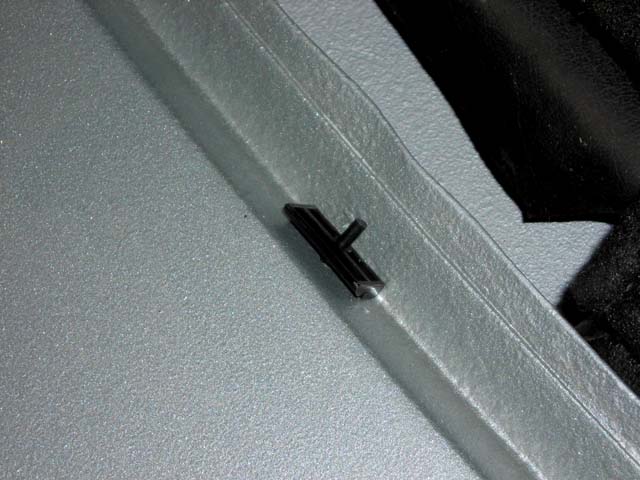 You need to get it very close to flush, because if you don't, when you try to push the rivet in, it will just pop the clip out of the hole (ask me how I know (IMG:style_emoticons/default/dry.gif) ). This is not fatal, though, because you can usually use a pair of pliers to pull the rivet back out and start over (assuming that you have not mashed the rivet as you try to push it in). Part II, coming soon. |
  |
Replies
| aircooledboy |
 Aug 14 2007, 11:21 AM Aug 14 2007, 11:21 AM
Post
#2
|
|
Sweet Pea's 1st ride in daddy's "vroom -vroom"    Group: Members Posts: 1,672 Joined: 4-February 04 From: Rockford, IL Member No.: 1,629 Region Association: Upper MidWest |
A nice install. Good Work. (IMG:style_emoticons/default/beerchug.gif)
A few details to add (from a former glass installer): 1. The butyl tape in the pictures above is not quite in the right spot. The optimal location for the tape is nearer to the inside edge of the pinch weld. What you are shooting for is to have the tape completely between the glass and the pinch weld when you are done. If it sticks out passed the edge of the glass here and there, it isn't the end of the world, but the maximum seal is gained by having the tape in between the glass and the pinch, as opposed to bulging out around the edges. 2. There is a clear primer that should be put on the glass before installing. You wipe it on with a clean rag in a band about 5/8" wide around the inside surface perimeter of the glass. It increases the the strength of the bond dramatically. This can add meaningful structural rigidity in a rollover. You could get this primer at any local auto glass shop in the past for about $5/can, but that could be more difficult now since reputable installers no longer use butyl to install windshields. Urethane is used exclusively now, due to its superior structural strength. In the past, the role of the windshield in maintaining the integrity of the passenger compartment in a roll over wasn't as well understood as it it today. Since a butyl install is much easier for the DIY'er, given the above it seems like a good idea to at least maximize the strength of a butyl install, and that is why the primer is a good idea. 3. Perry is right. There is a specific 3M product called "window weld primer" for this job. Butyl will stick just fine to clean paint, but sticks better to this primer. Better bond= better rigidity. See above for why that matters. Cost was about the same as glass primer, but might also be harder to come by these days (see above). On the other hand, I just saw it at Pep Boys the other day. 4. When joining the ends of the butyl, it should be done at the bottom, about 6' or so from the center, NEVER on the top, and it best joined by an "end to end butt." The technique here is that before laying down the final 6 inches or so, you should carefully hold the final portion near the begining point, being very careful not to touch the tape to the frame or the other end of the tape (Did I mention being careful?). Cut the tape about 1/4" long, butt the ends together first, then work the last 6" down. Another common method is a slight "side by side" overlap, but the narrow width of the pinch weld on a 914 frame makes that a poor choice here, as it has a fair chance of being visible. NEVER use a stacked overlap. The pressure required to flatten a stack enough to get a good seal dances right on the edge of the pressure requred to break the glass. No good reason to do it. 5. When placing the windshield, you set the bottom lightly on the blocks first. This is a job best done with 2 people for the inexperienced. As long as you handle the glass by the edge only gloves are not necessary. Gloves can actually be more bad than good, because touching the sealing surface with a glove can contaminate it just as much as a bare hand, but you may not know it until too late, because the glove prevented you from feeling it. Center the glass as best you can before setting onto the blocks, then lay the glass back nearly in place, but not allowing it to touch the tape on the sides or top until you are CERTAIN it is properly centered. Perfection in not required, but if you are too far off, it can prevent the trim clips from moving enough to accept the trim later. Now, lightly lay the glass into place. You can actually still make small adjustments at this point by twisting a small wood block between the glass edge and the frame edge to nudge it up to about 1/4". Once you are completely certain you are well centered, THEN you go around the perimeter of the glass applying moderate pressure with your palm around the top, bottom and sides of the glass. USE GENTLE PRESSURE ON THE CORNERS. This is the weak spot of our windshields, and too much pressure will snap the corner. See my description below as to what you are looking for. If the corners look good, leave them alone. 6. You are done when you have a uniform dark black band around the perimeter of the glass. Trust me, you will know what I mean when you are looking at it. If you have a white line crossing the band, or a spot where the band gets narrowed to less than 1/4 ", you are looking a present or future leak. Either of these problems can usually be fixed with a little more pressure to that spot, remembering you are working with glass so don't lose your mind. If more pressure doesn't fix the problem, you need to get a tube of liquid butyl, and squirt it in around the trouble spot until you have broadened the seal or filled the white line. The butt joint is a common place to get this "white line", so pay close attention to that spot. Go slow, and this is about a 4 or 5 on the 1-10 difficullty scale. |
| racunniff |
 Aug 14 2007, 11:17 PM Aug 14 2007, 11:17 PM
Post
#3
|
|
volt914   Group: Members Posts: 172 Joined: 21-August 06 From: Fort Collins, CO Member No.: 6,705 Region Association: Rocky Mountains |
A nice install. Good Work. (IMG:style_emoticons/default/beerchug.gif) A few details to add (from a former glass installer): 1. The butyl tape in the pictures above is not quite in the right spot... 2. There is a clear primer that should be put on the glass before installing... 3. Perry is right. There is a specific 3M product called "window weld primer" for this job... 4. When joining the ends of the butyl, it should be done at the bottom, about 6' or so from the center, NEVER on the top... 5. When placing the windshield, you set the bottom lightly on the blocks first... 6. You are done when you have a uniform dark black band around the perimeter of the glass... Go slow, and this is about a 4 or 5 on the 1-10 difficullty scale. Thanks for the tips! I am obviously not a professional glass installer (nor even an amateur one until Last week (IMG:style_emoticons/default/biggrin.gif) ) I agree, the butyl was not positioned ideally. I have not decided if I care enough to rip the whole thing out or not... Is not applying the clear primer a safety hazard of any kind? (other than weakening the bond somewhat, obviously). |
| aircooledboy |
 Aug 15 2007, 07:35 PM Aug 15 2007, 07:35 PM
Post
#4
|
|
Sweet Pea's 1st ride in daddy's "vroom -vroom"    Group: Members Posts: 1,672 Joined: 4-February 04 From: Rockford, IL Member No.: 1,629 Region Association: Upper MidWest |
Thanks for the tips! I am obviously not a professional glass installer (nor even an amateur one until Last week (IMG:style_emoticons/default/biggrin.gif) ) I agree, the butyl was not positioned ideally. I have not decided if I care enough to rip the whole thing out or not... Is not applying the clear primer a safety hazard of any kind? (other than weakening the bond somewhat, obviously). No hazard beyond the potential reduction in the bond strength. You have to do the cost/benefit analysis for yourself, but I can say for sure if the car were mine, I wouldn't give it a second thought. As far as removing it to better position the tape, I wouldn't do that either. Removing a butyl set windshield is the easiest removal, but still a bit tricky for the 1st timer. It's properly done with a special heated knife, but can be cut out with "piano wire" and a bit of finesse. I could get it out with no trouble, but I've done it literally hundreds of times. You could probably get it out too, but there are a number of "feel" sort of things the you gave to mindful of to avoid a boo-boo. A small error results in a $200ish good reason to be very pissed off. If I were you, wouldn't pull your glass out unless it leaked or whistled. Every glass installer has had a job where they got too wide with the tape like you did. You just push the tape under the glass where you can, just like it appears you did accross the top. As long as the tape it still clean, it will still seal just fine. If we had to do that across a fairly long stretch, we would then "back it up" by running a bead of urerthane over the area, and smooth it so that it covered from the edge of the glass to the frame. We did this really as a extra measure of assurance that the customer wouldn't have a problem later, and in 99.99% of cases it was probably not necessary. Once again, if I were you I wouldn't take that step unless you develope a problem, but it is an option. (IMG:style_emoticons/default/aktion035.gif) (IMG:style_emoticons/default/monkeydance.gif) |
Posts in this topic
 racunniff Windshield install Aug 5 2007, 11:48 PM
 racunniff Part II.
The final step in installing a clip is t... Aug 6 2007, 12:08 AM
 racunniff Part III
Not much in this part - I have yet to ac... Aug 6 2007, 12:12 AM
 watsonrx13 Excellent write up, definately a classic how-to on... Aug 6 2007, 05:21 AM

 racunniff
Excellent write up, definately a classic how-to o... Aug 6 2007, 11:22 PM
 9146986 One thing that I recommend is painting the windshi... Aug 6 2007, 08:01 AM

 racunniff
One thing that I recommend is painting the windsh... Aug 6 2007, 11:23 PM

 jmitro
One thing that I recommend is painting the windsh... Sep 28 2018, 06:36 AM
 rhodyguy great write up. first ever for a windshield i thin... Aug 6 2007, 09:31 AM

 racunniff
great write up. first ever for a windshield i thi... Aug 6 2007, 11:27 PM
 KELTY360 Can't believe you did this alone....very impre... Aug 6 2007, 11:39 PM
 racunniff Part IV
Finished it off this weekend. First orde... Aug 13 2007, 09:39 PM

 mcbrems Pretty amazing that you didn't overspray onto ... May 19 2011, 03:50 PM
 racunniff Part V
One thing I discovered after I sanded the ... Aug 13 2007, 09:48 PM
 racunniff Part VI
Clip the lower piece in, then work your w... Aug 13 2007, 09:54 PM
 Gint We'll move this to the Lapuwali Classic Thread... Aug 13 2007, 10:31 PM

 racunniff
We'll move this to the Lapuwali Classic Threa... Aug 13 2007, 10:42 PM
 iamchappy I am surprised the left and right are marked oppos... Aug 14 2007, 08:24 AM

 racunniff
I am surprised the left and right are marked oppo... Aug 14 2007, 09:44 AM

 theer
I am surprised the left and right are marked opp... Sep 28 2018, 07:57 AM

 buhs914
No hazard beyond the potential reduction in the ... Jun 5 2010, 10:58 PM
 rhodyguy i'm in the middle of pulling one and this may ... Aug 17 2007, 01:15 PM
 bandjoey I changed my windshield in the cooler weather at p... Jun 6 2010, 09:23 PM
 PRS914-6 I really admire people who jump in and do their ow... Jun 6 2010, 10:02 PM
 ConeDodger For any of you Northern California guys who are do... May 19 2011, 06:16 PM
 mcbrems I humbly offer my windshield install post from my ... Jun 3 2011, 03:57 PM
 avidfanjpl Dumb question
Where do the 2 spacers go?
I have ... Jun 3 2011, 04:23 PM
 sfrenck Just did an install last week. My 2 cents - my fr... Jun 3 2011, 07:23 PM

 mcbrems
...One thing I wish I had done while the window w... Jun 6 2011, 06:04 PM
 Mikey914 I came across these while looking at a maintence m... Jun 4 2011, 01:19 AM
 majkos I love it!
I'm gonna try to make a few.
I... Jun 5 2011, 11:48 AM

 jaxdream
I love it!
I'm gonna try to make a few.
I... Jun 6 2011, 08:23 AM
 JawjaPorsche Thanks for an excellent write up. Sep 28 2018, 01:47 PM
  |
1 User(s) are reading this topic (1 Guests and 0 Anonymous Users)
0 Members:

|
Lo-Fi Version | Time is now: 3rd April 2025 - 05:12 AM |
Invision Power Board
v9.1.4 © 2025 IPS, Inc.


