|
|
|
Thursday, 3 April 2025 |

|
Porsche, and the Porsche crest are registered trademarks of Dr. Ing. h.c. F. Porsche AG.
This site is not affiliated with Porsche in any way. Its only purpose is to provide an online forum for car enthusiasts. All other trademarks are property of their respective owners. |
|
|
  |
| nick mironov |
 Jun 2 2010, 01:02 AM Jun 2 2010, 01:02 AM
Post
#41
|
|
nickm   Group: Members Posts: 204 Joined: 12-June 05 From: San Francisco, CA Member No.: 4,264 |
I purchased Scott's / Renegade's bypass thermostat solution. Nice, neat solution. It installs fairly easily. The only problem was that the kit's Y-fitting for the bypass connection at the pump suction did not fit because of my particular setup (I have steel tubing under the car rather than hoses), so I made a T-fitting (pictures later).
It is now installed and the cooling system is "burped". The coolant seems to come up to temperature twice as fast as before, which is very nice (and unexpected). I will report on the results after some varied driving conditions. Even though I strictily followed Renegade's 3,000 RPM limit when cold and had the holes drilled into the T'stat, the pump still failed, and while driving only 35 mph. The pressure bounce (see results above) of the stamped impeller test suggests that there is some significant cyclic pressure effect for that impeller style. I suspect that it is this cyclic pressure variation that ultimately makes the blades fail from bending fatigue (just like bending and breaking a paper clip). The cast pumps did not exhibit this condition, so it must be something about the geometry of the stamped impeller. My guess is that if you open up your pump housing your blades will already be bent, and it is only a matter of time before one fails and breaks off. Note that the test of the broken pump (one blade missing altogether and 5 remaining bent blades still moved water pretty well. One would not suspect a problem until it was too late. In any case, a bypass is the way to go, and the Renegade kit is very simple. I am further hedging my bets and using Slits's cast impeller with the Renegade bypass kit. Nick |
| SLITS |
 Jun 2 2010, 01:50 PM Jun 2 2010, 01:50 PM
Post
#42
|
|
"This Utah shit is HARSH!"           Group: Benefactors Posts: 13,602 Joined: 22-February 04 From: SoCal Mountains ... Member No.: 1,696 Region Association: None  |
Ok, last bit of information I will post on this.
First, the GMB pump is the cheapest piece of crap on the market. Rebuilders will not touch their castings as the metallurgy, QC and such is just to shabby for a reliable rebuild. Secondly, they use cermaic seals which can crack and leak at the blink of an eye if subjected to cavitation. I won't address the poor quality of the stamped steel impellers. The buying public demands inexpensive and that's exactly what they get. As far as the seals / bearings going out ... The seals on a water pump were designed as a secondary pressure outlet. If the thermostat doesn't open on excess pressure, the seal will and weep water. If it is leaking, something else is wrong in the system. Bearings will fail due to excess tension on the pulley. Remember, that pulley is side-loaded (kinda like spacing rims out causes wheel bearing failure) and that is why the manufacturers specify a specific tension. As I was told, a water pump can be built to never leak, but was designed the way as they are as a secondary pressure relief in the system (just like freeze plugs, etc). Be aware, all pumps can have their problems, but the impeller blades of a cast iron pump do not bend nor disintegrate (unless you don't renew your coolant) Coolant (ethylene glycohol or even propolyene glycohol) breaks down into two organic acids under heat. These acids go after system metals and especially like aluminum. You can choose whichever pump you wish. All this thread has done is expose exactly what the pumps are. I am not the expert here ... the gentleman I ask questions of has 40 years in the water pump rebuilding industry. |
| nick mironov |
 Jun 6 2010, 10:54 AM Jun 6 2010, 10:54 AM
Post
#43
|
|
nickm   Group: Members Posts: 204 Joined: 12-June 05 From: San Francisco, CA Member No.: 4,264 |
The Renegade system thermostat with bypass is now installed and operating.
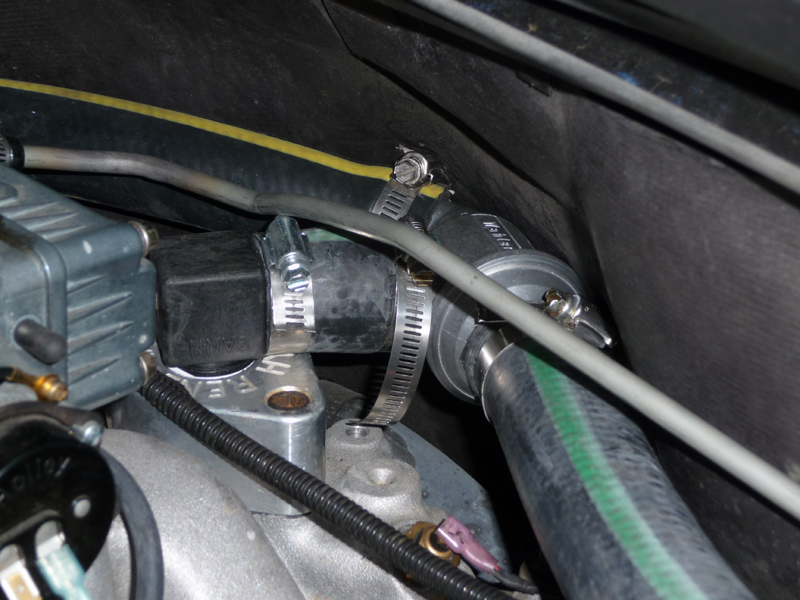
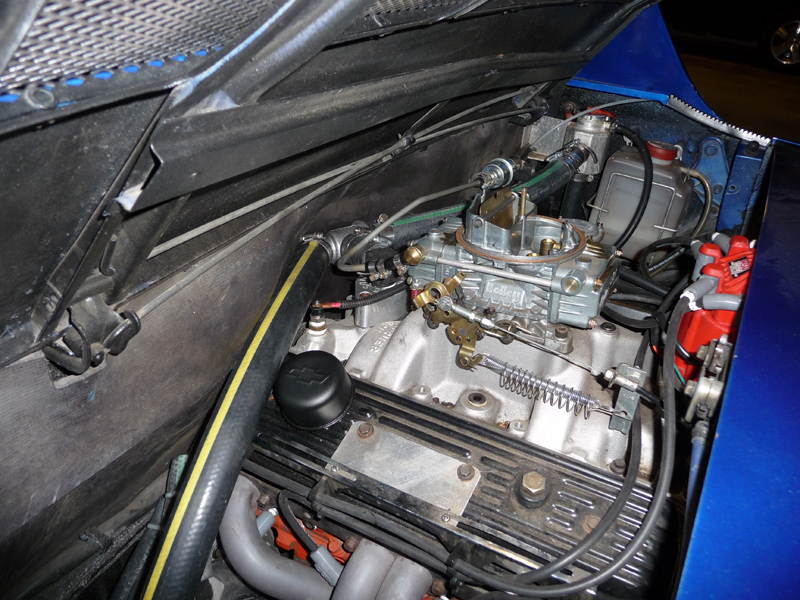
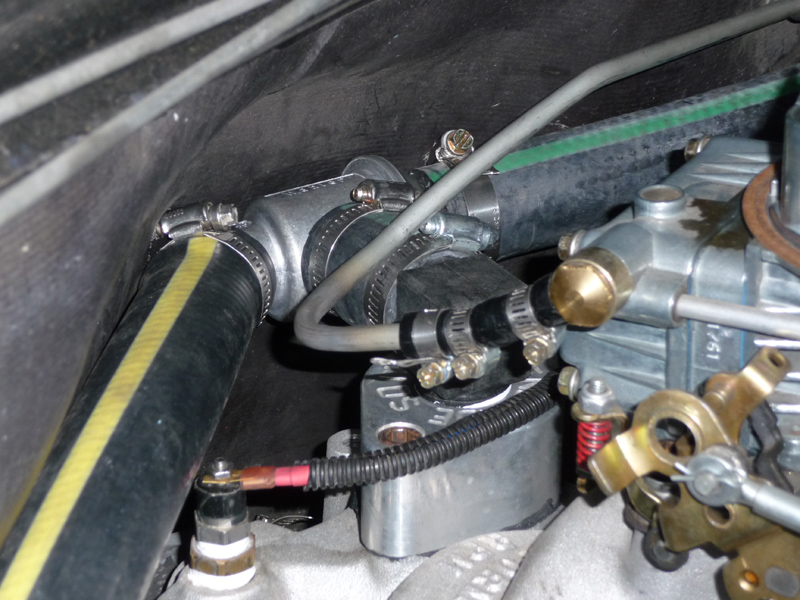
The Wahler thermostat is for a BMW 2002 or 320i. (W0133-1627641 80 deg C / 176 deg F, W0133-1627306 75 deg C / 167 deg F, W0133-1622197 71 def C / 160 deg F) The thermostat installation is pretty tight at the rear firewall, especially if you still have the acoustic pad. You could probably come up with a different water outlet that will give you more room. The system vented fairly easily and was pretty mcuh free of air after 3 or 4 runs. The coolant warms up to operating temperature twice as fast as before. I didn't expect this at all. It must be because the small holes I drilled into the original thermostat for promoting venting and some flow during cold conditions let through some water which ran through the radiator and was cooled. Anyway - a benefit. Everything works as expected, but we have not had any really warm weather to give the bypass thermostat and new water pump a serious test. 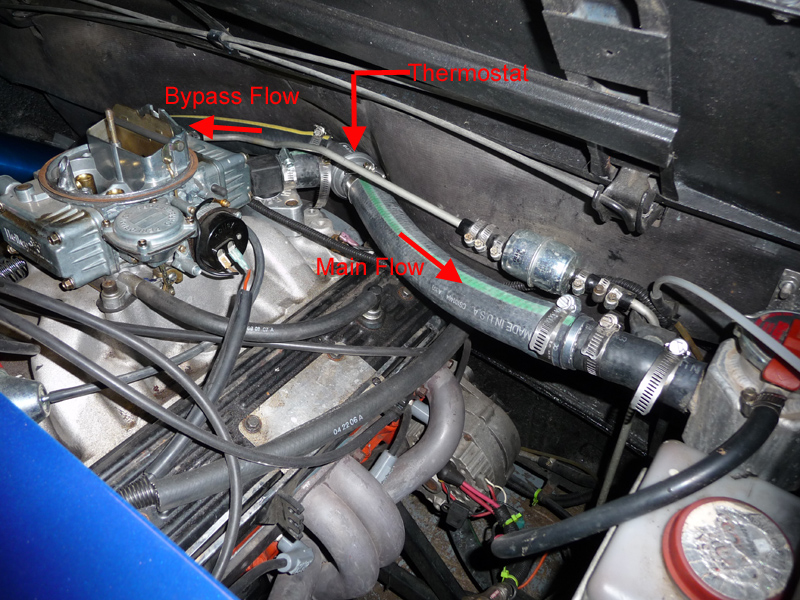 |
| nick mironov |
 Jun 6 2010, 10:55 AM Jun 6 2010, 10:55 AM
Post
#44
|
|
nickm   Group: Members Posts: 204 Joined: 12-June 05 From: San Francisco, CA Member No.: 4,264 |
 |
| nick mironov |
 Jun 6 2010, 10:55 AM Jun 6 2010, 10:55 AM
Post
#45
|
|
nickm   Group: Members Posts: 204 Joined: 12-June 05 From: San Francisco, CA Member No.: 4,264 |
 |
| nick mironov |
 Jun 6 2010, 10:56 AM Jun 6 2010, 10:56 AM
Post
#46
|
|
nickm   Group: Members Posts: 204 Joined: 12-June 05 From: San Francisco, CA Member No.: 4,264 |
 |
| nick mironov |
 Jun 6 2010, 10:58 AM Jun 6 2010, 10:58 AM
Post
#47
|
|
nickm   Group: Members Posts: 204 Joined: 12-June 05 From: San Francisco, CA Member No.: 4,264 |
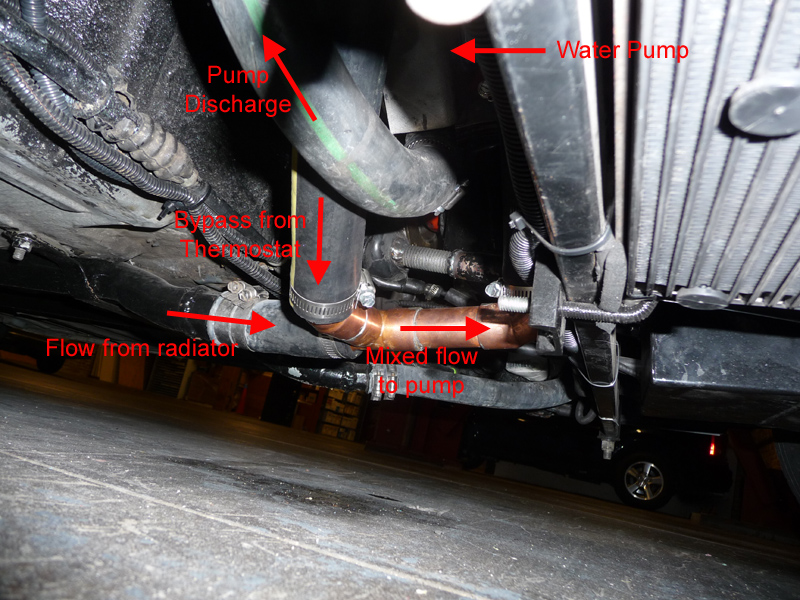
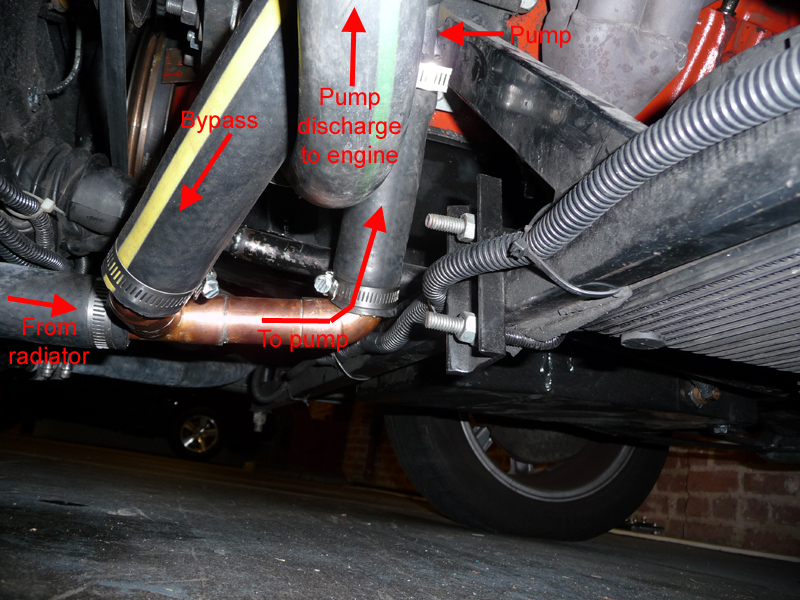
The only problem I had was that the Renegade "Y" fittinng would not fit into the space I had available (probably because I have pipe inder the car instead of hoses). So, I soldered together a 1" copper "T" fitting and got the exact angles I needed so that the hoses were not kinked.
 |
| nick mironov |
 Jun 6 2010, 10:59 AM Jun 6 2010, 10:59 AM
Post
#48
|
|
nickm   Group: Members Posts: 204 Joined: 12-June 05 From: San Francisco, CA Member No.: 4,264 |
 |
| PRS914-6 |
 Jun 6 2010, 04:49 PM Jun 6 2010, 04:49 PM
Post
#49
|
|
Excellence Magazine Project 914 3.6    Group: Retired Members Posts: 1,278 Joined: 20-May 06 From: Central California Member No.: 6,031 Region Association: None  |
First let me say that I have never done a SBC conversion. I have however had a lot of SBC experience. If I am covering something that has already been looked at, forgive me.....
On a stock Chevy block at the water pump there is a bypass port above the bolt holes on the inlet side of the water pump and the gasket has a hole in it for the port. The port allows full circular flow around the engine and a fast warm up. Pressure pushes through the block and it pushes out the bypass port to be circulated by the water pump again. In essence keeping hot spots down and allowing the engine water to uniformly warm up as it flows in a circle. If that hole is blocked off, the water will not have any place to go, will not circulate and would cause problems that you guys are describing. Has anyone drilled a hole at the cover plate at the bypass hole and plumbed that to the inlet of the remote water pump to allow full circulation? Ya can't have a pump discharge to nowhere without a problem. The above pictures of bypass seems to do similar but quite large for the requirement. |
| BRAVE_HELIOS |
 Nov 1 2010, 01:46 PM Nov 1 2010, 01:46 PM
Post
#50
|
|
"Knowledge speaks, wisdom listens"   Group: Members Posts: 295 Joined: 25-September 06 From: The Land Of ID! Member No.: 6,920 Region Association: Pacific Northwest |
This is the Test Setup. Although the pump housing has two outlets, for convenience, I decided to use one for the pressure gauge and use the other for the output flow. If one were to test both outlets, I would not expect double the flow – maybe only 30% more. That would correspond well to the advertised pump rating of about 40 gpm at 4,000 RPM that I have seen. The motive force for spinning the pumps during testing was a 2,500 RPM hand-drill attached to the protruding bolt on the blue-colored channel that you see in the picture. Unfortunately, the drill could not achieve the full 2,500 RPM under load, so I had to settle for whatever it could do. As a result I had to calculate the resulting water pressures at higher RPMs. The calculated results (list image) do seem to correspond to real conditions, indicating very high pressures at dead head conditions - thermostat is closed during cold engine conditions and not having a bypass. Note that a nearly closed thermostat could be experienced under cruise conditions in very mild weather resulting in the same high pressure effect. Based on my experience and many other posts that I have read about failed pump impellers, the high pressure conditions do happen and that’s what results in catastrophic pump failures. The objective of this testing is to find a pump impeller that is more durable (able to withstand dead head pressures) and to possibly produce less pressure without sacrificing much water flow. Note that the Chrysler big block pumps were used on engines running at about 4,000 rpm, and in my case, my 283 SBC can run to over 6,000 rpm. Hey Nick, Not quite to the point where I have experienced a water pump failure... but great info non-the-less! I have a few questions pertaining to the installation/configuration of the 2 water pump hoses and where they attach to the engine block. I think you answered one of the questions already with your photo... just need confirmation! Specifically, I am using a Renegade mechanical water pump setup (mounted on the drivers side) and I've seen some conflicting photos of how the two smaller water pump ports are connected to the front of the block(SBC)... in regards to which port on the water pump gets connected to which port on the front side of the engine? Does it matter? It seems like the water pump can be mounted in its bracket in more than one position. I think the whole pump can be rotated 90 degrees at a time until the pump to bracket bolts line up. Does this matter? At this moment, mine is mounted so that, looking at the rear of the pump, one small port is at the 10-11 o'clock position and the other is at the 4-5 o'clock position. The inlet port on the water pump (coming from the radiator) is facing down or at the 6 o'clock position. Is this okay? Once again, any info is greatly appreciated. Thanks again! Tony |
| BRAVE_HELIOS |
 Oct 5 2011, 10:03 PM Oct 5 2011, 10:03 PM
Post
#51
|
|
"Knowledge speaks, wisdom listens"   Group: Members Posts: 295 Joined: 25-September 06 From: The Land Of ID! Member No.: 6,920 Region Association: Pacific Northwest |
Love this write-up!!
I am in the market for a replacement water pump. My Renagade unit failed, not with bent blades but with failed ceramic seals. Can you supply any manufactures and part numbers to go with the water pumps you tested? The local part stores only carry the 8 blade cast housing pump that will not fit in the Renagade housing. As always, any info greatly appeciated! (IMG:style_emoticons/default/smile.gif) BTW, I also PM'd Ron to get more info on his cast rebuilt units. I hope he still has some! The Results Since I did not have test equipment to test the pumps at actual motor driven RPMs (idle through 6,000 RPM), I had to settle for low RPM tests and extrapolate out to the higher RPMs. The engine pulley and the pump pulley are the same size (they look the same, I didn’t actually measure them) so the pump RPM is the same as the engine RPM. Since I could not achieve actual performance data, I decided to test only one of the two pump outlets for convenience. I think that if both outlets were testes simultaneously, the flow would not be double, but only about 30% more. The results indicate relative (not absolute) performance of the pumps. See test data below. Broken Stamped Impeller This impeller, even though missing a blade and being mangled, performed surprisingly well (even though it was way out of balance). This means to me that one could have a badly damaged impeller with bent blades, and the pump would still work and one would never even know until a blade came off due to cyclic stressing. Replacement Stamped Impeller This produced the highest flows and pressures. However, highest flows and pressures are not necessarily what we want. We want to keep the pressures moderate so that we don’t burst the hoses or have the pump fail. Note that during dead head testing, the pressure was erratic and bouncing between 6 and 10 PSI. (The other pumps did not do this). This is suggesting to me that something like cavitation might be going on during dead heading. I suspect that this is what is causing the stamped pumps to fail. 3.66” Cast Impeller This pump had the lowest pressure at only slightly reduced flow (even before I beveled the housing inlet). The idle flow was the lowest of the group (as expected), but not as low as I thought it would be. I settled on this pump and also beveled the inlet for better water flow. I did not retest it after beveling the inlet. 4.365” Cast Impeller The tight tip clearance of this pump turned me off. Any small deviation could potentially cause it to bind up. It had good performance, better than the stamped impeller as far as pressure and flow. It was the best looking of (except that the hub appears to be out of round, but did not cause any noticeable vibration). Other Information I decided to install bypass anyway, to a keep the dead head pressures down. Renegade is starting to market a bypass system and I decided to try it. It is very simple. You remove the regular thermostat and install an external Wahler bypass thermostat, connect the discharge to the filler pot (as usual) and run the bypass back to the pump inlet and make the connection with a Tee fitting (pictures later). The Wahler thermostat is for a BMW 2002 or 320i. (W0133-1627641 80 deg C / 176 deg F, W0133-1627306 75 deg C / 167 deg F, W0133-1622197 71 def C / 160 deg F) Cast Iron Pump Sources Slits says that he has 30 cores (3.66 diameter cast iron) that can be rebuilt and sold for $55 plus shipping. This is a very good deal. Although I could find many kinds of stamped and cast impeller pumps on the internet, I could find no information about impeller diameters or any other specific dimensions. And, the designs from the various manufacturers are quite different. You would need to use trial and error to find what could fit into your housing. Judging from the pictures that I saw, the marine big block Chrysler pumps seem to have the smaller diameter. The cast iron impeller pumps that I saw ran in the $125 to $200 range. The stamped impeller pumps ran in the $30 to $90 range. My recommendation – go with SLITS. |
  |
1 User(s) are reading this topic (1 Guests and 0 Anonymous Users)
0 Members:

|
Lo-Fi Version | Time is now: 3rd April 2025 - 03:39 PM |
Invision Power Board
v9.1.4 © 2025 IPS, Inc.


