|
|

|
Porsche, and the Porsche crest are registered trademarks of Dr. Ing. h.c. F. Porsche AG.
This site is not affiliated with Porsche in any way. Its only purpose is to provide an online forum for car enthusiasts. All other trademarks are property of their respective owners. |
|
|
  |
| nathansnathan |
 Dec 11 2011, 12:30 AM Dec 11 2011, 12:30 AM
Post
#91
|
|
Senior Member    Group: Members Posts: 1,052 Joined: 31-May 10 From: Laguna Beach, CA Member No.: 11,782 Region Association: None |
(IMG:style_emoticons/default/thisthreadisworthlesswithoutpics.gif) (IMG:style_emoticons/default/poke.gif) I haven't documented the bite that well. I grabbed a blurry pic with my cell phone right when they took the bandage off today. I was surprised by how much pus had come out. There is a 'wick' inserted about 3/4 inch beneath my skin and yellow green pus like "shtuff" dripping out. I'd 'expressed' it the day before, in my bus, in the parking ramp at work, projectile pus-letting, was traumatized and went to the walk-in, then urgent care, then the ER. I can only get tiny pics off my phone through verizon's online send thing as I don't have the cable/ might not work on my mac. You kind of can imagine despite being blurry/ small. That is almost peanut butter-like ooz coming off the wick. 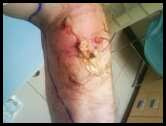 |
| Elliot Cannon |
 Dec 11 2011, 12:38 AM Dec 11 2011, 12:38 AM
Post
#92
|
|
914 Guru      Group: Retired Members Posts: 8,487 Joined: 29-December 06 From: Paso Robles Ca. (Central coast) Member No.: 7,407 Region Association: None 

|
Great work on the car. Good on ya for saving one. Was that a brown recluse spider? It's good to work on the car but make sure you're healthy first.
Cheers, Elliot |
| nathansnathan |
 Dec 11 2011, 12:46 AM Dec 11 2011, 12:46 AM
Post
#93
|
|
Senior Member    Group: Members Posts: 1,052 Joined: 31-May 10 From: Laguna Beach, CA Member No.: 11,782 Region Association: None |
Great work on the car. Good on ya for saving one. Was that a brown recluse spider? It's good to work on the car but make sure you're healthy first. Cheers, Elliot brown recluses don't get this far west, I saw. Thanks (IMG:style_emoticons/default/beerchug.gif) getting reorganized in the meantime. |
| Mike Bellis |
 Dec 11 2011, 12:52 AM Dec 11 2011, 12:52 AM
Post
#94
|
|
Resident Electrician      Group: Members Posts: 8,347 Joined: 22-June 09 From: Midlothian TX Member No.: 10,496 Region Association: None 

|
Great work on the car. Good on ya for saving one. Was that a brown recluse spider? It's good to work on the car but make sure you're healthy first. Cheers, Elliot brown recluses don't get this far west, I saw. Thanks (IMG:style_emoticons/default/beerchug.gif) getting reorganized in the meantime. We got them up north... (IMG:style_emoticons/default/sad.gif) Next time please get video of the projectile puss... (IMG:style_emoticons/default/evilgrin.gif) |
| FourBlades |
 Dec 11 2011, 06:27 AM Dec 11 2011, 06:27 AM
Post
#95
|
|
From Wreck to Rockin     Group: Members Posts: 2,056 Joined: 3-December 07 From: Brevard, FL Member No.: 8,414 Region Association: South East States 
|
You are a real craftsman, this is some of the most meticulous work on here. Make sure you take care of the infection completely. Take the time to get thorough treatment so it does not haunt you later. John |
| saigon71 |
 Dec 11 2011, 07:32 AM Dec 11 2011, 07:32 AM
Post
#96
|
|
Advanced Member     Group: Members Posts: 2,019 Joined: 1-June 09 From: Dillsburg, PA Member No.: 10,428 Region Association: MidAtlantic Region 

|
Your craftsmanship is awesome! (IMG:style_emoticons/default/beerchug.gif) Our cars have similar rust issues...mine is worse down low (longs, etc) but yours took a beating on the top half.
Take good care of that spider bite! I was clearing brush at my Mom's place a few years back and got bit. Still don't know what type of spider it was...but it jacked me up pretty good and seemed to "dissolve" some of the flesh on my arm. Great work! |
| sixnotfour |
 Dec 11 2011, 08:23 AM Dec 11 2011, 08:23 AM
Post
#97
|
|
914 Wizard           Group: Members Posts: 11,079 Joined: 12-September 04 From: Life Elevated..planet UT. Member No.: 2,744 Region Association: Rocky Mountains 

|
Spider bite , nasty, get well.
Awesome splice work, Looks like you need a shrink-er/stretch-er for your flanges. I agree about the rotary phase converter the only way to go, I have used 4 of the little box type, I even had one switchable between 1-3HP to 3-5HP. Yes they work, But no power, Not good for starting and stopping reversing, In the end I finally bought a rotary and love it. Esp for multiple loads. |
| BarberDave |
 Dec 11 2011, 09:00 AM Dec 11 2011, 09:00 AM
Post
#98
|
|
Barberdave    Group: Members Posts: 1,605 Joined: 12-January 03 From: Wauseon Ohio Member No.: 135 Region Association: Upper MidWest |
(IMG:style_emoticons/default/smilie_pokal.gif)
WOW, What talent !!! I did mine in 2000 , with the help of 2 great friends. My skills improved , but never approched yours. You fabed most of your replacement panels, why ? Money ? There is a place called Restoration Design that makes everything you did, along with Egrman , and other vendors here. Seems to me that would be the quickest way. I know there is the factor of ," Why buy it when I have the ability to do it my self". Any way you have my admiration on both the ability, and skill set. Now don't you know that any 914ers garage is never clean and organized , next will come a bigger garage , then a storage shed, this and the need too aquire more parts cars, ( just ask Jamie Rust ) in the PNW. There is no cure and no 12 step program to help you. Your hooked!!!! Thanks for this thread and for saveing 2 914,s. Did you sent the vins to Andy ? Great job ! Dave (IMG:style_emoticons/default/slap.gif) |
| nathansnathan |
 Dec 11 2011, 02:14 PM Dec 11 2011, 02:14 PM
Post
#99
|
|
Senior Member    Group: Members Posts: 1,052 Joined: 31-May 10 From: Laguna Beach, CA Member No.: 11,782 Region Association: None |
Thanks, guys for all the compliments/ encouragement. I really can't wait to get her together!
The way restoration design does the hell hole repair isn't the same as factory from what I can figure - they omit the outer piece so just the corrugated piece is used, which I didn't want to do. Like on their site, if you click on the image for '22' (IMG:http://www.914world.com/bbs2/uploads_offsite/www.restoration-design.com-11782-1323634475.1.jpg) you get this, which is the inner (IMG:http://www.914world.com/bbs2/uploads_offsite/www.restoration-design.com-11782-1323634476.2.jpg) Auto Atlanta has the whole shebang, 22 and 23 as 1 piece, from the factory, but for a whopping $3000! I did think about that but, ... no. (IMG:style_emoticons/default/biggrin.gif) So I'm doing it the hard way. The tig is a big help. A shrinker stretcher would be nice, like what Eastwood has, though I don't like how it rough the metal all up, how it works. (IMG:http://www.914world.com/bbs2/uploads_offsite/www.eastwood.com-11782-1323634476.3.jpg) Oh, I'll be doing some more pus-letting soon - just got back from the 3rd trip to the hospital for antibiotic treatment and now I'm on my own. They 've instructed me on how to express it, insert a new wick, and dress it.... can't wait (IMG:style_emoticons/default/smoke.gif) We'll see if I can get a video. Seriously, it's gross like you have never imagined, like having diarrhea out your arm, the nurses were all very impressed. (IMG:style_emoticons/default/biggrin.gif) |
| SirAndy |
 Dec 11 2011, 02:27 PM Dec 11 2011, 02:27 PM
Post
#100
|
|
Resident German                          Group: Admin Posts: 42,388 Joined: 21-January 03 From: Oakland, Kalifornia Member No.: 179 Region Association: Northern California |
The way restoration design does the hell hole repair isn't the same as factory from what I can figure - they omit the outer piece so just the corrugated piece is used, which I didn't want to do. I'm pretty sure RD has both pieces. There was a thread about that a while ago. They are pretty active here, PM peteyd if you have questions. (IMG:style_emoticons/default/shades.gif) |
| nathansnathan |
 Dec 11 2011, 05:08 PM Dec 11 2011, 05:08 PM
Post
#101
|
|
Senior Member    Group: Members Posts: 1,052 Joined: 31-May 10 From: Laguna Beach, CA Member No.: 11,782 Region Association: None |
The way restoration design does the hell hole repair isn't the same as factory from what I can figure - they omit the outer piece so just the corrugated piece is used, which I didn't want to do. I'm pretty sure RD has both pieces. There was a thread about that a while ago. They are pretty active here, PM peteyd if you have questions. (IMG:style_emoticons/default/shades.gif) Thanks, I've pm'd him. I can't remember if I'd called them about this, or maybe talking to Dr 914 at AA, or what but I had somehow concluded otherwise. Hopefully I was wrong as maybe they would also have, though doubtful, the piece forward of the firewall, the inner. It's got even deeper corrugations at the bottom to fit over the outer piece's corrugations. I've got nothing that is salvageable that is like that and will have to make it. (IMG:style_emoticons/default/smash.gif) |
| nathansnathan |
 Dec 11 2011, 05:08 PM Dec 11 2011, 05:08 PM
Post
#102
|
|
Senior Member    Group: Members Posts: 1,052 Joined: 31-May 10 From: Laguna Beach, CA Member No.: 11,782 Region Association: None |
There is no cure and no 12 step program to help you. Your hooked!!!! Thanks for this thread and for saveing 2 914,s. Did you sent the vins to Andy ? Great job ! Dave (IMG:style_emoticons/default/slap.gif) I'm actually subscribed subscribed to the whole Garage forum here, meaning I see every thread starting post at minimum. (IMG:style_emoticons/default/smoke.gif) I look forward to commencing work on my car for 4-12 hours per day once I heal, maybe 2 weeks. (IMG:style_emoticons/default/chowtime.gif) I've finally got the chance (can't work on my car) to enter the 2nd car to the registry. I explained there how, despite her being cut up, I hope to one day fabricate an all steel narrow bodied 914 using its shell, with all of the outer panels being detachable. (IMG:style_emoticons/default/huh.gif) |
| sixnotfour |
 Dec 11 2011, 11:02 PM Dec 11 2011, 11:02 PM
Post
#103
|
|
914 Wizard           Group: Members Posts: 11,079 Joined: 12-September 04 From: Life Elevated..planet UT. Member No.: 2,744 Region Association: Rocky Mountains 

|
QUOTE insert a new wick, and dress it.. I had staff infection in an incision where they had inserted a chest tube, nasty stuff. The the gizmo I had for 2 weeks was a vacuum pump sealed to my body pulling a vacuum on the infected area sucking both fluid and promoting healing. I had to visit every other day to have the wick changed and reattach.. I had to do antibiotics through a central venous catheter. Before this all got figured out ,I knew I was in trouble when Hard coughing to excite my lungs to regain breathing , I blew a big blob of goo out the wound , that was fine 12 hours earlier. Honey I think I need to go to Emergency Again, 10 days later was the above pump and stuff. Take Care Man , I finally realized how fragile the human body can be. (IMG:style_emoticons/default/beerchug.gif) (IMG:style_emoticons/default/popcorn[1].gif) (IMG:style_emoticons/default/pray.gif) (IMG:style_emoticons/default/sawzall-smiley.gif) (IMG:style_emoticons/default/welder.gif) (IMG:style_emoticons/default/smash.gif) (IMG:style_emoticons/default/smilie_pokal.gif) |
| nathansnathan |
 Dec 13 2011, 05:37 PM Dec 13 2011, 05:37 PM
Post
#104
|
|
Senior Member    Group: Members Posts: 1,052 Joined: 31-May 10 From: Laguna Beach, CA Member No.: 11,782 Region Association: None |
The way restoration design does the hell hole repair isn't the same as factory from what I can figure - they omit the outer piece so just the corrugated piece is used, which I didn't want to do. I'm pretty sure RD has both pieces. There was a thread about that a while ago. They are pretty active here, PM peteyd if you have questions. (IMG:style_emoticons/default/shades.gif) Thanks, I've pm'd him. I can't remember if I'd called them about this, or maybe talking to Dr 914 at AA, or what but I had somehow concluded otherwise. Hopefully I was wrong as maybe they would also have, though doubtful, the piece forward of the firewall, the inner. It's got even deeper corrugations at the bottom to fit over the outer piece's corrugations. I've got nothing that is salvageable that is like that and will have to make it. (IMG:style_emoticons/default/smash.gif) it took me 5 messages back and forth to clarify what I was talking about, but I'm finally sure about this now. Nobody makes the smooth piece that goes just behind the passenger suspension console, the passenger outside inner long, rear of the fire wall, nor do they make the passenger inside inner long forward of the firewall. - The way they do it, the inside inner long behind the firewall connects directly to the outside inner long that is in front of the firewall. Hope that's clear (IMG:style_emoticons/default/stromberg.gif) You can see it in this pic (IMG:http://www.914world.com/bbs2/uploads_offsite/www.darrylsgarage.com-11782-1323819474.1.jpg) |
| SirAndy |
 Dec 13 2011, 05:58 PM Dec 13 2011, 05:58 PM
Post
#105
|
|
Resident German                          Group: Admin Posts: 42,388 Joined: 21-January 03 From: Oakland, Kalifornia Member No.: 179 Region Association: Northern California |
the inside inner long behind the firewall connects directly to the outside inner long that is in front of the firewall. (IMG:style_emoticons/default/confused24.gif) Now you got me all confuzzled ... (IMG:style_emoticons/default/biggrin.gif) |
| Krieger |
 Dec 13 2011, 07:14 PM Dec 13 2011, 07:14 PM
Post
#106
|
|
Advanced Member     Group: Members Posts: 4,833 Joined: 24-May 04 From: Santa Rosa CA Member No.: 2,104 Region Association: None 
|
Very impressive fab skills. Keep on keepen on!
|
| nathansnathan |
 Dec 13 2011, 08:07 PM Dec 13 2011, 08:07 PM
Post
#107
|
|
Senior Member    Group: Members Posts: 1,052 Joined: 31-May 10 From: Laguna Beach, CA Member No.: 11,782 Region Association: None |
the inside inner long behind the firewall connects directly to the outside inner long that is in front of the firewall. (IMG:style_emoticons/default/confused24.gif) Now you got me all confuzzled ... (IMG:style_emoticons/default/biggrin.gif) The longs are supposed to be 2 layers of sheet metal from just forward of the seatbelt hole/ jack post all the way back to the top of the inner suspension console. Here is quoted the message that I think made it clear. I've been told I'm wrong about this a few times so I just want to set it straight. (IMG:style_emoticons/default/smile.gif) (adding product pic/part numbers for clarity) (IMG:http://www.914world.com/bbs2/uploads_offsite/www.restoration-design.com-11782-1323828439.1.jpg) (IMG:http://www.914world.com/bbs2/uploads_offsite/www.restoration-design.com-11782-1323828440.2.jpg) QUOTE I am still unsure of what piece it is that you are referring to. Perhaps if you had a porsche part number or even take a picture of your car and send me that picture. To the best of my knowledge there is nothing that lays over P351, but I could be wrong. Send me a photo to [restoration design] Hi, Peter, Sending this in continuation of our conversion on 914world pm. This is my photo, the entirety of the inner passenger long taken out. It is somewhat obscured by the heater tube, but you can see the P351, the inside inner long, extends forward of the firewall. The part that has surface rust and goes forward to the heater bracket is a separate piece than P352 - it goes inside it. (IMG:http://www.914world.com/bbs2/uploads_offsite/www.914club.com-11782-1294592745.4.jpg) Similarly, P352 does not get butt welded to P351. it should be attached, rear of the firewall, to a smooth piece. You can see in this image that the smooth piece has been partially cut away. It goes rearward to the front of the rear trunk, and is the piece that the inner suspension console is attached to. The part that is cut away from this piece also has an indent for the engine mount, to lay over the indent that is part of P351. (IMG:http://www.914world.com/bbs2/uploads_offsite/www.eggscollective.org-11782-1291433482.2.jpg) You can see the driver version of P352 attached to a smooth section - From the factory, P352 is part of the piece I am talking about - I am looking for the part of it that is rear of the firewall. (IMG:http://www.914world.com/bbs2/uploads/post-8858-1280502713.jpg) Hopefully this will make it clear, the 2 pieces that I'm talking about. Nathan Scruggs Nathan, I finally see what you are talking about. I didn’t even realize that there was a piece that covers the P352. Unfortunately I do not have that piece. I have that NOS piece but will not be making that die for the foreseeable future. Looks like you will have to fab something up yourself or hack something out of a parts car. I have no used 914s here with that piece in good condition. |
| SirAndy |
 Dec 13 2011, 10:01 PM Dec 13 2011, 10:01 PM
Post
#108
|
|
Resident German                          Group: Admin Posts: 42,388 Joined: 21-January 03 From: Oakland, Kalifornia Member No.: 179 Region Association: Northern California |
The longs are supposed to be 2 layers of sheet metal from just forward of the seatbelt hole/ jack post all the way back to the top of the inner suspension console. Ok, now i get it. That inner part (with the ribs) was added on later cars, early cars don't have that. (IMG:style_emoticons/default/shades.gif) |
| nathansnathan |
 Jan 28 2012, 01:24 PM Jan 28 2012, 01:24 PM
Post
#109
|
|
Senior Member    Group: Members Posts: 1,052 Joined: 31-May 10 From: Laguna Beach, CA Member No.: 11,782 Region Association: None |
The longs are supposed to be 2 layers of sheet metal from just forward of the seatbelt hole/ jack post all the way back to the top of the inner suspension console. Ok, now i get it. That inner part (with the ribs) was added on later cars, early cars don't have that. (IMG:style_emoticons/default/shades.gif) Actually, no. (IMG:style_emoticons/default/biggrin.gif) I've been thinking about his for awhile, and got distracted some matters with my bus over new years. (IMG:style_emoticons/default/headbang.gif) Sorry to get back so late (IMG:style_emoticons/default/smile.gif) Jeff Hail talks about his in his "Bringing out the dead" thread http://www.914world.com/bbs2/index.php?sho...76791&st=61 Where the inner long come's together with the rear frame rail it was double walled by the factory highlited in red. If I were to just weld the inner long to the rear frame rail without the double wall it would be a very flexible joint and eventually fail. This would be compounded by suspension movement and engine weight and torque. This area is where the rear center section of the tub (torque box) ties into the rear structure of the vehicle. This area needs to be as strong or stronger than the factory designed it to be. Everytime the suspension compresses this area is subjected to load. Everytime the vehicle is launched it is subject to load. All of the cars had the same construction in that area. My 71, 72, and the 75 or 76 in the link. Here is his shot of the inner layer of the inner long forward of the firewall. The lower seatbelt bolt threads are welded to that piece. (IMG:http://www.914world.com/bbs2/uploads/post-7712-1193013431.jpg) Attached image(s) 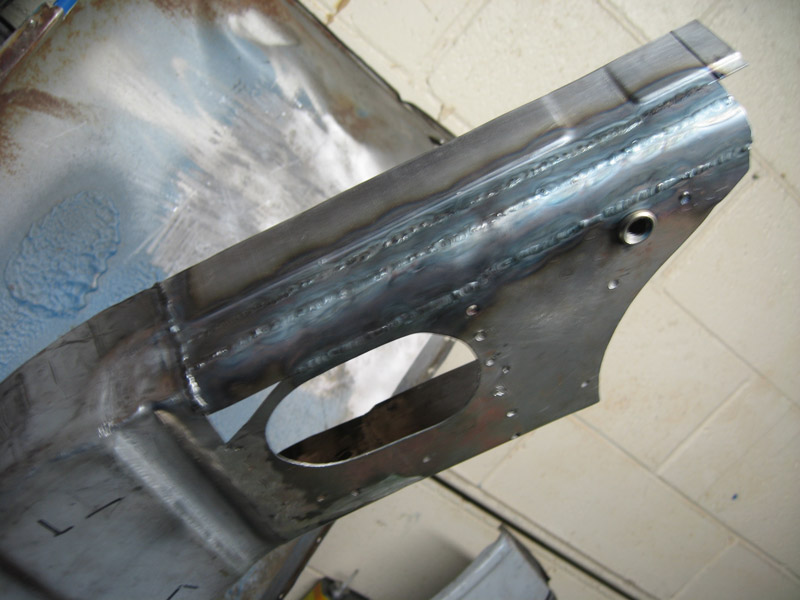
|
| nathansnathan |
 Jan 28 2012, 02:01 PM Jan 28 2012, 02:01 PM
Post
#110
|
|
Senior Member    Group: Members Posts: 1,052 Joined: 31-May 10 From: Laguna Beach, CA Member No.: 11,782 Region Association: None |
I'd hoped that I'd be posting the attachment of the whole inner piece with my next (this) post, but, well don't get me talking about my bus. (IMG:style_emoticons/default/smile.gif)
Instead, I've just gotten to prepping it for install, almost there. I almost finished the inner layer. I've got to cut that front part where it's marked. I ended up using the shallower corrugations from the outer layer of the parts car in construction of the bottom of the inner forward piece there (accidentally attached to the post above) and the attachment, below. 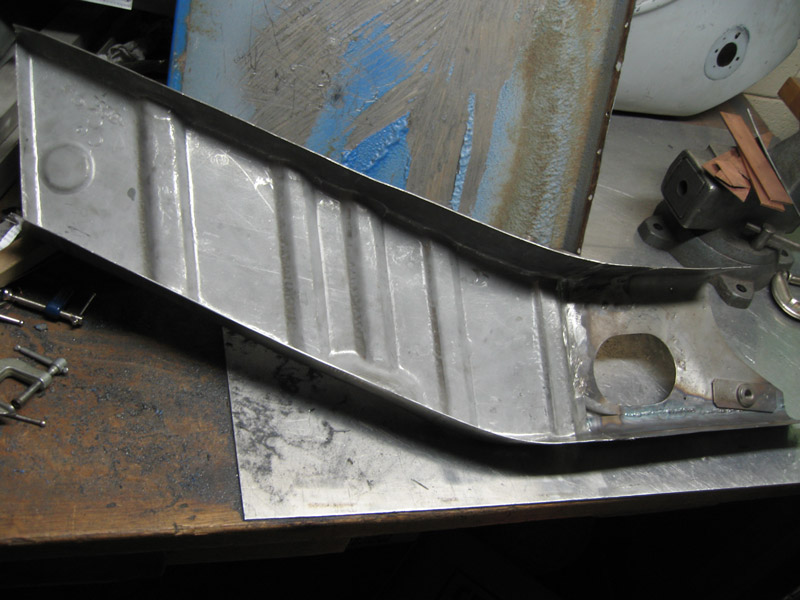 Also, I got the recess for the engine mount handled. 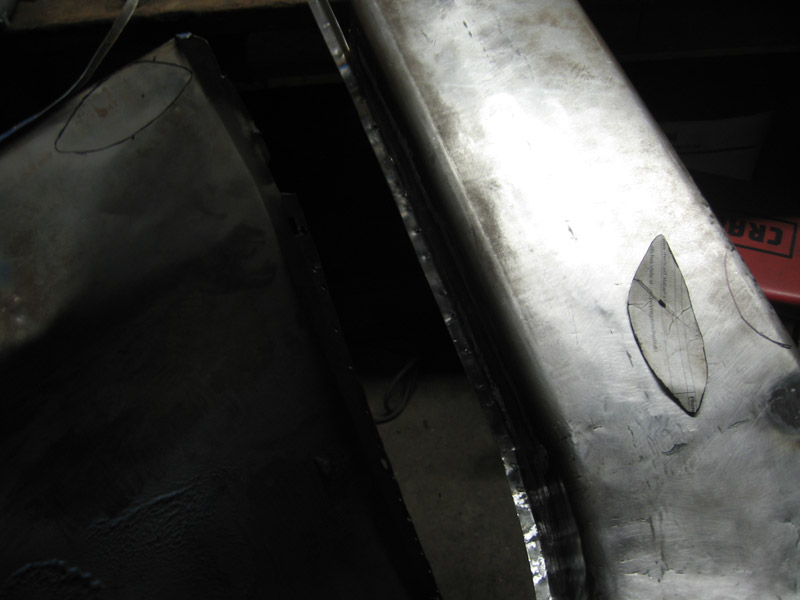 Had to cut into the virgin long. 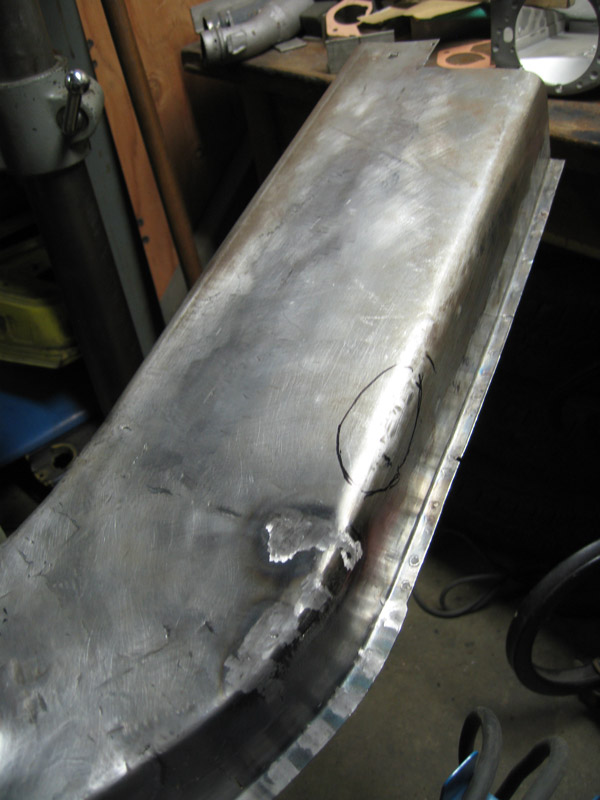 After a lot of comparing, etc to the parts car, 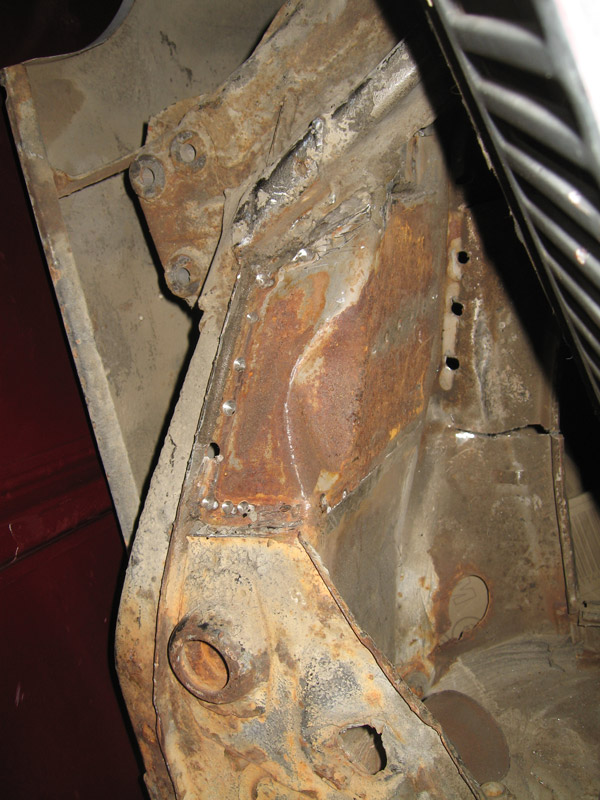 I fit up the inner and outer inner long after cutting a small hole in the outer ( no pic sorry), and ground away using a grinder to get it out to where the template said it should be. 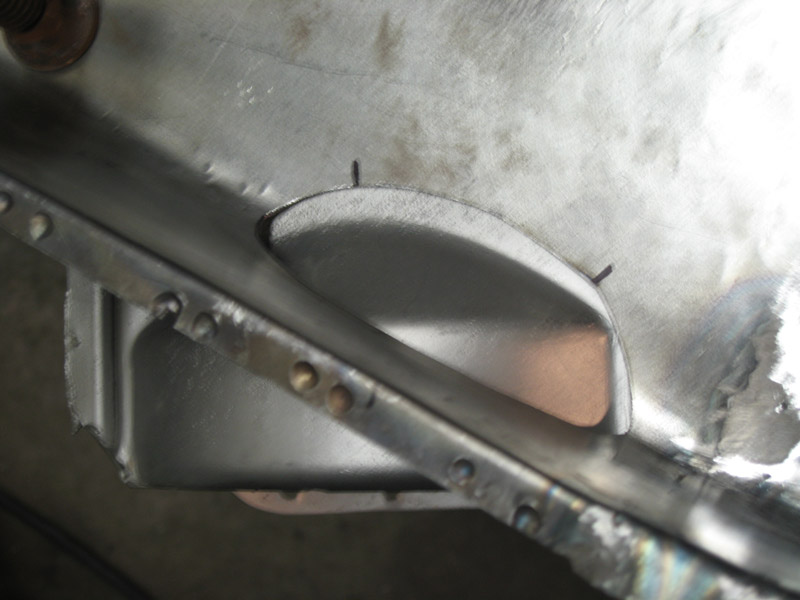 The piece made out of part of my wrinkled door skin, funny how it's creased from the halfway point of 1 side, and then angles, lining up with the arch of the engine mount - hard to explain. (IMG:style_emoticons/default/smile.gif) 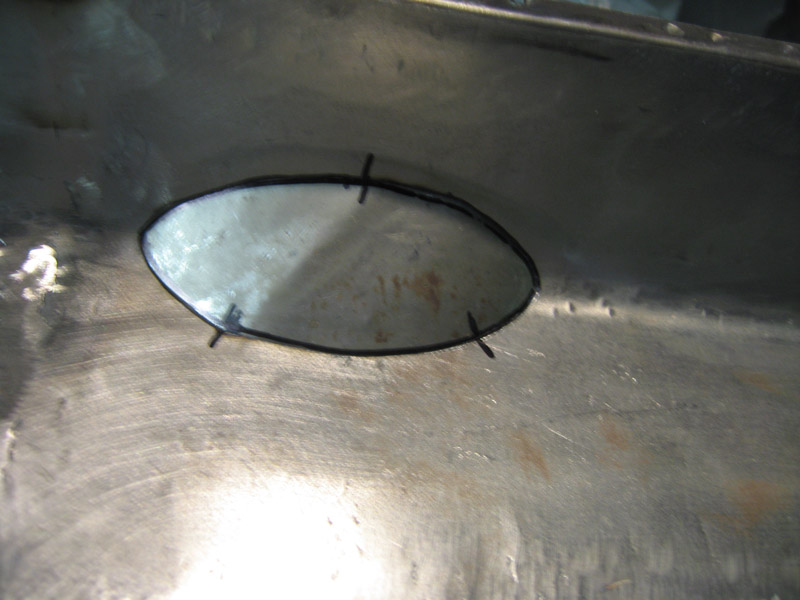 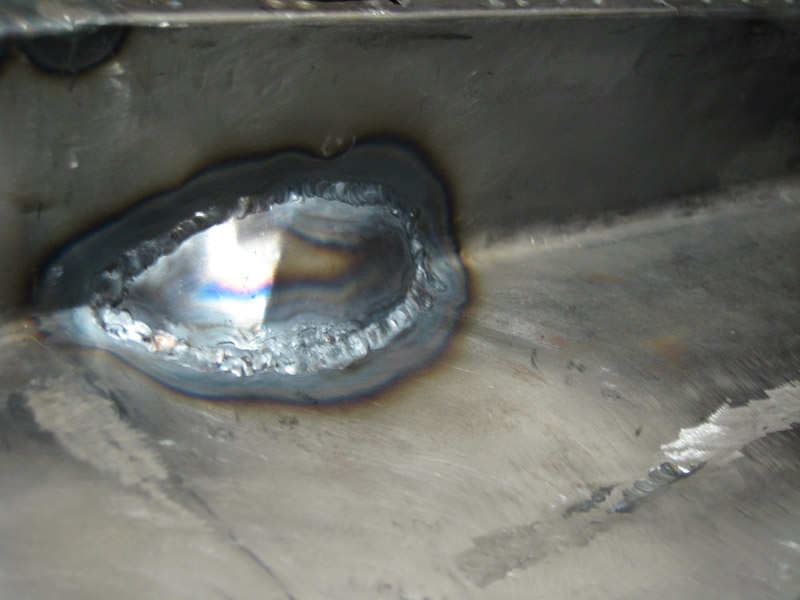 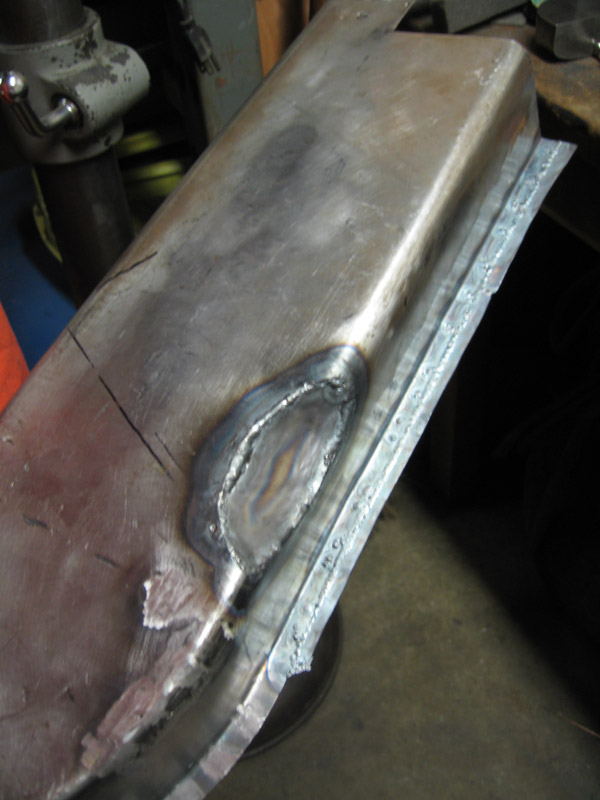 I'm currently out of of grinding/ cutting disks for my mini die grinder to smooth this all out. Yard store has a great price on an Acat pnuematic mini angle grinder. I've just ordered that to step up my grinding smoothing process, along with 2" roloc holders, sanding disks and surface conditioning wheels. It's hard to finish the welds with a straight mini die grinder and then a flap wheel on an electric 4 1/2"angle grinder as I've been doing. ... which is not so precise either to make the flange lips (? not sure about the terminology here) larger. The flanges are larger at the back, and I've been putting off enlarging the ones I've repurposed from the front of the parts car. The difference is small but significant. I had to go bigger to facilitate welding and will trim. I'm still at it actually. 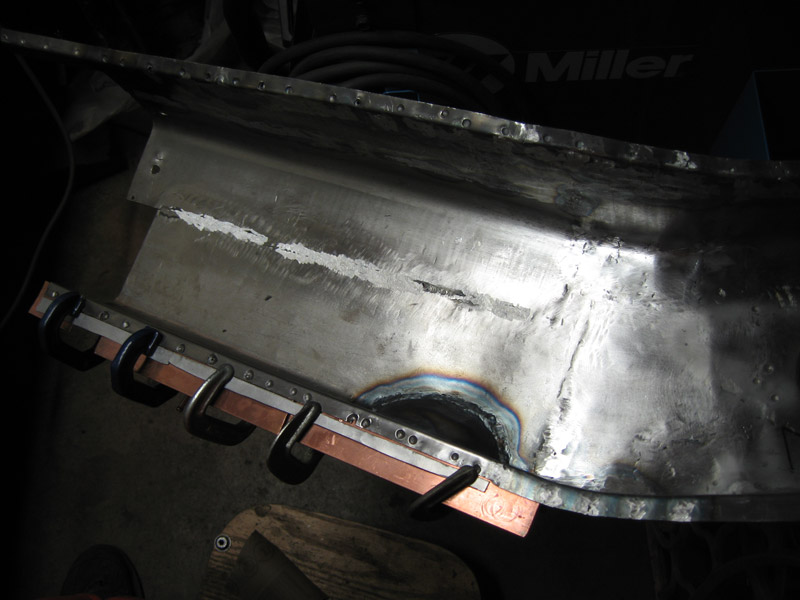 It will require more hammering also; welding brought the top and bottom of the inner in, and the outer is springing out (IMG:style_emoticons/default/smash.gif) I've outlined the inner layer in an adriatic glow. 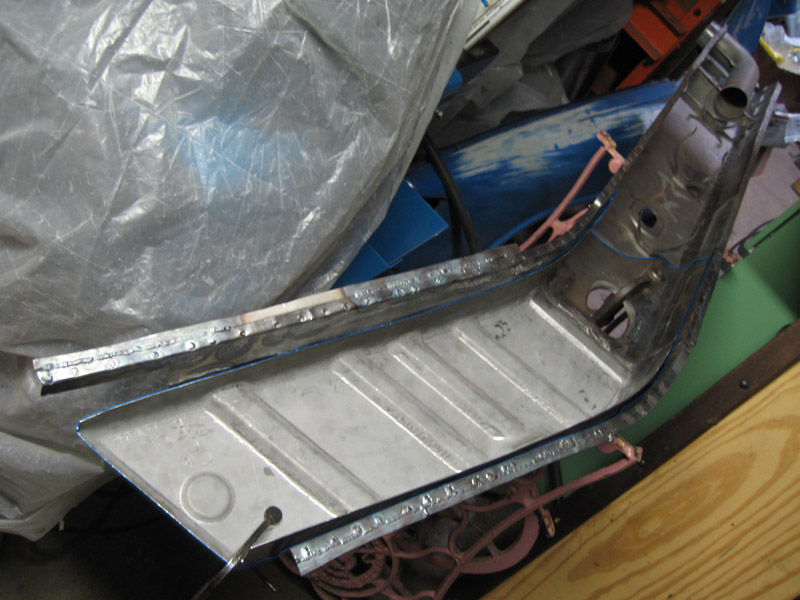 I am thinking that I will put the inner and outer layers of the long together and then put them up to the car, a bit different than how Jeff did it. I feel more comfortable being able to clamp the layers, and to back the welds. Attach the heater tube, the rear heater channel, and put it on. (!) It's a bit more complicated than that...weld thru primer...., actually, but... . The engine mount and inner suspension console will go on after. 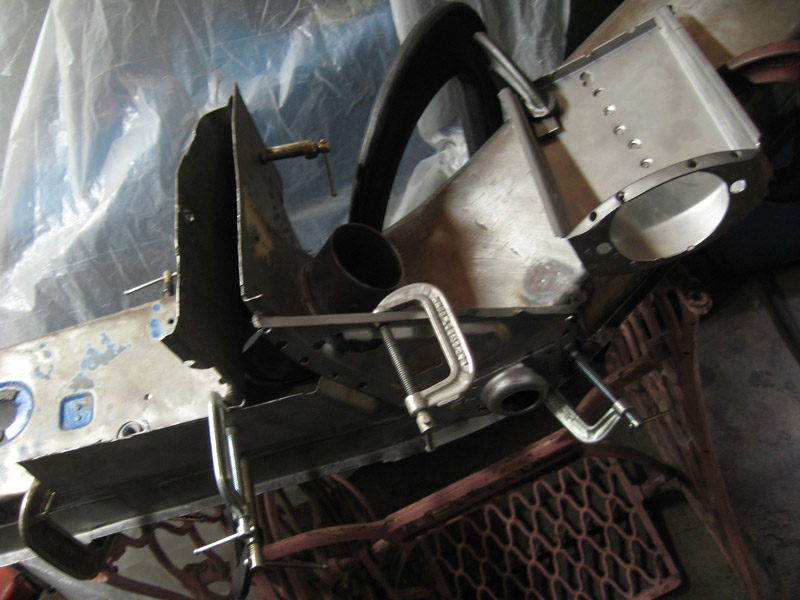 A bit of a fit up. I need to make the bottom of the engine mount, as that is from the drivers side of the donor. A bit of a difference in the upper part on the side, the flange height, but besides that (and the bottom which is symmetrically inverse) they are the same. I need to get some thicker gauge metal to make that. I'd like to have my suspension jig and inner console fitted, engine support bar going to the fitted-up mount, as well as firewall front and rear all in position before welding the inner assembly in. I don't want the bottom of the car to sit too far out and may need to use a tie down strap to pull it together. We'll see soon. 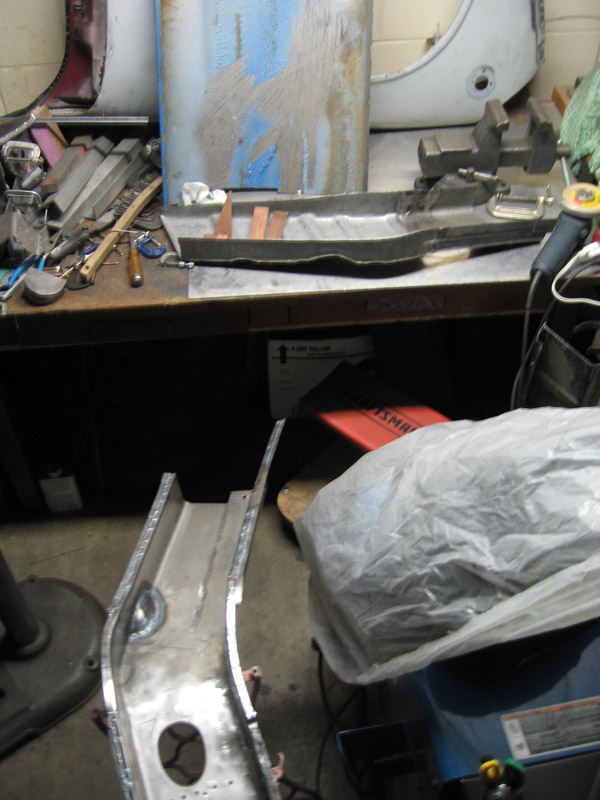 |
  |
1 User(s) are reading this topic (1 Guests and 0 Anonymous Users)
0 Members:

|
Lo-Fi Version | Time is now: 31st December 2025 - 02:12 AM |
Invision Power Board
v9.1.4 © 2025 IPS, Inc.


