|
|

|
Porsche, and the Porsche crest are registered trademarks of Dr. Ing. h.c. F. Porsche AG.
This site is not affiliated with Porsche in any way. Its only purpose is to provide an online forum for car enthusiasts. All other trademarks are property of their respective owners. |
|
|
  |
| Eric_Shea |
 May 17 2004, 11:08 AM May 17 2004, 11:08 AM
Post
#1
|
|
PMB Performance                Group: Admin Posts: 19,289 Joined: 3-September 03 From: Salt Lake City, UT Member No.: 1,110 Region Association: Rocky Mountains  |
After Saturday’s bushings install came Sunday’s bearing install. The factory manual can be quite vague on most subjects; lessons that become clear only after doing it so… hopefully this can clear things up a bit regarding installing rear bearings:
Step 1 – If you haven’t taken out your old bearings then you’ll want to do that. If the hub is in then you’ll need to drive it out of the control arm. This varies from a “light tap” to a “full blown slam”. You will ruin your old bearing but… that’s what we’re doing here. Find a suitable drift. Porsche calls it a P297a (better known as a suitable drift). I use an old 911 rear torsion bar. Once the hub is out you’ll need to drive out the bearing. Again, a vague reference to a “suitable thrust piece” to drive it out. After the hub is out you’ll see the lip on the backside of the bearing. Use a hardened punch and slowly tap out the bearing moving the punch from 9:00 to 3:00 to 12:00 to 6:00… you get the picture. Slowly so you don’t lodge it sideways in the bearing pocket and damage the control arm. Make sure the punch is resting on the bearing edge and not scoring the pocket surface. Save an old bearing housing… |
| Eric_Shea |
 May 17 2004, 11:09 AM May 17 2004, 11:09 AM
Post
#2
|
|
PMB Performance                Group: Admin Posts: 19,289 Joined: 3-September 03 From: Salt Lake City, UT Member No.: 1,110 Region Association: Rocky Mountains  |
Step 2 – Freeze your bearings. Do this as soon as you get them so they’ll be ready to go once you have prepped the control arm. This really does help. The tolerances are extremely tight. The cold bearing going in the room temperature housing give you the advantage.
Attached image(s) 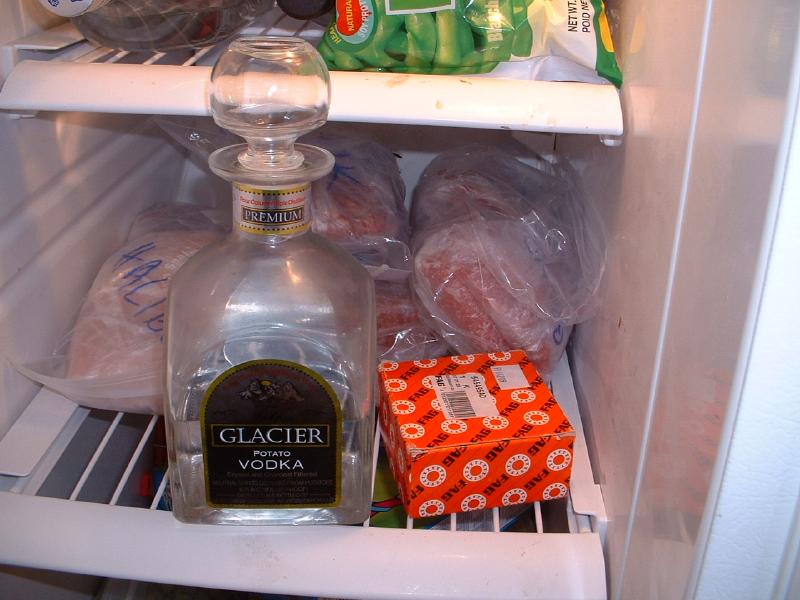
|
| Eric_Shea |
 May 17 2004, 11:09 AM May 17 2004, 11:09 AM
Post
#3
|
|
PMB Performance                Group: Admin Posts: 19,289 Joined: 3-September 03 From: Salt Lake City, UT Member No.: 1,110 Region Association: Rocky Mountains  |
Step 3 – Prep the arm. I like to lightly rub some 600 grit wet-dry in the bearing pocket just to feel for burs and to clean anything up. Don’t wrench on it just clean it up.
|
| Eric_Shea |
 May 17 2004, 11:10 AM May 17 2004, 11:10 AM
Post
#4
|
|
PMB Performance                Group: Admin Posts: 19,289 Joined: 3-September 03 From: Salt Lake City, UT Member No.: 1,110 Region Association: Rocky Mountains  |
Step 4 – Install your now frozen bearings. I’ve seen these range from a virtual “drop in” fit to a “press in” fit. Porsche says use “special tool P302”. P302 is described as a ”thrust piece”. My “thrust piece” is an old bearing housing. I use a piece of flat steel on top of the old bearing and lightly tap the new bearing in. You must make sure the bearing is going in straight, if it goes in at an angle you’ll ruin the bearing and possibly the control arm. Be patient and tap lightly. As the bearing gets further down in the pocket you can begin to assert more force. Some may need to be pressed in the last few millimeter’s.
Attached image(s) 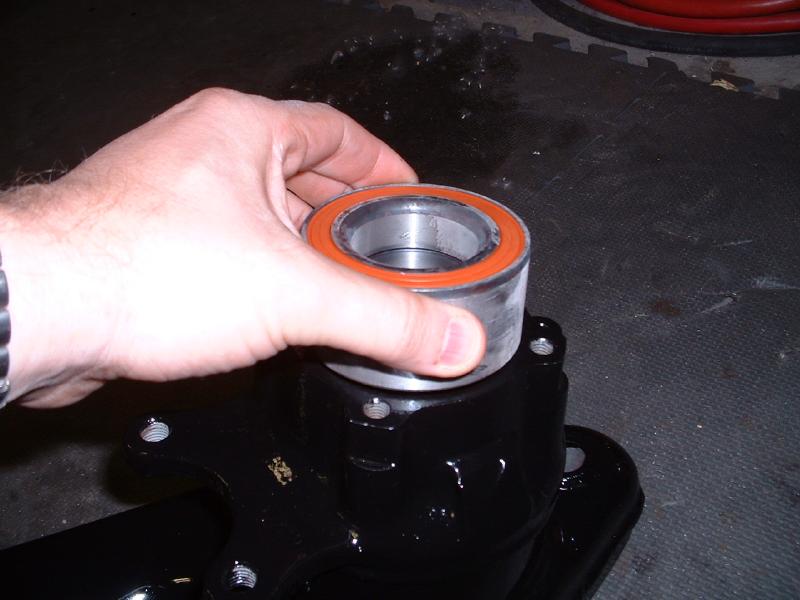
|
| Eric_Shea |
 May 17 2004, 11:11 AM May 17 2004, 11:11 AM
Post
#5
|
|
PMB Performance                Group: Admin Posts: 19,289 Joined: 3-September 03 From: Salt Lake City, UT Member No.: 1,110 Region Association: Rocky Mountains  |
Step 5 – Once the bearings are in, install the bearing caps. Torque the bolts to 18-ft lbs.
Attached image(s) 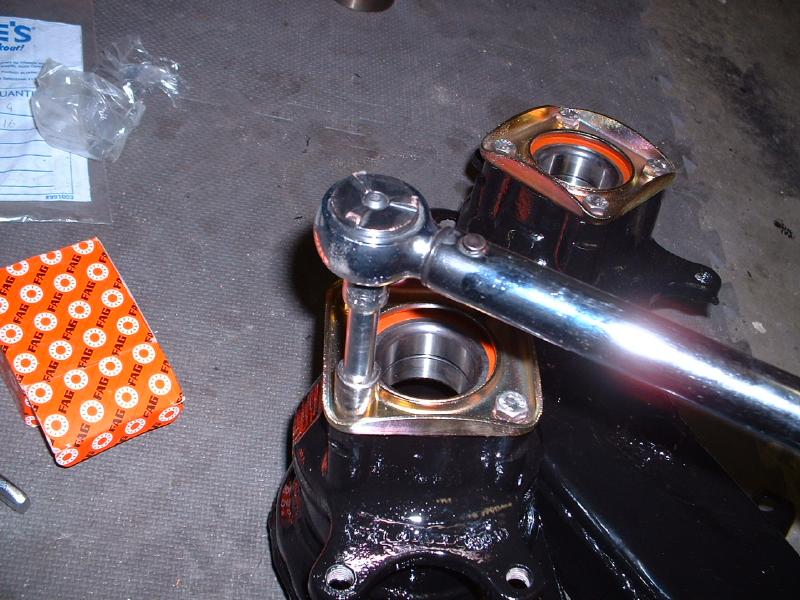
|
| Eric_Shea |
 May 17 2004, 11:12 AM May 17 2004, 11:12 AM
Post
#6
|
|
PMB Performance                Group: Admin Posts: 19,289 Joined: 3-September 03 From: Salt Lake City, UT Member No.: 1,110 Region Association: Rocky Mountains  |
Step 6 – Now it’s the time to reinstall the hub. Porsche says use the P298b assemble fixture. Most searches on the site give the answer to this factory tool dilemma. Use the stub axle. Slide the stub axle through the bearing from the backside and slip the hub over top it. Use the castle nut “upside down” to grab the first few threads on the stub axle. Once you get it started you can turn the castle nut over and finish the job. I only had 914-6 stub axles lying around and this set of control arms is for a regular 914 stub axle. I built a tool to draw the hub into the bearing. This consisted of a threaded rod and a few nuts and suitable sockets and washers. The main thing when performing this step is getting the hub in “straight” just as we did the bearings. You don’t want the hub pulled in at any exaggerated angle. Slowly crank it in.
You’re done. Put’em back on and enjoy the ride. Attached image(s) 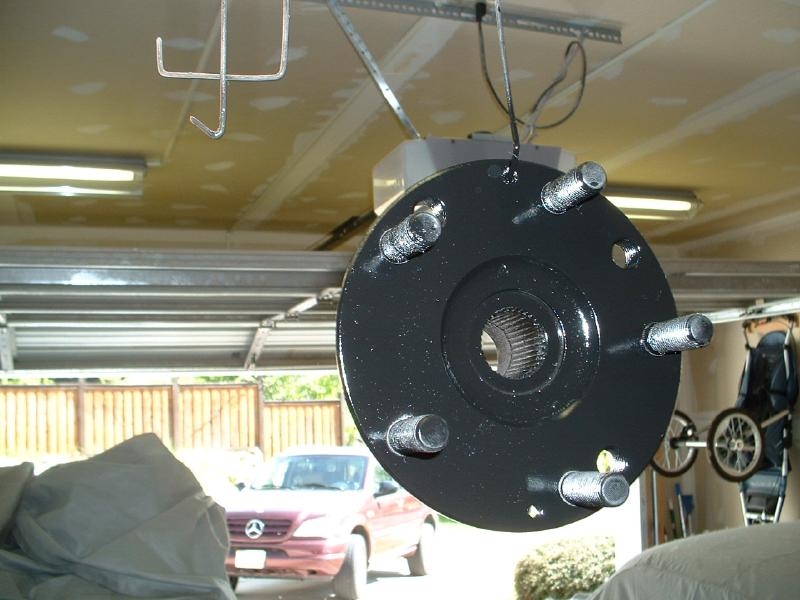
|
| Eric_Shea |
 May 17 2004, 11:13 AM May 17 2004, 11:13 AM
Post
#7
|
|
PMB Performance                Group: Admin Posts: 19,289 Joined: 3-September 03 From: Salt Lake City, UT Member No.: 1,110 Region Association: Rocky Mountains  |
Getting started...
Attached image(s) 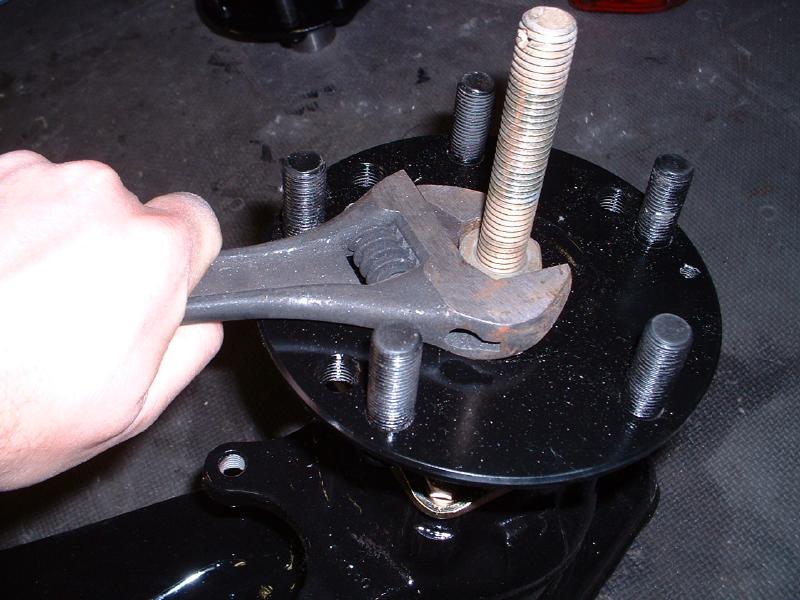
|
| Eric_Shea |
 May 17 2004, 11:13 AM May 17 2004, 11:13 AM
Post
#8
|
|
PMB Performance                Group: Admin Posts: 19,289 Joined: 3-September 03 From: Salt Lake City, UT Member No.: 1,110 Region Association: Rocky Mountains  |
Getting closer...
Attached image(s) 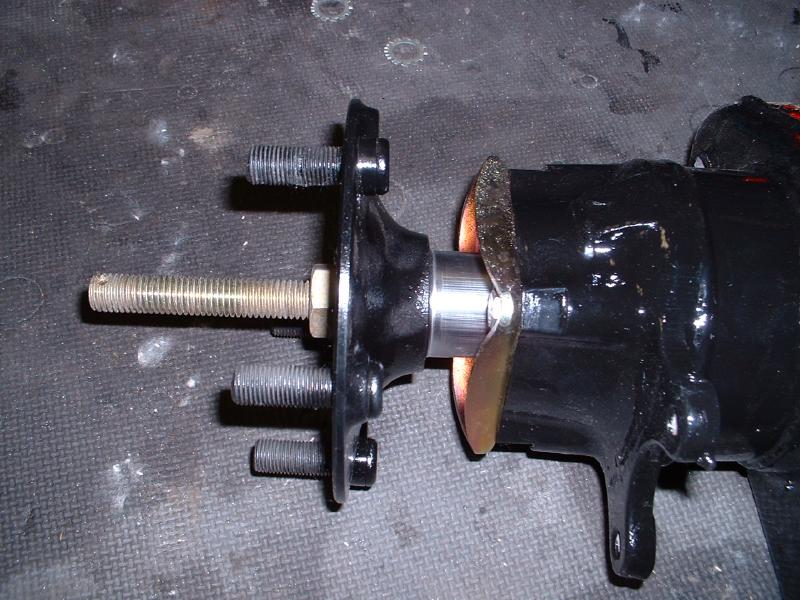
|
| Eric_Shea |
 May 17 2004, 11:14 AM May 17 2004, 11:14 AM
Post
#9
|
|
PMB Performance                Group: Admin Posts: 19,289 Joined: 3-September 03 From: Salt Lake City, UT Member No.: 1,110 Region Association: Rocky Mountains  |
Hub drawn in...
Attached image(s) 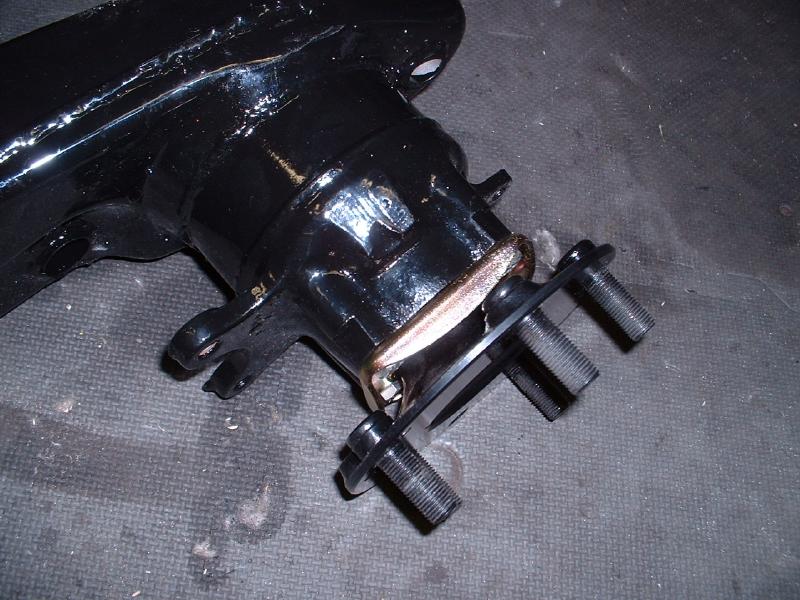
|
| Eric_Shea |
 May 17 2004, 11:15 AM May 17 2004, 11:15 AM
Post
#10
|
|
PMB Performance                Group: Admin Posts: 19,289 Joined: 3-September 03 From: Salt Lake City, UT Member No.: 1,110 Region Association: Rocky Mountains  |
The install tool...
Attached image(s) 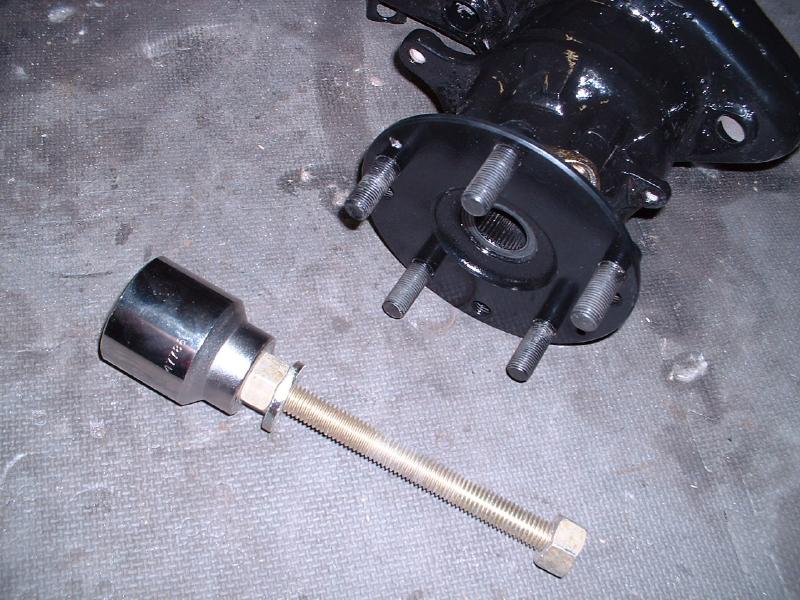
|
| william harris |
 May 17 2004, 01:10 PM May 17 2004, 01:10 PM
Post
#11
|
|
914 Restorer    Group: Members Posts: 1,459 Joined: 9-January 04 From: Hamilton, MA Member No.: 1,539 |
(IMG:style_emoticons/default/smilie_pokal.gif) Go directly to the Classics threads! At this pace I will throw the Haynes manual into the trash. It tells you almost nothing. Thanks for such detailed instructions and great pictures. (IMG:style_emoticons/default/beer.gif)
|
| Eric_Shea |
 May 17 2004, 01:57 PM May 17 2004, 01:57 PM
Post
#12
|
|
PMB Performance                Group: Admin Posts: 19,289 Joined: 3-September 03 From: Salt Lake City, UT Member No.: 1,110 Region Association: Rocky Mountains  |
Right on Chief! Glad it could help. I was wondering if you were going this route as well...
(IMG:style_emoticons/default/beerchug.gif) |
| tat2dphreak |
 May 17 2004, 02:07 PM May 17 2004, 02:07 PM
Post
#13
|
|
stoya, stoya, stoya      Group: Benefactors Posts: 8,797 Joined: 6-June 03 From: Wylie, TX Member No.: 792 Region Association: Southwest Region  |
great info dude!! (IMG:style_emoticons/default/smilie_pokal.gif)
|
| Targa |
 May 17 2004, 02:19 PM May 17 2004, 02:19 PM
Post
#14
|
|
V Member   Group: Members Posts: 180 Joined: 26-December 02 From: San Mateo, CA Member No.: 18 |
Very clean Eric! I only have one question: When do you start pouring the vodka? (IMG:style_emoticons/default/confused24.gif)
|
| watsonrx13 |
 May 17 2004, 02:23 PM May 17 2004, 02:23 PM
Post
#15
|
|
Advanced Member     Group: Members Posts: 2,735 Joined: 18-February 03 From: Plant City, FL Member No.: 312 Region Association: South East States |
A fantastic and comprehensive article.
Thanks for the effort of the documentation and the pics. I know personally how much longer it takes working on the car when you have to stop to take a pic. I'm working on 3 914's and completely documention my trials and tribulations of each. This is the reason this BBS will succeed, the knowledgable people, such as yourself, taking the time to provide all of us with correct way to fix and or improve the 914s. Thanks again Eric. (IMG:style_emoticons/default/smilie_pokal.gif) |
| Eric_Shea |
 May 17 2004, 03:12 PM May 17 2004, 03:12 PM
Post
#16
|
|
PMB Performance                Group: Admin Posts: 19,289 Joined: 3-September 03 From: Salt Lake City, UT Member No.: 1,110 Region Association: Rocky Mountains  |
QUOTE When do you start pouring the vodka? Now's as good a time as any!! (IMG:style_emoticons/default/w00t.gif) (IMG:style_emoticons/default/drunk.gif) QUOTE I know personally how much longer it takes working on the car when you have to stop to take a pic. I'm working on 3 914's and completely documention my trials and tribulations of each. And... you're insane just like the rest of us. (IMG:style_emoticons/default/w00t.gif) I've been watching your metalwork. Very nice! Here's to ya (IMG:style_emoticons/default/beer.gif) I can't wait until you get that puppy painted. Taking pics is becoming second nature. I'm our PCA regions newsletter editor and as Rich Herzog and other editors out there will attest: if you don't get the editorial no one will!! Glad to help... |
| seanery |
 May 17 2004, 03:20 PM May 17 2004, 03:20 PM
Post
#17
|
|
waiting to rebuild whitey!                Group: Retired Admin Posts: 15,854 Joined: 7-January 03 From: Indy Member No.: 100 Region Association: None |
Great Job Eric!
I plan on printing this thread out to have with me when I do mine! (IMG:style_emoticons/default/smilie_pokal.gif) |
| John2kx |
 May 17 2004, 04:04 PM May 17 2004, 04:04 PM
Post
#18
|
|
Senior Member    Group: Members Posts: 502 Joined: 22-August 03 From: Augusta, Ga. Member No.: 1,066 |
Eric,
Great job on the procedure you used. Exactly how I did it with one exception. I froze the hub and allowed bearings to reach room temperature (actually overnight) before pressing frozen hub through bearing. Used a similar tool and found it real easy to drive home. John Attached image(s) 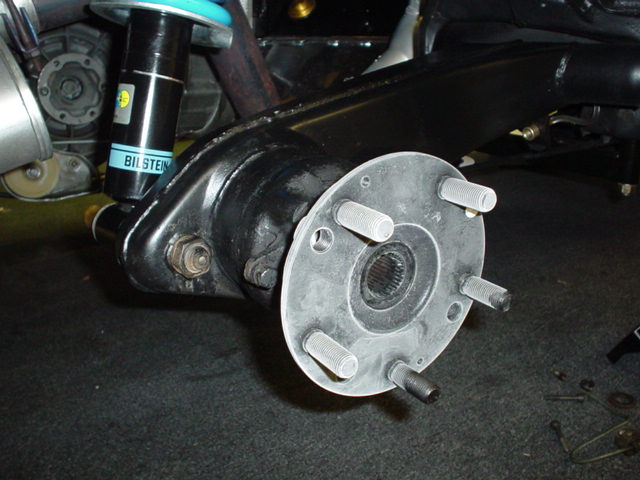
|
| Eric_Shea |
 May 17 2004, 04:33 PM May 17 2004, 04:33 PM
Post
#19
|
|
PMB Performance                Group: Admin Posts: 19,289 Joined: 3-September 03 From: Salt Lake City, UT Member No.: 1,110 Region Association: Rocky Mountains  |
Look at that frozen hub... great idea! (IMG:style_emoticons/default/smilie_pokal.gif)
|
| seanery |
 May 17 2004, 05:43 PM May 17 2004, 05:43 PM
Post
#20
|
|
waiting to rebuild whitey!                Group: Retired Admin Posts: 15,854 Joined: 7-January 03 From: Indy Member No.: 100 Region Association: None |
let me get this straight:
1. freeze bearing & hub 2. install bearing 3. let bearing come to temp 4. install frozen hub into ambient temp bearing race does that go with what's been shown here? |
  |
1 User(s) are reading this topic (1 Guests and 0 Anonymous Users)
0 Members:

|
Lo-Fi Version | Time is now: 27th December 2024 - 03:57 AM |
Invision Power Board
v9.1.4 © 2024 IPS, Inc.


