|
|
|
Porsche, and the Porsche crest are registered trademarks of Dr. Ing. h.c. F. Porsche AG.
This site is not affiliated with Porsche in any way. Its only purpose is to provide an online forum for car enthusiasts. All other trademarks are property of their respective owners. |
|
|

  |

| Cairo94507 |
 Apr 17 2013, 08:59 PM Apr 17 2013, 08:59 PM
Post
#161
|
|
Michael  Group: Members Posts: 10,297 Joined: 1-November 08 From: Auburn, CA Member No.: 9,712 Region Association: Northern California |
Love the wheel. Note to self: gotta get mine to Weidman.
|
   |

 
|
| Derek Seymour |
Apr 17 2013, 09:32 PM
Post
#162
|
|
Member Group: Members Posts: 394 Joined: 10-March 09 From: Yucaipa Member No.: 10,151 Region Association: Southern California |
A fix it. And get her back on the track too. If she could talk that is what she would say.
|
|
|
|
| siverson |
Apr 29 2013, 12:33 AM
Post
#163
|
|
Advanced Member Group: Benefactors Posts: 2,458 Joined: 5-May 03 From: San Diego, CA Member No.: 654 Region Association: Southern California |
I have the suspension back on all four corners now, and I've started the brakes.
And... I learned some 911s have 16mm front spindles, and some are 18mm. My old struts were 16mm (one broke), and the replacements are 18mm. The old wheels bearings work fine, but the washer and lock nut thing at the end of the spindle need to be replaced. Strange that wheel bearings are the same, but the nut is not. -Steve |
|
|
|
| sixnotfour |
Apr 29 2013, 12:42 AM
Post
#164
|
|
914 Wizard Group: Members Posts: 10,790 Joined: 12-September 04 From: Life Elevated..planet UT. Member No.: 2,744 Region Association: Rocky Mountains |
Koni's early versus late
|
|
|
|
| siverson |
May 2 2013, 11:06 AM
Post
#165
|
|
Advanced Member Group: Benefactors Posts: 2,458 Joined: 5-May 03 From: San Diego, CA Member No.: 654 Region Association: Southern California |
Starting to get parts back on the previously ugly corner...
Two questions: 1. I've never figured out exactly how tight to make front axle nut/wheel bearing. I tightened these and then backed them out only 1/8th of a turn or so. The wheel spins fine, but it is possible to "wiggle" the top of rotor on the axle just a little. So... how tight? 2. Both rotors are new, but there is a *very* slight wobble when spun. It's only detectable when the you look closely at the distance between inside of the caliper and rotor. That tolerance is very tight to start, and you can see the rotor move back and forth slightly within the caliper. I've never noticed this before. Is this normal? -Steve Attached thumbnail(s) 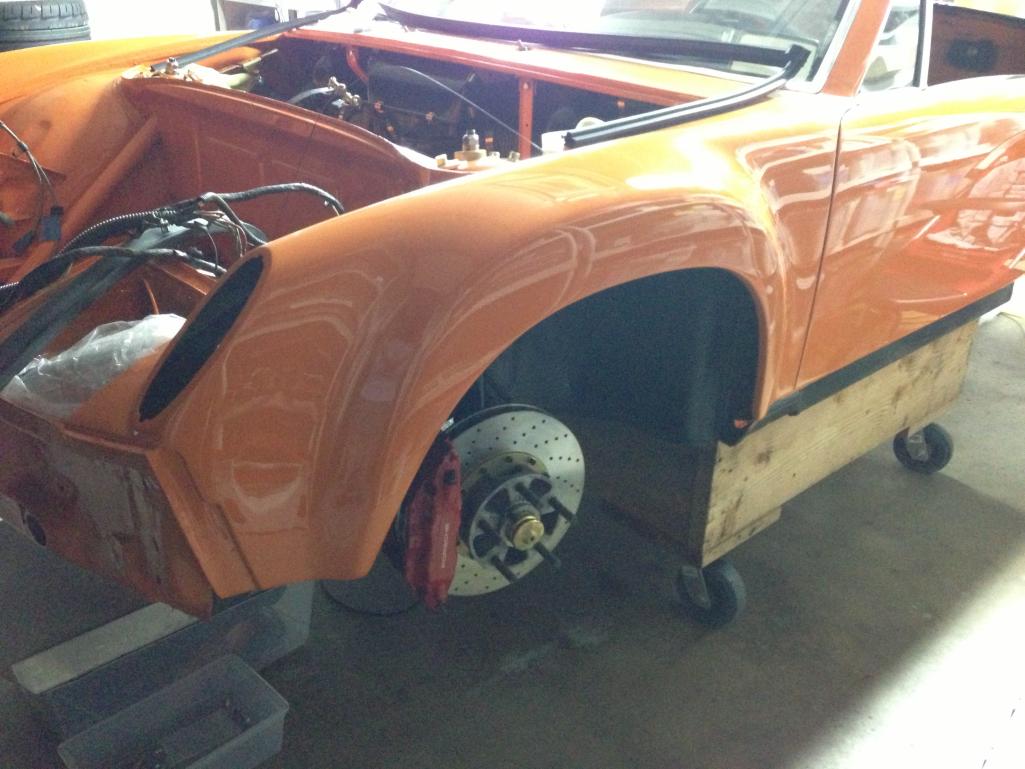
|
|
|
|
| Dave_Darling |
May 2 2013, 03:26 PM
Post
#166
|
|
914 Idiot Group: Members Posts: 15,146 Joined: 9-January 03 From: Silicon Valley / Kailua-Kona Member No.: 121 Region Association: Northern California |
Spec for the axle nut is "until you can just barely move the washer with a screwdriver". Seriously.
I'm not sure how the rotor is attached to the hub on your setup. The four-cylinder front rotors obviously have it as one solid cast piece, so there should be no wobbling. The rears have a separate rotor and hub (like most cars do), and in that case it is normal for the rotor to be a little bit loose. Remember that the rotor is in those cases sandwiched between the hub and the wheel, which is put on with 90 lb-ft of torque... So, uh, I guess I'm not sure about your wobble. --DD |
|
|
|
| '73-914kid |
May 2 2013, 05:21 PM
Post
#167
|
|
Senior Member Group: Members Posts: 1,473 Joined: 1-November 08 From: Vista, CA Member No.: 9,714 Region Association: Southern California |
You have the same setup in the front that I just recently installed.. It's a coleman racing products brake rotor, with an aluminum hat, bolted to the aluminum hub. There are now 2 interfaces that must be bolted up almost perfectly, and they are sometimes hard to get lined up. I'm fighting some brake pedal pulsing becasue of the "wobble" you speak of. It's just run-out in the brake rotor from things not being seated in the right position.
If I were you, I would remove the caliper and start unbolting, and rotating things until you find a position that it is all happy. Check run-out with a dial indicator. Did you disassemble the rotor/hat/hub assembly after the crash? you might have gotten things seated back properly... |
|
|
|
| john rogers |
May 2 2013, 06:54 PM
Post
#168
|
|
Senior Member Group: Members Posts: 1,525 Joined: 4-March 03 From: Chula Vista CA Member No.: 391 |
Years ago when I installed the "Brad" 4 bolt alloy hubs and vented rotors with M calipers there was some wobble when at rest with the wheels off the ground. After the first practice session there was no more. If the hub spins true with a dial indicator I would then check the hat and then finally the rotor. My guess is the rotor mating surface is machined a bit off or possibly the bolts are not torqued evenly.
As for tightening the spindle nut, I always tightened it so there was wheel drag, then loosened it, then tightened it again and finally loosening it just enough so there was no wobble at the outer edge of the tire. When the wheel/tire on it gave an old guy like me more leverage. |
|
|
|
| siverson |
May 2 2013, 09:30 PM
Post
#169
|
|
Advanced Member Group: Benefactors Posts: 2,458 Joined: 5-May 03 From: San Diego, CA Member No.: 654 Region Association: Southern California |
Thanks for the tips.
> Did you disassemble the rotor/hat/hub assembly after the crash? Yes, it's been a bad case of "while I'm in there" and have basically rebuilt everything. Actually, in regards to the front suspension, I have rebuilt everything. New Tarrett sway bar to replace the Welt, Elephant bushings to replace the plastic, new von struts to replace the Bilsteins, etc. > finally loosening it just enough so there was no wobble at the outer edge of the tire Thanks - that's sounds about like what I did. I'll try again and check. -Steve |
|
|
|
| siverson |
Aug 5 2013, 05:03 PM
Post
#170
|
|
Advanced Member Group: Benefactors Posts: 2,458 Joined: 5-May 03 From: San Diego, CA Member No.: 654 Region Association: Southern California |
I think I'm the worldest slowest car mechanic, but I am making progress. Headlight mechanics and wiring are done now, but I probably put everything together 5 times before I got things right.
The headlight mechanism is tighter and better fitting than before. One weird bug is that sometimes (5% of the time) the passenger side headlight motor cycles and makes an extra trip before it stops closing. I think there is a dirty internal microswitch or something. Another strange problem I've seen is that the wiper relay is warm to the touch, even when off. All other relays have no temperature to them, even when being used. Maybe I'll just replace it. -Steve Attached thumbnail(s) 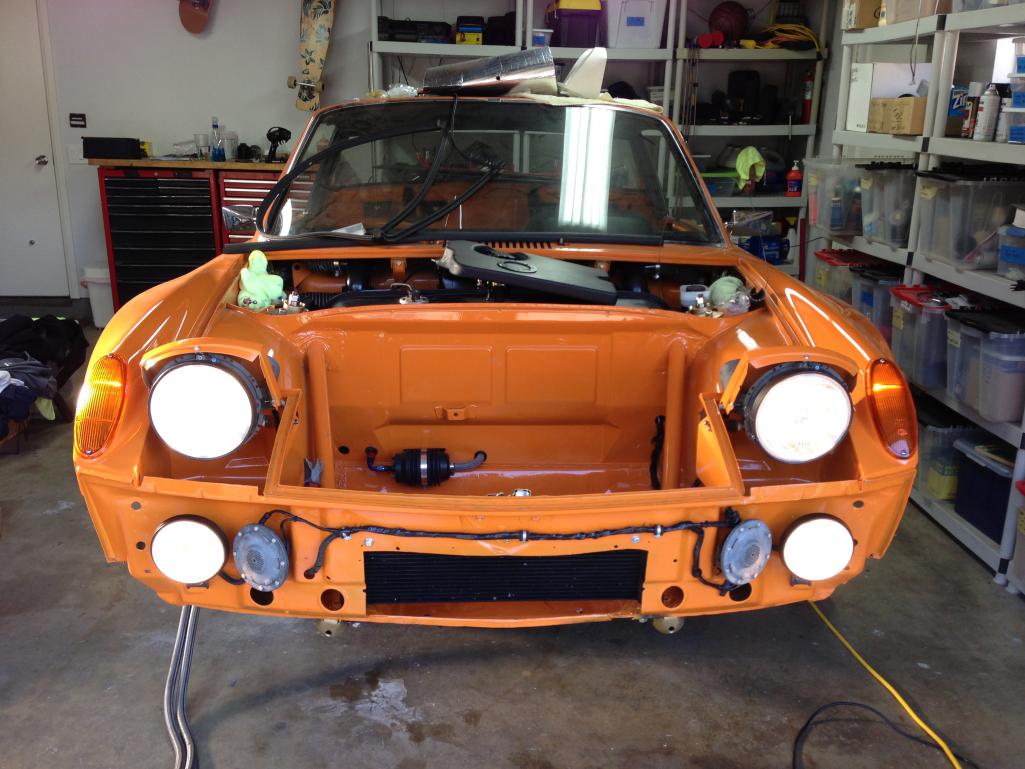
|
|
|
|
| siverson |
Aug 5 2013, 05:04 PM
Post
#171
|
|
Advanced Member Group: Benefactors Posts: 2,458 Joined: 5-May 03 From: San Diego, CA Member No.: 654 Region Association: Southern California |
I also cleaned up the driving light wiring a little. "While I'm in here..."
-Steve |
|
|
|
| tscrihfield |
Aug 5 2013, 05:09 PM
Post
#172
|
|
Drive Fast and Take Chances Group: Members Posts: 643 Joined: 8-September 10 From: Amelia Ohio Member No.: 12,156 Region Association: None |
car looks wonderful steve! I am glad you saved it!
Thomas |
|
|
|
| Elliot Cannon |
Aug 5 2013, 05:47 PM
Post
#173
|
|
914 Guru Group: Retired Members Posts: 8,487 Joined: 29-December 06 From: Paso Robles Ca. (Central coast) Member No.: 7,407 Region Association: None |
QUOTE(Dave_Darling @ May 2 2013, 02:26 PM)  Spec for the axle nut is "until you can just barely move the washer with a screwdriver". Seriously. I'm not sure how the rotor is attached to the hub on your setup. The four-cylinder front rotors obviously have it as one solid cast piece, so there should be no wobbling. The rears have a separate rotor and hub (like most cars do), and in that case it is normal for the rotor to be a little bit loose. Remember that the rotor is in those cases sandwiched between the hub and the wheel, which is put on with 90 lb-ft of torque... So, uh, I guess I'm not sure about your wobble. --DD I had a 1960 VW bug and the front axle nut adjustment was exactly the same technique. The way I have done it is to tighten it fairly tight to seat everything, then loosen it till like Dave said, "until you can barely move the washer with a screwdriver". It doesn't seem very technically sophisticated but it works great. The car looks fantastic. Now finish it up and get started on that single seater. (IMG:style_emoticons/default/laugh.gif) |
|
|
|
| Matt Romanowski |
Aug 5 2013, 05:51 PM
Post
#174
|
|
Senior Member Group: Members Posts: 878 Joined: 4-January 04 From: Manchester, NH Member No.: 1,507 |
It looks like you're doing a great job. Even if it takes longer than planned, you'll know everything was done right.
|
|
|
|
| chad newton |
Aug 6 2013, 11:12 AM
Post
#175
|
|
Member Group: Members Posts: 110 Joined: 26-August 11 From: behind the red curtain Member No.: 13,491 Region Association: None |
I'm glad you fixed it. If you want a track car get a shitty one like I did and only do what u have to do to it. Single stage garage paint, fiberglass flares, cheaper.... Your drivetrain will always have to be good, but that's something that can be moved to another body without worrying about scraping the other. No attachments.(IMG:style_emoticons/default/smile.gif)
|
|
|
|
| siverson |
Aug 13 2013, 10:04 PM
Post
#176
|
|
Advanced Member Group: Benefactors Posts: 2,458 Joined: 5-May 03 From: San Diego, CA Member No.: 654 Region Association: Southern California |
And while I was in there, I filled in some unused holes, and made the battery box a little narrower to fit lightweight battery. (IMG:style_emoticons/default/welder.gif)
I think the stock battery location is a good spot for a street/track car, and I'm hoping this cleans up the engine bay a little by keeping the battery "tucked in" on the side more and not such a large eye sore. Or maybe I should start watcher fewer American Hot Rod re-runs and just put my car back together and drive it... (IMG:style_emoticons/default/smile.gif) (IMG:style_emoticons/default/driving.gif) -Steve Attached thumbnail(s) 
|
|
|
|
| Jeff Hail |
Aug 14 2013, 12:43 PM
Post
#177
|
|
Senior Member Group: Members Posts: 1,141 Joined: 3-May 07 From: LA/ CA Member No.: 7,712 |
QUOTE(siverson @ Aug 13 2013, 09:04 PM) And while I was in there, I filled in some unused holes, and made the battery box a little narrower to fit lightweight battery. (IMG:style_emoticons/default/welder.gif) I think the stock battery location is a good spot for a street/track car, and I'm hoping this cleans up the engine bay a little by keeping the battery "tucked in" on the side more and not such a large eye sore. Or maybe I should start watcher fewer American Hot Rod re-runs and just put my car back together and drive it... (IMG:style_emoticons/default/smile.gif) (IMG:style_emoticons/default/driving.gif) -Steve Looking great! |
|
|
|
| siverson |
Sep 14 2013, 11:15 PM
Post
#178
|
|
Advanced Member Group: Benefactors Posts: 2,458 Joined: 5-May 03 From: San Diego, CA Member No.: 654 Region Association: Southern California |
I had two helpers with me on 9/14 today...
Attached image(s) 
|
|
|
|
| siverson |
Sep 14 2013, 11:30 PM
Post
#179
|
|
Advanced Member Group: Benefactors Posts: 2,458 Joined: 5-May 03 From: San Diego, CA Member No.: 654 Region Association: Southern California |
I got the car on four wheels for the first time in 18 months or so.
The primary motivation is I wanted to re-spray the engine compartment. When it was last shot they did so with a lot less care than the rest of the car - I think they were just assuming it was an "engine compartment" and not a place to worship wonderful flat 6 sounds. (IMG:style_emoticons/default/smile.gif) Anyways, there were some runs in the paint (ugg), and I decided to make a custom, small battery box for my new smaller battery, and I've always wanted to close up some of the extra holes in the engine shelf that were no longer used. Very anal retentive, but whatever... The problem is that I'm a pretty welder, and an even worse painter. Fortunately, plenty of grinding can make welds looks decent, so that's done. But in regards to paint, I'm looking for some advice. Any tips on exactly what steps I should do next to have this turn out nice? What's the easiest way for someone who can't even paint a bedroom wall well? As the photos below show, I've completed the primer. I was planning on letting this dry for a week (I should have a couple hours next week free), and then I plan to: 1. lightly sand the primer to get rid of some of the big bumps. I'm not going for anywhere near a perfect/mirror finish here, I just didn't want ugly paint runs like I had before. 2. blow out the dust with the air compressor, and clean up further wet a damp rag. Is that right? ok to get the primer slightly wet again? (again, I told you I really have no idea what I'm doing with paint). 3. then, I have an extra pint of paint from when the car was refinished. That pint is about 9 months old now. Think it's still ok? I have a cheap LPHV spray gun from the home depot that I used for a furniture project several years ago. I was planning I just using the paint straight (it seems quite thin/liquid). maybe spray 2-3 coats and then I'm done? do I need to sand the paint as well? color coat? Any other tips? Or should I just try and get some signal orange spray cans made up? -Steve Attached image(s) 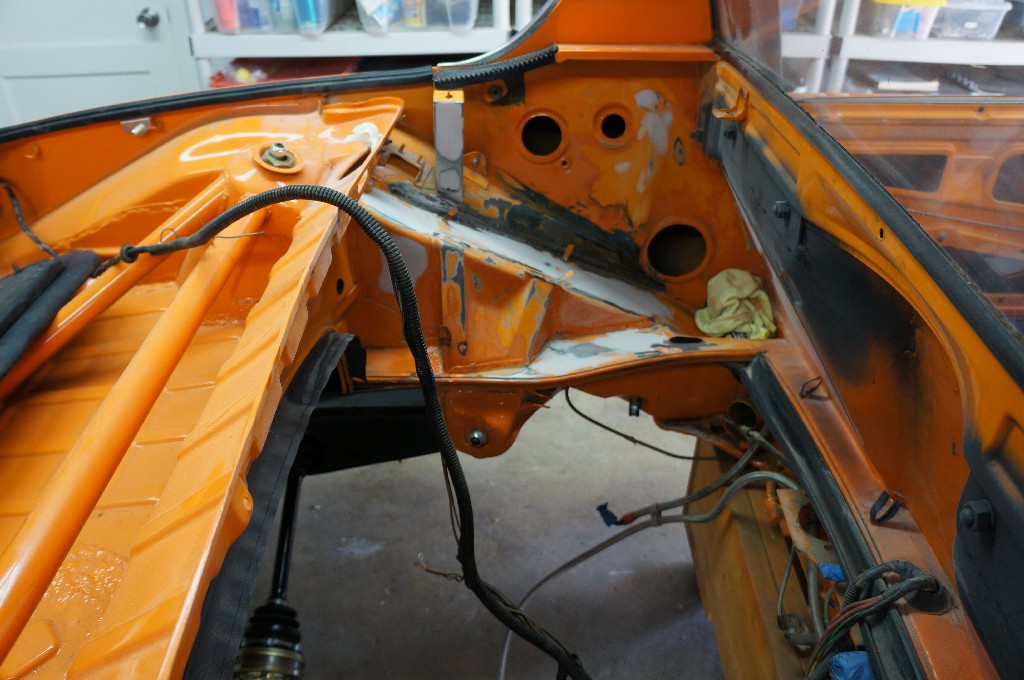 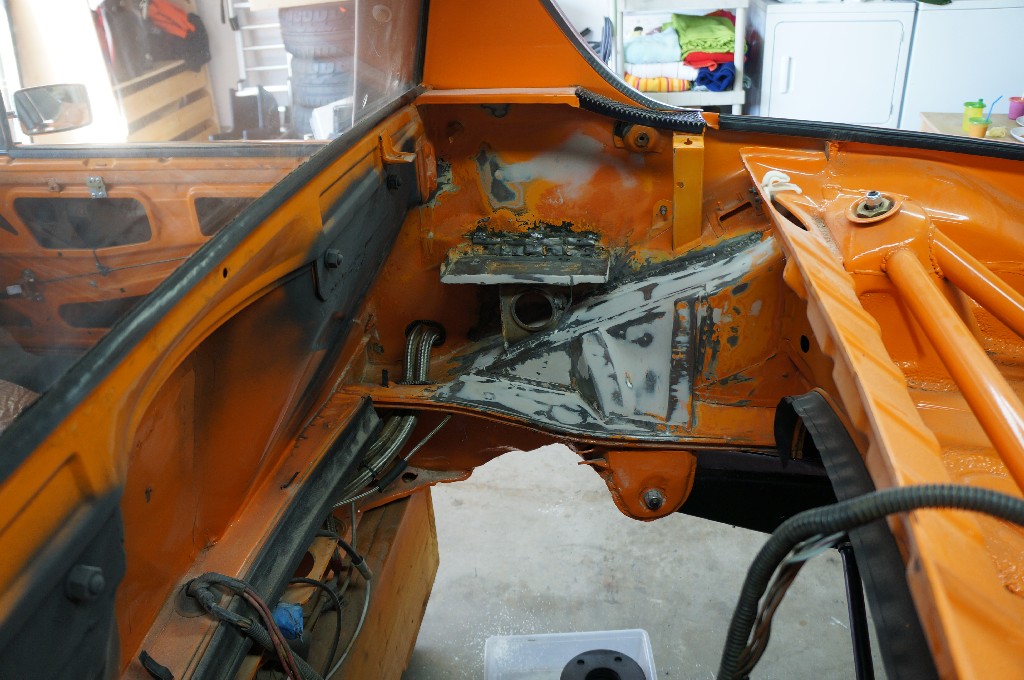 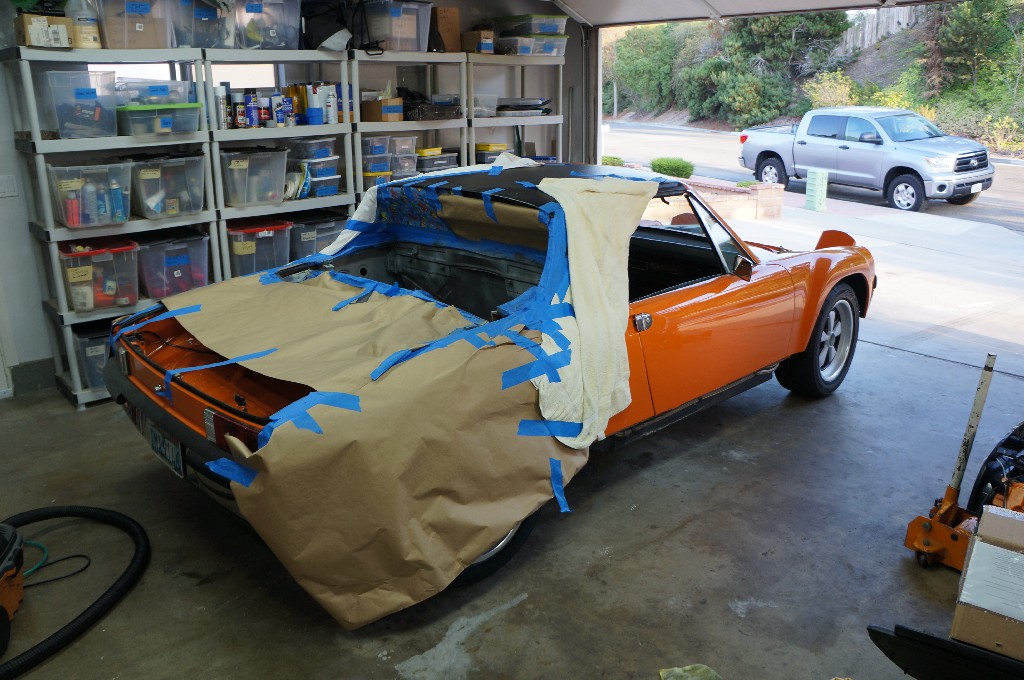  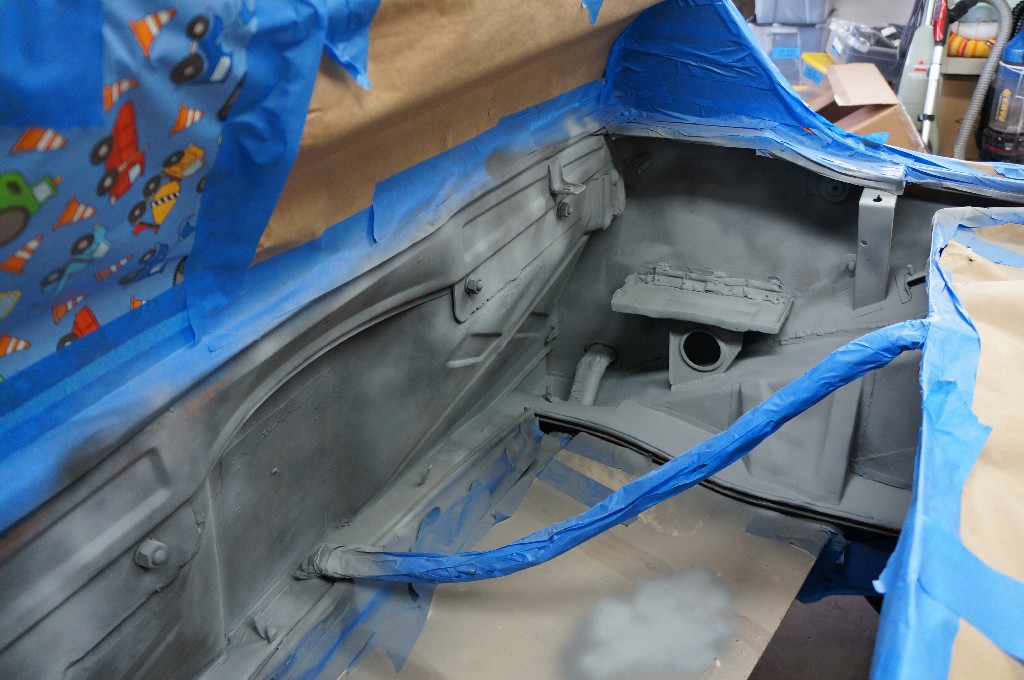
|
|
|
|
| siverson |
Sep 14 2013, 11:31 PM
Post
#180
|
|
Advanced Member Group: Benefactors Posts: 2,458 Joined: 5-May 03 From: San Diego, CA Member No.: 654 Region Association: Southern California |
Yes, that's birthday wrapping paper. And towels. My paper roll ran out. (IMG:style_emoticons/default/smile.gif)
|
|
|
|
|
1 User(s) are reading this topic (1 Guests and 0 Anonymous Users)
0 Members:

|
Lo-Fi Version | Time is now: 19th April 2025 - 12:27 PM |
Invision Power Board
v9.1.4 © 2025 IPS, Inc.