|
|
|
Porsche, and the Porsche crest are registered trademarks of Dr. Ing. h.c. F. Porsche AG.
This site is not affiliated with Porsche in any way. Its only purpose is to provide an online forum for car enthusiasts. All other trademarks are property of their respective owners. |
|
|

  |

| siverson |
 Sep 14 2013, 11:32 PM Sep 14 2013, 11:32 PM
Post
#181
|
|
Advanced Member  Group: Benefactors Posts: 2,458 Joined: 5-May 03 From: San Diego, CA Member No.: 654 Region Association: Southern California |
My paint gun looks something like this. I've never really been able to get good results with it.
-Steve Attached image(s) 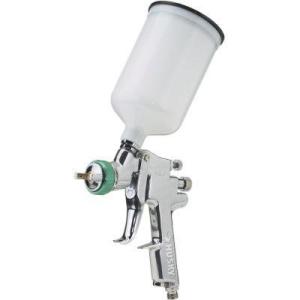
|
   |

 
|
| siverson |
Sep 14 2013, 11:34 PM
Post
#182
|
|
Advanced Member Group: Benefactors Posts: 2,458 Joined: 5-May 03 From: San Diego, CA Member No.: 654 Region Association: Southern California |
And yes I also realize this is horribly out of order (painting the engine compartment now?!?!), but I bought some new toys for the engine and it's going to look quite nice, so I'm hoping the engine compartment can step it up a notch as well.
|
|
|
|
| 74914LE |
Sep 15 2013, 09:26 PM
Post
#183
|
|
Member Group: Members Posts: 136 Joined: 6-April 04 From: Fort Worth, TX Member No.: 1,895 |
I actually did a respray on my engine compartment over the last two weekends. It is not too hard if you do your research, and take the time to prep everything correctly. First I bought a couple of books on the topic, then went to the local Auto Paint supply store and asked a lot of questions. Told them what I was looking to do, and they helped me select everything I needed. This is what I ended up doing.
1. Fixed all the rusted areas with a wire bush and rust converter. Patched any holes in the normal way with new sheet metal. 2. Sanded out all the rough spots with progressively finer sand paper until I ended up with 400 grit Wet/Dry 3. Masked and papered everything so that the overspray would not be a problem. 4. Cleaned the whole compartment with De-greaser/wax remover. 4. Went over eveything with a tack rag after I had blow it out with air. 5. Shot the compartment with Sealer/Primer. Let dry for 24 hours. 6. Sanded the primer with 400 Wet/Dry, then cleaned, and tacked as before. 7. Used Urethane Paint to shoot the compartment, using a $40 HVLP Gun I picked up at Harbor Freight. The key is to practice and get the spray correct before you start on the car. I used a large cardboard box. The Paint was a 2:1 20% mix. Paint/Hardner/Reducer. Be sure you use all the right safety set up, respirator, including goggles, as you are going to get lots overspray when painting that compartment. 8. I sprayed a tack coat, waited 15 minutes, then cover coat, 15 more minutes, then final coat. Let it cure for 24 hours. 9. The great part about Urethane Paint, is that if you have a nib or run, you can color sand it right out, and polish to get it back to a high gloss. Very impressed with the work I did on my first try. The key is to get your gun set up correctly, and to paint with proper technique. 6-8 inches from the surface, with the proper setup and pressure, and you will do a great job. IMHO, it is all about taking your time, and asking lots of questions at the paint shop. Modern Paint is much easier to deal with than the old enamels. Best of luck! |
|
|
|
| siverson |
Sep 25 2013, 11:41 PM
Post
#184
|
|
Advanced Member Group: Benefactors Posts: 2,458 Joined: 5-May 03 From: San Diego, CA Member No.: 654 Region Association: Southern California |
74914LE, thanks for the tips. I'll give that a try this weekend.
And... I think I've solved another long term problem with my car. Actually, I didn't solve it but Sean at SD Autosport had some good advice on the phone this afternoon. The background and theory: Now that I have the car on the ground, I noticed that the passenger side door gap is changing - even without the engine in the car! And it now has an outer Brad Meyeur kit AND inner Engman kit. But, to make a long story short, I installed the Brad Meyeur kit long ago (~10 years?) and when I did it, I removed the front "box" on the front end of the long to run my oil lines through. I had entirely forgot that I even did this, until I compared the left and right sides (photos below). Sean's theory, and it sounds about right to me, is that the front of the car may be flexing, not the rear, and that's causing the change in door gap. And the passenger side (where the box was removed) changes much more than the drivers side, which is barely measurable. Plus, as a test this evening I just jacked up the front passenger side of the car from the front donut just lifting the front wheel off the ground but leaving the rear on the ground. So there is still weight on the rear (and I guess even a little more weight), but the nose "drops down" (the car is flexing) and the door gap opens up. That is, if I just jack up the front, the gap opens back up and all is well. So, what does 914world think? Does this sound about right? Am I my own DPO for removing that box? (yes) Now to figure out how to fix this... -Steve |
|
|
|
| siverson |
Sep 25 2013, 11:42 PM
Post
#185
|
|
Advanced Member Group: Benefactors Posts: 2,458 Joined: 5-May 03 From: San Diego, CA Member No.: 654 Region Association: Southern California |
Passenger side with box removed:
Attached thumbnail(s) 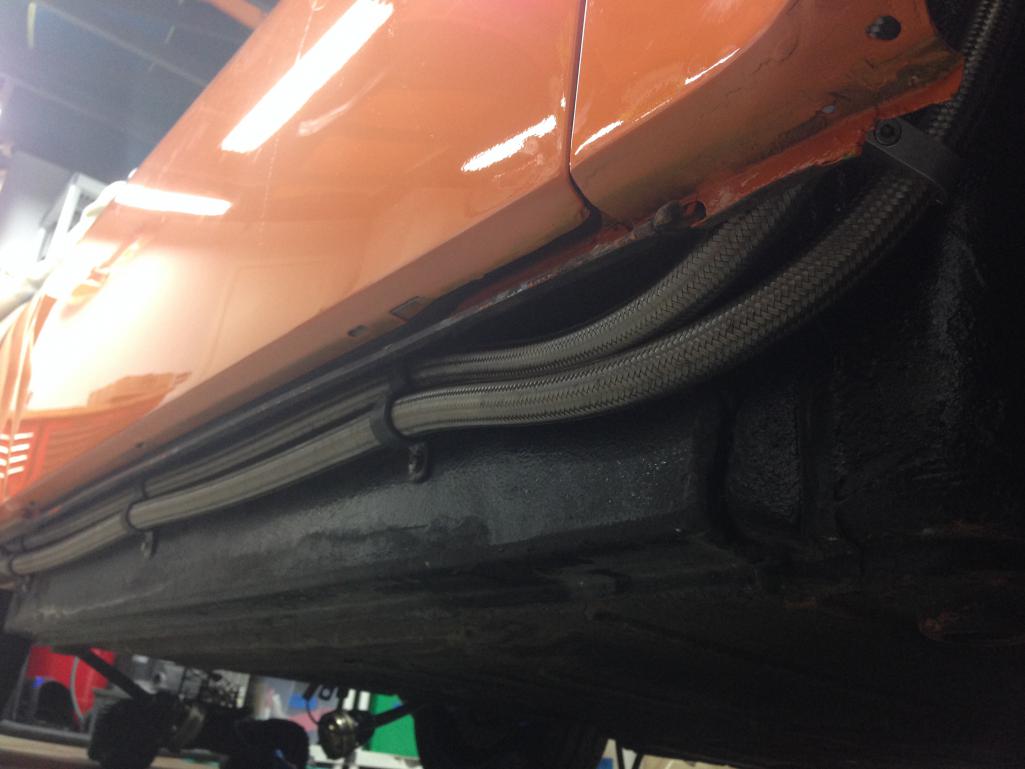
|
|
|
|
| siverson |
Sep 25 2013, 11:44 PM
Post
#186
|
|
Advanced Member Group: Benefactors Posts: 2,458 Joined: 5-May 03 From: San Diego, CA Member No.: 654 Region Association: Southern California |
Drivers side with box still there (Brad Meyeur kit cut short, as I think it supposed to be done):
Attached thumbnail(s) 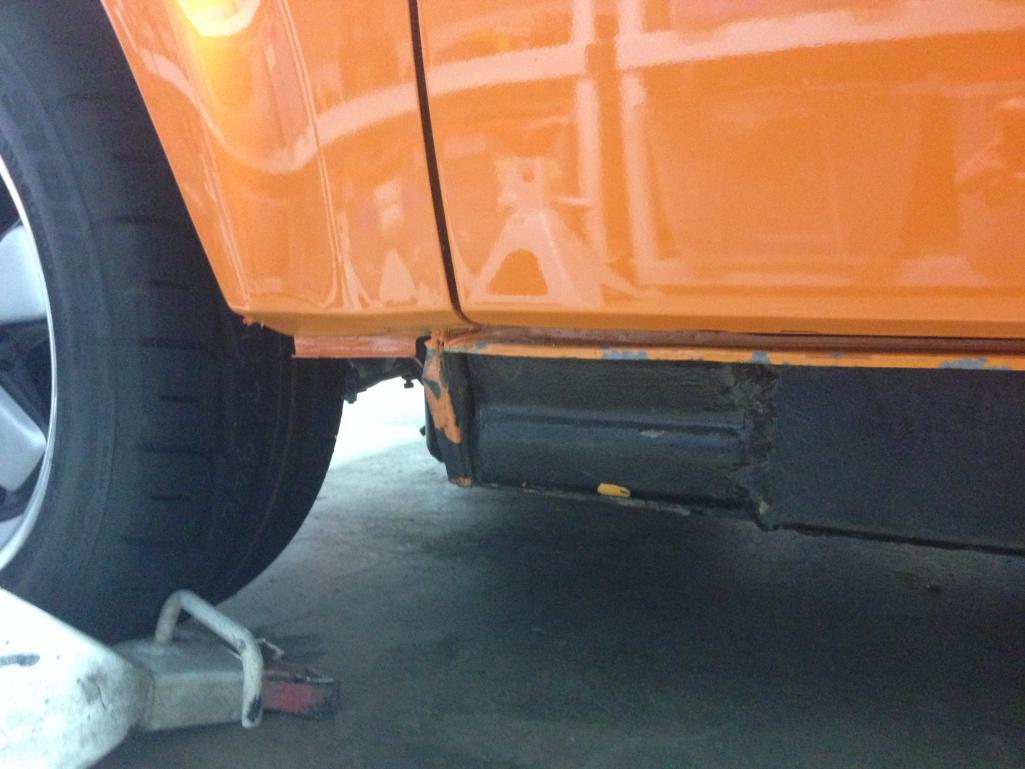
|
|
|
|
| siverson |
Sep 28 2013, 07:51 PM
Post
#187
|
|
Advanced Member Group: Benefactors Posts: 2,458 Joined: 5-May 03 From: San Diego, CA Member No.: 654 Region Association: Southern California |
Bump... Is it a bad idea to remove that front "box"?
-Steve |
|
|
|
| rick 918-S |
Sep 28 2013, 09:08 PM
Post
#188
|
|
Hey nice rack! -Celette Group: Members Posts: 20,925 Joined: 30-December 02 From: Now in Superior WI Member No.: 43 Region Association: Northstar Region |
Torque box. Helps prevent cowl shake or flex. Early Mustang convertibles had a floor stiffener welded in the foot well. If you have the Engman kit and it extends to the location of the dead peddle I would think you could run a 14 ga. plate on the back side of the "A" pillar where the speaker is located from the door to the inner wheel house. This will make a vertical "L" shape from your Engman kit and support the cowl.
Let me see if I can diagram what I'm referring to. EDIT: Hope this works. 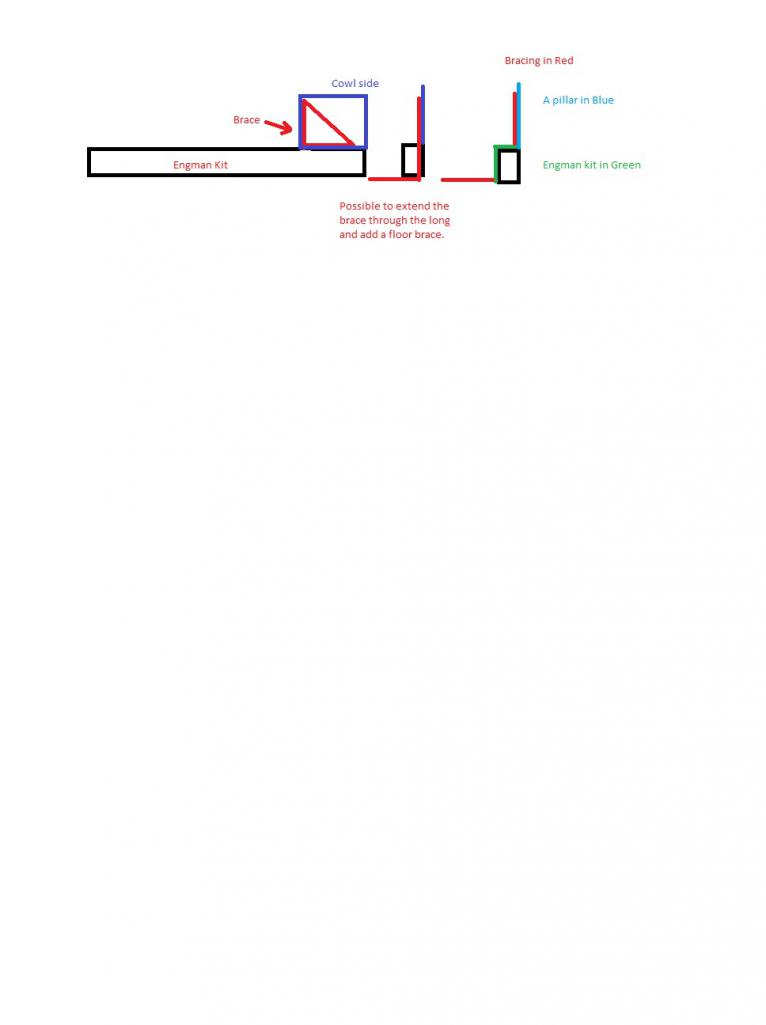 My sketch is crude but the idea is to transfer the weak cowl section into the stiffener to carry the rear stiffness through the cowl. Short of cage with NASCAR door braces This could be a solution. |
|
|
|
| siverson |
Sep 30 2013, 11:24 AM
Post
#189
|
|
Advanced Member Group: Benefactors Posts: 2,458 Joined: 5-May 03 From: San Diego, CA Member No.: 654 Region Association: Southern California |
Thanks for the idea Rick. I'll give that some thought...
-Steve Attached thumbnail(s) 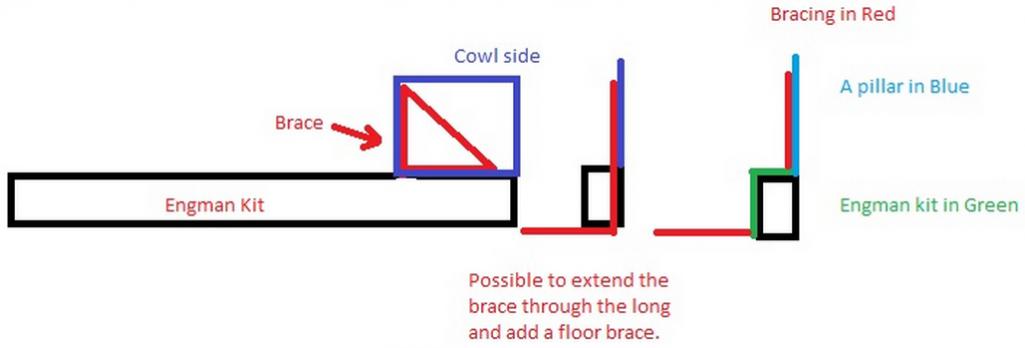
|
|
|
|
| ChrisFoley |
Sep 30 2013, 11:38 AM
Post
#190
|
|
I am Tangerine Racing Group: Members Posts: 7,981 Joined: 29-January 03 From: Bolton, CT Member No.: 209 Region Association: None |
I wouldn't have expected to see that much movement from removing the outer section at the base of the a-pillar but your explanation and observations seem to bear it out.
Most times I've seen oil lines in that area the box was simply cut open at the front and rear for the lines to go through. |
|
|
|
| siverson |
Nov 27 2013, 01:43 AM
Post
#191
|
|
Advanced Member Group: Benefactors Posts: 2,458 Joined: 5-May 03 From: San Diego, CA Member No.: 654 Region Association: Southern California |
> simply cut open at the front and rear for the lines to go through
Yeah, that's what I'll do *next time*. I think the accident and straightening exacerbated the problem though. -Steve |
|
|
|
| siverson |
Nov 27 2013, 01:48 AM
Post
#192
|
|
Advanced Member Group: Benefactors Posts: 2,458 Joined: 5-May 03 From: San Diego, CA Member No.: 654 Region Association: Southern California |
What's taking me so long on this project? Besides having a busy job and two little kids, I've also been adding to it with projects like this. I'm switching over from the factory motronic to ITBs/Pectel.
After I polished and cad plated the intake horns, they were too pretty to cover up so I made a lexan cover for the air filters. The air filter base is just powder coated. Next is to make a small trim to cover up the ugly glue/gasket I used to attach the lexan. A bit blingy, but oh well, I've always loved the look and sound of ITBs. -Steve Attached thumbnail(s) 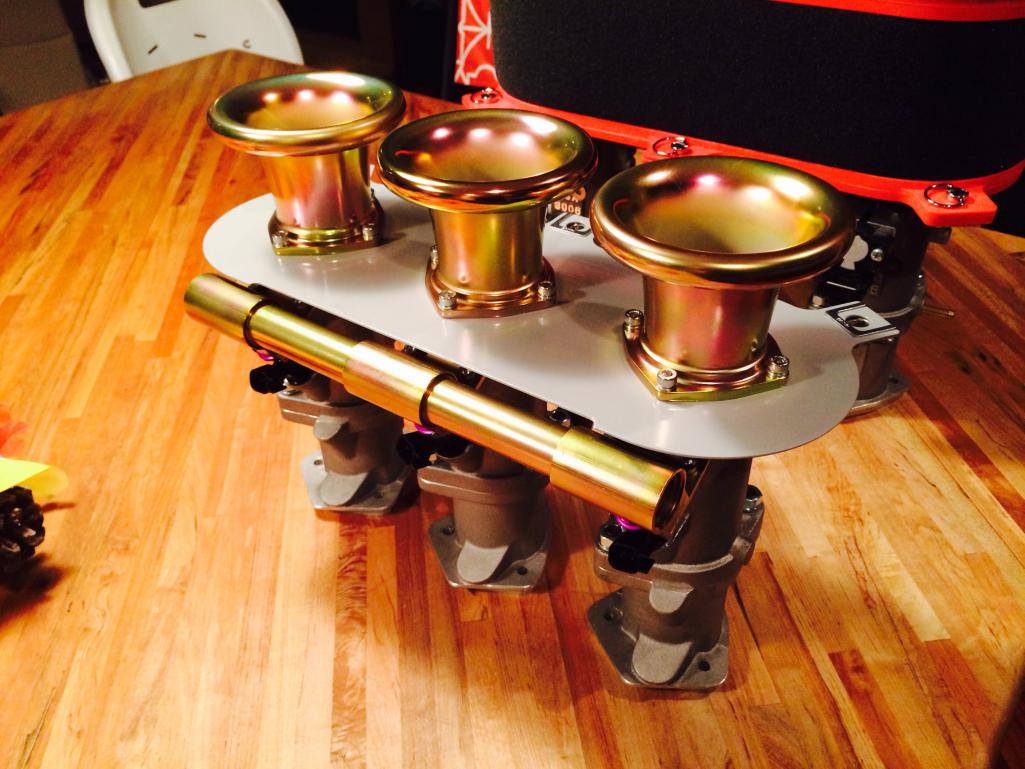 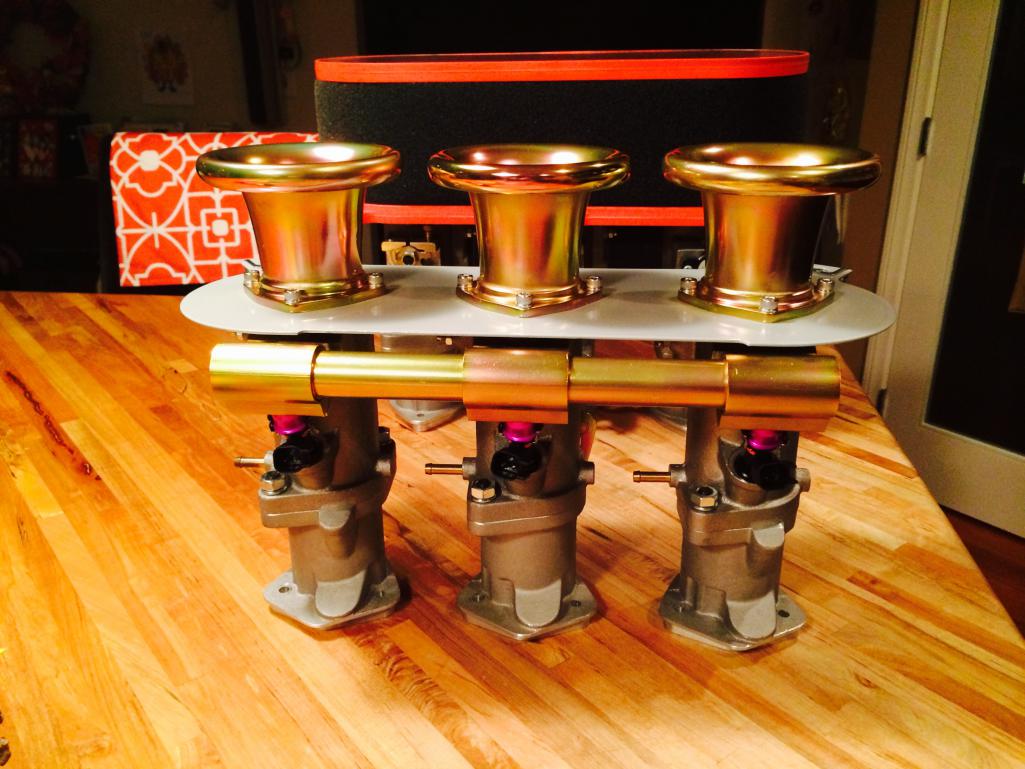
|
|
|
|
| siverson |
Nov 27 2013, 01:48 AM
Post
#193
|
|
Advanced Member Group: Benefactors Posts: 2,458 Joined: 5-May 03 From: San Diego, CA Member No.: 654 Region Association: Southern California |
From the top.
Attached thumbnail(s) 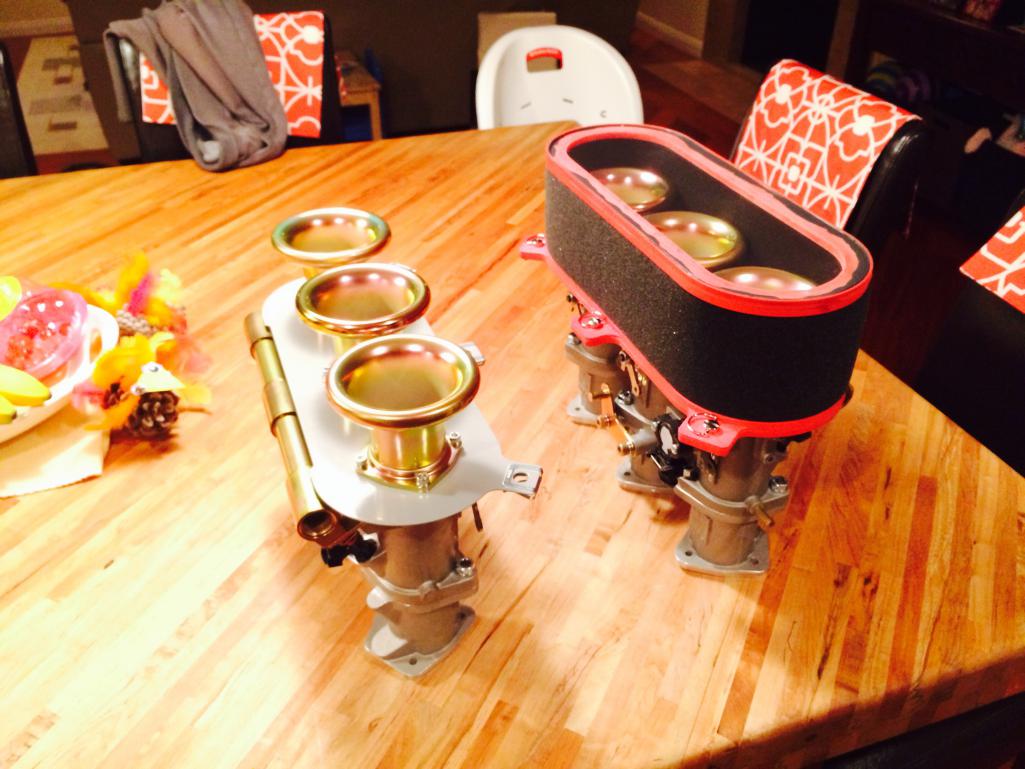
|
|
|
|
| bulitt |
Nov 27 2013, 05:23 AM
Post
#194
|
|
Achtzylinder Group: Members Posts: 4,189 Joined: 2-October 11 Member No.: 13,632 Region Association: South East States |
Nice! I would paint a black edge around that lexan. Might be easier than an edging.
|
|
|
|
| siverson |
Dec 9 2013, 11:43 PM
Post
#195
|
|
Advanced Member Group: Benefactors Posts: 2,458 Joined: 5-May 03 From: San Diego, CA Member No.: 654 Region Association: Southern California |
> Most times I've seen oil lines in that area the box was simply cut open at the front and rear for the lines to go through.
Yup - that's what I'll do next time! > Torque box. Helps prevent cowl shake or flex. Rick, yes, I think this is in general what I'm up against. Sean thinks it may be something around the inner front fender/gas tank area (as I understood how he described it), but he hasn't seen it yet. Having said that, short of shipping my car to Rick ( (IMG:style_emoticons/default/smile.gif) ), anyone have other suggestions on who might be able to fix this in Southern California (stiffen up my car)? Sean likely can do it, but he has been quite busy and unavailable lately. I called a couple well known mechanics, but this is too far down the body work/chassis work for their comfort level. |
|
|
|
| siverson |
Dec 11 2013, 12:54 AM
Post
#196
|
|
Advanced Member Group: Benefactors Posts: 2,458 Joined: 5-May 03 From: San Diego, CA Member No.: 654 Region Association: Southern California |
Anyone? Recommended chassis / roll cage shops in Southern California?
-Steve |
|
|
|
| 0396 |
Dec 11 2013, 09:55 AM
Post
#197
|
|
Advanced Member Group: Members Posts: 2,046 Joined: 13-October 03 From: L.A. Calif Member No.: 1,245 Region Association: Southern California |
QUOTE(siverson @ Nov 26 2013, 11:48 PM)  What's taking me so long on this project? Besides having a busy job and two little kids, I've also been adding to it with projects like this. I'm switching over from the factory motronic to ITBs/Pectel. After I polished and cad plated the intake horns, they were too pretty to cover up so I made a lexan cover for the air filters. The air filter base is just powder coated. Next is to make a small trim to cover up the ugly glue/gasket I used to attach the lexan. A bit blingy, but oh well, I've always loved the look and sound of ITBs. -Steve Congrats on your progress.. ITBs, verrrry nice, who makes them? |
|
|
|
| 0396 |
Dec 18 2013, 02:50 PM
Post
#198
|
|
Advanced Member Group: Members Posts: 2,046 Joined: 13-October 03 From: L.A. Calif Member No.: 1,245 Region Association: Southern California |
Bump for response on ITB. -(IMG:style_emoticons/default/smile.gif)
|
|
|
|
| siverson |
Dec 19 2013, 06:01 PM
Post
#199
|
|
Advanced Member Group: Benefactors Posts: 2,458 Joined: 5-May 03 From: San Diego, CA Member No.: 654 Region Association: Southern California |
ITBs are TMW 3006, and I'll be using a Pectel SQ6 ECU.
UPDATE: Decided to use Vi-PEC i88 instead. -Steve |
|
|
|
| 0396 |
Dec 19 2013, 08:14 PM
Post
#200
|
|
Advanced Member Group: Members Posts: 2,046 Joined: 13-October 03 From: L.A. Calif Member No.: 1,245 Region Association: Southern California |
QUOTE(siverson @ Dec 19 2013, 04:01 PM) ITBs are TMW 3006, and I'll be using a Pectel SQ6 ECU. Thanks for the info..they look pretty! Hope to see your car on the road in spring of 2014. |
|
|
|
|
1 User(s) are reading this topic (1 Guests and 0 Anonymous Users)
0 Members:

|
Lo-Fi Version | Time is now: 19th April 2025 - 12:27 PM |
Invision Power Board
v9.1.4 © 2025 IPS, Inc.