|
|
|
Porsche, and the Porsche crest are registered trademarks of Dr. Ing. h.c. F. Porsche AG.
This site is not affiliated with Porsche in any way. Its only purpose is to provide an online forum for car enthusiasts. All other trademarks are property of their respective owners. |
|
|

  |

| Valy |
 Sep 3 2011, 01:38 AM Sep 3 2011, 01:38 AM
Post
#1
|
|
Senior Member  Group: Members Posts: 1,677 Joined: 6-April 10 From: Sunnyvale, CA Member No.: 11,573 Region Association: Northern California |
I got a spare engine with my car. The engine looks nice but the PO drained the oil out and left the sump open. Then he wrapped it in plastic wrap and dropped the engine on the left head so it has a nice crack.
Got myself a new pair of heads that are rebuilt right now. It's going to be a big L-Jet as I don't have the patience to deal with the old D-Jet (although I have all the parts for a D-Jet). I I'm going to make it a 2056cc unless in change my mind and go crazy with a bigger crank (IMG:style_emoticons/default/idea.gif) I started taking the engine apart and going to document as much as I can. Not my first rebuild but is my first Type4 rebuild so wish me luck! Today I got pistons 3 & 4 out. #3 looks nice, not too much signs of wear. The ring gaps are about 1mm (trash) #4 is also nice but the piston got a small bent while trying to remove the pin. That bent trapped the oil ring. Never mind, I'm going for bigger one anyway. The cylinder registers are nice. In fact, the entire case is very nice and clean. Anyone knows the meaning of the inscriptions on the cylinders and pistons? 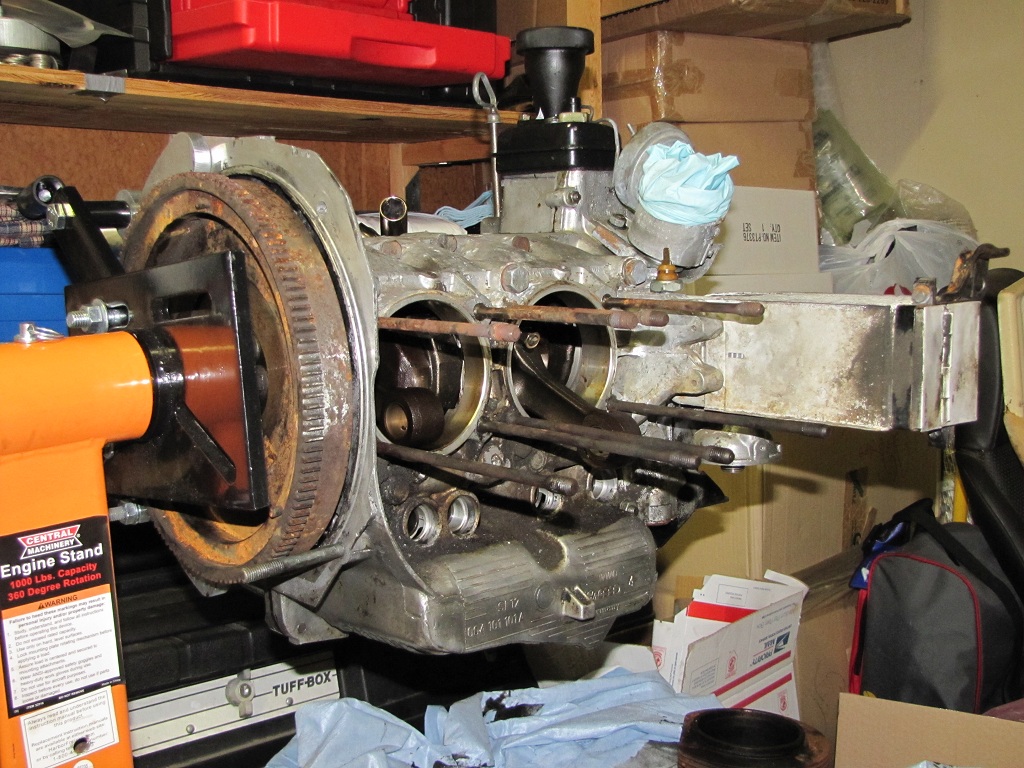 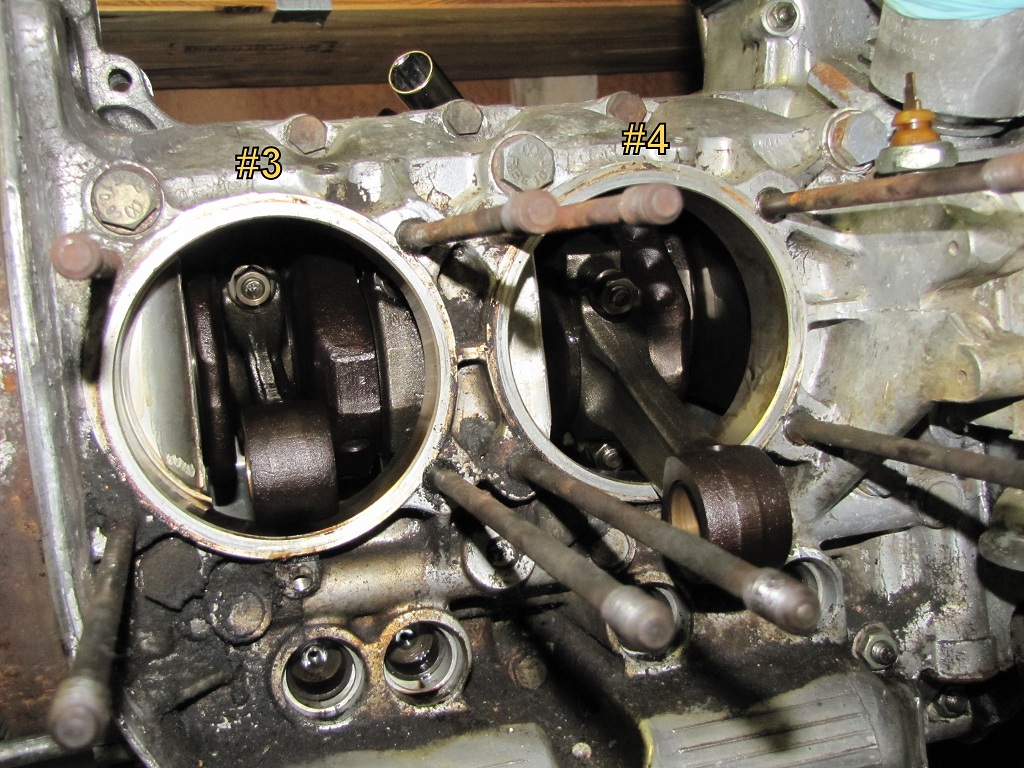 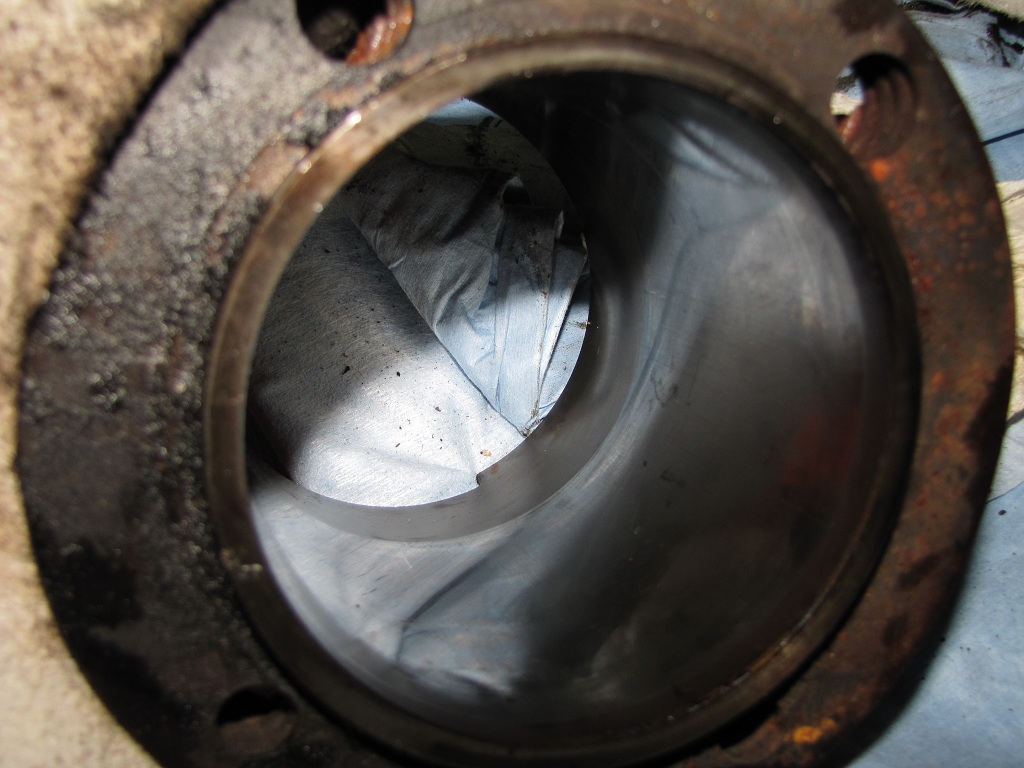 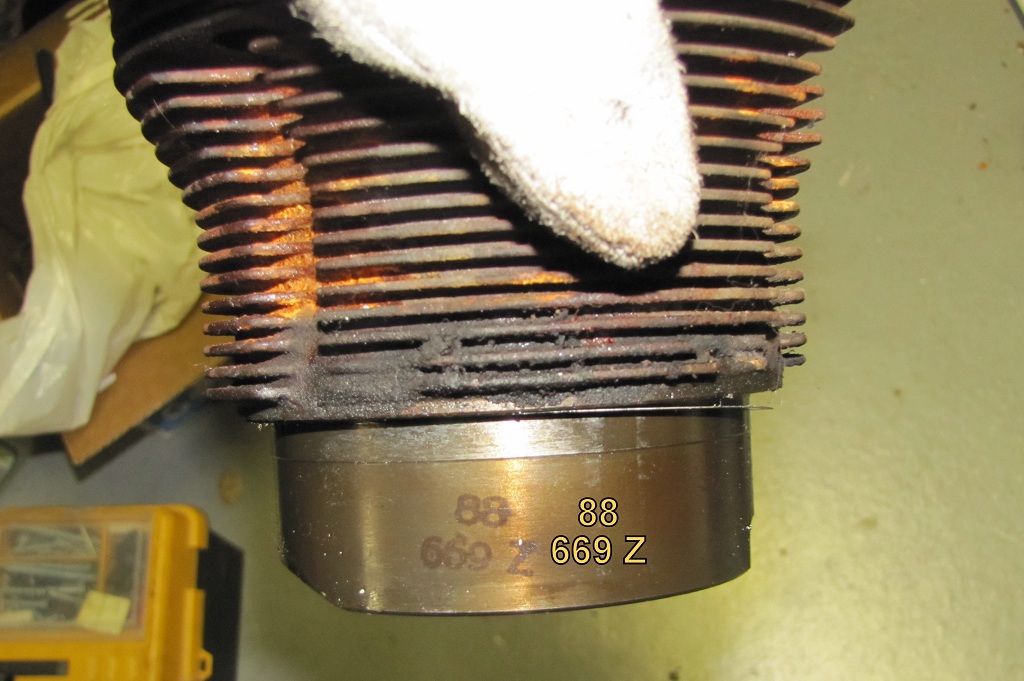 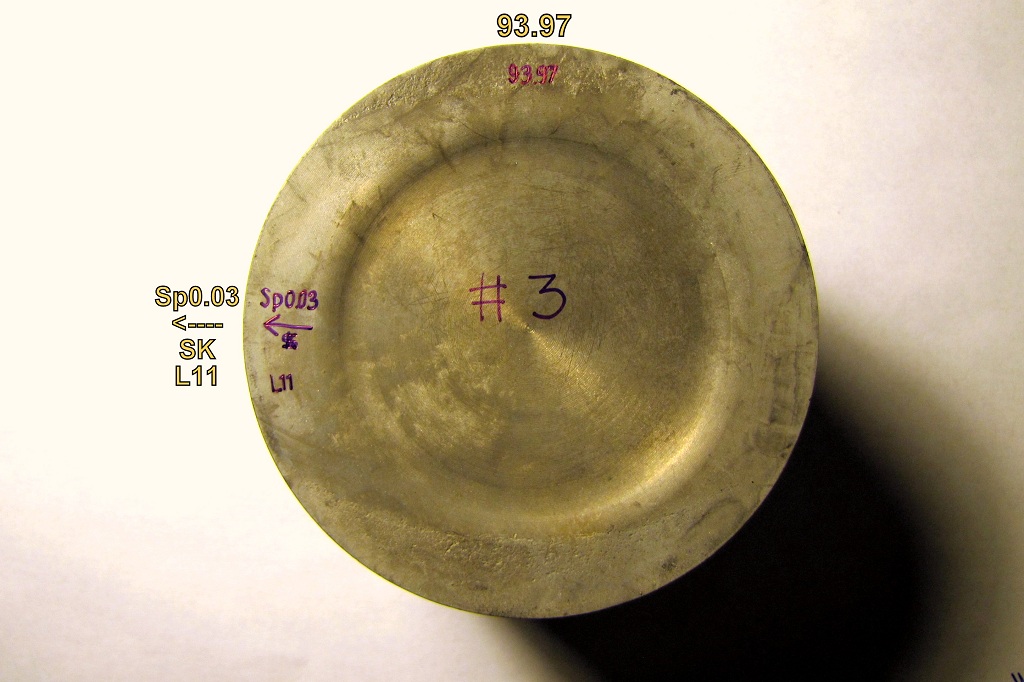 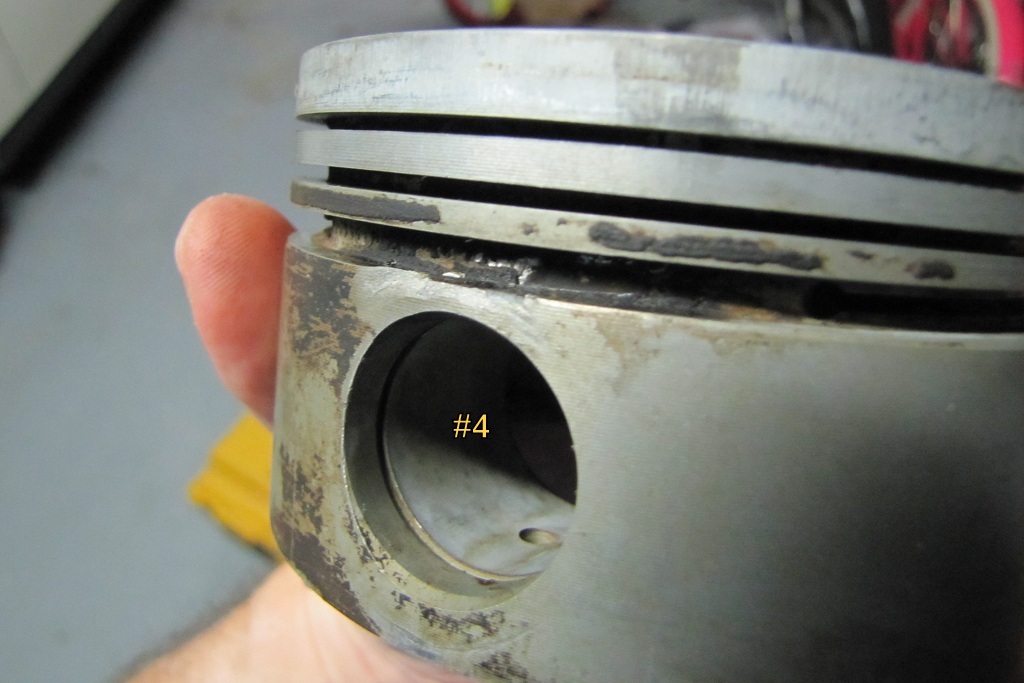 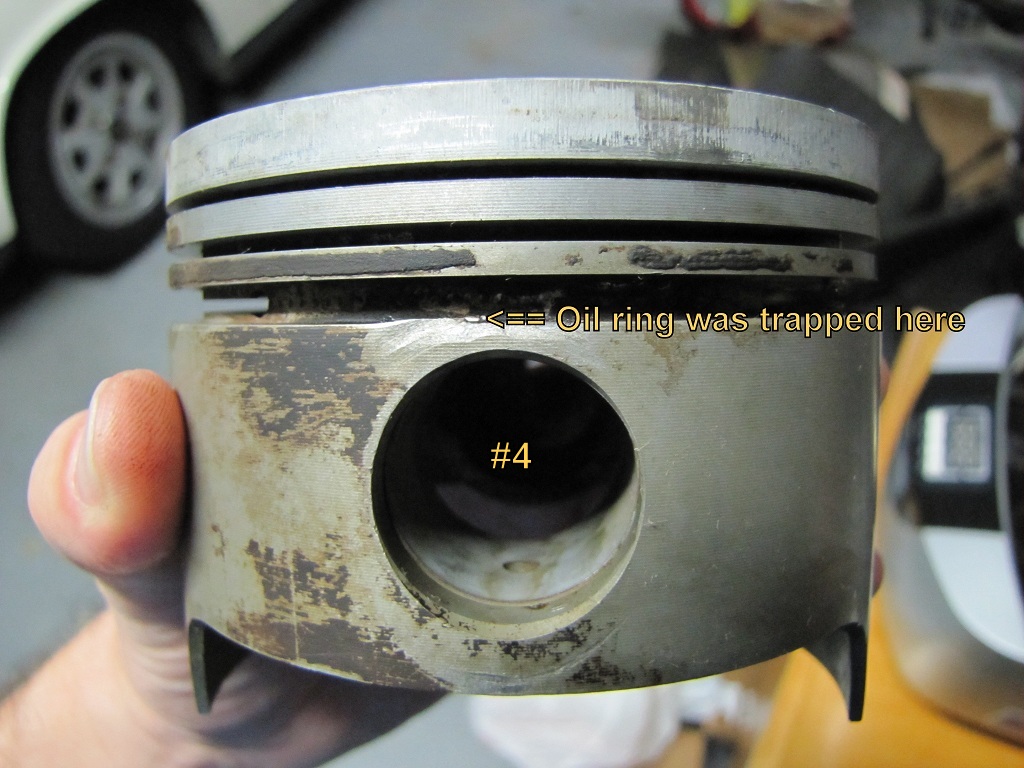 |
   |

 
|
| dlee6204 |
Sep 3 2011, 06:29 AM
Post
#2
|
|
Howdy Group: Members Posts: 2,162 Joined: 30-April 06 From: Burnsville, NC Member No.: 5,956 |
|
|
|
|
| Valy |
Sep 4 2011, 07:47 PM
Post
#3
|
|
Senior Member Group: Members Posts: 1,677 Joined: 6-April 10 From: Sunnyvale, CA Member No.: 11,573 Region Association: Northern California |
More work today and more surprises.
Took off cylinders #1 and #2. The heads are full of deposits, I would say 2 or 3 times more deposits than on the other head. I also found that the #2 exhaust pushrod has some unusual wear. It is 11.88mm instead of 12mm. I couldn't find anything that could contact the pushrod in that area. I didn't notice the wear when the pushrod came out so I don't know if it's on the head or cam side. Anyone has any idea what causes this? 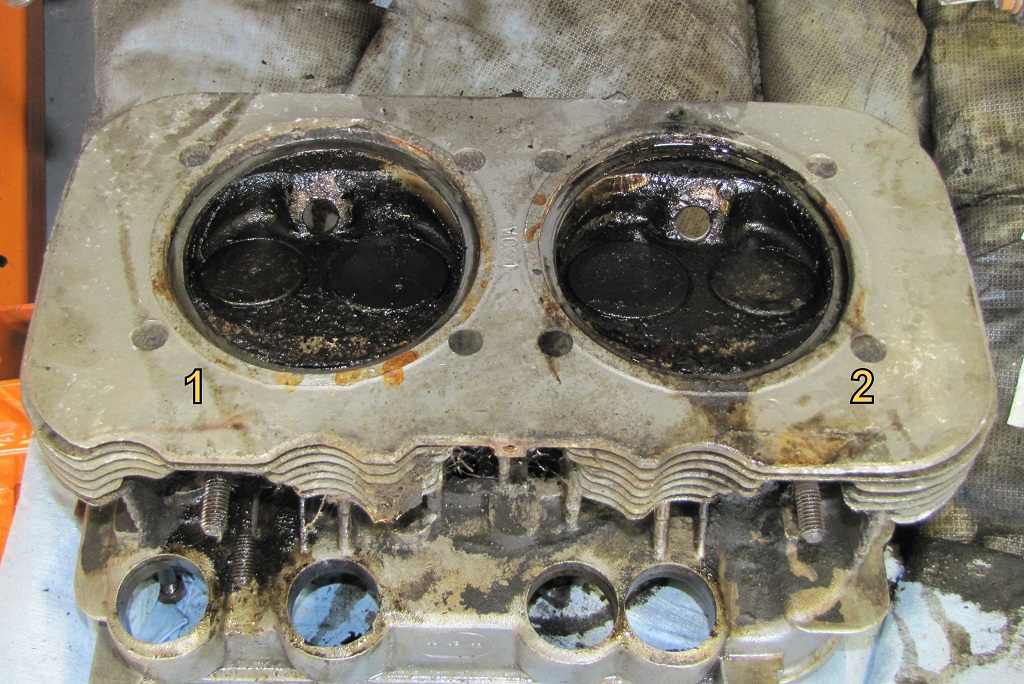 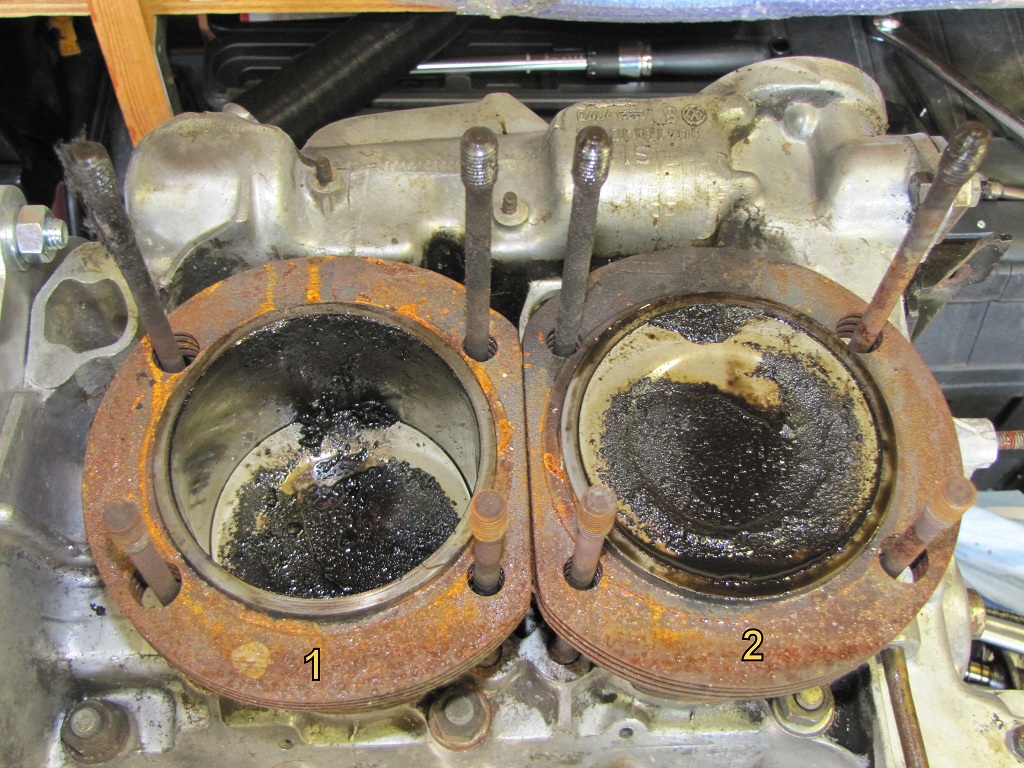 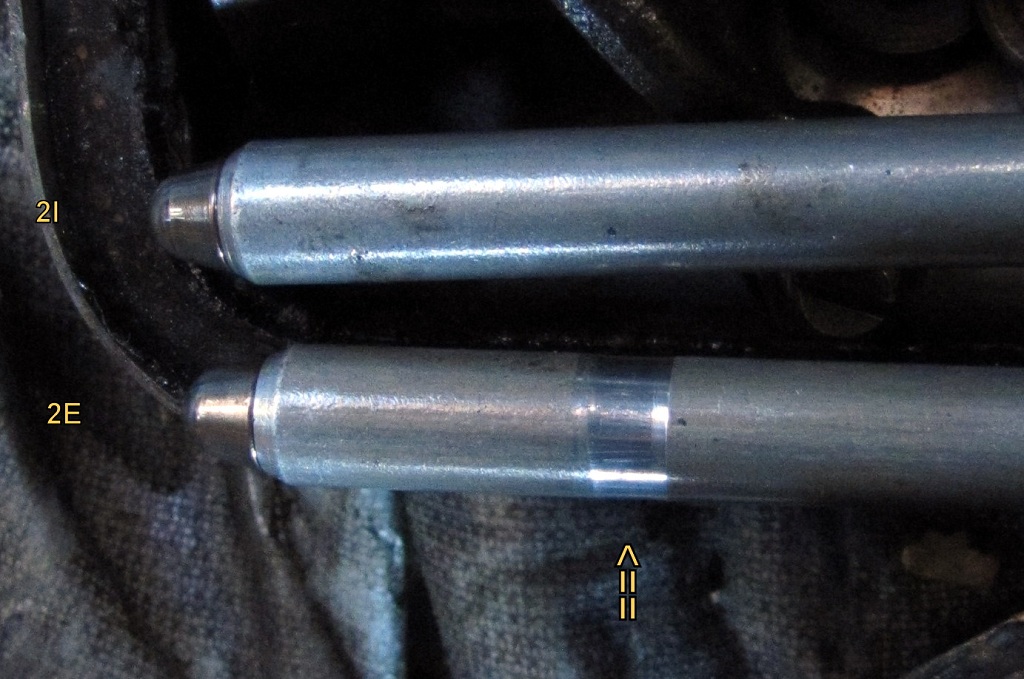 |
|
|
|
| Dave_Darling |
Sep 4 2011, 07:54 PM
Post
#4
|
|
914 Idiot Group: Members Posts: 15,146 Joined: 9-January 03 From: Silicon Valley / Kailua-Kona Member No.: 121 Region Association: Northern California |
Piston writing: 93.97 == diameter in mm. That's what fits correctly in the 94mm cylinders. The arrow points toward the flywheel, I think. Not sure about the rest of the writing, but it looks like a stock piston.
Pushrod wear: Someone didn't get the tube retaining wire in place on that cylinder. The hard steel wire rubbed on the soft aluminum, producing the wear you see there. We have seen pushrods notched from this sort of thing. --DD |
|
|
|
| bcheney |
Sep 4 2011, 09:20 PM
Post
#5
|
|
Senior Member Group: Members Posts: 1,341 Joined: 16-November 03 From: Orlando, FL Member No.: 1,348 Region Association: South East States |
QUOTE(Dave_Darling @ Sep 4 2011, 06:54 PM)  Piston writing: 93.97 == diameter in mm. That's what fits correctly in the 94mm cylinders. The arrow points toward the flywheel, I think. Not sure about the rest of the writing, but it looks like a stock piston. Pushrod wear: Someone didn't get the tube retaining wire in place on that cylinder. The hard steel wire rubbed on the soft aluminum, producing the wear you see there. We have seen pushrods notched from this sort of thing. --DD |
|
|
|
| Valy |
Sep 4 2011, 09:31 PM
Post
#6
|
|
Senior Member Group: Members Posts: 1,677 Joined: 6-April 10 From: Sunnyvale, CA Member No.: 11,573 Region Association: Northern California |
QUOTE(Dave_Darling @ Sep 4 2011, 06:54 PM) Piston writing: 93.97 == diameter in mm. That's what fits correctly in the 94mm cylinders. The arrow points toward the flywheel, I think. Not sure about the rest of the writing, but it looks like a stock piston. Pushrod wear: Someone didn't get the tube retaining wire in place on that cylinder. The hard steel wire rubbed on the soft aluminum, producing the wear you see there. We have seen pushrods notched from this sort of thing. --DD I guess I can reuse that pushrod, correct? It's only 0.06mm off the sidewall. |
|
|
|
| bcheney |
Sep 4 2011, 09:38 PM
Post
#7
|
|
Senior Member Group: Members Posts: 1,341 Joined: 16-November 03 From: Orlando, FL Member No.: 1,348 Region Association: South East States |
Well...I'm not an expert on component wear...but, would think you could. However, used or new pushrods can be found so why not just get a replacement?
|
|
|
|
| VaccaRabite |
Sep 5 2011, 07:19 AM
Post
#8
|
|
En Garde! Group: Admin Posts: 13,717 Joined: 15-December 03 From: Dallastown, PA Member No.: 1,435 Region Association: MidAtlantic Region |
Assuming you are going to put a non stock cam in the 2056 you will want to do fresh geometry. Cut to length steel pushrods are not expensive and allow you to get perfect cam and rocker geometry. They also allow you to run at 0 lash which makes for easier valve adjustments.
|
|
|
|
| Jake Raby |
Sep 5 2011, 08:44 AM
Post
#9
|
|
Engine Surgeon Group: Members Posts: 9,398 Joined: 31-August 03 From: Lost Member No.: 1,095 Region Association: South East States |
Yep, retention wire wear..
But if you do this job completely you'll not be using those anyway, so send them to the recycler and don't worry about it. No les than 11 variables impact proper valve train geometry, with any rebuild you'll experience at least 4 of these things and all it takes is one to demand a different length pushrod than factory. |
|
|
|
| Valy |
Sep 5 2011, 10:22 AM
Post
#10
|
|
Senior Member Group: Members Posts: 1,677 Joined: 6-April 10 From: Sunnyvale, CA Member No.: 11,573 Region Association: Northern California |
Oil pump doesn't want to come off. I took the 4 nuts off and the pump is still stacked in. (IMG:style_emoticons/default/headbang.gif)
Am I missing something? Is there anything else that holds it? (IMG:style_emoticons/default/confused24.gif) Can I use the side tabs to pull it hard? I'm afraid to leverage on the case, not to brake it. 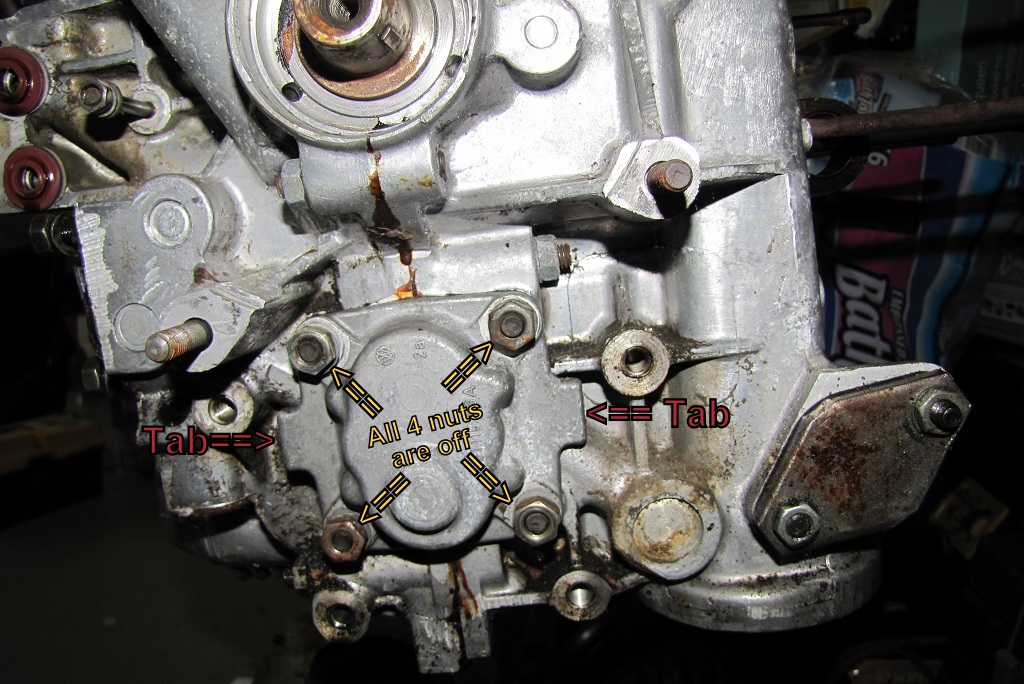 |
|
|
|
| McMark |
Sep 5 2011, 10:27 AM
Post
#11
|
|
914 Freak! Group: Retired Admin Posts: 20,179 Joined: 13-March 03 From: Grand Rapids, MI Member No.: 419 Region Association: None |
Yup, use the tabs and pry it off. I'm sure someone out there has damaged a case doing that, but use your head and pry carefully and you'll be fine.
You know you gots a bus case there? Not that it matters much, but that blocked off passage just above the taco plate is where the bus dipstick and oil filler tube go. |
|
|
|
| Valy |
Sep 5 2011, 11:00 AM
Post
#12
|
|
Senior Member Group: Members Posts: 1,677 Joined: 6-April 10 From: Sunnyvale, CA Member No.: 11,573 Region Association: Northern California |
QUOTE(McMark @ Sep 5 2011, 09:27 AM) Yup, use the tabs and pry it off. I'm sure someone out there has damaged a case doing that, but use your head and pry carefully and you'll be fine. You know you gots a bus case there? Not that it matters much, but that blocked off passage just above the taco plate is where the bus dipstick and oil filler tube go. The case is a generic Type4 one. It has a strange SN on it and looks like it's a replacement case. Otherwise the case looks nice and clean without too much wear. I don't see any problem with it being specked initially for a bus. Here is a picture of the SN. (IMG:http://www.914world.com/bbs2/uploads/post-11573-1314680829.jpg) |
|
|
|
| r_towle |
Sep 5 2011, 11:08 AM
Post
#13
|
|
Custom Member Group: Members Posts: 24,705 Joined: 9-January 03 From: Taxachusetts Member No.: 124 Region Association: North East States |
Pry it off, be careful.
Its held in tight, and there may even be some adhesive in there to stop it from leaking...so wiggle back and forth, eventually it will give up. Rich |
|
|
|
| JFJ914 |
Sep 5 2011, 01:08 PM
Post
#14
|
|
Senior Member Group: Benefactors Posts: 813 Joined: 13-June 03 From: Alpharetta, GA Member No.: 814 Region Association: South East States |
Loosen some of those case nuts that surround it. Use the pry tabs, thats why they're there. You can also wait until you have all the case bolts loose and you're ready to split the case. Nothing sez it has to come out now.
|
|
|
|
| VaccaRabite |
Sep 5 2011, 01:42 PM
Post
#15
|
|
En Garde! Group: Admin Posts: 13,717 Joined: 15-December 03 From: Dallastown, PA Member No.: 1,435 Region Association: MidAtlantic Region |
QUOTE(Valy @ Sep 5 2011, 12:00 PM) QUOTE(McMark @ Sep 5 2011, 09:27 AM) Yup, use the tabs and pry it off. I'm sure someone out there has damaged a case doing that, but use your head and pry carefully and you'll be fine. You know you gots a bus case there? Not that it matters much, but that blocked off passage just above the taco plate is where the bus dipstick and oil filler tube go. The case is a generic Type4 one. It has a strange SN on it and looks like it's a replacement case. Otherwise the case looks nice and clean without too much wear. I don't see any problem with it being specked initially for a bus. Here is a picture of the SN. Speced for a bus is 100% fine. Mark is correct about the oil temp sensor location. The 914 unit will not fit. The modern 2 1/16 sender will fit, but you have to use the modern gauge. Zach |
|
|
|
| Jake Raby |
Sep 5 2011, 01:43 PM
Post
#16
|
|
Engine Surgeon Group: Members Posts: 9,398 Joined: 31-August 03 From: Lost Member No.: 1,095 Region Association: South East States |
Worst case pull two of the studs on one case half and split the case with it in place.
|
|
|
|
| Cap'n Krusty |
Sep 5 2011, 01:55 PM
Post
#17
|
|
Cap'n Krusty Group: Members Posts: 10,794 Joined: 24-June 04 From: Santa Maria, CA Member No.: 2,246 Region Association: Central California |
QUOTE(Vacca Rabite @ Sep 5 2011, 12:42 PM) QUOTE(Valy @ Sep 5 2011, 12:00 PM) QUOTE(McMark @ Sep 5 2011, 09:27 AM) Yup, use the tabs and pry it off. I'm sure someone out there has damaged a case doing that, but use your head and pry carefully and you'll be fine. You know you gots a bus case there? Not that it matters much, but that blocked off passage just above the taco plate is where the bus dipstick and oil filler tube go. The case is a generic Type4 one. It has a strange SN on it and looks like it's a replacement case. Otherwise the case looks nice and clean without too much wear. I don't see any problem with it being specked initially for a bus. Here is a picture of the SN. Speced for a bus is 100% fine. Mark is correct about the oil temp sensor location. The 914 unit will not fit. The modern 2 1/16 sender will fit, but you have to use the modern gauge. Zach I don't see any comments about temperature sensor location in any post other than yours. The type of case has NOTHING to do with oil temp sensor fitment, and the stock one will fit fine. Second time I've seen this misguided notion in the last few days ................ The Cap'n |
|
|
|
| Valy |
Sep 5 2011, 03:19 PM
Post
#18
|
|
Senior Member Group: Members Posts: 1,677 Joined: 6-April 10 From: Sunnyvale, CA Member No.: 11,573 Region Association: Northern California |
Just to make thing clear:
The engine is a 914 2.0L. It may have a replacement case but the heads, dipstick and temp sensors are in there expected location. The dipstick comes out near the breather. If I could just take off that oil pump... BTW, should I bother changing it to a higher volume one? any advantage in a 2056cc? EDIT: I was high on something when I wrote the line on the carb fuel pump. |
|
|
|
| Valy |
Sep 5 2011, 04:22 PM
Post
#19
|
|
Senior Member Group: Members Posts: 1,677 Joined: 6-April 10 From: Sunnyvale, CA Member No.: 11,573 Region Association: Northern California |
Oil pump is out (IMG:style_emoticons/default/piratenanner.gif)
It has some wear on the driving tooth. Normal width is 9.5mm and the worst wear is at 9.0mm on one side and 9.2mm on the other. Do I need to split the oil pump? It seems the nuts have some sort of lock on them. Would I need new nuts? Are those available? I think I'm ready to split the case now. (IMG:style_emoticons/default/smash.gif) 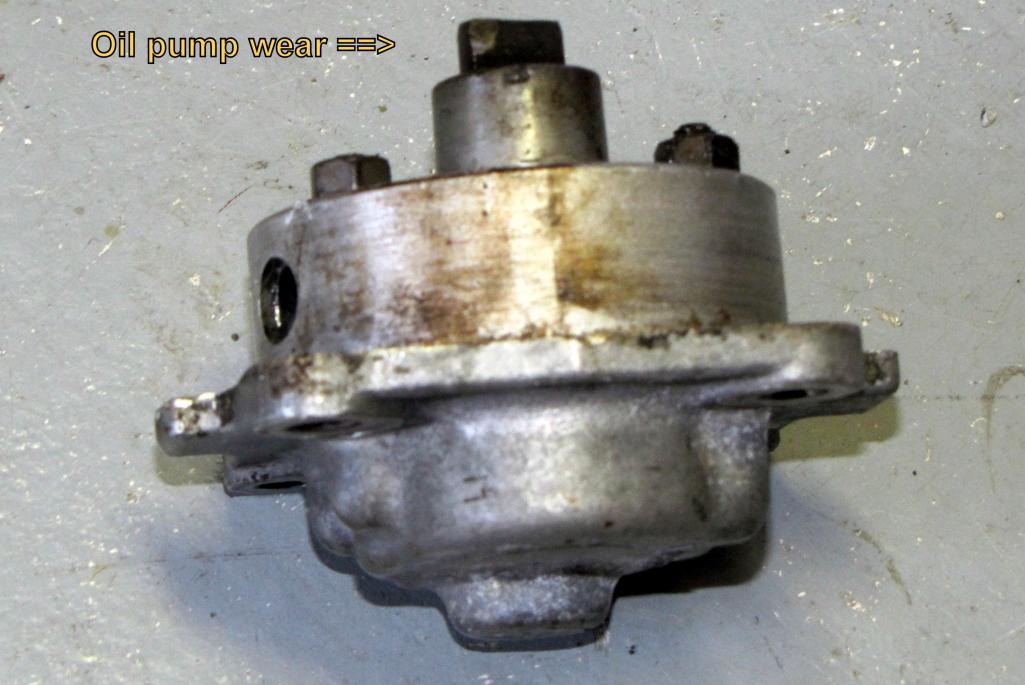 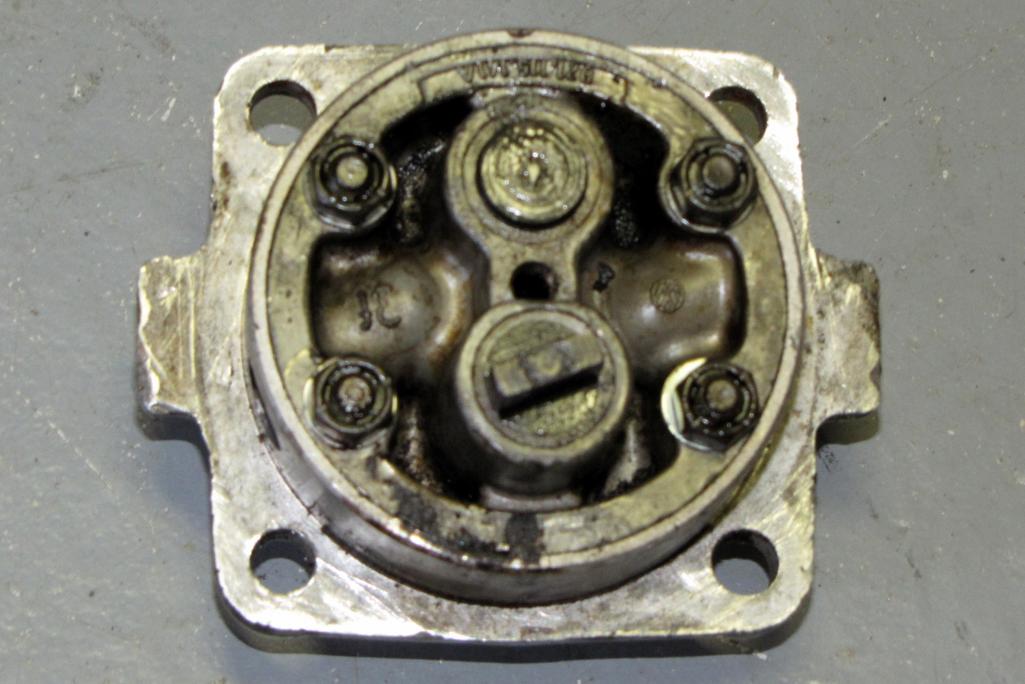 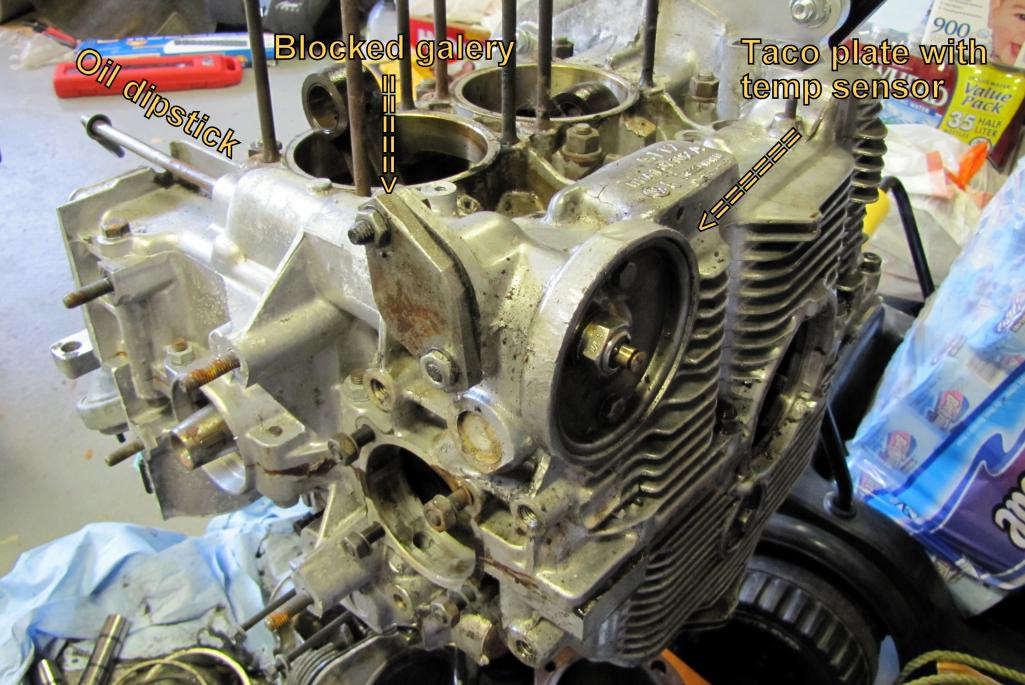 |
|
|
|
| Jake Raby |
Sep 5 2011, 04:30 PM
Post
#20
|
|
Engine Surgeon Group: Members Posts: 9,398 Joined: 31-August 03 From: Lost Member No.: 1,095 Region Association: South East States |
The lowermost pic of the oil pump shows a failing pump.. See that idler gear shaft?? Its become loosened in the body and is waiting to contact the camshaft. This is a common problem with stock pumps and the reason why I haven't used one in over 15 years. Once you lose an engine to that occurrence; you learn the lesson really quick.
|
|
|
|
|
1 User(s) are reading this topic (1 Guests and 0 Anonymous Users)
0 Members:

|
Lo-Fi Version | Time is now: 19th April 2025 - 02:18 AM |
Invision Power Board
v9.1.4 © 2025 IPS, Inc.