|
|

|
Porsche, and the Porsche crest are registered trademarks of Dr. Ing. h.c. F. Porsche AG.
This site is not affiliated with Porsche in any way. Its only purpose is to provide an online forum for car enthusiasts. All other trademarks are property of their respective owners. |
|
|
  |
| dangrouche |
 Jul 5 2018, 12:25 AM Jul 5 2018, 12:25 AM
Post
#10741
|
|
dangrouche    Group: Members Posts: 550 Joined: 1-May 04 From: San Francisco Bay Area Member No.: 2,012 Region Association: None |
another pic
Attached thumbnail(s) 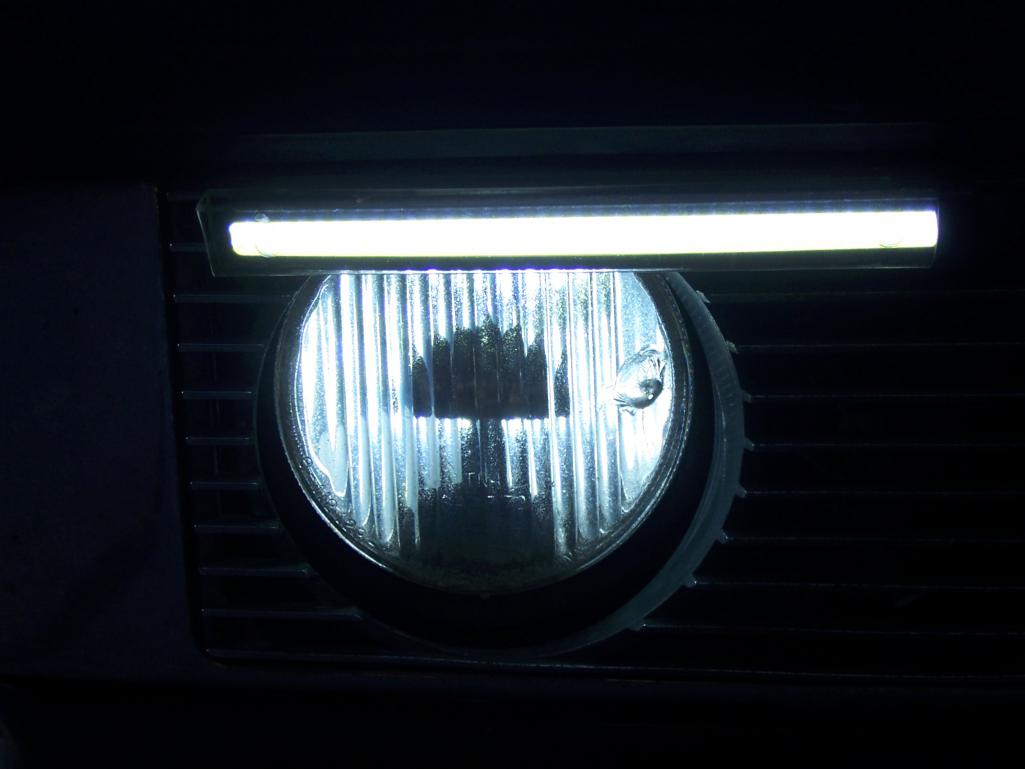
|
| 76-914 |
 Jul 5 2018, 01:35 AM Jul 5 2018, 01:35 AM
Post
#10742
|
|
Repeat Offender & Resident Subaru Antagonist           Group: Members Posts: 13,654 Joined: 23-January 09 From: Temecula, CA Member No.: 9,964 Region Association: Southern California 
|
Great writeup. Ordering mine in a few days.
|
| mb911 |
 Jul 5 2018, 05:19 AM Jul 5 2018, 05:19 AM
Post
#10743
|
|
914 Guru      Group: Members Posts: 7,422 Joined: 2-January 09 From: Burlington wi Member No.: 9,892 Region Association: Upper MidWest 
|
really cheap bulb conversion (under $5 total and I had to wait for the items from China) from OEM fog lamp to LED bulb with no permanent modification to any of the existing wiring. the base: https://www.ebay.com/itm/1pc-T10-W5W-194-T1...119.m1438.l2649 the bulb: https://www.ebay.com/itm/2pcs-Xenon-White-N...119.m1438.l2649 the completed conversion assembly using a plastic tube that fits into the BA20S socket Thanks for the links just ordered a set.. |
| eric9144 |
 Jul 5 2018, 08:31 AM Jul 5 2018, 08:31 AM
Post
#10744
|
|
Advanced Member     Group: Members Posts: 2,760 Joined: 30-March 11 From: San Diego, CA Member No.: 12,876 Region Association: Southern California 
|
really cheap bulb conversion (under $5 total and I had to wait for the items from China) from OEM fog lamp to LED bulb with no permanent modification to any of the existing wiring. the base: https://www.ebay.com/itm/1pc-T10-W5W-194-T1...119.m1438.l2649 the bulb: https://www.ebay.com/itm/2pcs-Xenon-White-N...119.m1438.l2649 the completed conversion assembly using a plastic tube that fits into the BA20S socket Thanks for the links just ordered a set.. Damn, great work, the BA20S's were really hard to find and expensive in LED, that is far better! (IMG:style_emoticons/default/beerchug.gif) |
| cary |
 Jul 6 2018, 09:18 AM Jul 6 2018, 09:18 AM
Post
#10745
|
|
Advanced Member     Group: Members Posts: 3,900 Joined: 26-January 04 From: Sherwood Oregon Member No.: 1,608 Region Association: Pacific Northwest 
|
Had a few minutes before my Dad's (Son's) Garage project was going to show up.
Snap the bumper cover back on Mom's Pilot. So I pulled the frunk cable for a little lubing. Found quite a bit of rust on the upper end of the cable that screws into the handle. To create a smooth surface I tuned up with the wire wheel on the bench grinder instead of the blast cabinet. I'm sure this was most of the binding. Swapped out the latch with one of the 8 or ten coming out of the rattler basket. Plus a shot of the transition from steel to plastic. Cable wants to hang up on the plastic edge/lip while re installing cable. Gooder as new. 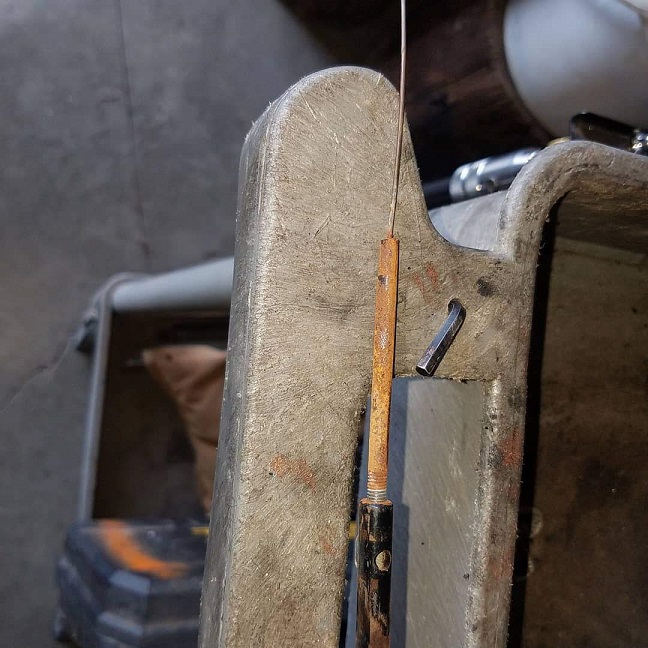 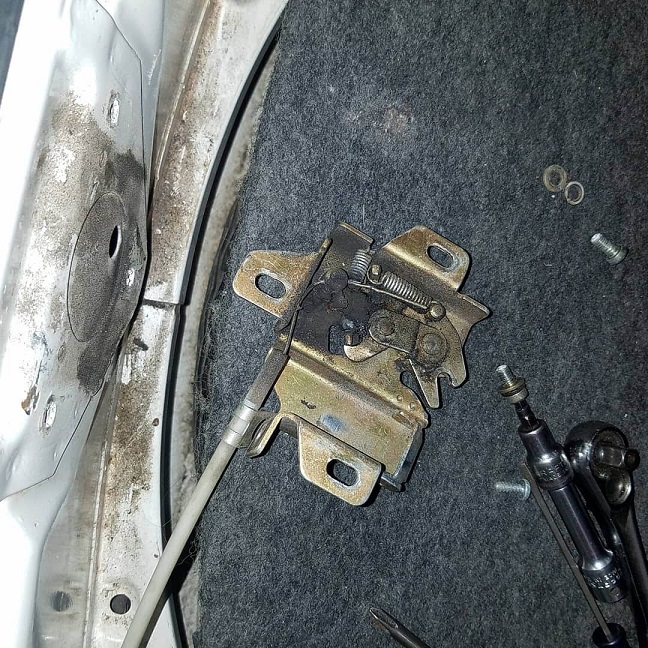 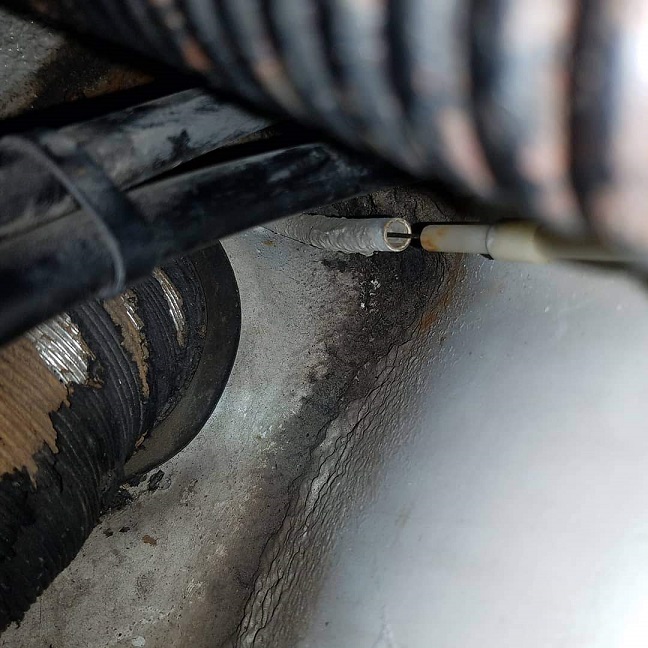 |
| JFG |
 Jul 6 2018, 10:37 AM Jul 6 2018, 10:37 AM
Post
#10746
|
|
Senior Member    Group: Members Posts: 686 Joined: 7-April 16 From: Wales Member No.: 19,869 Region Association: None |
I polished up the bonnet (hood) but there are what looks like circular scratches. Like someone has used a coarse grade wet n dry and rubbed in circles. They haven't. I'm going to need to figure this out as i dont want to paint it again.
The passenger door is ready for a light matt black spray before i flat that back and hopefuy find no more imperfections. Then the trunk. |
| burton73 |
 Jul 6 2018, 02:31 PM Jul 6 2018, 02:31 PM
Post
#10747
|
|
Senior member, and old dude     Group: Members Posts: 3,728 Joined: 2-January 07 From: Los Angeles Member No.: 7,414 Region Association: Southern California 
|
Just Picked up my 7s and 8s 911 numbers for my 6 #41
True RS Finish not paint. Now to get these to PMB and sell my fresh 7s and 8s 15s polished with new tires we just put on the car there. (IMG:style_emoticons/default/wub.gif) (IMG:style_emoticons/default/wub.gif) (IMG:style_emoticons/default/wub.gif) Bob B 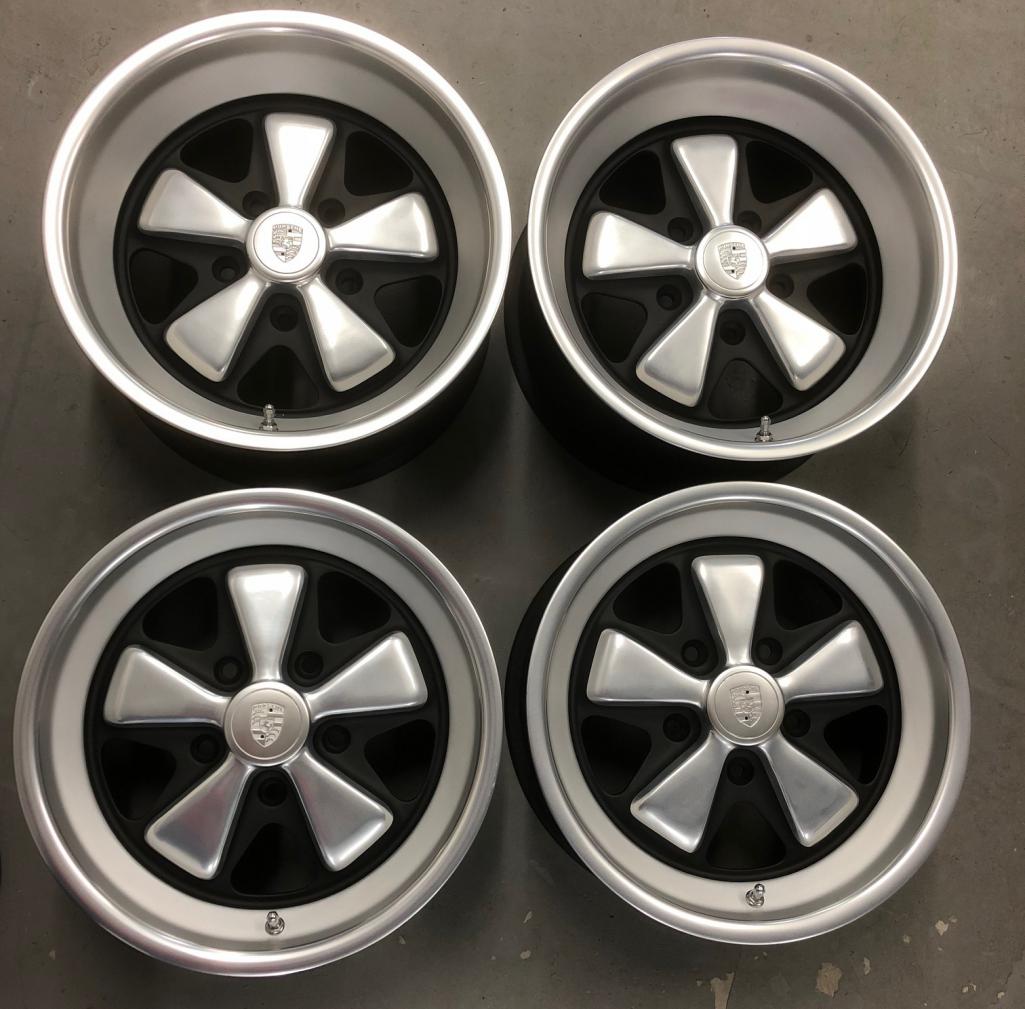 |
| ClayPerrine |
 Jul 7 2018, 12:24 PM Jul 7 2018, 12:24 PM
Post
#10748
|
|
Life's been good to me so far.....                Group: Admin Posts: 15,981 Joined: 11-September 03 From: Hurst, TX. Member No.: 1,143 Region Association: NineFourteenerVille 
|
While the motor and trans are out of Elwood, I adjusted the valves. Much easier than in the car. This afternoon, I will pull the front shifter rod and replace the missing firewall bushing.
Waiting on the flywheel to be turned, then I can put the clutch back together and hook the transmission back up. Repaint the tin and the upper valve covers, then the motor goes back in. Leaning toward installing the collars around the chain tensioners in case one fails. I don't want to do the oil fed tensioners, but the safety collars would fit under the stock timing chain covers. Betty has been replacing seals on her car. She has finished the rear trunk, and is working on cleaning the channel for the front trunk seal. I need to order butyl for the rear windows in Elwood and Frody. Both are loose, and I need to change out the rear window in Elwood for the heated one that came with the car. |
| Aualexa1 |
 Jul 7 2018, 03:38 PM Jul 7 2018, 03:38 PM
Post
#10749
|
|
Newbie  Group: Members Posts: 45 Joined: 17-June 17 From: South Jersey Member No.: 21,189 Region Association: MidAtlantic Region |
Got rid of my aftermarket wheels and mounted a set of date-matched ‘73 Fuchs to my ‘73 914. Psyched about finding a matching set of Fuchs in good condition.
Attached thumbnail(s) 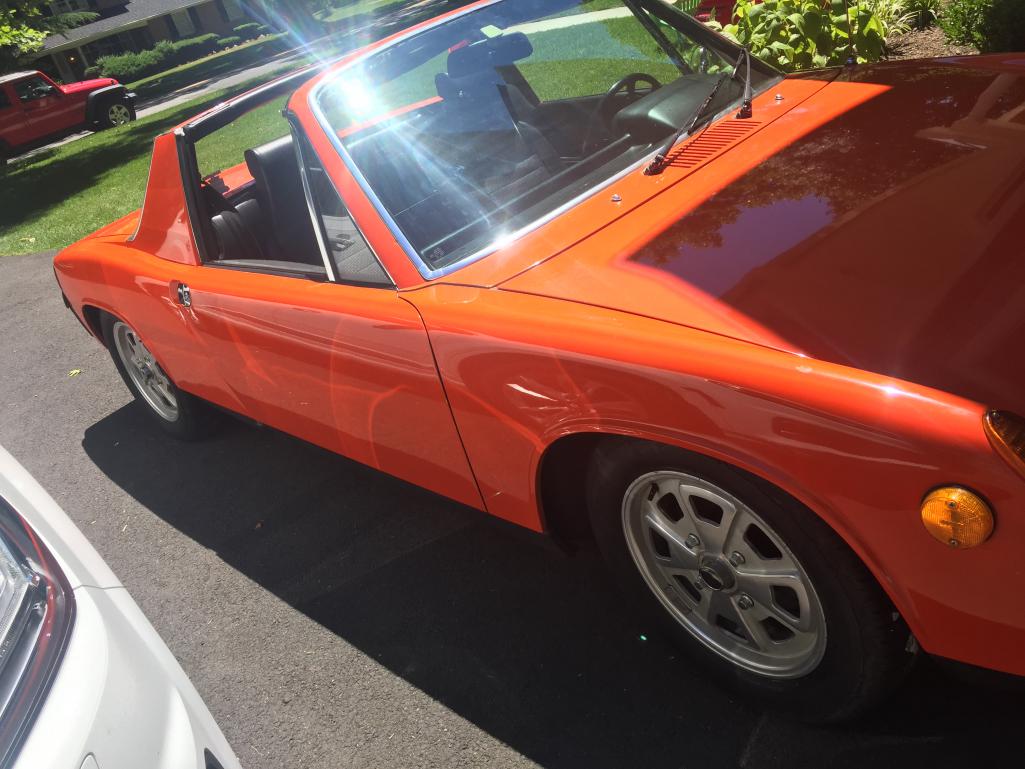
|
| Shadowfax |
 Jul 7 2018, 04:19 PM Jul 7 2018, 04:19 PM
Post
#10750
|
|
Show us the meaning of haste    Group: Members Posts: 509 Joined: 19-January 15 Member No.: 18,340 Region Association: South East States 
|
|
| Shadowfax |
 Jul 7 2018, 04:25 PM Jul 7 2018, 04:25 PM
Post
#10751
|
|
Show us the meaning of haste    Group: Members Posts: 509 Joined: 19-January 15 Member No.: 18,340 Region Association: South East States 
|
Started taking off trim, lights etc to get it ready for paint. Gonna replace the trunk with a rust-free lid (Thanks, Curt!) and have them remedy any dings and/or surface rust. Am taking it in this week and should have it back by the end of the month. Will finish the removing the bumpers, rocker panels, lights and interior tomorrow.
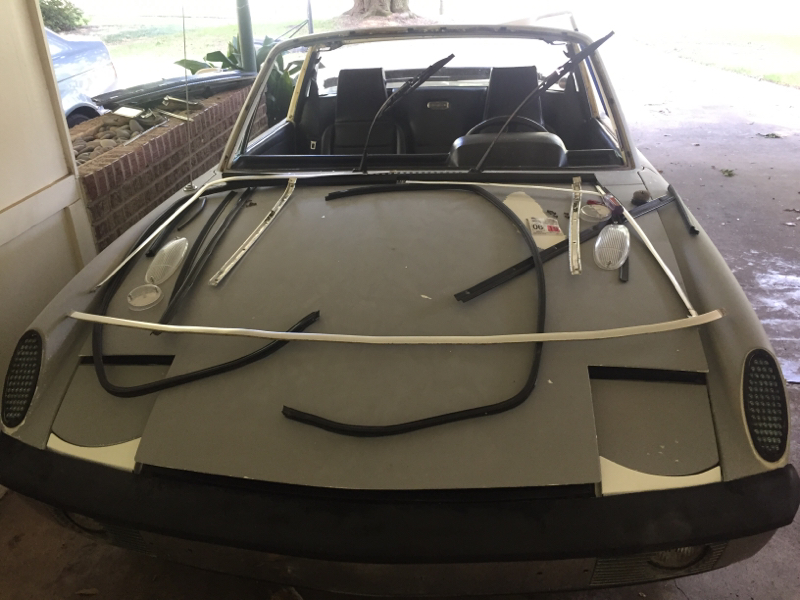 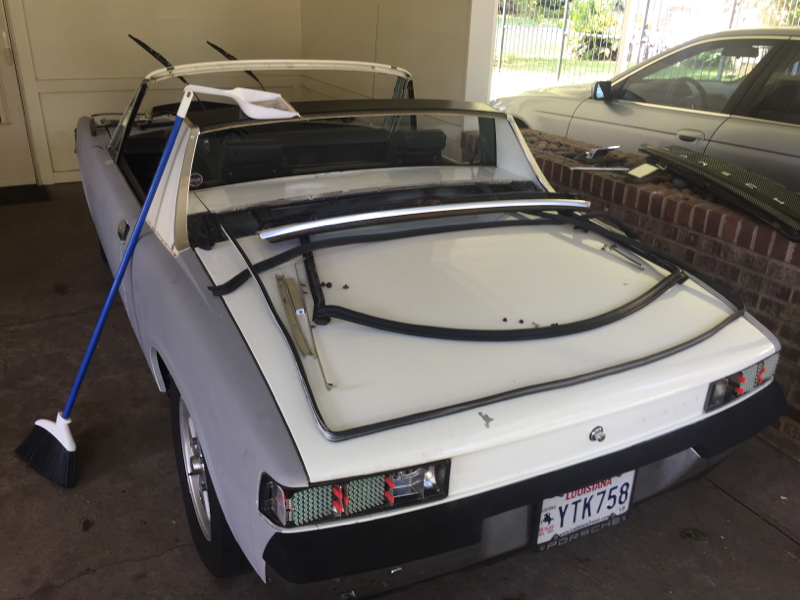 |
| sholman5 |
 Jul 7 2018, 04:49 PM Jul 7 2018, 04:49 PM
Post
#10752
|
|
Kraut burner   Group: Members Posts: 189 Joined: 11-September 16 From: Ormond beach, Fl. Member No.: 20,391 Region Association: South East States 
|
|
| euro911 |
 Jul 7 2018, 06:40 PM Jul 7 2018, 06:40 PM
Post
#10753
|
|
Retired & living the dream. God help me if I wake up!      Group: Members Posts: 8,860 Joined: 2-December 06 From: So.Cal. & No.AZ (USA) Member No.: 7,300 Region Association: Southern California 
|
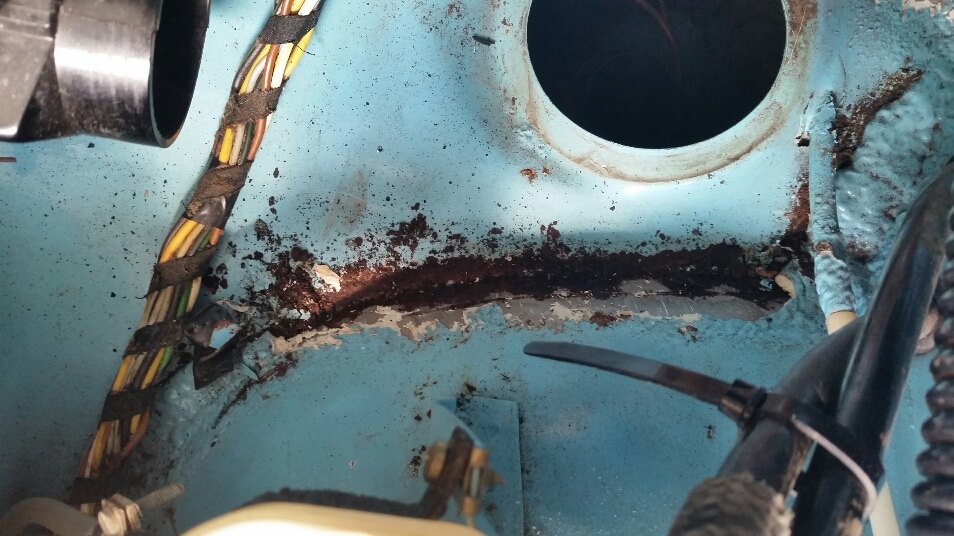
(IMG:http://www.914world.com/bbs2/uploads/post-20391-1531003575.jpg)
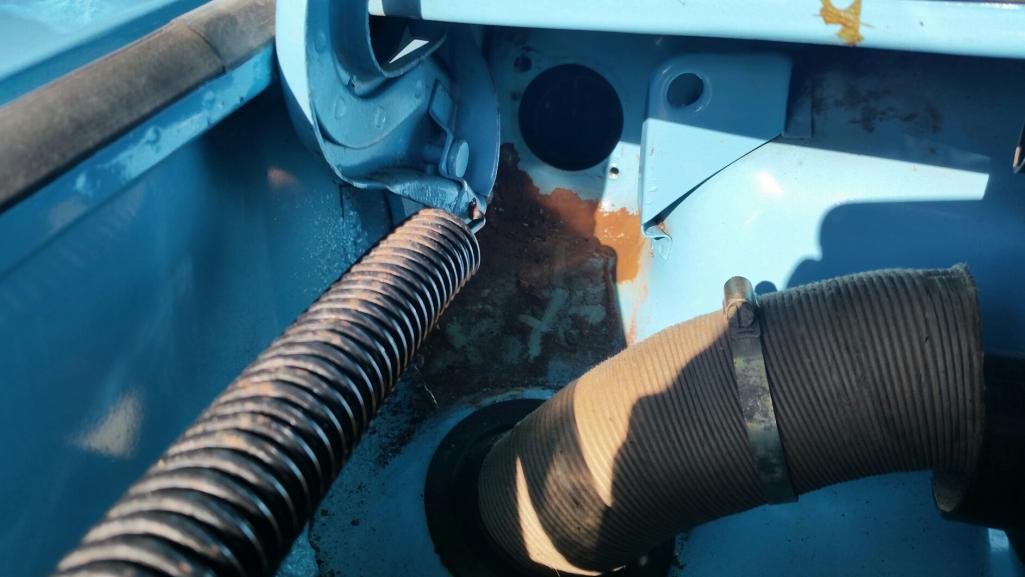
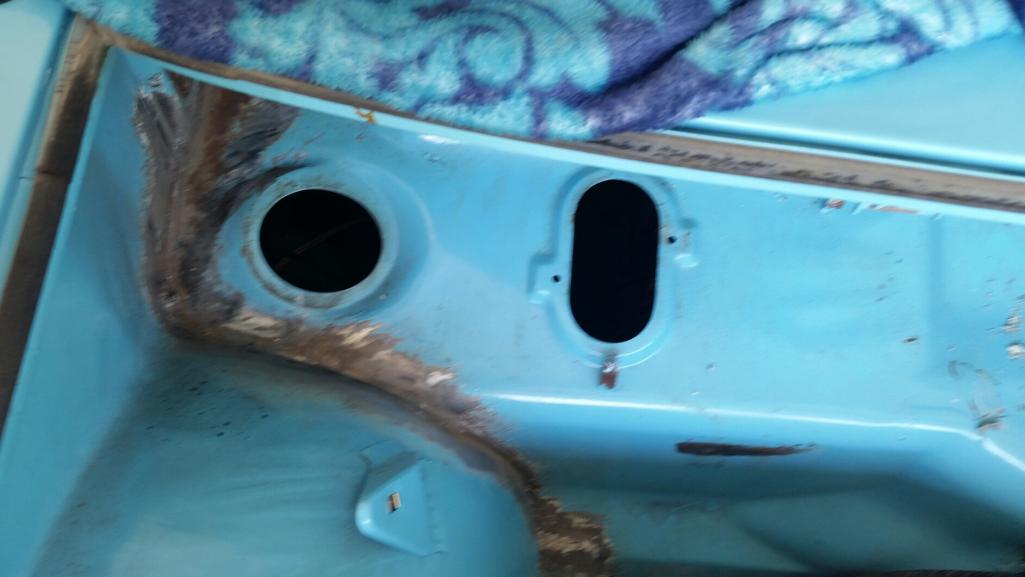
Is that rust under the sealer, Bob? Was it clearly protruding or seeping into the surrounding area? Is rusting under the sealer a common [hidden] problem? I guess I'd better check in my '71, just in case there's something growing under it too ??? |
| 914Sixer |
 Jul 7 2018, 08:51 PM Jul 7 2018, 08:51 PM
Post
#10754
|
|
914 Guru      Group: Members Posts: 9,043 Joined: 17-January 05 From: San Angelo Texas Member No.: 3,457 Region Association: Southwest Region 
|
Body man called and wanted some money today. Went to see how things are comming along. Rear trunk is mostly in place. A little more needed.
Attached image(s) 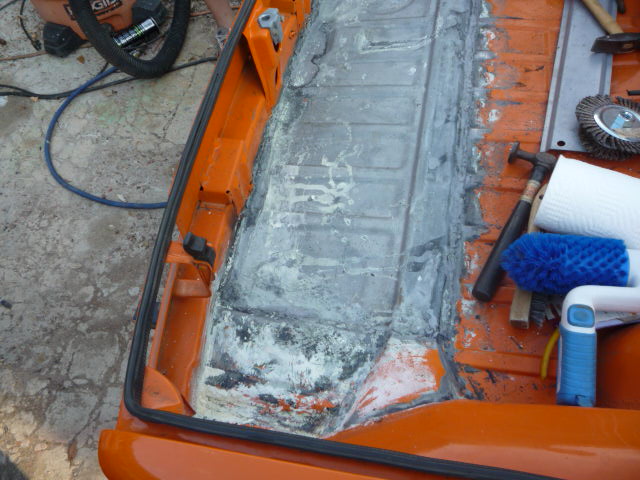 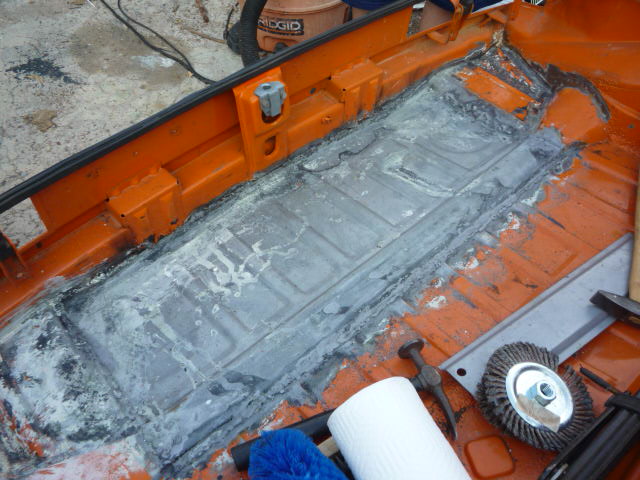
|
| sholman5 |
 Jul 8 2018, 06:16 AM Jul 8 2018, 06:16 AM
Post
#10755
|
|
Kraut burner   Group: Members Posts: 189 Joined: 11-September 16 From: Ormond beach, Fl. Member No.: 20,391 Region Association: South East States 
|
(IMG:http://www.914world.com/bbs2/uploads/post-20391-1531003575.jpg) Is that rust under the sealer, Bob? Was it clearly protruding or seeping into the surrounding area? Is rusting under the sealer a common [hidden] problem? I guess I'd better check in my '71, just in case there's something growing under it too ??? Not Bob. Idk if it is a common problem. Apparently it is on mine. The sealer is over 40 yrs old and very porous. It only needs one spot for water to seep in and gravity takes care of the rest. Check the under the windshield cowl where the fresh hoses are. The paint was peeling off and had surface rust. I decided to remove the tank and fresh air system and remove all of the sealer. Will treat rust and reseal. Chris |
| Chris914n6 |
 Jul 8 2018, 02:13 PM Jul 8 2018, 02:13 PM
Post
#10756
|
|
Jackstands are my life.     Group: Members Posts: 3,431 Joined: 14-March 03 From: Las Vegas, NV Member No.: 431 Region Association: Southwest Region |
Picked up a 2011 WRX trans. I will get it to mate with my VQ35de using paper drawings... or not (IMG:style_emoticons/default/idea.gif) (IMG:style_emoticons/default/sheeplove.gif) (IMG:style_emoticons/default/headbang.gif) (IMG:style_emoticons/default/av-943.gif)
I've also got an idea for a not MR2 cable shift setup to fiddle with. |
| URY914 |
 Jul 8 2018, 02:50 PM Jul 8 2018, 02:50 PM
Post
#10757
|
|
I built the lightest 914 in the history of mankind.                                                                                                     Group: Members Posts: 124,600 Joined: 3-February 03 From: Jacksonville, FL Member No.: 222 Region Association: None |
Friday I got the permit to add on to my carport/utility room. The addition will allow me to get the car out of storage and get back on the a/x course. (IMG:style_emoticons/default/biggrin.gif)
|
| Steve |
 Jul 8 2018, 11:24 PM Jul 8 2018, 11:24 PM
Post
#10758
|
|
914 Guru      Group: Members Posts: 5,780 Joined: 14-June 03 From: Orange County, CA Member No.: 822 Region Association: Southern California 
|
|
| Mueller |
 Jul 8 2018, 11:59 PM Jul 8 2018, 11:59 PM
Post
#10759
|
|
914 Freak!                Group: Members Posts: 17,150 Joined: 4-January 03 From: Antioch, CA Member No.: 87 Region Association: None 
|
Installed new rotors/pads on Sandy's /6.
Had to modify the rear pads. Instead of having 2 oblong holes for the pins 1 hole is round and needs to be drilled or milled. I milled these out with a quick little program. 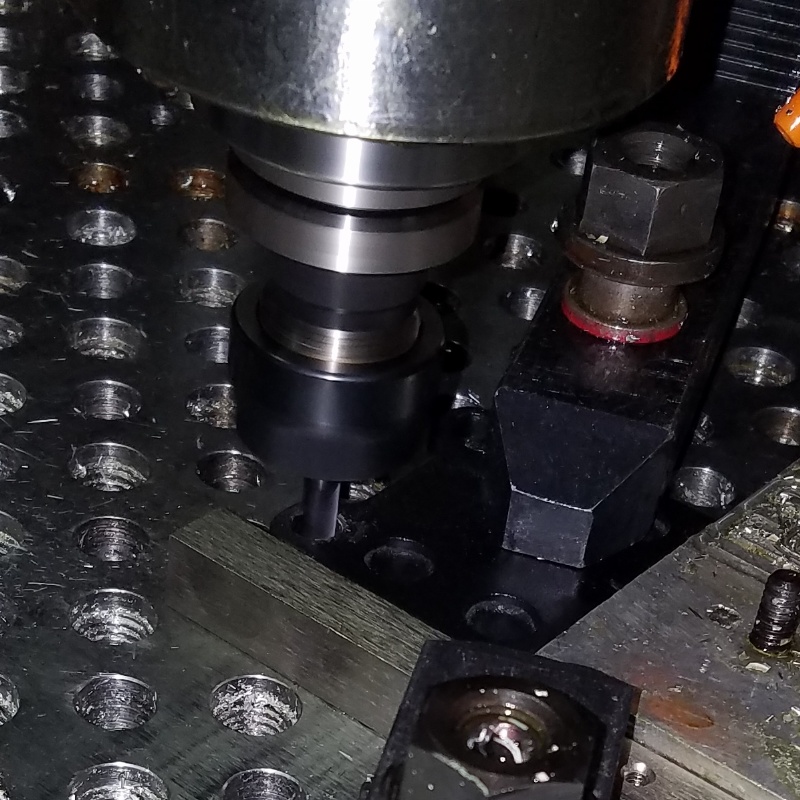 |
| euro911 |
 Jul 9 2018, 12:44 AM Jul 9 2018, 12:44 AM
Post
#10760
|
|
Retired & living the dream. God help me if I wake up!      Group: Members Posts: 8,860 Joined: 2-December 06 From: So.Cal. & No.AZ (USA) Member No.: 7,300 Region Association: Southern California 
|
I installed a late 80’s corvette 3rd brake light on my GT engine lid. That's where I mounted the same thing on the 'BB'. Still very visible during the day. Spokes LED’s also helps!! 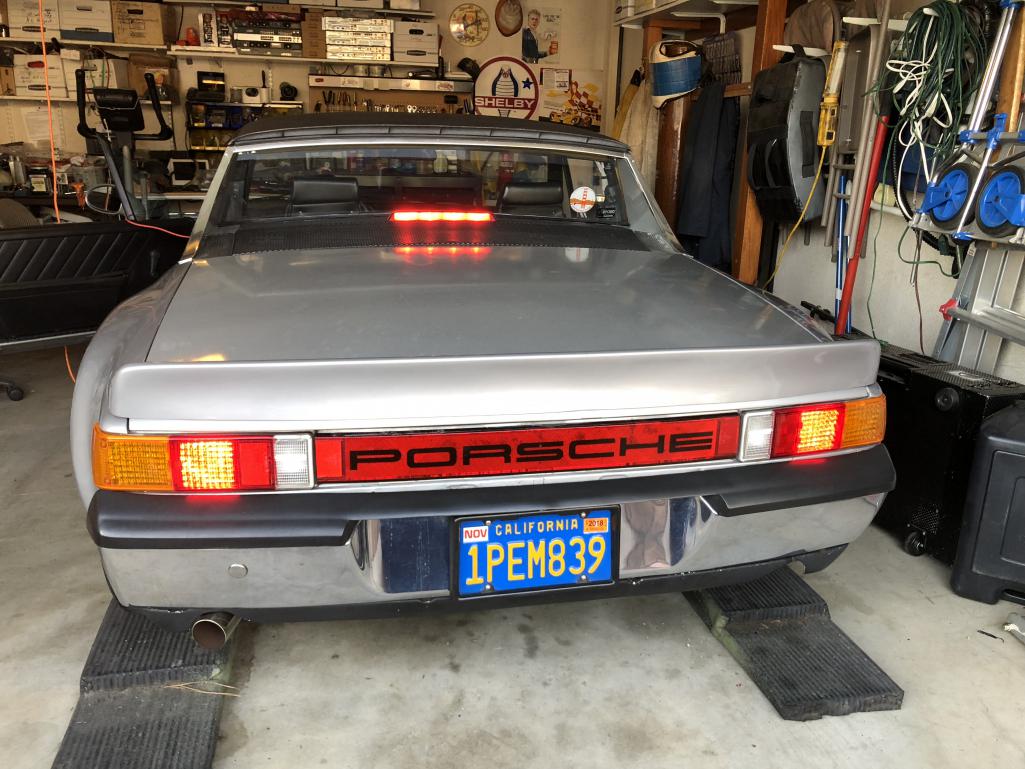 (IMG:http://www.914world.com/bbs2/uploads/post-7300-1329368785.jpg) I ran wires down into the engine compartment, but still haven't spliced them going to the brake light wires in the harness (IMG:style_emoticons/default/wacko.gif) I'm going to do the LED strip in the targa upper crossbar on the '71 (IMG:style_emoticons/default/idea.gif) |
  |
13 User(s) are reading this topic (13 Guests and 0 Anonymous Users)
0 Members:

|
Lo-Fi Version | Time is now: 14th January 2025 - 11:17 PM |
Invision Power Board
v9.1.4 © 2025 IPS, Inc.


