|
|

|
Porsche, and the Porsche crest are registered trademarks of Dr. Ing. h.c. F. Porsche AG.
This site is not affiliated with Porsche in any way. Its only purpose is to provide an online forum for car enthusiasts. All other trademarks are property of their respective owners. |
|
|
  |
| TravisNeff |
 Mar 17 2012, 10:57 PM Mar 17 2012, 10:57 PM
Post
#6
|
|
914 Guru      Group: Members Posts: 5,082 Joined: 20-March 03 From: Mesa, AZ Member No.: 447 Region Association: Southwest Region 
|
So the front cowl has definately fell in. The rear targa bar on the drivers side, I think fell in too. I remember having to reaseal the rear window after my welding extravaganza
Seals and stricker plates are out of the doors. You would think there are more issues on the driver side with the tight gap, measurements prove it's the passenger side with the biggest problem |
| rick 918-S |
 Mar 18 2012, 12:01 PM Mar 18 2012, 12:01 PM
Post
#7
|
|
Hey nice rack! -Celette                Group: Members Posts: 20,841 Joined: 30-December 02 From: Now in Superior WI Member No.: 43 Region Association: Northstar Region 

|
Hey Travis, Just wanted to let you know I saw this post. I will comment on it later. I have to head out for awhile.
|
| jmill |
 Mar 18 2012, 06:31 PM Mar 18 2012, 06:31 PM
Post
#8
|
|
Green Hornet     Group: Members Posts: 2,449 Joined: 9-May 08 From: Racine, Wisconsin Member No.: 9,038 Region Association: Upper MidWest |
Racine, WI is a little closer than AZ but this is how he hooked me up.
Attached image(s) 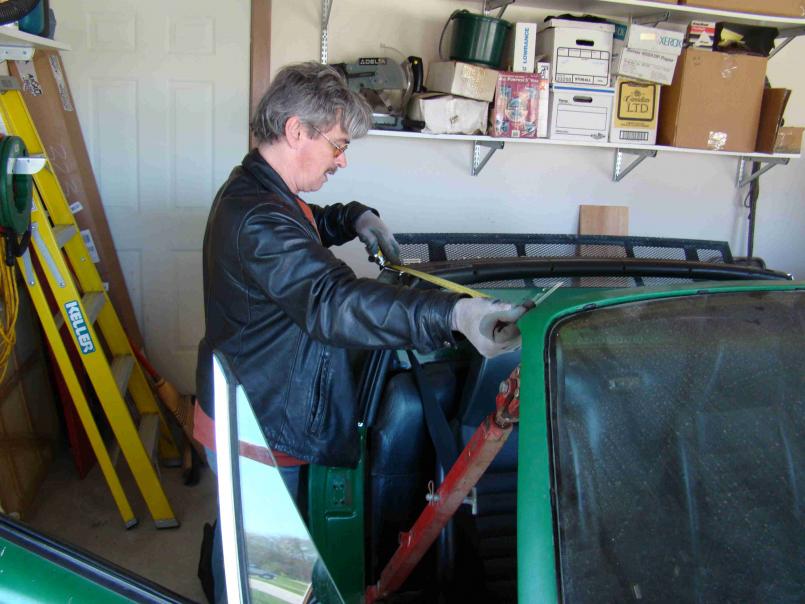
|
| Dr Evil |
 Mar 18 2012, 07:35 PM Mar 18 2012, 07:35 PM
Post
#9
|
|
Send me your transmission!                Group: Members Posts: 23,036 Joined: 21-November 03 From: Loveland, OH 45140 Member No.: 1,372 Region Association: MidAtlantic Region 
|
Dont show pics of Rick. He aint that pretty (IMG:style_emoticons/default/smile.gif) (IMG:style_emoticons/default/poke.gif)
|
| rick 918-S |
 Mar 18 2012, 09:11 PM Mar 18 2012, 09:11 PM
Post
#10
|
|
Hey nice rack! -Celette                Group: Members Posts: 20,841 Joined: 30-December 02 From: Now in Superior WI Member No.: 43 Region Association: Northstar Region 

|
Dont show pics of Rick. He aint that pretty (IMG:style_emoticons/default/smile.gif) (IMG:style_emoticons/default/poke.gif) Hey! I resemble that remark! (IMG:style_emoticons/default/dry.gif) Anywho, The photos show the issue pretty well. If you were closer I would drive over and tweek it for you. But for now all I can suggest is to do your best and try to un-do the issue. Normally You could tweek the chassis with a port-o-power or my turnbuckle tool like John's car. But after the chassis stiffeners are welded when you try to push the chassis it bends in places it most likely shouldn't. This only makes matters worse. So what I would suggest is to figure out where you went wrong and back up to that point. This may require cutting through the stiffener to weaken the car enough to bend it back in place. This tool works very well. If you want I'll put it in a cardboard tube and ship to you. You pay shipping both ways. It's heavy and shipping won't be cheap. 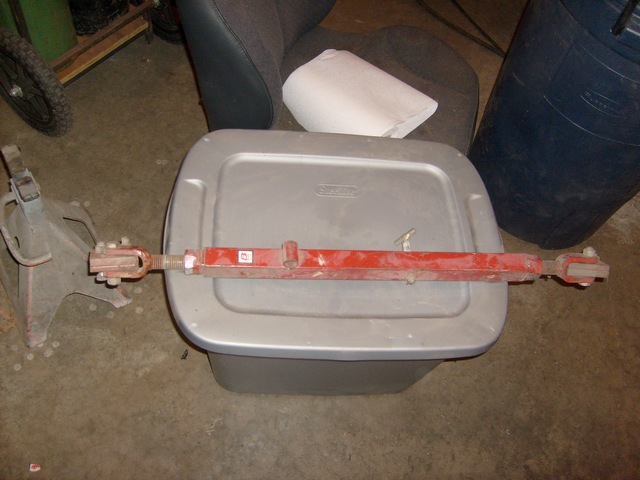 My second suggestion would be to see if there is a local body shop that has one and would either loan or rent it to you. You can move a door opening with very little effort. |
| MoveQik |
 Mar 18 2012, 09:13 PM Mar 18 2012, 09:13 PM
Post
#11
|
|
What size wheels can I fit?     Group: Members Posts: 4,654 Joined: 5-April 05 From: Scottsdale, AZ Member No.: 3,881 Region Association: Southwest Region  |
Travis, I'll be over in 5. We'll have it straight by morning.
|
| TravisNeff |
 Mar 18 2012, 09:20 PM Mar 18 2012, 09:20 PM
Post
#12
|
|
914 Guru      Group: Members Posts: 5,082 Joined: 20-March 03 From: Mesa, AZ Member No.: 447 Region Association: Southwest Region 
|
(IMG:style_emoticons/default/smash.gif) giddyup! lol
Travis, I'll be over in 5. We'll have it straight by morning. |
| TravisNeff |
 Mar 18 2012, 09:23 PM Mar 18 2012, 09:23 PM
Post
#13
|
|
914 Guru      Group: Members Posts: 5,082 Joined: 20-March 03 From: Mesa, AZ Member No.: 447 Region Association: Southwest Region 
|
My plan is to cut through the stiffening kit at the cowl on both sides. push out the passenger side first, then driver side. next make a cut in the stiffening kit at the rear of the drivers door and push the drivers side targa bar back.
Sound like the right approach? |
| rick 918-S |
 Mar 18 2012, 09:27 PM Mar 18 2012, 09:27 PM
Post
#14
|
|
Hey nice rack! -Celette                Group: Members Posts: 20,841 Joined: 30-December 02 From: Now in Superior WI Member No.: 43 Region Association: Northstar Region 

|
My plan is to cut through the stiffening kit at the cowl on both sides. push out the passenger side first, then driver side. next make a cut in the stiffening kit at the rear of the drivers door and push the drivers side targa bar back. Sound like the right approach? That sounds reasonable. But you should be sure to put in a support through the door opening before you weld again. Edit: also pull the catches off the "B" pillar so you car adjust the doors without any interference from the latch. Once your done welding and the doors swing free and line up you can replace the catch. |
| TravisNeff |
 Mar 18 2012, 09:41 PM Mar 18 2012, 09:41 PM
Post
#15
|
|
914 Guru      Group: Members Posts: 5,082 Joined: 20-March 03 From: Mesa, AZ Member No.: 447 Region Association: Southwest Region 
|
So I will make my cuts here in the front
Attached thumbnail(s) 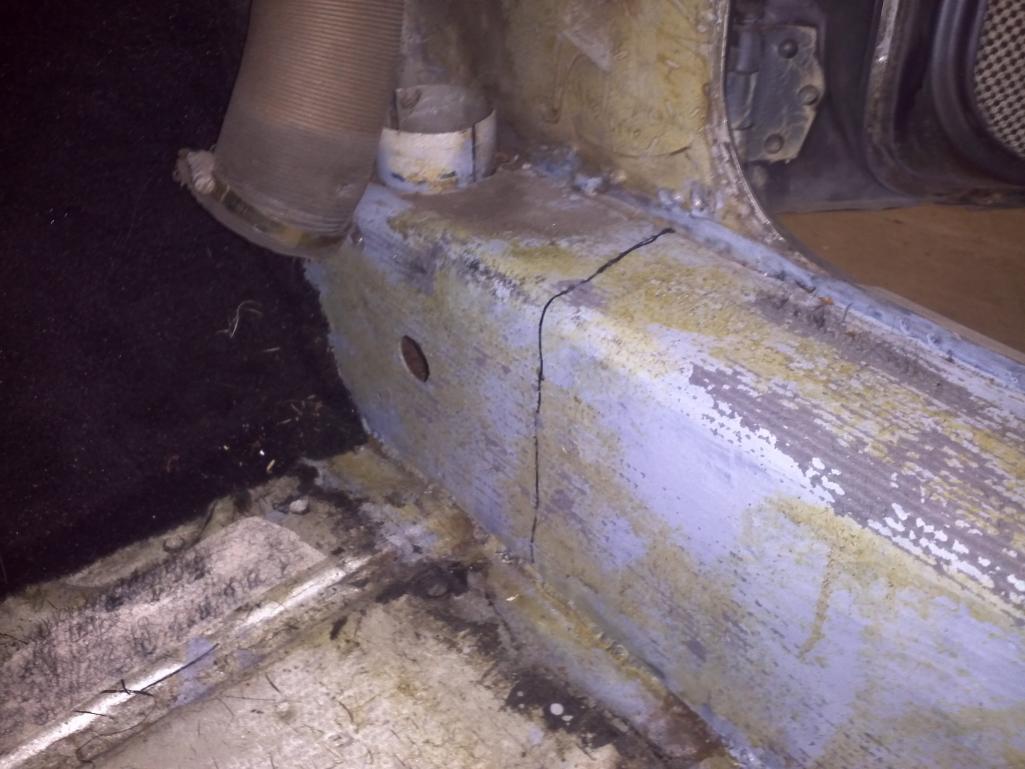
|
| rick 918-S |
 Mar 18 2012, 09:50 PM Mar 18 2012, 09:50 PM
Post
#16
|
|
Hey nice rack! -Celette                Group: Members Posts: 20,841 Joined: 30-December 02 From: Now in Superior WI Member No.: 43 Region Association: Northstar Region 

|
Show me the stiffeners. I would likely cut the stiffeners not the stock inner longs.
|
| Eric_Shea |
 Mar 18 2012, 09:53 PM Mar 18 2012, 09:53 PM
Post
#17
|
|
PMB Performance                Group: Admin Posts: 19,289 Joined: 3-September 03 From: Salt Lake City, UT Member No.: 1,110 Region Association: Rocky Mountains  |
That is the stiffener...
|
| TravisNeff |
 Mar 18 2012, 09:58 PM Mar 18 2012, 09:58 PM
Post
#18
|
|
914 Guru      Group: Members Posts: 5,082 Joined: 20-March 03 From: Mesa, AZ Member No.: 447 Region Association: Southwest Region 
|
LOL, you're looking right at them. i did my best to make it look like i never installed one - and yes, i would only cut through the stiffener and not through the longs.
Attached thumbnail(s) 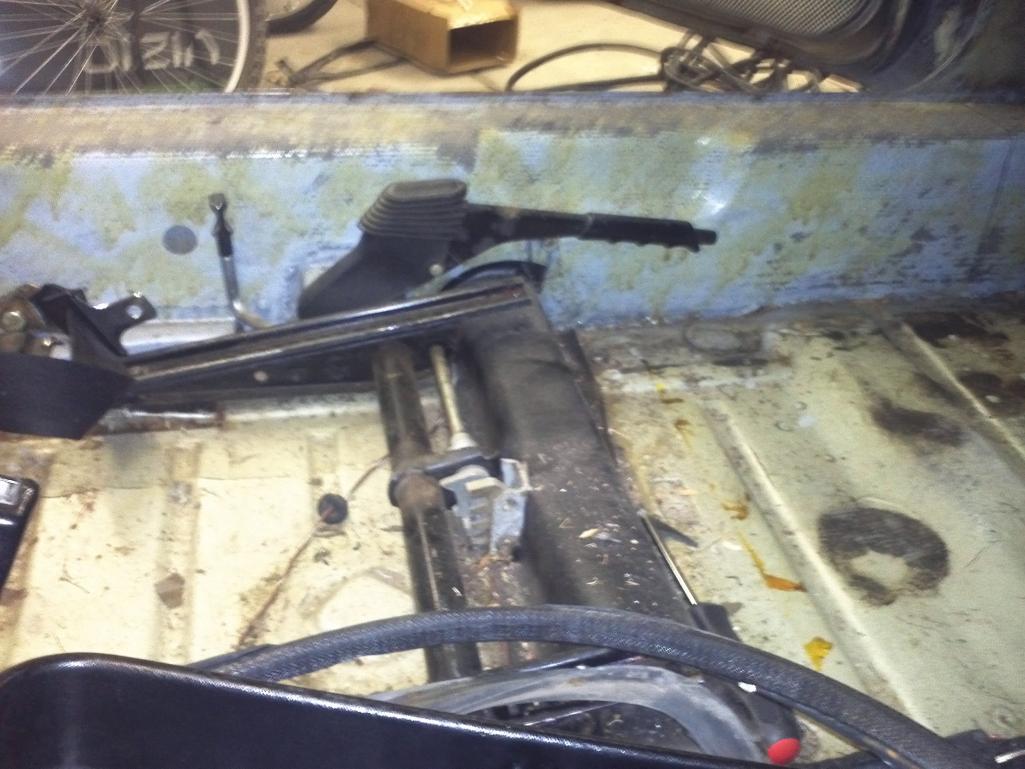
|
| rick 918-S |
 Mar 18 2012, 10:02 PM Mar 18 2012, 10:02 PM
Post
#19
|
|
Hey nice rack! -Celette                Group: Members Posts: 20,841 Joined: 30-December 02 From: Now in Superior WI Member No.: 43 Region Association: Northstar Region 

|
LOL, you're looking right at them. i did my best to make it look like i never installed one - and yes, i would only cut through the stiffener and not through the longs. Oh, ya ok... Yes just through the stiffener. Be sure to remove the catches. Take your time. Measure twice then measure again. Make yourself a diagram to keep track of your progress. Brace the openings after you get them set before welding. (IMG:style_emoticons/default/welder.gif) |
| TravisNeff |
 Mar 18 2012, 10:59 PM Mar 18 2012, 10:59 PM
Post
#20
|
|
914 Guru      Group: Members Posts: 5,082 Joined: 20-March 03 From: Mesa, AZ Member No.: 447 Region Association: Southwest Region 
|
Rear catches are out, front quarter windows & caps are out too. door panels tomorrow and let the cutting begin.
one last question, i will put the porta power at the base of the long and the rear firewall, the front, I presume that i will push on the panel flange at the upper hinge height (or should it be higher?) |
| rick 918-S |
 Mar 18 2012, 11:16 PM Mar 18 2012, 11:16 PM
Post
#21
|
|
Hey nice rack! -Celette                Group: Members Posts: 20,841 Joined: 30-December 02 From: Now in Superior WI Member No.: 43 Region Association: Northstar Region 

|
Rear catches are out, front quarter windows & caps are out too. door panels tomorrow and let the cutting begin. one last question, i will put the porta power at the base of the long and the rear firewall, the front, I presume that i will push on the panel flange at the upper hinge height (or should it be higher?) Stay about the upper hinge height. Use blocks of wood or thick rubber pads and watch to see that your not crushing the pressure points where the port-o-power cintacts the body. The windsheild frame should be in the right place. Don't tweek that unless your vent window is binding. It shouldn't be.. |
| FourBlades |
 Mar 19 2012, 08:05 AM Mar 19 2012, 08:05 AM
Post
#22
|
|
From Wreck to Rockin     Group: Members Posts: 2,056 Joined: 3-December 07 From: Brevard, FL Member No.: 8,414 Region Association: South East States 
|
I'd like to see a lot of pictures of how this works. I did the same thing to my passenger side when I welded in my Engman. The door closes fine but the gap is really small. (IMG:style_emoticons/default/popcorn[1].gif) (IMG:style_emoticons/default/popcorn[1].gif) (IMG:style_emoticons/default/popcorn[1].gif) John |
| TravisNeff |
 Mar 19 2012, 08:57 AM Mar 19 2012, 08:57 AM
Post
#23
|
|
914 Guru      Group: Members Posts: 5,082 Joined: 20-March 03 From: Mesa, AZ Member No.: 447 Region Association: Southwest Region 
|
I will be documenting this all the way through, good, bad or indifferent. i know there are a lot of people on here that have run into an issue with a bent tub
|
| TravisNeff |
 Mar 19 2012, 07:38 PM Mar 19 2012, 07:38 PM
Post
#24
|
|
914 Guru      Group: Members Posts: 5,082 Joined: 20-March 03 From: Mesa, AZ Member No.: 447 Region Association: Southwest Region 
|
I did my cuts like I showed you before, only cutting through the stiffening kit. I pushed out the passenger cowl - going very slowly, rechecking the door fit and top. the passenger side might need a little more, but I decided to do the drivers side a push and looks like I am going in the right direction.
heading back out to take some measurements and snap y'all a couple of pics. |
| TravisNeff |
 Mar 19 2012, 09:11 PM Mar 19 2012, 09:11 PM
Post
#25
|
|
914 Guru      Group: Members Posts: 5,082 Joined: 20-March 03 From: Mesa, AZ Member No.: 447 Region Association: Southwest Region 
|
the car on jackstands, notice that i have the jackstands behind the cowl, this will give me a little more leverage
Attached thumbnail(s) 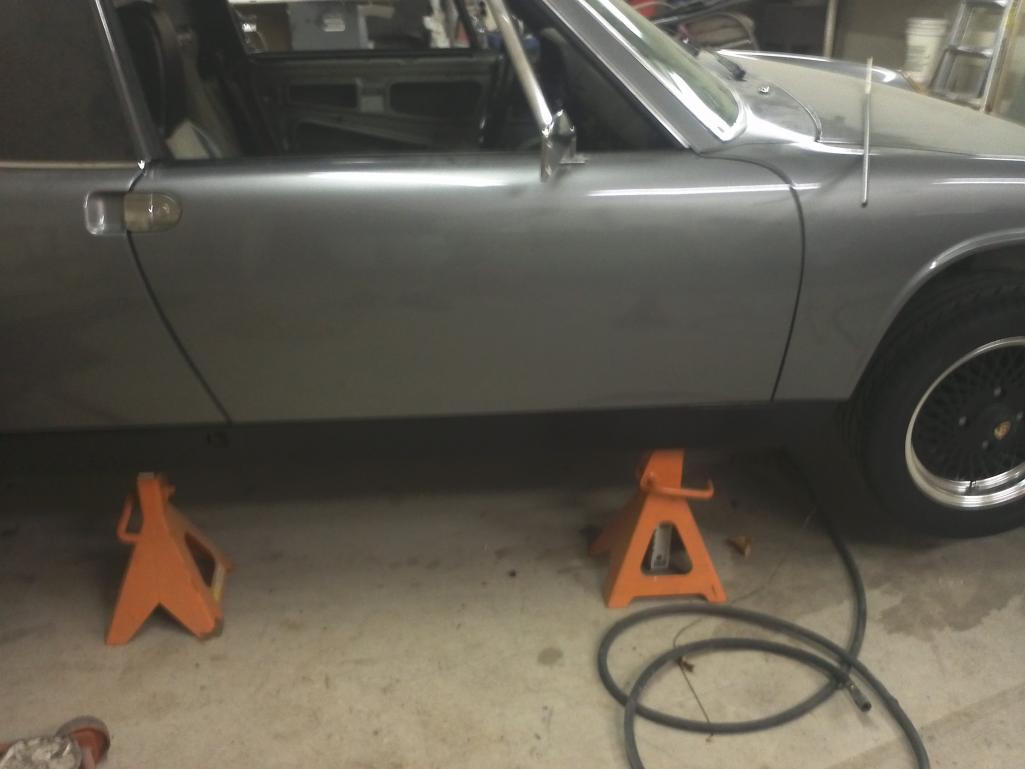
|
  |
8 User(s) are reading this topic (8 Guests and 0 Anonymous Users)
0 Members:

|
Lo-Fi Version | Time is now: 17th January 2025 - 12:01 AM |
Invision Power Board
v9.1.4 © 2025 IPS, Inc.


