|
|

|
Porsche, and the Porsche crest are registered trademarks of Dr. Ing. h.c. F. Porsche AG.
This site is not affiliated with Porsche in any way. Its only purpose is to provide an online forum for car enthusiasts. All other trademarks are property of their respective owners. |
|
|
  |
| dlee6204 |
 Jul 27 2021, 02:03 PM Jul 27 2021, 02:03 PM
Post
#101
|
|
Howdy     Group: Members Posts: 2,162 Joined: 30-April 06 From: Burnsville, NC Member No.: 5,956 |
Nice work @friethmiller . It's nice to see it coming together and your build is top notch!
|
| friethmiller |
 Jul 27 2021, 02:34 PM Jul 27 2021, 02:34 PM
Post
#102
|
|
Senior Member    Group: Members Posts: 667 Joined: 10-February 19 From: Austin, TX Member No.: 22,863 Region Association: Southwest Region 
|
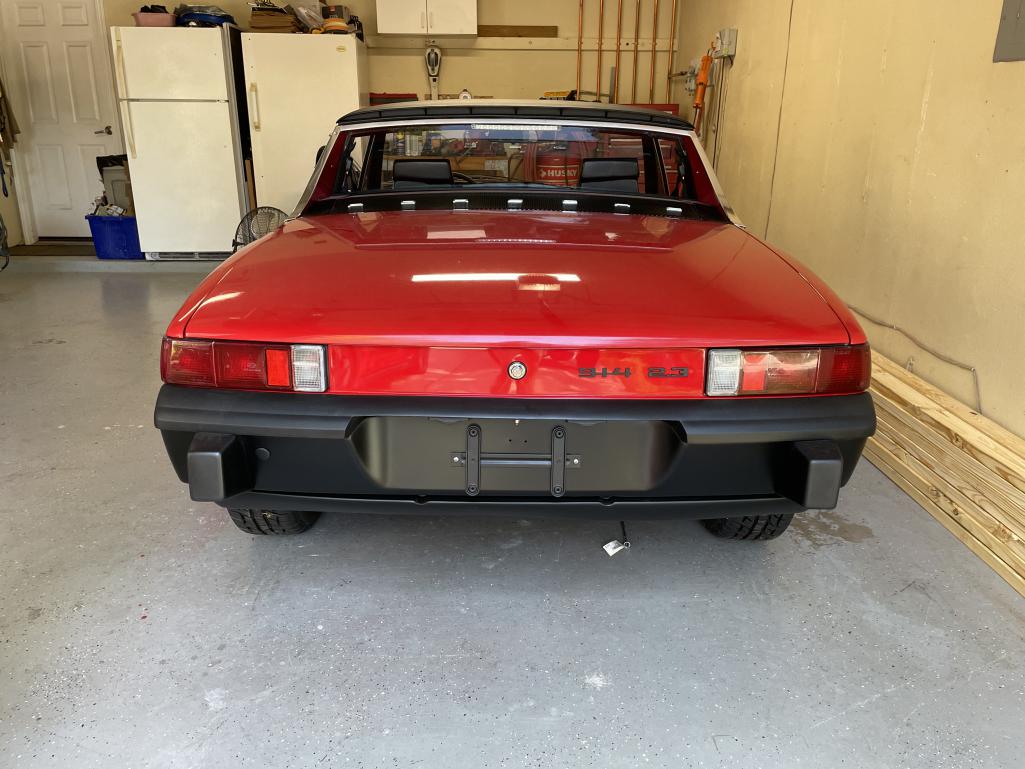
Thanks Doug and Shivers! Inching closer to the day I get to drive this car. It's been 3 1/2 years of restoration work and I've never driven a 914. I'm taking my time trying to get things in place and learning as I go. Here's where that engine is going (IMG:style_emoticons/default/smile.gif)
 |
| friethmiller |
 Jul 27 2021, 08:52 PM Jul 27 2021, 08:52 PM
Post
#103
|
|
Senior Member    Group: Members Posts: 667 Joined: 10-February 19 From: Austin, TX Member No.: 22,863 Region Association: Southwest Region 
|
How will you set or check the engine timing with the AC compressor mounted above the timing port in the fan housing? I recommend to transfer your timing marks to the back of the flywheel and you can then use the small access hole on the back of the engine to set your timing. Doug, Do you mean the hike with the black plastic plug located on the passenger side at the rear of the case? Or, the smaller hole on the other side? 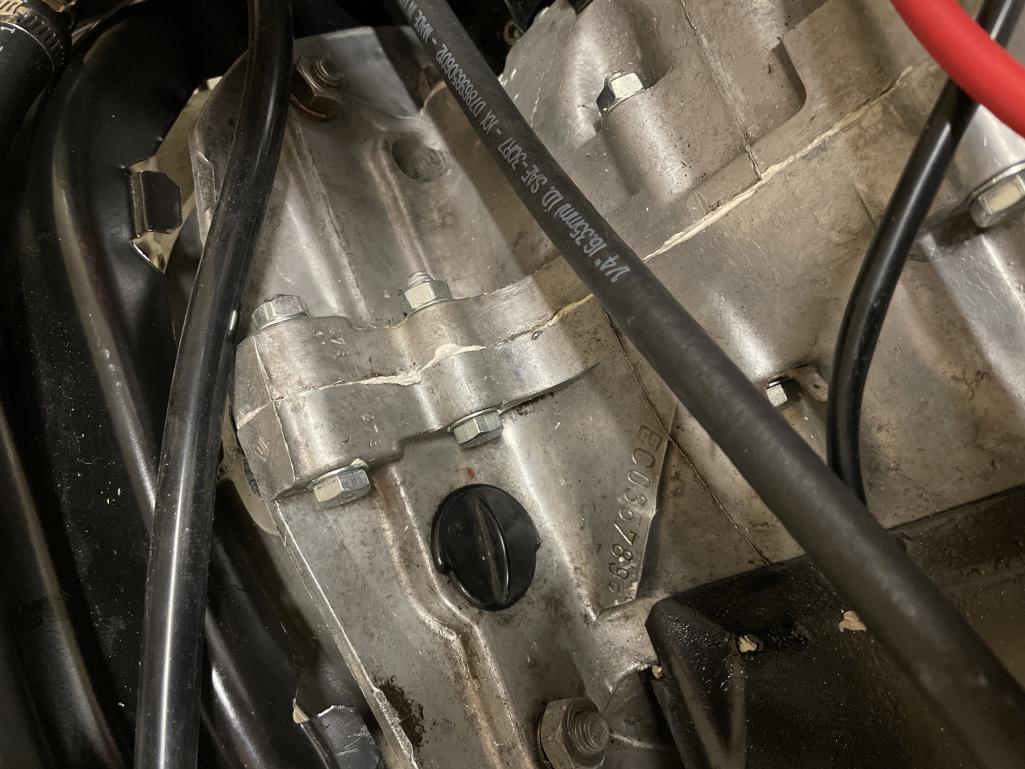 |
| dlee6204 |
 Jul 28 2021, 03:49 AM Jul 28 2021, 03:49 AM
Post
#104
|
|
Howdy     Group: Members Posts: 2,162 Joined: 30-April 06 From: Burnsville, NC Member No.: 5,956 |
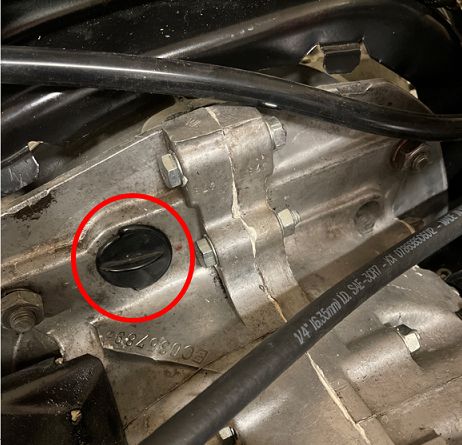
This one
 |
| Warren914 |
 Jul 28 2021, 05:38 AM Jul 28 2021, 05:38 AM
Post
#105
|
|
Member   Group: Members Posts: 93 Joined: 26-February 21 From: Nova Scotia Member No.: 25,265 Region Association: Canada |
I'm having AC installed this summer as part of engine/transmission rebuild with Mark Henry. Really looking forward to having the car back. Plan is to build a GT deck lid and install a 12x24 condenser underneath. Two 11-inch puller fans will be used. One fan comes on with the compressor and the other is controlled by the trinary switch or switch in the cab. I've built up a simple diode matrix with color coded wires to simplify installation. A Sanden SD7H13 compressor, engine mount, pulley and belt have been supplied by Gilmore Enterprises. Under dash evaporator, condenser coil, hoses, dryer come from Vintage Air. I saw pictures of used dryer/receivers in the older messages in the thread. From my discussion with HVAC techs, those should never be reused. It has a limited capacity for moisture removal. If the refrigerant is replaced due to maintenance or a leak the dryer should be replaced. Has anyone had an issue with electrical overload with the AC system? VintageAir claims the under dash evaporator may need up to about 25A for the blower and compressor clutch. The condenser fans could require about 9A each. That's up to 43A total. Maybe I'll be looking at an upgraded alternator next summer. |
| Mark Henry |
 Jul 28 2021, 07:18 AM Jul 28 2021, 07:18 AM
Post
#106
|
|
that's what I do!                Group: Members Posts: 20,065 Joined: 27-December 02 From: Port Hope, Ontario Member No.: 26 Region Association: Canada |
I'm having AC installed this summer as part of engine/transmission rebuild with Mark Henry. Really looking forward to having the car back. Plan is to build a GT deck lid and install a 12x24 condenser underneath. Two 11-inch puller fans will be used. One fan comes on with the compressor and the other is controlled by the trinary switch or switch in the cab. I've built up a simple diode matrix with color coded wires to simplify installation. A Sanden SD7H13 compressor, engine mount, pulley and belt have been supplied by Gilmore Enterprises. Under dash evaporator, condenser coil, hoses, dryer come from Vintage Air. I saw pictures of used dryer/receivers in the older messages in the thread. From my discussion with HVAC techs, those should never be reused. It has a limited capacity for moisture removal. If the refrigerant is replaced due to maintenance or a leak the dryer should be replaced. Has anyone had an issue with electrical overload with the AC system? VintageAir claims the under dash evaporator may need up to about 25A for the blower and compressor clutch. The condenser fans could require about 9A each. That's up to 43A total. Maybe I'll be looking at an upgraded alternator next summer. Usually those will be start up loads, actual running loads will likely be less, Warren with your huge Optima yellow top battery those start up loads hopefully won't be an issue. I'm planing to run a 10+ gauge wire direct from the battery to up under the dash for the head unit. |
| Warren914 |
 Jul 28 2021, 07:37 AM Jul 28 2021, 07:37 AM
Post
#107
|
|
Member   Group: Members Posts: 93 Joined: 26-February 21 From: Nova Scotia Member No.: 25,265 Region Association: Canada |
Hope you're taking photos! I have a bunch of wire, connectors, etc to ship to you with the diode block. Usually those will be start up loads, actual running loads will likely be less, Warren with your huge Optima yellow top battery those start up loads hopefully won't be an issue. I'm planing to run a 10+ gauge wire direct from the battery to up under the dash for the head unit. |
| friethmiller |
 Jul 28 2021, 09:55 AM Jul 28 2021, 09:55 AM
Post
#108
|
|
Senior Member    Group: Members Posts: 667 Joined: 10-February 19 From: Austin, TX Member No.: 22,863 Region Association: Southwest Region 
|
Sounds like a cool build Warren914. Maybe you and/or MH can share some pics.
|
| Warren914 |
 Jul 28 2021, 10:13 AM Jul 28 2021, 10:13 AM
Post
#109
|
|
Member   Group: Members Posts: 93 Joined: 26-February 21 From: Nova Scotia Member No.: 25,265 Region Association: Canada |
|
| bandjoey |
 Jul 28 2021, 06:42 PM Jul 28 2021, 06:42 PM
Post
#110
|
|
bandjoey     Group: Members Posts: 4,930 Joined: 26-September 07 From: Bedford Tx Member No.: 8,156 Region Association: Southwest Region |
I don't feel it's my place to post photos of Mark's garage. I'll leave it to him to post those. Here's my hand drawing for the wiring. The diode block has six diodes to switch relays and shunt reverse spikes to ground. Six wires exit the sealed heat shrink module. 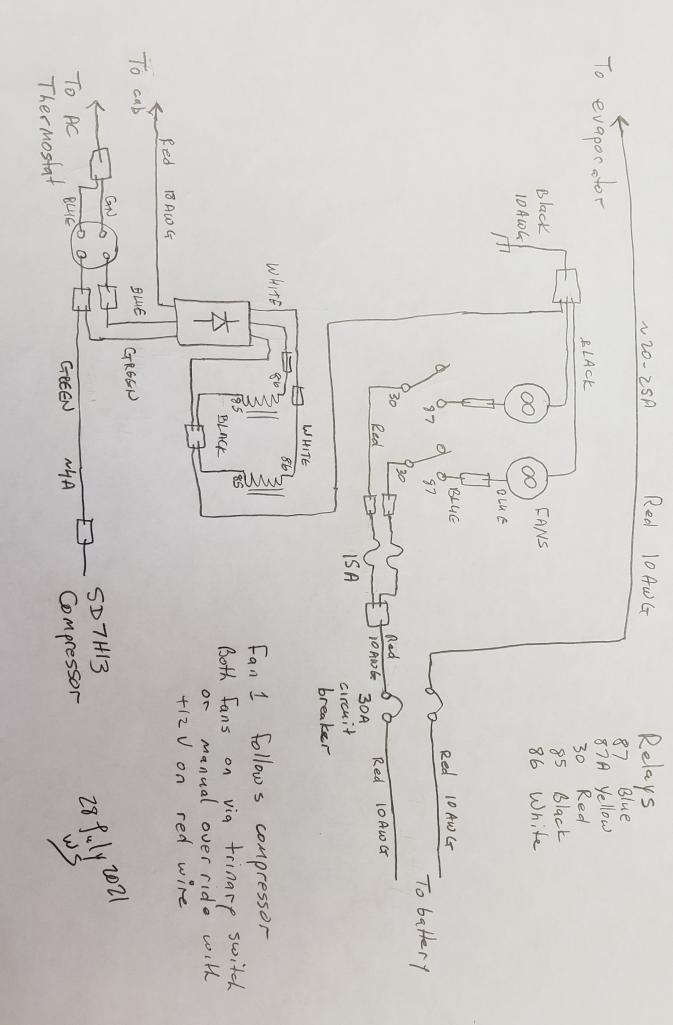 Hi Warren..I think we're all watching these AC threads. I just saw your Facebook post on the AC install, and posted a link here. I'll go back and reroute people here. |
| 76-914 |
 Jul 28 2021, 07:45 PM Jul 28 2021, 07:45 PM
Post
#111
|
|
Repeat Offender & Resident Subaru Antagonist           Group: Members Posts: 13,647 Joined: 23-January 09 From: Temecula, CA Member No.: 9,964 Region Association: Southern California 
|
I'm having AC installed this summer as part of engine/transmission rebuild with Mark Henry. Really looking forward to having the car back. Plan is to build a GT deck lid and install a 12x24 condenser underneath. Two 11-inch puller fans will be used. One fan comes on with the compressor and the other is controlled by the trinary switch or switch in the cab. I've built up a simple diode matrix with color coded wires to simplify installation. A Sanden SD7H13 compressor, engine mount, pulley and belt have been supplied by Gilmore Enterprises. Under dash evaporator, condenser coil, hoses, dryer come from Vintage Air. I saw pictures of used dryer/receivers in the older messages in the thread. From my discussion with HVAC techs, those should never be reused. It has a limited capacity for moisture removal. If the refrigerant is replaced due to maintenance or a leak the dryer should be replaced. Has anyone had an issue with electrical overload with the AC system? VintageAir claims the under dash evaporator may need up to about 25A for the blower and compressor clutch. The condenser fans could require about 9A each. That's up to 43A total. Maybe I'll be looking at an upgraded alternator next summer. Which evap unit did you purchase from Vintage Air. BTW, they're friendly and helpful should you have a question. You'll usually get someone on the phone that knows what they're talking about, which is a big plus. (IMG:style_emoticons/default/beerchug.gif) |
| Mark Henry |
 Jul 28 2021, 08:16 PM Jul 28 2021, 08:16 PM
Post
#112
|
|
that's what I do!                Group: Members Posts: 20,065 Joined: 27-December 02 From: Port Hope, Ontario Member No.: 26 Region Association: Canada |
Attached image(s) 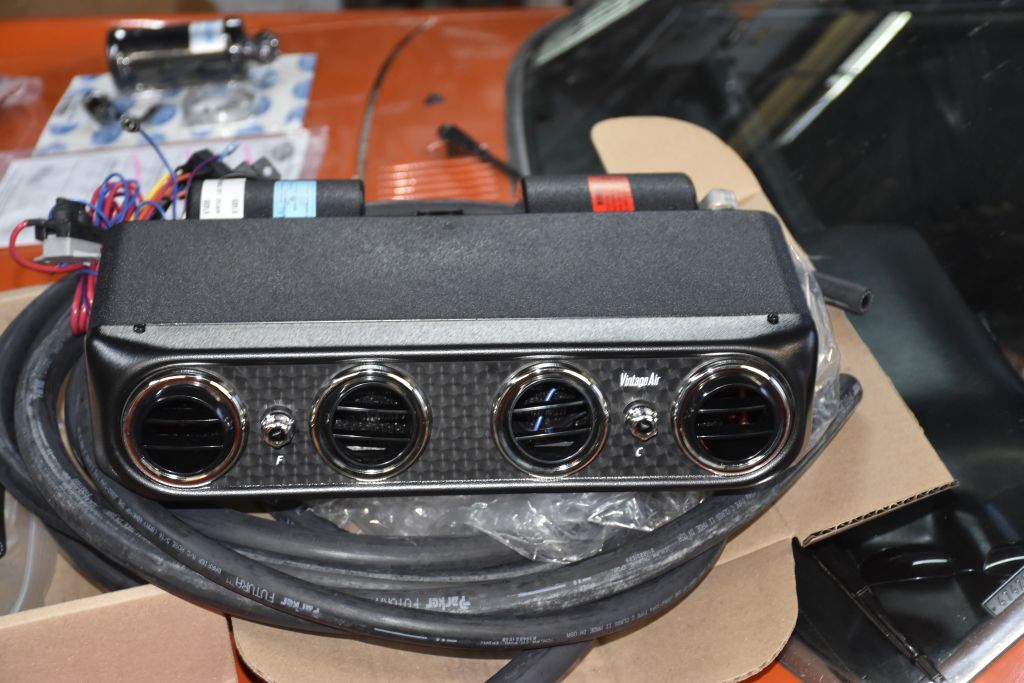
|
| Warren914 |
 Jul 29 2021, 12:40 AM Jul 29 2021, 12:40 AM
Post
#113
|
|
Member   Group: Members Posts: 93 Joined: 26-February 21 From: Nova Scotia Member No.: 25,265 Region Association: Canada |
Tech support at VintageAir has been very good. I'm pleased with their knowlwdge and willingness to help on the phone or via email.
I asked my kids (and Mark) for opinions on the evaporator. This was the unanimous suggestion. Heritage Under Dash System Cool Only Blk Anod Eng Turned Aluminum https://www.vintageair.com/custom/product-pop.php?pn=674005 Which evap unit did you purchase from Vintage Air. BTW, they're friendly and helpful should you have a question. You'll usually get someone on the phone that knows what they're talking about, which is a big plus. (IMG:style_emoticons/default/beerchug.gif) |
| friethmiller |
 Jul 29 2021, 09:40 AM Jul 29 2021, 09:40 AM
Post
#114
|
|
Senior Member    Group: Members Posts: 667 Joined: 10-February 19 From: Austin, TX Member No.: 22,863 Region Association: Southwest Region 
|
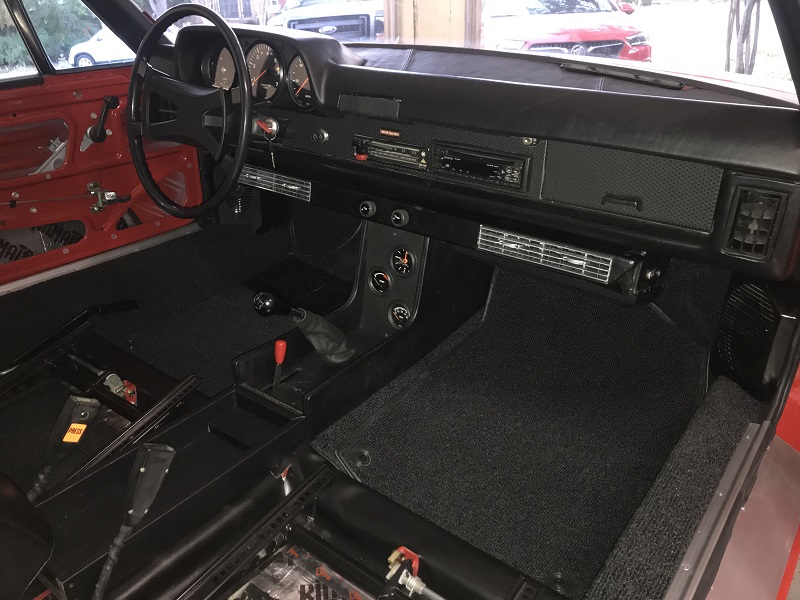
I actually did not care for the evaporate unit that came in the kit from Classic Auto Air. It was the wrong color and too big to fit between the dash and my original A/C center console. Moreover, it wasn't the same unit that was pictured on their web site. I was a little upset since their customer service couldn't help me. In a micro-fit-of-rage, I decided to purchase a "more" original unit off eBay and use that one instead. The problem with an original unit is that it's... well... 50 years old! So, I decided to create my own Frankenstein. I restored the front end of the old unit and married it up with the new backend/evap motor. The two halves almost matched exactly. Just had to fill in a small spot in the back. My goal was to get the best of both worlds. None of the hoses or electric is hooked up yet but here are a few photos.
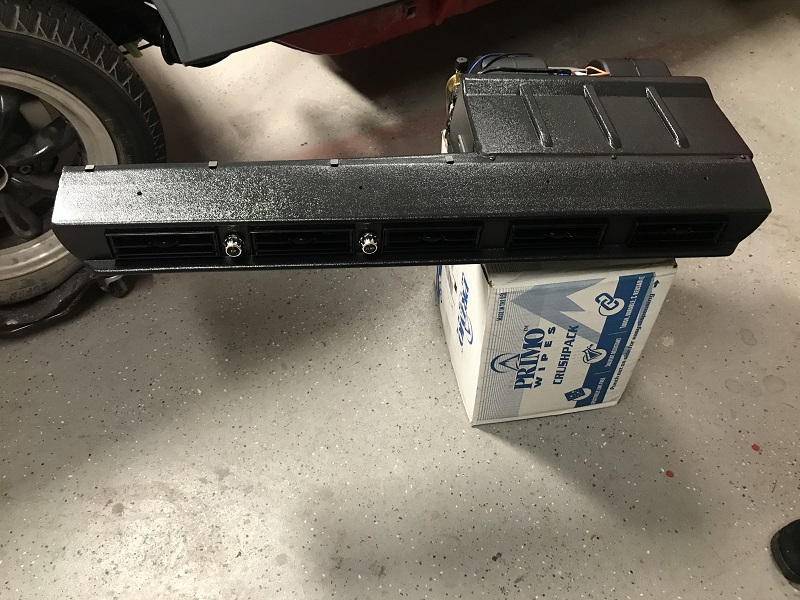 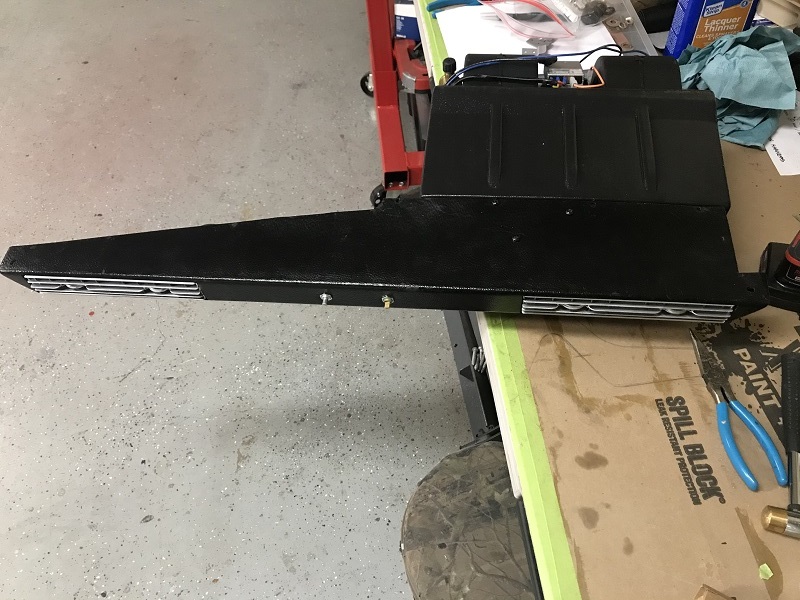 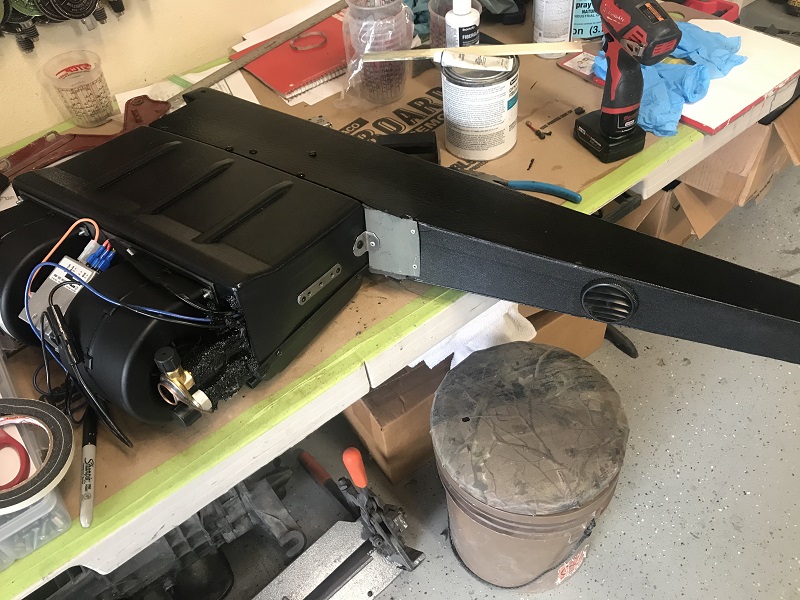  |
| djway |
 Jul 29 2021, 03:50 PM Jul 29 2021, 03:50 PM
Post
#115
|
|
Senior Member    Group: Members Posts: 787 Joined: 16-October 15 From: Riverside Member No.: 19,266 Region Association: Southern California |
Looks good.
I rehabbed a VPC unit for my T4 powered Notchback. All I changed was to add a new style expansion valve. Blew very cold. I did discover that using the Mastercool tool to crimp the fittings to the hose requires multiple crimps at 180 deg increments to avoid leaks. A bigger problem for me has been finding vents in good shape as they are a specific size. Yours look good. |
| 76-914 |
 Jul 29 2021, 07:10 PM Jul 29 2021, 07:10 PM
Post
#116
|
|
Repeat Offender & Resident Subaru Antagonist           Group: Members Posts: 13,647 Joined: 23-January 09 From: Temecula, CA Member No.: 9,964 Region Association: Southern California 
|
That looks great!
|
| 76-914 |
 Jul 29 2021, 07:15 PM Jul 29 2021, 07:15 PM
Post
#117
|
|
Repeat Offender & Resident Subaru Antagonist           Group: Members Posts: 13,647 Joined: 23-January 09 From: Temecula, CA Member No.: 9,964 Region Association: Southern California 
|
Looks good. I rehabbed a VPC unit for my T4 powered Notchback. All I changed was to add a new style expansion valve. Blew very cold. I did discover that using the Mastercool tool to crimp the fittings to the hose requires multiple crimps at 180 deg increments to avoid leaks. A bigger problem for me has been finding vents in good shape as they are a specific size. Yours look good. Same tool here. I found that going past the the indicated stop point works too. (IMG:style_emoticons/default/beerchug.gif) |
| friethmiller |
 Jul 29 2021, 10:15 PM Jul 29 2021, 10:15 PM
Post
#118
|
|
Senior Member    Group: Members Posts: 667 Joined: 10-February 19 From: Austin, TX Member No.: 22,863 Region Association: Southwest Region 
|
Good to know on the Master Cool Crimper. I haven’t used mine yet and will definitely keep that in mind when I do. FWIW, I still have usable vents from the front of my new unit that I don’t need. If anyone wants them, I have 5 plastic vents that are approximately 5” x 1 1/2”
|
| 76-914 |
 Jul 29 2021, 10:52 PM Jul 29 2021, 10:52 PM
Post
#119
|
|
Repeat Offender & Resident Subaru Antagonist           Group: Members Posts: 13,647 Joined: 23-January 09 From: Temecula, CA Member No.: 9,964 Region Association: Southern California 
|
Good to know on the Master Cool Crimper. I haven’t used mine yet and will definitely keep that in mind when I do. FWIW, I still have usable vents from the front of my new unit that I don’t need. If anyone wants them, I have 5 plastic vents that are approximately 5” x 1 1/2” I need a replacement vent but mine is Vintage Air. Let me measure mine tomorrow and post a pic. These companies are small and may share a manufacturer. |
| djway |
 Jul 30 2021, 10:52 PM Jul 30 2021, 10:52 PM
Post
#120
|
|
Senior Member    Group: Members Posts: 787 Joined: 16-October 15 From: Riverside Member No.: 19,266 Region Association: Southern California |
My vents are aprox 4 x 1.25 (IMG:style_emoticons/default/sad.gif)
I always went a little past the indicator mark when crimping. What I noticed was the ferrule didn't crimp in and kind of stuck out at where I assume was the location the jaws met. I was able to get the device back on the ferrule while in location which I mounted it to be 180deg from where I assume it was originally. I tried the AC again after it had been sitting for a while and still seemed to blow cold so fingers crossed. I also made a bracket and installed the throttle stop solenoid which really helps drivability. (IMG:style_emoticons/default/smile.gif) |
  |
1 User(s) are reading this topic (1 Guests and 0 Anonymous Users)
0 Members:

|
Lo-Fi Version | Time is now: 28th December 2024 - 09:18 PM |
Invision Power Board
v9.1.4 © 2024 IPS, Inc.


