|
|

|
Porsche, and the Porsche crest are registered trademarks of Dr. Ing. h.c. F. Porsche AG.
This site is not affiliated with Porsche in any way. Its only purpose is to provide an online forum for car enthusiasts. All other trademarks are property of their respective owners. |
|
|
  |
| 76-914 |
 May 1 2014, 10:23 AM May 1 2014, 10:23 AM
Post
#245
|
|
Repeat Offender & Resident Subaru Antagonist           Group: Members Posts: 13,698 Joined: 23-January 09 From: Temecula, CA Member No.: 9,964 Region Association: Southern California 
|
Hey Chris, I'm having withdrawals. Got any updates? (IMG:style_emoticons/default/drooley.gif)
|
| Chris H. |
 May 1 2014, 12:38 PM May 1 2014, 12:38 PM
Post
#246
|
|
Senior Member     Group: Members Posts: 4,055 Joined: 2-January 03 From: Chicago 'burbs Member No.: 73 Region Association: Upper MidWest 
|
Hey Kent,
Wish I had more visual updates but I'm mostly collecting parts right now. Got all my hose and stuff. Right now I'm waiting for Jags That Run to call me back so they can send the last few bits for my cooling system setup. Spent way too much time over-thinking my coolant filler neck because the SVX high-point is at a weird angle just a few inches from the firewall. 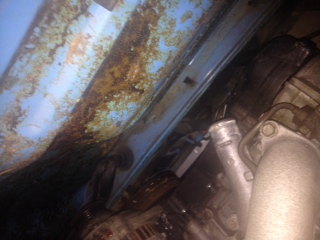 Finally came up with something I think will work... 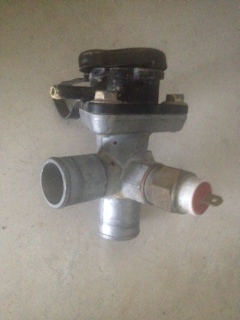 This is a Yamaha snowmobile/large motorcycle filler. Very durable (seems like an aluminum alloy of some kind...) and the filler neck extends quite a bit above the coolant hose "hole" which is needed since the engine line is larger and we're connecting it there. The sender on there can be removed and capped. The cap is loose BTW... The 7/8 hose fits great, although I I also bought this Honda 1000rr filler which has the same size hose outlets. Might try it as well but I like the Yamaha so far. 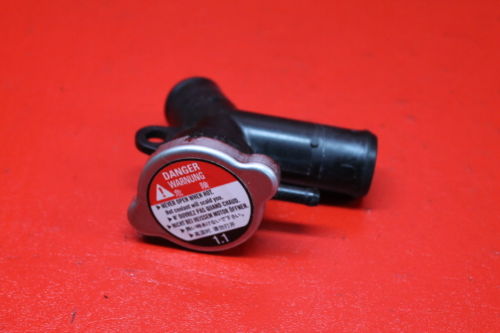 Next I'll steal phoenix-hobbies' idea and weld nuts to the underside of the floor pan to mount the coolant lines so I don't have to drill holes in the floor. The lines barely protrude below the grooves in the floor pan. But first I need to install the clutch master...that little 90 degree elbow should be on my porch by now. |
| 76-914 |
 May 1 2014, 01:00 PM May 1 2014, 01:00 PM
Post
#247
|
|
Repeat Offender & Resident Subaru Antagonist           Group: Members Posts: 13,698 Joined: 23-January 09 From: Temecula, CA Member No.: 9,964 Region Association: Southern California 
|
(IMG:style_emoticons/default/piratenanner.gif) Cool! Great find. If you don't use that Honda neck I'll buy it from you. Are those jam nuts that you will be welding to the pan? I can't imagine a regular nut working well. You'd only catch 3 to 4 threads. (IMG:style_emoticons/default/confused24.gif)
|
| Chris H. |
 May 1 2014, 01:47 PM May 1 2014, 01:47 PM
Post
#248
|
|
Senior Member     Group: Members Posts: 4,055 Joined: 2-January 03 From: Chicago 'burbs Member No.: 73 Region Association: Upper MidWest 
|
I haven't picked the nuts yet...(that sounded weird (IMG:style_emoticons/default/biggrin.gif) ) but I'll let you know .
I'm glad you asked about the Honda filler because I was gonna offer it to you in the last post but didn't want you to think I didn't like your current setup (which I do like). It's just that it's copper so at some point you'll probably want to change it. This will work great whenever you decide to swap it out. The 7/8 return line goes in the upper hole which is your high point, then you can run another 7/8 hose from the lower outlet down to a tee where those larger hoses intersect, done deal. It has an attachment loop so you don't have to worry about it slumping over. I got it for $6.95 SHIPPED so I won't sell it to you but I'll be happy to give it to you when I'm done. I only bought it because the hose sizes looked bigger than they are in the e-bay pic. I think they are actually 7/8" now that I put a ruler to them. The angle of the lower inlet even kinda follows the contour of the firewall if you have the room (and I don't). BTW the Yamaha filler is from a mid-90's VMAX snowmobile for anyone interested. Like $20 on e-bay. There are many models, 500, 600, etc. |
| 76-914 |
 May 1 2014, 03:53 PM May 1 2014, 03:53 PM
Post
#249
|
|
Repeat Offender & Resident Subaru Antagonist           Group: Members Posts: 13,698 Joined: 23-January 09 From: Temecula, CA Member No.: 9,964 Region Association: Southern California 
|
LMK, I'll paypal ya whenever. Re: welding nuts to the pan. You know what I'm getting at, right? The screw will stop as soon as it hits the pan. Why not drill your holes, insert a bolt and weld it in place giving you studs beneath?? Or did I miss something completely? (IMG:style_emoticons/default/drunk.gif)
|
| Chris H. |
 May 1 2014, 04:23 PM May 1 2014, 04:23 PM
Post
#250
|
|
Senior Member     Group: Members Posts: 4,055 Joined: 2-January 03 From: Chicago 'burbs Member No.: 73 Region Association: Upper MidWest 
|
I just don't want to cut a bunch of small holes in the floor. Our weather isn't as good around here so I don't want ANY water in the cabin. If you weld the nut to the pan underneath you can screw the bolts in and not cut any holes. Just have to weld the side not through the middle and use short bolts. I'll look for a deeper than normal nut. As long as I use enough straps it'll hold fine.
You're not Pay Pal'ing me pal. I'll just send it to you when I'm done. If I need six dollars someday I'll know who to call. |
| 76-914 |
 May 1 2014, 05:21 PM May 1 2014, 05:21 PM
Post
#251
|
|
Repeat Offender & Resident Subaru Antagonist           Group: Members Posts: 13,698 Joined: 23-January 09 From: Temecula, CA Member No.: 9,964 Region Association: Southern California 
|
Thanks Chris.
|
| 76-914 |
 May 1 2014, 06:32 PM May 1 2014, 06:32 PM
Post
#252
|
|
Repeat Offender & Resident Subaru Antagonist           Group: Members Posts: 13,698 Joined: 23-January 09 From: Temecula, CA Member No.: 9,964 Region Association: Southern California 
|
|
| Chris H. |
 May 1 2014, 06:46 PM May 1 2014, 06:46 PM
Post
#253
|
|
Senior Member     Group: Members Posts: 4,055 Joined: 2-January 03 From: Chicago 'burbs Member No.: 73 Region Association: Upper MidWest 
|
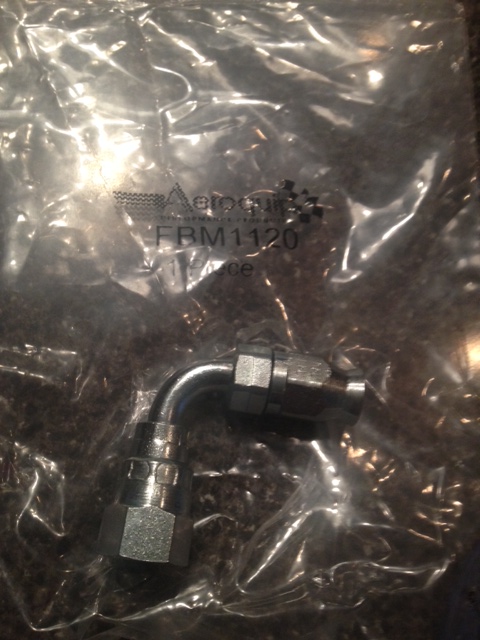
That's it! Just got it today. I searched the straight one I bought originally and it was easy to find with your pic. No excuses now I guess. Better get at it.
 |
| 76-914 |
 May 27 2014, 09:26 AM May 27 2014, 09:26 AM
Post
#254
|
|
Repeat Offender & Resident Subaru Antagonist           Group: Members Posts: 13,698 Joined: 23-January 09 From: Temecula, CA Member No.: 9,964 Region Association: Southern California 
|
***NOTICE*** This thread needs action or risk exposure in the "Slacker's Thread"! (IMG:style_emoticons/default/stirthepot.gif)
|
| Chris H. |
 May 27 2014, 09:54 AM May 27 2014, 09:54 AM
Post
#255
|
|
Senior Member     Group: Members Posts: 4,055 Joined: 2-January 03 From: Chicago 'burbs Member No.: 73 Region Association: Upper MidWest 
|
Duly noted sir. I'll get some updates in here pretty soon.
|
| ruby914 |
 May 27 2014, 10:30 AM May 27 2014, 10:30 AM
Post
#256
|
|
Senior Member    Group: Members Posts: 720 Joined: 26-April 09 From: Hawthorne, Ca Member No.: 10,305 Region Association: None |
Duly noted sir. I'll get some updates in here pretty soon. As soon as he gets his car started, he call you out. (IMG:style_emoticons/default/biggrin.gif) |
| Chris H. |
 May 27 2014, 10:54 AM May 27 2014, 10:54 AM
Post
#257
|
|
Senior Member     Group: Members Posts: 4,055 Joined: 2-January 03 From: Chicago 'burbs Member No.: 73 Region Association: Upper MidWest 
|
It's the adrenaline (IMG:style_emoticons/default/biggrin.gif) . I do need to update this thread though. Pretty much just posting on Kent's the last couple of months!
BTW what gauge aluminum/sheet metal is best for radiator shrouding and where do you get it? I went to Home Depot and the stuff they stock is too thin. I see special order thicknesses but not sure which is the best mix of firm yet flexible. I assume aluminum is what everyone uses? |
| 76-914 |
 May 27 2014, 11:49 AM May 27 2014, 11:49 AM
Post
#258
|
|
Repeat Offender & Resident Subaru Antagonist           Group: Members Posts: 13,698 Joined: 23-January 09 From: Temecula, CA Member No.: 9,964 Region Association: Southern California 
|
I used some sheet metal I had laying around. You'll get some mild oxidation with the aluminum where it comes in contact with the body steel. I'd go steel. For your aluminum needs; aircraftspruce.com We will be looking for lots of pic's. (IMG:style_emoticons/default/biggrin.gif) And yes Mike, Chris will be chiding me next but that's how it works in this suby group. We're a Mutual Prodding Society. (IMG:style_emoticons/default/av-943.gif)
|
| Chris H. |
 May 27 2014, 02:22 PM May 27 2014, 02:22 PM
Post
#259
|
|
Senior Member     Group: Members Posts: 4,055 Joined: 2-January 03 From: Chicago 'burbs Member No.: 73 Region Association: Upper MidWest 
|
Yeah I'm saving mine up... (IMG:style_emoticons/default/poke.gif) (IMG:style_emoticons/default/biggrin.gif)
So...sheet steel..what gauge?? Can I get it at a home improvement place? |
| 76-914 |
 May 28 2014, 07:40 AM May 28 2014, 07:40 AM
Post
#260
|
|
Repeat Offender & Resident Subaru Antagonist           Group: Members Posts: 13,698 Joined: 23-January 09 From: Temecula, CA Member No.: 9,964 Region Association: Southern California 
|
20 0r 22ga? I'll check it this evening. Yes, you can get it at the depot or lowe's. TIP: Bobco metals in LA will cut and ship just about any piece of metal. Go get 'em Hot Rod.
|
| Chris H. |
 Jun 8 2014, 07:29 PM Jun 8 2014, 07:29 PM
Post
#261
|
|
Senior Member     Group: Members Posts: 4,055 Joined: 2-January 03 From: Chicago 'burbs Member No.: 73 Region Association: Upper MidWest 
|
Finally finished my hydraulic clutch setup! Whew! Nerve wracking. Normally I don't do much measuring and re-measuring but this time there could not be a mm of extra space. My car is rust free and any car enthusiast from the Midwest knows that you better be REALLY careful cutting holes in or near the floor of an un-galvanized VW product. I think the extra time was worth it, because it's gonna be well sealed.
If you have a 19mm MC and are going to use a bracket like this you might as well drill out the original MC pedal cluster bolts because they will be too short. Be careful not to mangle the surrounding area. It takes a lot of abuse getting kicked with your feet so the metal can't be weak. I used a dremel with a cutoff wheel and then the sand stone grinder. 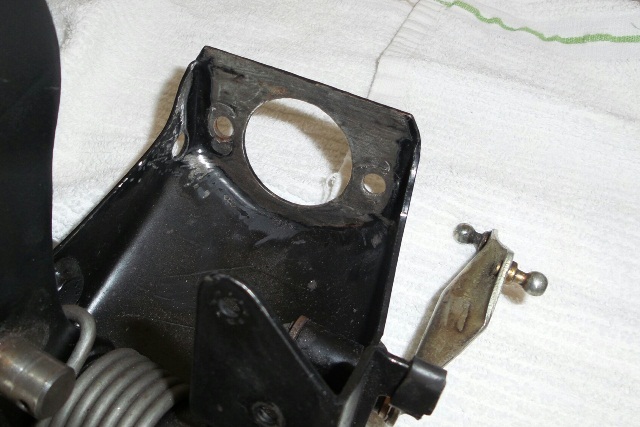 Just need to re-paint it now. Found these 30mm long metric bolts at HD with the lock washer heads. very nice because they grip the cluster so you don't have to clamp them to tighten them. The nut is 13mm just like stock 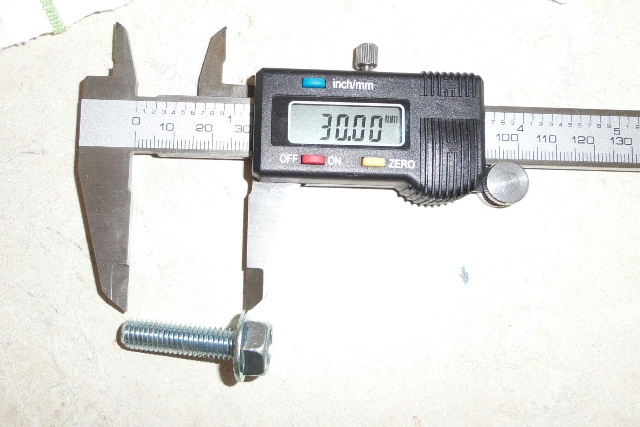 Here's the wide shot. I had to trim mine because the MC had a groove in it. It's a little loose so it looks like it's sagging left (it is). The hole next to it is for the hydraulic line. Used a 5/16 bit and then widened it a little more. 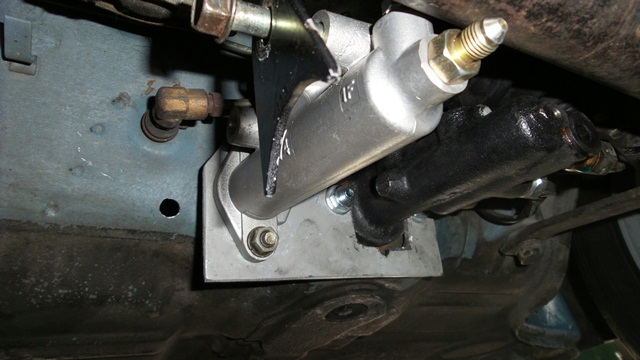 And the side shot. You can see how I measured out for the hole. Just bolted up the bracket without the MC on it and traced out the outline for reference. DO NOT cut the entire hole out. Then I drilled a hole just below the center line starting with small bits and going larger until the hole was large enough to test fit the setup. Need to trim just above the pin as you can see, but the hole is still very small. NOTE: the rubber baffle seal is not installed yet which will seal it up nicely. 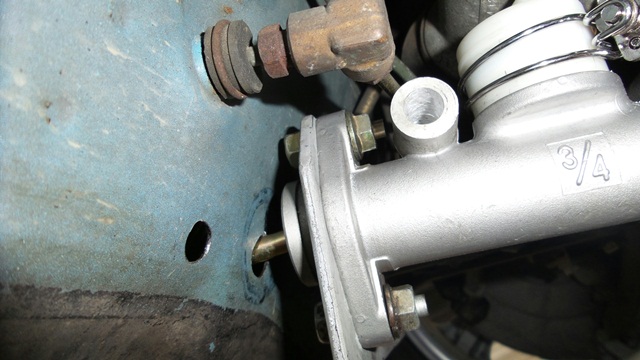 Inside shot. Man the clutch action feels soooooo smooth. I know it will firm up when pressurized but it feels a lot different (better). 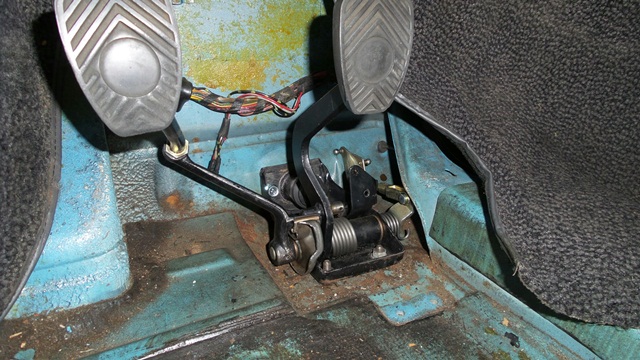 Floor shot 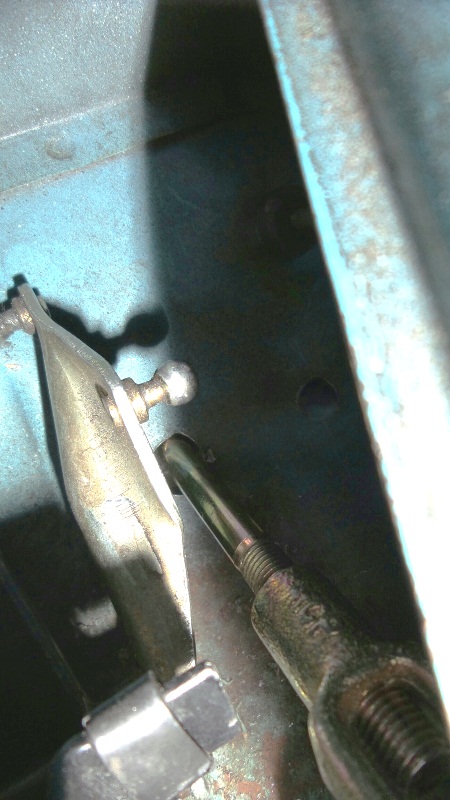 Gotta say very nice engineering Kent! Even though my brake MC required me to trim the bracket, it's still just as strong as before. Once I hook up the brace it'll be awesome. (IMG:style_emoticons/default/beerchug.gif) Next on the list: I cut 2 more holes in the ^&*&^ing trunk for the radiator hoses (small ones) and attach the hoses underneath. |
| Chris914n6 |
 Jun 8 2014, 09:15 PM Jun 8 2014, 09:15 PM
Post
#262
|
|
Jackstands are my life.     Group: Members Posts: 3,461 Joined: 14-March 03 From: Las Vegas, NV Member No.: 431 Region Association: Southwest Region |
Find a local steel supply place. A 4x8 of .050 aluminum is near $50. .050 is what RH uses.
|
| CptTripps |
 Jun 9 2014, 06:24 AM Jun 9 2014, 06:24 AM
Post
#263
|
|
:: Punch and Pie ::     Group: Members Posts: 3,585 Joined: 26-December 04 From: Tuscaloosa, AL and Akron, OH Member No.: 3,342 Region Association: Upper MidWest |
It's a VERY tight fit in there for sure.
One thing I did differently was to double-brace on either side of the clutch master. I was getting a little movement there and the additional brace seemed to work well. You're also going to want to make the hole through that wall a little bigger. I found that there is a little up/down movement when pushing the clutch in/out. Just a thought or two... Attached image(s) 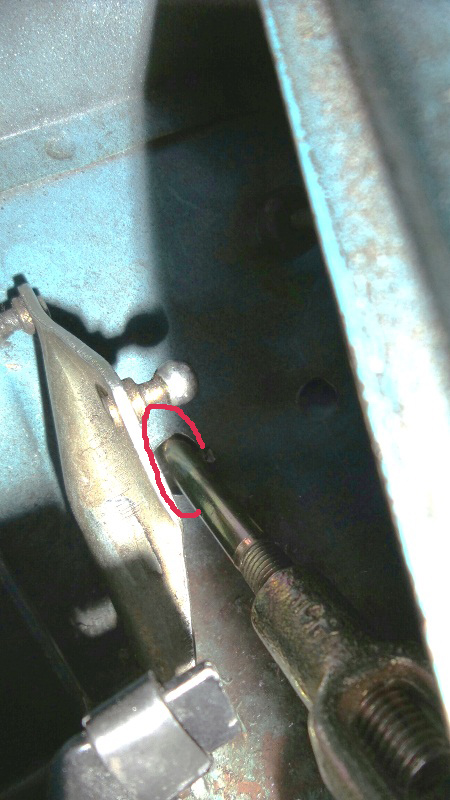 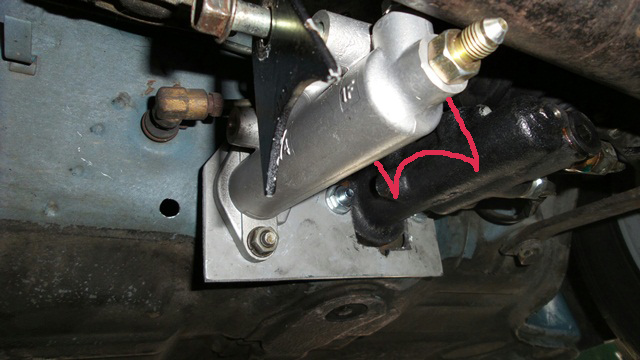
|
| Chris H. |
 Jun 9 2014, 07:41 AM Jun 9 2014, 07:41 AM
Post
#264
|
|
Senior Member     Group: Members Posts: 4,055 Joined: 2-January 03 From: Chicago 'burbs Member No.: 73 Region Association: Upper MidWest 
|
Good call on the extra brace Doug. I enlarged the hole a bit last night after the test fit, just wanted to remove as little as possible. It's probably about 3-4mm larger above the pin. Should be enough but we'll see.
|
  |
2 User(s) are reading this topic (2 Guests and 0 Anonymous Users)
0 Members:

|
Lo-Fi Version | Time is now: 21st April 2025 - 11:30 AM |
Invision Power Board
v9.1.4 © 2025 IPS, Inc.


