|
|

|
Porsche, and the Porsche crest are registered trademarks of Dr. Ing. h.c. F. Porsche AG.
This site is not affiliated with Porsche in any way. Its only purpose is to provide an online forum for car enthusiasts. All other trademarks are property of their respective owners. |
|
|
  |
| Chris H. |
 Jul 16 2016, 12:15 PM Jul 16 2016, 12:15 PM
Post
#705
|
|
Senior Member     Group: Members Posts: 4,055 Joined: 2-January 03 From: Chicago 'burbs Member No.: 73 Region Association: Upper MidWest 
|
Not really. Pretty much the same. It's very quiet at idle and then when you lean on it the exhaust is way louder than the intake. Neither is that loud compared to an air cooled engine. I can hear the fuel injectors clicking with my head in the engine bay. That's how quiet it is.
|
| mgp4591 |
 Jul 17 2016, 02:18 AM Jul 17 2016, 02:18 AM
Post
#706
|
|
914 Guru      Group: Members Posts: 5,609 Joined: 1-August 12 From: Salt Lake City Ut Member No.: 14,748 Region Association: Intermountain Region 
|
Not really. Pretty much the same. It's very quiet at idle and then when you lean on it the exhaust is way louder than the intake. Neither is that loud compared to an air cooled engine. I can hear the fuel injectors clicking with my head in the engine bay. That's how quiet it is. Great! Now I just have to go over your thread to find all the parts I need to flip this sucka before I install mine... (IMG:style_emoticons/default/shades.gif) |
| flmont |
 Jul 22 2016, 10:19 PM Jul 22 2016, 10:19 PM
Post
#707
|
|
Senior Member    Group: Members Posts: 879 Joined: 21-October 08 From: Tucson,Az Member No.: 9,676 Region Association: Southwest Region 
|
What is the best route for a aftermarket ECU harness set-up for a EG33,..??? or best vendor options,.??
|
| a914622 |
 Jul 22 2016, 10:52 PM Jul 22 2016, 10:52 PM
Post
#708
|
|
Member   Group: Members Posts: 316 Joined: 12-August 10 From: northwest Member No.: 12,048 Region Association: Pacific Northwest |
Congrats Chris!!! That video sounds great.
Can you mesure the top of the flipped manifold to the bottom of the deck lid. Just a rough idea. Thanks |
| Chris H. |
 Jul 22 2016, 11:22 PM Jul 22 2016, 11:22 PM
Post
#709
|
|
Senior Member     Group: Members Posts: 4,055 Joined: 2-January 03 From: Chicago 'burbs Member No.: 73 Region Association: Upper MidWest 
|
Thanks! Sure I'll get that for you tomorrow. I owe Kent some pics too. Kent that coolant hose is not here yet! Monday at the latest.
|
| 914forme |
 Jul 23 2016, 11:36 AM Jul 23 2016, 11:36 AM
Post
#710
|
|
Times a wastin', get wrenchin'!     Group: Members Posts: 3,896 Joined: 24-July 04 From: Dayton, Ohio Member No.: 2,388 Region Association: None 
|
What is the best route for a aftermarket ECU harness set-up for a EG33,..??? or best vendor options,.?? So your asking for an opinion? How much work do you want to do. Nothing at all, SDS - it will be a custom harness, they will work with you, done lots of EG33 you just need to do a final tune Outback is the same You love doing it all - MegaSquirt Start a new thread for your build. We need another EG33 build thread for entertainment. The stock ecu is a very capable unit, look at Chris' build he is moving down the road with force. Need a little more the chips are a viable option. |
| flmont |
 Jul 23 2016, 12:25 PM Jul 23 2016, 12:25 PM
Post
#711
|
|
Senior Member    Group: Members Posts: 879 Joined: 21-October 08 From: Tucson,Az Member No.: 9,676 Region Association: Southwest Region 
|
SDS is for me, whats the cost on that system.
|
| flmont |
 Jul 23 2016, 12:27 PM Jul 23 2016, 12:27 PM
Post
#712
|
|
Senior Member    Group: Members Posts: 879 Joined: 21-October 08 From: Tucson,Az Member No.: 9,676 Region Association: Southwest Region 
|
Oh i would do the chips,injection,and the Z32,
|
| Chris H. |
 Jul 23 2016, 01:31 PM Jul 23 2016, 01:31 PM
Post
#713
|
|
Senior Member     Group: Members Posts: 4,055 Joined: 2-January 03 From: Chicago 'burbs Member No.: 73 Region Association: Upper MidWest 
|
You can do that with the subiechips setup. Stock ECU, upgrade chip is about $300, then just buy 300zx injectors and MAF. I think you need the wiring connectors too. The guy on the subaru-svx forum will help you. Same guy who does the group buys is the subiechips guy.
The SDS is money but a great system. You can really tune the engine to exactly how you want it. Someday soon I'll go aftermarket. Tired of guessing if it's running right or not. |
| Chris H. |
 Jul 23 2016, 05:25 PM Jul 23 2016, 05:25 PM
Post
#714
|
|
Senior Member     Group: Members Posts: 4,055 Joined: 2-January 03 From: Chicago 'burbs Member No.: 73 Region Association: Upper MidWest 
|
Alright a few updates. I have the coolant drained again since my new 1.25 lines are coming Monday. Kent you must be pacing the floor. I'll make sure to get the package turned around quickly.
Here is a pic of where my lines come through the front trunk. I have them following the indentations in the floor underneath. 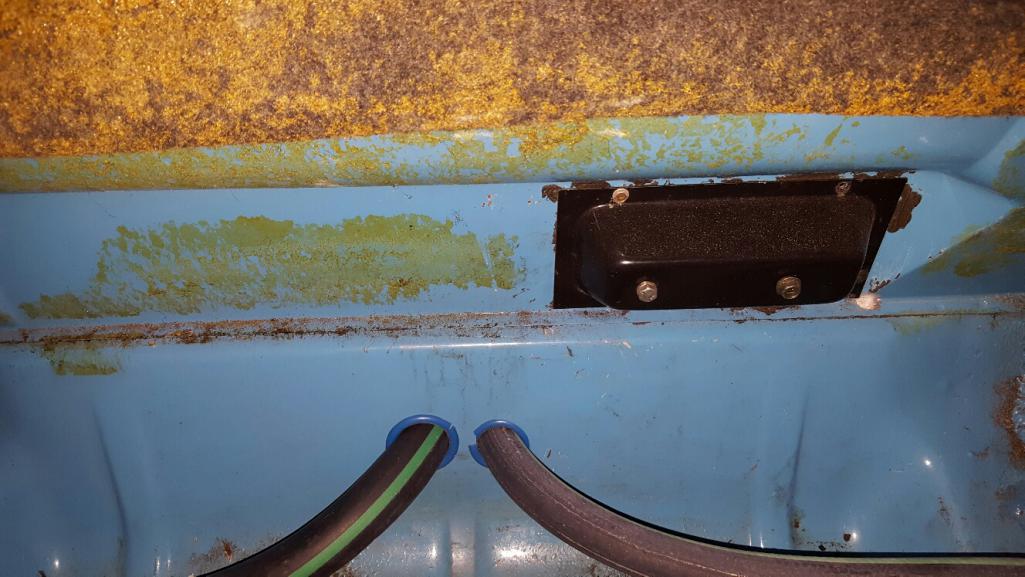 Someone was asking about fuel pump relocation in another thread...well...there is the fuel pump behind that black plate. Walbro pump fits in the stock location. BTW it is running much quieter now. Here is the engine with the intake flipped. 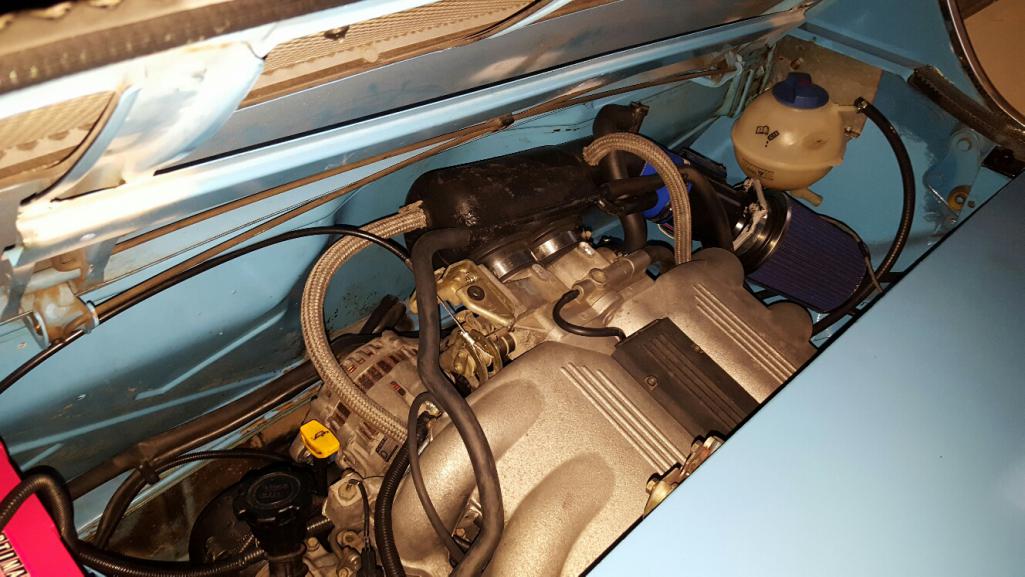 The stock plastic intake piece is actually flipped as well because it would not fit the other way (battery). You can see it is slightly tipped up and higher on the right side because it is hitting the firewall on that side. The intake is very thick so I think I can shave a little off of it and get it to fit. I had to shorten it quite a bit. Luckily I have another one. If my Optima ever dies on me I will use the battery tray as a support for the stock air cleaner and put a small battery on the other side. Here's an idea of how high the intake is in relation to the engine lid. 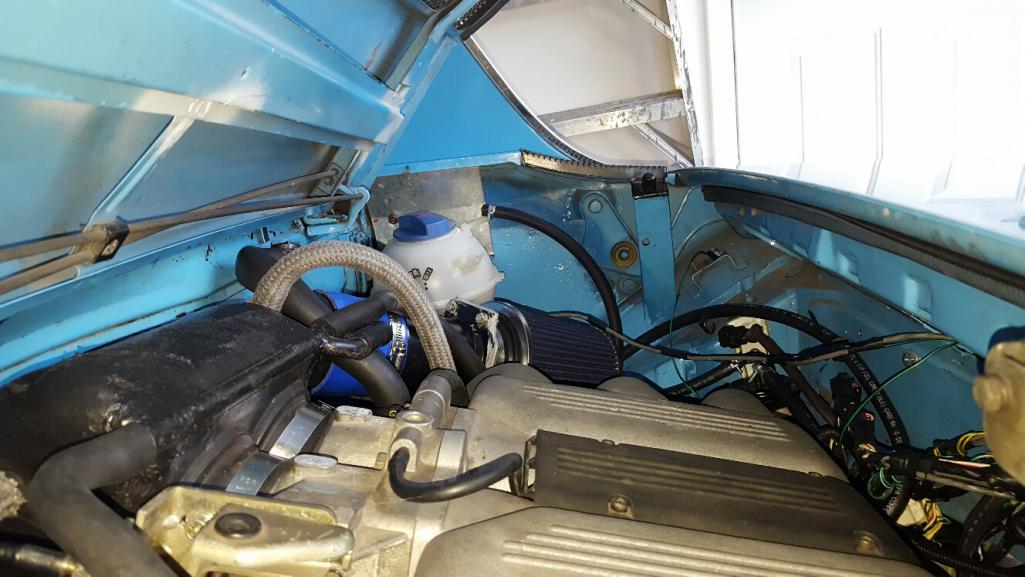 The intake itself clears easily, with about 3.5 to 4 inches of room. Here I used the MAF because its is the same height but easier to show measurement to the lid hinge. 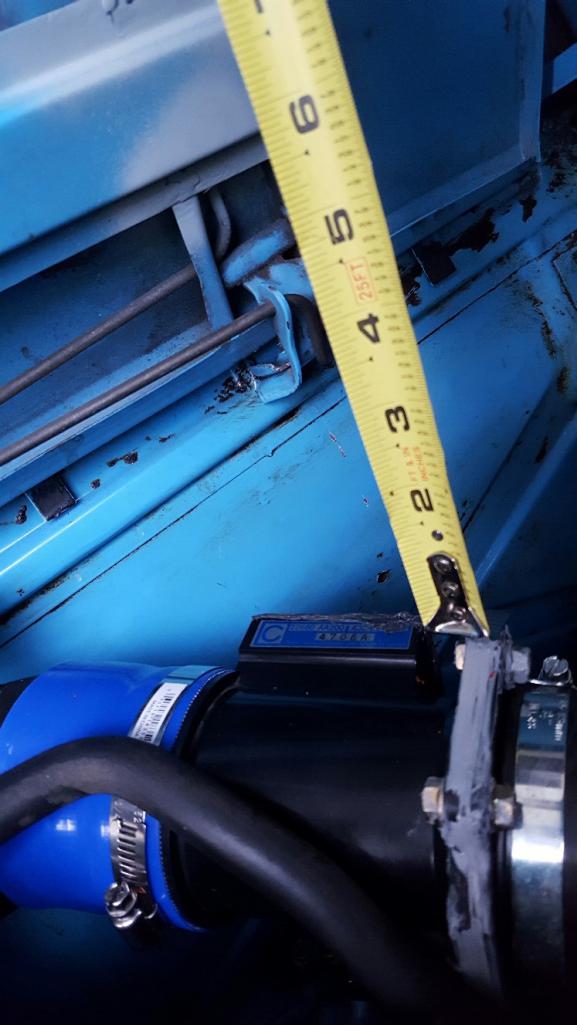 Could put the rain tray back in I guess. The plastic snorkel piece is close to the lid but that is mainly because it is upside down so the IAC valve hose is on top. It would be behind the rain tray anyway. |
| 76-914 |
 Jul 24 2016, 08:43 AM Jul 24 2016, 08:43 AM
Post
#715
|
|
Repeat Offender & Resident Subaru Antagonist           Group: Members Posts: 13,698 Joined: 23-January 09 From: Temecula, CA Member No.: 9,964 Region Association: Southern California 
|
Wow! That's a clean install, Chris. Where did you hide all of the wiring? Take your time on the hose. I'm waiting on a reverse lite switch that I destroyed yesterday. In the interim, I may connect it back to the old water lines to see if I destroyed the engine or repaired it. (IMG:style_emoticons/default/shades.gif)
|
| 914forme |
 Jul 24 2016, 01:01 PM Jul 24 2016, 01:01 PM
Post
#716
|
|
Times a wastin', get wrenchin'!     Group: Members Posts: 3,896 Joined: 24-July 04 From: Dayton, Ohio Member No.: 2,388 Region Association: None 
|
Looking great Chris. The intake snorkel is ABS so you could put it and weld it to give you clearance.
Also why are you updating the coolant lines? |
| Chris H. |
 Jul 24 2016, 07:40 PM Jul 24 2016, 07:40 PM
Post
#717
|
|
Senior Member     Group: Members Posts: 4,055 Joined: 2-January 03 From: Chicago 'burbs Member No.: 73 Region Association: Upper MidWest 
|
Good to know thanks Steve. I'm just moving to 1.25" hoses from 3/4 and 7/8. Kent and I have been talking about it for a while and now that he just did some work to his engine it's a good time. Not having any cooling issues myself but I haven't done any long trips and also always wanted to do a square radiator laying flat like Ross's (rnellums). Then put a false bottom in and have a water tight smaller usable trunk area and keep the heat down up there.
|
| 914forme |
 Jul 25 2016, 11:44 AM Jul 25 2016, 11:44 AM
Post
#718
|
|
Times a wastin', get wrenchin'!     Group: Members Posts: 3,896 Joined: 24-July 04 From: Dayton, Ohio Member No.: 2,388 Region Association: None 
|
Make sure you test the intake abS idea, there should be a number of the plastic type on it somewhere. I would just take a piece of ABS and see if you can weld it over one of the tubes your not using. Worse case you can always redo it in fiberglass though.
Oh okay, interesting, I am planning on going strawmann and doing a nice rad ductwork on my project. With a board, figured waterproof bags under the floor, nice stuff above, we will see, it will be a small trunk for sure. Also thought about moving my fuel tank, lower and infront of the firewall. Building a fake floor above the swaybar where to old fuel tank was and putting it in there. Could open it up if I wanted to do some tubing and tie in, and make a larger from trunk. All have their merits, all have their downsides. If I run E85 I will need to keep a semi large fuel tank to allow me a decent amount of distance between gas stations. Starting to wonder if the E85 thing should be done. Plan for it for now, if I boost my engine then I have no worries about what I have done. Guessing I need to draw up a few designs and play with the space. I still got time. Still welding in the rear trunk area. (IMG:style_emoticons/default/av-943.gif) (IMG:style_emoticons/default/headbang.gif) (IMG:style_emoticons/default/screwy.gif) |
| A&P Mech |
 Jul 25 2016, 12:17 PM Jul 25 2016, 12:17 PM
Post
#719
|
|
Member   Group: Members Posts: 401 Joined: 10-September 13 From: United States Member No.: 16,371 Region Association: Rocky Mountains |
The engine installation looks great! I really like the flipped intake. (IMG:style_emoticons/default/beerchug.gif)
|
| a914622 |
 Jul 26 2016, 07:10 PM Jul 26 2016, 07:10 PM
Post
#720
|
|
Member   Group: Members Posts: 316 Joined: 12-August 10 From: northwest Member No.: 12,048 Region Association: Pacific Northwest |
Chris
Thanks that's perfect. I have had a brain storm on the flipped intake. Based on that pic I'm going forward with it. I will pm you pics when I'm done with the machining. Jeff |
| Chris H. |
 Jul 26 2016, 08:08 PM Jul 26 2016, 08:08 PM
Post
#721
|
|
Senior Member     Group: Members Posts: 4,055 Joined: 2-January 03 From: Chicago 'burbs Member No.: 73 Region Association: Upper MidWest 
|
Ha! Can't wait to see what it is (IMG:style_emoticons/default/biggrin.gif) . Guessing it's a custom intake. Let me know if you need more measurements. I'm gonna be working on it the next few days now that it's not so hot.
Here's the precision chassis one... 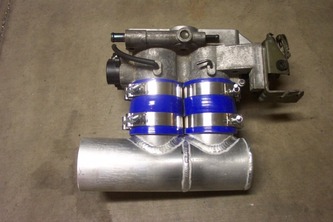 I have extra parts if something goes wrong. Throttle body, TPS, etc. |
| 914forme |
 Jul 27 2016, 04:45 AM Jul 27 2016, 04:45 AM
Post
#722
|
|
Times a wastin', get wrenchin'!     Group: Members Posts: 3,896 Joined: 24-July 04 From: Dayton, Ohio Member No.: 2,388 Region Association: None 
|
I am shockedPrecision Chassis did not add beads to the ends. At minimum a set of welded beads would have worked. I come out of the turbo TDI world, so beads go on everything after having issues with hoses blowing off. Yes even on the intake low pressure side beads = insurance
Would not be to hard to duplicate their work. Getting a TIG in-between the two inlets would be a pain in the.... That is why they welded the two pieces separate and then put them together. Almost think this piece would be easier in fiberglass / Carbon wrap. Use the AL pipes for the hose connection points. Bond it up with fiberglass, epoxy resin, do the final wrap in carbon. Welding it, you could build a small chamber to hold the unit, fill it with argon, and run the tungsten out of your cup super deep. That would avoid having to split the tube to do the welds. Or go old school and use gas welding, everyone forgets about that one. I guess if you want to play with fire, you could also cast it. For that matter you could cast it out of plastic. Or just take ABS pipes and make your own version with ABS cement, that is a Lowes plumbing isle item. All would work, I really like the ABS idea, as it is the simplest for the home mechanic. You can also worse case do the assembly with with a minor tool investments. A hole saw would be nice with a drill press not need just be nice. Of course a Mill or Tubing notcher would do the trick in no time, so many ways to do this. |
| Chris H. |
 Jul 30 2016, 06:12 PM Jul 30 2016, 06:12 PM
Post
#723
|
|
Senior Member     Group: Members Posts: 4,055 Joined: 2-January 03 From: Chicago 'burbs Member No.: 73 Region Association: Upper MidWest 
|
Found something cool today on the EG33 engine, especially for all you speed hut gauge guys. I've been wanting to change my air bleed system slightly to shorten the distance and get it to the highest point which happens to be right at the water outlet on top. That's where I had my temp sensor mounted with an aluminum extender piece. I just figured out that on the crossover bar on the engine itself there is both a water temp sensor (which you can NOT remove) and a water temp GAUGE sender. The gauge sender seems to have the same thread setup as the speed hut temp sender!
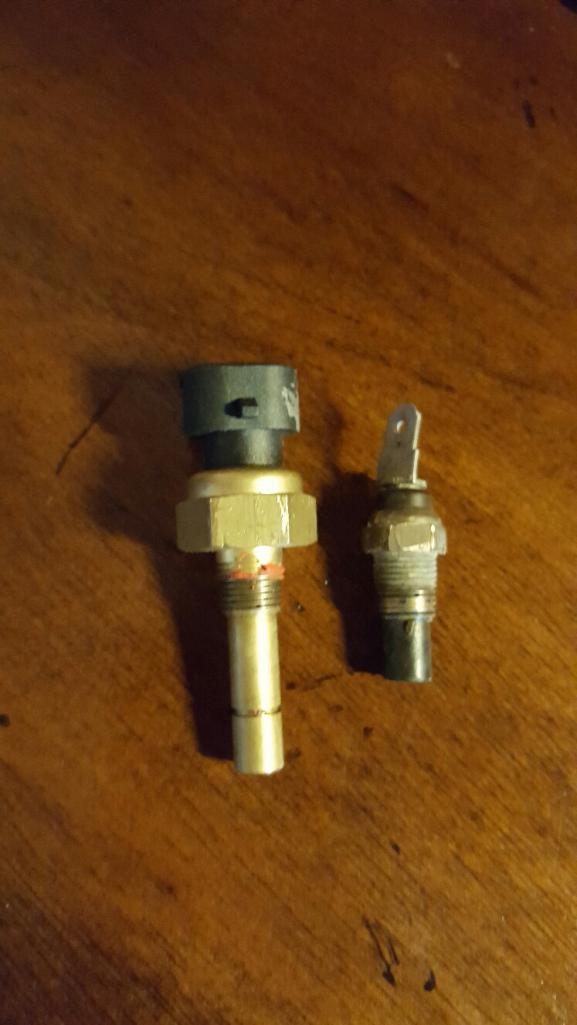 I trimmed the end of the speed hut sender just to be sure it fit in there OK (the other one is VERY short) and put that thing in! Now I can use the aluminum piece for my air outlet. I'll install a small bleeder valve on the radiator to bleed it too just to speed up the process. I haven't tested this yet with the car running but don't see why it won't work. Although the water temp sensor is required, the one right above it to the gauge should not be. More updates to come, I'm installing the hoses this weekend. Mostly swearing and talking to myself now. It's going pretty well though. |
| Chris H. |
 Aug 12 2016, 10:56 PM Aug 12 2016, 10:56 PM
Post
#724
|
|
Senior Member     Group: Members Posts: 4,055 Joined: 2-January 03 From: Chicago 'burbs Member No.: 73 Region Association: Upper MidWest 
|
Got the hoses in. It runs VERY cool now. They don't look too much different than the old ones so there's not much to see. I'll have a new video update this weekend once it stops raining.
More lessons learned: 1. When you make changes to correct small problems, do them ONE at a time. I installed the Speed Sensor AND re-did my vacuum hoses under the manifold that control the iris valve. When I did that I followed a set of instructions that incorrectly showed the 1-way valve for the vacuum canister that connects to the iris valve installed backwards. It's amazing how something the size of a pen cap could jack things up so much. 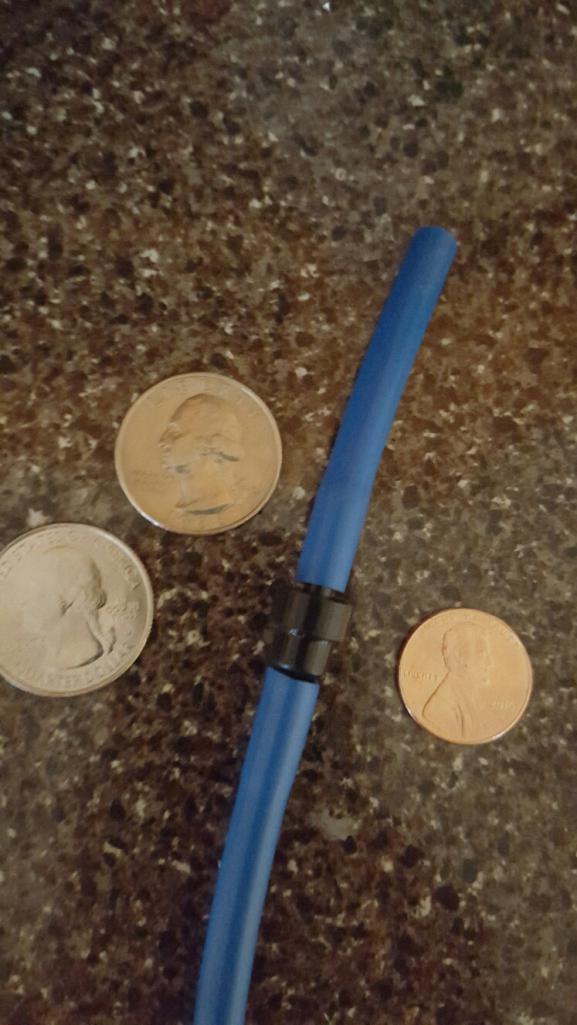 All the popping, weak acceleration, etc is gone. I forgot how FAST the thing was initially. Forget those 4 cylinder N/A comments. Can't go backwards from this! 2. Don't forget what you've learned. After years with L-Jet, I can't believe I didn't clamp every hose. What an improvement! (the unclamped ones do not have any vacuum and are not connected to the intake air flow so no worries) 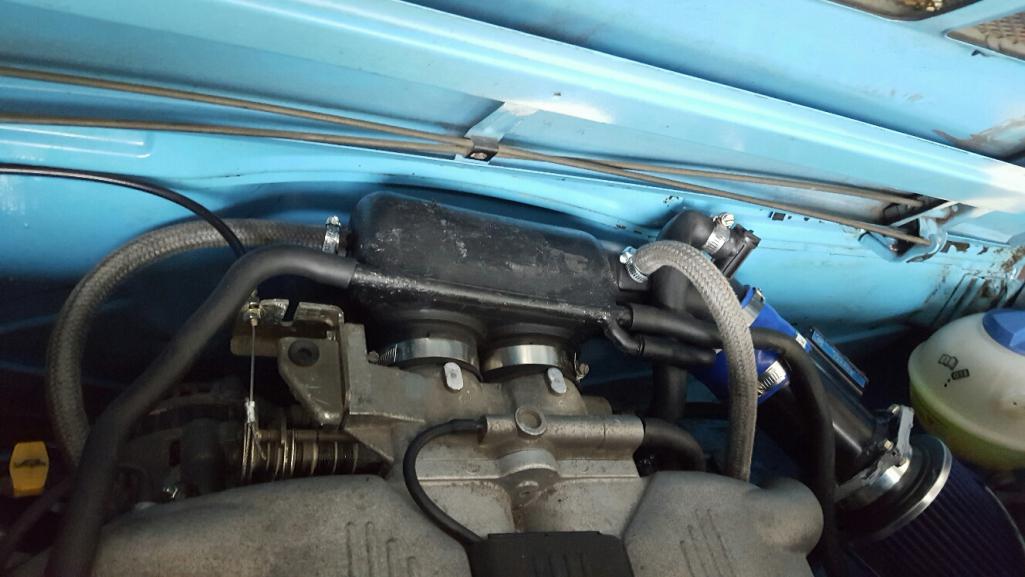 3. Bob's system for cooling lines setup is great. Make sure your return line is at the highest point and keep the hose setup simple. I have one continuous hose going to the radiator, one coming back. No extra clamped elbows, nothing. I had ZERO air pockets. The pressurized expansion tank has a screw on cap with a 5/8 lower line that goes to the water pump and a smaller upper line that comes off of the upper engine coolant tube (high point of system). Pics: 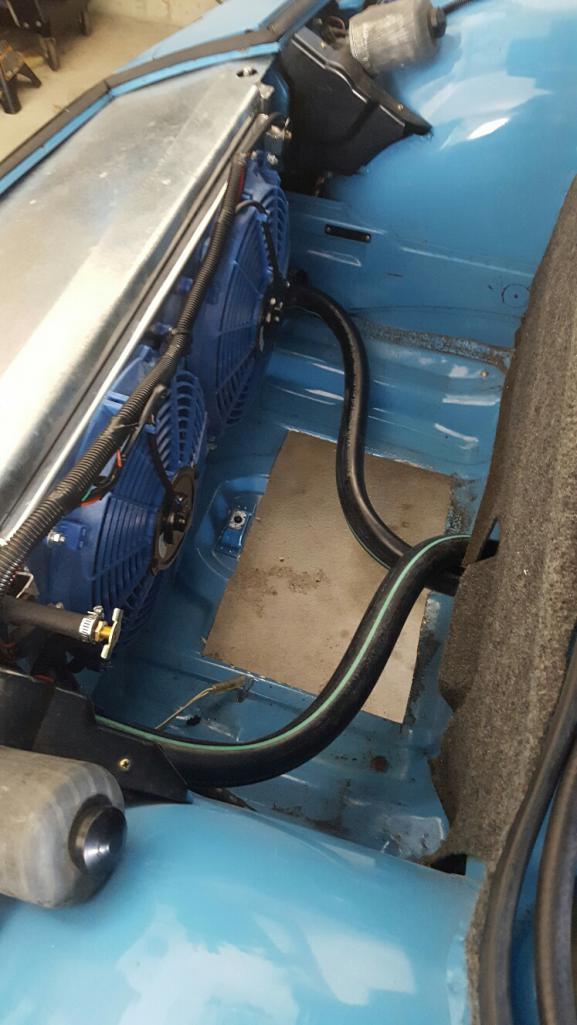 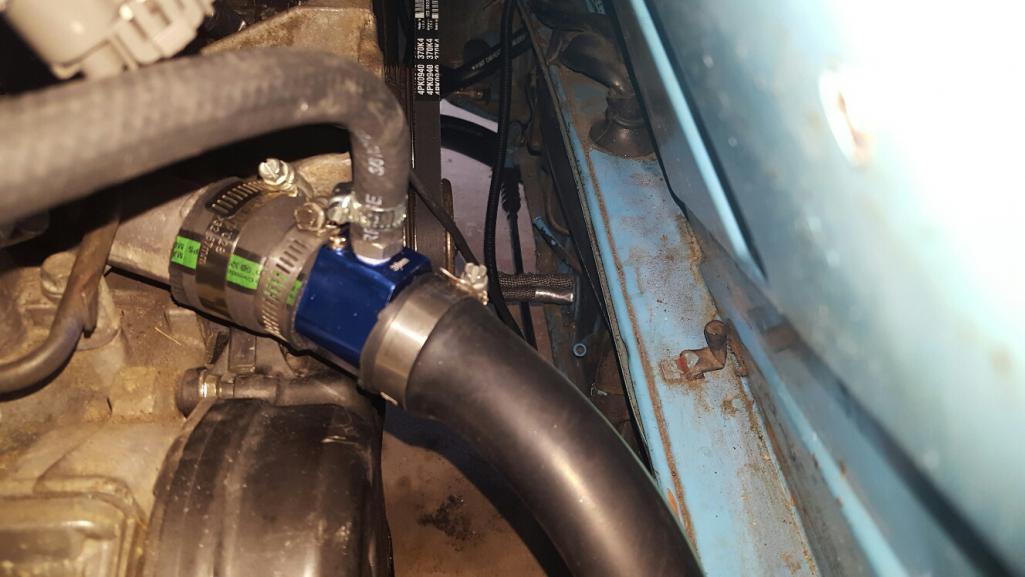 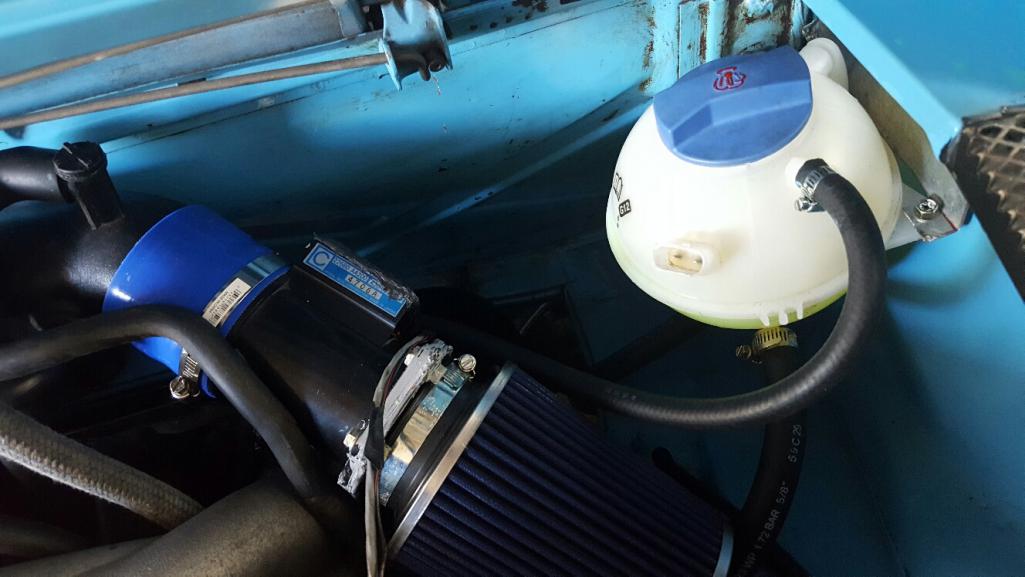 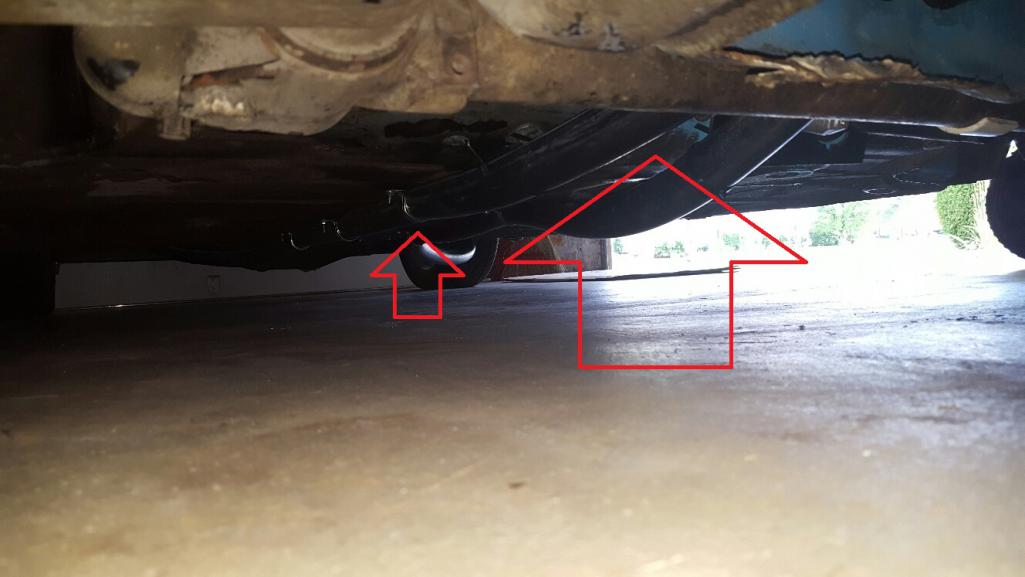 Definitely a lot fatter hoses but they fit fine. Seeing temps only to 180 and when the fans come on they drop immediately. Ignore the arrows in the last pic. Those are for Kent. 4. You may recall that I removed some of the hoses on my engine since I flipped the intake. One thing I realized was that I inadvertently deleted most of the "warm up" loop that the coolant circulates within before the car warms up. I decided to take the thermostat out for that reason. It actually warms up just as quickly as before. Just made a small aluminum circle of the same diameter and inserted it into the rubber seal. Not a drop. Video tomorrow if the deluge stops! |
  |
2 User(s) are reading this topic (2 Guests and 0 Anonymous Users)
0 Members:

|
Lo-Fi Version | Time is now: 21st April 2025 - 11:17 PM |
Invision Power Board
v9.1.4 © 2025 IPS, Inc.


