|
|
|
Porsche, and the Porsche crest are registered trademarks of Dr. Ing. h.c. F. Porsche AG.
This site is not affiliated with Porsche in any way. Its only purpose is to provide an online forum for car enthusiasts. All other trademarks are property of their respective owners. |
|
|

  |

| mdelwiche |
 Mar 30 2014, 09:03 PM Mar 30 2014, 09:03 PM
Post
#21
|
|
Vegas_914  Group: Members Posts: 59 Joined: 17-March 12 From: Tucson, AZ Member No.: 14,266 Region Association: Southwest Region |
So I have a lot of catching up to do, as my schedule has been really busy between work and going to school, I really haven't had to the time to document things as extensively as I wanted. Also my time line to get the car re-assembled has increased greatly. I got word last month that I am going to Aviano Italy for my next assignment and I have to be there by the end of November. That gives me roughly 7 months to get things in order, but definitely would like to get things together a lot sooner so I could enjoy the car for a little bit before I put it in storage for the next four years.
Here is where I left off. car is back from paint...again not a total nut and bolt restoration, but a nice 'refurbishment'....  The front valance wasn't removed as I specified (should have done it myself) and therefore was shot body color. It was pretty beat up anyways and I will more than likely order a new one   |
   |

 
|
| Cupomeat |
Mar 30 2014, 09:18 PM
Post
#22
|
|
missing my NY 914 in VA Group: Members Posts: 1,336 Joined: 26-November 07 From: Oakton VA Member No.: 8,376 Region Association: MidAtlantic Region |
Lookin Good!!!
I love the 75-76s, which makes me a minority, but they did improve a bunch of things along the way. |
|
|
|
| 76-914 |
Mar 31 2014, 09:18 AM
Post
#23
|
|
Repeat Offender & Resident Subaru Antagonist Group: Members Posts: 13,521 Joined: 23-January 09 From: Temecula, CA Member No.: 9,964 Region Association: Southern California |
Wait a minute. Your going to Italy for four years w/o the teener??? You must plan on buying a Porsche once there, huh? Some very fine roads for the drivers there.
|
|
|
|
| mdelwiche |
Mar 31 2014, 10:13 AM
Post
#24
|
|
Vegas_914 Group: Members Posts: 59 Joined: 17-March 12 From: Tucson, AZ Member No.: 14,266 Region Association: Southwest Region |
QUOTE(76-914 @ Mar 31 2014, 08:18 AM)  Wait a minute. Your going to Italy for four years w/o the teener??? You must plan on buying a Porsche once there, huh? Some very fine roads for the drivers there. I really don't want to leave it. I am researching the SOFA agreement for US GI's over there, because there is a provision stating we can only have 3 vehicles...but I don't know if that is the whole time we are there or only 3 at one time. The military is shipping my Explorer which is the wifey's ride and then I am going to bring my M3 as my DD. Once I get there I and get settled, I'd like to send for the 914 and bring her there as well...but I would also like to pick a Euro 911 or something of that sorts since I am out there. I have to figure out how to work that in. I agree, I can't imagine nothing better but driving my 914 through the roads of the Italian coutryside! |
|
|
|
| mdelwiche |
Mar 31 2014, 07:35 PM
Post
#25
|
|
Vegas_914 Group: Members Posts: 59 Joined: 17-March 12 From: Tucson, AZ Member No.: 14,266 Region Association: Southwest Region |
Rear end disassembly commenced next: removed both trailing arms, disassembled hubs, removed wheel bearings, removed sway bar and brackets, disassembled CV joints, removed brake lines, entire back end was disassembled...
Once everything was apart, I removed all the old undercoating, rustproofed and shot with new underbody coating. As I am doing this, I realize yes I probably should of done this before I sent the car off to paint, but originally this project just started off as an engine re-seal and then one thing lead to another...those who do choose to read this, I have realized I have a made a lot of rookie mistakes, but hey its a learning process!   New undercoating applied...I also choose to do the lower engine bay as trying to keep this area clean in the future probably will be futile  |
|
|
|
| mdelwiche |
Mar 31 2014, 07:53 PM
Post
#26
|
|
Vegas_914 Group: Members Posts: 59 Joined: 17-March 12 From: Tucson, AZ Member No.: 14,266 Region Association: Southwest Region |
Rear Brake Rebuild:
After watching Eric Shea's video on YouTube, I went ahead and took the plunge and bought a 914 rear brake rebuild kit from PMB Performance. Their kits are top notch and as well as their customer service. They helped me out as I also ended up needing new pistons and the internal mechanisms inside of them, as mine were too far gone. With the brake kit I also bought new hard lines for the rear from PMB. They were pre-bent and the price was right that I couldn't pass them up and put the old nasty old lines back on.  I can't believe I was riding around with a caliper looking like this    |
|
|
|
| mdelwiche |
May 4 2014, 09:02 PM
Post
#27
|
|
Vegas_914 Group: Members Posts: 59 Joined: 17-March 12 From: Tucson, AZ Member No.: 14,266 Region Association: Southwest Region |
So I had to burn some excess leave from work and the timing was perfect to get some real progress done on the teener!
Got the rear end all put back together (minus the castle nut..which is on now) and mounted the freshly rebuilt calipers from PMB  Installed the sail vinyl...thanks 914Rubber!  Scored a nice set of 75-76 heat exchangers from Mrfourteener. I had planned on backdating to earlier style but he hooked me up with a great deal on these and a exhaust. Also included was all the plumbing and a blower, which was all missing from my car when I got her.   ..and then the big task, getting the motor full reassembled with all of the tins, new alternator, all new fuel lines and vacuum hoses. I will have to pull the injector back out really quick as I have a service kit from Mr Injector coming in this week with new strainers and caps. But if all goes as planned, it should be off the stand by next weekend and reunited with the tranny.    Got some newly plated hardware from Bruce Stone...this stuff really looks good, i am probably going to order a few more items...  Cleaned and refurbished all of my lighting housings...have new lenses and gaskets for the front and side markers. Haven't sprung for the rears lenses yet (...so pricey for new ones)  Ripped the pedal assembly out as I am prepping to POR-15 the floorboards...it was pretty nasty down there, but from what I have seen from others on this site, I guess it wasn't all that bad, but definielty needed to be dealt with.  ...and the retired pedal assembly. I have a refurbished one on my bench which needs to be assembled.  I have another week off at the end of this month, so the goal is to the engine fired before we hit June! |
|
|
|
| Qarl |
May 4 2014, 09:14 PM
Post
#28
|
|
Shriveled member Group: Benefactors Posts: 5,233 Joined: 8-February 03 From: Florida Member No.: 271 Region Association: None |
Looking great. Nice work and attention to detail!
Neat that your wife helps as well! (IMG:style_emoticons/default/piratenanner.gif) |
|
|
|
| mdelwiche |
May 4 2014, 09:28 PM
Post
#29
|
|
Vegas_914 Group: Members Posts: 59 Joined: 17-March 12 From: Tucson, AZ Member No.: 14,266 Region Association: Southwest Region |
QUOTE(Qarl @ May 4 2014, 08:14 PM) Looking great. Nice work and attention to detail! Neat that your wife helps as well! (IMG:style_emoticons/default/piratenanner.gif) Thanks! She was out today working on getting the trim ready. I think she is actually excited now to get this thing finished so we can ship it with us to Italy when we leave later this year! |
|
|
|
| Larmo63 |
May 4 2014, 10:04 PM
Post
#30
|
|
Advanced Member Group: Members Posts: 4,264 Joined: 3-March 14 From: San Clemente, Ca Member No.: 17,068 Region Association: Southern California |
Great project and stick-to-it-ive-ness!!! These builds are a labor of love and you guys obviously love this car. I hope you enjoy many miles of motoring pleasure.
|
|
|
|
| mdelwiche |
Nov 11 2014, 10:23 AM
Post
#31
|
|
Vegas_914 Group: Members Posts: 59 Joined: 17-March 12 From: Tucson, AZ Member No.: 14,266 Region Association: Southwest Region |
It has been awhile since I last posted status as I have been moving at a frantic pace to get the car completed before I leave the country...
Here is where I left off: Engine is finally off the stand and getting to be reunited with the transmission after two years!  Engine insertion about to begin...  My second set of hands was delayed so I started the process myself and I was surprised I was able to get it installed in about an hour. The biggest issues I ran into was that the new fuel rails I used extended out further than the width of the engine bay. I had to get creative with the way I lowered the car down onto the engine so i didn't crush or pinch the rails.  The powerplant is in!  |
|
|
|
| mdelwiche |
Nov 11 2014, 11:02 AM
Post
#32
|
|
Vegas_914 Group: Members Posts: 59 Joined: 17-March 12 From: Tucson, AZ Member No.: 14,266 Region Association: Southwest Region |
Started hooking uptake electrics to test and I was getting some sparking at the battery post. I isolated it to line for alternator or the alternator itself. The original wire harness for the alternator was pretty brittle from the age, but I traced the whole line and i didn't see and areas which it may have a cut in it and was shorting out on the chassis or on something else. The next step would be to test the alternator which means I would have to remove it though to check it. With the engine in, I thought this was going to be a PIA. After doing some research and finding a nice article on the Pelican sites, I saw it was not an impossible tasks.
Once I had pulled the alternator, and took off the backing plate, I notice one of the terminals had pushed through the protective boot and was shorting out on the backing plate. The alternator I had put in there was a replacement and luckily was still under warranty, I was just unsure if NAPA would replace it. Luckily when I went back to the store I bought it from, their tester was done so they just ordered me a new one. I also decided to buy a new alternator harness from Jeff Bowlsey just to potentially eliminate and other potential problems. 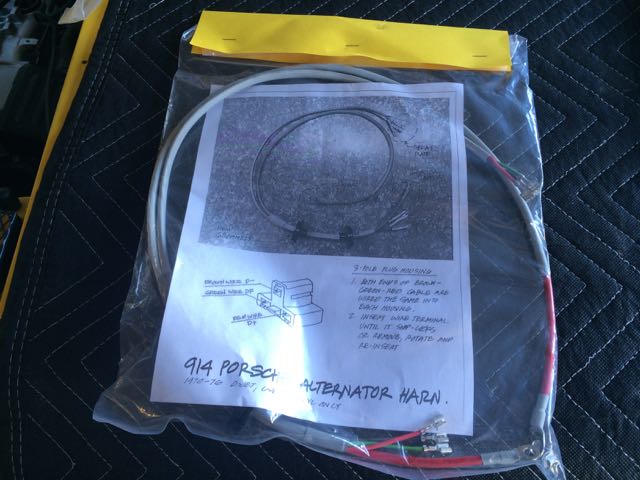 New harness from Jeff Bowlsey...Definitely a work of art. Great guy and awesome customer service. I emailed him on a Sunday and he got right back to me and I had a harness at my house by Wednesday!  Old harness next to new harness 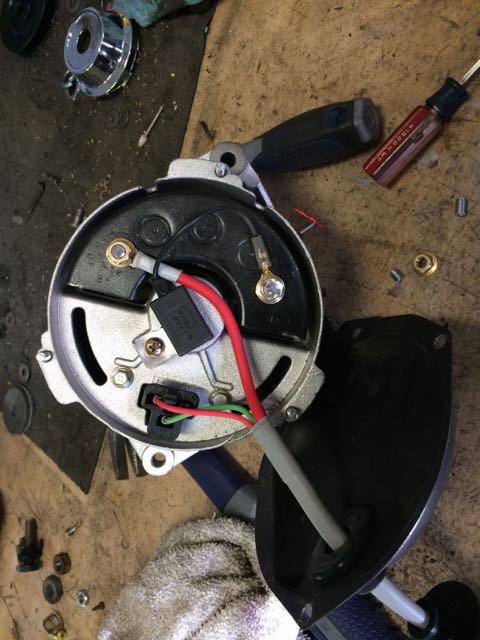 New harness attached to alternator. I made sure the connecting post were ground down enough to not make contact with the backing plate this time... Re-installed alternator (took about an hour)...problem solved! Attached image(s) 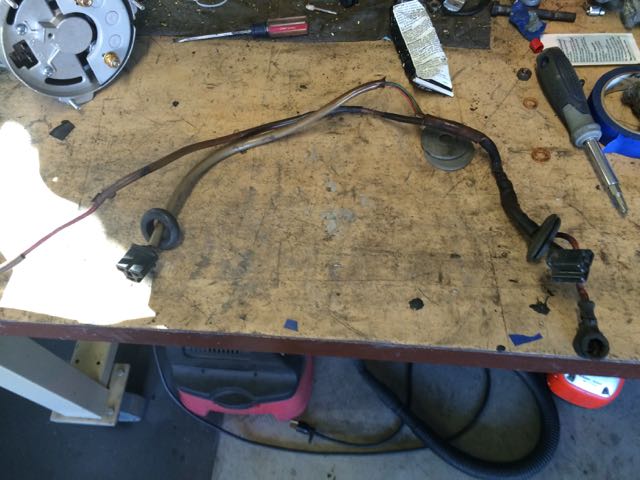
|
|
|
|
| mdelwiche |
Nov 11 2014, 11:18 AM
Post
#33
|
|
Vegas_914 Group: Members Posts: 59 Joined: 17-March 12 From: Tucson, AZ Member No.: 14,266 Region Association: Southwest Region |
Got a little inspiration along the way during my build...on one of my weekend trips to LA for the Pomona Swap meet, I got the opportunity to stop by and visit Magnus Walker and take a peek at his collection. Also got a sneek peak of his wheel line before they were released!
 His '78 SCHR   Good old car number #277  Cheers!  He signed an Urban Outlaw poster for me and added some words of encouragement for my build. |
|
|
|
| 76-914 |
Nov 11 2014, 11:26 AM
Post
#34
|
|
Repeat Offender & Resident Subaru Antagonist Group: Members Posts: 13,521 Joined: 23-January 09 From: Temecula, CA Member No.: 9,964 Region Association: Southern California |
Well, did you start it yet?
|
|
|
|
| mdelwiche |
Nov 11 2014, 11:35 AM
Post
#35
|
|
Vegas_914 Group: Members Posts: 59 Joined: 17-March 12 From: Tucson, AZ Member No.: 14,266 Region Association: Southwest Region |
QUOTE(76-914 @ Nov 11 2014, 09:26 AM) Well, did you start it yet? Yep it is up and running! Had to get some assistance from a few friends but she is on the road! I need to get my thread up to date! |
|
|
|
| veekry9 |
Nov 11 2014, 12:47 PM
Post
#36
|
|
OldMember Group: Retired Members Posts: 3,068 Joined: 17-June 13 From: TO Member No.: 16,025 Region Association: Canada |
|
|
|
|
| mdelwiche |
Nov 11 2014, 12:49 PM
Post
#37
|
|
Vegas_914 Group: Members Posts: 59 Joined: 17-March 12 From: Tucson, AZ Member No.: 14,266 Region Association: Southwest Region |
Now that the back end was complete, it was time to tackle the front end suspension...
This is what I started with 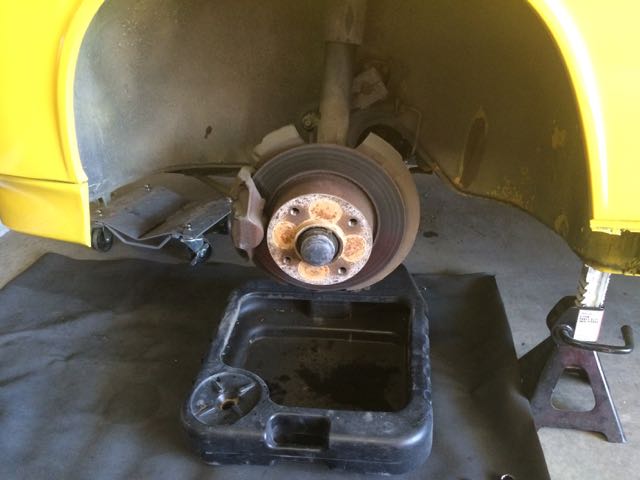 New powder coated control arms. I bought these two years ago when I started my resto. What i didn't do is realize that I bought a set that didn't have the tabs for the front sway bar. So again i and to jump on the net and order a U-Tab kiys from Pelican to complete the install. Also installed a new set of polygraphite bushings, and turbo tie rods. 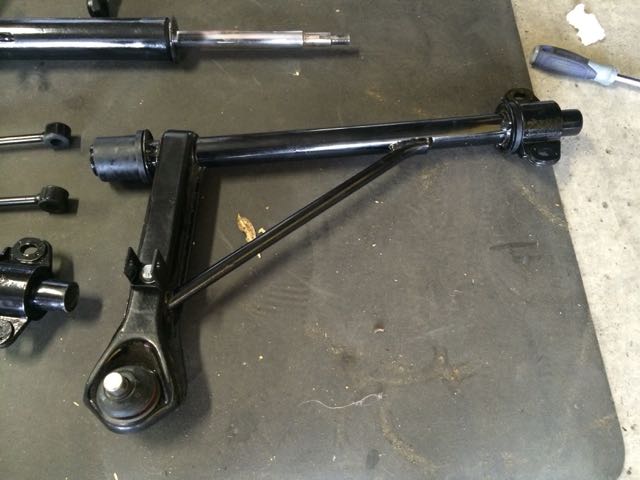 front struts refurbished and powder coated with new KYB struts installed 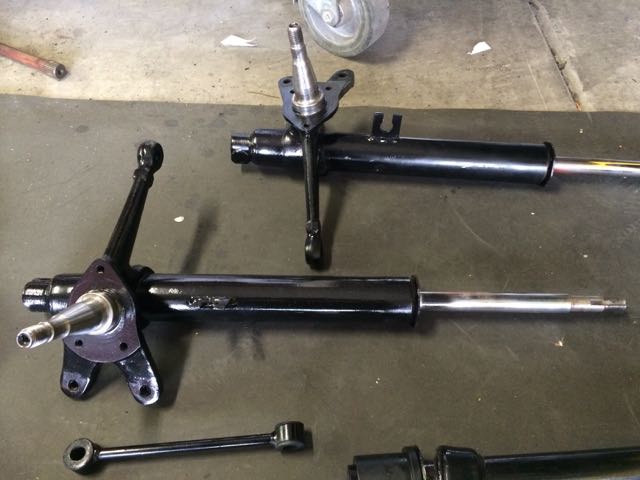 front wells with a fresh undercoating 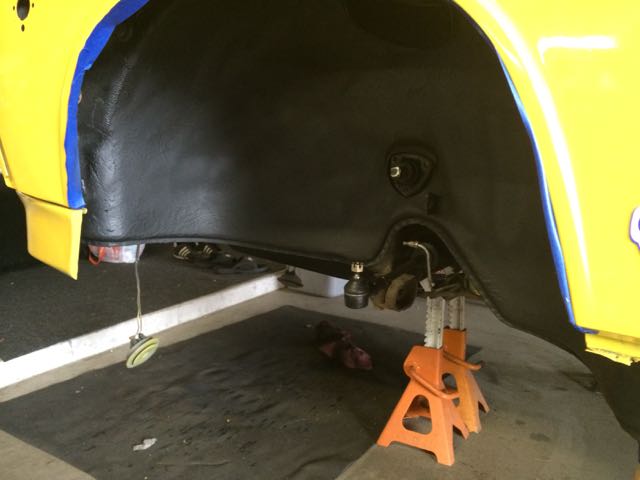 rebuilt from brakes, kit courtesy of the guys up at PMB 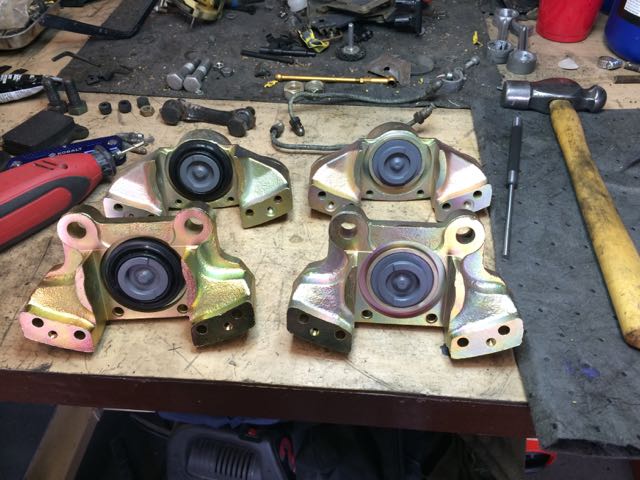 Final assembly, with brakes calipers mounted, new Zimmerman rotors and new brake lines...the Works!  |
|
|
|
|
1 User(s) are reading this topic (1 Guests and 0 Anonymous Users)
0 Members:

|
Lo-Fi Version | Time is now: 1st July 2024 - 06:53 AM |
Invision Power Board
v9.1.4 © 2024 IPS, Inc.