|
|

|
Porsche, and the Porsche crest are registered trademarks of Dr. Ing. h.c. F. Porsche AG.
This site is not affiliated with Porsche in any way. Its only purpose is to provide an online forum for car enthusiasts. All other trademarks are property of their respective owners. |
|
|
  |
| r3dplanet |
 Mar 4 2014, 09:36 PM Mar 4 2014, 09:36 PM
Post
#21
|
|
Senior Member    Group: Members Posts: 679 Joined: 3-September 05 From: Portland, Oregon Member No.: 4,741 Region Association: None |
The hell you say! The 1.7 should never be considered lowly. My '73 1.7 liter engine runs better than any other -4 except for the '73 2.0, and mine is ultimately destined to be a 1911.
Stop a moment, collect your thoughts, and look deep within your consciousness. Stay there a moment and allow the goodness of the 1.7 to soak through your bones. As though you're playing frisbee with on the beach with Tracy Reed. Like that one time you made it with your college intern student teacher in high school after displaying your Hamlet-reading prowess. Like hearing that glorious 1.7 roar behind the firewall as you take your 914 out for a warm summer's night drive with the top down. Reflect on this, and allow the perspective to change you. Steve has already done this. His brainspace is right where it needs to be, clear and strong. Steve has taken the right steps. Steve knows his shit. So learn from Steve and love the 1.7 liter. -m. WOW. Really impressive work Steve. Nice to see someone spending time and energy renewing even a lowly 1.7. You'll enjoy the heck out of it when it's done. (IMG:style_emoticons/default/beerchug.gif) |
| ben*james |
 Mar 4 2014, 09:40 PM Mar 4 2014, 09:40 PM
Post
#22
|
|
LIFER    Group: Members Posts: 525 Joined: 16-February 09 From: Portland Oregon Member No.: 10,062 Region Association: Pacific Northwest 
|
Cracking me up! (IMG:style_emoticons/default/agree.gif)
1.7 is worthy (IMG:style_emoticons/default/pray.gif) The hell you say! The 1.7 should never be considered lowly. My '73 1.7 liter engine runs better than any other -4 except for the '73 2.0, and mine is ultimately destined to be a 1911. Stop a moment, collect your thoughts, and look deep within your consciousness. Stay there a moment and allow the goodness of the 1.7 to soak through your bones. As though you're playing frisbee with on the beach with Tracy Reed. Like that one time you made it with your college intern student teacher in high school after displaying your Hamlet-reading prowess. Like hearing that glorious 1.7 roar behind the firewall as you take your 914 out for a warm summer's night drive with the top down. Reflect on this, and allow the perspective to change you. Steve has already done this. His brainspace is right where it needs to be, clear and strong. Steve has taken the right steps. Steve knows his shit. So learn from Steve and love the 1.7 liter. -m. WOW. Really impressive work Steve. Nice to see someone spending time and energy renewing even a lowly 1.7. You'll enjoy the heck out of it when it's done. (IMG:style_emoticons/default/beerchug.gif) |
| type47 |
 Mar 5 2014, 06:18 AM Mar 5 2014, 06:18 AM
Post
#23
|
|
Viermeister     Group: Members Posts: 4,254 Joined: 7-August 03 From: Vienna, VA Member No.: 994 Region Association: MidAtlantic Region |
|
| Steve_R |
 Mar 5 2014, 08:07 AM Mar 5 2014, 08:07 AM
Post
#24
|
|
Member   Group: Members Posts: 68 Joined: 8-August 12 From: San Diego, CA Member No.: 14,777 Region Association: None |
... and relocated the fuel pump and filter to under the gas tank. totally awesome work! Won't the filter location make it really hard to change? Thanks and good point. I think I'll re-relocate it back to it's original location and maybe add some insulation to help with vapor lock. |
| Steve_R |
 Mar 5 2014, 08:18 AM Mar 5 2014, 08:18 AM
Post
#25
|
|
Member   Group: Members Posts: 68 Joined: 8-August 12 From: San Diego, CA Member No.: 14,777 Region Association: None |
... and relocated the fuel pump and filter to under the gas tank. totally awesome work! Won't the filter location make it really hard to change? Thanks and good point. I think I'll re-relocate it back to it's original location and maybe add some insulation to help with vapor lock. Actually, now that I think about it, it should be between the tank and the pump. So, I think I'll just leave it there. I want it to look stock as much as possible so I don't want to put it in the front trunk. |
| saigon71 |
 Mar 5 2014, 08:36 AM Mar 5 2014, 08:36 AM
Post
#26
|
|
Advanced Member     Group: Members Posts: 2,007 Joined: 1-June 09 From: Dillsburg, PA Member No.: 10,428 Region Association: MidAtlantic Region 

|
Impressive work...very clean and meticulous! (IMG:style_emoticons/default/beerchug.gif)
|
| Steve_R |
 Mar 5 2014, 10:14 PM Mar 5 2014, 10:14 PM
Post
#27
|
|
Member   Group: Members Posts: 68 Joined: 8-August 12 From: San Diego, CA Member No.: 14,777 Region Association: None |
The front bumper had a rust hole that needed some patching. I cut out the section and welded in a piece. I made a crude form out of wood to form a slight curve in the piece before I welded it in place. I also welded up the bumper guard holes. After a lot of grinding and filing it turned out really good.
Also, the front valance needed a lot of work. I built a frame out of 2x4s to support it while i did the body work. I used wood screws to hold it to the support. After a long search, I found the perfect semi gloss paint. It's called 2K urethane underhood black from Eastwood. I think it matches the original semi gloss black perfectly. Attached image(s) 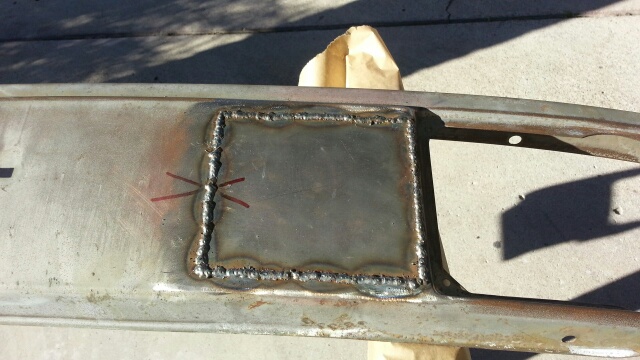 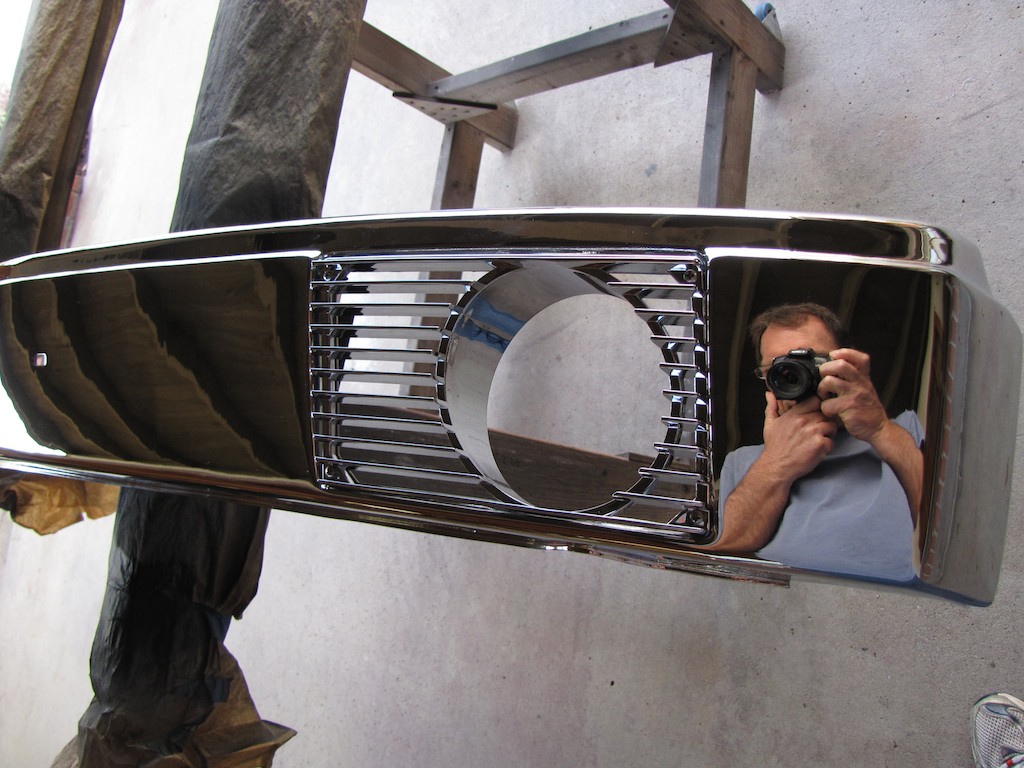 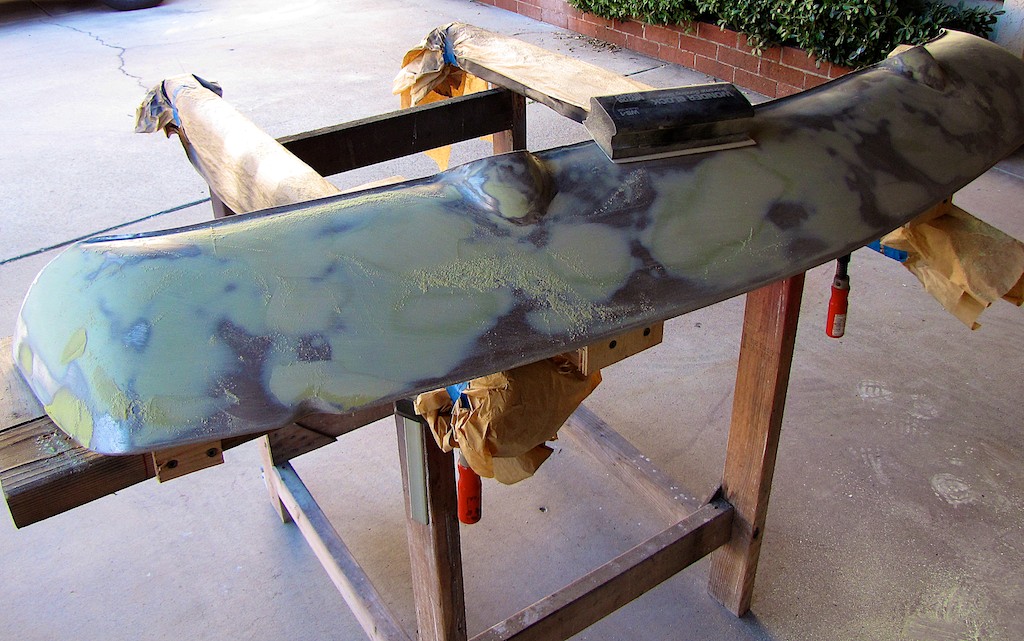 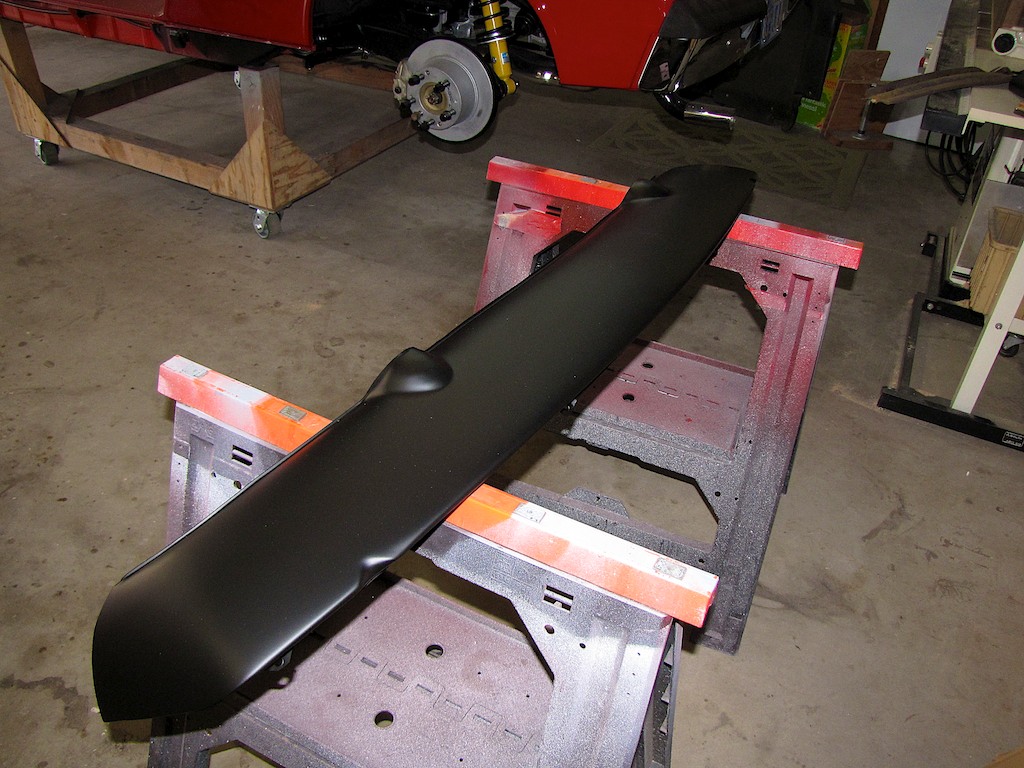 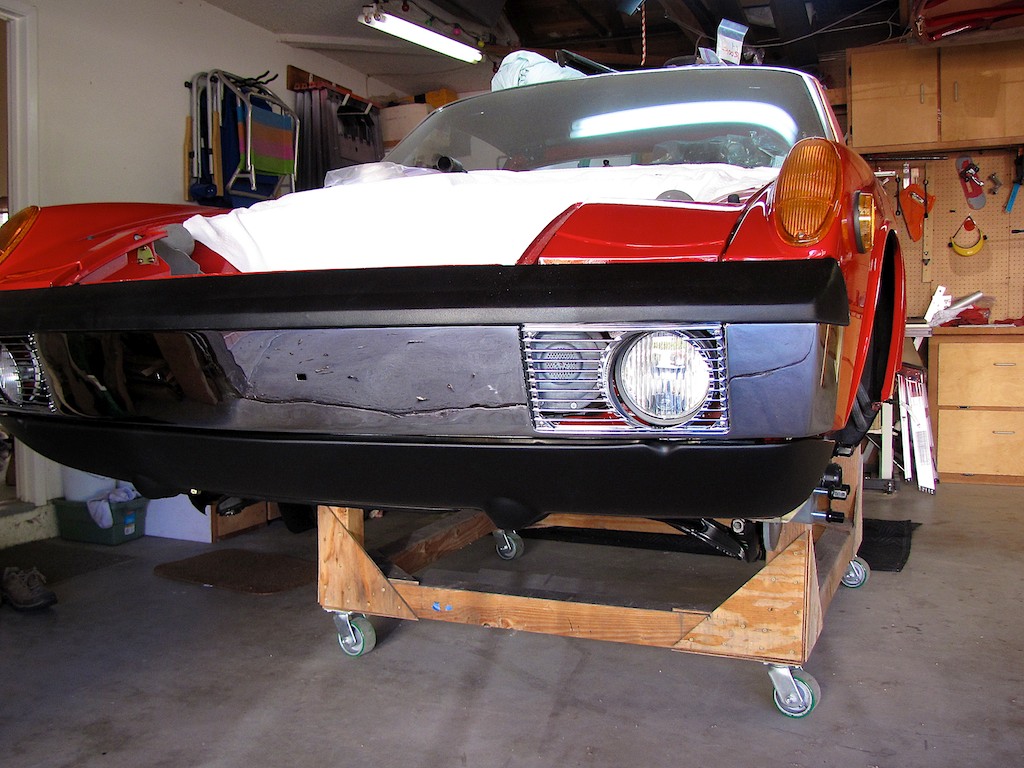
|
| mepstein |
 Mar 5 2014, 10:27 PM Mar 5 2014, 10:27 PM
Post
#28
|
|
914-6 GT in waiting                Group: Members Posts: 19,687 Joined: 19-September 09 From: Landenberg, PA/Wilmington, DE Member No.: 10,825 Region Association: MidAtlantic Region 
|
Just WOW!
|
| ndfrigi |
 Mar 5 2014, 10:35 PM Mar 5 2014, 10:35 PM
Post
#29
|
|
Advanced Member     Group: Members Posts: 2,960 Joined: 21-August 11 From: Orange County Member No.: 13,474 Region Association: Southern California 
|
The front bumper had a rust hole that needed some patching. I cut out the section and welded in a piece. I made a crude form out of wood to form a slight curve in the piece before I welded it in place. I also welded up the bumper guard holes. After a lot of grinding and filing it turned out really good. Also, the front valance needed a lot of work. I built a frame out of 2x4s to support it while i did the body work. I used wood screws to hold it to the support. After a long search, I found the perfect semi gloss paint. It's called 2K urethane underhood black from Eastwood. I think it matches the original semi gloss black perfectly. wait!!!! Is that front bumper that was repaired is the same bumper that was installed in the car? Metal bumper to chrome bumper? |
| Steve_R |
 Mar 5 2014, 10:53 PM Mar 5 2014, 10:53 PM
Post
#30
|
|
Member   Group: Members Posts: 68 Joined: 8-August 12 From: San Diego, CA Member No.: 14,777 Region Association: None |
Yes, it is the same bumper. I forgot to mention that I took it to the chrome plater and had him strip off the chrome so I could weld on it.
|
| ndfrigi |
 Mar 5 2014, 11:48 PM Mar 5 2014, 11:48 PM
Post
#31
|
|
Advanced Member     Group: Members Posts: 2,960 Joined: 21-August 11 From: Orange County Member No.: 13,474 Region Association: Southern California 
|
Yes, it is the same bumper. I forgot to mention that I took it to the chrome plater and had him strip off the chrome so I could weld on it. Sir Steve, that is an amazing job! It seems you prepare to do that than buying a clean chromed bumper. Is it cheaper that way sir? Can you share how much for the chrome plating and what shop in San Diego? Thanks in advance and God bless! Noel |
| Shindog1961 |
 Mar 6 2014, 12:03 AM Mar 6 2014, 12:03 AM
Post
#32
|
|
Member   Group: Members Posts: 196 Joined: 10-November 12 From: Santa Fe New Mexico Member No.: 15,133 Region Association: Southwest Region |
Nice! Really like the dolly, how did you get the body on to the dolly? Did you hoist it or jack it?
|
| Steve_R |
 Mar 6 2014, 12:15 AM Mar 6 2014, 12:15 AM
Post
#33
|
|
Member   Group: Members Posts: 68 Joined: 8-August 12 From: San Diego, CA Member No.: 14,777 Region Association: None |
Yes, it is the same bumper. I forgot to mention that I took it to the chrome plater and had him strip off the chrome so I could weld on it. Sir Steve, that is an amazing job! It seems you prepare to do that than buying a clean chromed bumper. Is it cheaper that way sir? Can you share how much for the chrome plating and what shop in San Diego? Thanks in advance and God bless! Noel Noel, I think it was a lot cheaper. It was a lot of work on my part but, I really enjoy the process. Since I already had the bumper the only cost was chroming it and the $20 I paid the muffler shop to weld it. Don at Escondido Plating did the chrome and he charged me $400 for the front bumper He also plated both bumpers, shifter, inside and outside door handles and the seat belt loops. In the end I think it was cheeper than buying another one and having it rechromed. |
| mepstein |
 Mar 6 2014, 07:17 AM Mar 6 2014, 07:17 AM
Post
#34
|
|
914-6 GT in waiting                Group: Members Posts: 19,687 Joined: 19-September 09 From: Landenberg, PA/Wilmington, DE Member No.: 10,825 Region Association: MidAtlantic Region 
|
Yes, it is the same bumper. I forgot to mention that I took it to the chrome plater and had him strip off the chrome so I could weld on it. Sir Steve, that is an amazing job! It seems you prepare to do that than buying a clean chromed bumper. Is it cheaper that way sir? Can you share how much for the chrome plating and what shop in San Diego? Thanks in advance and God bless! Noel Noel, I think it was a lot cheaper. It was a lot of work on my part but, I really enjoy the process. Since I already had the bumper the only cost was chroming it and the $20 I paid the muffler shop to weld it. Don at Escondido Plating did the chrome and he charged me $400 for the front bumper He also plated both bumpers, shifter, inside and outside door handles and the seat belt loops. In the end I think it was cheeper than buying another one and having it rechromed. Thanks for that info. Looks like you found a great vendor for chrome. |
| ndfrigi |
 Mar 6 2014, 11:40 AM Mar 6 2014, 11:40 AM
Post
#35
|
|
Advanced Member     Group: Members Posts: 2,960 Joined: 21-August 11 From: Orange County Member No.: 13,474 Region Association: Southern California 
|
Yes, it is the same bumper. I forgot to mention that I took it to the chrome plater and had him strip off the chrome so I could weld on it. Sir Steve, that is an amazing job! It seems you prepare to do that than buying a clean chromed bumper. Is it cheaper that way sir? Can you share how much for the chrome plating and what shop in San Diego? Thanks in advance and God bless! Noel Noel, I think it was a lot cheaper. It was a lot of work on my part but, I really enjoy the process. Since I already had the bumper the only cost was chroming it and the $20 I paid the muffler shop to weld it. Don at Escondido Plating did the chrome and he charged me $400 for the front bumper He also plated both bumpers, shifter, inside and outside door handles and the seat belt loops. In the end I think it was cheeper than buying another one and having it rechromed. Meaning Sir Steve, $400 for all those? (2 bumpers, shifter, handles and belt loops). Can I chrome plate a bumper which is originally a painted bumper? Thus it has same metal thickness for those original chromed bumper and painted bumper? Any plans of doing a 914 guys BBQ fellowship at your place soon? |
| Steve_R |
 Mar 6 2014, 11:43 PM Mar 6 2014, 11:43 PM
Post
#36
|
|
Member   Group: Members Posts: 68 Joined: 8-August 12 From: San Diego, CA Member No.: 14,777 Region Association: None |
Yes, it is the same bumper. I forgot to mention that I took it to the chrome plater and had him strip off the chrome so I could weld on it. Sir Steve, that is an amazing job! It seems you prepare to do that than buying a clean chromed bumper. Is it cheaper that way sir? Can you share how much for the chrome plating and what shop in San Diego? Thanks in advance and God bless! Noel Noel, I think it was a lot cheaper. It was a lot of work on my part but, I really enjoy the process. Since I already had the bumper the only cost was chroming it and the $20 I paid the muffler shop to weld it. Don at Escondido Plating did the chrome and he charged me $400 for the front bumper He also plated both bumpers, shifter, inside and outside door handles and the seat belt loops. In the end I think it was cheeper than buying another one and having it rechromed. Meaning Sir Steve, $400 for all those? (2 bumpers, shifter, handles and belt loops). Can I chrome plate a bumper which is originally a painted bumper? Thus it has same metal thickness for those original chromed bumper and painted bumper? Any plans of doing a 914 guys BBQ fellowship at your place soon? Noel, It was $400 for just the front bumper. I can't remember how much the other parts were but the rear bumper was around $350. He charged me a little more for the front because he needed to add a little more copper to fill in some of the small pits from welding. |
| Steve_R |
 Mar 7 2014, 12:04 AM Mar 7 2014, 12:04 AM
Post
#37
|
|
Member   Group: Members Posts: 68 Joined: 8-August 12 From: San Diego, CA Member No.: 14,777 Region Association: None |
One of the more challenging projects was to rebuild the seat belts. I had all of the hardware zinc plated and I bought some 2" webbing on ebay for $15.00. I took the webbing to a upholstery shop and they sewed on the end pieces and charged me $10.00
The hardest part was getting the springs back in place. For the plastic covers I used some Meguiar's Professional Vinyl & Rubber Cleaner/Conditioner. This stuff is amazing. It makes plastic look new. I'm not sure how long it will last but, I've applied it to some other plastic parts over two months ago and they still look new. Attached image(s) 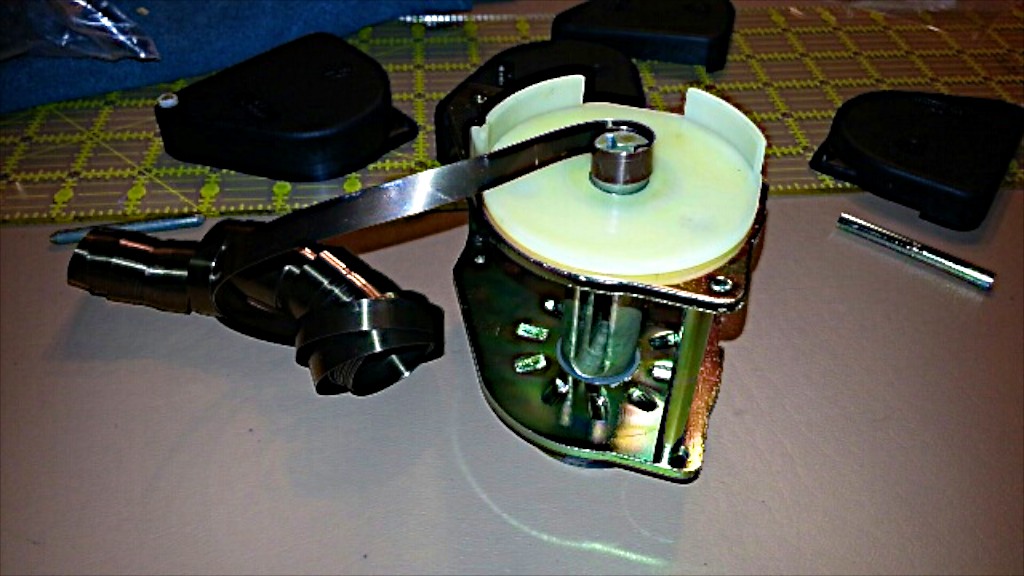 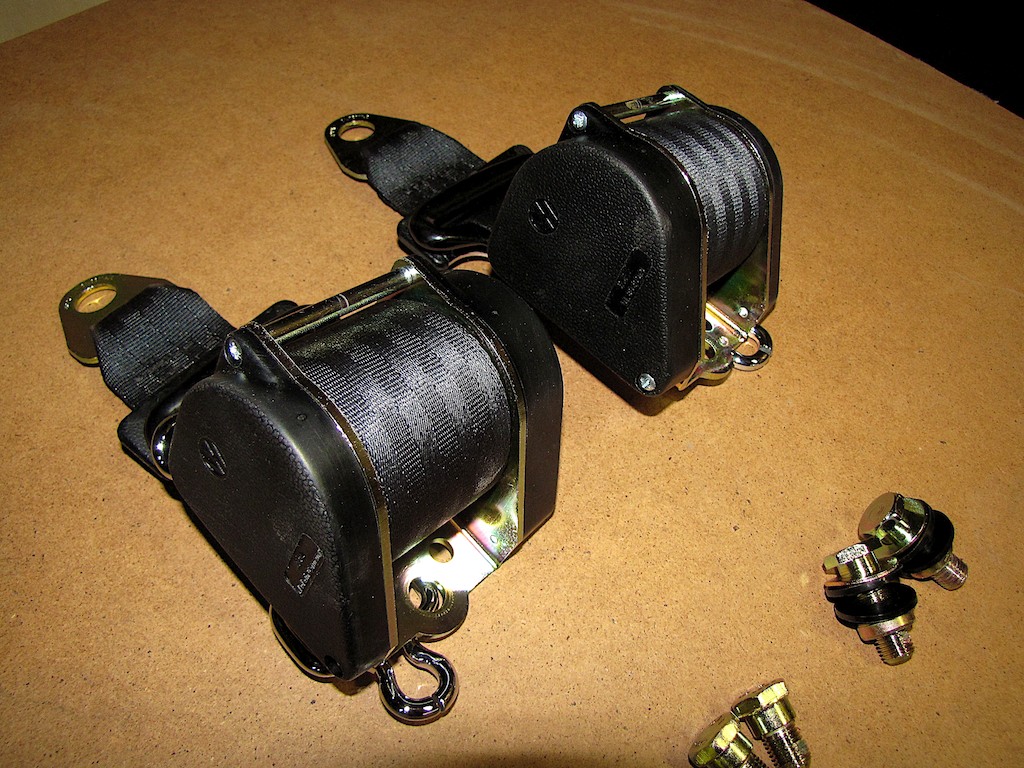
|
| Cairo94507 |
 Mar 7 2014, 07:22 AM Mar 7 2014, 07:22 AM
Post
#38
|
|
Michael           Group: Members Posts: 10,153 Joined: 1-November 08 From: Auburn, CA Member No.: 9,712 Region Association: Northern California 
|
Steve that is some outstanding work. Bumper looks brand new- better than brand new actually.
|
| DRPHIL914 |
 Mar 7 2014, 07:53 AM Mar 7 2014, 07:53 AM
Post
#39
|
|
Dr. Phil      Group: Members Posts: 5,811 Joined: 9-December 09 From: Bluffton, SC Member No.: 11,106 Region Association: South East States 
|
(IMG:style_emoticons/default/smilie_pokal.gif) Very nice!, enjoyed seeing it all come together! How close are you to having it on wheels?
- also, when you did the front suspension parts(i am doing this now) looks like you put 5 -lug on, re-drilled rotors- *what wheels are you going with? * also did you pull just clean and powder coat your original stuff, or did you source new, like the a-arms, dust shields etc? Looks like you have left no stone unturned!! great job- |
| KELTY360 |
 Mar 7 2014, 08:06 AM Mar 7 2014, 08:06 AM
Post
#40
|
|
914 Neferati      Group: Members Posts: 5,102 Joined: 31-December 05 From: Pt. Townsend, WA Member No.: 5,344 Region Association: Pacific Northwest 
|
... and relocated the fuel pump and filter to under the gas tank. totally awesome work! Won't the filter location make it really hard to change? Thanks and good point. I think I'll re-relocate it back to it's original location and maybe add some insulation to help with vapor lock. Actually, now that I think about it, it should be between the tank and the pump. So, I think I'll just leave it there. I want it to look stock as much as possible so I don't want to put it in the front trunk. Spectacular work! Your attention to detail will pay off many times over. You can make a more convenient location for the pump and filter by mounting in the cavity that holds the steering rack and master cylinder. It's protected from road debris by the panel yet easily accessed for service. What are your plans for wheels? |
  |
6 User(s) are reading this topic (6 Guests and 0 Anonymous Users)
0 Members:

|
Lo-Fi Version | Time is now: 8th January 2025 - 08:25 PM |
Invision Power Board
v9.1.4 © 2025 IPS, Inc.


