|
|
|
Porsche, and the Porsche crest are registered trademarks of Dr. Ing. h.c. F. Porsche AG.
This site is not affiliated with Porsche in any way. Its only purpose is to provide an online forum for car enthusiasts. All other trademarks are property of their respective owners. |
|
|

  |

| CptTripps |
 Jan 23 2014, 07:21 AM Jan 23 2014, 07:21 AM
Post
#261
|
|
:: Punch and Pie ::  Group: Members Posts: 3,584 Joined: 26-December 04 From: Mentor, OH Member No.: 3,342 Region Association: Upper MidWest |
Worked on my door brace last night. I need to stretch out 1/8" on the top of the pass door. Came up with a good brace for now. Just need to replace it with one that presses against the door plates now so I can weld everything else up.
Attached thumbnail(s) 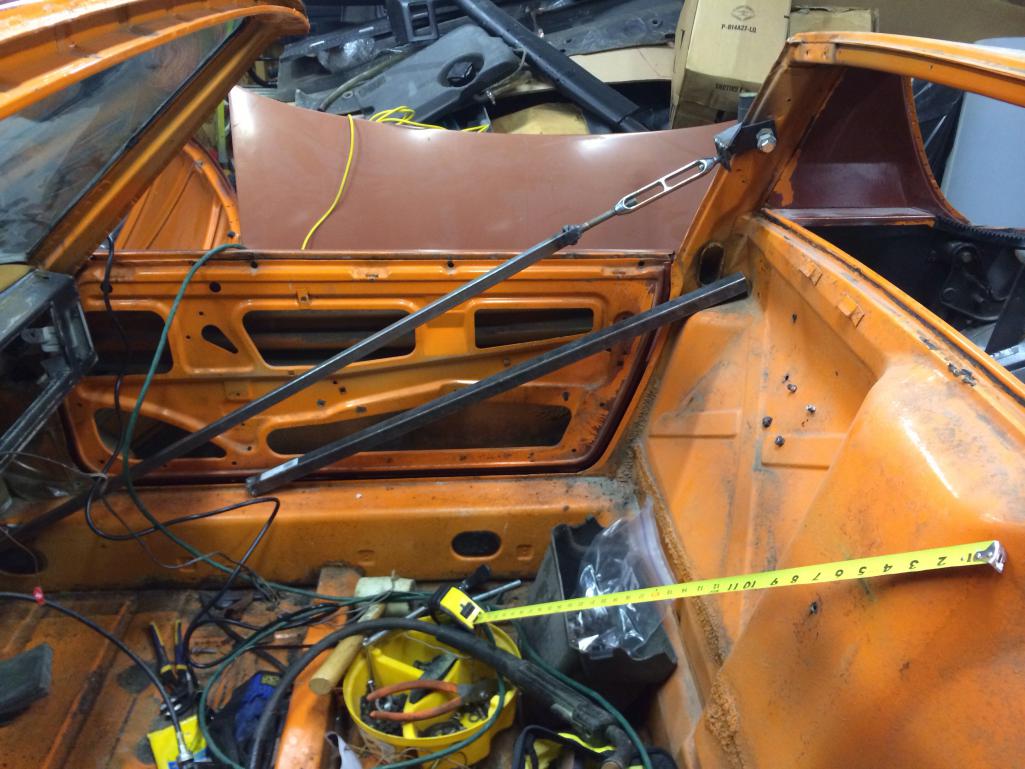
|
   |

 
|
| CptTripps |
Jan 25 2014, 01:21 PM
Post
#262
|
|
:: Punch and Pie :: Group: Members Posts: 3,584 Joined: 26-December 04 From: Mentor, OH Member No.: 3,342 Region Association: Upper MidWest |
Since it's sub-zero and snowing sideways, I decided to work on stuff in the house today. I did a thread on it ( How To: CptTripps' Cat-Eye LED Light mod ) but here's what my front marker lights will look like.
https://www.youtube.com/watch?v=K80jWrQ03p0 |
|
|
|
| CptTripps |
Jan 26 2014, 04:39 PM
Post
#263
|
|
:: Punch and Pie :: Group: Members Posts: 3,584 Joined: 26-December 04 From: Mentor, OH Member No.: 3,342 Region Association: Upper MidWest |
Garrett (7) was my helper today. He mostly just sat by the heater and kept me company. That was A-OK by me.
We built door braces and welded them up so we can get the rotisserie going. This is going to help a LOT as I finish up the welding on the flares, and contemplate a roll-bar idea I have. Attached thumbnail(s) 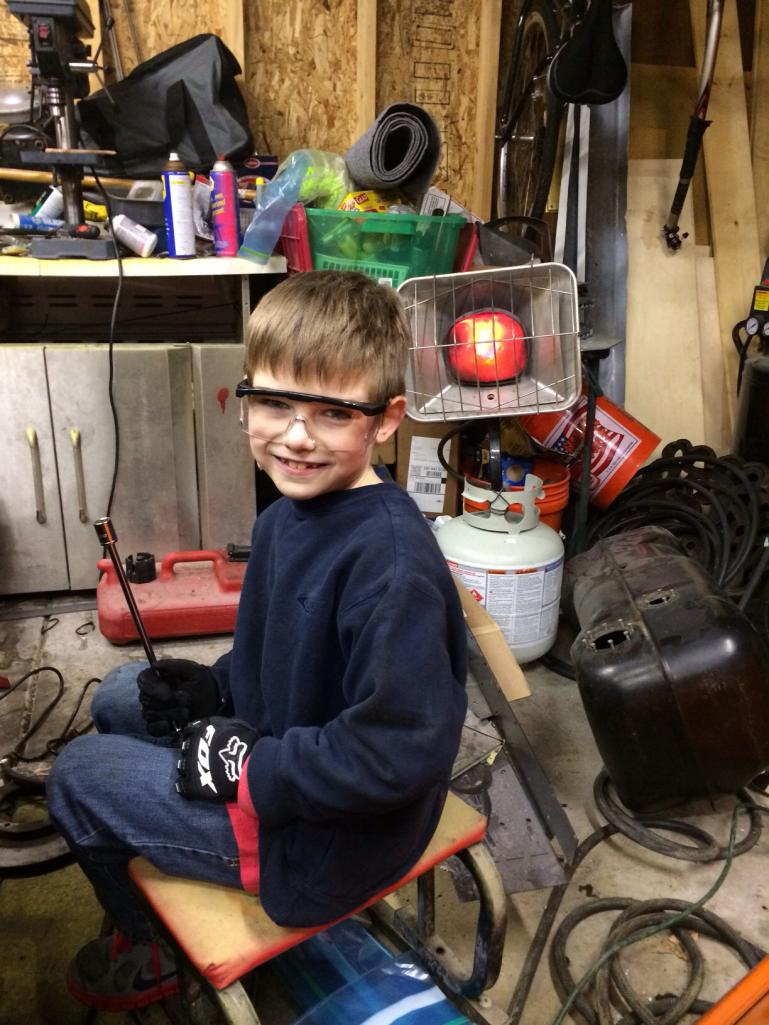
|
|
|
|
| ruby914 |
Jan 26 2014, 11:16 PM
Post
#264
|
|
Senior Member Group: Members Posts: 720 Joined: 26-April 09 From: Hawthorne, Ca Member No.: 10,305 Region Association: None |
"sub-zero and snowing sideways" (IMG:style_emoticons/default/lol-2.gif) Yeah right! (IMG:style_emoticons/default/av-943.gif)
Have you come up with plan on how you will add nomenclature to your cockpit panel. After I got back from my 2 day camping / surf trip, up north, I found this: http://www.pulsarprofx.com/DecalPRO/Vertic...Porche_911.html 911? No respect. |
|
|
|
| CptTripps |
Jan 27 2014, 12:46 AM
Post
#265
|
|
:: Punch and Pie :: Group: Members Posts: 3,584 Joined: 26-December 04 From: Mentor, OH Member No.: 3,342 Region Association: Upper MidWest |
That was yesterday! Today I had cabin-fever and wanted to get some work done!
That decal system looks interesting. I was going to do vinyl and then clear-coat over, but that looks a lot nicer. I actually least have that laminator at the office, so all I really need is the kit. Hmmmmm. |
|
|
|
| CptTripps |
Jan 27 2014, 10:13 AM
Post
#266
|
|
:: Punch and Pie :: Group: Members Posts: 3,584 Joined: 26-December 04 From: Mentor, OH Member No.: 3,342 Region Association: Upper MidWest |
QUOTE(ruby914 @ Jan 27 2014, 12:16 AM)  Have you come up with plan on how you will add nomenclature to your cockpit panel. After I got back from my 2 day camping / surf trip, up north, I found this: http://www.pulsarprofx.com/DecalPRO/Vertic...Porche_911.html I just ordered the "starter kit". Looking at this, it's pretty much exactly what I was looking to do, so we'll see how it works out! Watch the installation video though. The installation process is more complicated than I was hoping, but in the end, should look pretty outstanding. Attached image(s) 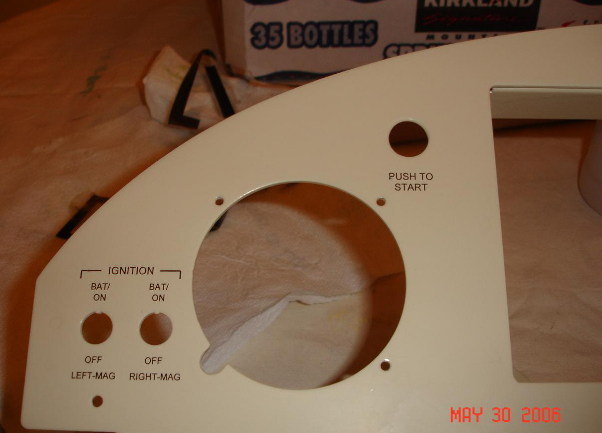
|
|
|
|
| CptTripps |
Jan 27 2014, 10:24 AM
Post
#267
|
|
:: Punch and Pie :: Group: Members Posts: 3,584 Joined: 26-December 04 From: Mentor, OH Member No.: 3,342 Region Association: Upper MidWest |
Got the braces welded in to place (on plates) last night, so I'm ready for "full-rotisserie-action" tonight. I've GOT to get this things stripped the rest of the way down so Mr. Sandblast Guy can get started with his part.
The "expander" I made up (still attached at one end in the photo) worked well enough for me to stretch out the gap by 1/8" before I braced it. I plan on re-welding the hell hole repair the PPO did, and I believe that'll ease it up enough to the point I won't have to worry about it springing back. I also worked on my "Rendering" a little bit. Used a pic of my actual rims and calipers. Attached thumbnail(s) 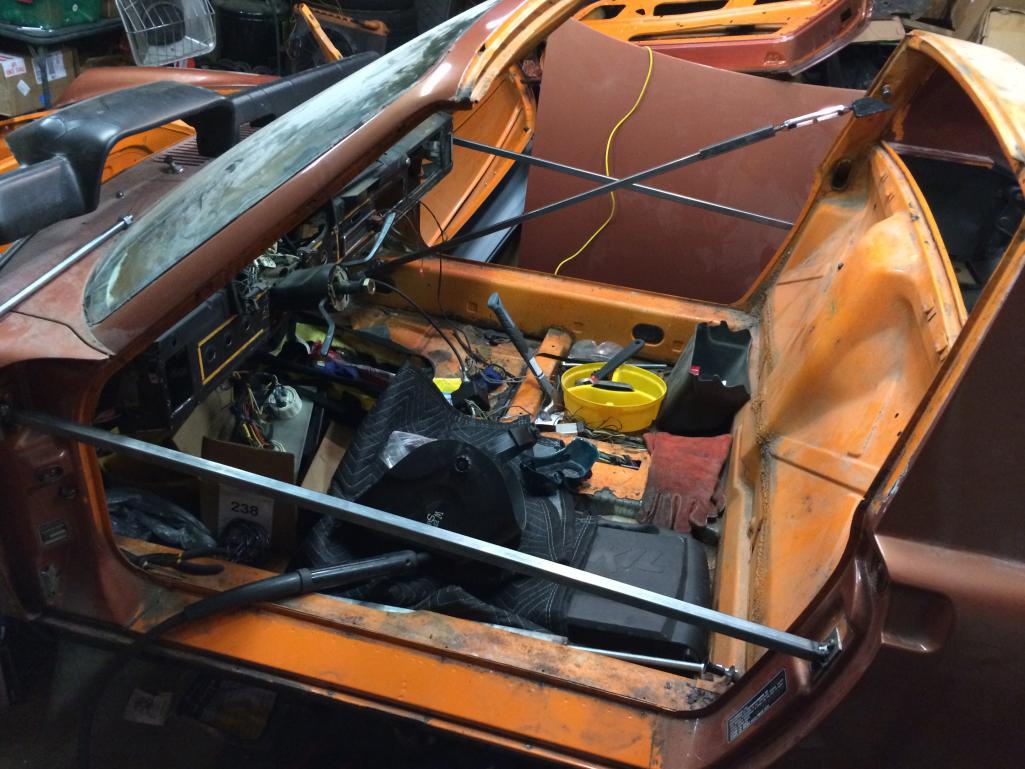 Attached image(s) 
|
|
|
|
| CptTripps |
Jan 30 2014, 08:29 AM
Post
#268
|
|
:: Punch and Pie :: Group: Members Posts: 3,584 Joined: 26-December 04 From: Mentor, OH Member No.: 3,342 Region Association: Upper MidWest |
Spent time last night stripping the tub and getting her ready to head over to the sand-blaster this weekend. The pile of things for the powder-coater is getting bigger and bigger too.
Picked up the windshield today. So I've got that taken care of now too. If I can get the tub back from sand and primer by next weekend...I'll be ahead of schedule for being on the road by April 15th. (IMG:style_emoticons/default/smilie_pokal.gif) Attached thumbnail(s) 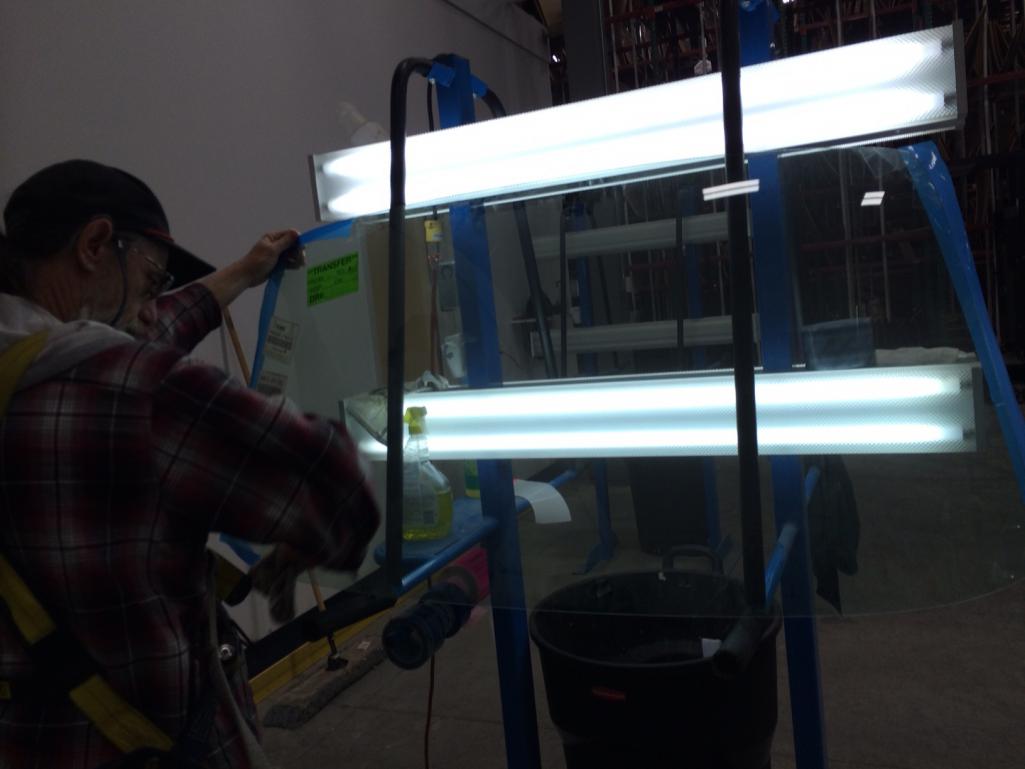
|
|
|
|
| Jeff Hail |
Jan 30 2014, 06:59 PM
Post
#269
|
|
Senior Member Group: Members Posts: 1,141 Joined: 3-May 07 From: LA/ CA Member No.: 7,712 |
QUOTE(CptTripps @ Jan 23 2014, 05:21 AM) Worked on my door brace last night. I need to stretch out 1/8" on the top of the pass door. Came up with a good brace for now. Just need to replace it with one that presses against the door plates now so I can weld everything else up. Cool project! Watch out for those turn buckles for tensioning the door opening! They hurt when they explode. |
|
|
|
| CptTripps |
Feb 2 2014, 06:36 PM
Post
#270
|
|
:: Punch and Pie :: Group: Members Posts: 3,584 Joined: 26-December 04 From: Mentor, OH Member No.: 3,342 Region Association: Upper MidWest |
Shit ton of work done today in the garage. Went in at 9a...left at 6:30 to watch the game. Got the tub cmpletely stripped...except for the steering rack. I'll get that off tomorrow and I should be able to get the tub to the sand blaster on Tuesday!
I'm a little discouraged at the Hell Hole repair. Looks a little suspect, and there's a lot of bondo up top. Also, the battery tray is BOLTED into place. That's just strange. I also have a pile of crap to take to the powder coater tomorrow. A-Arms, Dust Covers, Struts, and a bunch of random stuff. Attached thumbnail(s) 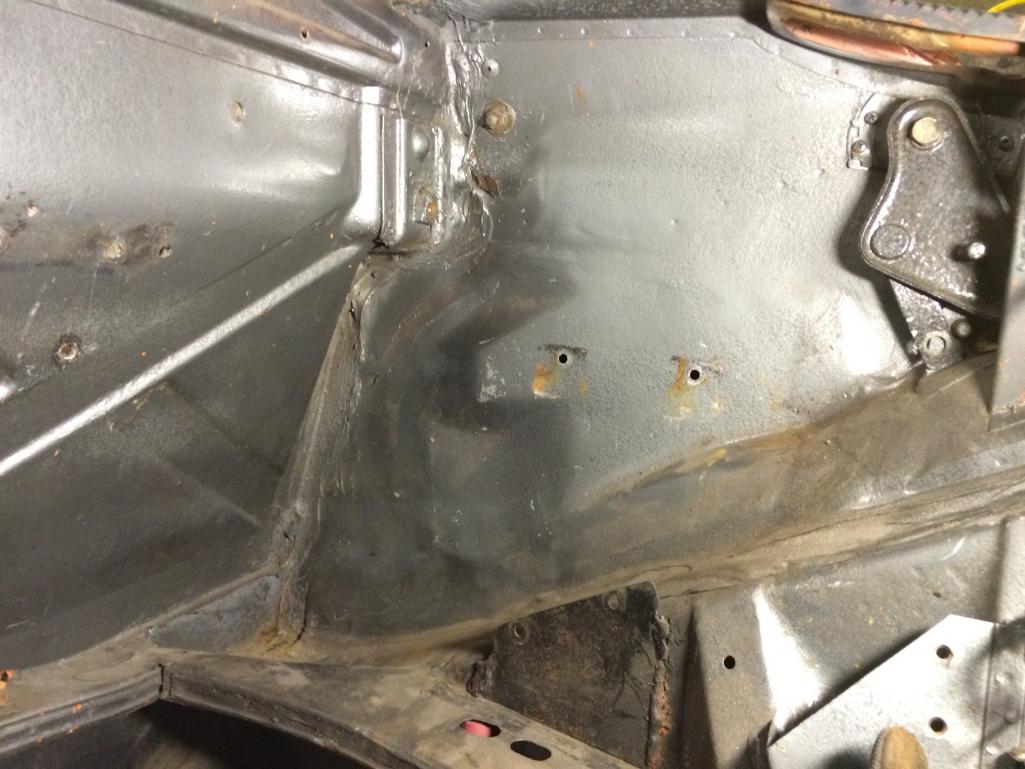 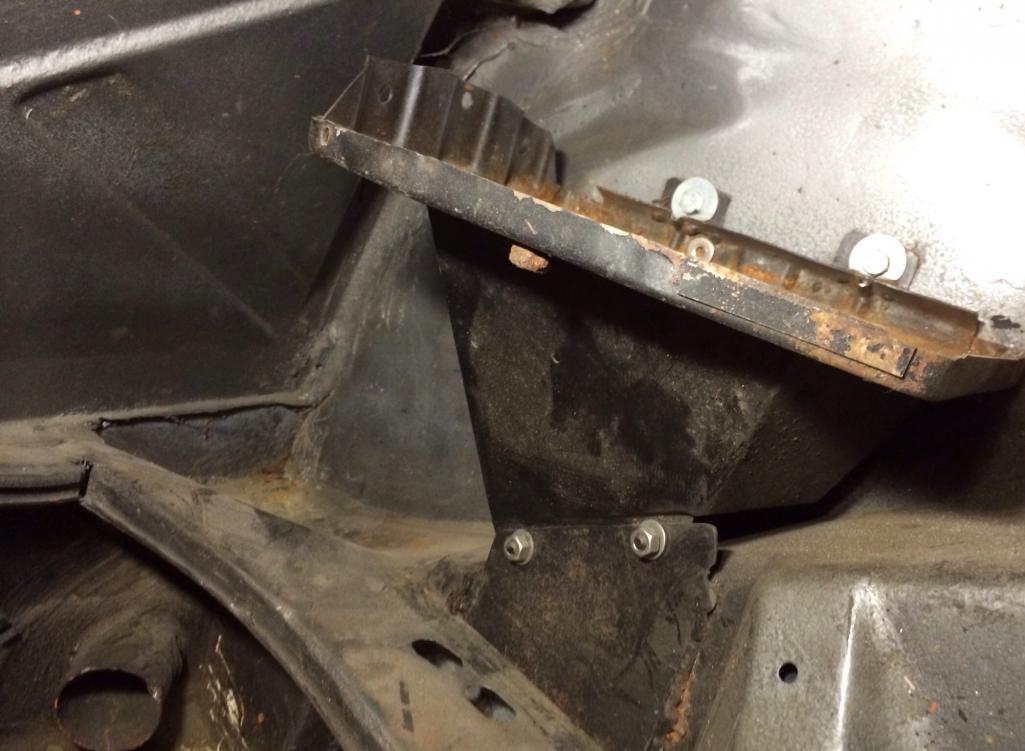 
|
|
|
|
| 914forme |
Feb 2 2014, 07:33 PM
Post
#271
|
|
Times a wastin', get wrenchin'! Group: Members Posts: 3,896 Joined: 24-July 04 From: Dayton, Ohio Member No.: 2,388 Region Association: None |
I bolted my tray in also. I figured it would rust, so when it did, I would just u-bolt and bolt in a new one. Jon Lowe suggested it when I did the hell hole on my 914.
Come to think of it, theres no rust on that tray, and I use AGM batteries. (IMG:style_emoticons/default/dry.gif) Also glad to see the decal system, I was heading towards vinyl myself, but this system will let me do other things also, so yeah. Nice to see its what Mark used for his quad gauge, now if I can just figure out the proper font. (IMG:style_emoticons/default/headbang.gif) |
|
|
|
| CptTripps |
Feb 3 2014, 02:08 PM
Post
#272
|
|
:: Punch and Pie :: Group: Members Posts: 3,584 Joined: 26-December 04 From: Mentor, OH Member No.: 3,342 Region Association: Upper MidWest |
After watching the "Orange 75 Project" for several months, I'm starting to think about the rear trunk, and how I can maintain access to the motor, while keeping my trunk intact as well.
I'm not sure on ALL the dimensions yet, but this is the general idea. Put a hinge up there to let me mount the computer and wiring, then be able to lift it up if needed. The green box is my hYdra-EMS computer, and the blocks are the screw-down terminals for marrying the stock harness to the aftermarket ECU. Attached thumbnail(s)  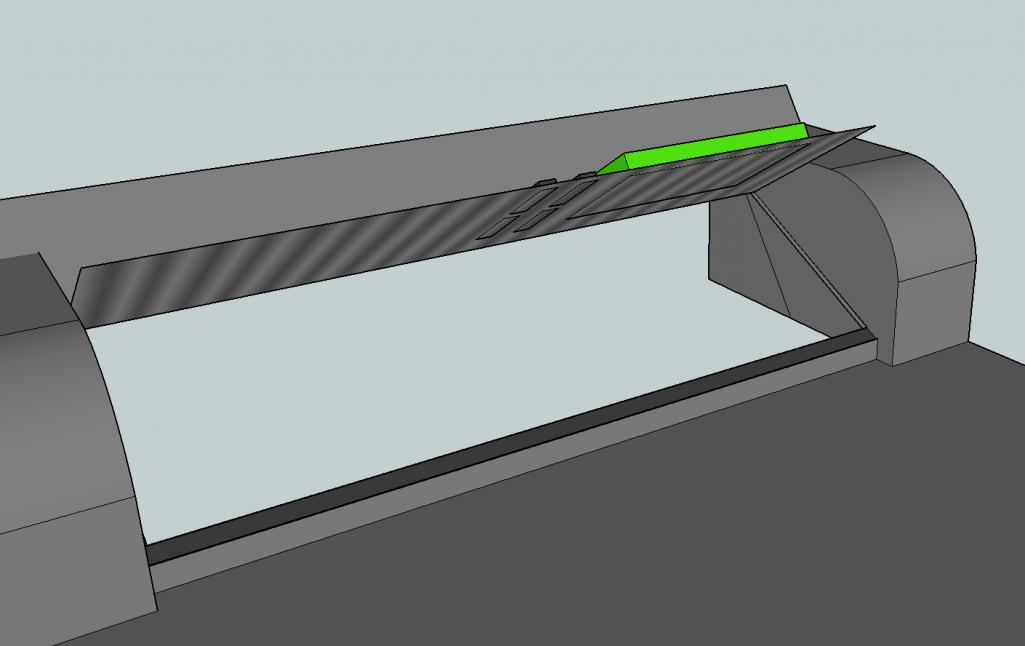
|
|
|
|
| CptTripps |
Feb 3 2014, 02:13 PM
Post
#273
|
|
:: Punch and Pie :: Group: Members Posts: 3,584 Joined: 26-December 04 From: Mentor, OH Member No.: 3,342 Region Association: Upper MidWest |
Dropped off a ton of stuff to the Powder Coater today.
Front suspension, brake dust guards, and a mess of other little knick-knacks. This is the box that's being powdered a "Muted Chrome" while the other pieces (not pictured) will be the green. I snapped a pic of what the combo should look like together. Attached thumbnail(s) 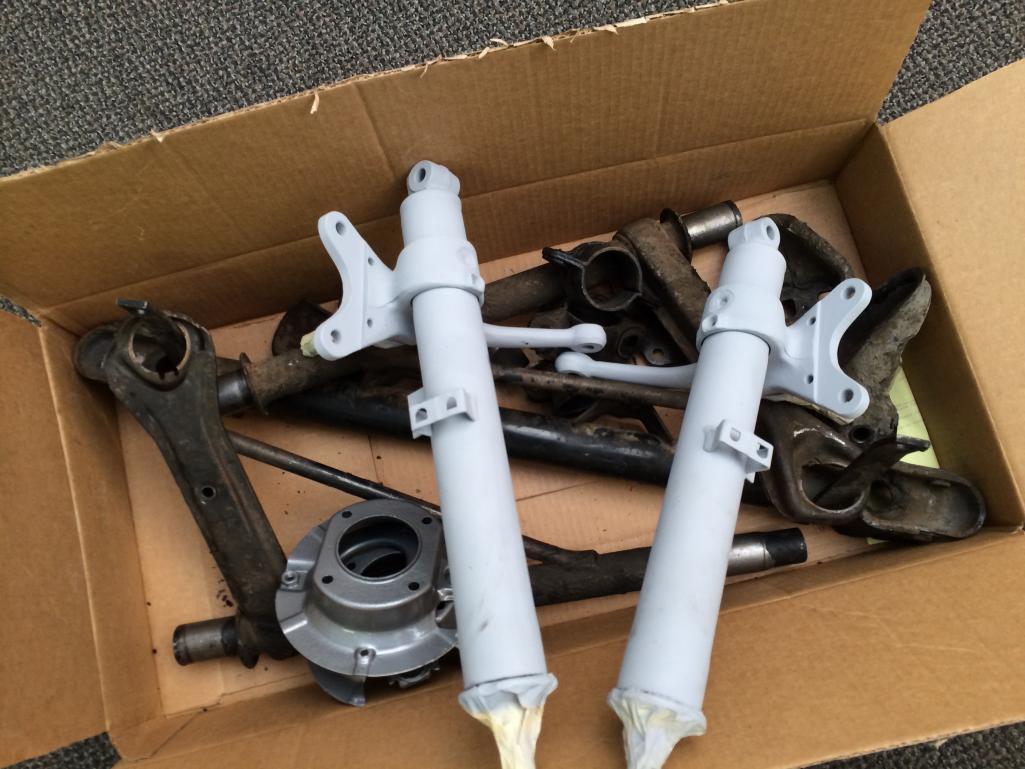 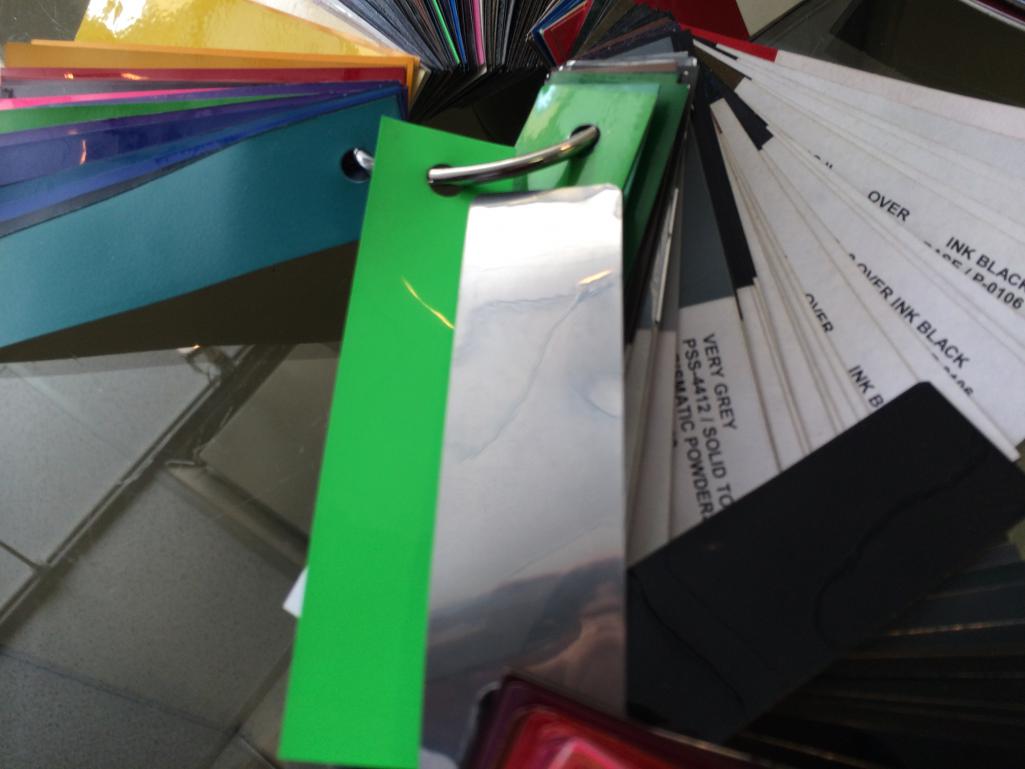
|
|
|
|
| effutuo101 |
Feb 3 2014, 06:31 PM
Post
#274
|
|
Advanced Member Group: Members Posts: 2,735 Joined: 10-April 05 From: Lemon Grove Member No.: 3,914 Region Association: Southern California |
sweet!
Those will be pretty when completed. |
|
|
|
| CptTripps |
Feb 3 2014, 09:53 PM
Post
#275
|
|
:: Punch and Pie :: Group: Members Posts: 3,584 Joined: 26-December 04 From: Mentor, OH Member No.: 3,342 Region Association: Upper MidWest |
So, I had an idea on the way home about the steering wheel. Since the top of the wheel is normally in the way...why do I need a top to my wheel?
I had an extra Momo wheel in the garage, so I thought I'd play a little bit. Here's the wheel I had. I played with some tape to see what part I'd want to take off. 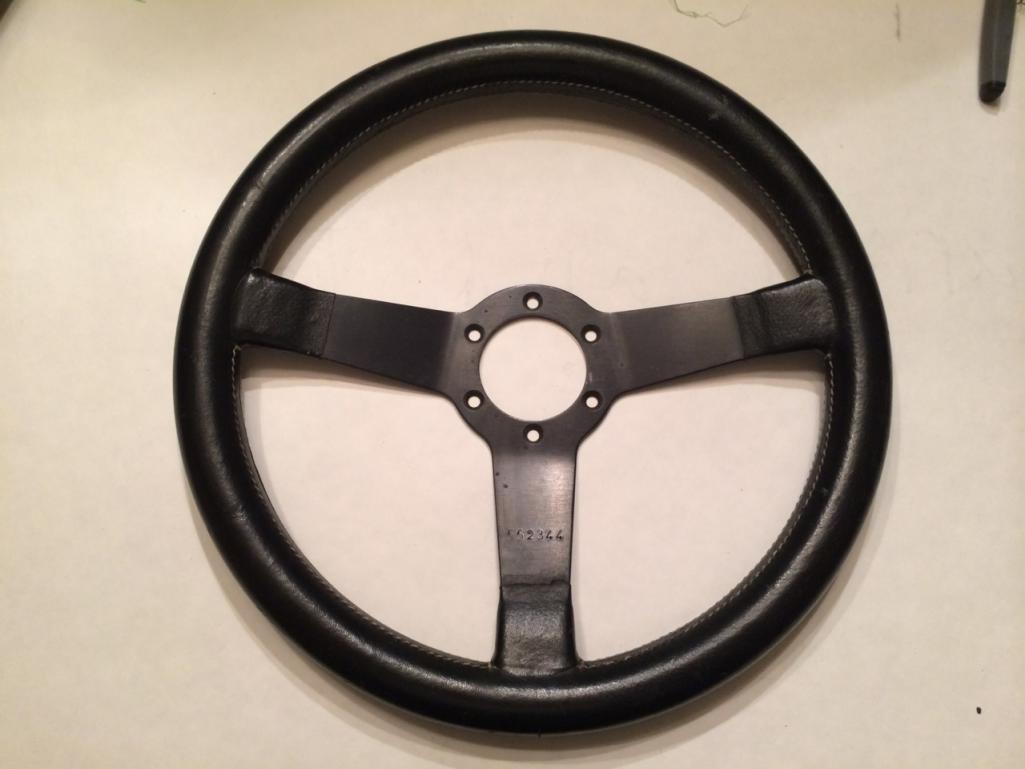 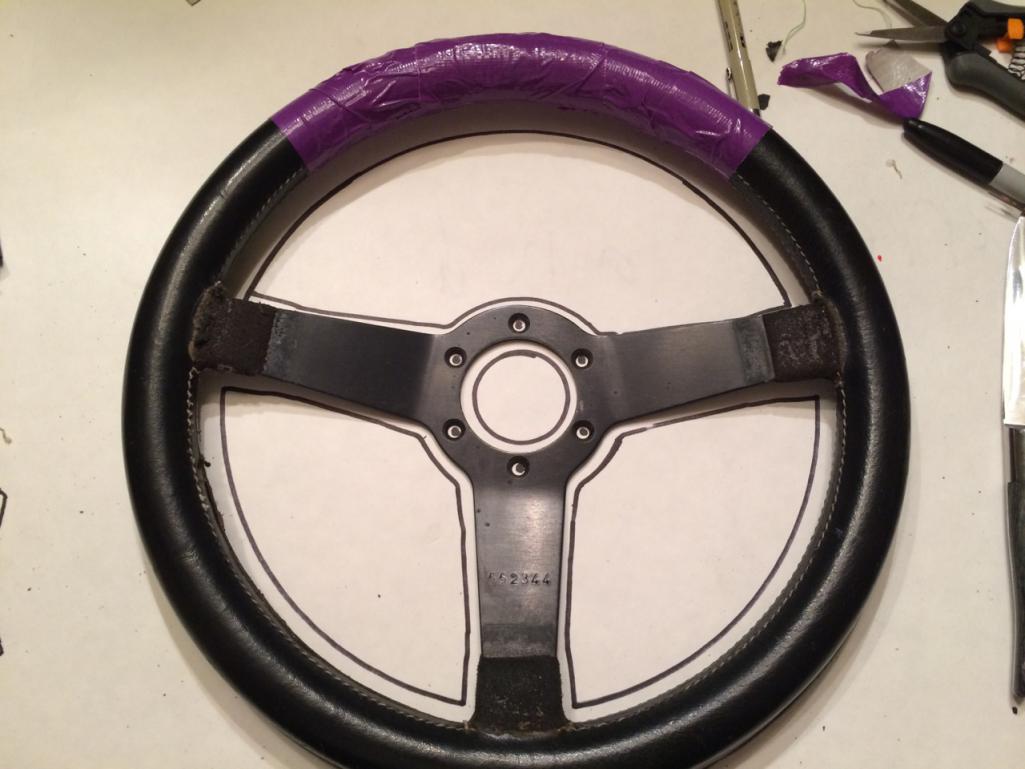 Then...I got to cuttin! 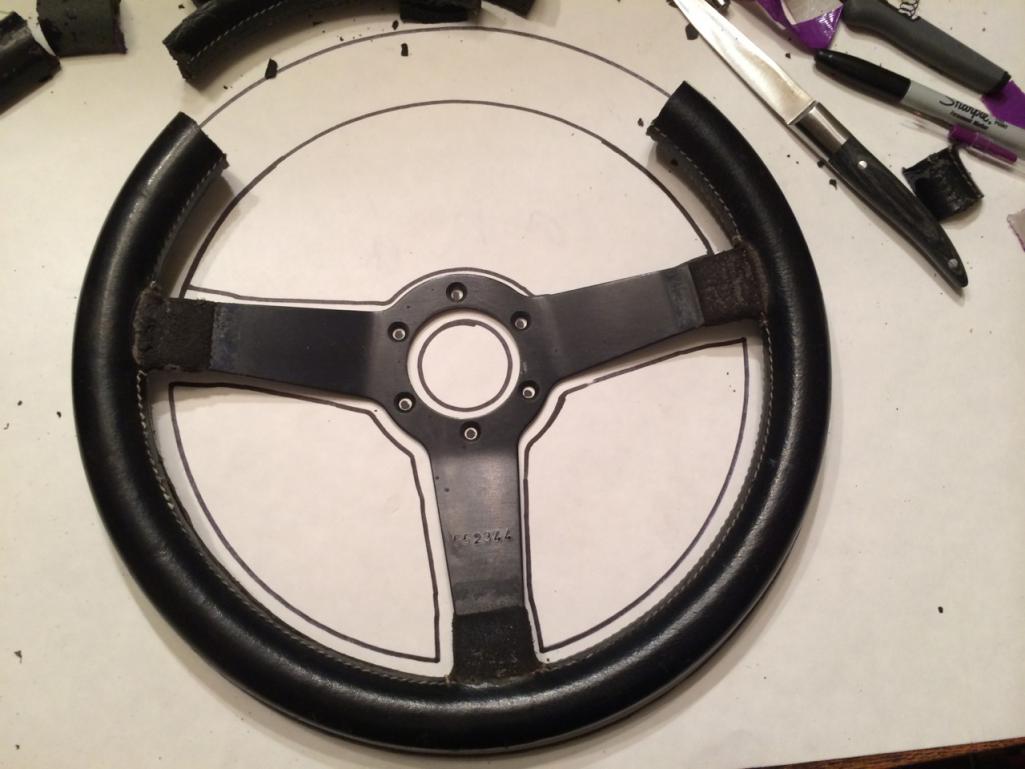 I used parts of the "discarded" foam to make caps for the cut part.  Then to the University of Google for a "Baseball Stitching 101" class. Played with some old vinyl I had that I was considering using for something else. 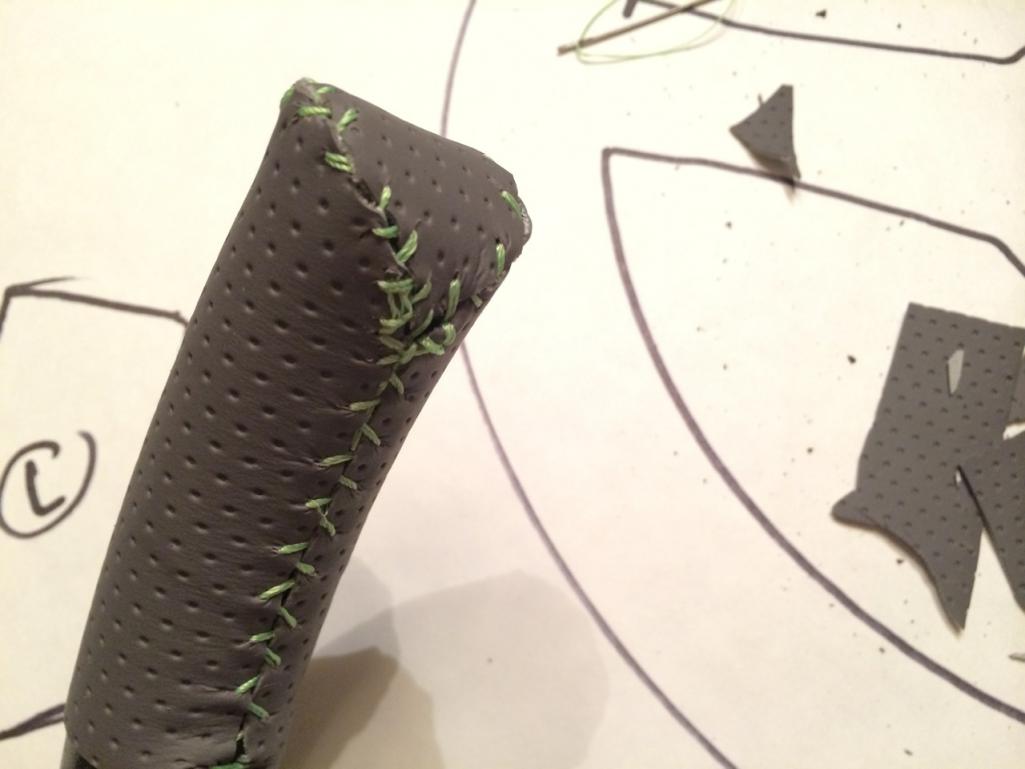 Boy...do I ever suck at baseball stitching! Let's try again with a piece of scrap leather. 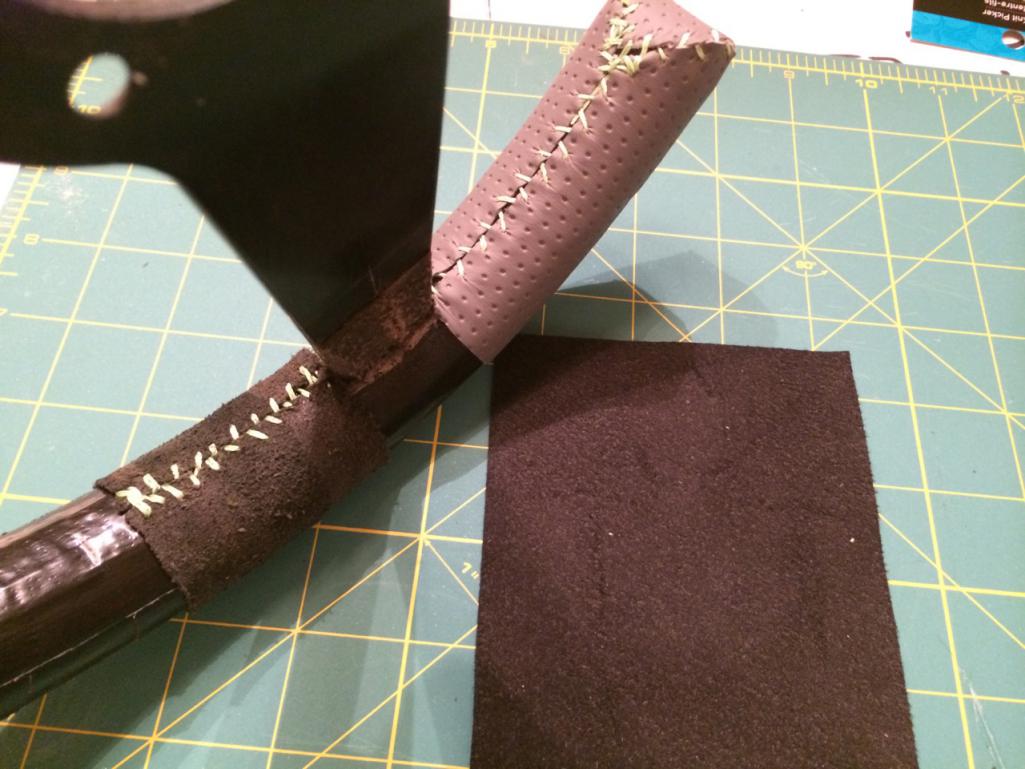 Better...so I cracked out the Alcantara I'm gong to use for another part of the build. Let's see how that goes? 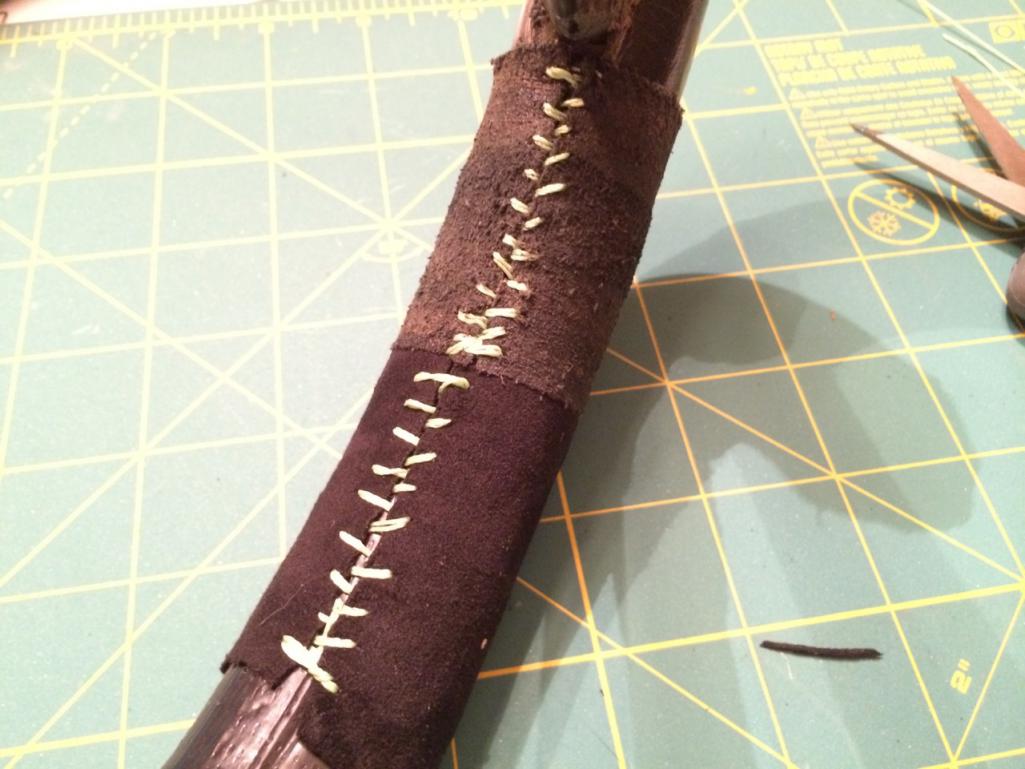 What I learned, was that if I can pre-cut the holes and keep them uniform, this isn't going to be too hard. Time consuming...yes. Hard? Not really. Here's where I landed for the evening. Not too bad for about 1h worth of work. 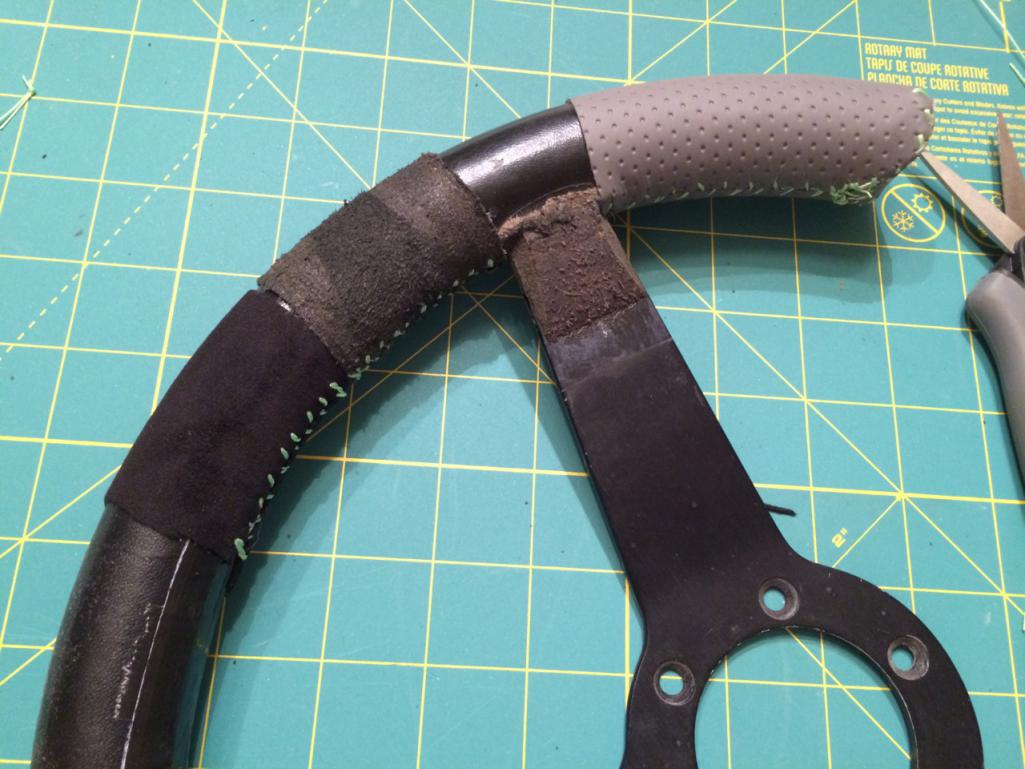 I'm going to cover the rest of the wheel later this week when I get some other stuff in. A template would be the next step. I REALLY don't want to waste any of the Alcantara. It's about $120 per yard. (IMG:style_emoticons/default/screwy.gif) |
|
|
|
| mgp4591 |
Feb 3 2014, 10:06 PM
Post
#276
|
|
914 Guru Group: Members Posts: 5,525 Joined: 1-August 12 From: Salt Lake City Ut Member No.: 14,748 Region Association: Intermountain Region |
QUOTE(CptTripps @ Feb 3 2014, 08:53 PM) So, I had an idea on the way home about the steering wheel. Since the top of the wheel is normally in the way...why do I need a top to my wheel? I had an extra Momo wheel in the garage, so I thought I'd play a little bit. Here's the wheel I had. I played with some tape to see what part I'd want to take off. Then...I got to cuttin! I used parts of the "discarded" foam to make caps for the cut part. Then to the University of Google for a "Baseball Stitching 101" class. Played with some old vinyl I had that I was considering using for something else. Boy...do I ever suck at baseball stitching! Let's try again with a piece of scrap leather. Better...so I cracked out the Alcantara I'm gong to use for another part of the build. Let's see how that goes? What I learned, was that if I can pre-cut the holes and keep them uniform, this isn't going to be too hard. Time consuming...yes. Hard? Not really. Here's where I landed for the evening. Not too bad for about 1h worth of work. I'm going to cover the rest of the wheel later this week when I get some other stuff in. A template would be the next step. I REALLY don't want to waste any of the Alcantara. It's about $120 per yard. (IMG:style_emoticons/default/screwy.gif) Interesting solution! Ever thought of going to a bike shop and picking up some handlebar plugs and tape? They've got some options for covering! |
 |
|
| CptTripps |
Feb 4 2014, 08:48 PM
Post
#277
|
|
:: Punch and Pie :: Group: Members Posts: 3,584 Joined: 26-December 04 From: Mentor, OH Member No.: 3,342 Region Association: Upper MidWest |
Naaa. I'm going full custom.
Covered the center tonight and I'll have the Alcantara seen up for the rest of the wheel tomorrow. I'm really starting to see the theme come together. What an awesomely gratifying process. Now if I can just get the body don't likety-split, I'd be a happy dude! Attached thumbnail(s) 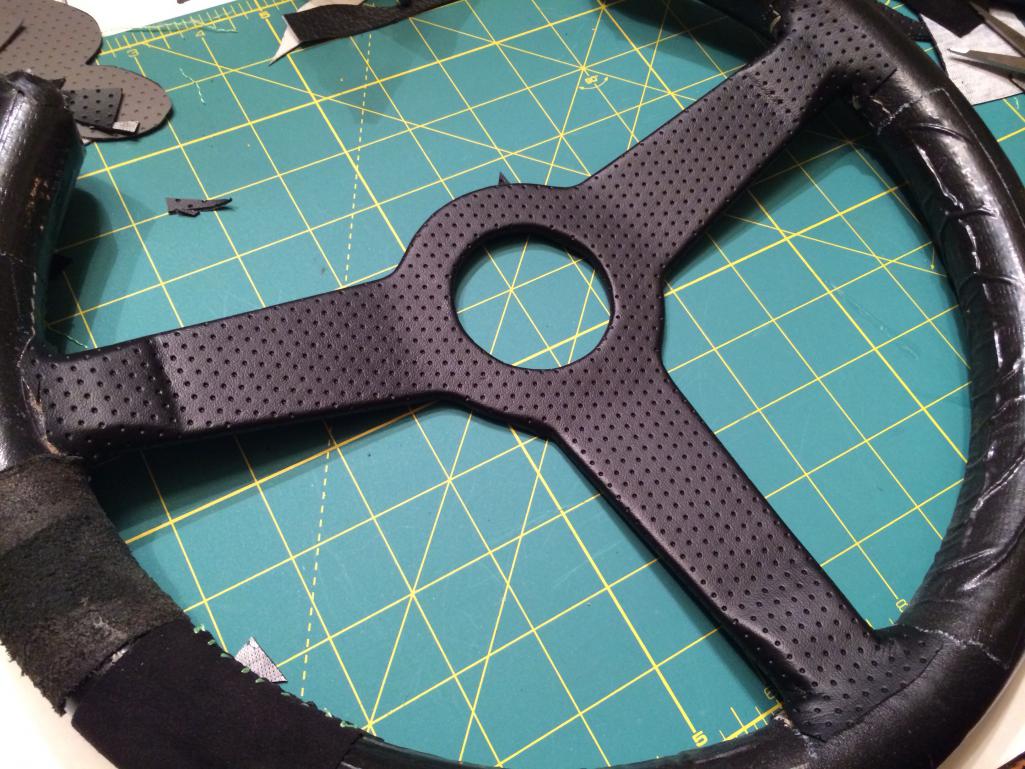
|
|
|
|
| McMark |
Feb 5 2014, 12:33 AM
Post
#278
|
|
914 Freak! Group: Retired Admin Posts: 20,179 Joined: 13-March 03 From: Grand Rapids, MI Member No.: 419 Region Association: None |
Like! (IMG:style_emoticons/default/thumb3d.gif)
That tub better not come back with big surprises. (IMG:style_emoticons/default/wink.gif) |
|
|
|
| CptTripps |
Feb 5 2014, 03:07 AM
Post
#279
|
|
:: Punch and Pie :: Group: Members Posts: 3,584 Joined: 26-December 04 From: Mentor, OH Member No.: 3,342 Region Association: Upper MidWest |
QUOTE(McMark @ Feb 5 2014, 01:33 AM) My biggest fear! I'm already aware of a mess on the pass-front quarter, but past that it'll be the worlds worst game of "Hide & Seek" She's ready to go. Just waiting on my trailer. Attached thumbnail(s) 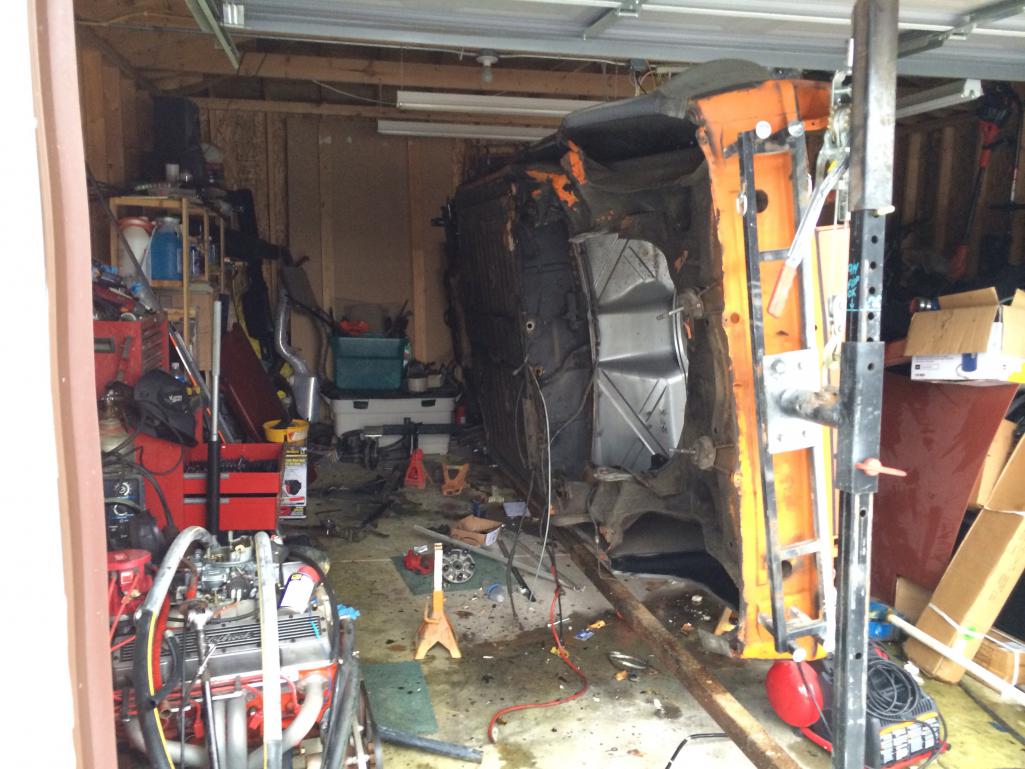
|
|
|
|
| mepstein |
Feb 5 2014, 07:51 AM
Post
#280
|
|
914-6 GT in waiting Group: Members Posts: 19,693 Joined: 19-September 09 From: Landenberg, PA/Wilmington, DE Member No.: 10,825 Region Association: MidAtlantic Region |
Cut out the bottom and it will look like the steering yoke on a plane.
Hopefully your face will not come in contact with the modified wheel (IMG:style_emoticons/default/shades.gif) |
|
|
|
|
1 User(s) are reading this topic (1 Guests and 0 Anonymous Users)
0 Members:

|
Lo-Fi Version | Time is now: 10th January 2025 - 10:59 PM |
Invision Power Board
v9.1.4 © 2025 IPS, Inc.