|
|
|
Porsche, and the Porsche crest are registered trademarks of Dr. Ing. h.c. F. Porsche AG.
This site is not affiliated with Porsche in any way. Its only purpose is to provide an online forum for car enthusiasts. All other trademarks are property of their respective owners. |
|
|

  |

| 914forme |
 Mar 2 2014, 05:20 PM Mar 2 2014, 05:20 PM
Post
#341
|
|
Times a wastin', get wrenchin'!  Group: Members Posts: 3,896 Joined: 24-July 04 From: Dayton, Ohio Member No.: 2,388 Region Association: None |
Doug, don't solder your joints, get high quality crimpers and crimps, crimp them, then adhesive heat shrink over the joint. They are less likely to break and also are repairable if need be, with out cutting out a section. The heat shrink also acts a strain relief. But you can do it how ever you want.
I come from the computer world where when I started we soldered everything. I now crimp everything using crimpers and adhesive heat shrink as my strain reliefs. But thats just me. You still should use an adhesive heat shrink for strain relief. |
   |

 
|
| CptTripps |
Mar 2 2014, 06:59 PM
Post
#342
|
|
:: Punch and Pie :: Group: Members Posts: 3,584 Joined: 26-December 04 From: Mentor, OH Member No.: 3,342 Region Association: Upper MidWest |
I hear you loud and clear. I meant to type "de-soldering". Some of the Subaru connectors were soldered inside the connectors. I just ordered about 200 new female ends for all the different Delphi connectors. I'm also re-doing all the connections to the Hydra. In between, it'll be a using a termination block so I can move to other pins if I need to re-map something.
|
|
|
|
| 914forme |
Mar 2 2014, 07:53 PM
Post
#343
|
|
Times a wastin', get wrenchin'! Group: Members Posts: 3,896 Joined: 24-July 04 From: Dayton, Ohio Member No.: 2,388 Region Association: None |
(IMG:style_emoticons/default/aktion035.gif) Carry on then good sir carry on.
QUOTE(CptTripps @ Mar 2 2014, 07:59 PM)  I hear you loud and clear. I meant to type "de-soldering". Some of the Subaru connectors were soldered inside the connectors. I just ordered about 200 new female ends for all the different Delphi connectors. I'm also re-doing all the connections to the Hydra. In between, it'll be a using a termination block so I can move to other pins if I need to re-map something. BTW, you could have looked at my post, I showed how to convert to 2WD and well specifically that nut, it is a pain. Yet once you figure it out, its easy as pie. |
|
|
|
| CptTripps |
Mar 3 2014, 06:46 AM
Post
#344
|
|
:: Punch and Pie :: Group: Members Posts: 3,584 Joined: 26-December 04 From: Mentor, OH Member No.: 3,342 Region Association: Upper MidWest |
QUOTE(914forme @ Mar 2 2014, 08:53 PM) BTW, you could have looked at my post, I showed how to convert to 2WD and well specifically that nut, it is a pain. Yet once you figure it out, its easy as pie. I'd looked at a lot of posts, I just didn't remember any of them. (IMG:style_emoticons/default/headbang.gif) At that moment, I was in the garage...covered in grease...and had Ian's number. (IMG:style_emoticons/default/biggrin.gif) Most of yesterday was spent cleaning...and cleaning...and cleaning. Things just got "out of hand" in the garage, and with the car out of there, it was now or never. My Dad came over to help me build the Christmas present he and my Grandfather bought me. Took us 2 hours, but having drawers for ALL my tools is going to be awesome. Attached thumbnail(s) 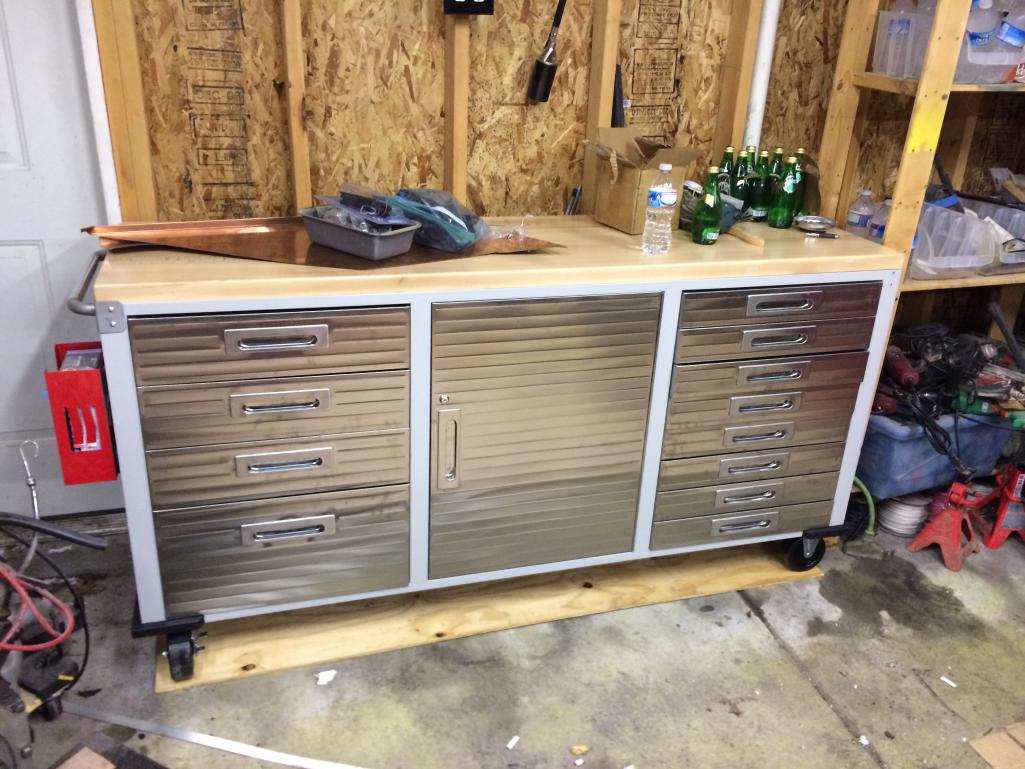
|
|
|
|
| CptTripps |
Mar 3 2014, 07:53 PM
Post
#345
|
|
:: Punch and Pie :: Group: Members Posts: 3,584 Joined: 26-December 04 From: Mentor, OH Member No.: 3,342 Region Association: Upper MidWest |
I spent the night tearing down all the connections for the engine harness. All new high-temp wiring has been ordered in about 20 different colors.
I expect I'll have the entire harness done by the weekend. I've got it all mapped out in an excel sheet, and printed shrink tubing for both ends of each wire. So the plan is to get everything terminated to the connector, and leave 10' at the end so I can take a lot of time to wire it through properly to the termination block. Attached thumbnail(s) 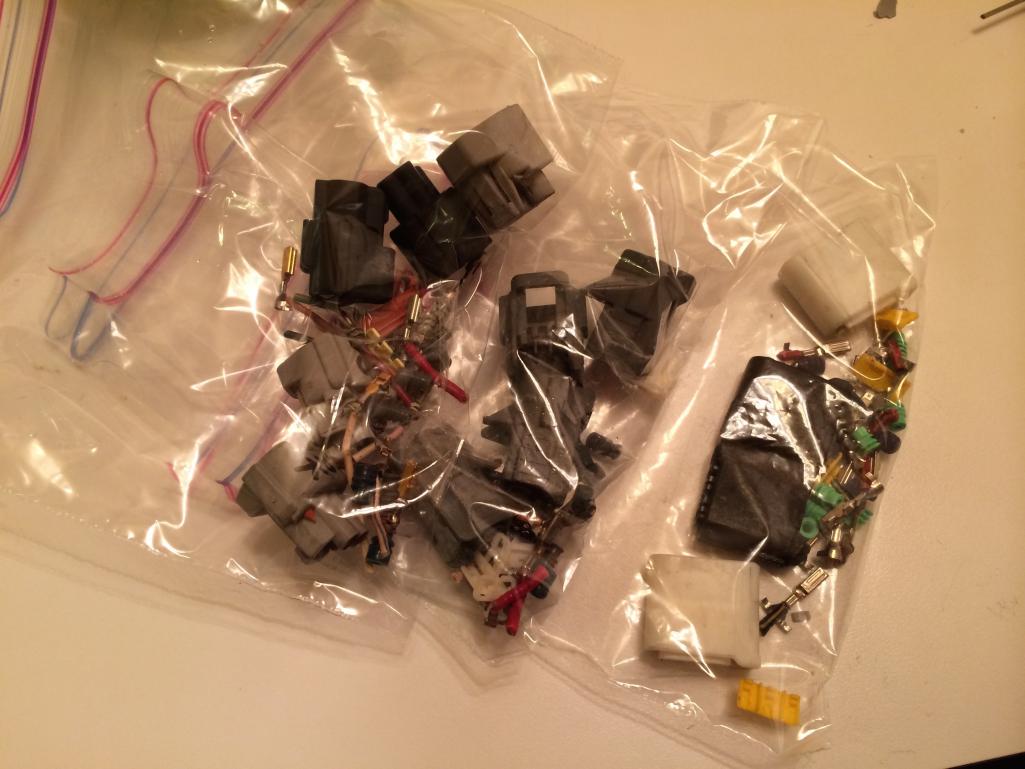
|
|
|
|
| 76-914 |
Mar 3 2014, 11:24 PM
Post
#346
|
|
Repeat Offender & Resident Subaru Antagonist Group: Members Posts: 13,653 Joined: 23-January 09 From: Temecula, CA Member No.: 9,964 Region Association: Southern California |
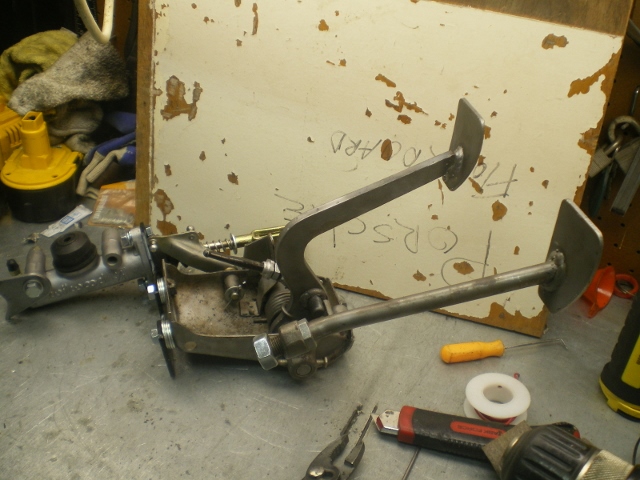
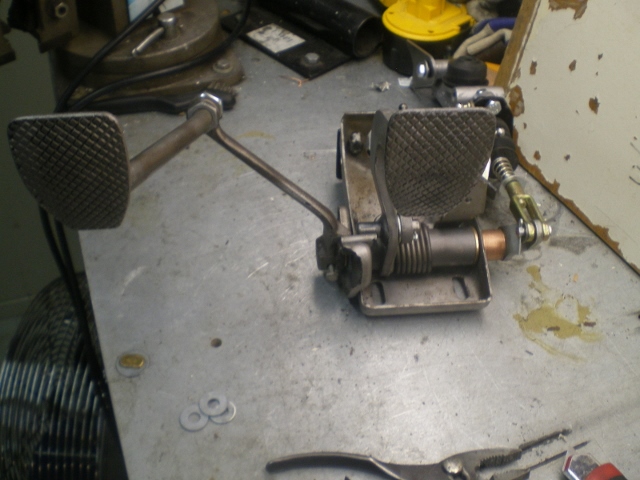
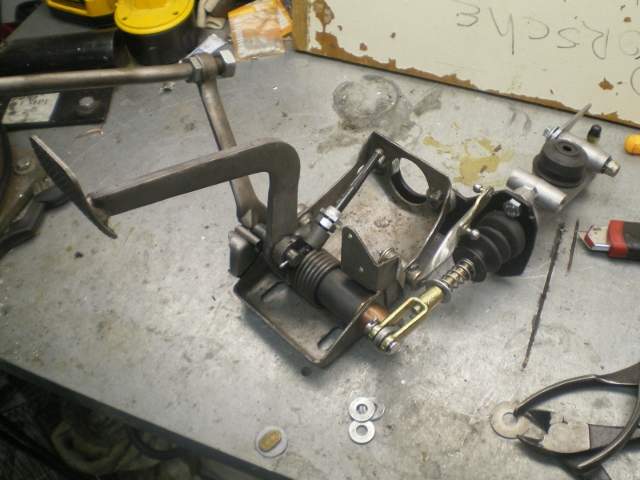
Your pedal assembly is ready for shipping tomorrow. I'll pm you tomorrow. I made some rubber stop pads. Ugly but effective. Note the washer orientation, don't mix washers. The one on the accelerator shaft is unique in size. Do not omit any washers or interference is possible.
      |
|
|
|
| CptTripps |
Mar 4 2014, 08:40 AM
Post
#347
|
|
:: Punch and Pie :: Group: Members Posts: 3,584 Joined: 26-December 04 From: Mentor, OH Member No.: 3,342 Region Association: Upper MidWest |
Looks AWESOME!
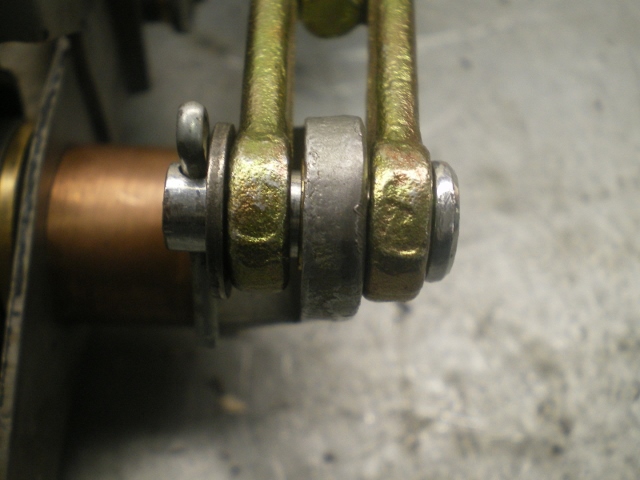
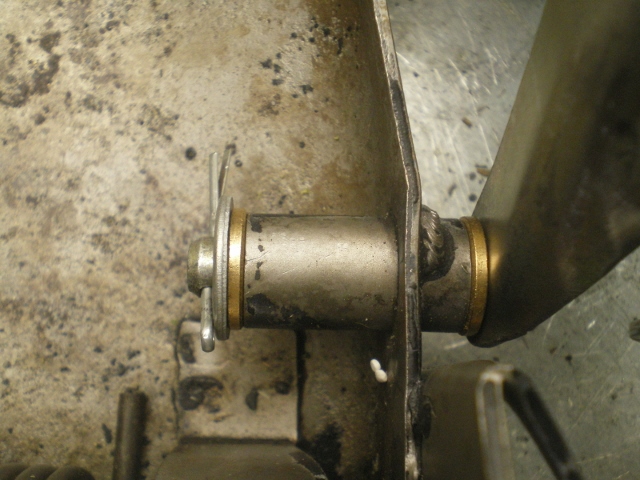
A couple points of clarification: 1: Is the gap expected? I'd assume YES so there is play for the clevis. 2: Are these washers needed? I'd expect 1-2, and the rest you're showing are to simulate the thickness of the body. Thanks for the awesome work. Can't wait to get it back and stripped before I send it off to powder. Attached image(s) 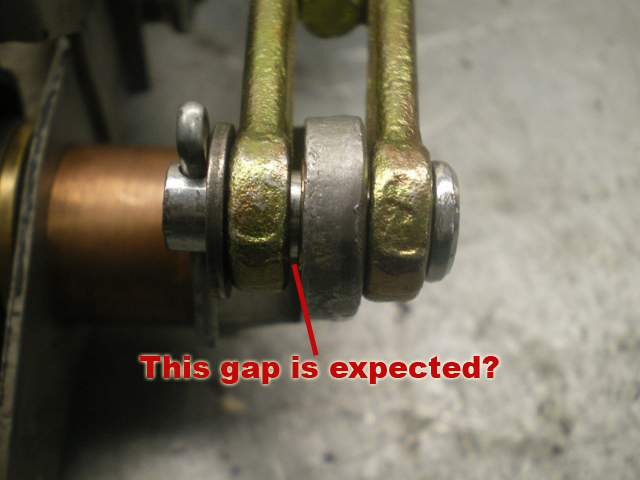 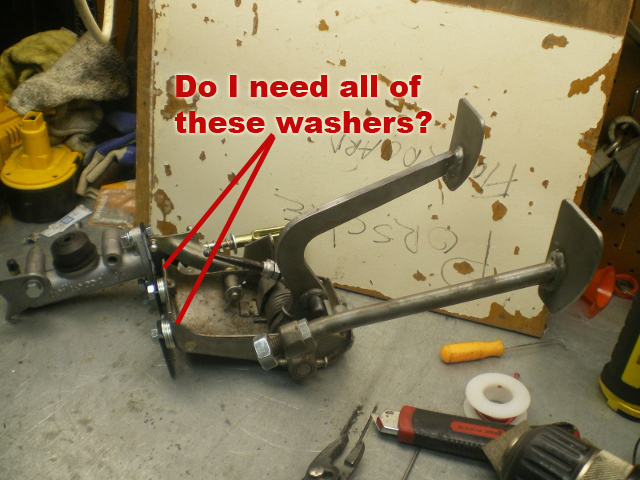
|
|
|
|
| 76-914 |
Mar 4 2014, 10:20 AM
Post
#348
|
|
Repeat Offender & Resident Subaru Antagonist Group: Members Posts: 13,653 Joined: 23-January 09 From: Temecula, CA Member No.: 9,964 Region Association: Southern California |
#1- correctamundo.
#2- no, they are used just to set it up and simulate the floor area. Your assumptions are correct. |
|
|
|
| CptTripps |
Mar 4 2014, 12:14 PM
Post
#349
|
|
:: Punch and Pie :: Group: Members Posts: 3,584 Joined: 26-December 04 From: Mentor, OH Member No.: 3,342 Region Association: Upper MidWest |
QUOTE(76-914 @ Mar 4 2014, 11:20 AM) Your assumptions are correct. This marks the first time in history this has happened! Great work Kent. Thanks! In other build news: I sand-blasted and dropped off more pieces/parts to powder-coating. I'm having the PORSCHE and 914 lettering done in the neon green. Attached thumbnail(s) 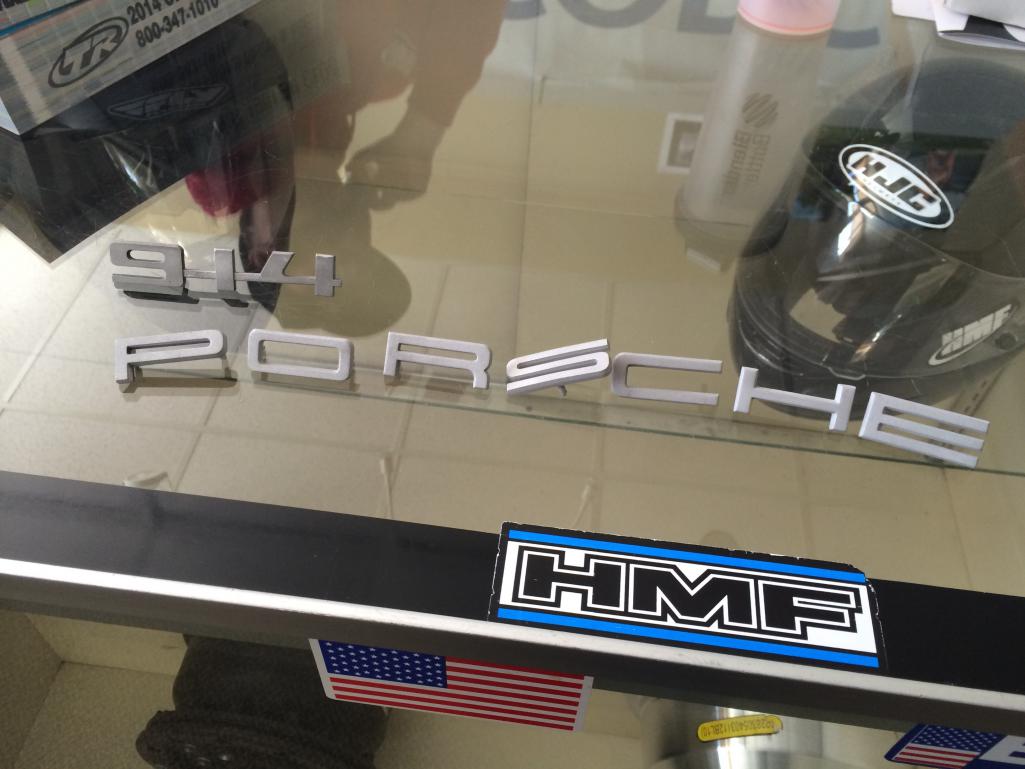
|
|
|
|
| 76-914 |
Mar 4 2014, 02:58 PM
Post
#350
|
|
Repeat Offender & Resident Subaru Antagonist Group: Members Posts: 13,653 Joined: 23-January 09 From: Temecula, CA Member No.: 9,964 Region Association: Southern California |
Nice, what colour is the car?
|
|
|
|
| CptTripps |
Mar 5 2014, 02:32 AM
Post
#351
|
|
:: Punch and Pie :: Group: Members Posts: 3,584 Joined: 26-December 04 From: Mentor, OH Member No.: 3,342 Region Association: Upper MidWest |
Spent the night in the garage working on little things.
Ground and re-welded the tubes for the trailing arms. My welding skills aren't great, but WAY better than they used to be. These go off to powder in the AM. Attached thumbnail(s) 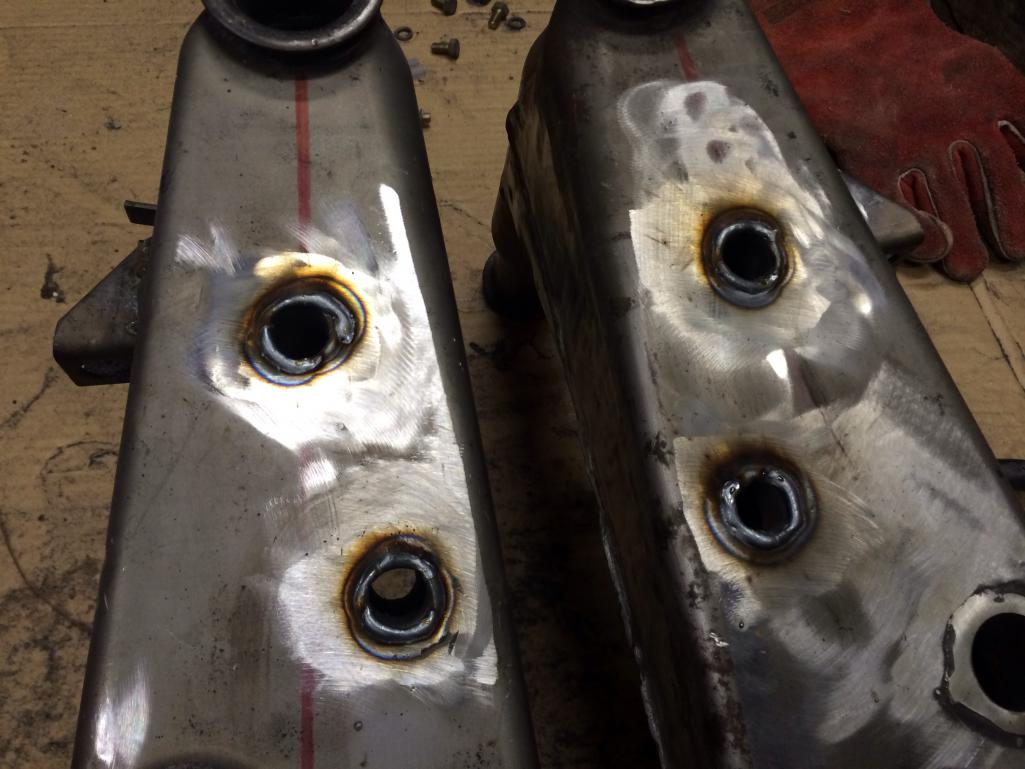
|
|
|
|
| CptTripps |
Mar 5 2014, 06:23 PM
Post
#352
|
|
:: Punch and Pie :: Group: Members Posts: 3,584 Joined: 26-December 04 From: Mentor, OH Member No.: 3,342 Region Association: Upper MidWest |
Stopped by the sandblaster today. JUST in time!
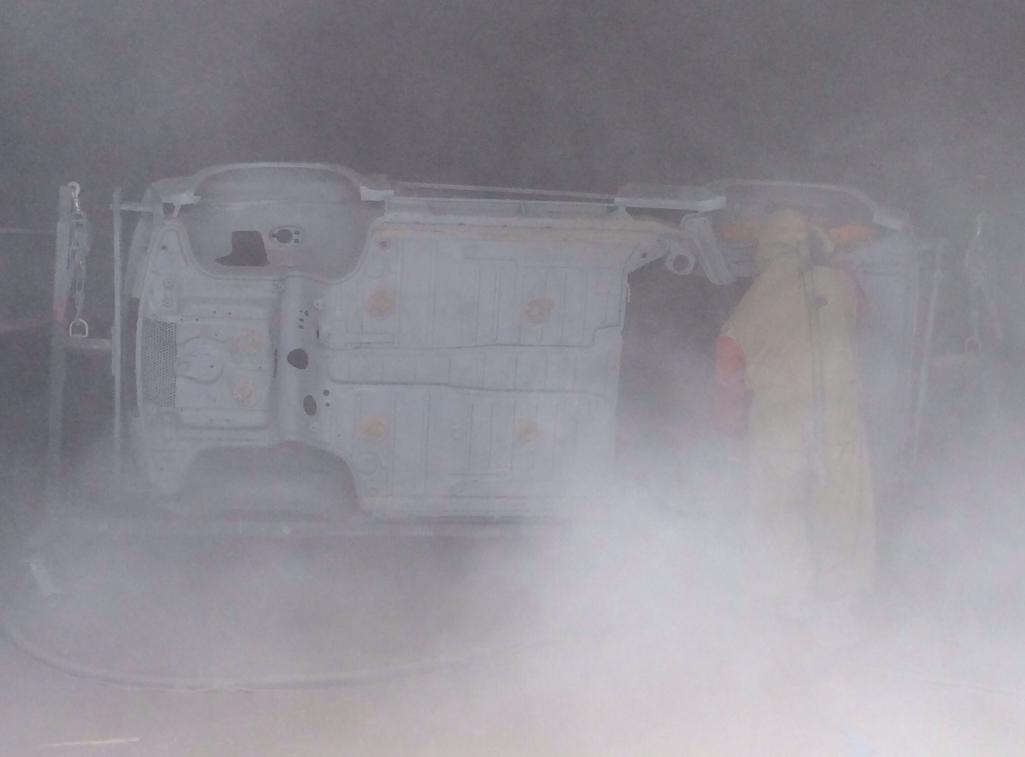 When the dust cleared (pun intended) I got quite a sight. 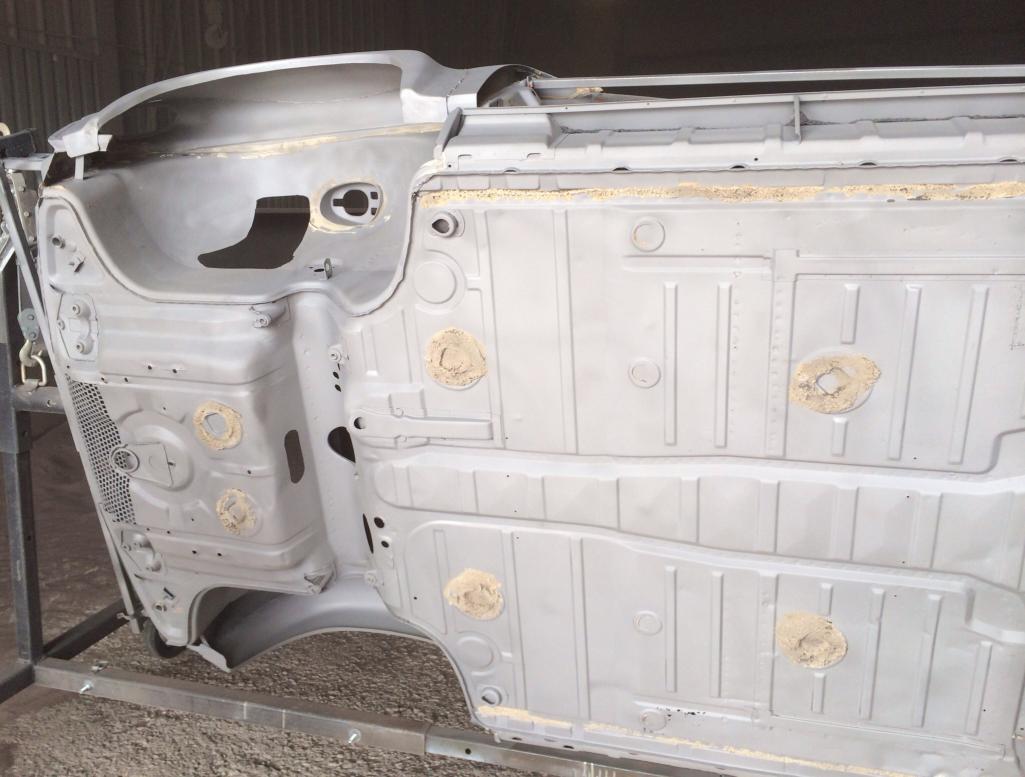 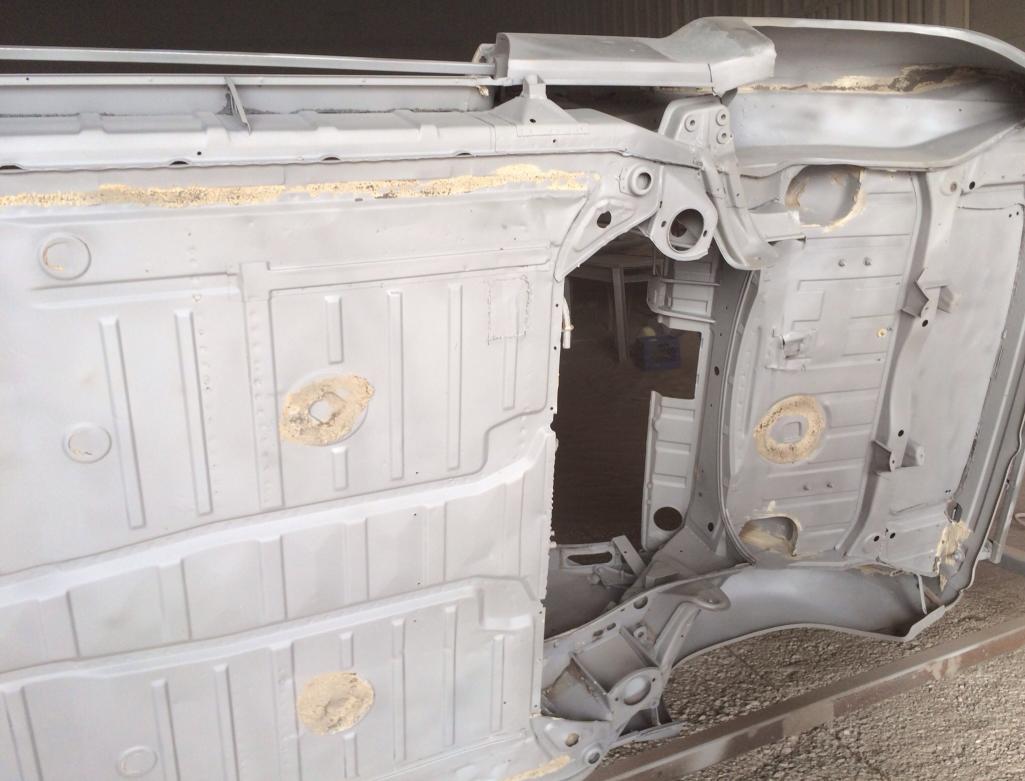 So...my tub is in a LOT better shape than I was expecting. 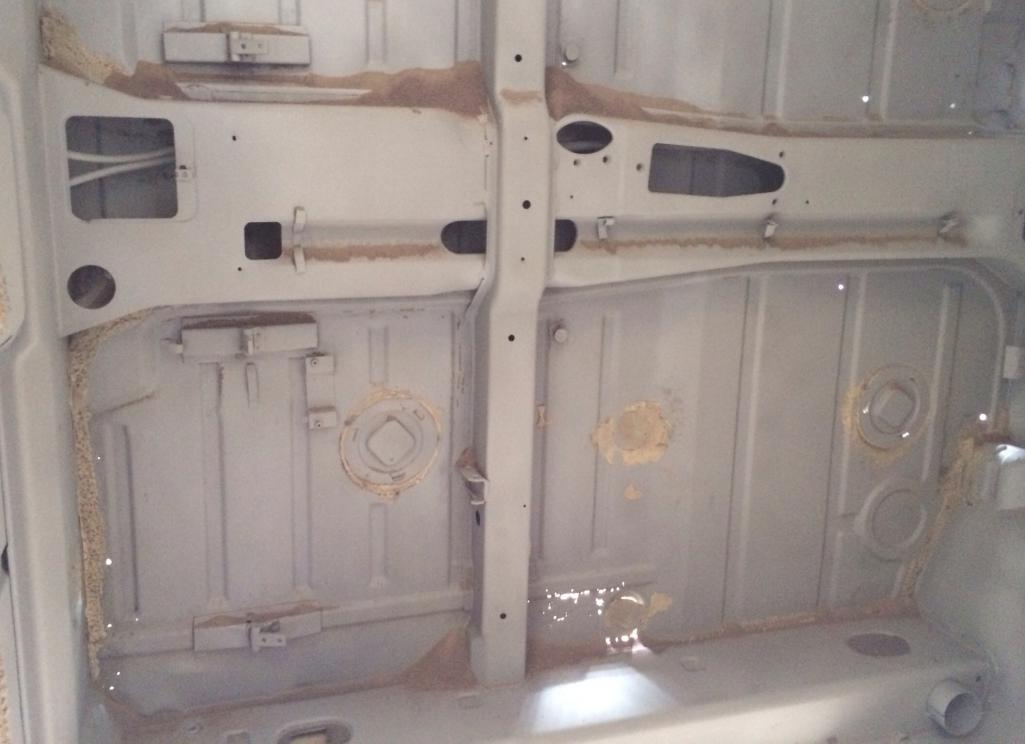  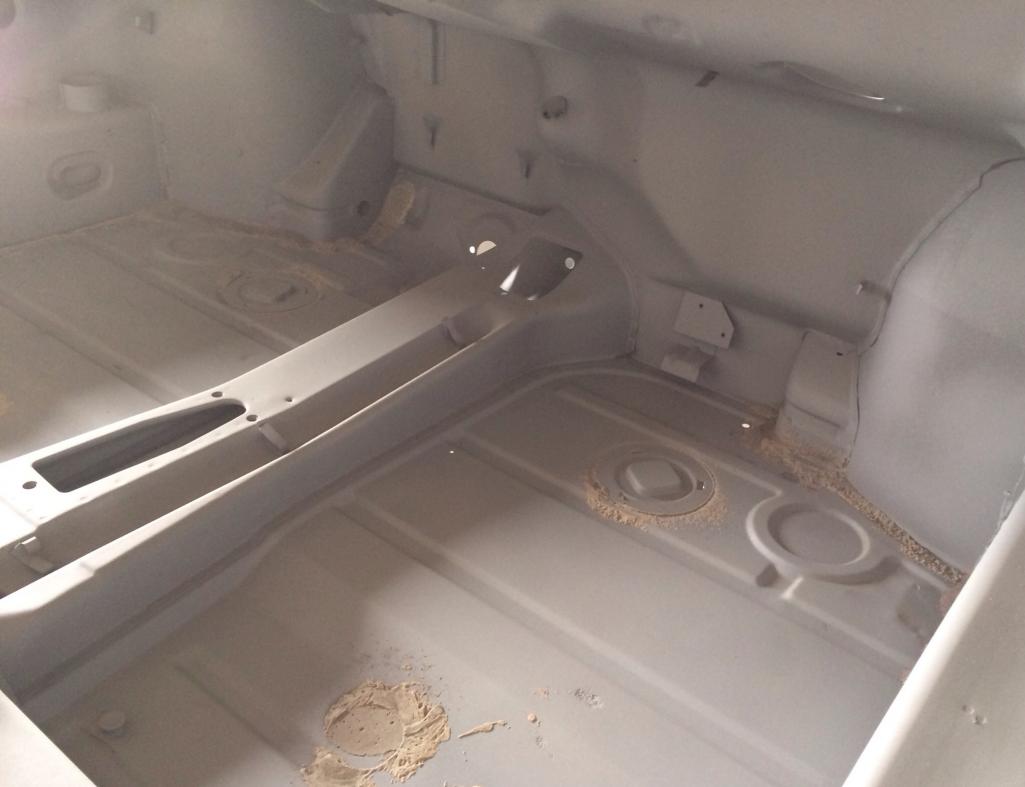 Just a tiny bit of Swiss cheese on the passenger floor, But everything else appears to be real solid. They're etch-priming in the AM. I'll have it back in the garage on Saturday! |
|
|
|
| Chris H. |
Mar 5 2014, 07:05 PM
Post
#353
|
|
Senior Member Group: Members Posts: 4,053 Joined: 2-January 03 From: Chicago 'burbs Member No.: 73 Region Association: Upper MidWest |
Awesome. That's a great tub! Tiny little patch and a few plug welds for the extra holes drilled over the years and you're all good.
|
|
|
|
| Cairo94507 |
Mar 5 2014, 07:07 PM
Post
#354
|
|
Michael Group: Members Posts: 10,163 Joined: 1-November 08 From: Auburn, CA Member No.: 9,712 Region Association: Northern California |
That is so freaking exciting. You are lucky to be able to stop and see it in progress. I can't wait to go visit my car at Scotty's.
|
|
|
|
| CptTripps |
Mar 5 2014, 09:56 PM
Post
#355
|
|
:: Punch and Pie :: Group: Members Posts: 3,584 Joined: 26-December 04 From: Mentor, OH Member No.: 3,342 Region Association: Upper MidWest |
Yeh, I was prepared for a nightmare scenario where there was a ton of hiding Bondo and dents. Lucked out this time I guess!
The actually helps quite a bit. I was expecting 3-4 weeks worth of bodywork, but I may be able to have the interior, bottom, and trunks painted by the 15th. |
|
|
|
| KELTY360 |
Mar 5 2014, 10:54 PM
Post
#356
|
|
914 Neferati Group: Members Posts: 5,102 Joined: 31-December 05 From: Pt. Townsend, WA Member No.: 5,344 Region Association: Pacific Northwest |
What did the hell hole look like?
|
|
|
|
| CptTripps |
Mar 5 2014, 11:27 PM
Post
#357
|
|
:: Punch and Pie :: Group: Members Posts: 3,584 Joined: 26-December 04 From: Mentor, OH Member No.: 3,342 Region Association: Upper MidWest |
HH is good. It's been repaired in the past, and I'll likely clean it up a little more. (My welds aren't great...these are horrid!)
This is getting exciting. |
|
|
|
| rnellums |
Mar 6 2014, 08:47 AM
Post
#358
|
|
Professional Enthusiast Group: Members Posts: 1,670 Joined: 26-November 09 From: Littleton, CO Member No.: 11,072 Region Association: Rocky Mountains |
It looks great! Its gonna be sweet painted!
|
|
|
|
| CptTripps |
Mar 6 2014, 11:16 AM
Post
#359
|
|
:: Punch and Pie :: Group: Members Posts: 3,584 Joined: 26-December 04 From: Mentor, OH Member No.: 3,342 Region Association: Upper MidWest |
Spent last night working on the ECU.
File this under "OCD" but it was driving me nuts that the wiring on the ECU cable was A: Thin and B: Blue. It took me a while digging through Delphi catalogs, but I found the right connector and ordered a few hundred female pins. While watching TV last night, I was able to re-build all three of my ECU cables. I used a larger gauge teflon coated wire that will also terminate easily into a distribution block. I plan on making that half of the panel real soon. I also snagged the Rhino label maker from the server room, and bought 1/4" shrink tube so I can print out labels for everything. I'm planning on doing this for every cable in the car. I know it seems like a lot of work, but I have a chart and can easily print everything out ahead of time, and then as I clip wires shorter, or build harnesses, I'm not having to look at a chart. I can easily identify every wire and know where it terminates and what it's for. One of those jobs that's easy to set up and stay on top of if I start it now. Attached thumbnail(s) 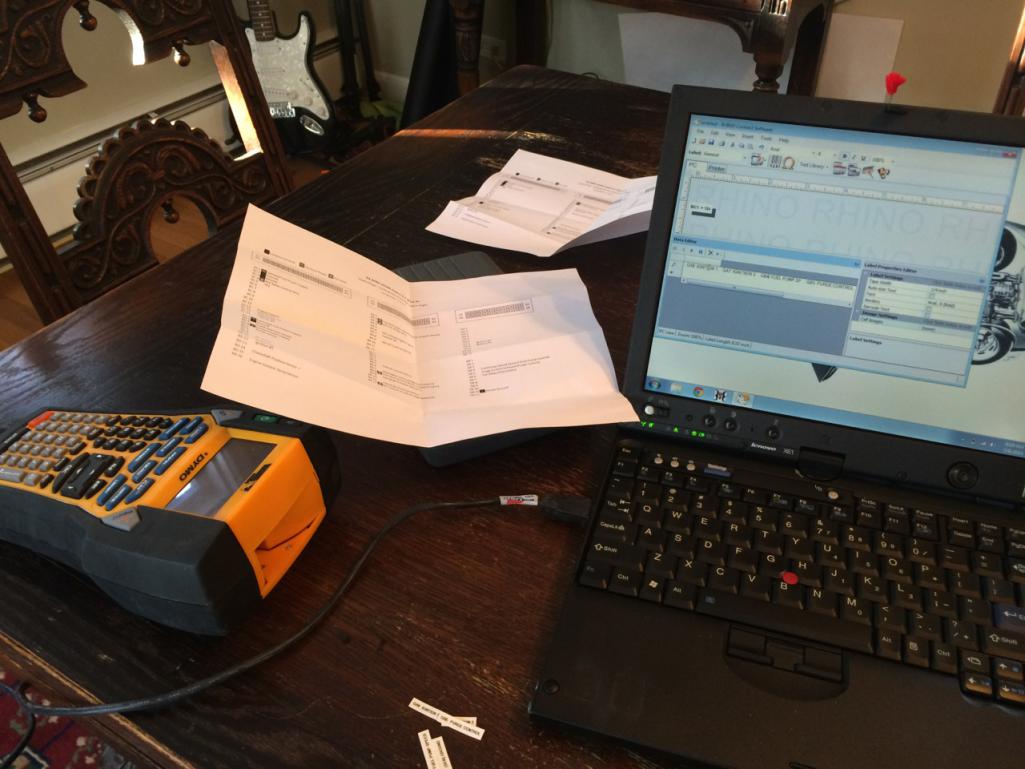 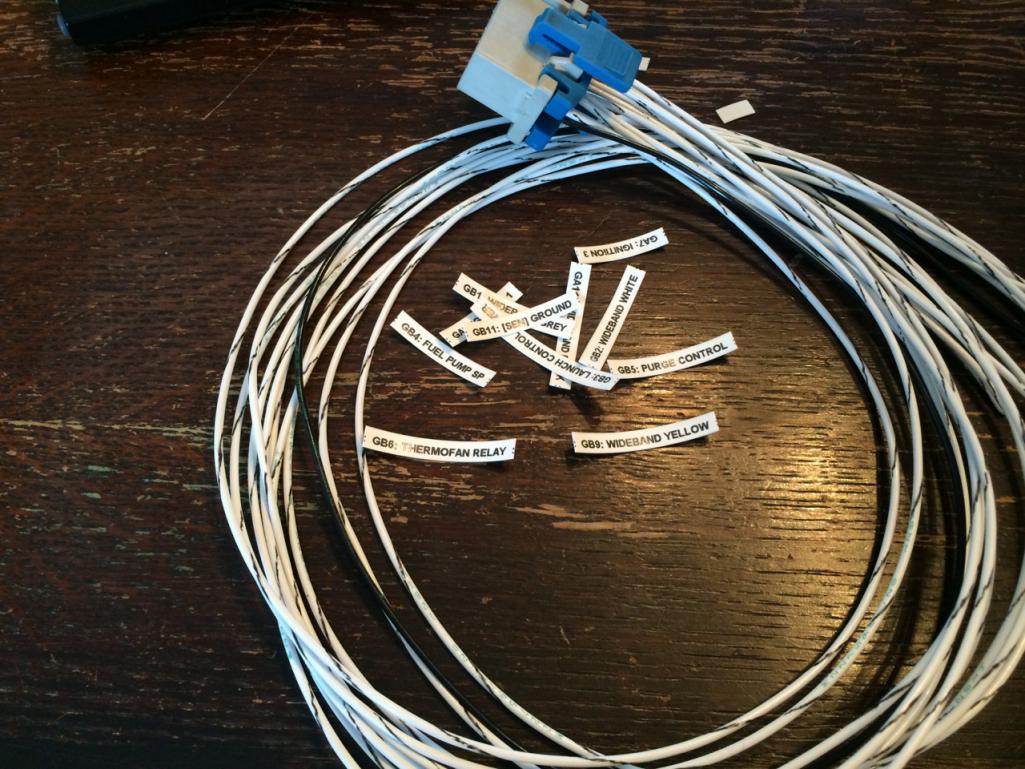 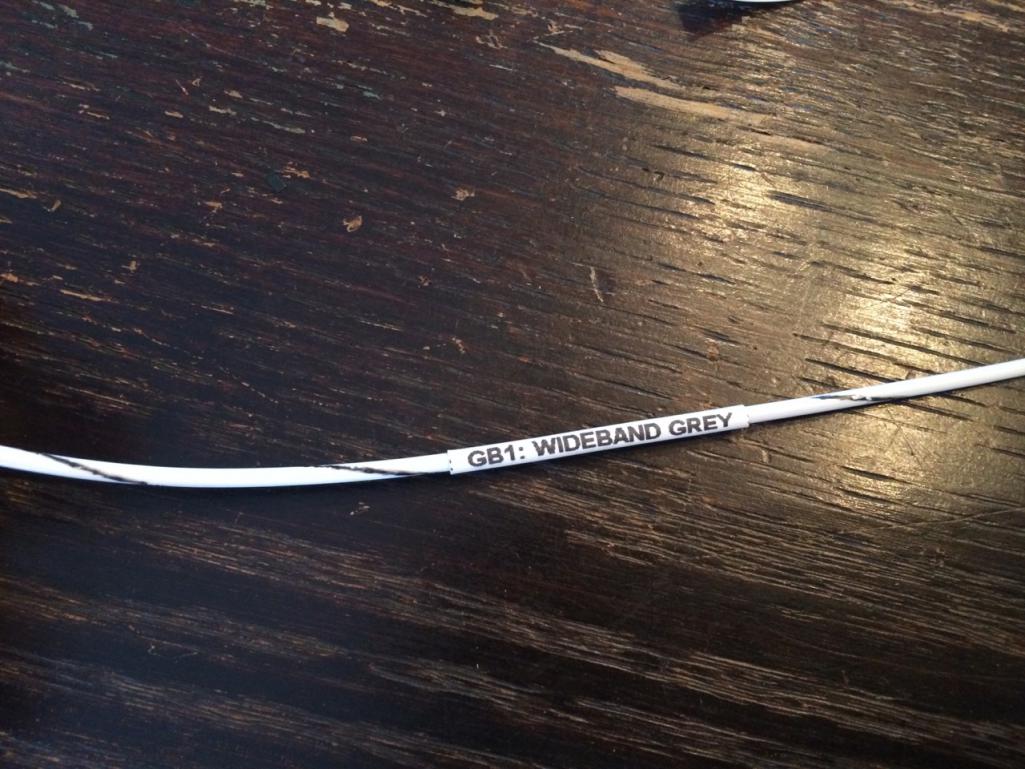
|
|
|
|
| 914forme |
Mar 6 2014, 06:29 PM
Post
#360
|
|
Times a wastin', get wrenchin'! Group: Members Posts: 3,896 Joined: 24-July 04 From: Dayton, Ohio Member No.: 2,388 Region Association: None |
Your doing a great job, I have the labeler, the heat shrink tubing, and the harnesses lying around. Now I just need to get off my butt and get something done.
Your making great progress, keep it up. (IMG:style_emoticons/default/popcorn[1].gif) |
|
|
|
|
1 User(s) are reading this topic (1 Guests and 0 Anonymous Users)
0 Members:

|
Lo-Fi Version | Time is now: 11th January 2025 - 04:42 AM |
Invision Power Board
v9.1.4 © 2025 IPS, Inc.