|
|

|
Porsche, and the Porsche crest are registered trademarks of Dr. Ing. h.c. F. Porsche AG.
This site is not affiliated with Porsche in any way. Its only purpose is to provide an online forum for car enthusiasts. All other trademarks are property of their respective owners. |
|
|
  |
| Mark Henry |
 Jul 9 2014, 07:17 AM Jul 9 2014, 07:17 AM
Post
#221
|
|
that's what I do!                Group: Members Posts: 20,065 Joined: 27-December 02 From: Port Hope, Ontario Member No.: 26 Region Association: Canada |
Checking ring gaps, the factory Malhes run tight tolerances .006 to .012 ring gaps Mine are damn close to the .006 mark...just a hair over.
Attached image(s) 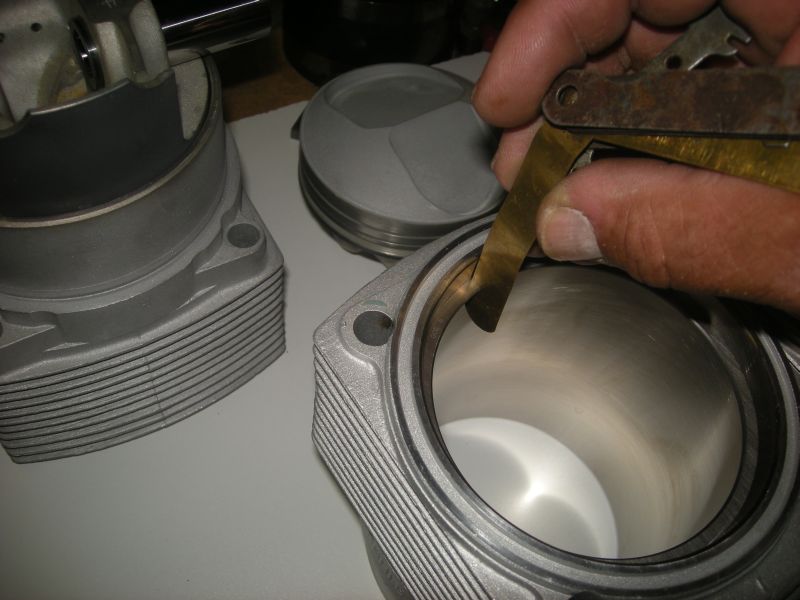
|
| Mark Henry |
 Jul 9 2014, 07:20 AM Jul 9 2014, 07:20 AM
Post
#222
|
|
that's what I do!                Group: Members Posts: 20,065 Joined: 27-December 02 From: Port Hope, Ontario Member No.: 26 Region Association: Canada |
Last time (knock on wood) I see these works of art
Attached image(s) 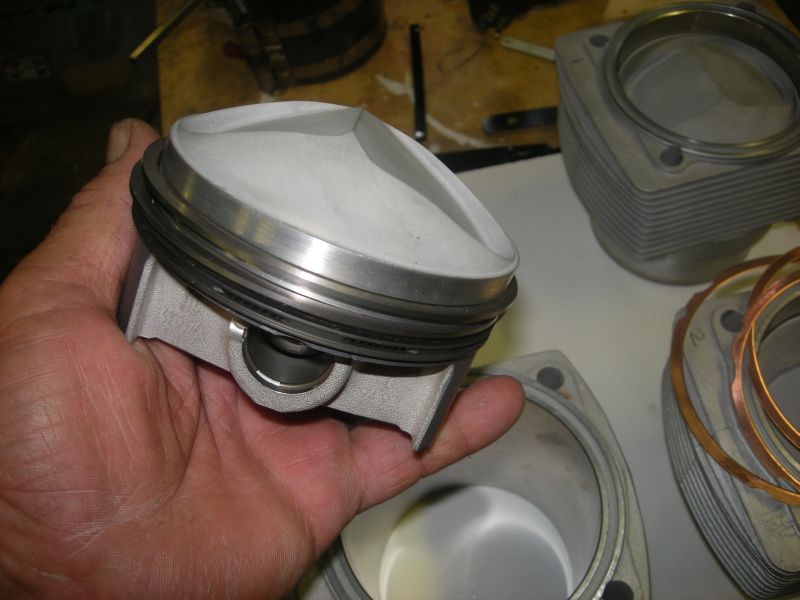
|
| Mark Henry |
 Jul 9 2014, 07:22 AM Jul 9 2014, 07:22 AM
Post
#223
|
|
that's what I do!                Group: Members Posts: 20,065 Joined: 27-December 02 From: Port Hope, Ontario Member No.: 26 Region Association: Canada |
Supertec head studs all ready.
Attached image(s) 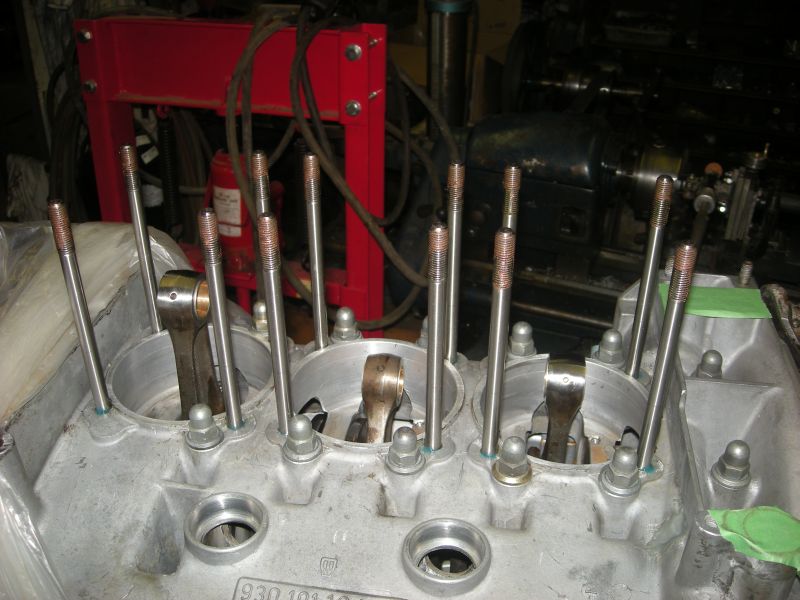
|
| Mark Henry |
 Jul 9 2014, 07:24 AM Jul 9 2014, 07:24 AM
Post
#224
|
|
that's what I do!                Group: Members Posts: 20,065 Joined: 27-December 02 From: Port Hope, Ontario Member No.: 26 Region Association: Canada |
Putting the Jugs and Slugs on the shortblock
Attached image(s) 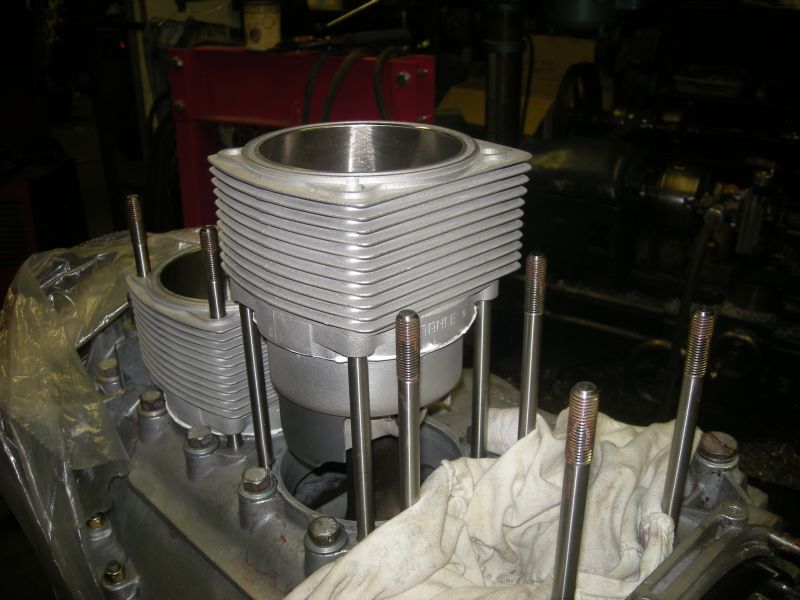 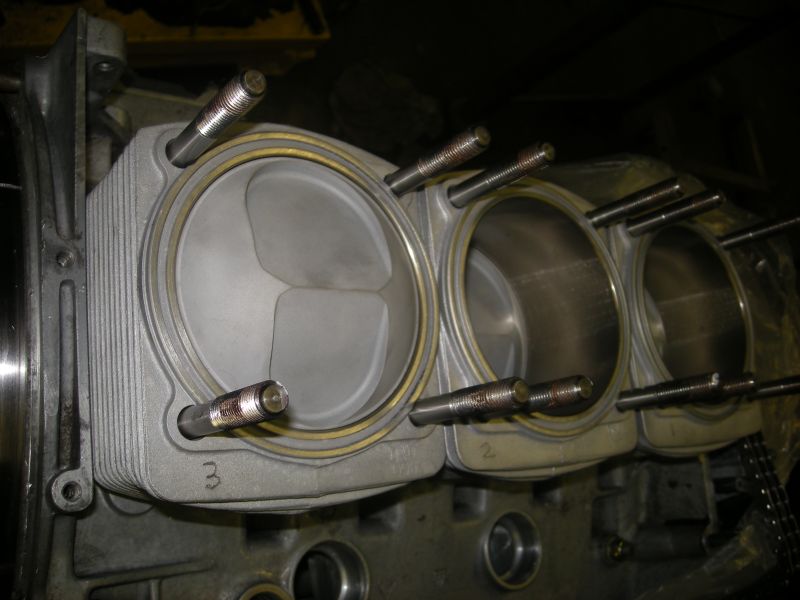
|
| Mark Henry |
 Jul 9 2014, 07:32 AM Jul 9 2014, 07:32 AM
Post
#225
|
|
that's what I do!                Group: Members Posts: 20,065 Joined: 27-December 02 From: Port Hope, Ontario Member No.: 26 Region Association: Canada |
Unfortunetly due to being in a rush to zip things up before sealants set I didn't get any pics. I chose to do the rockers first and drop the whole side on as one head. It can be done either way, this is how the factory did it. I've done a few 911 engines and I say the rocker first method is the easiest.
One trick I figured out is it's hard to drop the headstud nuts and washers on, I found if you put them on a screwdriver they dropped/guided on perfectly. Attached image(s) 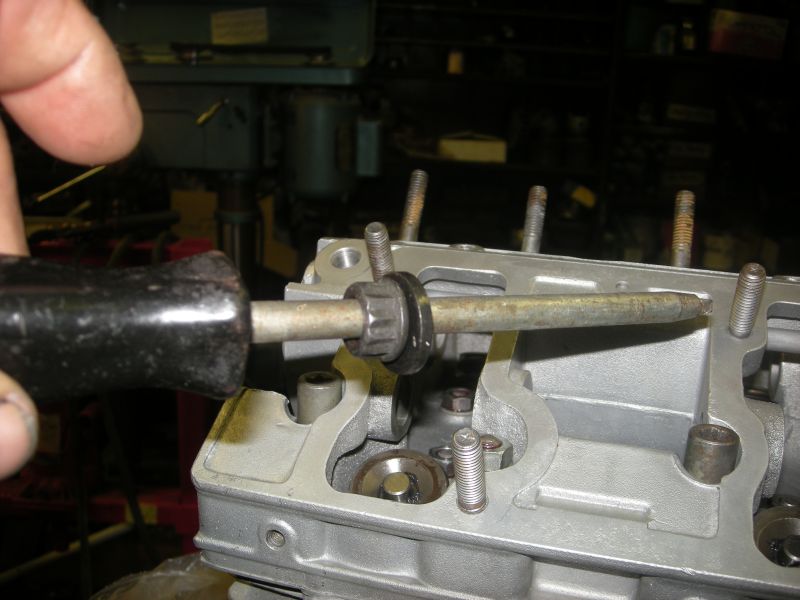
|
| Mark Henry |
 Jul 9 2014, 07:34 AM Jul 9 2014, 07:34 AM
Post
#226
|
|
that's what I do!                Group: Members Posts: 20,065 Joined: 27-December 02 From: Port Hope, Ontario Member No.: 26 Region Association: Canada |
Starting to look like an engine (IMG:style_emoticons/default/aktion035.gif)
I'll see if I can find the time to do some cam work this weekend. Attached image(s) 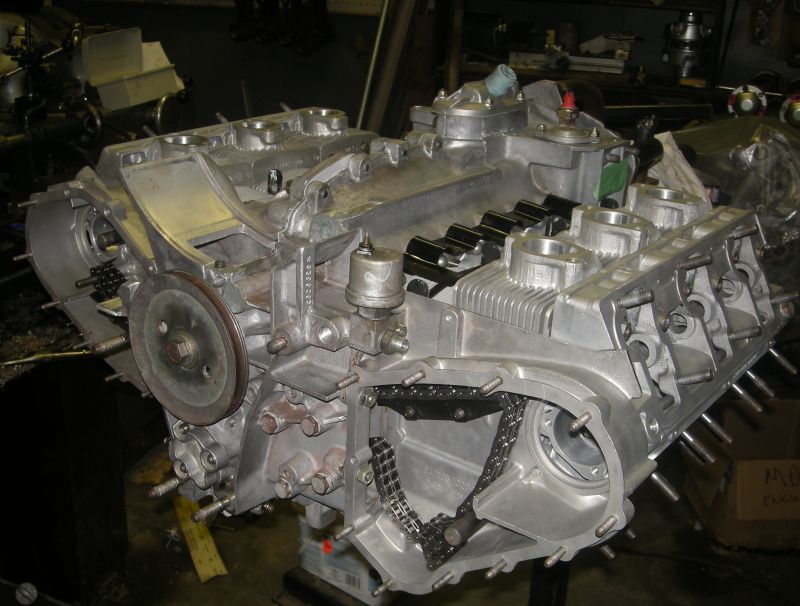
|
| Mark Henry |
 Jul 9 2014, 08:08 AM Jul 9 2014, 08:08 AM
Post
#227
|
|
that's what I do!                Group: Members Posts: 20,065 Joined: 27-December 02 From: Port Hope, Ontario Member No.: 26 Region Association: Canada |
One hitch I did run into is my cylinder air deflectors. I though they were all the same so I had a prepped set of 2.7 deflectors.....Wrong!
3.0-3.2 only...fuck!!!! Didn't want to wait so I made (copied) these cool 906 style deflectors out of Stainless steel. Attached image(s) 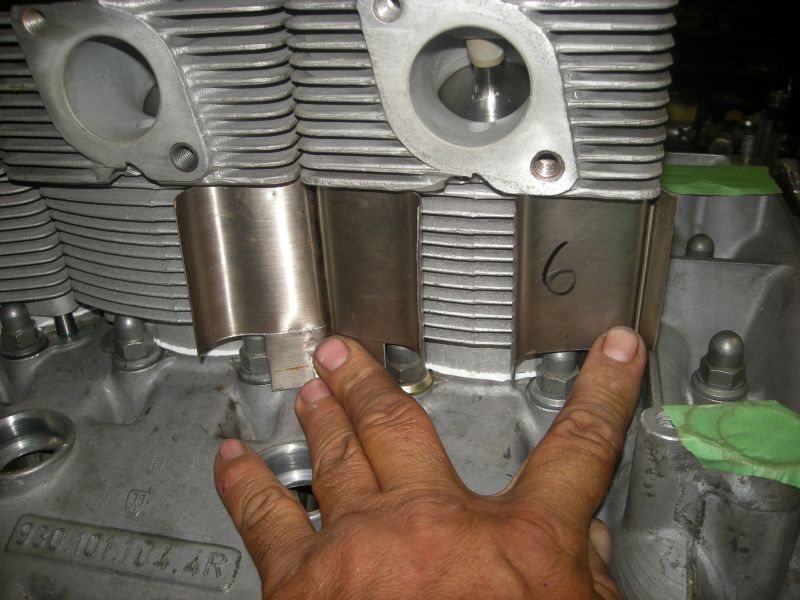
|
| puffinator |
 Jul 9 2014, 09:45 AM Jul 9 2014, 09:45 AM
Post
#228
|
|
Member   Group: Members Posts: 193 Joined: 6-August 13 From: Annapolis, MD Member No.: 16,218 Region Association: MidAtlantic Region |
I sure would appreciate you showing how you are going to go about your deck height and piston to valve clearance checks. I am doing a similar rebuild with JE pistons, '72E cylinders and '75 heads but still using the original case but with squirters, etc.
|
| Mark Henry |
 Jul 9 2014, 11:05 AM Jul 9 2014, 11:05 AM
Post
#229
|
|
that's what I do!                Group: Members Posts: 20,065 Joined: 27-December 02 From: Port Hope, Ontario Member No.: 26 Region Association: Canada |
I sure would appreciate you showing how you are going to go about your deck height and piston to valve clearance checks. I am doing a similar rebuild with JE pistons, '72E cylinders and '75 heads but still using the original case but with squirters, etc. I did that a long time ago, I sort of cheat and do it using measured volume. Basically this gives you both head CC and deck all in one shot. When doing this I do it at several deck heights and measure so I then just have to look at my notes to figure out what exactly I have. This link show exactly how I did it, look at what members Haycait911 and cgarr does, I did the same thing. http://forums.pelicanparts.com/911-engine-...sion-ratio.html Since I did a dry fit my deck came out at .046" and my notes said that .045" is 10.1:1 CR damn near dead nuts on. To run this CR you need to run twin-plug. |
| barefoot |
 Jul 10 2014, 12:47 PM Jul 10 2014, 12:47 PM
Post
#230
|
|
Senior Member    Group: Members Posts: 1,363 Joined: 19-March 13 From: Charleston SC Member No.: 15,673 Region Association: South East States 
|
|
| Mark Henry |
 Jul 10 2014, 02:42 PM Jul 10 2014, 02:42 PM
Post
#231
|
|
that's what I do!                Group: Members Posts: 20,065 Joined: 27-December 02 From: Port Hope, Ontario Member No.: 26 Region Association: Canada |
I'd have to add it up* but I'm guessing a bit over $10K in parts so far and I still have to do the oil lines and cooler.
Since I took my time collecting (4 years) I was able to wait for "deals" Examples This piston and cylinder kit, I paid $1500 (IIRC) for the new pistons but the pistons were slightly under stock size spec, but since I was re-plating the nikasil (LN) I just had it done to the spec. The result is a new P&C set Mahle RS that is worth $5000 for half price. Tank I waited and got the complete new DWD tank, fill neck and console for $800 I traded parts for the carbs, dizzy, Fuchs, axle parts, MSD, headers...etc. I also bought a 2.7 core with fan/alt and a bunch of new parts for $1200 and I'm not counting that even though I am using the fan/alt and half the new parts it came with. It has a good std. crank plus parts and I've machined the heads, so I think I could still easily get my money back, but it's my backup engine till I'm happy with this one. Add labour (note I did everything, including all machining except the for balance job) and I'd guess north of 160-200 hours. So if you were paying "full pop" I'd say this is about $30K job. Maybe more. (* I don't really want to tally up the bill...due to the fact I might shit myself) |
| Mark Henry |
 Jul 13 2014, 12:18 AM Jul 13 2014, 12:18 AM
Post
#232
|
|
that's what I do!                Group: Members Posts: 20,065 Joined: 27-December 02 From: Port Hope, Ontario Member No.: 26 Region Association: Canada |
One of my "deals" was a new set of WEB camshafts off of a member, but I didn't understand when he said they were built on 993 (964) cam cores but they do work on 4 bearing towers.
He did include the 993 sprockets, but what I didn't realize was that to use them the adjusting tools were $1000 (IMG:style_emoticons/default/huh.gif) Crap.... (IMG:style_emoticons/default/sad.gif) So I did some research and asked for a solution on the bird and found the hot ticket for the 993 was to weld up the cam nose, cut in a woodruff keyway in and convert it all back to the early 911 timing sprockets. So I had my crank grinder submerge weld and refinish the ends, I also had him cut off the 993 power steering drive. That cost me $100 (BTW the weld porosity does not matter, it's structural but it's not a bearing surface.) But I still needed to cut a woodruff keyway, no problem just get a $25 cutter and be done right? Wrong! (IMG:style_emoticons/default/unsure.gif) Freaking 911 cams are so freaking hard I'd need an expensive carbide cutter. (IMG:style_emoticons/default/rolleyes.gif) More research...on youtube guys were cutting keyways with dremels...crude, but the key was just for adjusting the cam timing, it's the bolt (or big nut), that's what holds the sprocket in place, not the key. Still I didn't want a hack. A bit of thinking and fabricating and here is my solution. My air die grinder in a holder that I built out of a piece of pipe and a Teig lathe slide I had. I got a bunch of dremel stones off the evilbay ($30 for 8, I used 2 of them) and resized them using a diamond dresser chucked in my lathe. Although locating the keyway isn't very critical, it was easy as the cam has a locating surface. End result I didn't save much as I hoped, but if you don't count my labour I still did save a bit. Oh well...you win some and you lose some. Attached thumbnail(s) 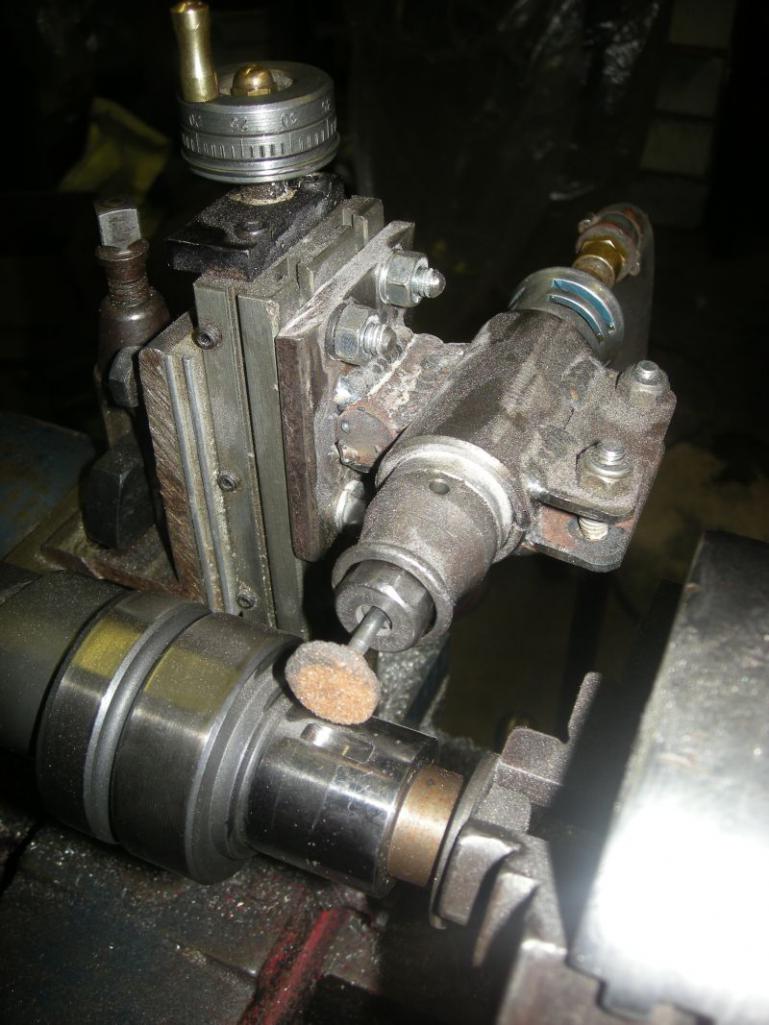 Attached image(s) 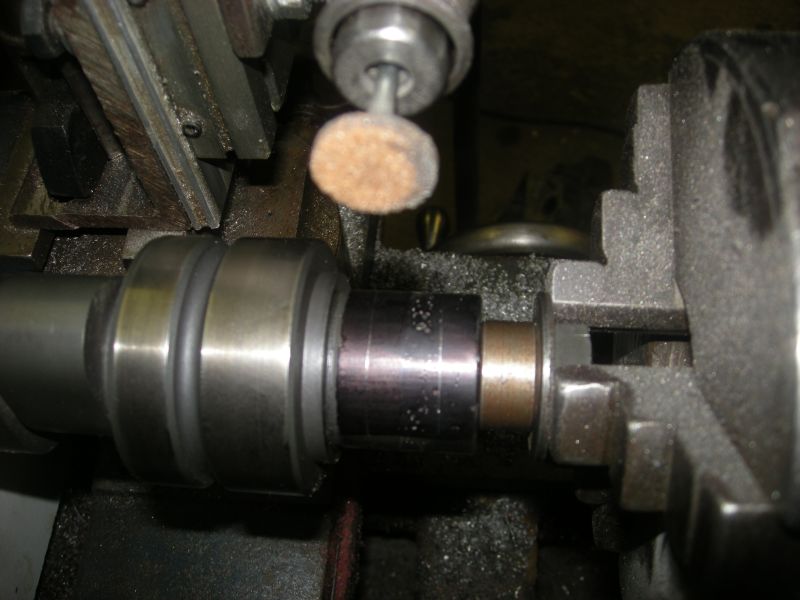 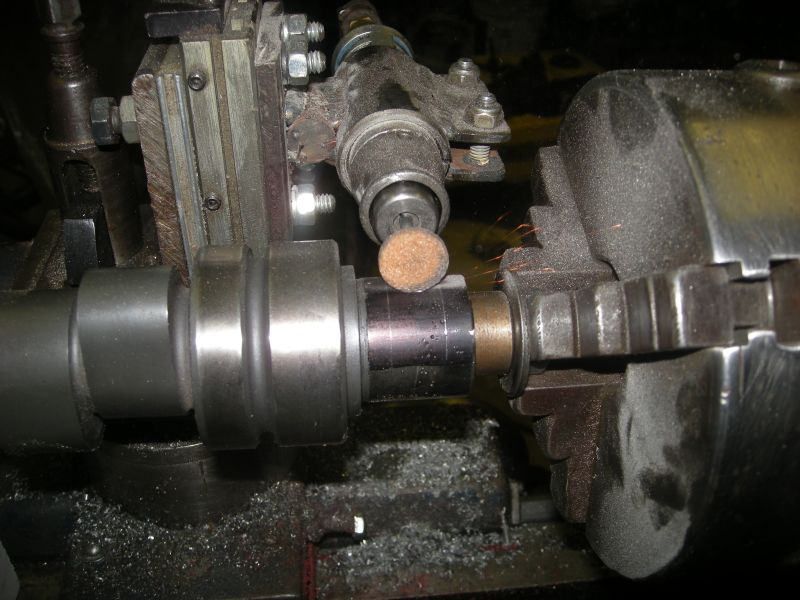 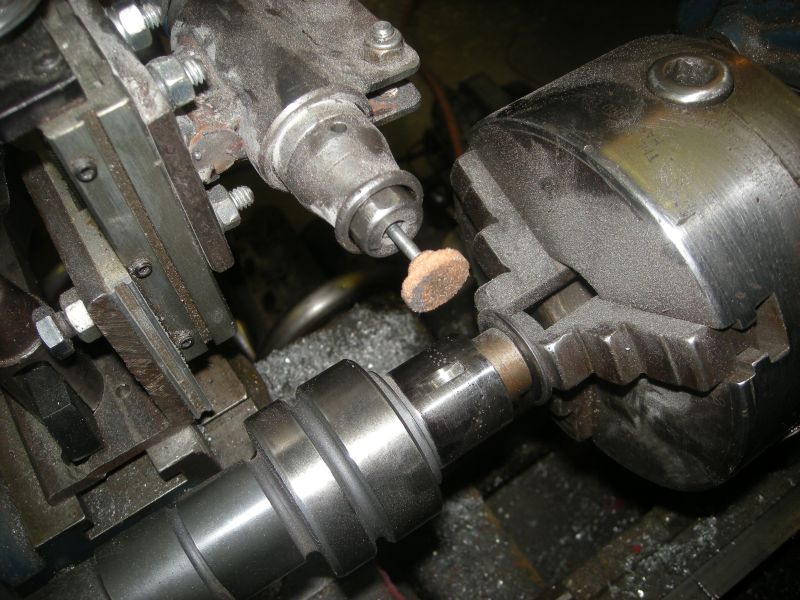 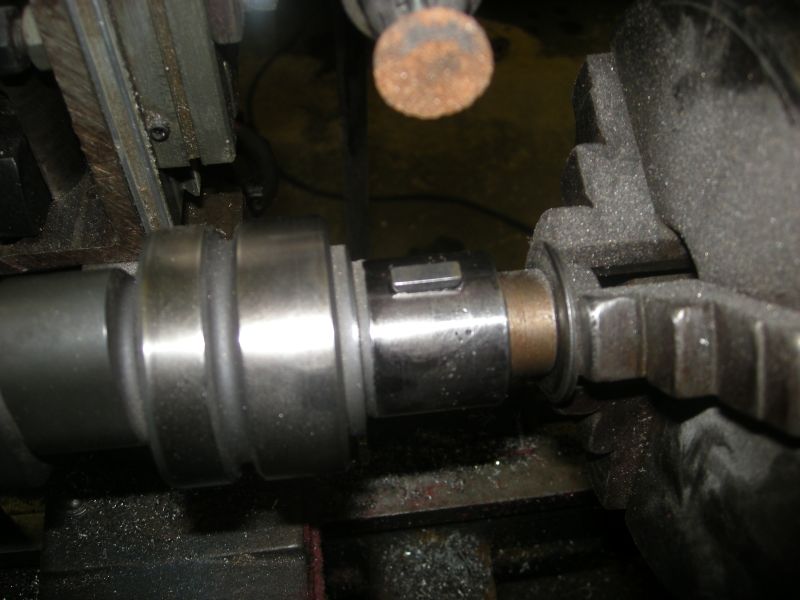 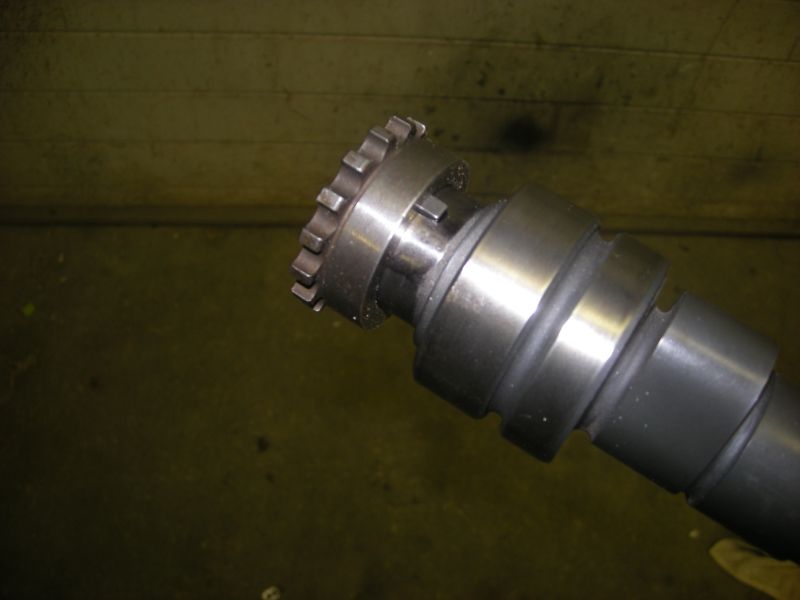
|
| MrHyde |
 Jul 13 2014, 07:37 AM Jul 13 2014, 07:37 AM
Post
#233
|
|
Senior Member    Group: Members Posts: 525 Joined: 13-October 10 From: Ontario, Canada Member No.: 12,268 Region Association: None |
Where there's a will, there's a way. ?
|
| Mark Henry |
 Jul 13 2014, 07:55 AM Jul 13 2014, 07:55 AM
Post
#234
|
|
that's what I do!                Group: Members Posts: 20,065 Joined: 27-December 02 From: Port Hope, Ontario Member No.: 26 Region Association: Canada |
Where there's a will, there's a way. ? It's the Canadian way (IMG:style_emoticons/default/wink.gif) Now I have at least a couple hours today cleaning all the grit off my lathe and re-oiling it. (IMG:style_emoticons/default/rolleyes.gif) |
| Mark Henry |
 Jul 14 2014, 06:51 AM Jul 14 2014, 06:51 AM
Post
#235
|
|
that's what I do!                Group: Members Posts: 20,065 Joined: 27-December 02 From: Port Hope, Ontario Member No.: 26 Region Association: Canada |
The WEB-CAMs built on 993 cores 2nd pic shows the power steering drive that was cut off. You have to cut it off if you want to run a stock cooler.
They are WEB grind 120/104 which is comparable to a MOD-S or IIRC a GE60 cam. Cam card says to set cam timing at 5.2mm. This is a carb or mechanicail FI cam, the bigger the cam timing number the hotter the cam. In the old days this would be called a "hot street, club racing or half-race cam". I'm hoping for hot street but driveable, I don't spend much time in traffic. Attached image(s) 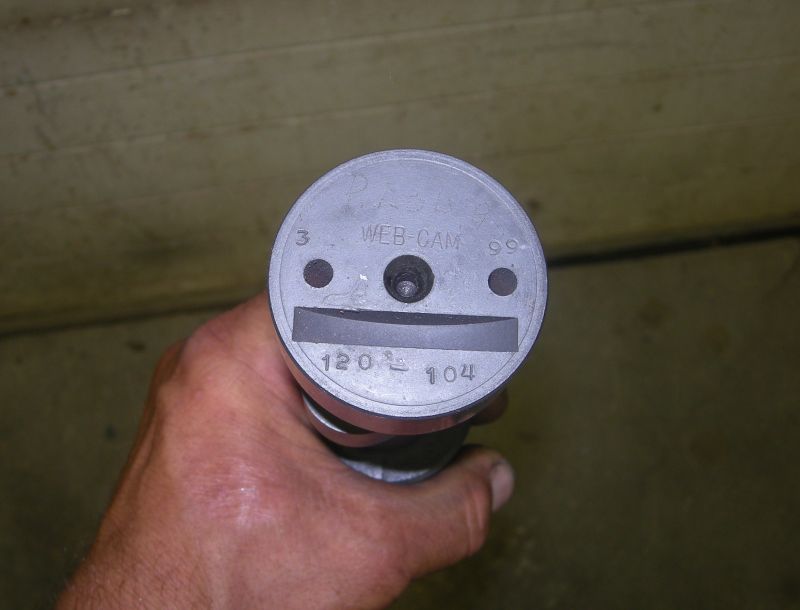 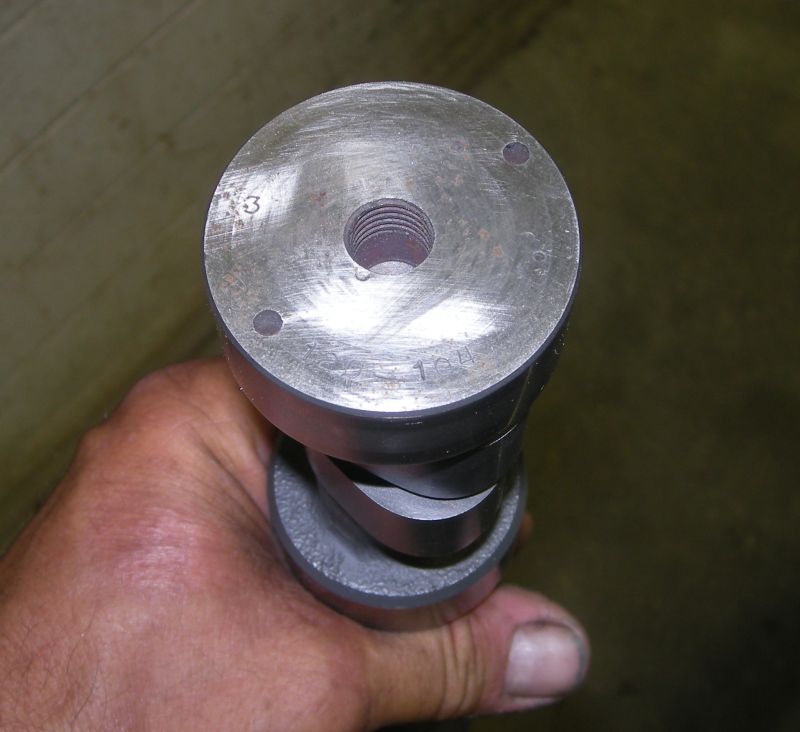
|
| Mark Henry |
 Jul 14 2014, 06:54 AM Jul 14 2014, 06:54 AM
Post
#236
|
|
that's what I do!                Group: Members Posts: 20,065 Joined: 27-December 02 From: Port Hope, Ontario Member No.: 26 Region Association: Canada |
Installing the cams, note new chains and sprocket (IMG:style_emoticons/default/chowtime.gif)
Attached image(s) 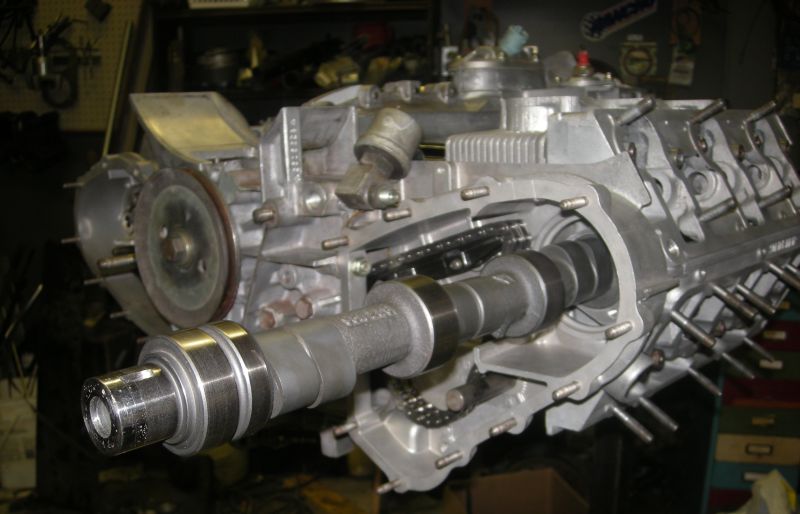 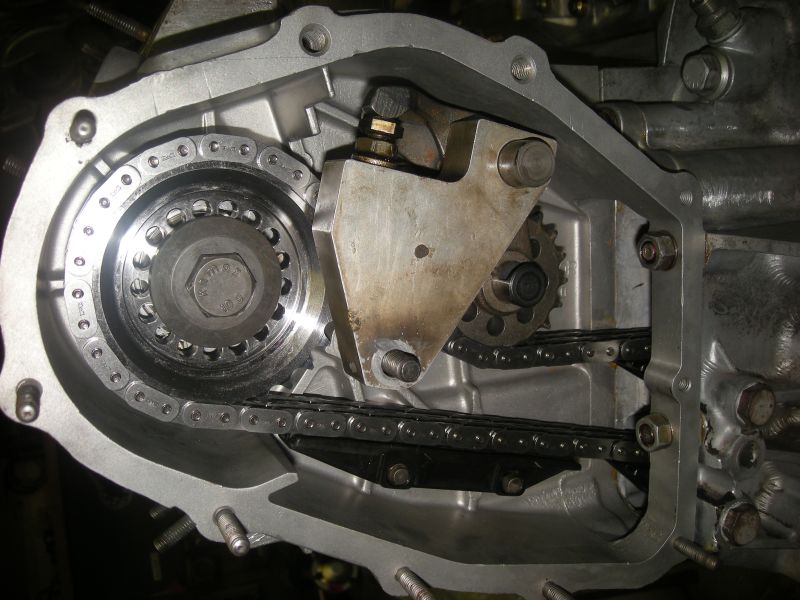
|
| Mark Henry |
 Jul 14 2014, 06:56 AM Jul 14 2014, 06:56 AM
Post
#237
|
|
that's what I do!                Group: Members Posts: 20,065 Joined: 27-December 02 From: Port Hope, Ontario Member No.: 26 Region Association: Canada |
Setting the cam sprocket alignment with a stromski straightedge and she's ready for the next step...cam timing. (IMG:style_emoticons/default/bravo.gif)
Attached image(s) 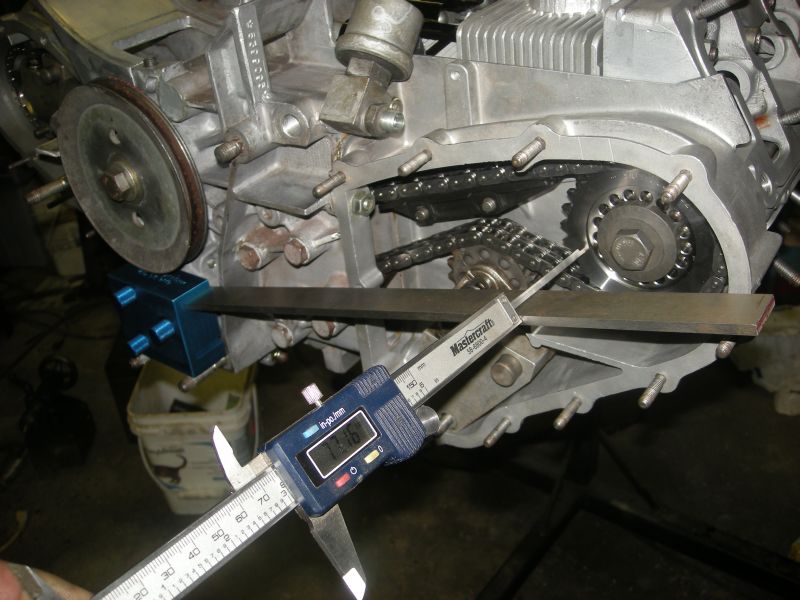 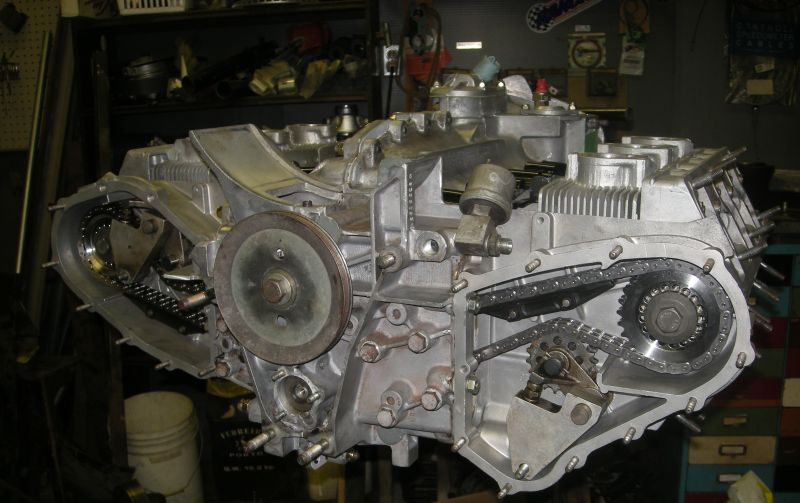
|
| Mark Henry |
 Jul 14 2014, 08:21 AM Jul 14 2014, 08:21 AM
Post
#238
|
|
that's what I do!                Group: Members Posts: 20,065 Joined: 27-December 02 From: Port Hope, Ontario Member No.: 26 Region Association: Canada |
On a none engine related issue I painted up my fuchs with the RSR rustolium silver...right now I'm torn between painting the background and leaving them as is.
what do you like? That's a polished lip under the tape and oh yeh... I installed my rear hubs. (IMG:style_emoticons/default/smile.gif) Attached image(s) 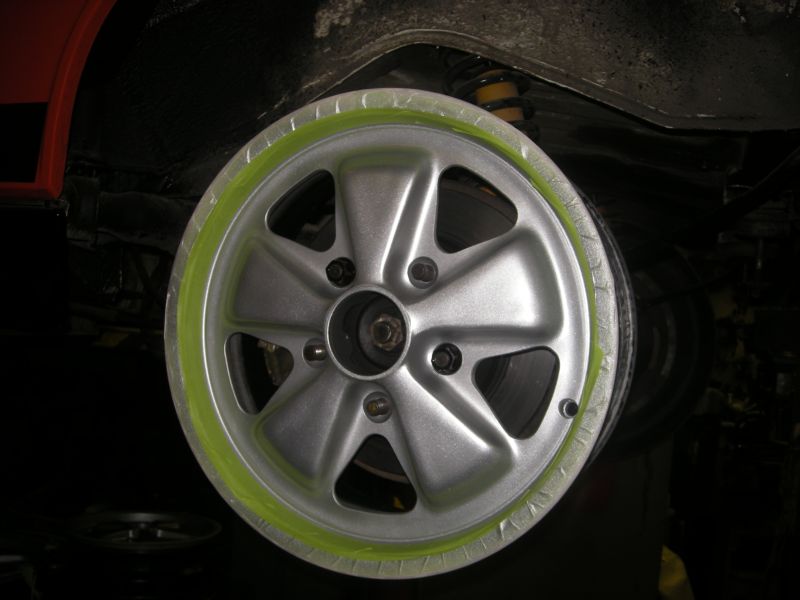
|
| gms |
 Jul 14 2014, 08:23 AM Jul 14 2014, 08:23 AM
Post
#239
|
|
Advanced Member     Group: Members Posts: 2,718 Joined: 12-March 04 From: Chicagoland Member No.: 1,785 Region Association: Upper MidWest 
|
Looks good Mark!
|
| wobbletop |
 Jul 14 2014, 08:33 AM Jul 14 2014, 08:33 AM
Post
#240
|
|
Member   Group: Members Posts: 382 Joined: 8-December 06 From: Ontario, Canada Member No.: 7,335 Region Association: Canada |
Making great progress Mark!
I always wondered how long those plastic chain guides last, but I guess there is no real contact with them and they are only there so they don't move when the car goes over bumps? |
  |
1 User(s) are reading this topic (1 Guests and 0 Anonymous Users)
0 Members:

|
Lo-Fi Version | Time is now: 20th April 2025 - 02:37 AM |
Invision Power Board
v9.1.4 © 2025 IPS, Inc.


