|
|

|
Porsche, and the Porsche crest are registered trademarks of Dr. Ing. h.c. F. Porsche AG.
This site is not affiliated with Porsche in any way. Its only purpose is to provide an online forum for car enthusiasts. All other trademarks are property of their respective owners. |
|
|
  |
| BeatNavy |
 Jan 11 2015, 02:52 PM Jan 11 2015, 02:52 PM
Post
#41
|
|
Certified Professional Scapegoat     Group: Members Posts: 2,942 Joined: 26-February 14 From: Easton, MD Member No.: 17,042 Region Association: MidAtlantic Region 
|
As much money as I'm fixin' to spend at RD I probably ought to get that for free. (IMG:style_emoticons/default/smile.gif) But with that info you gave me I'm sure I could fab something.
|
| BeatNavy |
 Jan 11 2015, 02:59 PM Jan 11 2015, 02:59 PM
Post
#42
|
|
Certified Professional Scapegoat     Group: Members Posts: 2,942 Joined: 26-February 14 From: Easton, MD Member No.: 17,042 Region Association: MidAtlantic Region 
|
Ok, I’m also taking assessment of the suspension console and the long inside that runs up to it. Here’s what I see (that I don’t like):
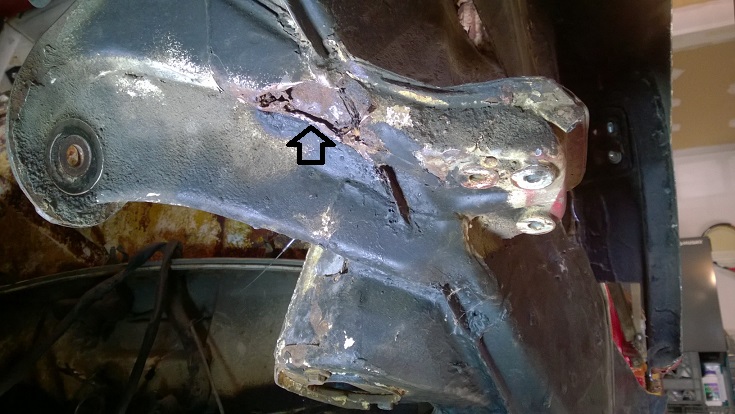 And, slightly closer view: 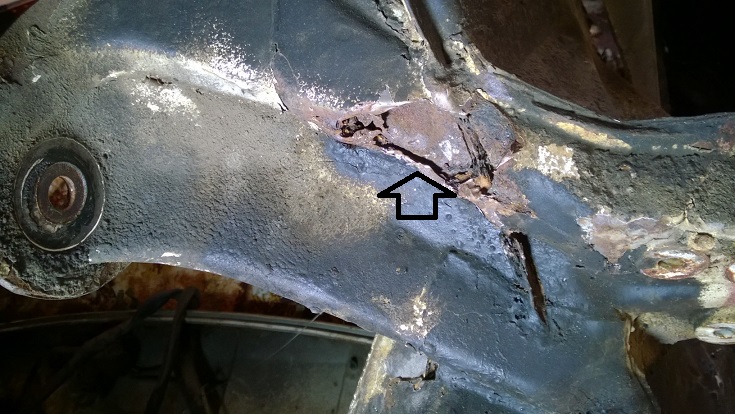 Between that, and this below, I think there’s little doubt that I’m going to need to remove the suspension console and the rest of that outer section (and don't worry, that orange milk crate is not actually supporting the car): 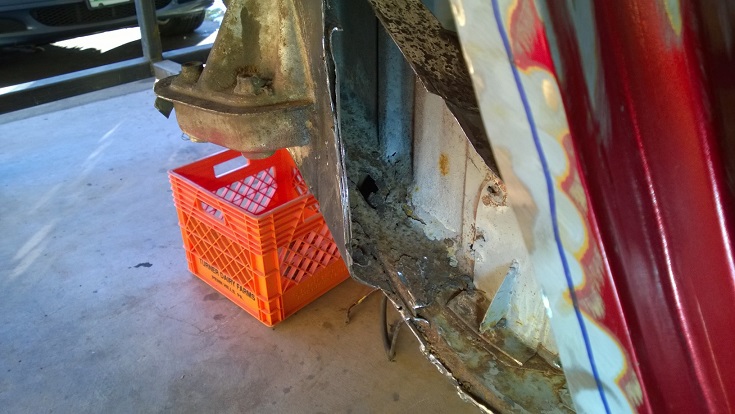 Second stupid question(s) for today (#5 overall): what’s the best way to remove that suspension console? From other people’s example I see the spot welds can be removed, but what other recommendations can you provide (e.g. measuring location, easiest way to separate, etc.)? Also, can/should this one be repaired? I saw someone had one FS the other day… TIA |
| SirAndy |
 Jan 11 2015, 03:16 PM Jan 11 2015, 03:16 PM
Post
#43
|
|
Resident German                          Group: Admin Posts: 41,931 Joined: 21-January 03 From: Oakland, Kalifornia Member No.: 179 Region Association: Northern California |
what other recommendations can you provide (e.g. measuring location, easiest way to separate, etc.)? I would build a jig that covers both consoles and the motor mounts. That way, you can position your replacements exactly where they need to be. (IMG:style_emoticons/default/welder.gif) |
| scotty b |
 Jan 11 2015, 04:51 PM Jan 11 2015, 04:51 PM
Post
#44
|
|
rust free you say ?                Group: Members Posts: 16,375 Joined: 7-January 05 From: richmond, Va. Member No.: 3,419 Region Association: None |
what other recommendations can you provide (e.g. measuring location, easiest way to separate, etc.)? I would build a jig that covers both consoles and the motor mounts. That way, you can position your replacements exactly where they need to be. (IMG:style_emoticons/default/welder.gif) (IMG:style_emoticons/default/agree.gif) 100% Also This " patch and brace " behind the heater tube is NOT factory. Someone has already been in there with a feeble attempt to keep the car in one piece. Yes there are several areas in there that are 2 and 3 layers of metal overlapping. A VERY poor design IMHO. I posted a picture here several years ago of the area just behind the jack post that was 3 layers of metal and had rusted in between each layer to the point the " metal " had stretched out to where it was close to 3/8" thick Attached image(s) 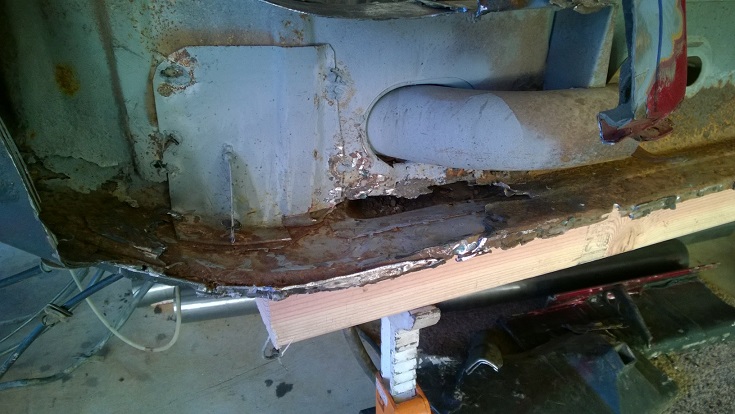
|
| BeatNavy |
 Jan 11 2015, 05:26 PM Jan 11 2015, 05:26 PM
Post
#45
|
|
Certified Professional Scapegoat     Group: Members Posts: 2,942 Joined: 26-February 14 From: Easton, MD Member No.: 17,042 Region Association: MidAtlantic Region 
|
Thank you, fellas. A jig, eh? With the help of the search function I think I've found what you're referring to: Jig.
Cool! Something else to build... |
| Grump |
 Jan 11 2015, 05:53 PM Jan 11 2015, 05:53 PM
Post
#46
|
|
Member   Group: Members Posts: 167 Joined: 26-April 06 From: Charlottesville Va. Member No.: 5,930 Region Association: None |
Roy,
Too bad you are not closer than 2 hours. I could pack my sawsall and have that 75 in pieces in short order. Welding, well that's something else. You are on your own there. Honestly, if you need assistance I don't mind the drive. Sometimes you just need 4 hands. I'm retired so available most of the time. I do need copious amounts of coffee though. As I see it you have 2 projects: keeping the DD on the road and the 75 rustoration. Both are likely to keep your mind working and awake at night. I'm slowing down on my to do list. Not many items left and when they are all done, then what? I know, there will always be projects that surface. Good luck/ Bill |
| Grump |
 Jan 11 2015, 05:54 PM Jan 11 2015, 05:54 PM
Post
#47
|
|
Member   Group: Members Posts: 167 Joined: 26-April 06 From: Charlottesville Va. Member No.: 5,930 Region Association: None |
oops, Roy... where did Rob come from?
|
| mepstein |
 Jan 11 2015, 06:23 PM Jan 11 2015, 06:23 PM
Post
#48
|
|
914-6 GT in waiting                Group: Members Posts: 19,637 Joined: 19-September 09 From: Landenberg, PA/Wilmington, DE Member No.: 10,825 Region Association: MidAtlantic Region 
|
Thank you, fellas. A jig, eh? With the help of the search function I think I've found what you're referring to: Jig. Cool! Something else to build... One solution Attached image(s) 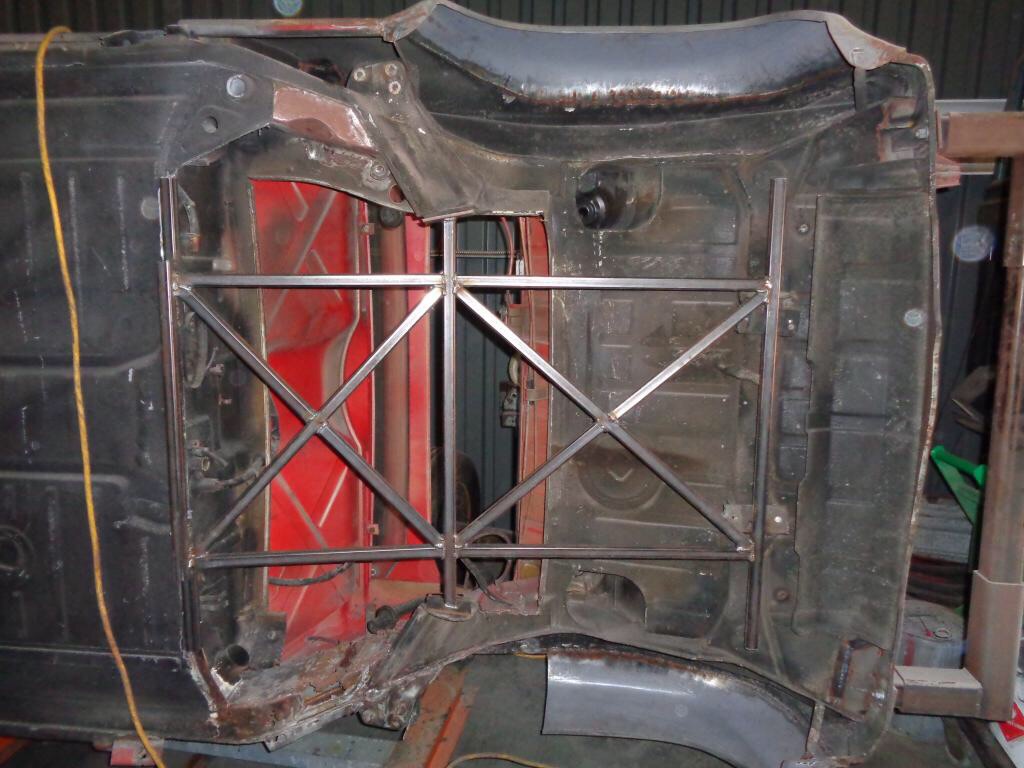
|
| scotty b |
 Jan 11 2015, 06:34 PM Jan 11 2015, 06:34 PM
Post
#49
|
|
rust free you say ?                Group: Members Posts: 16,375 Joined: 7-January 05 From: richmond, Va. Member No.: 3,419 Region Association: None |
With all the metal you'll be replacing you really need to do a lot more bracing than the simple console jig. Something like what I made for Marks car would be a good start. I was looking at his just yesterday in preparation for making the cuts ( for reals (IMG:style_emoticons/default/ohmy.gif) ) and think I'm also going to tack a couple braces to the rotted inner long/wheelhouse while I am repairing the outside, just as added insurance since the inside of his is so bad. You can NEVER have too much bracing, but you can definitely have to little
|
| BeatNavy |
 Jan 11 2015, 06:42 PM Jan 11 2015, 06:42 PM
Post
#50
|
|
Certified Professional Scapegoat     Group: Members Posts: 2,942 Joined: 26-February 14 From: Easton, MD Member No.: 17,042 Region Association: MidAtlantic Region 
|
Roy, Too bad you are not closer than 2 hours. I could pack my sawsall and have that 75 in pieces in short order. Welding, well that's something else. You are on your own there. Honestly, if you need assistance I don't mind the drive. Sometimes you just need 4 hands. I'm retired so available most of the time. I do need copious amounts of coffee though. As I see it you have 2 projects: keeping the DD on the road and the 75 rustoration. Both are likely to keep your mind working and awake at night. I'm slowing down on my to do list. Not many items left and when they are all done, then what? I know, there will always be projects that surface. Good luck/ Bill Hey Bill! May have to take you up on that if you're up for a drive to NoVa. I have plenty of coffee. Yeah, I have my hands full here but I would love an extra set of more mechanically-inclined eyes and hands. Thanks for all the help you've given me already. With all the metal you'll be replacing you really need to do a lot more bracing than the simple console jig. Something like what I made for Marks car would be a good start. I was looking at his just yesterday in preparation for making the cuts ( for reals (IMG:style_emoticons/default/ohmy.gif) ) and think I'm also going to tack a couple braces to the rotted inner long/wheelhouse while I am repairing the outside, just as added insurance since the inside of his is so bad. You can NEVER have too much bracing, but you can definitely have to little Hmmm...ok. This is going to require some more thought then. I'm may have some follow up questions, but the first thing is: I assume I need to both brace the frame AND locate the suspension consoles later, correct? Does this setup do this? I see where it appears to connected to the ear, but not the outer console. Thanks, Mark and Scotty. |
| scotty b |
 Jan 11 2015, 06:45 PM Jan 11 2015, 06:45 PM
Post
#51
|
|
rust free you say ?                Group: Members Posts: 16,375 Joined: 7-January 05 From: richmond, Va. Member No.: 3,419 Region Association: None |
Roy, Too bad you are not closer than 2 hours. I could pack my sawsall and have that 75 in pieces in short order. Welding, well that's something else. You are on your own there. Honestly, if you need assistance I don't mind the drive. Sometimes you just need 4 hands. I'm retired so available most of the time. I do need copious amounts of coffee though. As I see it you have 2 projects: keeping the DD on the road and the 75 rustoration. Both are likely to keep your mind working and awake at night. I'm slowing down on my to do list. Not many items left and when they are all done, then what? I know, there will always be projects that surface. Good luck/ Bill Hey Bill! May have to take you up on that if you're up for a drive to NoVa. I have plenty of coffee. Yeah, I have my hands full here but I would love an extra set of more mechanically-inclined eyes and hands. Thanks for all the help you've given me already. With all the metal you'll be replacing you really need to do a lot more bracing than the simple console jig. Something like what I made for Marks car would be a good start. I was looking at his just yesterday in preparation for making the cuts ( for reals (IMG:style_emoticons/default/ohmy.gif) ) and think I'm also going to tack a couple braces to the rotted inner long/wheelhouse while I am repairing the outside, just as added insurance since the inside of his is so bad. You can NEVER have too much bracing, but you can definitely have to little Hmmm...ok. This is going to require some more thought then. I'm may have some follow up questions, but the first thing is: I assume I need to both brace the frame AND locate the suspension consoles later, correct? Does this setup do this? I see where it appears to connected to the ear, but not the outer console. Thanks, Mark and Scotty. I made that jig to connect to the trans mounts, both suspension ears, and then a couple tack welds on the floor pan. That way the locations for the suspension mount are repeatable. The plates rest firmly on the inside of the consoles, and there is a nut welded to the back side of the plate. Bolt goes through the console bolt holes and tightens down |
| BeatNavy |
 Jan 11 2015, 06:51 PM Jan 11 2015, 06:51 PM
Post
#52
|
|
Certified Professional Scapegoat     Group: Members Posts: 2,942 Joined: 26-February 14 From: Easton, MD Member No.: 17,042 Region Association: MidAtlantic Region 
|
Roger that. It makes sense. I guess I'm breaking out the welder earlier than I had planned.
|
| BeatNavy |
 Jan 24 2015, 07:23 PM Jan 24 2015, 07:23 PM
Post
#53
|
|
Certified Professional Scapegoat     Group: Members Posts: 2,942 Joined: 26-February 14 From: Easton, MD Member No.: 17,042 Region Association: MidAtlantic Region 
|
Small update. My homework assignment was to build a brace and jig for the suspension console. I'm turning this in for at least partial credit (still have one diagonal to do):
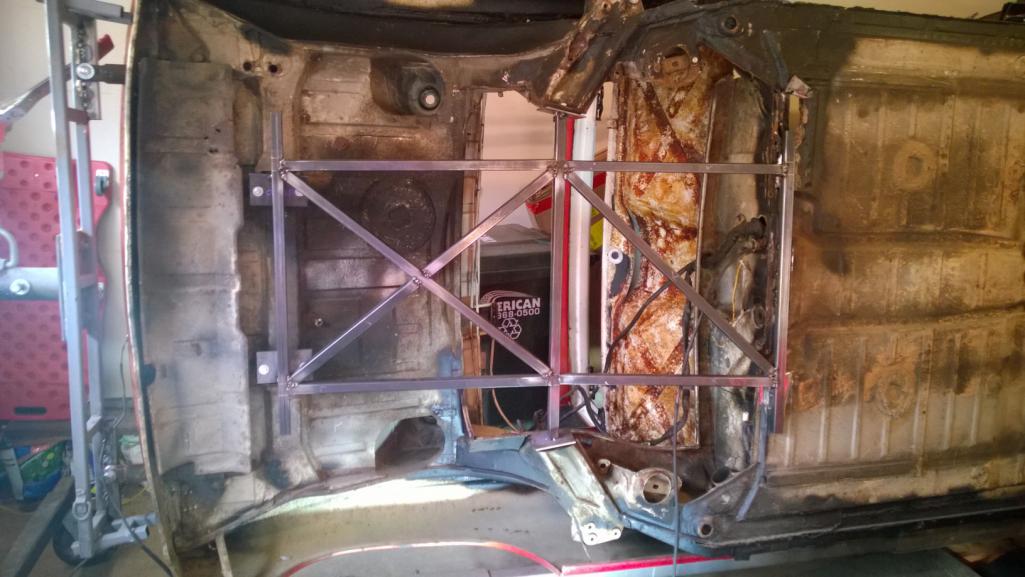 I also got my first shipment from RD. I wanted to get a good look at the new suspension console to help me remove the old one. I've a lot more to order from RD, so if they were publicly-traded, I'd say "buy RD stock now." 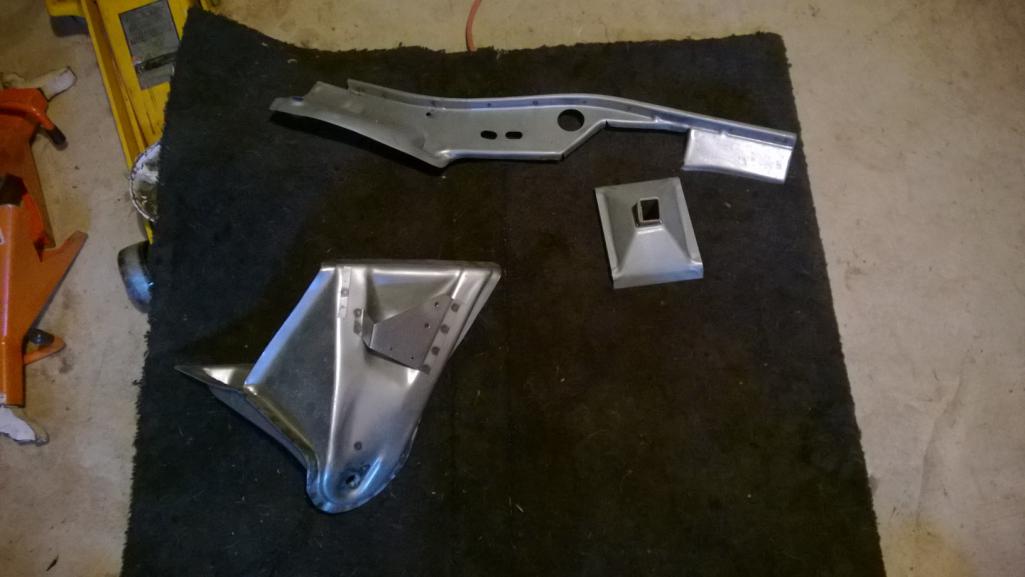 And, I found more rust. The floor pan and base of firewall is pretty well trashed. This is going to be a challenge as whatever fix I do is going to have to accommodate the cable outlets. 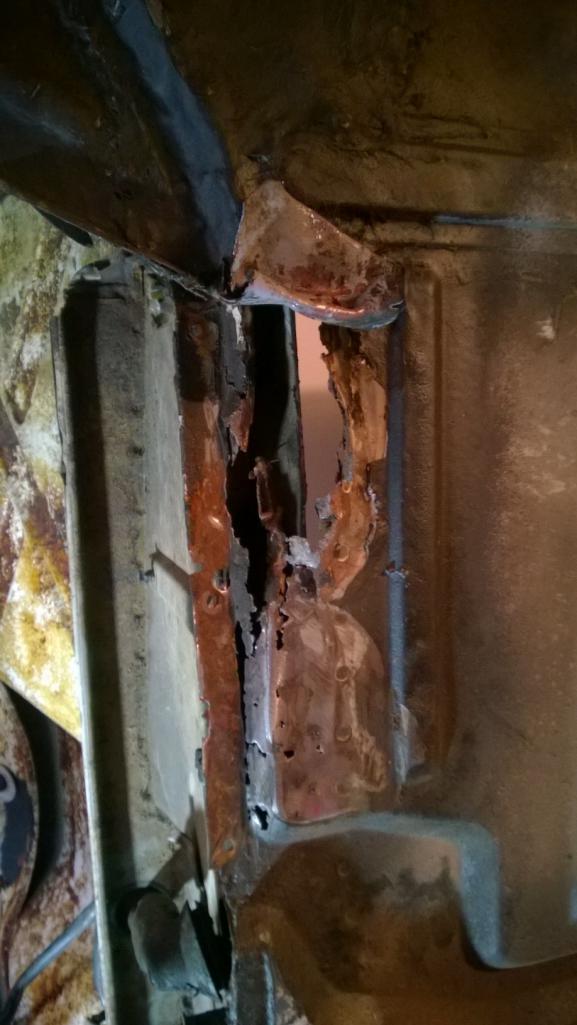 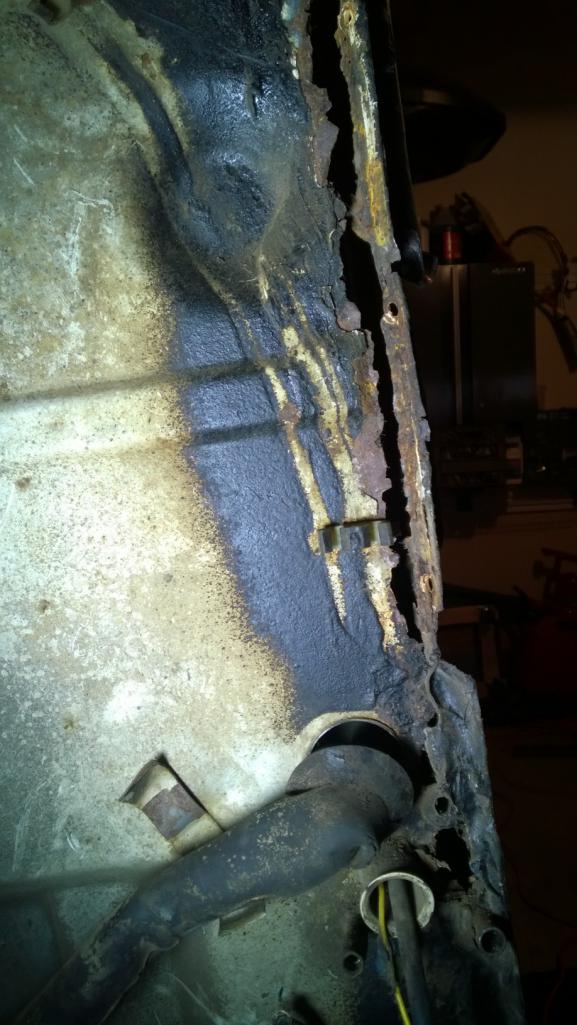 So now I'm removing the suspension console ear. I'm trying to drill out the spot welds, but it's slow going. Maybe I'll start grinding the welds off. Any suggestions to make this task any more pleasant? My intention is then to remove the outer suspension console piece and repair and clean that up. Hopefully make more progress tomorrow. 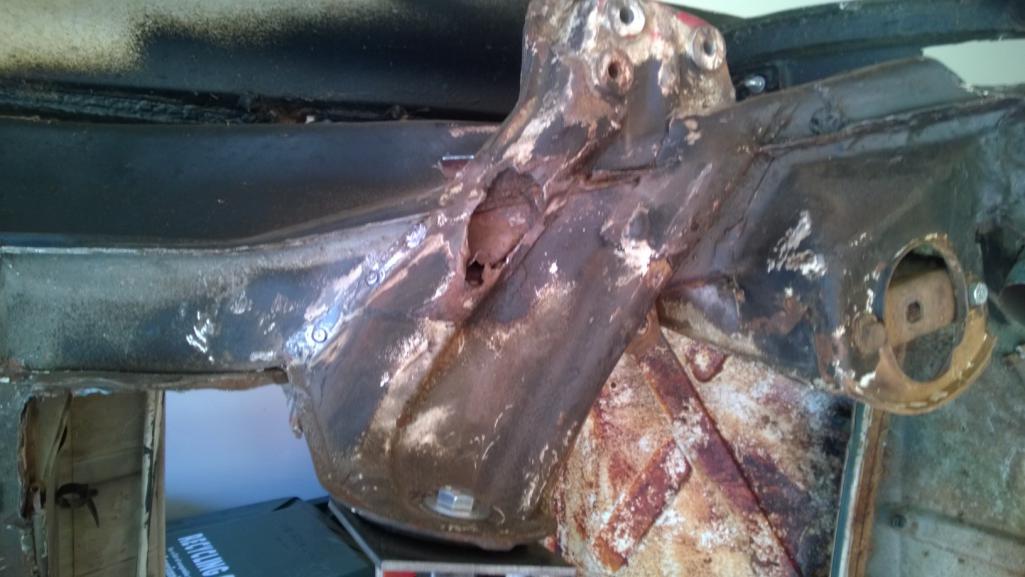 |
| scotty b |
 Jan 24 2015, 07:43 PM Jan 24 2015, 07:43 PM
Post
#54
|
|
rust free you say ?                Group: Members Posts: 16,375 Joined: 7-January 05 From: richmond, Va. Member No.: 3,419 Region Association: None |
There's no easy, pleasant, fast, or fun way to do it. I go around the edges with the plasma cutter and grind the flanges down. It's about the fastest way to go, but it does require the plasma cutter. Sometime next week I will be getting back to Marks car, and the suspension console on his will be getting replaced. I'll show some pics in his thread
|
| BeatNavy |
 Jan 24 2015, 07:52 PM Jan 24 2015, 07:52 PM
Post
#55
|
|
Certified Professional Scapegoat     Group: Members Posts: 2,942 Joined: 26-February 14 From: Easton, MD Member No.: 17,042 Region Association: MidAtlantic Region 
|
Thanks Scotty. My buddy has a plasma cutter - up in New Hampshire! (IMG:style_emoticons/default/blink.gif) I guess it's just going to be slog getting that thing out (my next homework assignment). I look forward to seeing any pictures you can provide for reference!
|
| cary |
 Jan 24 2015, 11:41 PM Jan 24 2015, 11:41 PM
Post
#56
|
|
Advanced Member     Group: Members Posts: 3,900 Joined: 26-January 04 From: Sherwood Oregon Member No.: 1,608 Region Association: Pacific Northwest 
|
Rob here's a pattern I found for the console tie.
http://www.performanceforum.com/wesvann/91.../rd-9-1-08.html |
| BeatNavy |
 Jan 25 2015, 07:35 AM Jan 25 2015, 07:35 AM
Post
#57
|
|
Certified Professional Scapegoat     Group: Members Posts: 2,942 Joined: 26-February 14 From: Easton, MD Member No.: 17,042 Region Association: MidAtlantic Region 
|
Rob here's a pattern I found for the console tie. http://www.performanceforum.com/wesvann/91.../rd-9-1-08.html Awesome Cary, thanks. That helps me understand how that's held on to the frame. With all the crappy undercoating, dirt, rust, etc. it' hard to see how things tie together. I didn't even know those ties were there. |
| saigon71 |
 Jan 25 2015, 07:51 AM Jan 25 2015, 07:51 AM
Post
#58
|
|
Advanced Member     Group: Members Posts: 2,006 Joined: 1-June 09 From: Dillsburg, PA Member No.: 10,428 Region Association: MidAtlantic Region 

|
You are tackling some serious rust!
The suspension console is just a PITA to remove. For non-spot welds I ground down the welds a little at a time until I could get a big screwdriver in between to pry the metal apart. Spot weld cutting bits work great for the spot welds, but I never invested in a set that would hold up for a long time without getting dull. I used a set of Dewalt Cobalt bits for most of them. Keep up the good work! (IMG:style_emoticons/default/beerchug.gif) |
| FourBlades |
 Jan 25 2015, 08:36 AM Jan 25 2015, 08:36 AM
Post
#59
|
|
From Wreck to Rockin     Group: Members Posts: 2,056 Joined: 3-December 07 From: Brevard, FL Member No.: 8,414 Region Association: South East States 
|
Its clear you have the skills to do this right! (IMG:style_emoticons/default/beerchug.gif) I have found the blair rotobroach to be the best spot weld bit. You can find them on Amazon along with a lot of other good, hard to find tools and parts. Use some cutting oil with each new spot weld and drill slow with firm pressure. Keep it going! John |
| BeatNavy |
 Jan 25 2015, 04:36 PM Jan 25 2015, 04:36 PM
Post
#60
|
|
Certified Professional Scapegoat     Group: Members Posts: 2,942 Joined: 26-February 14 From: Easton, MD Member No.: 17,042 Region Association: MidAtlantic Region 
|
You are tackling some serious rust! The suspension console is just a PITA to remove. For non-spot welds I ground down the welds a little at a time until I could get a big screwdriver in between to pry the metal apart. Spot weld cutting bits work great for the spot welds, but I never invested in a set that would hold up for a long time without getting dull. I used a set of Dewalt Cobalt bits for most of them. Keep up the good work! (IMG:style_emoticons/default/beerchug.gif) Thanks, Bob! I'll try your technique. Didn't have too much time in the garage today, but I made some progress on the outer welds that are easily accessible: 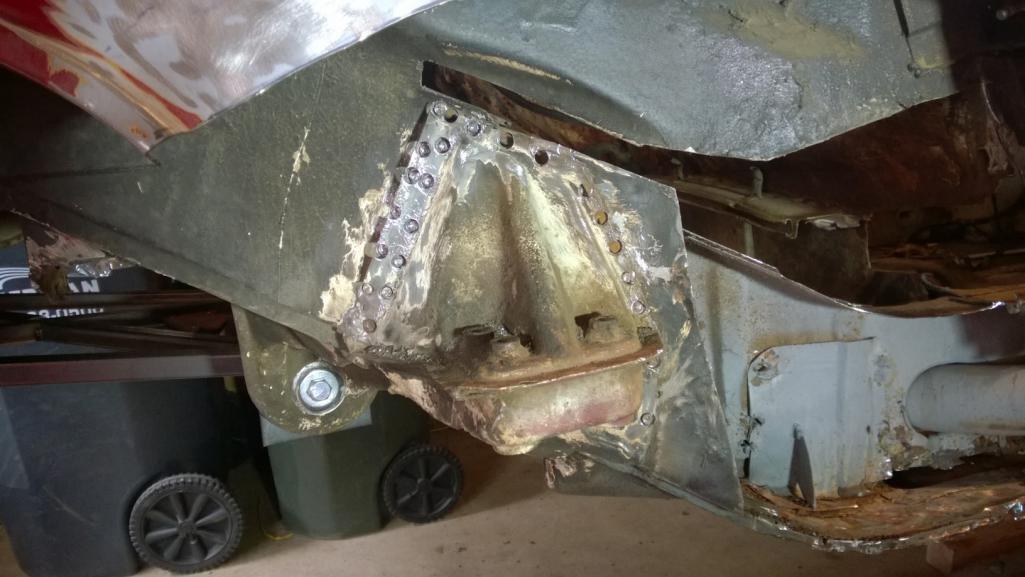 This thing IS going to be a PITA. Getting at those seams and the underside of the console will be a LOT of fun, especially with all that paint or undercoating. And those "brackets" (or whatever you call them) that hold the inner ear and outer console together -- not sure how exactly to remove them yet. Ground them down? Just cut them off? I also made a little "gauge" for helping me locate the outer console when I put it back on. I was just a little worried that the brace won't help me exactly locate the outer piece: 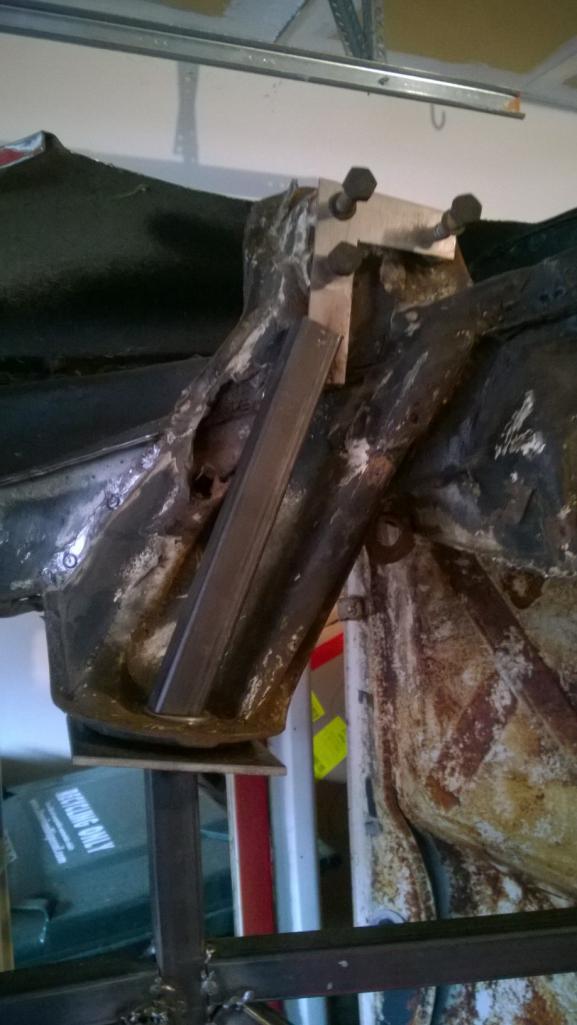 |
  |
3 User(s) are reading this topic (3 Guests and 0 Anonymous Users)
0 Members:

|
Lo-Fi Version | Time is now: 18th December 2024 - 06:49 AM |
Invision Power Board
v9.1.4 © 2024 IPS, Inc.


