|
|
|
Porsche, and the Porsche crest are registered trademarks of Dr. Ing. h.c. F. Porsche AG.
This site is not affiliated with Porsche in any way. Its only purpose is to provide an online forum for car enthusiasts. All other trademarks are property of their respective owners. |
|
|

  |

| saigon71 |
 Jan 24 2015, 11:39 AM Jan 24 2015, 11:39 AM
Post
#1
|
|
Advanced Member  Group: Members Posts: 2,006 Joined: 1-June 09 From: Dillsburg, PA Member No.: 10,428 Region Association: MidAtlantic Region |
Nothing is ever easy on these cars...
My heat exhangers got some oil in them from the bad oil cooler seals, so I decided to pull them for a good cleaning. One exhaust nut was really difficult to remove. Once I finally got it off, I saw that the threads were galled. Ordered some new exhaust studs. Went to work removing the old one after researching 914 world. Heated stud boss with MAP torch & sprayed a bunch of PB blaster. Welded a nut on the end...nut kept breaking loose without budging the stud, removing small portions off the top of the stud during the six attempts. Then welded a bar to the remainder of the stud and used an adjustable wrench for leverage. Heat & PB Blaster, working it a little at a time, back & forth. It finally broke free. Reheat & apply more PB. On about the 5th cycle, the stud broke off below the level of the head. Engine is in the car & I'd like to keep it that way. What are my best options for getting this thing out now...and installing a new stud? I've had horrible luck with EZ-outs on other applications. Thanks! 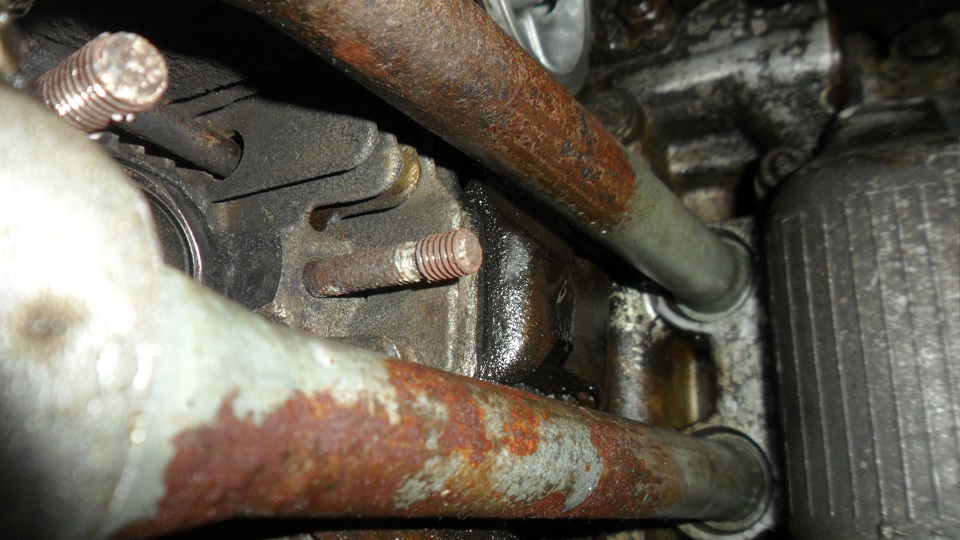 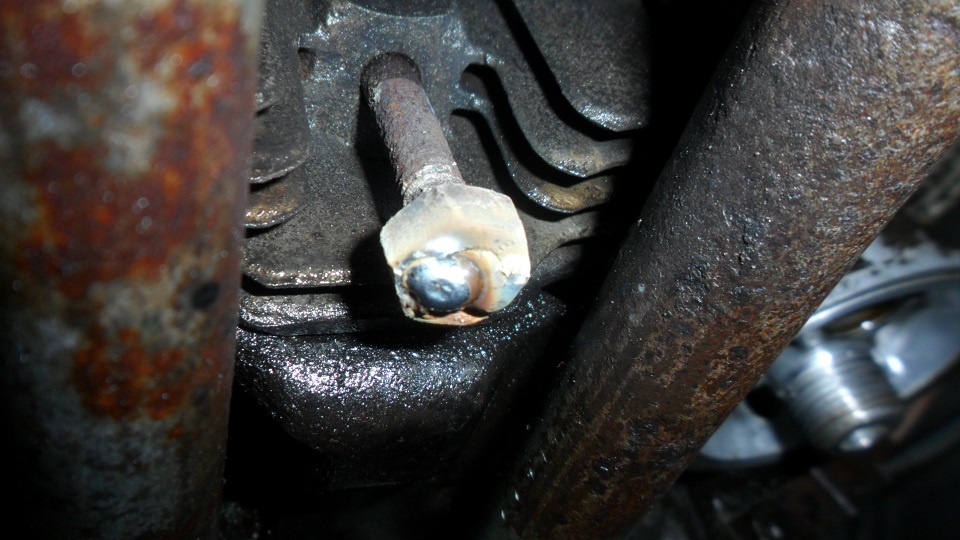 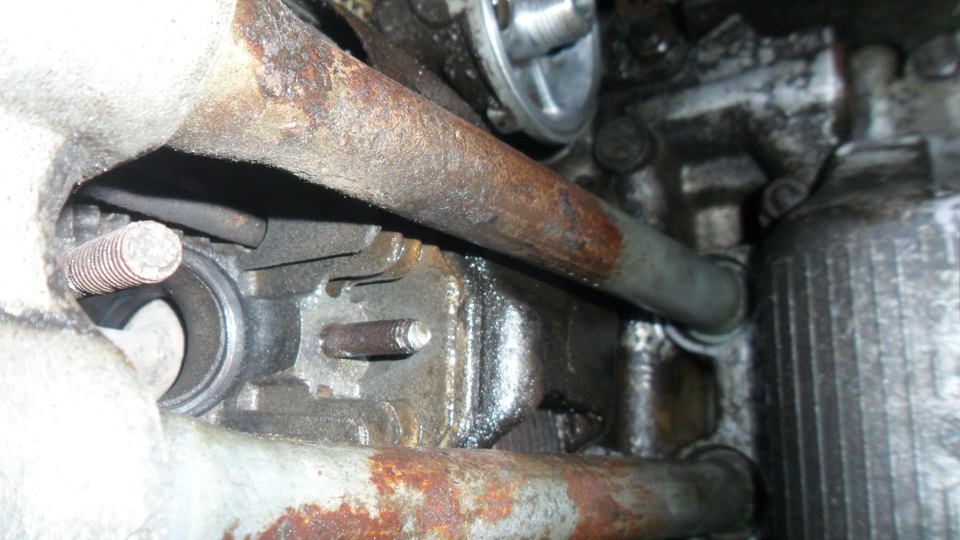 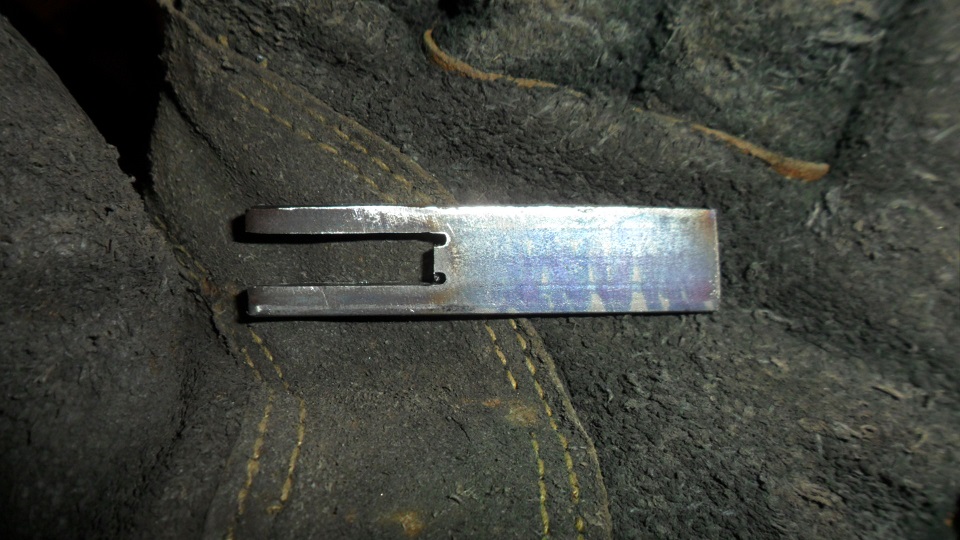 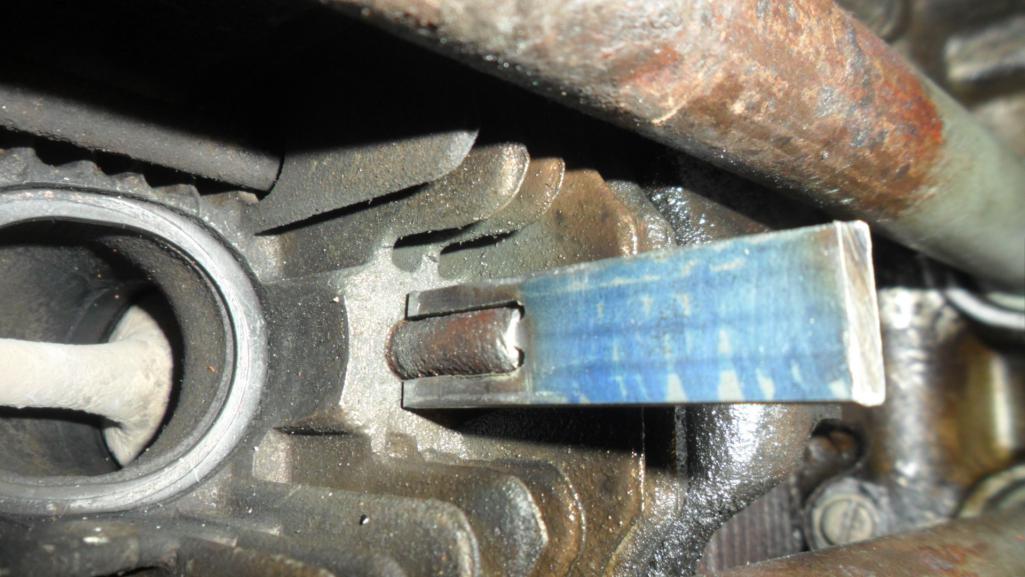  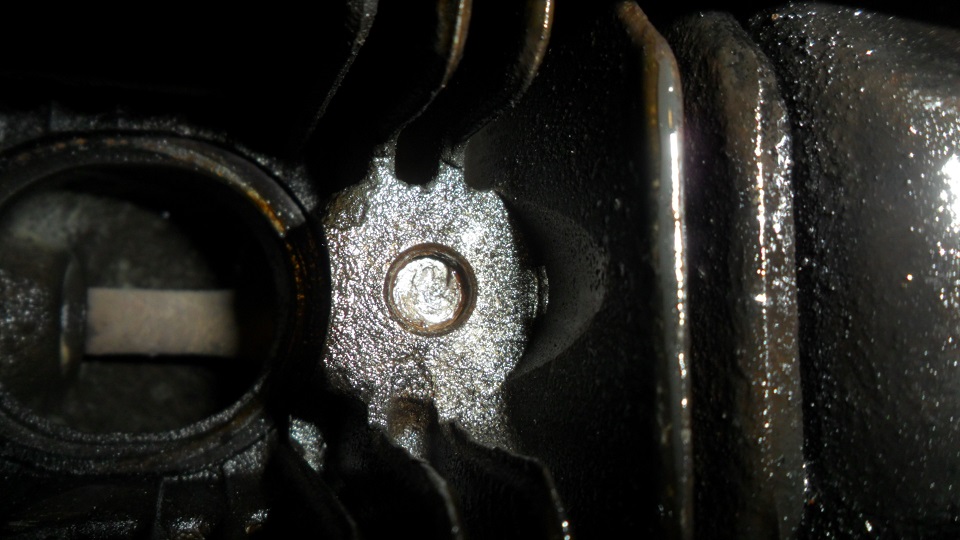 |
   |

 
|
| pilothyer |
Jan 24 2015, 11:49 AM
Post
#2
|
|
Member Group: Members Posts: 838 Joined: 21-May 08 From: N. Alabama Member No.: 9,080 Region Association: South East States |
I know this is not what you want to hear, but since the removal of the muffler and heat exchangers is about the worse part of engine removal (although not necessary) I think your best bet would be to drop the engine/transaxle remove the head and take it to a machine shop for the extraction. This will cost extra if an easy out is broken off in the stud.......I feel your pain because I have BTDT,
|
|
|
|
| Mark Henry |
Jan 24 2015, 12:03 PM
Post
#3
|
|
that's what I do! Group: Members Posts: 20,065 Joined: 27-December 02 From: Port Hope, Ontario Member No.: 26 Region Association: Canada |
Really hard to do in car.
What you did there is sort of like what I do with the head off, but I heat and quench it several times. Tad hard to do in car. Now you have to drill it out. Hard part in car is getting it centered and straight. You also have to be careful not too drill to far, as you can drill right into the combustion chamber. Then I step up the drill size till I take out everything but the threads. I get the rest of the thread out with a dental pick and small chisels. Sometimes you get real lucky and that's done. Often not so lucky, so I go with the 9mm/8mm step stud or a timesert. You still have to get every bit of steel out first before you go oversize, so you still have do all the above steps. If you don't get ever speck of steel out, when you drill your new hole it will drift and not be centered proper. I see this mistake often. Also there are jigs and stud guides but they don't work every time. https://www.google.ca/search?q=stud+drillin...mp;ved=0CDcQsAQ If you have a bigger budget you can get it removed with a MDM machine, about $100-$120 per stud, still have to remove the head. This shows you how it's done. https://www.youtube.com/watch?v=YbeKxFBZrF8 |
|
|
|
| veekry9 |
Jan 24 2015, 01:25 PM
Post
#4
|
|
OldMember Group: Retired Members Posts: 3,068 Joined: 17-June 13 From: TO Member No.: 16,025 Region Association: Canada |
QUOTE(saigon71 @ Jan 24 2015, 12:39 PM)  Nothing is ever easy on these cars... ....It finally broke free. Reheat & apply more PB. On about the 5th cycle, the stud broke off below the level of the head. Engine is in the car & I'd like to keep it that way. What are my best options for getting this thing out now...and installing a new stud? I've had horrible luck with EZ-outs on other applications. Thanks! PITA.Huh? The heat +PB broke through the corrosion and now needs more of the same. A hi-speed grinder to drill thru the bolt's minor dia (6mm)and removal of the thds helix. Underneath the car on your back with a face mask,in close quarters. Start drilling on center with a small dia drill(5/32 .094)use a center punch,carefully. Continue drilling with ever larger drills until the minor dia is reached.Do Not drill out the head's thds. Cleanout hole + remaining thds with brakeclean and insert new stud with Red Loctite or hitemp epoxy. Tough work,good luck. (IMG:style_emoticons/default/biggrin.gif) |
|
|
|
| larryM |
Jan 25 2015, 01:22 PM
Post
#5
|
|
emoze Group: Members Posts: 891 Joined: 1-January 03 From: mid- California Member No.: 65 Region Association: Northern California |
. your question updated
you should be able to get "exact enuf" by measuring a pair of intact studs per your pictures with a precision vernier caliper - you have likely soaked the hell out of it with Kroil and put lots of pinpoint heat on it with an Oxy-Acety torch already ?? - sometimes the heat will help the Kroil penetrate fwiw - i have successfully hand-drilled these things multiple times - first make sure the broken end is ground FLAT so you can center a self-starting bit on it - you start with a SMALL dia tough high speed steel RH drill bit & once you have a deep pilot hole you can progressively switch to larger left-hand bits - the things are tough, so expect to waste a couple bits sometimes the thing will come loose with the left-hander when you have it drilled out to a shell (the stomski tool uses LH bits) - or you can try an easy out once it is very thin (and soaked & heated) - or if it is down to super thin - just re-tap it on center worst case - if you miss exact center - you can buy step studs to fix these 10mm to 8mm - just drill & tap that slightly offset hole to 10 - yup - i have also done that more than once if you want lots of tips & good experienced advice on how to get studs out & what to do if they fail - go search Pelican for <exhaust studs> start here - broken exhaust studs |
|
|
|
| stugray |
Jan 25 2015, 11:13 PM
Post
#6
|
|
Advanced Member Group: Members Posts: 3,825 Joined: 17-September 09 From: Longmont, CO Member No.: 10,819 Region Association: None |
It can be done as mentioned above, but if you are not the patient type it will end badly.
Every time I have screwed up a job like that it has been from getting frustrated and breaking something or letting the drill wander. If you cant work on it comfortably underneath, then drop the engine. |
|
|
|
| JamesM |
Jan 26 2015, 04:58 PM
Post
#7
|
|
Senior Member Group: Members Posts: 1,991 Joined: 6-April 06 From: Kearns, UT Member No.: 5,834 Region Association: Intermountain Region |
Pull the engine now, it will save you in the long run.
You may get lucky drilling/extracting with the motor in the car, but it is a PITA and you will most likely just make the situation worse resulting in more costly repairs and requiring you pull the motor anyways. |
|
|
|
| larryM |
Jan 27 2015, 10:35 PM
Post
#8
|
|
emoze Group: Members Posts: 891 Joined: 1-January 03 From: mid- California Member No.: 65 Region Association: Northern California |
X2
assuming you have plenty of money, & can let the car be dead for some months pull the heads & send 'em to FAT or some other Type 4 expert for complete rebuilds - we already gave you other alternatives QUOTE(JamesM @ Jan 26 2015, 02:58 PM) Pull the engine now, it will save you in the long run. You may get lucky drilling/extracting with the motor in the car, but it is a PITA and you will most likely just make the situation worse resulting in more costly repairs and requiring you pull the motor anyways. |
|
|
|
| Mueller |
Jan 28 2015, 09:20 AM
Post
#9
|
|
914 Freak! Group: Members Posts: 17,150 Joined: 4-January 03 From: Antioch, CA Member No.: 87 Region Association: None |
I botched an attempt at drilling out an exhaust stud on a 1.8 motor in an old 914 of mine years ago....I ended up drilling into the combustion chamber!
On the plus side, the wife felt so bad for me being upset at the car she bought me a 911 for my birthday! (which I was not allowed to work on or take apart!) |
|
|
|
| IronHillRestorations |
Jan 28 2015, 09:37 PM
Post
#10
|
|
I. I. R. C. Group: Members Posts: 6,775 Joined: 18-March 03 From: West TN Member No.: 439 Region Association: None |
You'll get closer to hitting the center of the stud with a transfer punch. If you are going to attempt drilling it by hand, I'd recommend using a left hand twist drill bit.
If you haven't done this before, you might consider taking the car to a pro, or pulling the head and having a (experienced) machinist remove the remains of the stud. You've broken off whatever was left of the stud, including everything you've welded to it. If you aren't very, very careful the next step for the home mechanic is breaking a drill bit or extractor off in the head. This is my free advice. |
|
|
|
| relentless |
Jan 29 2015, 04:05 PM
Post
#11
|
|
Member Group: Members Posts: 350 Joined: 1-April 07 From: Oregon Member No.: 7,636 |
The stud is broken off below the level of the head, so good luck grinding that flat.
If you can find a piece of tubing the exact OD of the hole you can center a punch that just fits the ID, but good luck finding one with those specs. You might be able to have a machine shop machine a piece of old stud with a perfectly centered hole, and if you could get that held perfectly aligned you *might* be able to drill it out. I've used that technique before but always used a stud extraction device. I'm surprised you didn't try the 50-50 acetone/ATF mix, as it works better than any penetrating fluid you can purchase. I sometimes soak fasteners for a week or two before I even try to extract them, and of course heat is your friend. Good luck! |
|
|
|
| IronHillRestorations |
Jan 29 2015, 09:48 PM
Post
#12
|
|
I. I. R. C. Group: Members Posts: 6,775 Joined: 18-March 03 From: West TN Member No.: 439 Region Association: None |
I didn't mean to sound insulting Saigon, I just don't want you to get deeper in a hole.
From the closing the door after the cows are out department: A vintage piece of equipment that really works good for stuck studs, is a carbon arc torch that you use with an arc welder. You can contact that on the studs and get it red hot in seconds without the ancillary heat on everything else. |
|
|
|
| stugray |
Jan 30 2015, 12:05 AM
Post
#13
|
|
Advanced Member Group: Members Posts: 3,825 Joined: 17-September 09 From: Longmont, CO Member No.: 10,819 Region Association: None |
QUOTE(9146986 @ Jan 29 2015, 08:48 PM) A vintage piece of equipment that really works good for stuck studs, is a carbon arc torch that you use with an arc welder. You can contact that on the studs and get it red hot in seconds without the ancillary heat on everything else. I have a resistance welder that is basically a transformer in a box with a handle. It has the carbon arc rod. We used to use it for soldering really big stuff. I never thought of using it for that. I guess it would work well on gears and such as well. |
|
|
|
| saigon71 |
Jan 31 2015, 05:06 PM
Post
#14
|
|
Advanced Member Group: Members Posts: 2,006 Joined: 1-June 09 From: Dillsburg, PA Member No.: 10,428 Region Association: MidAtlantic Region |
Thanks for all the advice and suggestions – I greatly appreciate it. I REALLY didn’t want to drop the engine. After giving it some thought, I decided to try to tackle it with the engine in the car. My thought being: If I get lucky, I won’t have to drop it.
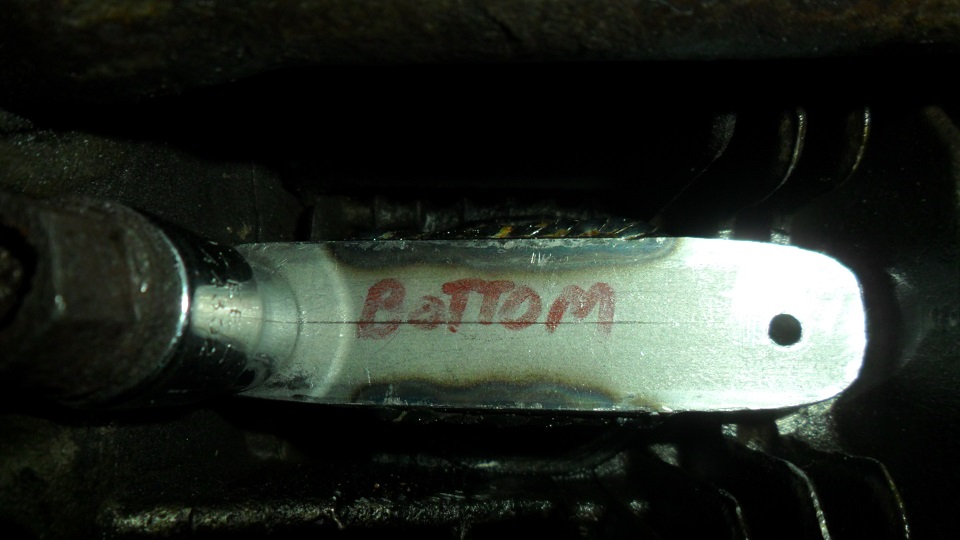
I center punched the hell out of the old stud, leaving a good mark. My key concern was drilling straight and true, so I decided to make some fixtures up out of scrap steel. Took a measurement off a heat exchanger flange so I know how long they needed to be. Made a template of the exchanger flange so I could contour the jig to fit into the tight space. Welded two pieces of flat stock together: 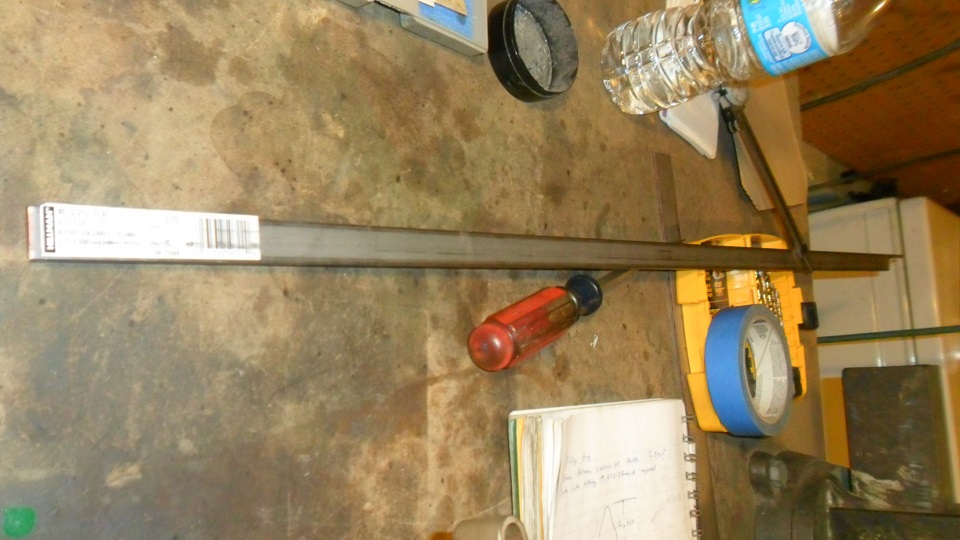 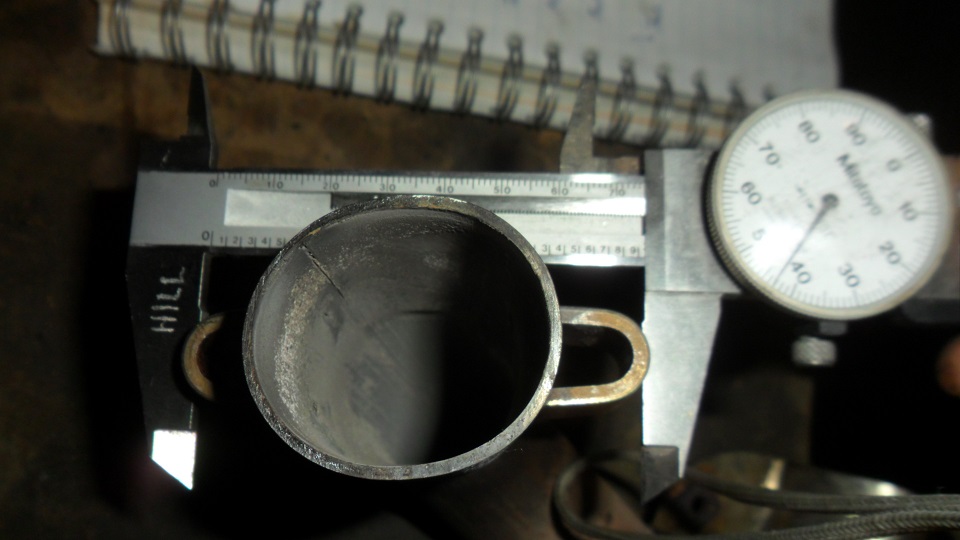 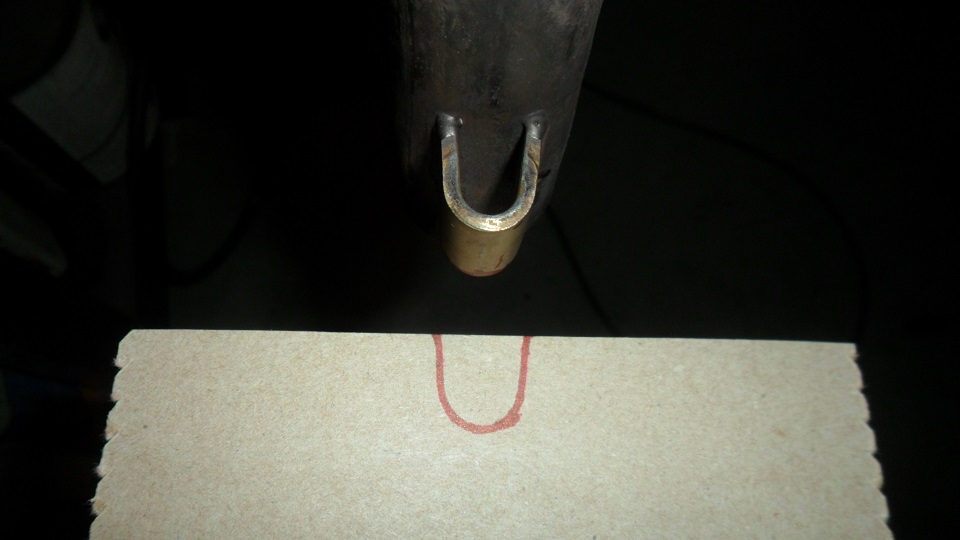 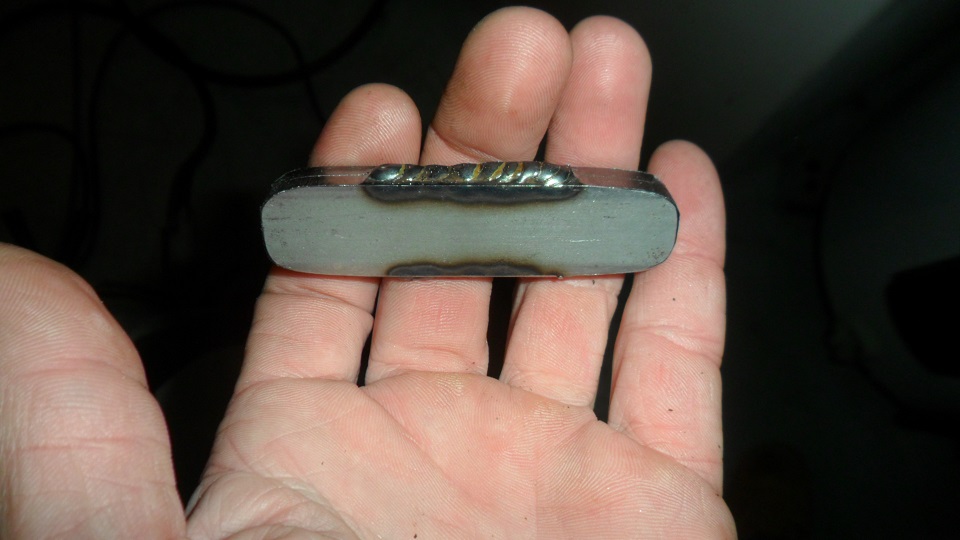 Scribed a center line on the jig. Using a center-to-center distance of 2.340, I centered the dial caliper and center punched the mounting hole. I don’t have a drill press, so I improvised, holding part of a combination square in place while step drilling the mount hole with a hand drill. Finished with a letter “N” bit: 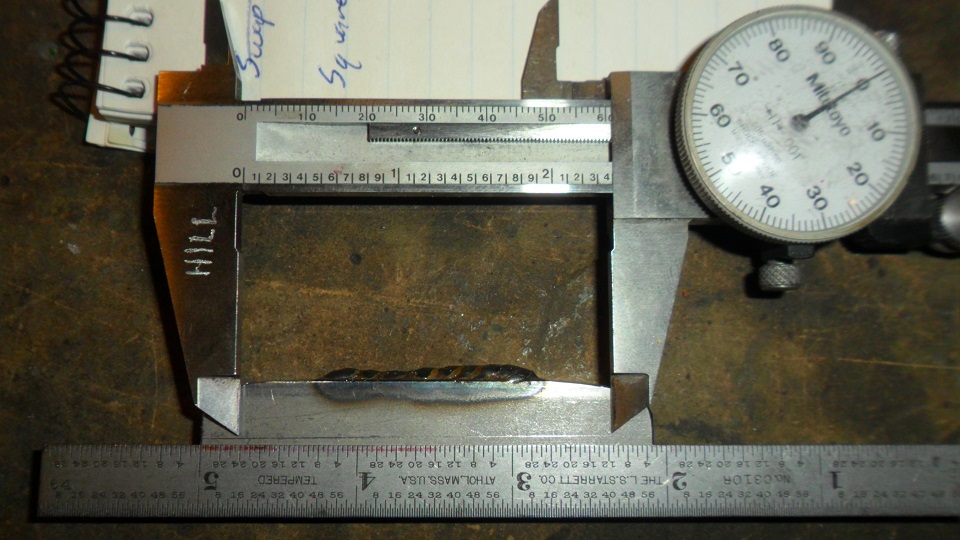 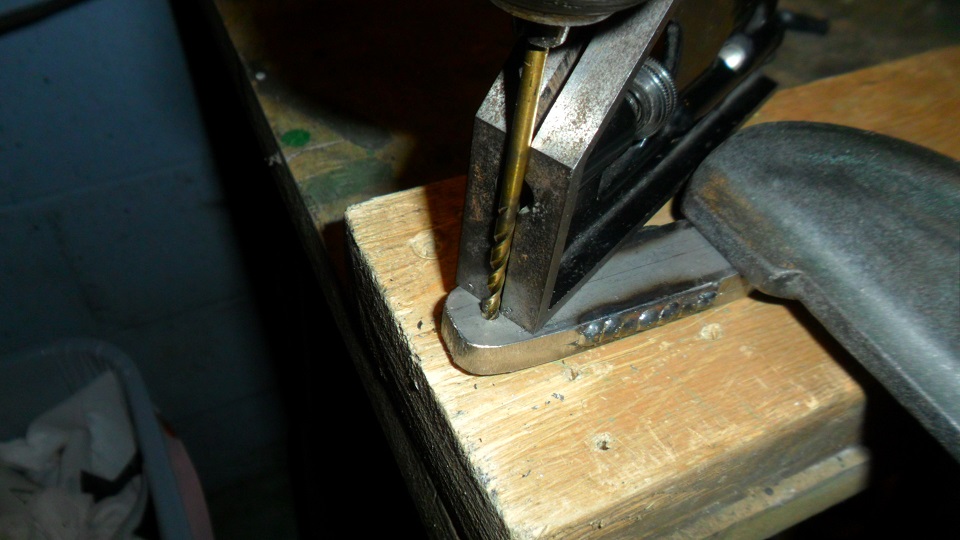 I still needed to know exactly where to center punch the other side, so put a dab of plumbers putty on the jig, sprayed the broken head boss with PB Blaster (so the putty wouldn’t stick) centered the fixture and tightened it up. Ended up with a nice A cup (IMG:style_emoticons/default/biggrin.gif) impression and was able to center punch through the putty: 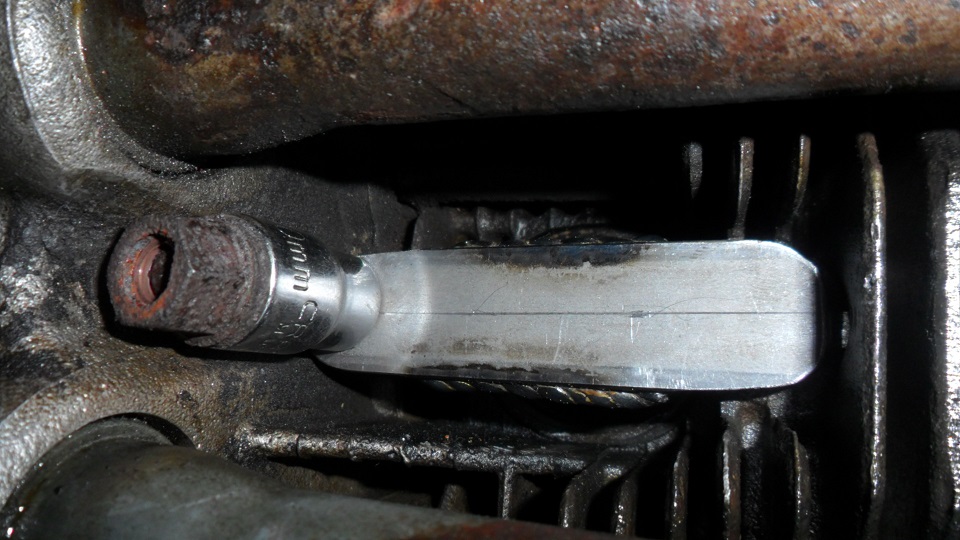  |
|
|
|
| saigon71 |
Jan 31 2015, 05:31 PM
Post
#15
|
|
Advanced Member Group: Members Posts: 2,006 Joined: 1-June 09 From: Dillsburg, PA Member No.: 10,428 Region Association: MidAtlantic Region |
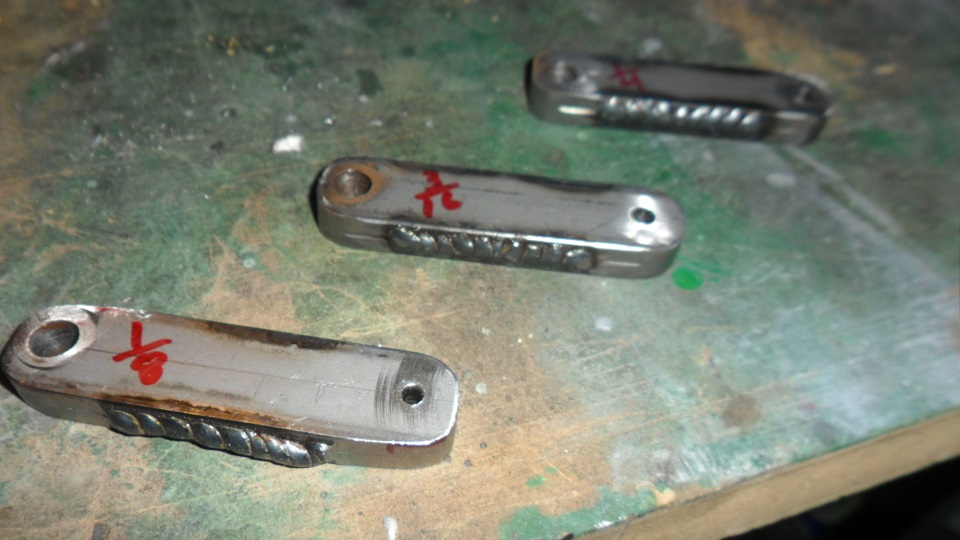
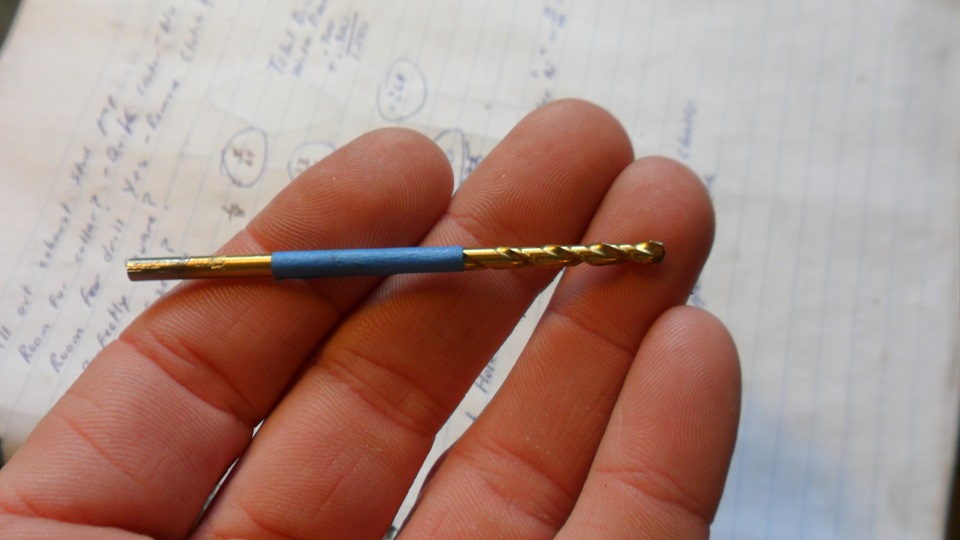
Made three different fixtures so I could step drill the stud. My new exhaust studs came in, so I added the length of the stud threads to the thickness of the jig and marked the drill bit with tape:
   Time to drill. Used a fine point red sharpie to mark the center punch hole in the stud, so I could see it through the pilot hole and tightened it down. Drilled right down the center. Aligned the next two jigs with the previous drill size and hole: 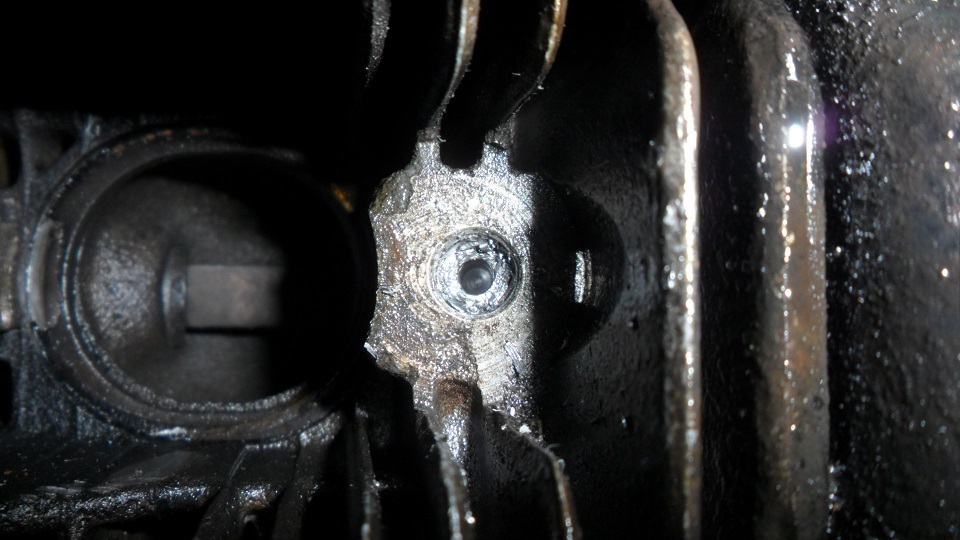 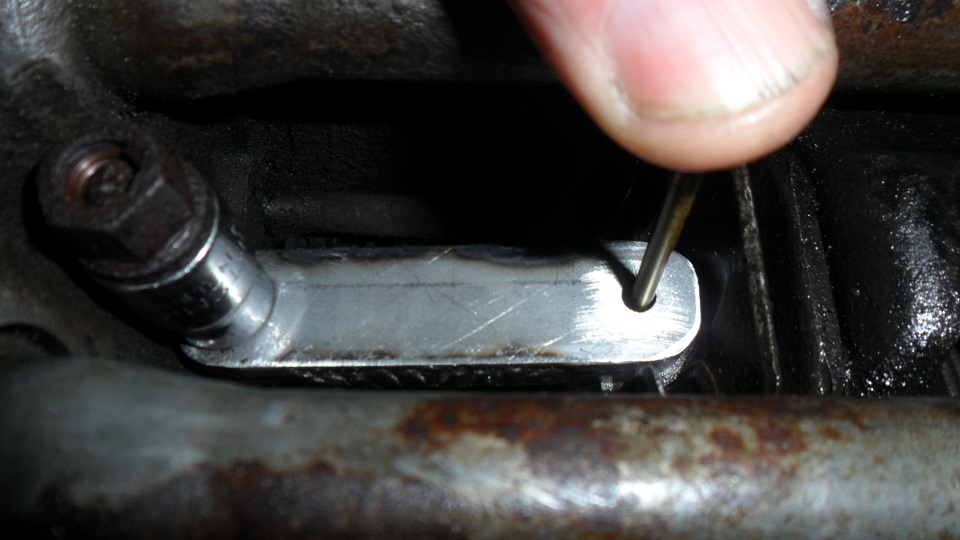 |
|
|
|
| type47 |
Jan 31 2015, 05:40 PM
Post
#16
|
|
Viermeister Group: Members Posts: 4,254 Joined: 7-August 03 From: Vienna, VA Member No.: 994 Region Association: MidAtlantic Region |
Go Bob, go! (IMG:style_emoticons/default/smilie_pokal.gif)
|
|
|
|
| saigon71 |
Jan 31 2015, 05:47 PM
Post
#17
|
|
Advanced Member Group: Members Posts: 2,006 Joined: 1-June 09 From: Dillsburg, PA Member No.: 10,428 Region Association: MidAtlantic Region |
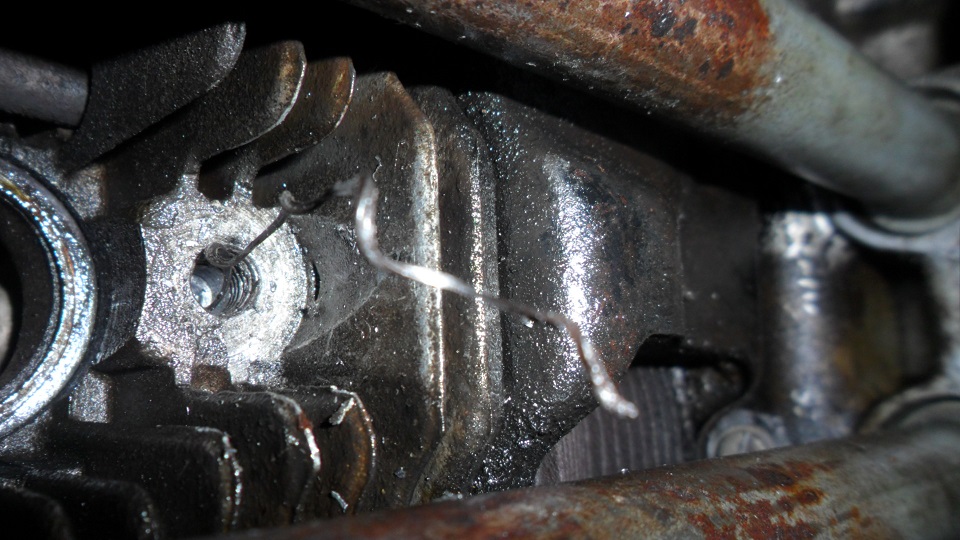
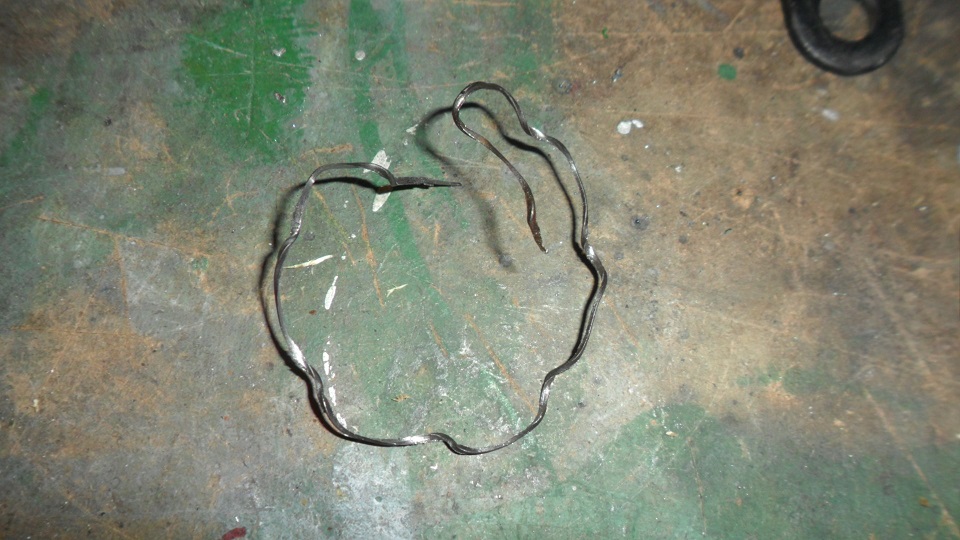
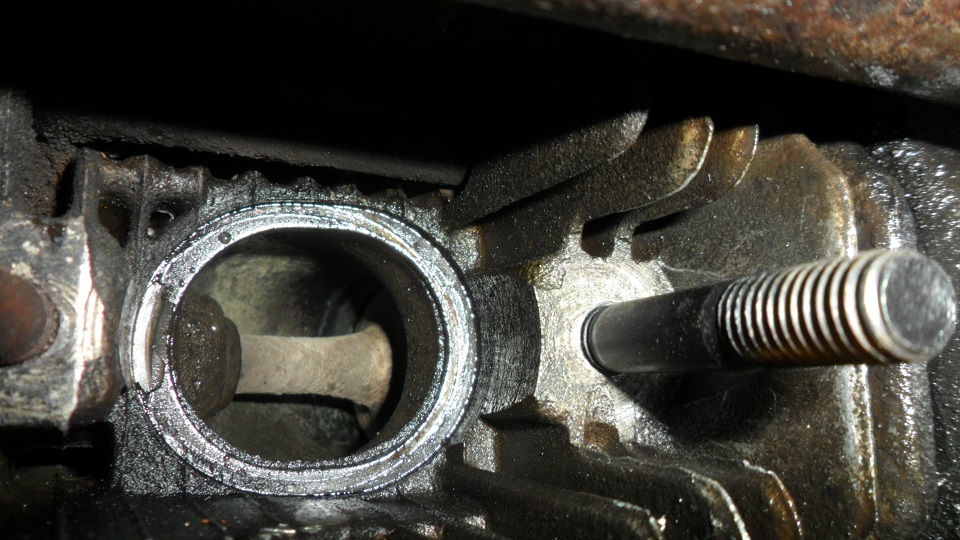
I am very happy to report that it worked well. Using a scribe, I was able to separate the first round of threads. Once I got enough exposed, I pulled the rest out with a pair of needle nose pliers in one long strand. Picked up a set of thread restorers and ran the M8 X 1.25 through the drilled out hole:
  |
|
|
|
| mepstein |
Jan 31 2015, 05:54 PM
Post
#18
|
|
914-6 GT in waiting Group: Members Posts: 19,592 Joined: 19-September 09 From: Landenberg, PA/Wilmington, DE Member No.: 10,825 Region Association: MidAtlantic Region |
Wow! You knocked it out of the park. Congrats!
|
|
|
|
| saigon71 |
Jan 31 2015, 05:59 PM
Post
#19
|
|
Advanced Member Group: Members Posts: 2,006 Joined: 1-June 09 From: Dillsburg, PA Member No.: 10,428 Region Association: MidAtlantic Region |
Glad to have this project done! I’m going to run the thread restoring “die” over the remaining stud threads, use copper anti-seize and new exhaust nuts. I’ve got a decent set up for the next time I bust one of these pigs off. (IMG:style_emoticons/default/evilgrin.gif)
 |
|
|
|
| Cap'n Krusty |
Jan 31 2015, 07:03 PM
Post
#20
|
|
Cap'n Krusty Group: Members Posts: 10,794 Joined: 24-June 04 From: Santa Maria, CA Member No.: 2,246 Region Association: Central California |
"New" exhaust nuts? Good luck finding those. I may have one or two used ones left; I keep finding them as we go through the stuff in the barn. They're Helicoiled on the inside, and should be fine for reuse. ALL the replacement nuts sold by almost everyone are of the locking variety, which were NEVER intended for use in this application.
The Cap'n |
|
|
|
|
1 User(s) are reading this topic (1 Guests and 0 Anonymous Users)
0 Members:

|
Lo-Fi Version | Time is now: 22nd November 2024 - 06:35 PM |
Invision Power Board
v9.1.4 © 2024 IPS, Inc.