|
|

|
Porsche, and the Porsche crest are registered trademarks of Dr. Ing. h.c. F. Porsche AG.
This site is not affiliated with Porsche in any way. Its only purpose is to provide an online forum for car enthusiasts. All other trademarks are property of their respective owners. |
|
|
  |
| moparrob |
 Sep 8 2017, 02:38 PM Sep 8 2017, 02:38 PM
Post
#201
|
|
Senior Member    Group: Members Posts: 646 Joined: 27-April 10 From: Los Angeles Member No.: 11,663 Region Association: None |
Liar ! You've done this before. (IMG:style_emoticons/default/biggrin.gif) Or it least it looks that way (IMG:style_emoticons/default/beerchug.gif) No, all of Jim's work is that way. I have been to his house and between his amazing woodworking skills in his kitchen, as well as the several other cars he has already restored, it is clear he has good skills and patience. Don't let his modesty fool you. |
| Maltese Falcon |
 Sep 8 2017, 03:12 PM Sep 8 2017, 03:12 PM
Post
#202
|
|
914 Guru      Group: Members Posts: 5,041 Joined: 14-September 04 From: Mulholland SoCal Member No.: 2,755 Region Association: None  |
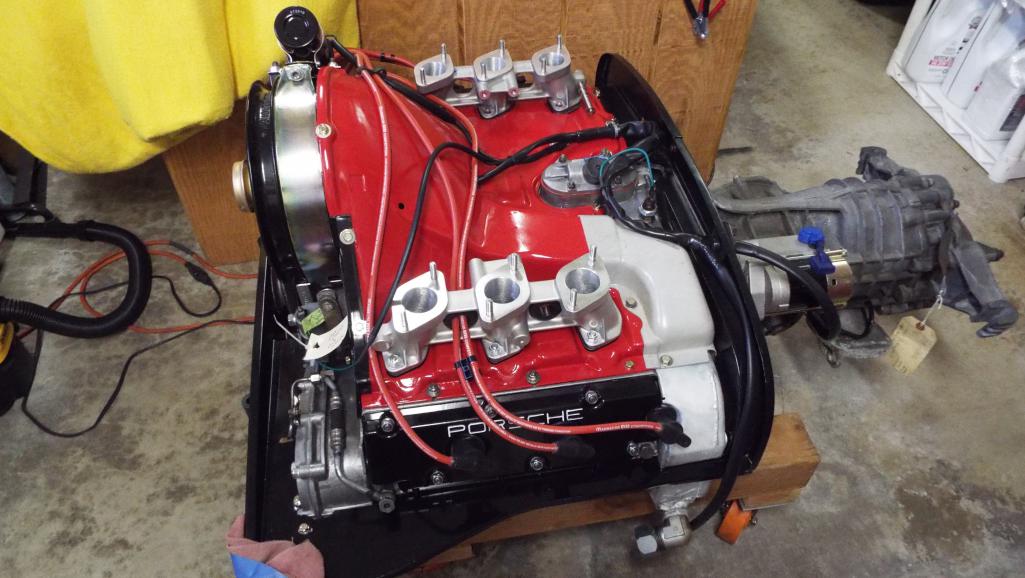
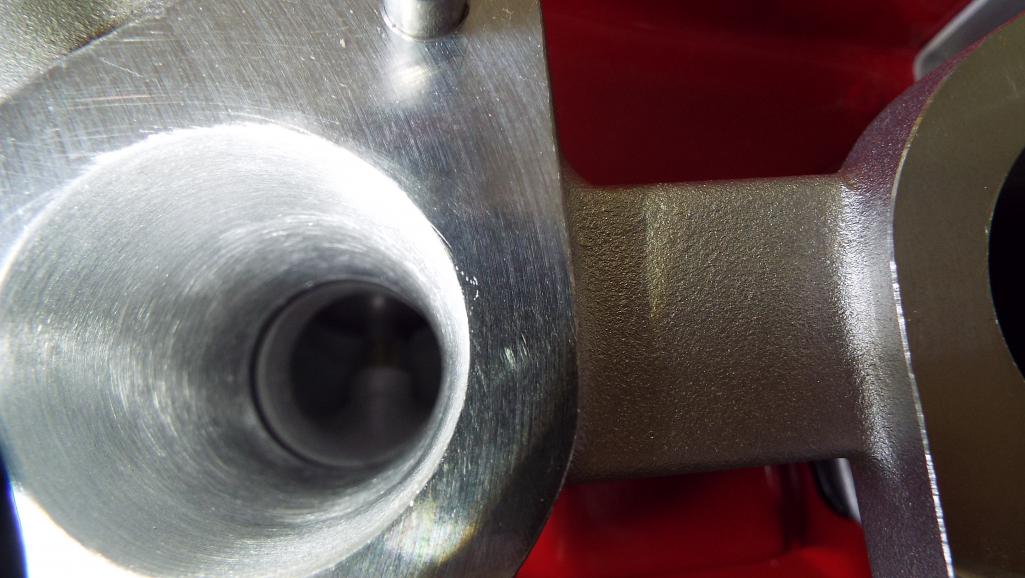
First hole done! That would be the obviously larger one in the center. How it matches up to the insulator And before and after with the ping pong ball really gives sense of the size. Yes that is the same ball. OK now just 2 more runners on this manifold with no mistakes! Working good so far........ Mil-Spec...just paint it OD green (IMG:style_emoticons/default/aktion035.gif) |
| whitetwinturbo |
 Sep 8 2017, 09:18 PM Sep 8 2017, 09:18 PM
Post
#203
|
|
Honey, does this wing make my ass look fat?    Group: Members Posts: 1,391 Joined: 22-October 11 From: Newport Beach/Kalefornya/USA Member No.: 13,704 Region Association: Southern California |
|
| Lucky9146 |
 Sep 8 2017, 09:36 PM Sep 8 2017, 09:36 PM
Post
#204
|
|
Always Wanted A Bigger Go Cart    Group: Members Posts: 1,676 Joined: 22-September 14 From: Poway California Member No.: 17,942 Region Association: Southern California 
|
Liar ! You've done this before. (IMG:style_emoticons/default/biggrin.gif) Or it least it looks that way (IMG:style_emoticons/default/beerchug.gif) No, all of Jim's work is that way. I have been to his house and between his amazing woodworking skills in his kitchen, as well as the several other cars he has already restored, it is clear he has good skills and patience. Don't let his modesty fool you. Thanks guys I need all the moral support I can get. We have all ground on metal at one time or another but I have to say expensive new aluminum manifolds was a first for me. (IMG:style_emoticons/default/smile.gif) One manifold done! It sure does dress up that engine! Next one close behind now. 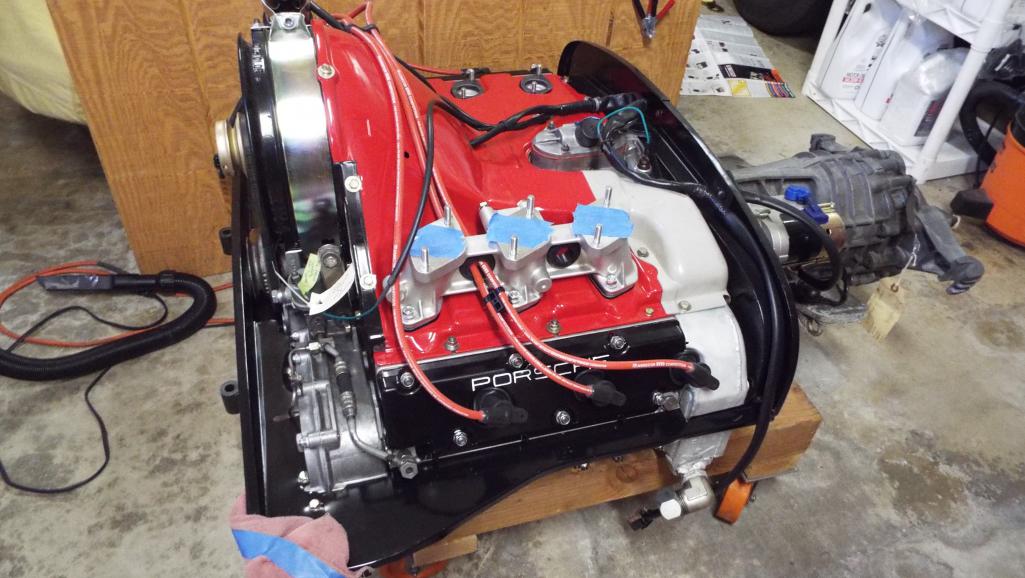 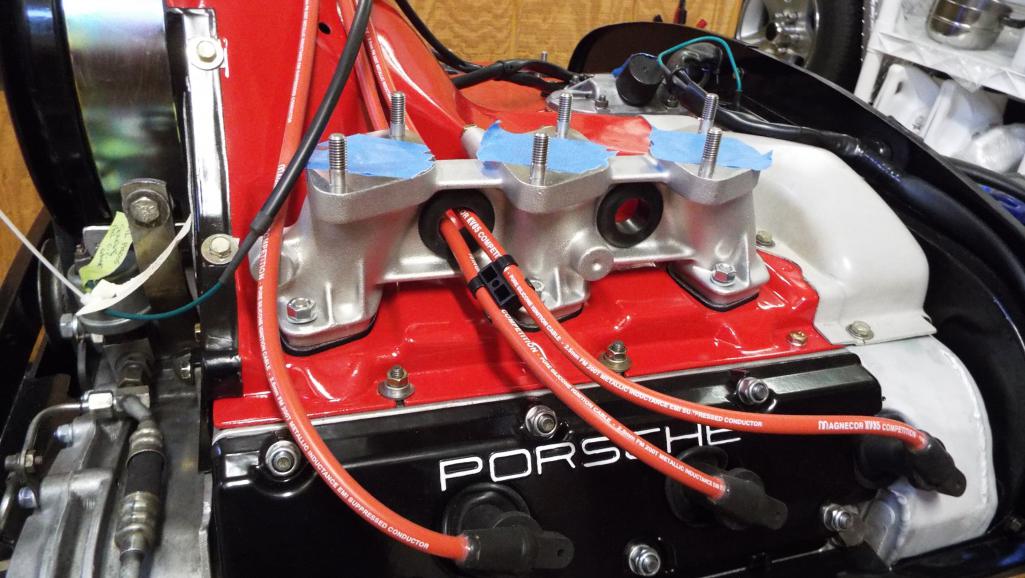 Thanks for checking in (IMG:style_emoticons/default/white914.jpg) |
| defianty |
 Sep 9 2017, 11:01 AM Sep 9 2017, 11:01 AM
Post
#205
|
|
Senior Member    Group: Members Posts: 659 Joined: 9-August 06 From: Essex, UK Member No.: 6,621 Region Association: None  |
Fantastic job on the porting. What size are the inlet ports? Have they been ported too?
|
| Lucky9146 |
 Sep 9 2017, 11:26 AM Sep 9 2017, 11:26 AM
Post
#206
|
|
Always Wanted A Bigger Go Cart    Group: Members Posts: 1,676 Joined: 22-September 14 From: Poway California Member No.: 17,942 Region Association: Southern California 
|
Fantastic job on the porting. What size are the inlet ports? Have they been ported too? Great to hear from the UK again! Thanks man! The inlet ports are billed as 40 but actually measure 41mm, so no they are not ported further than received. Thanks for checking in. (IMG:style_emoticons/default/white914.jpg) |
| defianty |
 Sep 9 2017, 11:37 AM Sep 9 2017, 11:37 AM
Post
#207
|
|
Senior Member    Group: Members Posts: 659 Joined: 9-August 06 From: Essex, UK Member No.: 6,621 Region Association: None  |
Fantastic job on the porting. What size are the inlet ports? Have they been ported too? Great to hear from the UK again! Thanks man! The inlet ports are billed as 40 but actually measure 41mm, so no they are not ported further than received. Thanks for checking in. (IMG:style_emoticons/default/white914.jpg) 41mm that's the same as mine then. I'm trying to ascertain as to whether my 3.0L 930/10 engine is standard as I thought 41mm was rather big. I think I've got a lot to learn! (IMG:style_emoticons/default/laugh.gif) |
| Lucky9146 |
 Sep 10 2017, 10:29 AM Sep 10 2017, 10:29 AM
Post
#208
|
|
Always Wanted A Bigger Go Cart    Group: Members Posts: 1,676 Joined: 22-September 14 From: Poway California Member No.: 17,942 Region Association: Southern California 
|
|
| Lucky9146 |
 Sep 10 2017, 10:58 AM Sep 10 2017, 10:58 AM
Post
#209
|
|
Always Wanted A Bigger Go Cart    Group: Members Posts: 1,676 Joined: 22-September 14 From: Poway California Member No.: 17,942 Region Association: Southern California 
|
Did I think I would spend an entire afternoon yesterday on my accelerator linkage? Nooooooooooo
Disclaimer on the following posts “my linkage may be different than your linkage”. Thought it might be a good idea to check out my carb linkage while the engine still easily accessible. Turned out to be one of the best decisions I could possibly make! As I got into it I thought I would document my Weber carb linkage set up. Maybe someone has posted it on the site already but I couldn’t find it. I am a lousy searcher. I learned so much in the process and if I had waited to do this after the engine was installed I would have been up and down and a half million times and needed a second person to help and it would have been a real pain in the ass! I can see that now. To Start: Tried to put my linkage on. Didn’t get far. Unfortunately my linkage has been sitting for several years now and that sitting had taken its toll. The linkage arm ends that go on the pivot balls were dried out inside, and they were corroded plus that little cir-clip inside the linkage arm end that captures the ball was non functional. Stuck in its groove. OK so stop right there and clean up every linkage end and polish up the little pivot balls. Unfortunately, I neglected to take pics of all that ugliness. Key is cleaning all linkage attachment points and applying a good grease to every moving part. While you are at it, make sure the rod ends work freely in the threaded part of the linkage arm end as well. Mine did not, some only screwed in half way. Make sure they actually screw in all the way because you just may just need that last bit of thread as I later discovered. WD40 is your friend here. 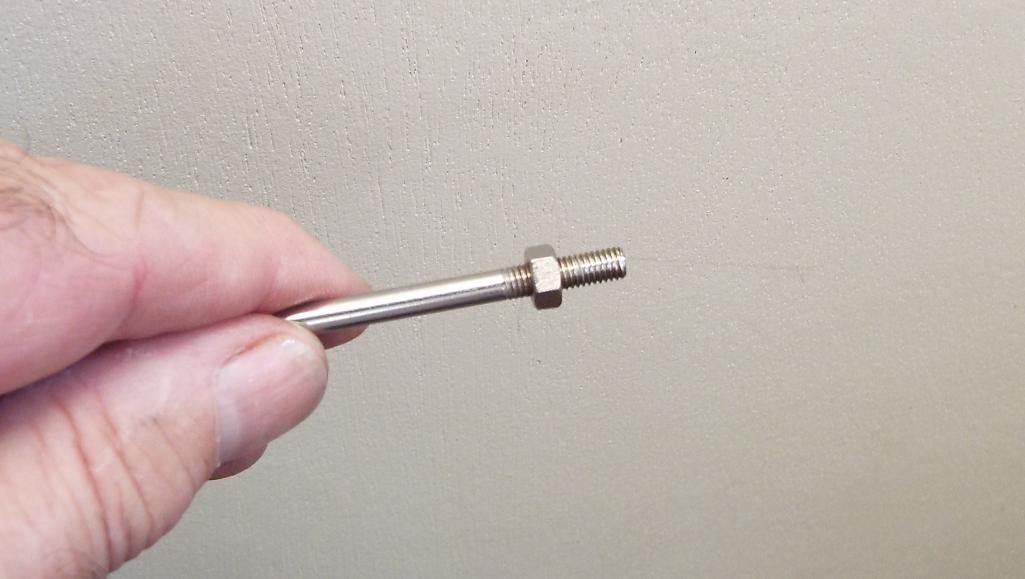 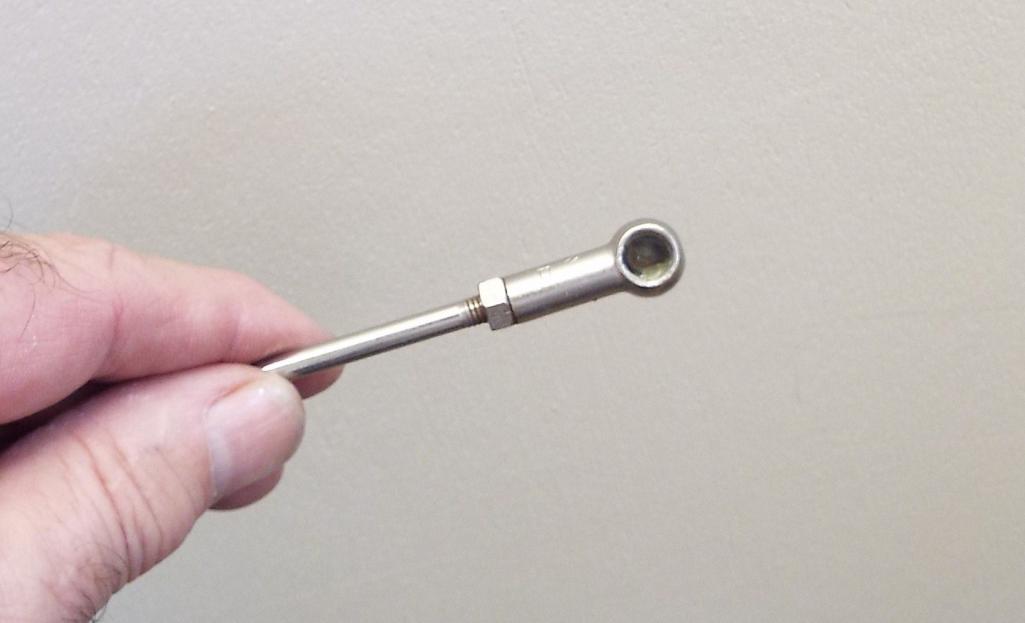 I needed to turn a difficult/ stuck rod ends and a 10 mm open end wrench works great for that. Protect that rod in a vise. 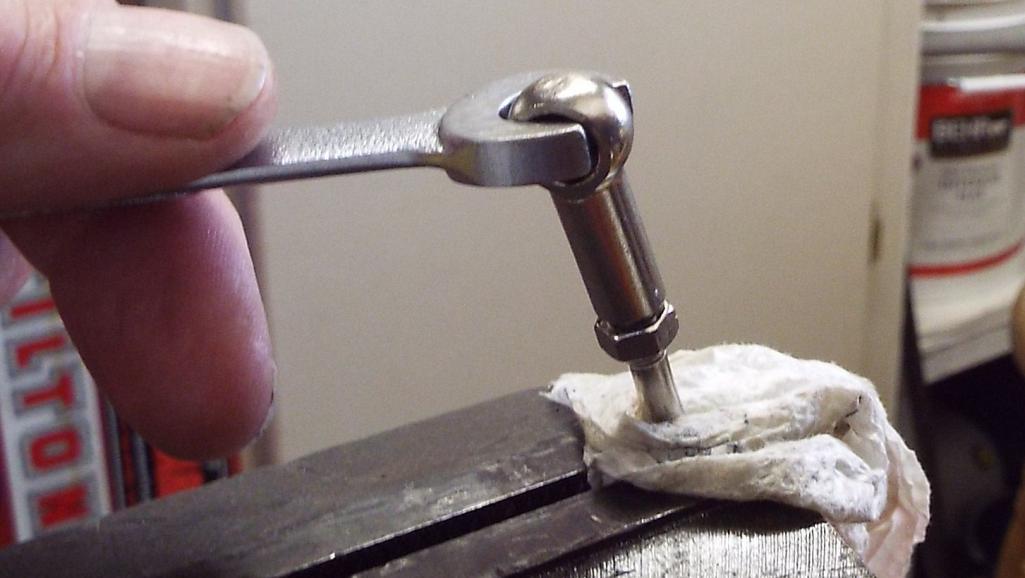 Next step, install the brackets for the cross bar to the intake manifolds followed by the cross bar. As you know these are new intake manifolds in my case so who knows how this will go? I mean this was all together once but with different manifolds. Should still work though, right? Now with the uprights loosely installed and grease in the sockets and also on the cross bar ball ends, tighten the bolts to the manifolds. Nope, not even close to rotating freely. Bit of tweaking on the uprights to release the inward pressure on the bar to free it up but still just enough tension to keep it well contained. 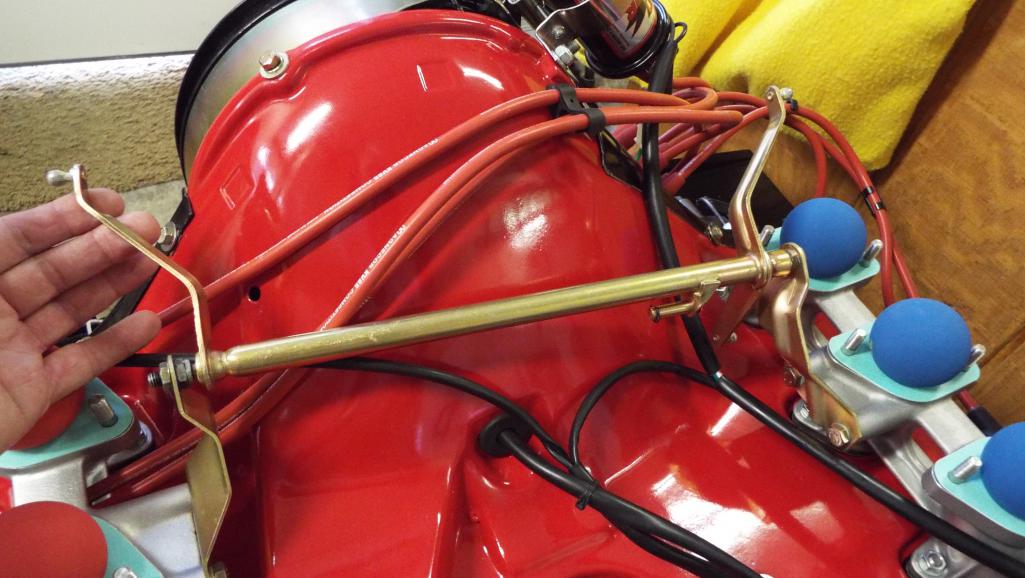 |
| Lucky9146 |
 Sep 10 2017, 11:11 AM Sep 10 2017, 11:11 AM
Post
#210
|
|
Always Wanted A Bigger Go Cart    Group: Members Posts: 1,676 Joined: 22-September 14 From: Poway California Member No.: 17,942 Region Association: Southern California 
|
Reverse lever positioning.
I found this to be about the right position as shown. Note inboard arm just a little past 12 o’clock and outboard arm a little past 3 o’clock. It is important that the outer arm not be much higher than shown as the arm should be beginning the downward movement. Your arm may be different. 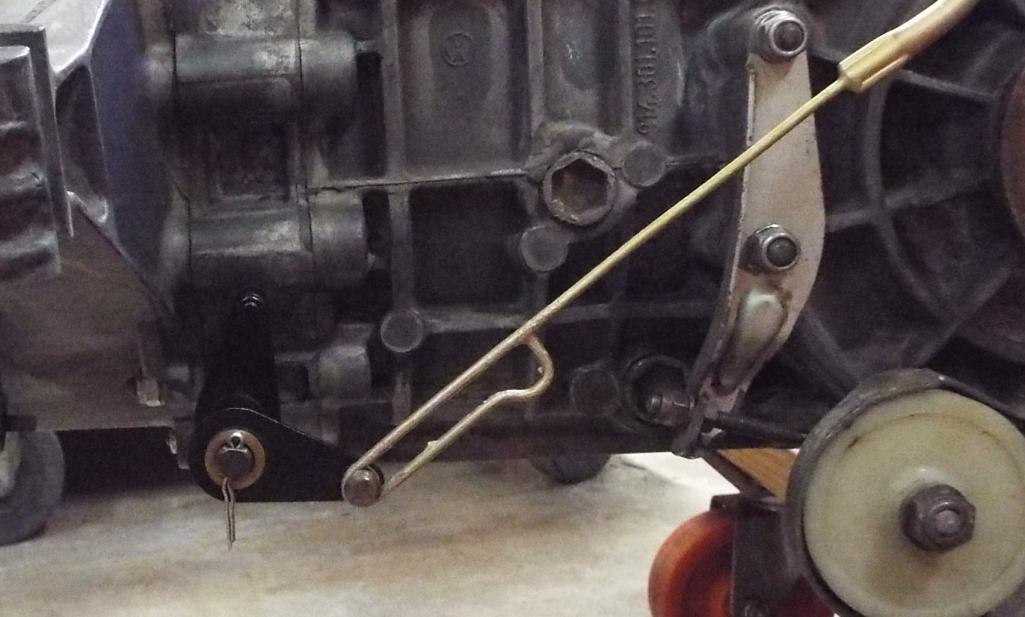 While at the same time the top triangular reverse lever almost horizontal across the top. 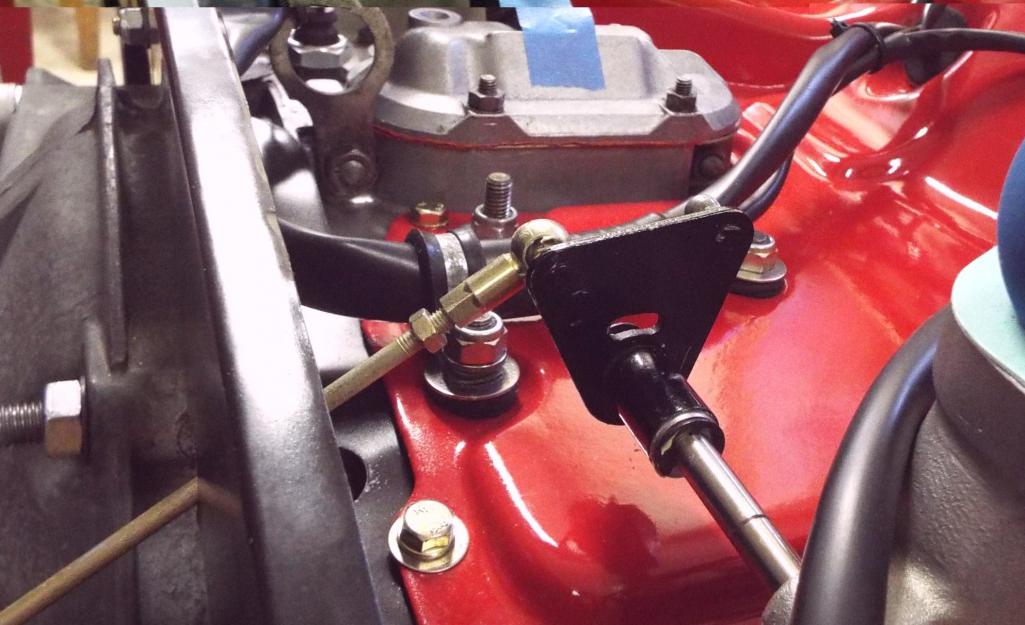 So, you have a hand on the trans end and the other hand on the upper pivot and you can feel when the linkage if is over extended and there actually is kind of a sweet spot and of course checking for binding. Adjust the long link as necessary to achieve. 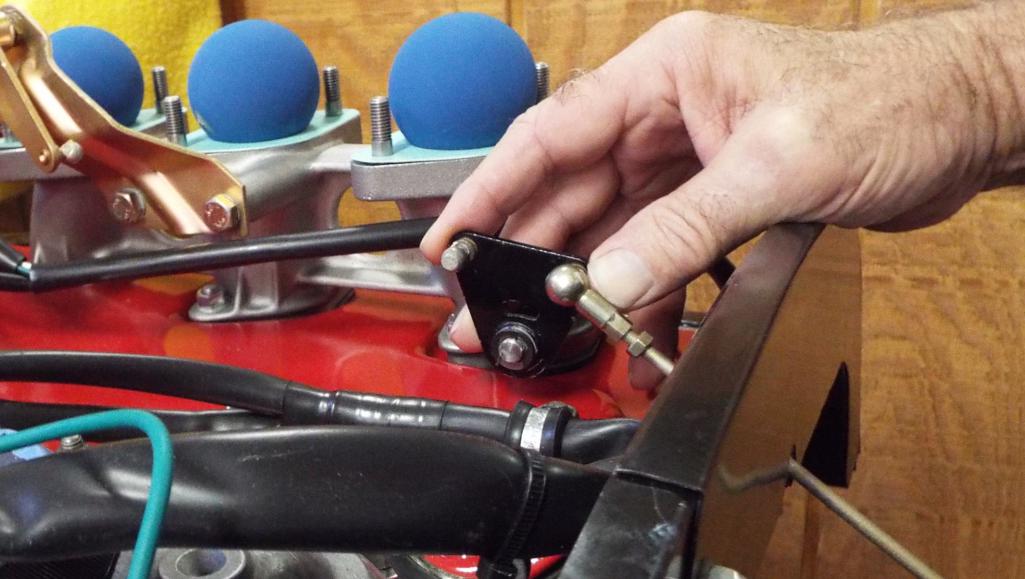 Now remove the long accelerator linkage going to the trans and install the piece of linkage running from the cross bar to the reverse lever and check that for free movement. Note the linkage is set to have the triangle reverse lever flat across the top and the attachment arm on the cross bar is vertical. 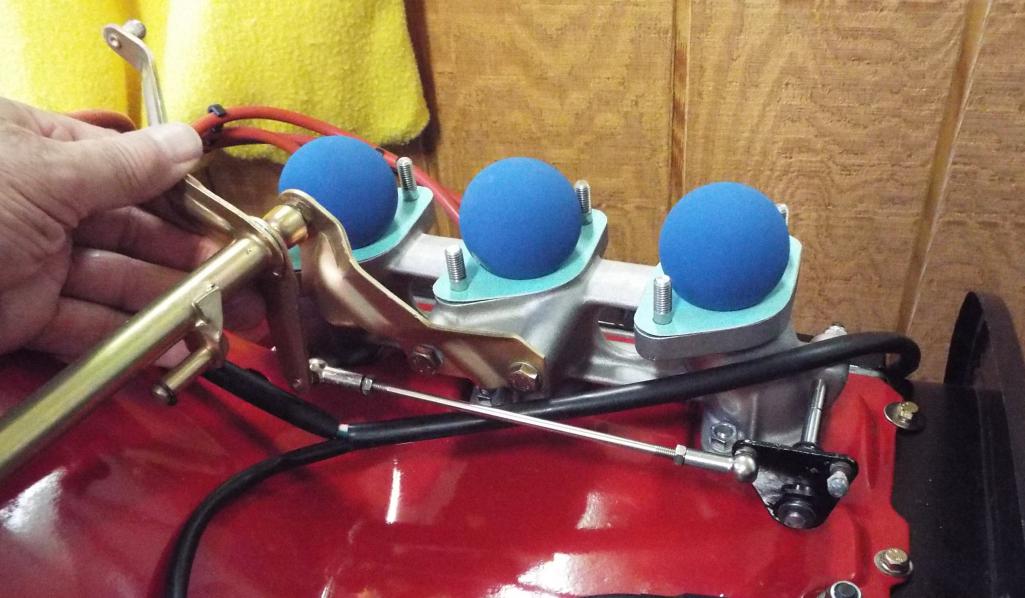 This link is critical to the set up. You may have to play with this linkage arm, because it is a very fine line between too long and too short, as it really affects the arms that go to the carbs from the cross bar. I actually think this arm on mine could be longer because I only had about 6 tread engagement at both ends. A little longer makes for longer arms at the carbs and my carb arms ended up very short. 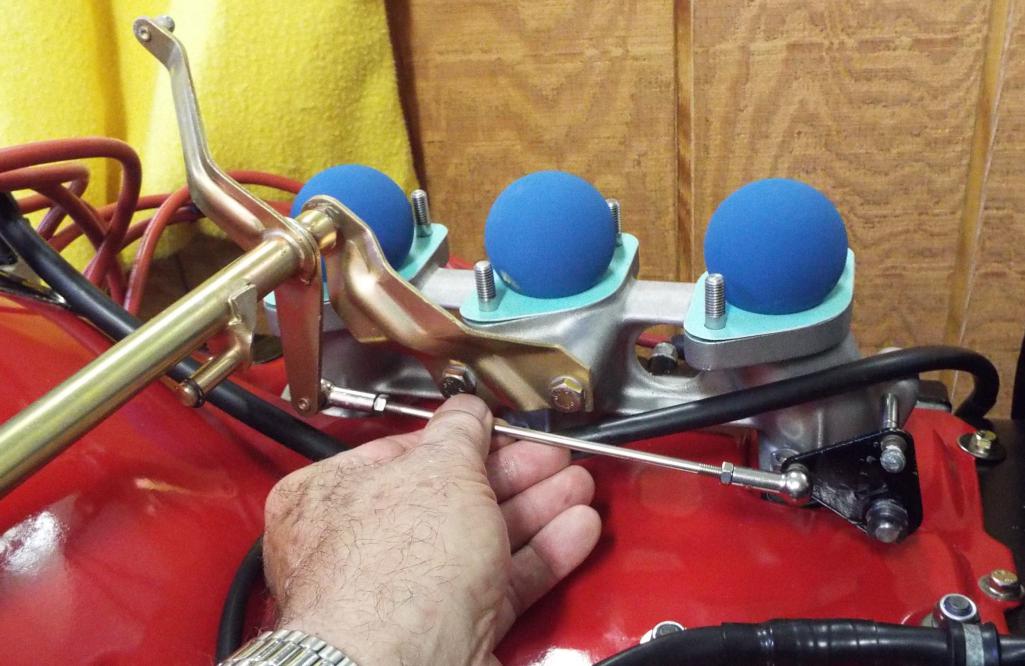 |
| Lucky9146 |
 Sep 10 2017, 11:22 AM Sep 10 2017, 11:22 AM
Post
#211
|
|
Always Wanted A Bigger Go Cart    Group: Members Posts: 1,676 Joined: 22-September 14 From: Poway California Member No.: 17,942 Region Association: Southern California 
|
Reattach the lower long linkage that goes over the rear axel to the trans and check free of movement.
All linkage has now been checked for free movement and is together. 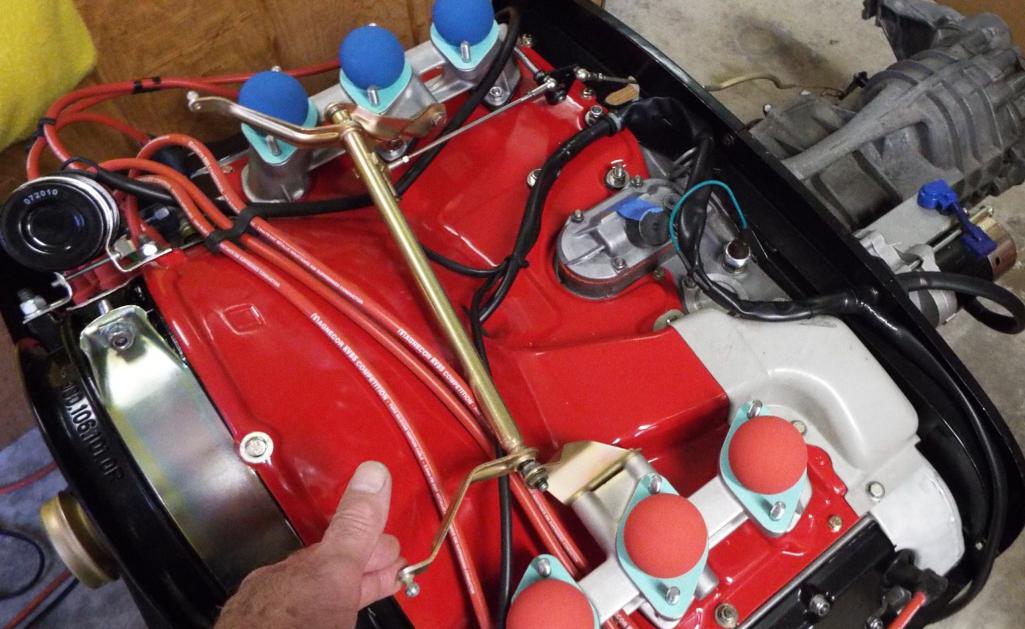 Now try to hook up ONE carb link to ONE carb and I started with the right carb. I chose this carb as it is the furthest away from the linkage on the other side of the engine/ trans actuator. Adjust the carb lever arm to maintain the locations of triangle reverse lever and trans pivot noted earlier. 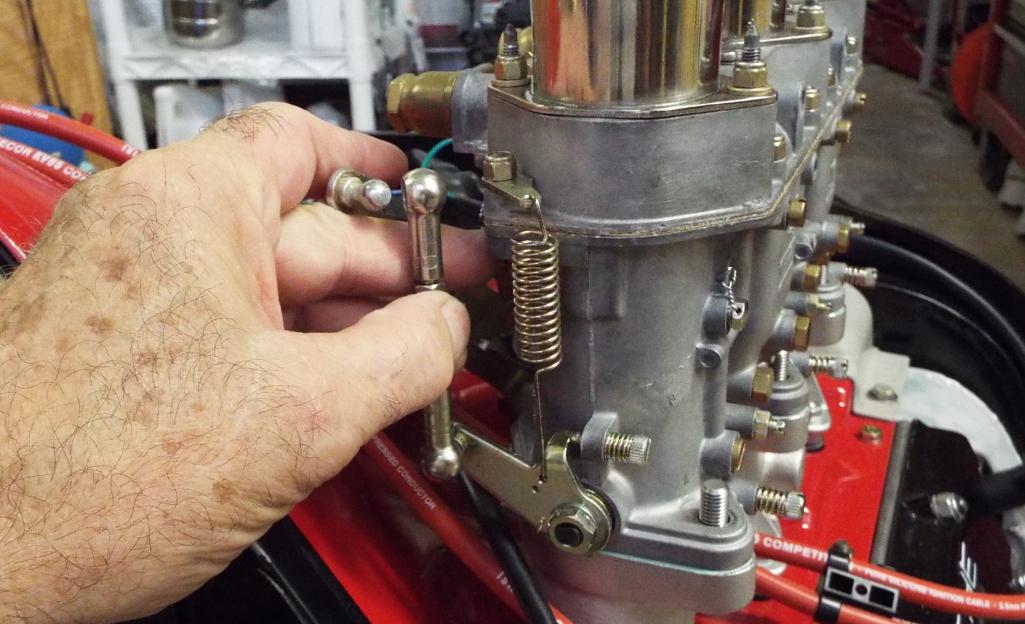 Note how the top of the triangle reverse lever is level across the top making sure it ended up where I wanted it when all assembled. While making adjustments, disconnect the carb arm when doing so, and re-set the carb link length when done. My 2 cents. 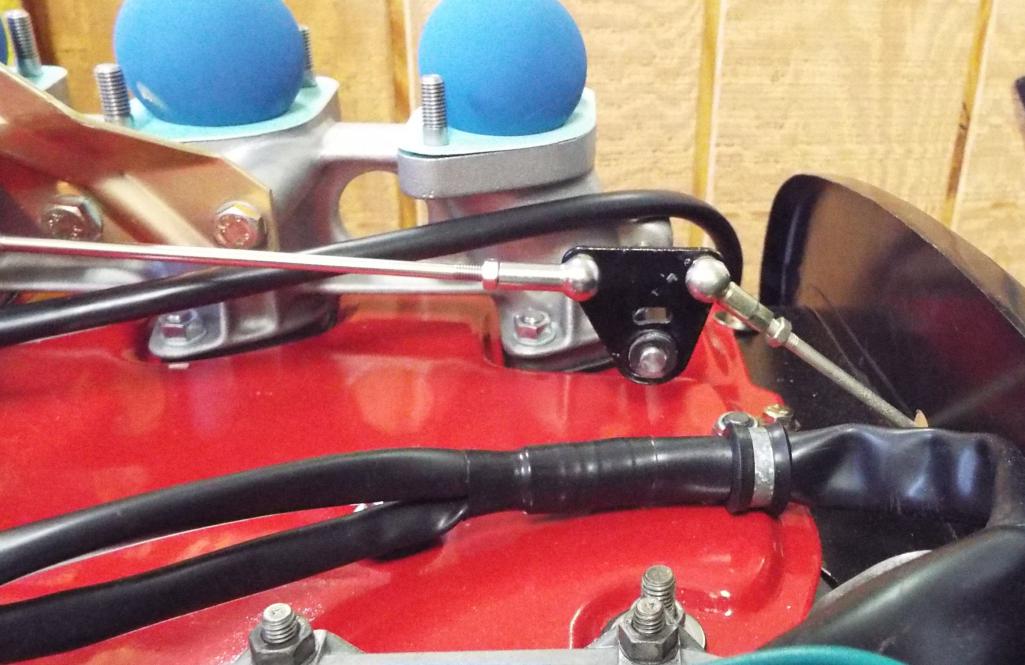 |
| Lucky9146 |
 Sep 10 2017, 11:34 AM Sep 10 2017, 11:34 AM
Post
#212
|
|
Always Wanted A Bigger Go Cart    Group: Members Posts: 1,676 Joined: 22-September 14 From: Poway California Member No.: 17,942 Region Association: Southern California 
|
From the trans reverse lever pivot
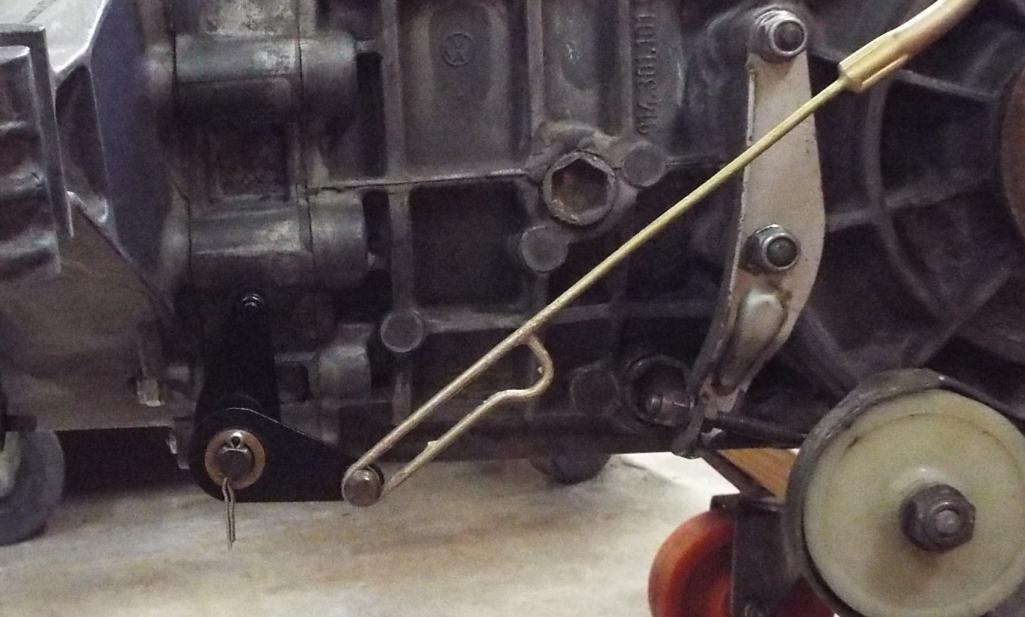 Get ready to actuate the mechanism by hand. Looking at the carb. note the closed position shown in the middle of this pic. Look at the bottom of the spring. 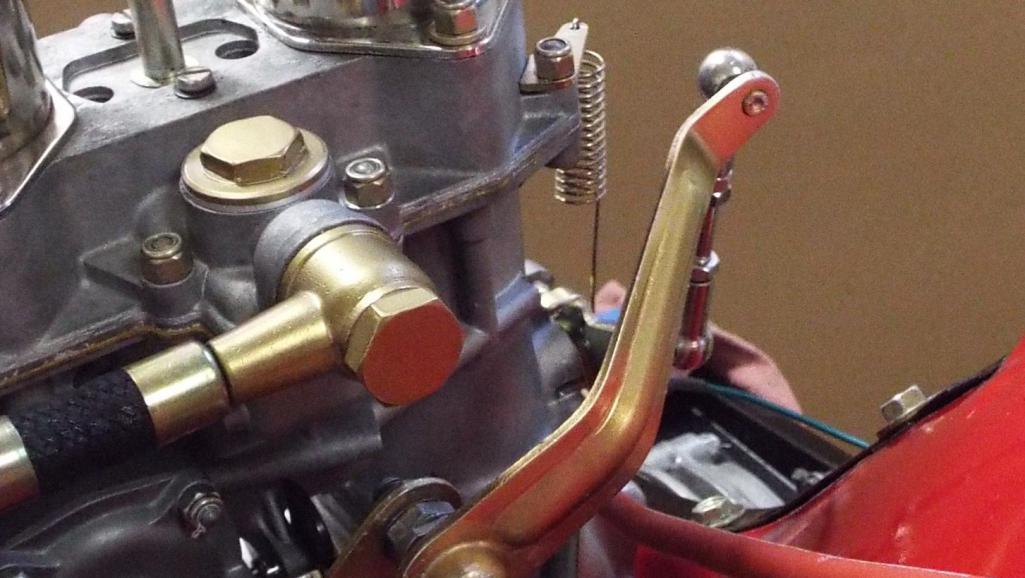 Now actuate the mechanism and make sure it rotates/ opens all the way down to the stop shown (this is the carb. main shaft rotation stop as it comes in contact with the carb housing). 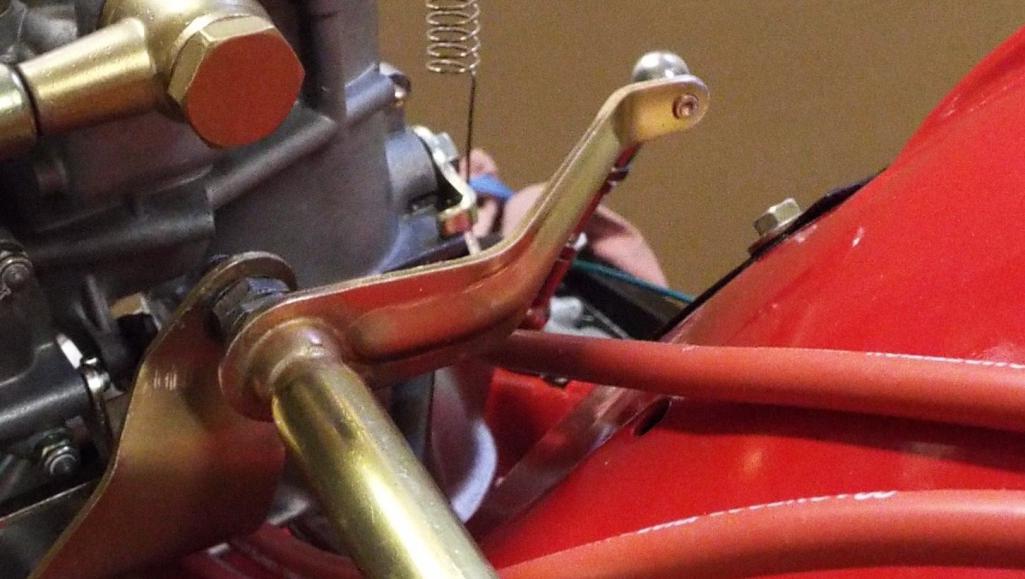 Should adjustment be necessary start here 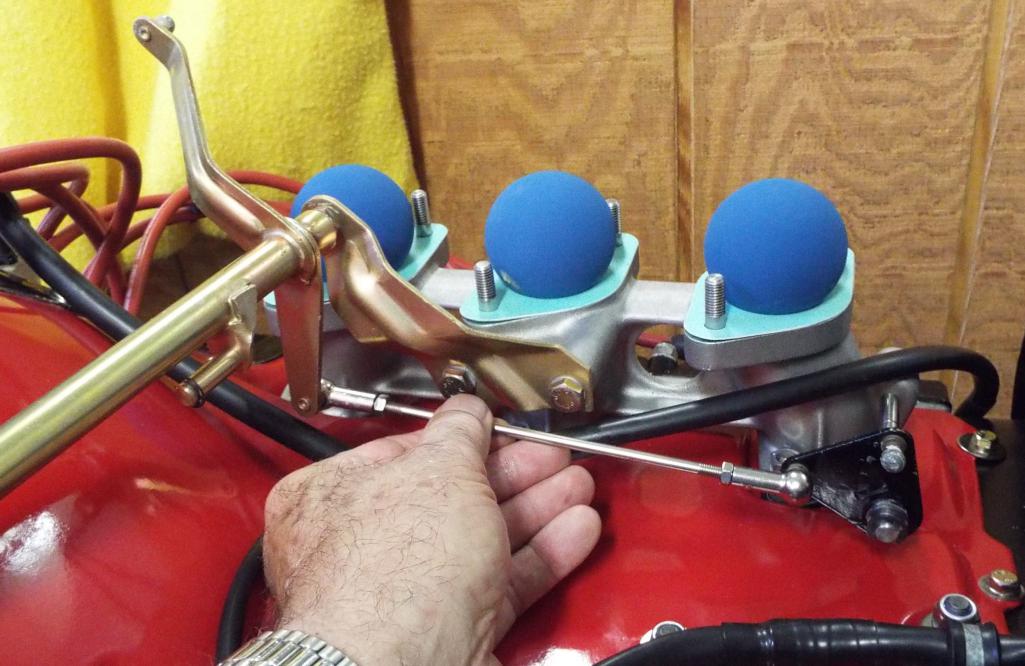 But disconnect the carb linkage first and then re –adjust the carb link to match. In my opinion this is very important. I still did not even have the left carb on at this point. 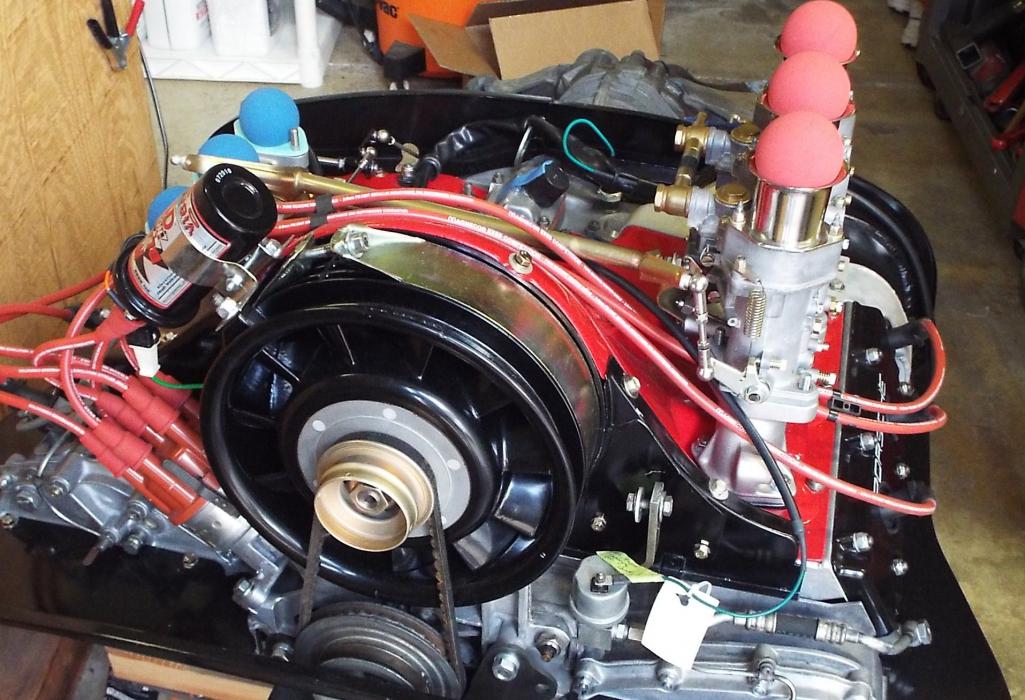 Now install and hook up the second carb and link. Adjust this carb. link to fit the already fully adjusted linkage and make sure it matches the ball height exactly before attaching. 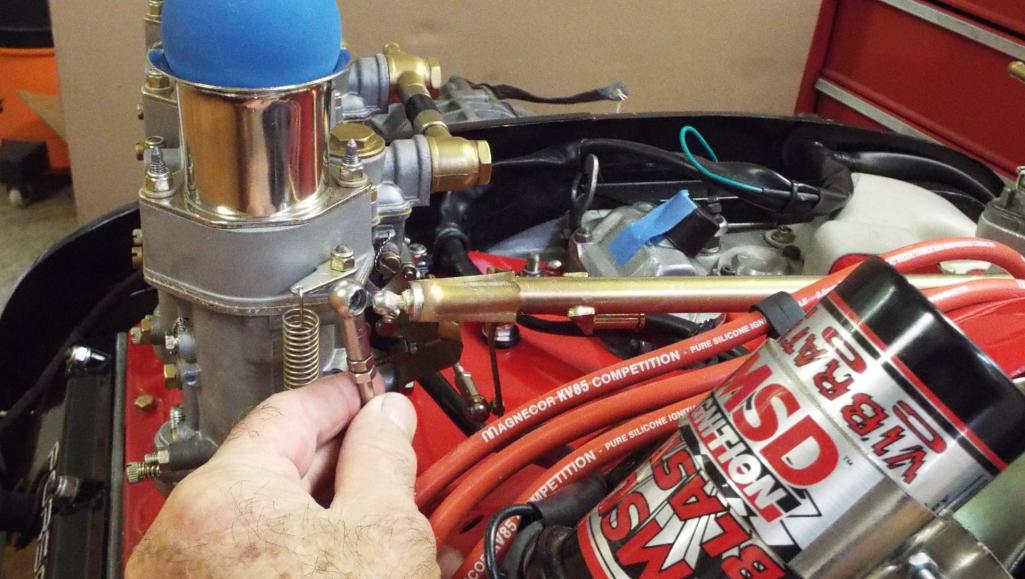 Actuate linkage from the trans again to make sure you have full travel on both carbs. to the full open stops. I would expect some minor adjustment to the carb arms but it should be set very close at this point. Done. Hope this helps someone. |
| bigkensteele |
 Sep 10 2017, 07:29 PM Sep 10 2017, 07:29 PM
Post
#213
|
|
Major Member     Group: Members Posts: 2,199 Joined: 30-August 04 From: Cincinnati, OH Member No.: 2,660 Region Association: South East States 
|
Done. Hope this helps someone. This helps me a great deal! I am pulling together a Weber setup, and the carbs I bought only came with the manifolds, the side plates and the rear pivot. Your latest posts have helped me identify what I still need as well as how to set it all up. Thanks!!! (IMG:style_emoticons/default/beerchug.gif) |
| gereed75 |
 Sep 10 2017, 08:07 PM Sep 10 2017, 08:07 PM
Post
#214
|
|
Senior Member    Group: Members Posts: 1,342 Joined: 19-March 13 From: Pittsburgh PA Member No.: 15,674 Region Association: North East States 
|
There is a ton of info on the Performance Oriented web site about setting up Webers, including info on "blue printing" the linkages.
|
| Lucky9146 |
 Sep 10 2017, 09:06 PM Sep 10 2017, 09:06 PM
Post
#215
|
|
Always Wanted A Bigger Go Cart    Group: Members Posts: 1,676 Joined: 22-September 14 From: Poway California Member No.: 17,942 Region Association: Southern California 
|
Done. Hope this helps someone. This helps me a great deal! I am pulling together a Weber setup, and the carbs I bought only came with the manifolds, the side plates and the rear pivot. Your latest posts have helped me identify what I still need as well as how to set it all up. Thanks!!! (IMG:style_emoticons/default/beerchug.gif) Glad I could help! I see the post right behind yours says Performance Oriented has a lot of info too so now we both learned something. I knew there was a lot of Carb info on the Performance Oriented site but not regarding the linkage on the engine itself. Thanks for checking in and good luck on your project! |
| Lucky9146 |
 Sep 10 2017, 09:11 PM Sep 10 2017, 09:11 PM
Post
#216
|
|
Always Wanted A Bigger Go Cart    Group: Members Posts: 1,676 Joined: 22-September 14 From: Poway California Member No.: 17,942 Region Association: Southern California 
|
There is a ton of info on the Performance Oriented web site about setting up Webers, including info on "blue printing" the linkages. Thanks gereed75 I should have known, that Paul is such a thorough guy. He did my carbs and I remember looking at a lot on his site on the time but obviously it didn't stick that he had linkage info. Appreciate the input and I will check it out. Thanks for weighing in. |
| Larmo63 |
 Sep 10 2017, 10:00 PM Sep 10 2017, 10:00 PM
Post
#217
|
|
Advanced Member     Group: Members Posts: 4,267 Joined: 3-March 14 From: San Clemente, Ca Member No.: 17,068 Region Association: Southern California |
I'm having issues with my linkage. We worked it a bit yesterday, but I'm not really happy with it. I like your set up better than mine. Mine is the Rich Johnson set, and, well, I like yours better.
|
| Lucky9146 |
 Sep 11 2017, 10:42 AM Sep 11 2017, 10:42 AM
Post
#218
|
|
Always Wanted A Bigger Go Cart    Group: Members Posts: 1,676 Joined: 22-September 14 From: Poway California Member No.: 17,942 Region Association: Southern California 
|
I'm having issues with my linkage. We worked it a bit yesterday, but I'm not really happy with it. I like your set up better than mine. Mine is the Rich Johnson set, and, well, I like yours better. Larmo63, Sorry to hear you are having linkage issues, that's a bummer! Thanks on my linkage set up! It came with the project and works, but I have no idea whose it is and can't recommend. My only complaint is that there is no flats on the rod ends like on my long linkage from the trans and that makes tightening each rod end a bit more difficult. I had to remove each segment to tighten each rod end stop nut because otherwise the rod end socket would turn as I tightened the stop nut and the rod end would end up twisted tight against the ball potentially causing binding. Hard to explain I guess. My long linkage is Porsche over the trans (right in picture) has the flats on the rod end making it much easier to tighten the stop nut. And on the left in picture has rod end with no flats and the stop nut. All the best in getting it sorted out! (IMG:style_emoticons/default/white914.jpg) 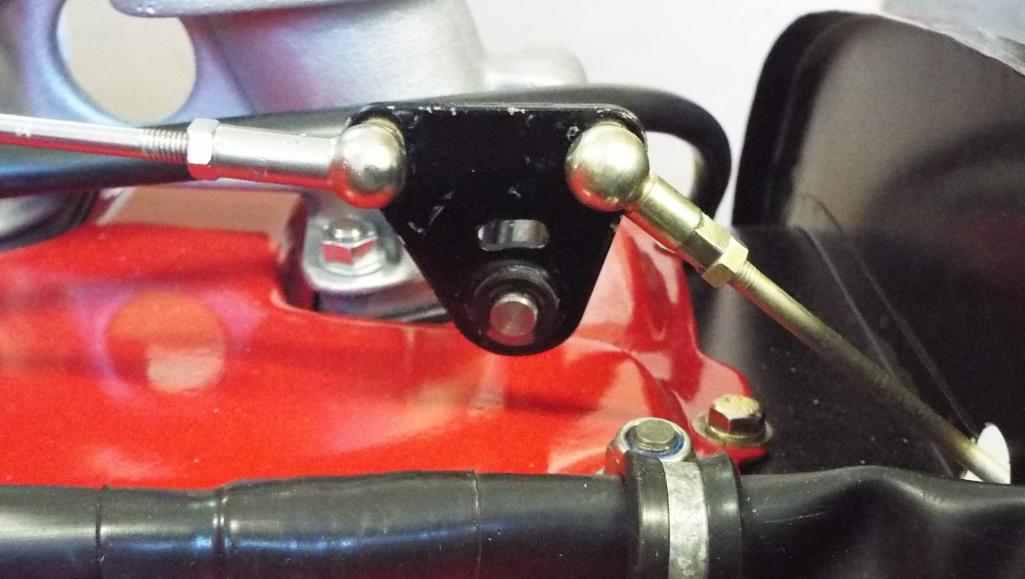 |
| Lucky9146 |
 Sep 11 2017, 11:09 PM Sep 11 2017, 11:09 PM
Post
#219
|
|
Always Wanted A Bigger Go Cart    Group: Members Posts: 1,676 Joined: 22-September 14 From: Poway California Member No.: 17,942 Region Association: Southern California 
|
Well almost to that point……………………
Rearranged the garage and cars today and got these two sweethearts closer together. They are just winking at each other right now and getting acquainted because this is probably the closest they have come yet! Should go in this week! My "install, hook up, and get it running" will not go as fast as Larmo63, who I have been following pretty close, because I think I have a few more “details” in front of me. At least I think I do because he had a running car, which I didn't, when he started his conversion. Got some install insight from him just tonight. Still will have to get one more braided line made from the tank to the engine and I have some extenuating circumstances with my emergency brake to figure out that I will cover on the thread. Plus there still are some dreaded electrical issues to deal with and that is certainly my least ability. On the electrical, I will have to do like a total refresh/re-learn because I had to side line this project from Dec 2015 to April 2017, and I have been only focused on the engine since April. Well I did order cool visors from Mikey. I also have a pretty good list with several other fun challenges. Plus I need to get with forrestkhaag and find out where he put all these fuel filters he keeps taking about. (IMG:style_emoticons/default/laugh.gif) Someone recently said they were 90% done with 90% to go. Yup kind of feels like that. My plan is to get the whole car up on stands once again when I get the engine in the mounts and then go from there. 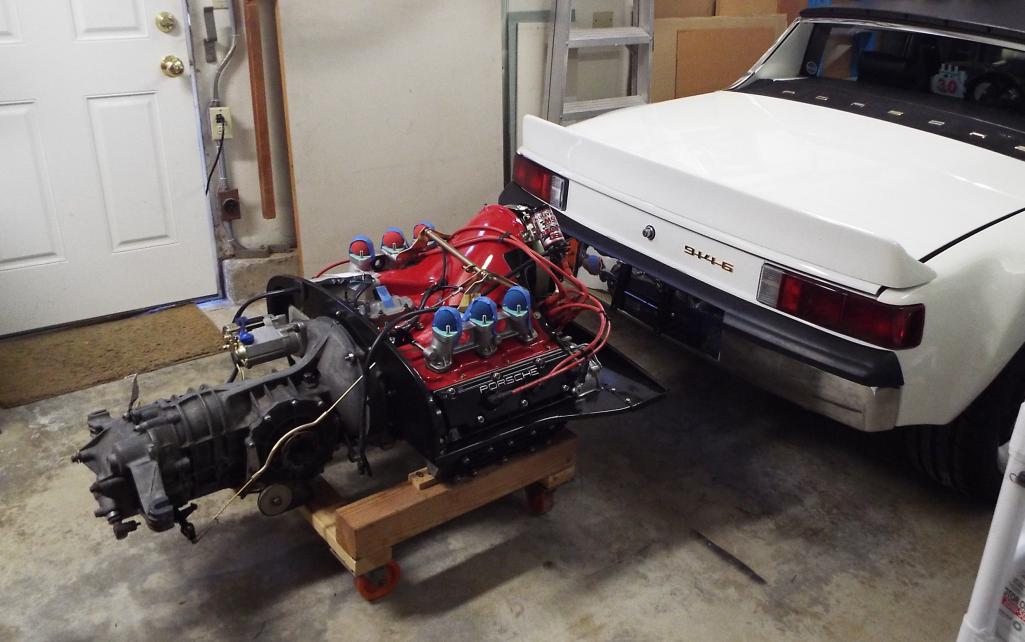 (IMG:style_emoticons/default/white914.jpg) |
| Retroracer |
 Sep 12 2017, 04:53 AM Sep 12 2017, 04:53 AM
Post
#220
|
|
Senior Member    Group: Members Posts: 637 Joined: 7-July 13 From: Bend OR Member No.: 16,100 Region Association: Pacific Northwest 
|
This is all great info for someone looking at a 6 conversion. One other point to watch out for - as I recently noticed this issue on my car, post-install - is to make sure the plug wires clear the throttle linkage on the left carb. Some of your pictures highlight the issue on the #4 wire. If you have super long wires then this is not an issue, but routing options can be limited on some sets.
Much easier to see if you're doing this with the engine out, also guiding / nailing down the plug wires is easier too. |
  |
1 User(s) are reading this topic (1 Guests and 0 Anonymous Users)
0 Members:

|
Lo-Fi Version | Time is now: 18th April 2025 - 04:42 AM |
Invision Power Board
v9.1.4 © 2025 IPS, Inc.


