|
|

|
Porsche, and the Porsche crest are registered trademarks of Dr. Ing. h.c. F. Porsche AG.
This site is not affiliated with Porsche in any way. Its only purpose is to provide an online forum for car enthusiasts. All other trademarks are property of their respective owners. |
|
|
  |
| Lucky9146 |
 Sep 26 2017, 12:07 PM Sep 26 2017, 12:07 PM
Post
#261
|
|
Always Wanted A Bigger Go Cart    Group: Members Posts: 1,676 Joined: 22-September 14 From: Poway California Member No.: 17,942 Region Association: Southern California 
|
Porschetub, How did you fabricate and attach the second bracket/boss to support the second bronze bushing on the shift linkage console? maf914,I used a scrap of 50x50x5 box section (RHS) cut and sectioned to make an angle,the reason I choose this was because the 5mm thinkness is basically correct to support the bush,I may have added an extra snap ring as a spacer but can't remember offhand. It takes a bit of setup time but wasn't too hard,as I had a longer rod made up I decided to add another uni-joint to further help rod alignment ,you need to cut a hole in the rear of the plastic cover for obvious reasons. I got the oil impregnated bushes from a seller on ebay. Hope that helps. Porschetub thanks for all the info I was wondering too how it was made and was glad maf914 asked. I am not sure who I know could make this but the piece is a really good idea. Yes, thank you Porschetub for the explanation. Chris at Tangerine Racing offers a kit that adds double bushings at the shift console, and Mark Henry and Brant have posted threads and photos of their custom double bushing installations. All good information. That's what I like about this site is you can learn something new almost every day. Never heard of Tangerine Racing. Went and looked at the kit. Wonder if you could buy just pieces? Also did not know that Mark and Brant had made them too. Thanks maf914 |
| porschetub |
 Sep 26 2017, 01:21 PM Sep 26 2017, 01:21 PM
Post
#262
|
|
Advanced Member     Group: Members Posts: 4,790 Joined: 25-July 15 From: New Zealand Member No.: 18,995 Region Association: None |
Porschetub, How did you fabricate and attach the second bracket/boss to support the second bronze bushing on the shift linkage console? maf914,I used a scrap of 50x50x5 box section (RHS) cut and sectioned to make an angle,the reason I choose this was because the 5mm thinkness is basically correct to support the bush,I may have added an extra snap ring as a spacer but can't remember offhand. It takes a bit of setup time but wasn't too hard,as I had a longer rod made up I decided to add another uni-joint to further help rod alignment ,you need to cut a hole in the rear of the plastic cover for obvious reasons. I got the oil impregnated bushes from a seller on ebay. Hope that helps. Porschetub thanks for all the info I was wondering too how it was made and was glad maf914 asked. I am not sure who I know could make this but the piece is a really good idea. Yes, thank you Porschetub for the explanation. Chris at Tangerine Racing offers a kit that adds double bushings at the shift console, and Mark Henry and Brant have posted threads and photos of their custom double bushing installations. All good information. That's what I like about this site is you can learn something new almost every day. Never heard of Tangerine Racing. Went and looked at the kit. Wonder if you could buy just pieces? Also did not know that Mark and Brant had made them too. Thanks maf914 I did ask Chris if he would sell me the dual bush console casting ,he replied promply and politely saying the part wasn't sold on its own. I have his firewall bush and already had a converted shift shaft reason for not needing the whole kit. |
| ACP911 |
 Sep 26 2017, 01:46 PM Sep 26 2017, 01:46 PM
Post
#263
|
|
Newbie  Group: Members Posts: 1 Joined: 26-September 17 From: POWAY Member No.: 21,461 Region Association: Southern California |
Hello 914/6 Gurus and LUCKY...
Well this thread is very impressive and for most of you but couple of individuals, you are experiencing this through this thread, for the very very lucky few, the original owner from time to time and also ME, we have the opportunity to see his amazing work in person and let me tell you, WOW is an understatement. Very meticulous, methodical, well planned and must admit, excessively planned at times, but that is what makes him who he is...... Well done my friend... All I can say is, I am thankful to have met you and get to experience your work first hand. Can't wait for the ride in this beauty.... GG w/85 M491 (IMG:style_emoticons/default/bye1.gif) (IMG:style_emoticons/default/beerchug.gif) |
| porschetub |
 Sep 26 2017, 07:40 PM Sep 26 2017, 07:40 PM
Post
#264
|
|
Advanced Member     Group: Members Posts: 4,790 Joined: 25-July 15 From: New Zealand Member No.: 18,995 Region Association: None |
Porschetub, How did you fabricate and attach the second bracket/boss to support the second bronze bushing on the shift linkage console? maf914,I used a scrap of 50x50x5 box section (RHS) cut and sectioned to make an angle,the reason I choose this was because the 5mm thinkness is basically correct to support the bush,I may have added an extra snap ring as a spacer but can't remember offhand. It takes a bit of setup time but wasn't too hard,as I had a longer rod made up I decided to add another uni-joint to further help rod alignment ,you need to cut a hole in the rear of the plastic cover for obvious reasons. I got the oil impregnated bushes from a seller on ebay. Hope that helps. Porschetub thanks for all the info I was wondering too how it was made and was glad maf914 asked. I am not sure who I know could make this but the piece is a really good idea. Oh come on Jim what you have done and achieved with this conversion you would ''knock it over" easy,it seems to really tighten things up and and provide a better reference to the shift gate if all is adjusted properly....key point. Go for it (IMG:style_emoticons/default/aktion035.gif) . |
| maf914 |
 Sep 27 2017, 07:47 AM Sep 27 2017, 07:47 AM
Post
#265
|
|
Not a Guru!     Group: Members Posts: 3,049 Joined: 30-April 03 From: Central Florida Member No.: 632 Region Association: None 
|
Here is a link to the thread where Porschetub, Mark and Brant provided photos of their double bushing linkage installations:
http://www.914world.com/bbs2/index.php?sho...&hl=linkage And here is a photo of the linkage kit that J-West offered in the past: Attached thumbnail(s) 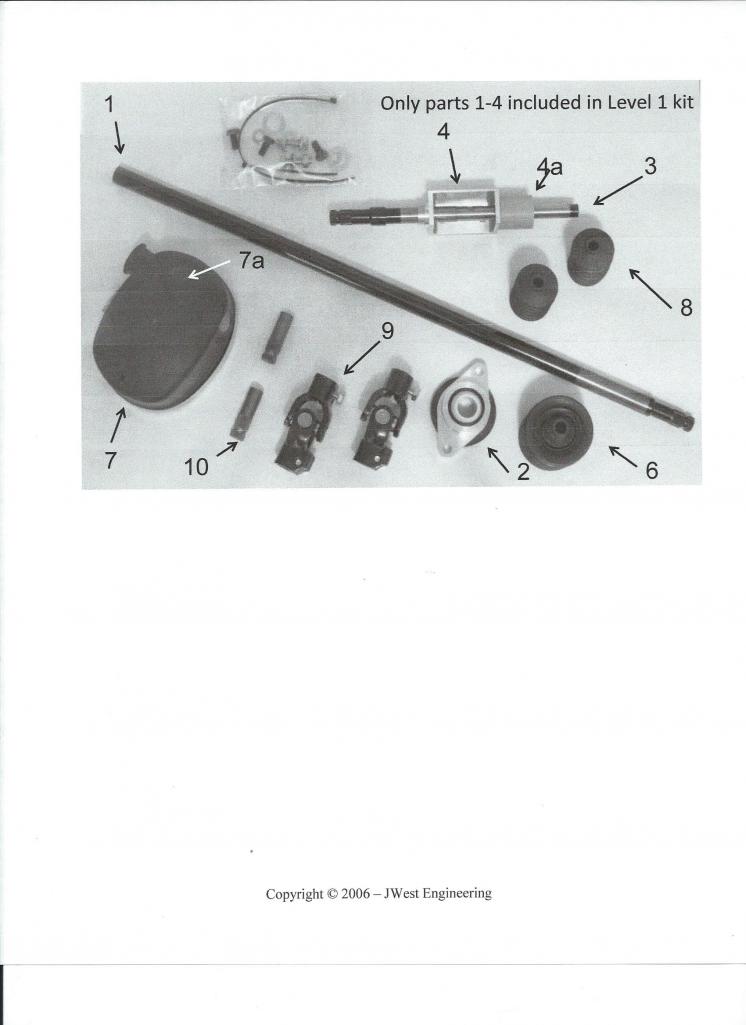
|
| Lucky9146 |
 Sep 27 2017, 08:14 AM Sep 27 2017, 08:14 AM
Post
#266
|
|
Always Wanted A Bigger Go Cart    Group: Members Posts: 1,676 Joined: 22-September 14 From: Poway California Member No.: 17,942 Region Association: Southern California 
|
Here is a link to the thread where Porschetub, Mark and Brant provided photos of their double bushing linkage installations: http://www.914world.com/bbs2/index.php?sho...&hl=linkage And here is a photo of the linkage kit that J-West offered in the past: Very helpful and thanks for posting in my thread much appreciated! (IMG:style_emoticons/default/beerchug.gif) I will look further into double bushing sure looks much more robust and thanks to Porschetub for raising the issue. (IMG:style_emoticons/default/beerchug.gif) Lots of good help here. |
| Lucky9146 |
 Sep 27 2017, 08:27 AM Sep 27 2017, 08:27 AM
Post
#267
|
|
Always Wanted A Bigger Go Cart    Group: Members Posts: 1,676 Joined: 22-September 14 From: Poway California Member No.: 17,942 Region Association: Southern California 
|
Have been close to installing my rear axle shafts to the tranny and was awaiting the gaskets when this timely thread appeared and proved quite helpful to me and I am sure the thread originator! Perry Keihl specifically addressed some of my questions. (IMG:style_emoticons/default/beerchug.gif) Thanks!
Who knew? "Schnoor washers" learning all the time (IMG:style_emoticons/default/idea.gif) (IMG:style_emoticons/default/type.gif) Thought it would be good to link in here. http://www.914world.com/bbs2/index.php?showtopic=316867 |
| Lucky9146 |
 Sep 27 2017, 11:31 PM Sep 27 2017, 11:31 PM
Post
#268
|
|
Always Wanted A Bigger Go Cart    Group: Members Posts: 1,676 Joined: 22-September 14 From: Poway California Member No.: 17,942 Region Association: Southern California 
|
Hello 914/6 Gurus and LUCKY... Well this thread is very impressive and for most of you but couple of individuals, you are experiencing this through this thread, for the very very lucky few, the original owner from time to time and also ME, we have the opportunity to see his amazing work in person and let me tell you, WOW is an understatement. Very meticulous, methodical, well planned and must admit, excessively planned at times, but that is what makes him who he is...... Well done my friend... All I can say is, I am thankful to have met you and get to experience your work first hand. Can't wait for the ride in this beauty.... GG w/85 M491 (IMG:style_emoticons/default/bye1.gif) (IMG:style_emoticons/default/beerchug.gif) Thanks ACP911 for looking in and you will get the first ride and then YOU will want a 914-6 guaranteed. (IMG:style_emoticons/default/slap.gif) Also since you signed up on World you will learn what a great site this is because of the people and support (IMG:style_emoticons/default/first.gif) (IMG:style_emoticons/default/beerchug.gif) |
| Lucky9146 |
 Sep 28 2017, 04:10 PM Sep 28 2017, 04:10 PM
Post
#269
|
|
Always Wanted A Bigger Go Cart    Group: Members Posts: 1,676 Joined: 22-September 14 From: Poway California Member No.: 17,942 Region Association: Southern California 
|
One last point on the work I had done back in Oct 2015 in the interior post #248 above.
Did you notice the long next to the driver seat? Since I will have a center pull E-brake I went ahead and took that scallop out of the long next to the driver seat where the E-brake lever originally was. Now nice and straight and clean just like the passenger side. But upon finally looking at the interior again I found that I have lots yet to do in there. I also found vinyl that I had installed on that cross rail hadn’t stuck well and was curling up and peeling off so will have to re-do that too, as well as finish installing all the rest of the vinyl, and carpet, and trim, and, and, and…………………………… 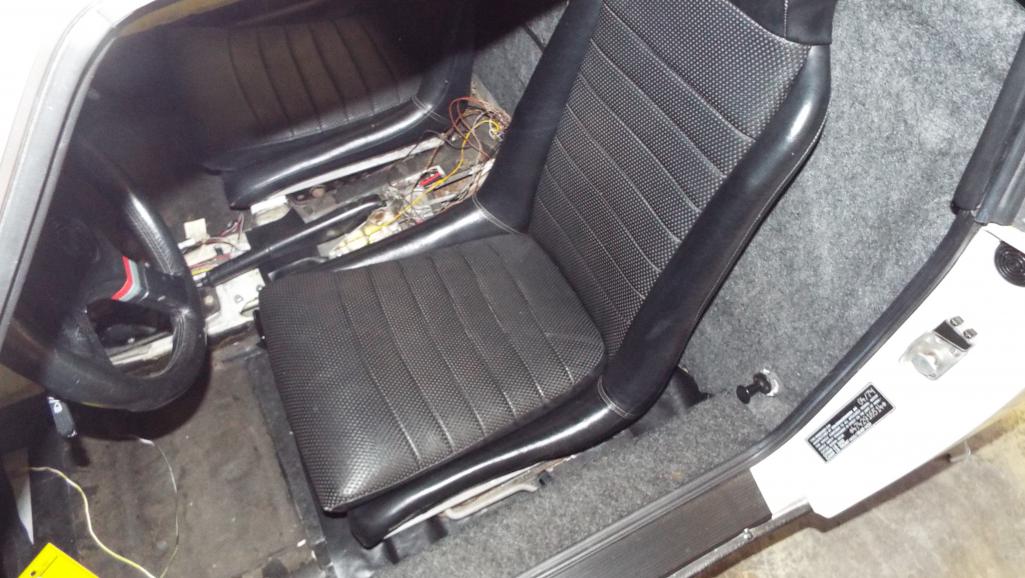 Back to the engine, got some parts! (IMG:style_emoticons/default/white914.jpg) |
| Lucky9146 |
 Sep 29 2017, 09:37 AM Sep 29 2017, 09:37 AM
Post
#270
|
|
Always Wanted A Bigger Go Cart    Group: Members Posts: 1,676 Joined: 22-September 14 From: Poway California Member No.: 17,942 Region Association: Southern California 
|
Hooked up my engine wiring the other night, took like 2 minutes. (IMG:style_emoticons/default/smile.gif)
That’s because when I did the Perry Keihl wiring harness with his super cool 14 pin connector for the chassis wiring I got the idea (IMG:style_emoticons/default/idea.gif) to make things easier when I did install the engine so I spent the time to add my own quick connectors. Yes, those are indeed trailer type pin connectors for my MSD ignition wires. Took a bit of extra planning but should engine removal be required in the future it’s a snap to disconnect. Could not find a 6 pin so used a 4 pin and 2 pin. (IMG:style_emoticons/default/white914.jpg) 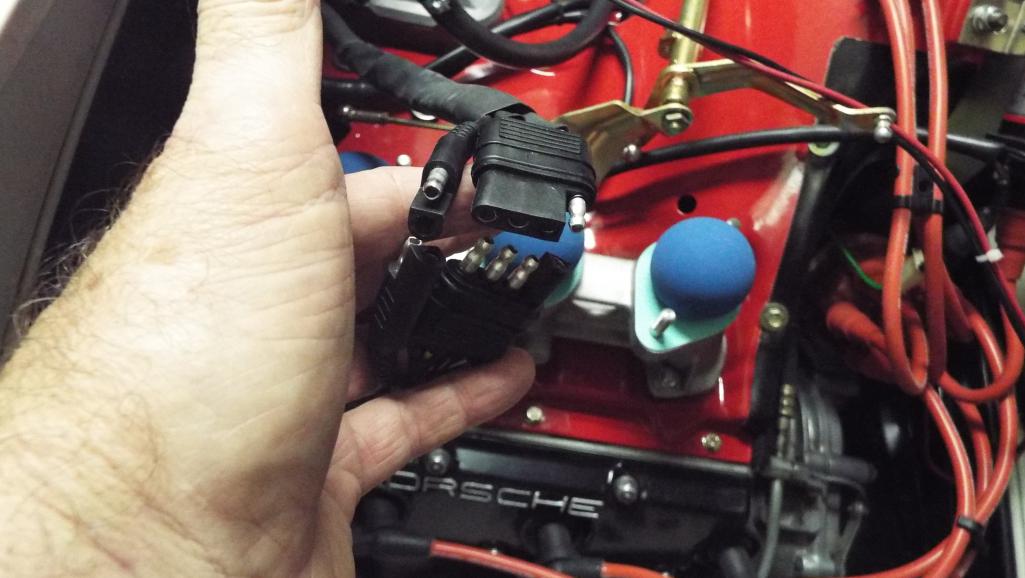 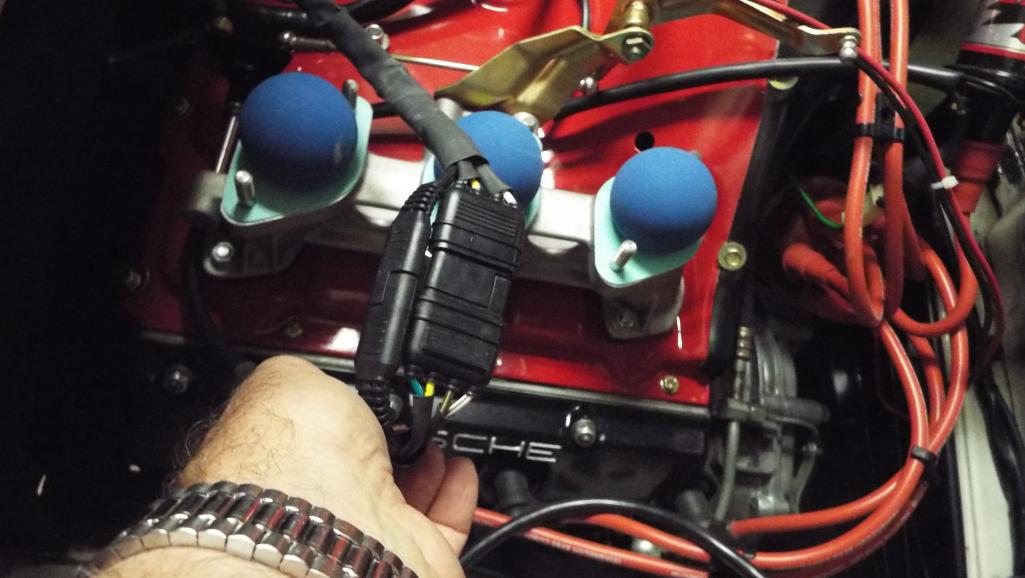 |
| whitetwinturbo |
 Sep 29 2017, 11:08 AM Sep 29 2017, 11:08 AM
Post
#271
|
|
Honey, does this wing make my ass look fat?    Group: Members Posts: 1,391 Joined: 22-October 11 From: Newport Beach/Kalefornya/USA Member No.: 13,704 Region Association: Southern California |
...........way cool connector (IMG:style_emoticons/default/biggrin.gif)
|
| jd74914 |
 Sep 29 2017, 11:14 AM Sep 29 2017, 11:14 AM
Post
#272
|
|
Its alive     Group: Members Posts: 4,841 Joined: 16-February 04 From: CT Member No.: 1,659 Region Association: North East States |
Quick disconnects are always nice. (IMG:style_emoticons/default/smile.gif)
I don't mean to rain on your parade, but I've never had any positive experiences with flat trailer connectors and it seems like a shame to use them on a build of this quality. They don't really positively lock and are pretty easy to damage. The might work OK for you, but if they don't consider switching to something like a 6 pin Delphi Weatherpack connector. They're inexpensive (~$5-10 for both sides, the terminals, and seals), don't require a super special crimper (very important if you're doing just one), and have a nice positive locking catch so the can't come loose with vibration. http://www.ebay.com/itm/Delphi-GM-6-Pin-We...A-/230864494085 |
| mepstein |
 Sep 29 2017, 11:20 AM Sep 29 2017, 11:20 AM
Post
#273
|
|
914-6 GT in waiting                Group: Members Posts: 19,842 Joined: 19-September 09 From: Landenberg, PA/Wilmington, DE Member No.: 10,825 Region Association: MidAtlantic Region 
|
Lucky - I like the idea, a lot.
Tony/cracker’s setup throughout his car. Awesome Attached thumbnail(s) 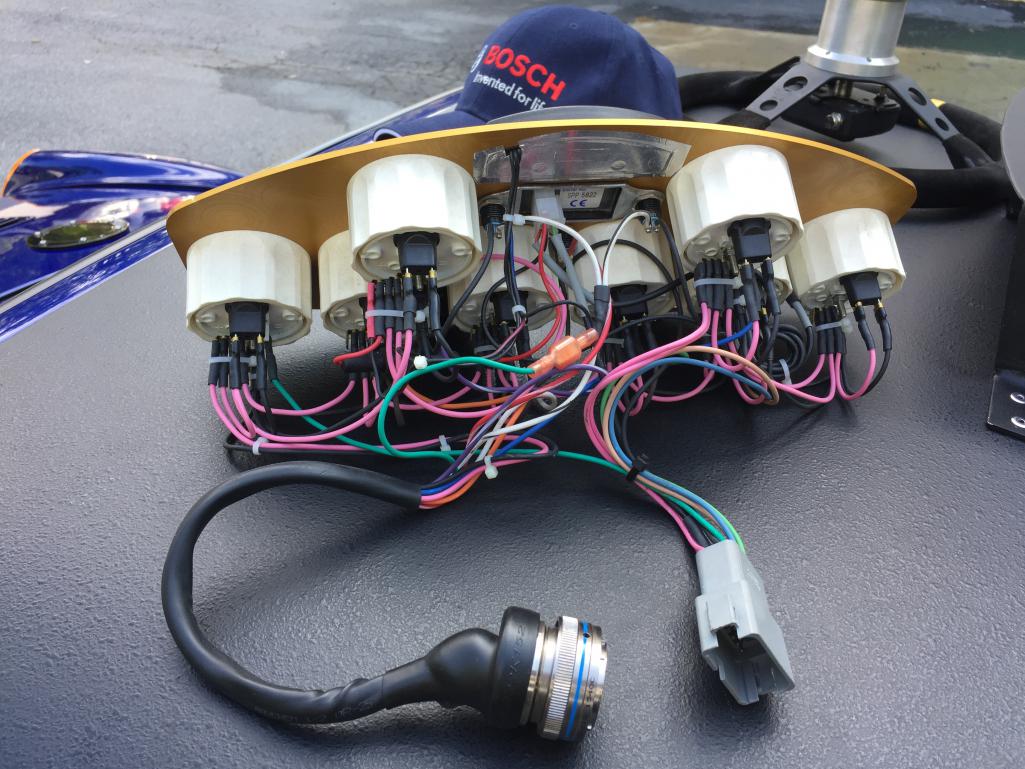
|
| Lucky9146 |
 Sep 29 2017, 12:43 PM Sep 29 2017, 12:43 PM
Post
#274
|
|
Always Wanted A Bigger Go Cart    Group: Members Posts: 1,676 Joined: 22-September 14 From: Poway California Member No.: 17,942 Region Association: Southern California 
|
Quick disconnects are always nice. (IMG:style_emoticons/default/smile.gif) I don't mean to rain on your parade, but I've never had any positive experiences with flat trailer connectors and it seems like a shame to use them on a build of this quality. They don't really positively lock and are pretty easy to damage. The might work OK for you, but if they don't consider switching to something like a 6 pin Delphi Weatherpack connector. They're inexpensive (~$5-10 for both sides, the terminals, and seals), don't require a super special crimper (very important if you're doing just one), and have a nice positive locking catch so the can't come loose with vibration. http://www.ebay.com/itm/Delphi-GM-6-Pin-We...A-/230864494085 jd74914 Thanks for the link and suggestion (IMG:style_emoticons/default/agree.gif) My parade is fine just a sprinkle here. (IMG:style_emoticons/default/biggrin.gif) Thanks also for the comment on my build! Much appreciated. (IMG:style_emoticons/default/beerchug.gif) 2 years ago when I set that all up I have to admit I did not look real hard for a 6 pin mostly because I was looking at trailer connectors and went for it. Spent hours in the engine bay soldering it all in, when it was easy, with no engine installed. And a lot of time on the harness soldering that end on when it was right in front of me. , It is always good to find out there are perfect products out there even though a little late for me (IMG:style_emoticons/default/headbang.gif) Maybe someone else coming along can use the information you provided and who knows down the road if my engine comes back out a Delphi would go in. My connector will live tucked up under the lip aft of the engine lid opening where they should be out of sight unless you lean over to look. (IMG:style_emoticons/default/white914.jpg) |
| moparrob |
 Sep 29 2017, 05:10 PM Sep 29 2017, 05:10 PM
Post
#275
|
|
Senior Member    Group: Members Posts: 646 Joined: 27-April 10 From: Los Angeles Member No.: 11,663 Region Association: None |
Jim, just think of all the amazing information you have learned during the process of this build – which you can hopefully apply when I send you my next car for you to build for me. (IMG:style_emoticons/default/biggrin.gif) (IMG:style_emoticons/default/beerchug.gif)
|
| Larmo63 |
 Sep 29 2017, 05:18 PM Sep 29 2017, 05:18 PM
Post
#276
|
|
Advanced Member     Group: Members Posts: 4,267 Joined: 3-March 14 From: San Clemente, Ca Member No.: 17,068 Region Association: Southern California |
You could use a little safety wire on the trailer plug....?
Suspenders AND a belt? |
| Lucky9146 |
 Sep 29 2017, 06:54 PM Sep 29 2017, 06:54 PM
Post
#277
|
|
Always Wanted A Bigger Go Cart    Group: Members Posts: 1,676 Joined: 22-September 14 From: Poway California Member No.: 17,942 Region Association: Southern California 
|
Jim, just think of all the amazing information you have learned during the process of this build – which you can hopefully apply when I send you my next car for you to build for me. (IMG:style_emoticons/default/biggrin.gif) (IMG:style_emoticons/default/beerchug.gif) Cool I was hoping for a turbo next! (IMG:style_emoticons/default/idea.gif) (IMG:style_emoticons/default/cool.gif) (IMG:style_emoticons/default/beerchug.gif) |
| Lucky9146 |
 Sep 29 2017, 06:58 PM Sep 29 2017, 06:58 PM
Post
#278
|
|
Always Wanted A Bigger Go Cart    Group: Members Posts: 1,676 Joined: 22-September 14 From: Poway California Member No.: 17,942 Region Association: Southern California 
|
You could use a little safety wire on the trailer plug....? Suspenders AND a belt? Done! and thanks for the call the other nite good info (IMG:style_emoticons/default/chatsmiley.gif) |
| Lucky9146 |
 Sep 30 2017, 02:21 PM Sep 30 2017, 02:21 PM
Post
#279
|
|
Always Wanted A Bigger Go Cart    Group: Members Posts: 1,676 Joined: 22-September 14 From: Poway California Member No.: 17,942 Region Association: Southern California 
|
Who knew? (IMG:style_emoticons/default/shades.gif)
Have been stopped now on right hand carb install now for a few days. Need to fashion a new fuel line in the engine compartment and have been looking at options and rounding up materials. PO ran an AN Alum hard line from the gas tank all the way back to the engine with good bends and connections, it looked great! He couldn’t have known it would interfere with the rain hat which sucks because it looked like such a clean direct install! (IMG:style_emoticons/default/first.gif) Then when I was doing MY work in the engine compartment I never even gave it a second thought, and on top of that I even ty-wrapped wires to the line, as it certainly looked as though it was out of the way. (IMG:style_emoticons/default/confused24.gif) Have to admit I do like the look of hard lines but Larmo63 makes a good point about the flexibility of his blue fuel lines. (IMG:style_emoticons/default/idea.gif) Will post the follow on solution hopefully soon. (IMG:style_emoticons/default/white914.jpg) All looked good till the engine went in. 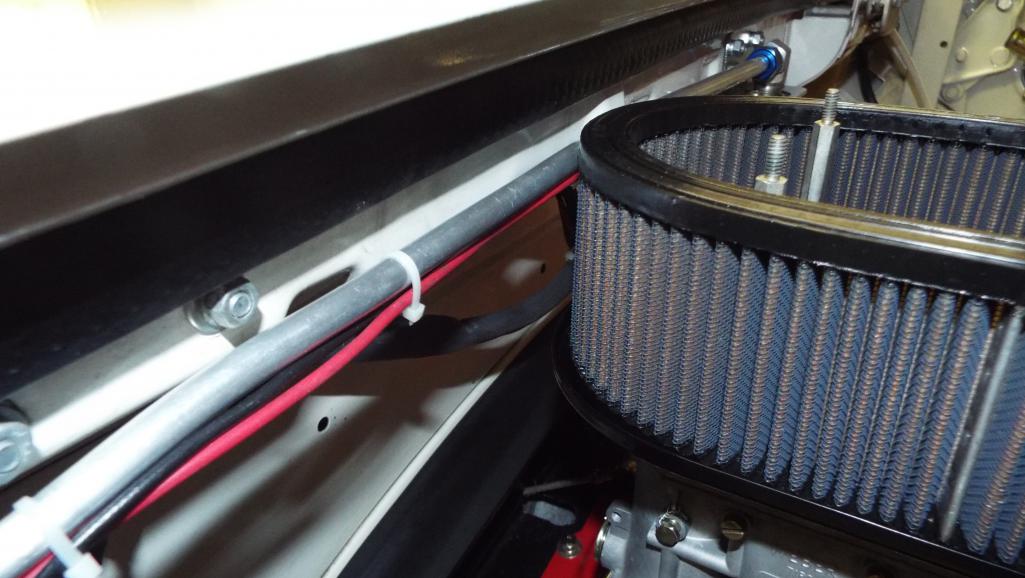 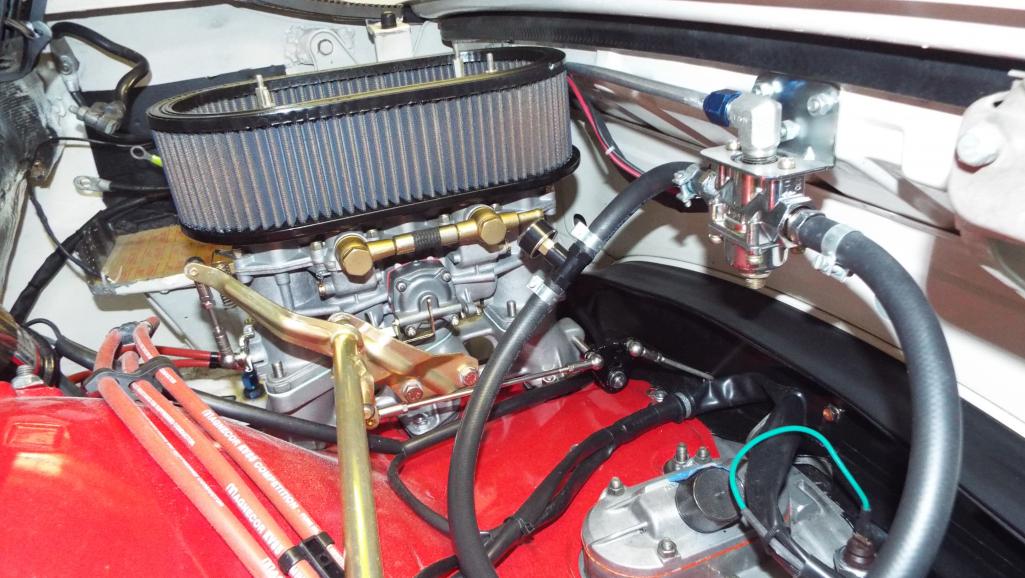 |
| Larmo63 |
 Sep 30 2017, 02:38 PM Sep 30 2017, 02:38 PM
Post
#280
|
|
Advanced Member     Group: Members Posts: 4,267 Joined: 3-March 14 From: San Clemente, Ca Member No.: 17,068 Region Association: Southern California |
It seems as if you could bend it to go under the rain hat pretty easily???
|
  |
1 User(s) are reading this topic (1 Guests and 0 Anonymous Users)
0 Members:

|
Lo-Fi Version | Time is now: 19th April 2025 - 07:47 AM |
Invision Power Board
v9.1.4 © 2025 IPS, Inc.


