|
|

|
Porsche, and the Porsche crest are registered trademarks of Dr. Ing. h.c. F. Porsche AG.
This site is not affiliated with Porsche in any way. Its only purpose is to provide an online forum for car enthusiasts. All other trademarks are property of their respective owners. |
|
|
  |
| Superhawk996 |
 Aug 19 2020, 09:53 AM Aug 19 2020, 09:53 AM
Post
#141
|
|
914 Guru      Group: Members Posts: 6,907 Joined: 25-August 18 From: Woods of N. Idaho Member No.: 22,428 Region Association: Galt's Gulch 
|
I continue to be amazed at how nice some of these cars look at 20ft as shown on page 1 but how rotted they really are.
Mine was exactly the same. Great fab work (IMG:style_emoticons/default/welder.gif) (IMG:style_emoticons/default/aktion035.gif) |
| mbseto |
 Aug 19 2020, 10:58 PM Aug 19 2020, 10:58 PM
Post
#142
|
|
Senior Member    Group: Members Posts: 1,257 Joined: 6-August 14 From: Cincy Member No.: 17,743 Region Association: North East States |
@Superhawk996 - I was specifically looking for one where the welding would all be inside and not visible. I got that, and I got it in spades!
|
| mbseto |
 Aug 19 2020, 11:14 PM Aug 19 2020, 11:14 PM
Post
#143
|
|
Senior Member    Group: Members Posts: 1,257 Joined: 6-August 14 From: Cincy Member No.: 17,743 Region Association: North East States |
Does the stump have auto shrink? @djway , funny you should ask... This is the inner layer, nested in the outer layer that I made above. You can see the angle isn't quite right. These pieces that angle both upward and inward - I tend to underestimate it in the layout. Of course I probably shouldn't rely on estimation at all... Anyway, a little shrinking might save it... 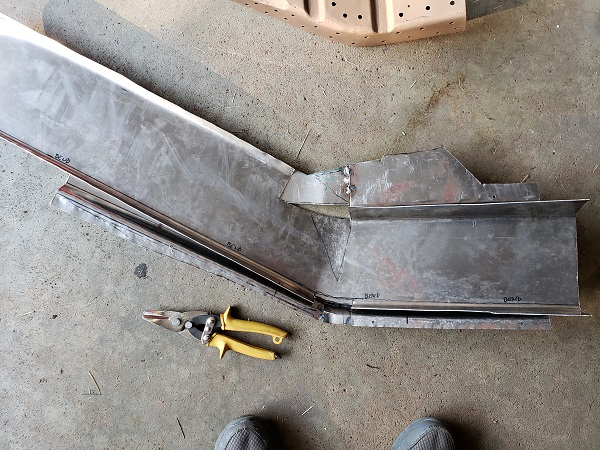 Grabbed the tucking fork and put one good tuck in the bottom of the elbow. Threw it on the stump and hammered it out. 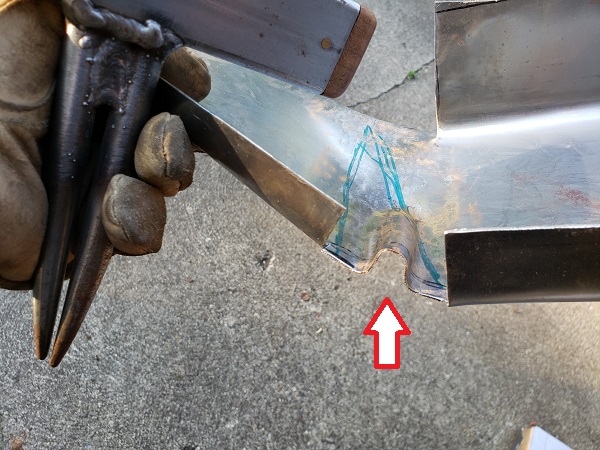 Just about right - a better man might've chased out the wrinkles with a good planishing. This is buried so many layers deep in the long that I am not worried about it. 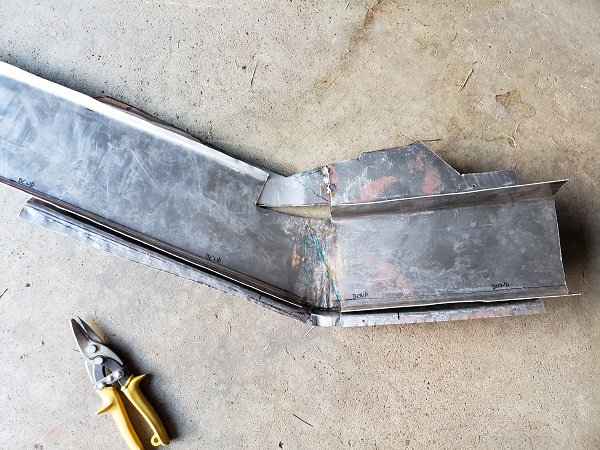 These are the two layers side-by-side. Cut a little piece to make that inside corner. 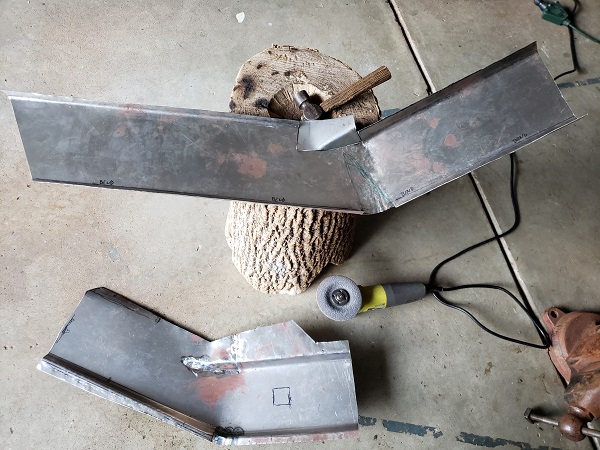 |
| Superhawk996 |
 Aug 20 2020, 07:36 AM Aug 20 2020, 07:36 AM
Post
#144
|
|
914 Guru      Group: Members Posts: 6,907 Joined: 25-August 18 From: Woods of N. Idaho Member No.: 22,428 Region Association: Galt's Gulch 
|
Always love seeing a shrinking stump.
These are so effective it’s stupid! Someday I hope to have an Oak Stump about 4 foot diameter with various radius bowls within it! No room right now . . . Someday! |
| RAB914 |
 Aug 20 2020, 09:48 AM Aug 20 2020, 09:48 AM
Post
#145
|
|
Member   Group: Members Posts: 55 Joined: 8-October 07 From: CANADA Member No.: 8,201 |
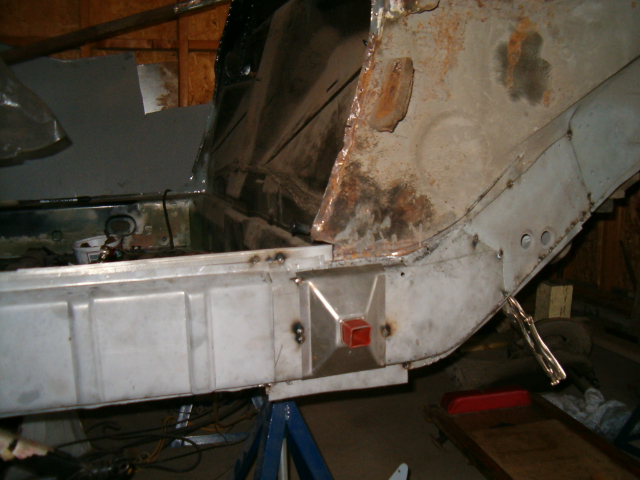
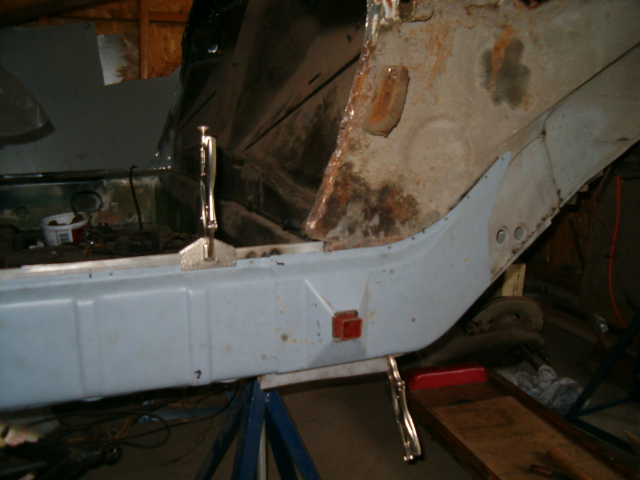
i have use a clam shell for make this part
  |
| djway |
 Aug 20 2020, 06:44 PM Aug 20 2020, 06:44 PM
Post
#146
|
|
Senior Member    Group: Members Posts: 787 Joined: 16-October 15 From: Riverside Member No.: 19,266 Region Association: Southern California |
Does the stump have auto shrink? @djway , funny you should ask... This is the inner layer, nested in the outer layer that I made above. You can see the angle isn't quite right. These pieces that angle both upward and inward - I tend to underestimate it in the layout. Of course I probably shouldn't rely on estimation at all... Anyway, a little shrinking might save it...  Grabbed the tucking fork and put one good tuck in the bottom of the elbow. Threw it on the stump and hammered it out.  Just about right - a better man might've chased out the wrinkles with a good planishing. This is buried so many layers deep in the long that I am not worried about it.  These are the two layers side-by-side. Cut a little piece to make that inside corner.  Cool. Ever since I saw my first Stump Shrink video I have really wanted one, and some hammers and some.......... (IMG:style_emoticons/default/smile.gif) Great work |
| bbrock |
 Aug 20 2020, 06:50 PM Aug 20 2020, 06:50 PM
Post
#147
|
|
914 Guru      Group: Members Posts: 5,269 Joined: 17-February 17 From: Montana Member No.: 20,845 Region Association: Rocky Mountains 
|
 If I'm not mistaken, that's a fine piece of ash you have there. (IMG:style_emoticons/default/wub.gif) |
| mbseto |
 Dec 14 2020, 11:59 AM Dec 14 2020, 11:59 AM
Post
#148
|
|
Senior Member    Group: Members Posts: 1,257 Joined: 6-August 14 From: Cincy Member No.: 17,743 Region Association: North East States |
If I'm not mistaken, that's a fine piece of ash you have there. (IMG:style_emoticons/default/wub.gif) @bbrock exactly right and mum's the word! Since the emerald ash borer appeared around here some years ago, people will pay you to haul it away. 2nd best type of firewood you can get. |
| mbseto |
 Dec 14 2020, 12:02 PM Dec 14 2020, 12:02 PM
Post
#149
|
|
Senior Member    Group: Members Posts: 1,257 Joined: 6-August 14 From: Cincy Member No.: 17,743 Region Association: North East States |
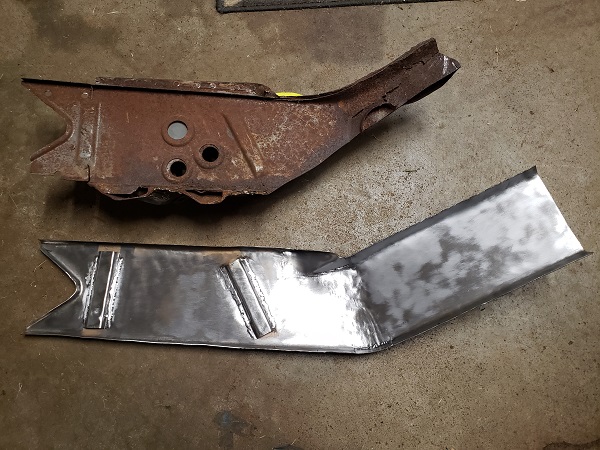
Finished inner long:
 |
| mbseto |
 Dec 14 2020, 12:05 PM Dec 14 2020, 12:05 PM
Post
#150
|
|
Senior Member    Group: Members Posts: 1,257 Joined: 6-August 14 From: Cincy Member No.: 17,743 Region Association: North East States |
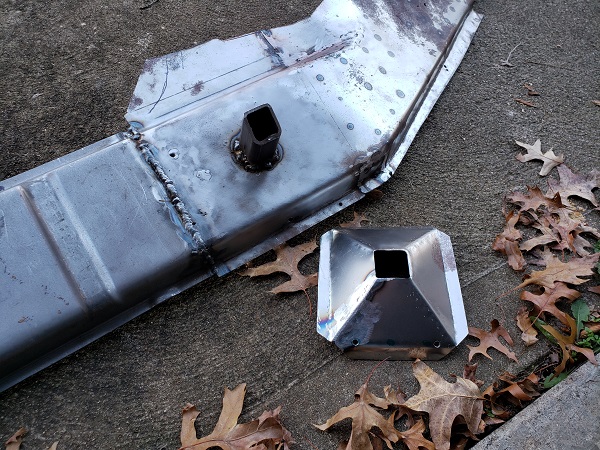
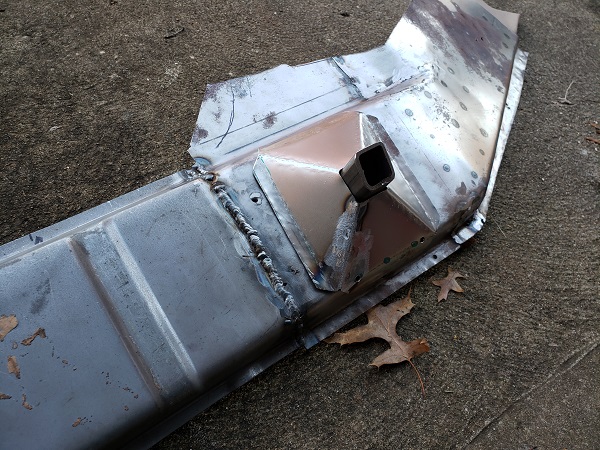
Here's the jack point. This is just fitment - I'm playing catchup here and I don't think I got pics of these primed on the insides for welding, but you know the drill. Rest assured, I am trying my best to protect this baby from the inside.
  |
| mbseto |
 Dec 14 2020, 12:26 PM Dec 14 2020, 12:26 PM
Post
#151
|
|
Senior Member    Group: Members Posts: 1,257 Joined: 6-August 14 From: Cincy Member No.: 17,743 Region Association: North East States |
After doing the passenger side I thought I'd take some additional care on the driver's side to cut carefully and strategically to make the reassembly go easier. However, after carefully cutting out the driver's side sill, it turned out to be quite a patchwork of PO reconstruction just like the rest of this long. Sort of a quiltwork of rectangular bits over rusted out areas and lots of brazing along the top.
This is one end, the other end looks similar. 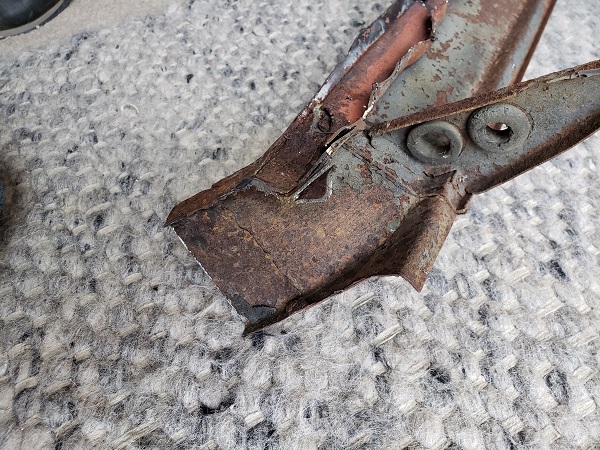 After a little soul searching, decided to refab the whole thing. Making a pattern: 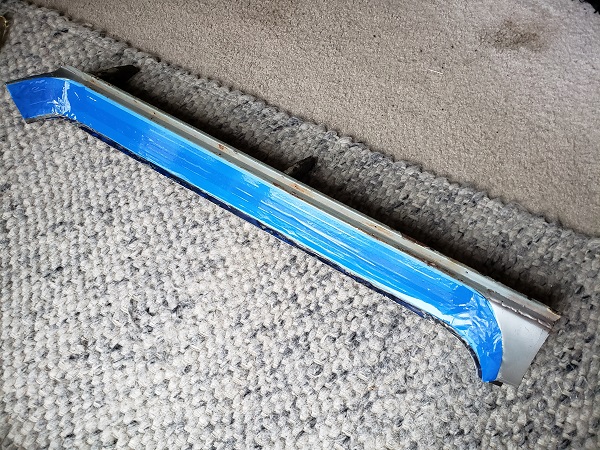 Transferred over to new metal: 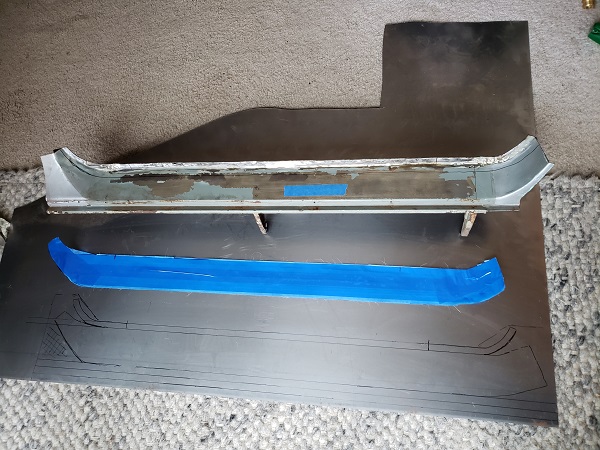 Bending to shape: 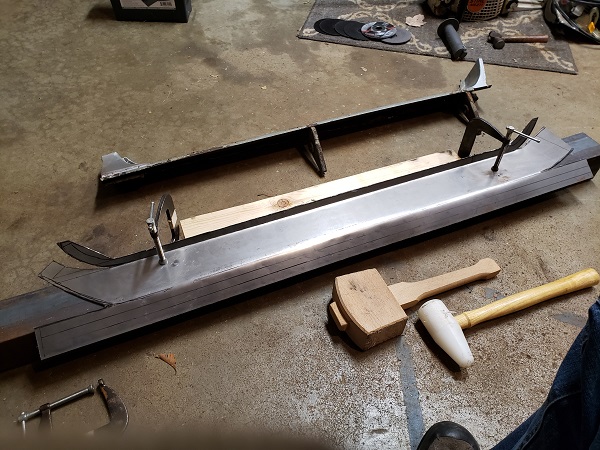 This is about 80% there - at that point I decided it may be best to get the long buttoned up and put the door back on and do the final fit of this guy with the door in place. I'll set this piece aside as it is and come back to it later. 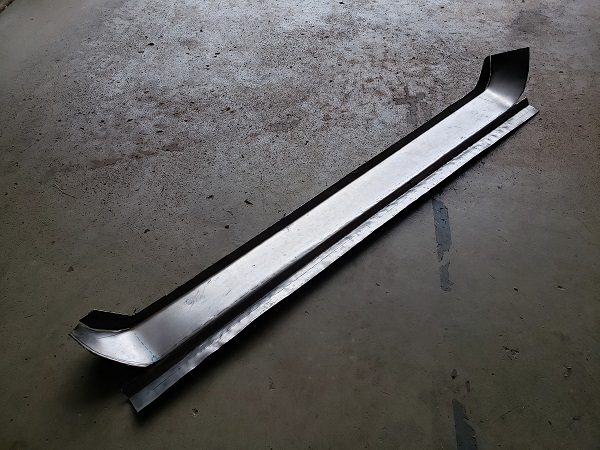 |
| 914forme |
 Dec 14 2020, 12:36 PM Dec 14 2020, 12:36 PM
Post
#152
|
|
Times a wastin', get wrenchin'!     Group: Members Posts: 3,896 Joined: 24-July 04 From: Dayton, Ohio Member No.: 2,388 Region Association: None 
|
Matthew your work always amazes me.
|
| bigkensteele |
 Dec 14 2020, 06:08 PM Dec 14 2020, 06:08 PM
Post
#153
|
|
Major Member     Group: Members Posts: 2,199 Joined: 30-August 04 From: Cincinnati, OH Member No.: 2,660 Region Association: South East States 
|
How has the welder been working out?
|
| mbseto |
 Dec 14 2020, 11:52 PM Dec 14 2020, 11:52 PM
Post
#154
|
|
Senior Member    Group: Members Posts: 1,257 Joined: 6-August 14 From: Cincy Member No.: 17,743 Region Association: North East States |
How has the welder been working out? Man, it is so much easier. My welds look better - still not professional level, but having a smooth feed and not having to worry about it hesitating makes the whole experience more stress free. I really appreciate the loan, thank you again. I'm waiting on a part before closing up the long. All the prep work has been done so as soon as it arrives I will have pics of the latest welds. |
| bigkensteele |
 Dec 15 2020, 04:42 PM Dec 15 2020, 04:42 PM
Post
#155
|
|
Major Member     Group: Members Posts: 2,199 Joined: 30-August 04 From: Cincinnati, OH Member No.: 2,660 Region Association: South East States 
|
How has the welder been working out? Man, it is so much easier. My welds look better - still not professional level, but having a smooth feed and not having to worry about it hesitating makes the whole experience more stress free. I really appreciate the loan, thank you again. I'm waiting on a part before closing up the long. All the prep work has been done so as soon as it arrives I will have pics of the latest welds. (IMG:style_emoticons/default/beerchug.gif) Glad it's working out! I need to get up there and check out your project. |
| mbseto |
 Jan 8 2021, 11:34 PM Jan 8 2021, 11:34 PM
Post
#156
|
|
Senior Member    Group: Members Posts: 1,257 Joined: 6-August 14 From: Cincy Member No.: 17,743 Region Association: North East States |
OK, things have taken a left turn, just going to throw some text in here to set the stage. Since the last set of pics, I tacked on the outer part of the long - it was put together as a single piece that goes from the front wheel well to the rear arch, made up of the piece you can buy from RD, a piece I made to extend that piece up the arch, and an inner layer that joins the two. The jack point is also on there.
So I tacked that in place and bolted the door back on to check alignment and to use a a reference to final form the new sill. But after putting the door on, I got a bad sinking feeling. The alignment is way off. I've had door braces in place and I've been measuring every step of the way and was pretty confident it was fine before bolting the door on, but clearly it is not. After thinking it over a while, I think I know what happened, but I can talk about that later. I need a plan. I'm asking for advice. So here's what it look like now... |
| mbseto |
 Jan 8 2021, 11:47 PM Jan 8 2021, 11:47 PM
Post
#157
|
|
Senior Member    Group: Members Posts: 1,257 Joined: 6-August 14 From: Cincy Member No.: 17,743 Region Association: North East States |
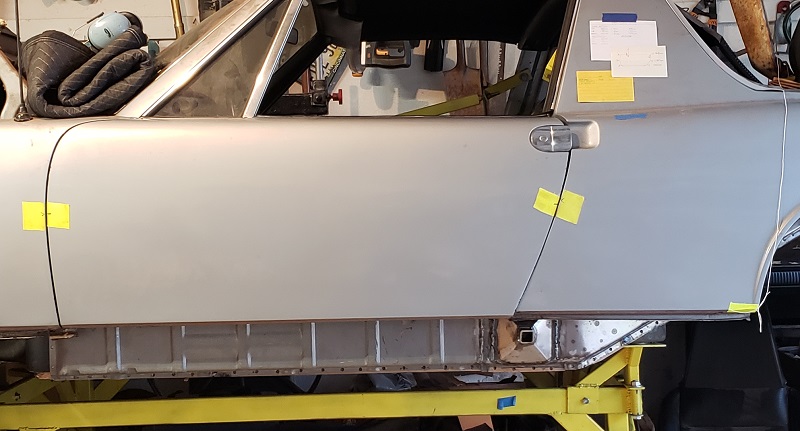 Since this pic was taken, I removed the outer layer of the long. It was only tacked in place. The floor pans are functionally gone - all edges are rusted out or cut except for literally a couple linear inches. The inner part of the long is welded solid to the good metal in the rear, but is only tacked in the front at the wheel well. The front and rear pieces of it are sleeved solid. The engine mount is tacked in place and would not be hard to remove. So what I'm thinking right now is-- the whole rear quarter needs to be lowered and rotated a couple degrees CCW. These two movements can be accomplished by 1) repositioning the engine mount to lower the rear quarter and 2) cutting the top and side of the inner long, pulling the gap closed and welding, which will rotate the rear quarter a bit OK guys, what do you think? |
| tygaboy |
 Jan 10 2021, 12:38 PM Jan 10 2021, 12:38 PM
Post
#158
|
|
914 Guru      Group: Members Posts: 5,542 Joined: 6-October 15 From: Petaluma, CA Member No.: 19,241 Region Association: Northern California 
|
Really sorry to see/hear this. And making any recommendations via pics is a bit dicey. That said: Based on that pic and your description, I'd agree that it sure looks like the back of the car needs to move and rotate.
What about the other side? Does it measure out correctly and do you have good door gaps there? If so, at least you have some points of reference. When I did my chassis work, I swapped back and forth between two different driver's doors - and yes, they fit differently from one another. I also found that by barely opening the door, I could lift up/push down on it and tweak the hinge mount area to get the rear edge to better align at the rear. So maybe try another door? Worst case, it verifies the situation. And have you fit the roof? That may help confirm where the rear of the car is. So about all I can offer is before you do any more cutting and welding, try swapping doors and fitting any other parts that will highlight what's where. Also important: take a deep breath, don't panic. You'll get through this. Remember, it's only metal. |
| 930cabman |
 Jan 11 2021, 06:26 AM Jan 11 2021, 06:26 AM
Post
#159
|
|
Advanced Member     Group: Members Posts: 4,004 Joined: 12-November 20 From: Buffalo Member No.: 24,877 Region Association: North East States 
|
 Since this pic was taken, I removed the outer layer of the long. It was only tacked in place. The floor pans are functionally gone - all edges are rusted out or cut except for literally a couple linear inches. The inner part of the long is welded solid to the good metal in the rear, but is only tacked in the front at the wheel well. The front and rear pieces of it are sleeved solid. The engine mount is tacked in place and would not be hard to remove. So what I'm thinking right now is-- the whole rear quarter needs to be lowered and rotated a couple degrees CCW. These two movements can be accomplished by 1) repositioning the engine mount to lower the rear quarter and 2) cutting the top and side of the inner long, pulling the gap closed and welding, which will rotate the rear quarter a bit OK guys, what do you think? Were the doors ever properly fitting since you owned the car? If so, that is a good baseline to work to getting things aligned properly. Us backyard guys do not have the luxury of a chassis jig/bench so we need to make due. The Egyptians did it. I would be careful moving engine mounts, .... My guess would be straighten things out in the mid section, longs, floor, ... Generally the front section is rigid to itself and the rear section rigid to itself, connecting the dots is our work. The floors on our project were mostly intact, I added a couple spreaders at the front strut mounts to the windscreen frame to the targa bar to the rear strut mounts to keep things together using a spirit level at several locations to keep an eye on things. So far so good. Do you have 25 1/8" from the windscreen frame to the targa bar? |
| bbrock |
 Jan 11 2021, 08:50 AM Jan 11 2021, 08:50 AM
Post
#160
|
|
914 Guru      Group: Members Posts: 5,269 Joined: 17-February 17 From: Montana Member No.: 20,845 Region Association: Rocky Mountains 
|
I've been wracking my brain over this much of the weekend and can only agree with what has already been said. Considering the careful and skillful quality of your work, I would be slow to second guess yourself and start moving mounts until you are absolutely sure you have figured out where the sag is coming from first.
As has been said, you can easily take that much sag out of a door simply by banging out bulge/stretch at the top hinge by banging the hinge landing on the post back in place. Unfortunately, it looks like the front gaps of your door is good so would question if that is the problem. Another thing to think about that the windshield frame is easily bent so maybe some careful checking there to make sure you can trust the measurement across the top. It looks like you have to remove your door brace to install the door. It might be worth rigging an adjustable brace you can use with the door on. I found it really helpful to be able to adjust the brace to understand how the chassis reacts as a whole as measurements change. If it were me, I'd be thinking hard about the inner long alignment as you already are. It's just too hard to say much more from pics. Hopefully some of the guys with Cellete experience can weigh in as they may have insight us garage cobblers don't. |
  |
1 User(s) are reading this topic (1 Guests and 0 Anonymous Users)
0 Members:

|
Lo-Fi Version | Time is now: 3rd April 2025 - 01:12 AM |
Invision Power Board
v9.1.4 © 2025 IPS, Inc.


