|
|
|
Porsche, and the Porsche crest are registered trademarks of Dr. Ing. h.c. F. Porsche AG.
This site is not affiliated with Porsche in any way. Its only purpose is to provide an online forum for car enthusiasts. All other trademarks are property of their respective owners. |
|
|

  |

| sdoolin |
 Dec 21 2016, 03:29 PM Dec 21 2016, 03:29 PM
Post
#201
|
|
Member  Group: Members Posts: 423 Joined: 1-May 14 From: LouKY Member No.: 17,299 Region Association: None |
QUOTE(BeatNavy @ Dec 21 2016, 03:13 PM)  QUOTE(sdoolin @ Dec 21 2016, 01:43 PM) Any advice or tips on installing new engine compartment rubber seals? I have reconnoitered this briefly and seems like it will be quite painful. Not sure if better to start the rubber bit into the channel and slide along, or just start the upper bit of the rubber all along the channel and press fit the lower lip of the rubber. Kind of hard to explain. I searched, didn't find anything specific. Don't try to slide the seal. Place the lower lip in the channel and press upper lip in with a blunt tool (preferably something that WON'T puncture the seal). It takes a little time but it is only a minor PITA. Thanks, I'll give that a shot tonight. |
   |

 
|
| sdoolin |
Dec 24 2016, 04:13 PM
Post
#202
|
|
Member Group: Members Posts: 423 Joined: 1-May 14 From: LouKY Member No.: 17,299 Region Association: None |
Engine is in. Bottom side is all buttoned up (heat exchangers, ductwork for heat, muffler, cables and shift rod. All good. I'll post pics a little later. Right now I have a question about wiring. There is a small in-enginebay wiring loom that connects to the rear of the relay board with a multi-pin connector. Off of this loom comes the reverse light wires, starter wires, and (I believe) oil pressure switch and coil wires.
My question is specific to the coil wires. There are two. One I assume for each "side" of the coil. The coil is numbered 1 on one side and 15 on the other (I think). Both wires are either black, or so dirty no amount of contact cleaner will reveal their original color. Does it matter which of these wires goes to which side of the coil?[i] Yes, electrical stuff is my weak point. If I can get this sorted out, I'll start the car tonight or tomorrow. |
|
|
|
| dlee6204 |
Dec 24 2016, 04:22 PM
Post
#203
|
|
Howdy Group: Members Posts: 2,162 Joined: 30-April 06 From: Burnsville, NC Member No.: 5,956 |
QUOTE(sdoolin @ Dec 24 2016, 05:13 PM) Engine is in. Bottom side is all buttoned up (heat exchangers, ductwork for heat, muffler, cables and shift rod. All good. I'll post pics a little later. Right now I have a question about wiring. There is a small in-enginebay wiring loom that connects to the rear of the relay board with a multi-pin connector. Off of this loom comes the reverse light wires, starter wires, and (I believe) oil pressure switch and coil wires. My question is specific to the coil wires. There are two. One I assume for each "side" of the coil. The coil is numbered 1 on one side and 15 on the other (I think). Both wires are either black, or so dirty no amount of contact cleaner will reveal their original color. Does it matter which of these wires goes to which side of the coil?[i] Yes, electrical stuff is my weak point. If I can get this sorted out, I'll start the car tonight or tomorrow. One of the wires should be black/purple stripe. This goes to the negative side of the coil. |
 |
|
| sdoolin |
Dec 24 2016, 04:25 PM
Post
#204
|
|
Member Group: Members Posts: 423 Joined: 1-May 14 From: LouKY Member No.: 17,299 Region Association: None |
QUOTE(dlee6204 @ Dec 24 2016, 05:22 PM) QUOTE(sdoolin @ Dec 24 2016, 05:13 PM) Engine is in. Bottom side is all buttoned up (heat exchangers, ductwork for heat, muffler, cables and shift rod. All good. I'll post pics a little later. Right now I have a question about wiring. There is a small in-enginebay wiring loom that connects to the rear of the relay board with a multi-pin connector. Off of this loom comes the reverse light wires, starter wires, and (I believe) oil pressure switch and coil wires. My question is specific to the coil wires. There are two. One I assume for each "side" of the coil. The coil is numbered 1 on one side and 15 on the other (I think). Both wires are either black, or so dirty no amount of contact cleaner will reveal their original color. Does it matter which of these wires goes to which side of the coil?[i] Yes, electrical stuff is my weak point. If I can get this sorted out, I'll start the car tonight or tomorrow. One of the wires should be black/purple stripe. This goes to the negative side of the coil. Thanks, which is the negative side? If it is obvious I am missing it. |
|
|
|
| BeatNavy |
Dec 24 2016, 04:33 PM
Post
#205
|
|
Certified Professional Scapegoat Group: Members Posts: 2,963 Joined: 26-February 14 From: Easton, MD Member No.: 17,042 Region Association: MidAtlantic Region |
Black/Purple is the tach wire and goes to negative (-) side, terminal 1 on coil.
Black is hot (+) and goes to terminal 15 on coil. |
|
|
|
| iankarr |
Dec 24 2016, 04:34 PM
Post
#206
|
|
The wrencher formerly known as Cuddy_K Group: Members Posts: 2,600 Joined: 22-May 15 From: Heber City, UT Member No.: 18,749 Region Association: Intermountain Region |
Look for the "-" symbol near the posts on the coil.
|
|
|
|
| sdoolin |
Dec 24 2016, 04:36 PM
Post
#207
|
|
Member Group: Members Posts: 423 Joined: 1-May 14 From: LouKY Member No.: 17,299 Region Association: None |
QUOTE(BeatNavy @ Dec 24 2016, 05:33 PM) Black/Purple is the tach wire and goes to negative (-) side, terminal 1 on coil. Black is hot (+) and goes to terminal 15 on coil. Sweet. Now I just got to see if I can identify black/purple. Thanks VERY much for the assist. Dizzy wire goes to 1 or 15? |
|
|
|
| BeatNavy |
Dec 24 2016, 04:40 PM
Post
#208
|
|
Certified Professional Scapegoat Group: Members Posts: 2,963 Joined: 26-February 14 From: Easton, MD Member No.: 17,042 Region Association: MidAtlantic Region |
QUOTE(sdoolin @ Dec 24 2016, 05:36 PM) QUOTE(BeatNavy @ Dec 24 2016, 05:33 PM) Black/Purple is the tach wire and goes to negative (-) side, terminal 1 on coil. Black is hot (+) and goes to terminal 15 on coil. Sweet. Now I just got to see if I can identify black/purple. Thanks VERY much for the assist. Dizzy wire goes to 1 or 15? It connects to the same spade as on terminal 1 (negative). Here's a reference: http://www.pelicanparts.com/914/parts/Elec...lectric_73C.jpg Coil is #6 in the diagram, dizzy is #5. |
|
|
|
| sdoolin |
Dec 24 2016, 04:48 PM
Post
#209
|
|
Member Group: Members Posts: 423 Joined: 1-May 14 From: LouKY Member No.: 17,299 Region Association: None |
QUOTE(BeatNavy @ Dec 24 2016, 05:40 PM) QUOTE(sdoolin @ Dec 24 2016, 05:36 PM) QUOTE(BeatNavy @ Dec 24 2016, 05:33 PM) Black/Purple is the tach wire and goes to negative (-) side, terminal 1 on coil. Black is hot (+) and goes to terminal 15 on coil. Sweet. Now I just got to see if I can identify black/purple. Thanks VERY much for the assist. Dizzy wire goes to 1 or 15? It connects to the same spade as on terminal 1 (negative). Here's a reference: http://www.pelicanparts.com/914/parts/Elec...lectric_73C.jpg Coil is #6 in the diagram, dizzy is #5. Perfect, thanks so much. |
|
|
|
| BeatNavy |
Dec 24 2016, 05:10 PM
Post
#210
|
|
Certified Professional Scapegoat Group: Members Posts: 2,963 Joined: 26-February 14 From: Easton, MD Member No.: 17,042 Region Association: MidAtlantic Region |
Good luck with the initial start (IMG:style_emoticons/default/beerchug.gif) Look forward to hearing how it goes...
|
|
|
|
| sdoolin |
Dec 24 2016, 06:28 PM
Post
#211
|
|
Member Group: Members Posts: 423 Joined: 1-May 14 From: LouKY Member No.: 17,299 Region Association: None |
It RUNS! Took it awhile to sputter to life, and it missed quite a bit for the first few minutes, but it ran at a little over 2k RPM for 15 mins. The idle speed on the carbs was set very high, so I just let it run at high idle for cam break in. I turned the idle speed down from side to side and got it to idle nicely at just about 1k RPM. Takes throttle reasonably well, revs out nicely and returns quickly to low idle. So initial carb setting is in the ball park. Ignition timing also in the ballpark since it ran, but I need to advance that when I have put a few more heat cycles on it.
One small fuel leak (I have installed serviceable glass fuel filters on each side of the carbs, and one has a small leak). No oil leaks that I can find. But man is it noisy at the rocker covers. So I need to investigate that. I suspect that my valve adjusters are contacting the rocker covers which is going to be a bummer. This build has chromoly pushrods so (I think) the spec for valve clearance is 0. I will obviously double check. For now it runs. Merry Christmas to me and thanks to everyone here that has offered advice and assistance. I'll post a few pics later, right now I think I am gonna celebrate with some tasty adult beverages. |
|
|
|
| sdoolin |
Dec 24 2016, 08:19 PM
Post
#212
|
|
Member Group: Members Posts: 423 Joined: 1-May 14 From: LouKY Member No.: 17,299 Region Association: None |
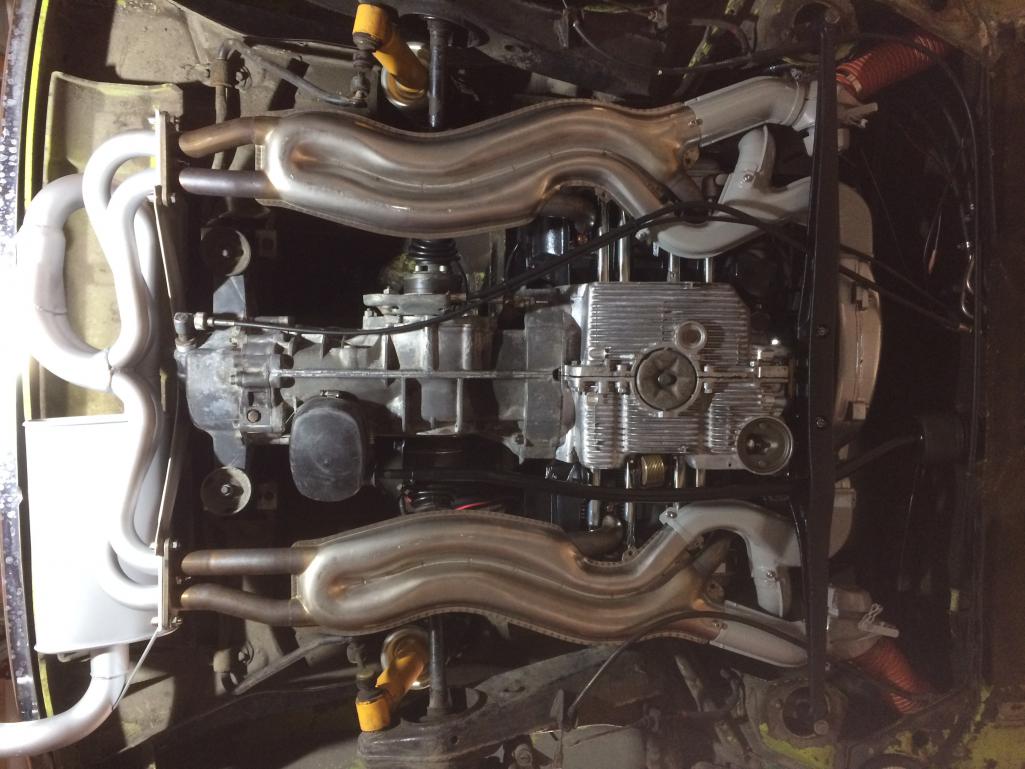
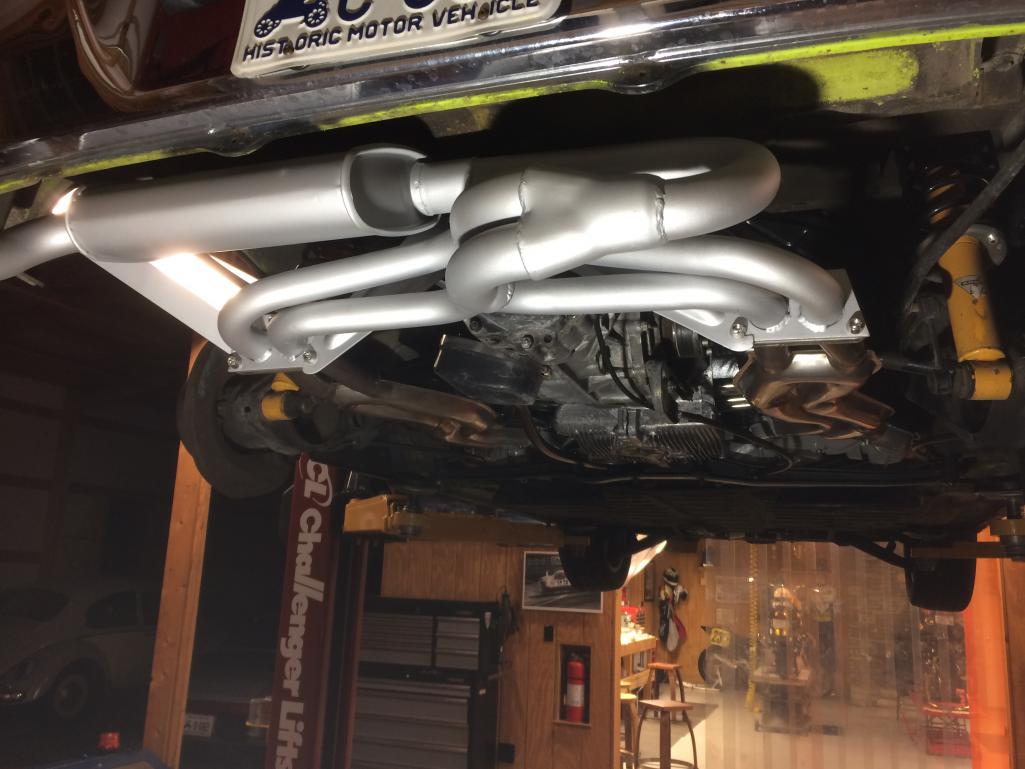
few pics of the install from the underside...
  |
|
|
|
| sdoolin |
Dec 27 2016, 12:25 PM
Post
#213
|
|
Member Group: Members Posts: 423 Joined: 1-May 14 From: LouKY Member No.: 17,299 Region Association: None |
Noise from the left side rocker cover investigated. Seems one of my valve adjusting lock nuts wasn't locked, allowing for a tad too much clearance between valve and adjuster on the exhaust valve on #2. Since I ran it this way for the better part of 10 - 15 mins, I removed that rocker shaft with rockers and inspected. Also inspected the pushrod. All seems OK thankfully.
I have probably 5 good heat cycles on it now. Drove it today for 10 miles and I am (I hate to say) underwhelmed so far. But, the timing is only set by feel/eyeball and I am running an 009 dizzy. Which I hate. At small throttle openings it stumbles and bogs, then clears out and pulls (sorta hard). It is driveable, but not all that it can be I don't think. All of the oil appears to stay inside the engine, no fuel leaks, and the carbs feel very close to dead-on. Someone sell me a proper dizzy? Please? Friends don't let friends drive around with Bosch 009s in their cars... |
|
|
|
| porschetub |
Dec 27 2016, 02:03 PM
Post
#214
|
|
914 Guru Group: Members Posts: 5,104 Joined: 25-July 15 From: New Zealand Member No.: 18,995 Region Association: None |
Really nice work,you have a truly handbuilt blueprinted engine which sets it aside from "just an average" rebuild.
The 009 is ok but just,these were made for industrial engines that run @ constant RPM around 3600,I did read that people in the know can get them to work by slowing the full advance which comes in too quickly for a street driven engine. You could try increasing the spring tension on one of the internal counterweights to get the advance "all in" @ higher RPM,I did that years ago with some success on a 010 which is basically the old version of the 009. Failing any improvement with the 009 you could run a vacuum assisted distributor but you then have the hassle of finding vacuum points on both your carbs,my Dellorto's have them but I'am not sure about the Webers cause I've never run them on a T4. If you buy a vacuum dizzy look for the Bosch one with a 205 end number (from memory),I have one converted to Hotspark pointless ignition that will go on my 1800 as I have a 009 on there now. The cheap Chinese made SVDA (?) is used with good results on the T1 motors but I don't know about the T4 perhaps some on here can chime in. |
|
|
|
| RoadGlue |
Dec 27 2016, 02:31 PM
Post
#215
|
|
Sonoma County Gear Head Group: Admin Posts: 2,034 Joined: 8-January 03 From: Santa Rosa, CA Member No.: 108 Region Association: Northern California |
QUOTE(porschetub @ Dec 27 2016, 12:03 PM) Failing any improvement with the 009 you could run a vacuum assisted distributor but you then have the hassle of finding vacuum points on both your carbs,my Dellorto's have them but I'am not sure about the Webers cause I've never run them on a T4. I've always had good luck running FI dizzies with vacuum advance on my 40 IDFs. I just take vacuum off one side. I don't think it needs to be taken off both, but I could be wrong! :-) |
|
|
|
| sdoolin |
Dec 27 2016, 04:22 PM
Post
#216
|
|
Member Group: Members Posts: 423 Joined: 1-May 14 From: LouKY Member No.: 17,299 Region Association: None |
QUOTE(RoadGlue @ Dec 27 2016, 03:31 PM) QUOTE(porschetub @ Dec 27 2016, 12:03 PM) Failing any improvement with the 009 you could run a vacuum assisted distributor but you then have the hassle of finding vacuum points on both your carbs,my Dellorto's have them but I'am not sure about the Webers cause I've never run them on a T4. I've always had good luck running FI dizzies with vacuum advance on my 40 IDFs. I just take vacuum off one side. I don't think it needs to be taken off both, but I could be wrong! :-) So - RoadGlue - you are saying you run the OE FI dizzy? I have duel Dellorto 40 DRLAs. They each have 2 vacuum ports at the base just below the throttle plates. It is worth a shot then to re-install the dizzy I took off the engine (nicely running FI 2.0), plug one vacuum port on it and connect the other to a single vacuum port on one of the carbs? Is this a pretty common solution? I have been tuning carbs and ignition timing all day. The 009 flat-spot will not go away. I can't see having invested this much time and energy into this build just to sacrifice driveability because of the stinking distributor. |
|
|
|
| RoadGlue |
Dec 27 2016, 04:27 PM
Post
#217
|
|
Sonoma County Gear Head Group: Admin Posts: 2,034 Joined: 8-January 03 From: Santa Rosa, CA Member No.: 108 Region Association: Northern California |
QUOTE(sdoolin @ Dec 27 2016, 02:22 PM) So - RoadGlue - you are saying you run the OE FI dizzy? I have duel Dellorto 40 DRLAs. They each have 2 vacuum ports at the base just below the throttle plates. It is worth a shot then to re-install the dizzy I took off the engine (nicely running FI 2.0), plug one vacuum port on it and connect the other to a single vacuum port on one of the carbs? Is this a pretty common solution? I have been tuning carbs and ignition timing all day. The 009 flat-spot will not go away. I can't see having invested this much time and energy into this build just to sacrifice driveability because of the stinking distributor. I'd absolutely give it a try! My previous carb cars all ran stock FI distributors, but I can't remember which models. I'm sure you can find an advance curve chart somewhere, but I'm at work and can't really dig around right now. I'm also not familiar with Dellorto's enough to say which ports you should be using (perhaps they're all the same...). Great build. Been following since the beginning. |
|
|
|
| sdoolin |
Dec 27 2016, 04:35 PM
Post
#218
|
|
Member Group: Members Posts: 423 Joined: 1-May 14 From: LouKY Member No.: 17,299 Region Association: None |
QUOTE(RoadGlue @ Dec 27 2016, 05:27 PM) QUOTE(sdoolin @ Dec 27 2016, 02:22 PM) So - RoadGlue - you are saying you run the OE FI dizzy? I have duel Dellorto 40 DRLAs. They each have 2 vacuum ports at the base just below the throttle plates. It is worth a shot then to re-install the dizzy I took off the engine (nicely running FI 2.0), plug one vacuum port on it and connect the other to a single vacuum port on one of the carbs? Is this a pretty common solution? I have been tuning carbs and ignition timing all day. The 009 flat-spot will not go away. I can't see having invested this much time and energy into this build just to sacrifice driveability because of the stinking distributor. I'd absolutely give it a try! My previous carb cars all ran stock FI distributors, but I can't remember which models. I'm sure you can find an advance curve chart somewhere, but I'm at work and can't really dig around right now. I'm also not familiar with Dellorto's enough to say which ports you should be using (perhaps they're all the same...). Great build. Been following since the beginning. Thanks so much. I'm going to give it a shot this week. If you (or if anyone) has any more info please share. |
|
|
|
| maf914 |
Dec 28 2016, 07:04 AM
Post
#219
|
|
Not a Guru! Group: Members Posts: 3,049 Joined: 30-April 03 From: Central Florida Member No.: 632 Region Association: None |
Very nice work. Good luck with your distributor efforts.
May I ask how you refinished your Bursch exhaust? Looks good! Thanks |
|
|
|
| sdoolin |
Dec 28 2016, 07:23 AM
Post
#220
|
|
Member Group: Members Posts: 423 Joined: 1-May 14 From: LouKY Member No.: 17,299 Region Association: None |
QUOTE(maf914 @ Dec 28 2016, 08:04 AM) Very nice work. Good luck with your distributor efforts. May I ask how you refinished your Bursch exhaust? Looks good! Thanks Thanks for the compliment. The Bursch was high temp ceramic coated by the same guy that does my powder coat work. I can get the exact brand/color of the coating if interested. |
|
|
|
|
1 User(s) are reading this topic (1 Guests and 0 Anonymous Users)
0 Members:

|
Lo-Fi Version | Time is now: 13th May 2026 - 09:24 AM |
Invision Power Board
v9.1.4 © 2026 IPS, Inc.