|
|
|
Porsche, and the Porsche crest are registered trademarks of Dr. Ing. h.c. F. Porsche AG.
This site is not affiliated with Porsche in any way. Its only purpose is to provide an online forum for car enthusiasts. All other trademarks are property of their respective owners. |
|
|

  |

| sdoolin |
 Mar 4 2016, 05:04 PM Mar 4 2016, 05:04 PM
Post
#41
|
|
Member  Group: Members Posts: 418 Joined: 1-May 14 From: LouKY Member No.: 17,299 Region Association: None |
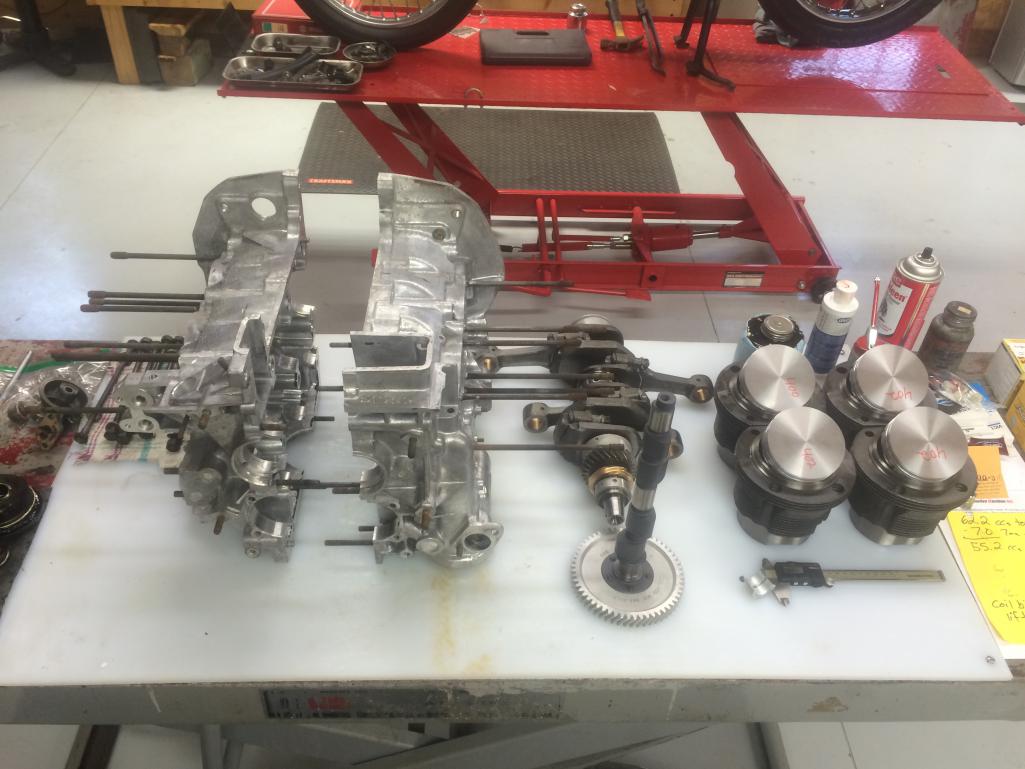
More RS+ Porn...
Notice the machinng/work done at the intake manifold surface... 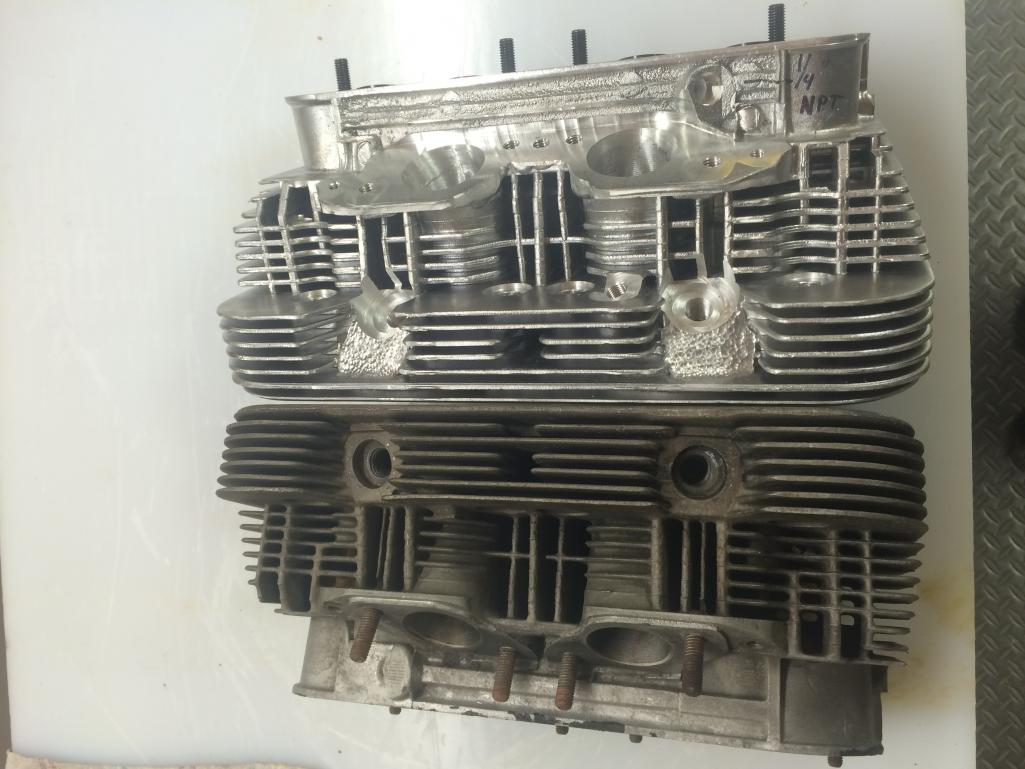 Work done to re-angle spark plugs... 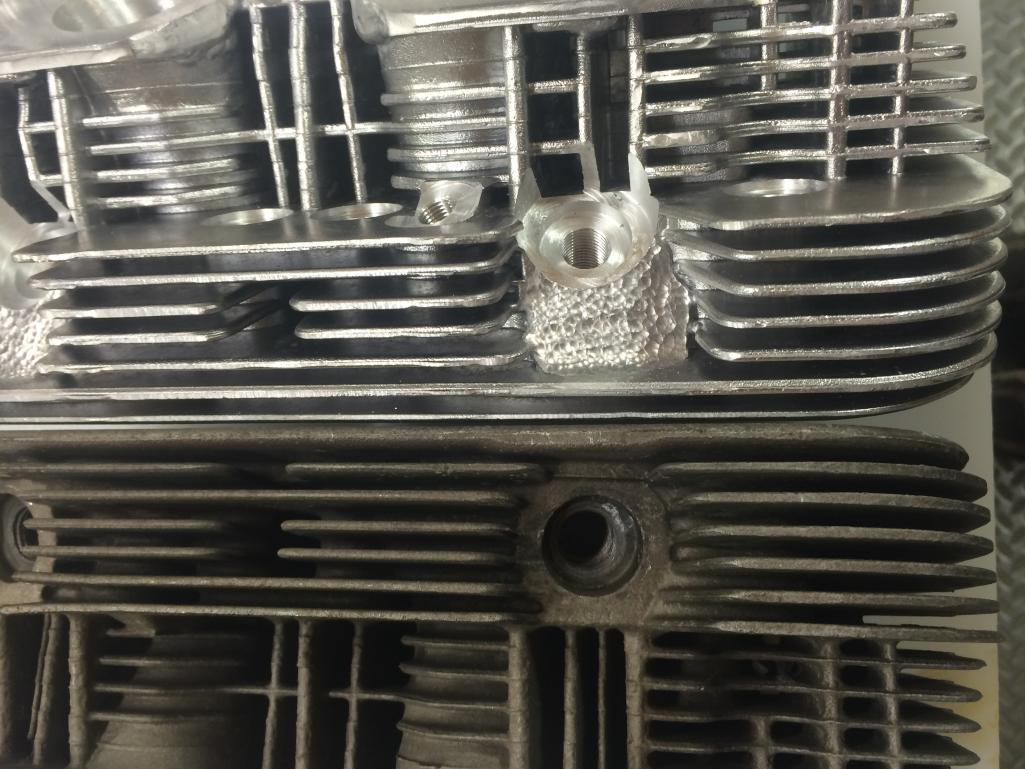 |
   |

 
|
| Dave_Darling |
Mar 4 2016, 07:06 PM
Post
#42
|
|
914 Idiot Group: Members Posts: 15,335 Joined: 9-January 03 From: Silicon Valley / Kailua-Kona Member No.: 121 Region Association: Northern California |
QUOTE(sdoolin @ Feb 3 2016, 06:57 PM)  My local guy says that these cases do NOT need align bored or decked. I imagine this is hard to believe? Does he mean your specific case, or all Type IVs in general? Conventional wisdom used to be that they didn't need align-boring. They are, after all, built tougher than the magnesium Type I case, which is pretty much always align-bored out of hand--because just about all of them need it. So we got used to saying, "These don't usually need it, check before you cut, OK?" That was a couple decades ago, though. Now they've run more miles and have more heat cycles and seen more wear. More than a few do need align-boring. It is best to have the case checked. --DD |
|
|
|
| sdoolin |
Mar 4 2016, 07:35 PM
Post
#43
|
|
Member Group: Members Posts: 418 Joined: 1-May 14 From: LouKY Member No.: 17,299 Region Association: None |
QUOTE Does he mean your specific case, or all Type IVs in general? He means my specific case. He measured the crank bore and the cylinder decks and he says all OK. He is balancing all moving parts (crank/rods/pistons), verifying all cylinder/head bolt threads are good (it came apart well), installing new threaded galley plugs and generally cleaning the cases up. I get it all beck next week. Then the real fun begins... |
|
|
|
| sdoolin |
Mar 4 2016, 07:41 PM
Post
#44
|
|
Member Group: Members Posts: 418 Joined: 1-May 14 From: LouKY Member No.: 17,299 Region Association: None |
Also, this set of cases hasn't seen a crankshaft turn in them for at least 20 years (closer to 30), so do not have the wear and tear or heat cycles that would've been associated with those years of operation.
|
|
|
|
| sdoolin |
Mar 11 2016, 06:51 PM
Post
#45
|
|
Member Group: Members Posts: 418 Joined: 1-May 14 From: LouKY Member No.: 17,299 Region Association: None |
So I finally picked up my cleaned/measured cases/crank and rods. Doing pre-assembly tonight. What is the conventional wisdom on re-installing the cylinder/head studs into the cases? Threadlock (Loctite) or no threadlock?
I have built 3 bus engines and have never used threadlock on the cylinder/head studs, but then I've never removed them in those builds. My thought has always been less threadlock is better, but I want to build this engine the best I can. Is there a torques spec for installing the cylinder/head studs? All opinions appreciated (I think)... |
|
|
|
| stugray |
Mar 11 2016, 07:08 PM
Post
#46
|
|
Advanced Member Group: Members Posts: 3,825 Joined: 17-September 09 From: Longmont, CO Member No.: 10,819 Region Association: None |
Right off the top of my head:
You will almost certainly take the case halves apart many times, so dont use any sealant on the mating halves till youre sure. The #1 mistake made is letting the bearings come unseated from the dowel pins that hold the bearings. This results in brand new, ruined bearings. As you torque the sides together rotate the crank & cam they should turn like butter even at full case torque. Once you have the rods attached, be careful when you rotate the assembly and dont let the rods slap on the case. Once you have the jugs on you will be measuring your deck height. I have an old thread where I struggled with this for a long time before getting it right. I'll see if I can dig it up. There are some tools provided by a member on this site (yeahmag) that makes the measurement 'almost' idiot-proof. Here it is: http://www.914world.com/bbs2/index.php?showtopic=196177 |
|
|
|
| sdoolin |
Mar 11 2016, 08:39 PM
Post
#47
|
|
Member Group: Members Posts: 418 Joined: 1-May 14 From: LouKY Member No.: 17,299 Region Association: None |
Yes, thanks for all of that (no disrespect intended). I have built a few of these engines for buses, so am familiar with the basics of crankshaft build-up and case mating. Definitely want things to spin free.
My specific question has to do with the long studs for the cylinders/heads. I removed them from the case halves before I sent them (the case halves) for measurement. Now, on re-assembly, is there a torque spec to re-install them to the cases, and, do we all think that threadlock is required for these? The cases have excellent threads and no helicoils were needed (as is often the case with type I engines). I generally avoid threadlock where possible, but not sure if these should be "loctited" or not. They have very nice "bite" into the threads/cases. |
|
|
|
| sdoolin |
Mar 12 2016, 08:53 AM
Post
#48
|
|
Member Group: Members Posts: 418 Joined: 1-May 14 From: LouKY Member No.: 17,299 Region Association: None |
Hope to have the cases all assembled by the end of this weekend. Crankshaft was balanced, rods were balanced (big-ends and small-ends), and new KB 96mm pistons were weight matched.
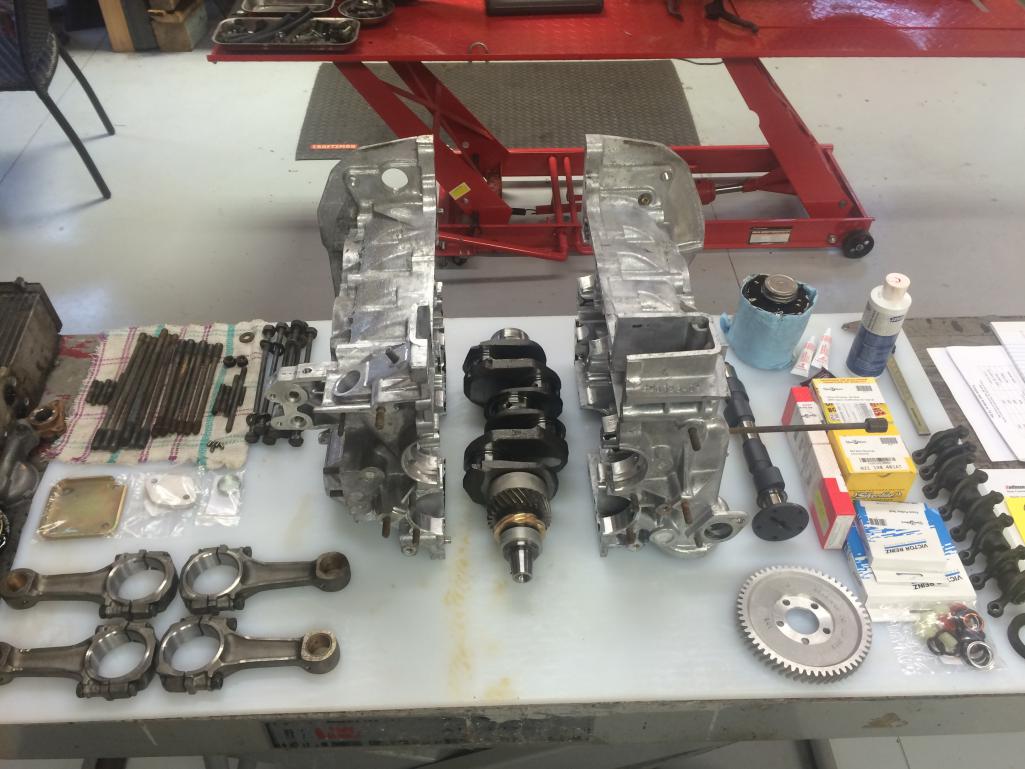 Then working out of town for a week, then next weekend hope to work on deck height and compression ratio... |
|
|
|
| sdoolin |
Mar 12 2016, 12:11 PM
Post
#49
|
|
Member Group: Members Posts: 418 Joined: 1-May 14 From: LouKY Member No.: 17,299 Region Association: None |
Oil Dipstick Tube fitment. Bus engine cases need to be drilled. I am using 5/16" hydraulic brake line press fit into a 5/16" hole in the case. Will secure with some JB Weld (or other) when complete.
Anyone know exact height of dipstick tube from top of case to top of tube? 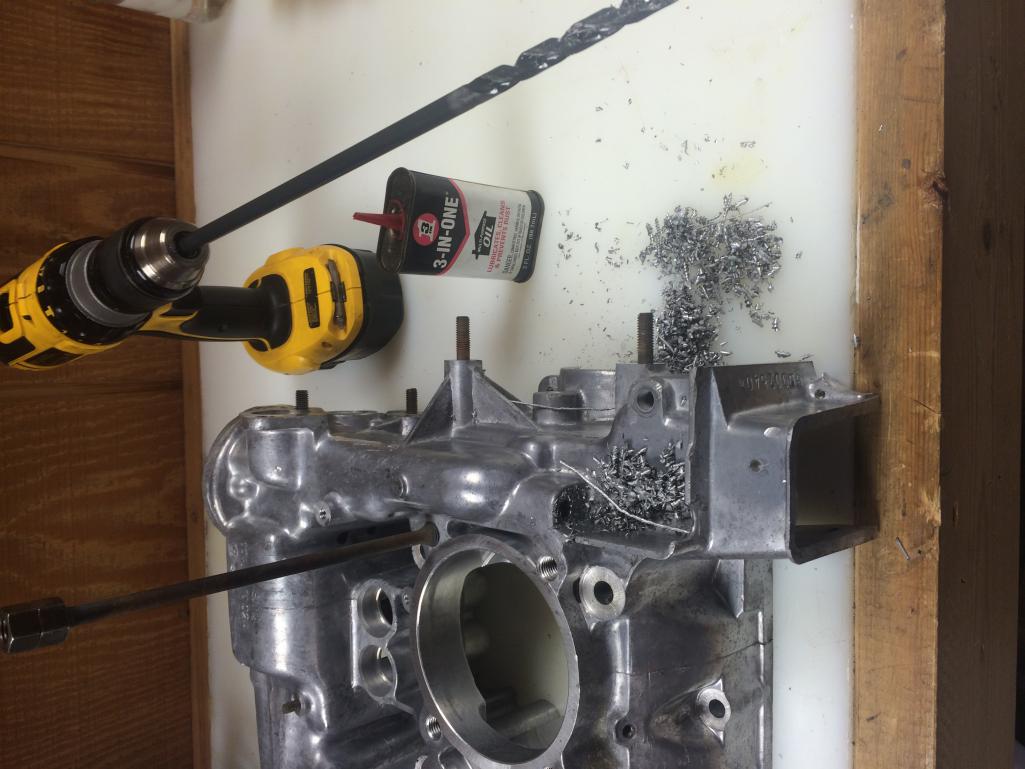 Accomplished on the crude side of the shop, but I am comfortable with the solution... |
|
|
|
| wndsrfr |
Mar 12 2016, 01:05 PM
Post
#50
|
|
Senior Member Group: Members Posts: 1,460 Joined: 30-April 09 From: Rescue, Virginia Member No.: 10,318 Region Association: MidAtlantic Region |
QUOTE(sdoolin @ Mar 12 2016, 10:11 AM) Oil Dipstick Tube fitment. Bus engine cases need to be drilled. I am using 5/16" hydraulic brake line press fit into a 5/16" hole in the case. Will secure with some JB Weld (or other) when complete. Anyone know exact height of dipstick tube from top of case to top of tube? I'm seeing 85 mm on a known stock case....3 & 3/8" ..... |
|
|
|
| sdoolin |
Mar 12 2016, 04:23 PM
Post
#51
|
|
Member Group: Members Posts: 418 Joined: 1-May 14 From: LouKY Member No.: 17,299 Region Association: None |
QUOTE I'm seeing 85 mm on a known stock case....3 & 3/8 Thanks for that, but that measurement appears too small. On my cases 3 & 3/8 will not clear the oil fill/breather box and on the engine in my car the dipstick tube def clears that breather (the metal box bit, not the plastic filler neck). I am at a full stop unfortunately as both of my new double thrust cam bearings (from Type IV Store) have locating tangs, and my case does not have a locating tang space on the right hand case (cyl 3 & 4). Very strange. I had hoped to get it all bolted together this weekend, but no love. |
|
|
|
| Valy |
Mar 12 2016, 09:11 PM
Post
#52
|
|
Senior Member Group: Members Posts: 1,677 Joined: 6-April 10 From: Sunnyvale, CA Member No.: 11,573 Region Association: Northern California |
One more thing you MAY want to change on that case:
If you're going to fit an oil temp sensor in the taco plate (original sensor), then check that it fits now. Some cases, and this includes some bus cases, have a lip there that needs to be removed for the long sensor to fit. Some are ok. I don't know when the change happened. I don't have a picture right now but please check and you'll see what I'm talking about. |
|
|
|
| Valy |
Mar 12 2016, 09:14 PM
Post
#53
|
|
Senior Member Group: Members Posts: 1,677 Joined: 6-April 10 From: Sunnyvale, CA Member No.: 11,573 Region Association: Northern California |
QUOTE(Valy @ Mar 12 2016, 07:11 PM) One more thing you MAY want to change on that case: If you're going to fit an oil temp sensor in the taco plate (original sensor), then check that it fits now. Some cases, and this includes some bus cases, have a lip there that needs to be removed for the long sensor to fit. Some are ok. I don't know when the change happened. I don't have a picture right now but please check and you'll see what I'm talking about. Here it is: http://www.914world.com/bbs2/index.php?s=&...t&p=1558181 |
|
|
|
| sdoolin |
Mar 13 2016, 08:44 AM
Post
#54
|
|
Member Group: Members Posts: 418 Joined: 1-May 14 From: LouKY Member No.: 17,299 Region Association: None |
QUOTE(Valy @ Mar 12 2016, 11:11 PM) One more thing you MAY want to change on that case: If you're going to fit an oil temp sensor in the taco plate (original sensor), then check that it fits now. Some cases, and this includes some bus cases, have a lip there that needs to be removed for the long sensor to fit. Some are ok. I don't know when the change happened. I don't have a picture right now but please check and you'll see what I'm talking about. Checked the taco plate location on these cases. All good, long sensor oil temp will fit. Thanks for the heads-up on that. |
|
|
|
| sdoolin |
Mar 25 2016, 11:03 AM
Post
#55
|
|
Member Group: Members Posts: 418 Joined: 1-May 14 From: LouKY Member No.: 17,299 Region Association: None |
 Finally ready to assemble cases. Don't think I'll get Ps & Cs done today, just the crank, cam, oil pump, etc. |
|
|
|
| sdoolin |
Mar 25 2016, 06:28 PM
Post
#56
|
|
Member Group: Members Posts: 418 Joined: 1-May 14 From: LouKY Member No.: 17,299 Region Association: None |
Cases reunited. Hardest bit was the oil pickup because, well, I left it out first attempt. Realized it when I had a single M10 thoughbolt snugged up. Tried again and tightened 2 of the M10s until I remembered to "locate" the pickup with its own through bolt.
Finally all together. All bolts torqued nicely, oil pump went in without an argument and I'm not bleeding anywhere. I call this a success. I consider this the easy bit with the rest getting more complicated. Deck height and CR must be checked and set, and then valvetrain geometry fun after that.  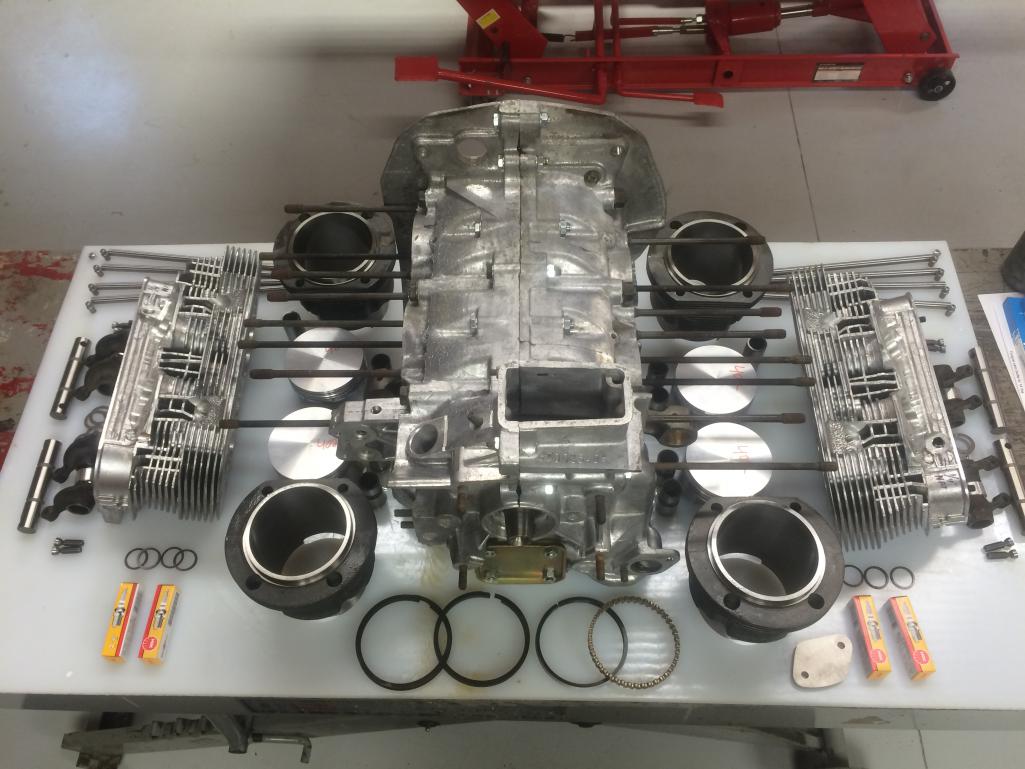 |
|
|
|
| Bleyseng |
Mar 26 2016, 10:58 AM
Post
#57
|
|
Aircooled Baby! Group: Members Posts: 13,037 Joined: 27-December 02 From: Seattle, Washington (for now) Member No.: 24 Region Association: Pacific Northwest |
Why are you using a bus case?
|
|
|
|
| sdoolin |
Mar 27 2016, 07:51 AM
Post
#58
|
|
Member Group: Members Posts: 418 Joined: 1-May 14 From: LouKY Member No.: 17,299 Region Association: None |
QUOTE(Bleyseng @ Mar 26 2016, 12:58 PM) Why are you using a bus case? Because it was there? |
|
|
|
| cgnj |
Mar 27 2016, 08:49 PM
Post
#59
|
|
Senior Member Group: Members Posts: 703 Joined: 6-March 03 From: Medford, NJ Member No.: 403 Region Association: None |
QUOTE(sdoolin @ Mar 27 2016, 06:51 AM) QUOTE(Bleyseng @ Mar 26 2016, 12:58 PM) Why are you using a bus case? Because it was there? It's in his hands. If I had a dime for every dollar I spent doing the "right thing" for my teeners, I'd have a 911 in the garage, next to the 928s and 914s (none of these are a "real" Porsche. Keep the recipts and pics and source a case later. The longer a project sits, the more likely it is a barn find. Get it back on the road. Back in the Stone Age Mallory Unilite, grey/grey springs. Apparently sold. Now made in China. You can get one from Tangerine Racing ready to go. Otherwise call john @ aircooled.net amd get his recurved svda distributor. |
|
|
|
| Tbrown4x4 |
Mar 30 2016, 06:16 PM
Post
#60
|
|
Senior Member Group: Members Posts: 708 Joined: 13-May 14 From: Port Orchard, WA Member No.: 17,338 Region Association: None |
Loving this thread! I have some 2.0 bus parts at the machine shop now for a 2056 build.
I was under my '73 the other day and noticed how close the engine bar comes to the 1.7 case where the bus oil fill would be. My bus engine came out of a '71, so the engine bar is smaller. I'm worried the block-off plate and studs in the bas case are going to hit the '73 engine bar, so I'm going to countersink the cover and use countersunk machine screws to hold the cover in place to try to get some clearance. Thought I'd give you a heads up about it. I saw the block-off plate in your pictures and the "1973 914" in your sig. Sounds like we're doing the same swap! (IMG:style_emoticons/default/smile.gif) |
|
|
|
|
1 User(s) are reading this topic (1 Guests and 0 Anonymous Users)
0 Members:

|
Lo-Fi Version | Time is now: 5th April 2026 - 09:42 AM |
Invision Power Board
v9.1.4 © 2026 IPS, Inc.