|
|

|
Porsche, and the Porsche crest are registered trademarks of Dr. Ing. h.c. F. Porsche AG.
This site is not affiliated with Porsche in any way. Its only purpose is to provide an online forum for car enthusiasts. All other trademarks are property of their respective owners. |
|
|
  |
| sdoolin |
 Sep 10 2016, 02:10 PM Sep 10 2016, 02:10 PM
Post
#1
|
|
Member   Group: Members Posts: 384 Joined: 1-May 14 From: LouKY Member No.: 17,299 Region Association: None |
Building a 2056 and almost complete with it except for carb rebuilding and a few other details. Going with dual Dell 40's.
My gasket kit came with what I will call "spacers" that are used between cylinder head and FI runners. Do I (should I) use these when mounting my carb manifolds? I did not use them on a bus engine I built years and years ago and it ran well - for a very long time so I am tempted to go without them, but thought I would ask. If there is significant good reason to use them, where do I find the seemingly very (very) thin gaskets that go on each side of them (head side & manifold side)? I ordered intake manifolds from Pelican but them seem a bit thick (I can use them if I choose not to use the "spacers"). Also have a few questions about accelerator cable and carb base plates. Can I re-use the cable that is in the car (it was injected and ran well)? If yes, is there an "off the shelf" bracket to mount it on the engine such that it operates the cross bar linkage? And finally (for now) does the cross bar linkage go on the front or back of the carbs (depending on base plate orientation)? Pics of your carb'ed set-up might really help me out here so if you got 'em, please feel free to use 'em. |
| N_Jay |
 Sep 10 2016, 02:17 PM Sep 10 2016, 02:17 PM
Post
#2
|
|
Member   Group: Members Posts: 283 Joined: 2-March 16 From: Chicago NW Burbs Member No.: 19,720 Region Association: None |
They cut down the heat that gets to the carbs.
|
| r_towle |
 Sep 10 2016, 02:17 PM Sep 10 2016, 02:17 PM
Post
#3
|
|
Custom Member                Group: Members Posts: 24,680 Joined: 9-January 03 From: Taxachusetts Member No.: 124 Region Association: North East States 
|
Hi,
So the phenolic spacers helps to prevent the heat from the heads getting up to the carbs and boiling the fuel....it happens. I use them at both joints, head to manifold and manifold to carbs. Gaskets, reddline Webber, or aircooled.net Linkage, Chris Foley, Tangering racing, or again the two above. Rich |
| Ansbacher |
 Sep 10 2016, 02:28 PM Sep 10 2016, 02:28 PM
Post
#4
|
|
Senior Member    Group: Members Posts: 689 Joined: 4-July 14 From: Tampa Bay, Florida Member No.: 17,589 |
I used spacers on a 356SC engine with Solex carbs for a while and saw no difference either way. May carbs always percolated when sitting after a good run, with or without the spacers.
Ansbacher |
| era vulgaris |
 Sep 10 2016, 05:53 PM Sep 10 2016, 05:53 PM
Post
#5
|
|
J is for Genius    Group: Members Posts: 982 Joined: 10-November 13 From: Raleigh, NC Member No.: 16,629 Region Association: South East States |
Use the spacers. I also have Dell 40's on my 2270, and I put paper gaskets from CB Performance (probably the same as yours from Pelican) on both sides of each phenolic spacer. So 4 paper gaskets and 2 spacers total. I had enough length on my intake manifold bolts for it, but it was close!
While my heads are fully warmed at 325* F on #3, my intake manifolds while warm are still cool enough to touch without burning my hands. Haven't had any issues with fuel percolation. |
| Localboy808 |
 Sep 10 2016, 10:43 PM Sep 10 2016, 10:43 PM
Post
#6
|
|
Member   Group: Members Posts: 185 Joined: 17-July 16 From: Palmdale, Ca Member No.: 20,194 Region Association: None |
Interesting discussion. Brings up a question. Does anyone have a source for longer intake studs? I need to replace mine to get a set of ICT intakes to fit with the thick spacers. Manifold bases are pretty thick. I'm not sure of the thread size and pitch.
|
| sdoolin |
 Sep 11 2016, 06:35 AM Sep 11 2016, 06:35 AM
Post
#7
|
|
Member   Group: Members Posts: 384 Joined: 1-May 14 From: LouKY Member No.: 17,299 Region Association: None |
Thanks for the replies.
I'm going to use the spacers, along with the thick(er) gaskets from Pelican. If intake studs are not long enough I can fix that be removing material from manifolds, or sourcing longer studs (that's what she said). (IMG:style_emoticons/default/unsure.gif) Still curious about accel. cable placement and base plate orientation for the linkage. |
| anderssj |
 Sep 11 2016, 06:31 PM Sep 11 2016, 06:31 PM
Post
#8
|
|
Dog is my copilot...    Group: Members Posts: 1,716 Joined: 28-January 03 From: VA Member No.: 207 Region Association: MidAtlantic Region 
|
My linkage is towards the front of the engine--nothing fancy, but it's been working pretty well this way since the early 1980s (IMG:style_emoticons/default/blink.gif)
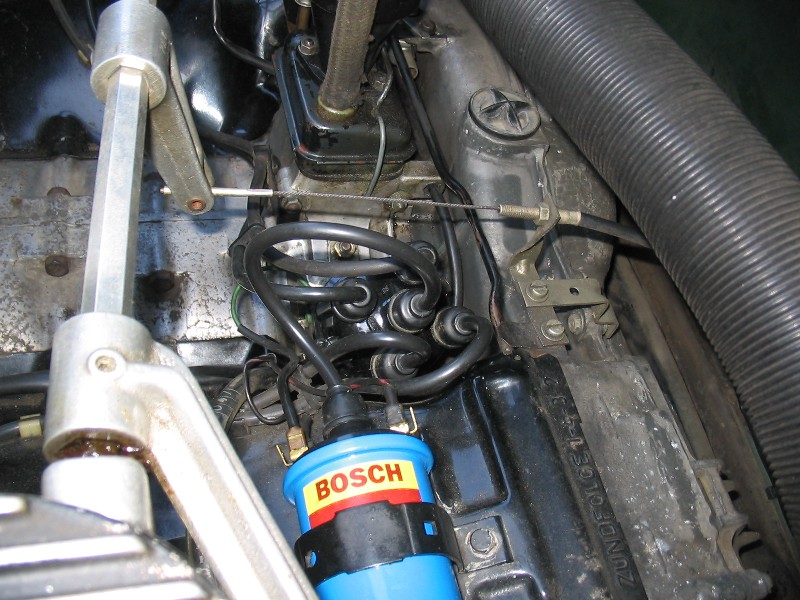 That said, I'm seriously considering going to Chris' cable linkage from Tangerine Racing. The CB Performance hex-bar is getting a little loose . . . Hope this helps! |
| sdoolin |
 Sep 18 2016, 12:46 PM Sep 18 2016, 12:46 PM
Post
#9
|
|
Member   Group: Members Posts: 384 Joined: 1-May 14 From: LouKY Member No.: 17,299 Region Association: None |
If you haven't installed new ball ends onto the carbs for the hex bar to operate on, they will be junk. I had that linkage on my bus and it was fine so long as you replaced those ball ends every couple of years. They become significantly out of round.
|
| sdoolin |
 Sep 18 2016, 12:52 PM Sep 18 2016, 12:52 PM
Post
#10
|
|
Member   Group: Members Posts: 384 Joined: 1-May 14 From: LouKY Member No.: 17,299 Region Association: None |
Getting ready to rebuild carbs for my 2056. Carbs on the right operate better than the ones on the left. So I have the CB upgrade kit(s) ready to install.
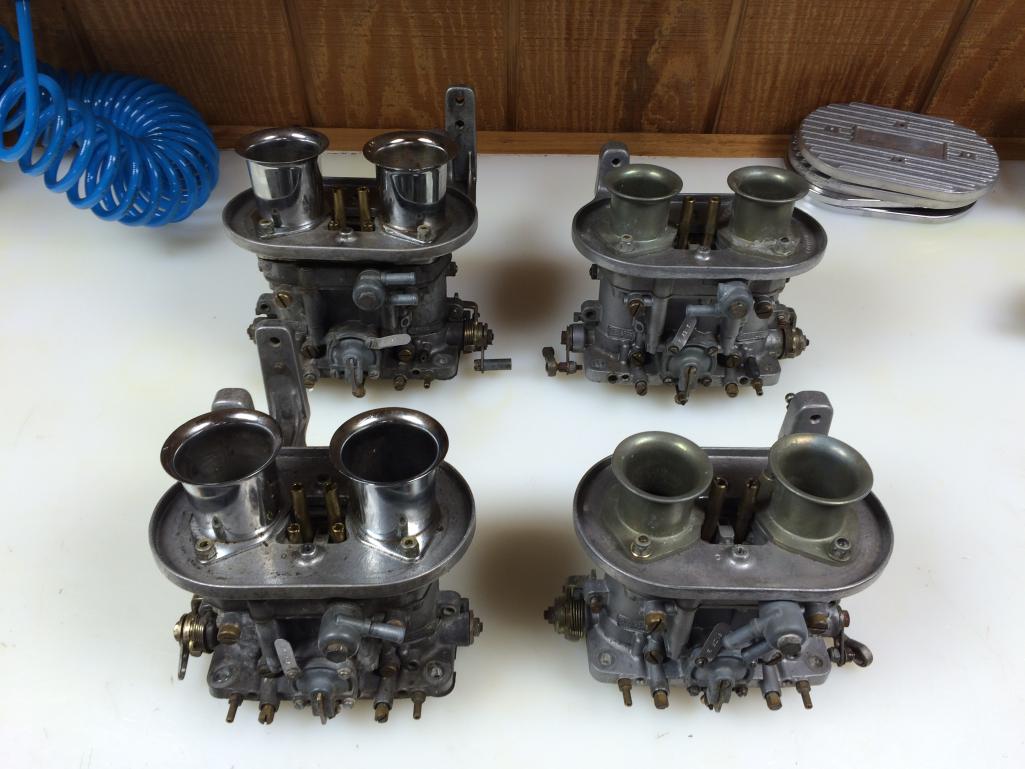 Carbs on left already have the upgrade kits installed, but the throttle shaft is quite sticky. They also have some strange base plates that I have not seen before. I think these base plates allow the hex bar linkage to be installed such that is straight across the engine as opposed to slightly askew? Do we have thoughts or feelings on these base plates? I will run the hexbar linkage for now. I am familiar with it and it works well so long as it is cared for. Still wondering about a throttle cable "locator"? Do I need to make one of these or does someone have one off the shelf? |
| Elliot Cannon |
 Sep 18 2016, 01:48 PM Sep 18 2016, 01:48 PM
Post
#11
|
|
914 Guru      Group: Retired Members Posts: 8,487 Joined: 29-December 06 From: Paso Robles Ca. (Central coast) Member No.: 7,407 Region Association: None 

|
I have had the hex bar linkage on my car for 13 years. When it got kind of loose, I changed it by modifying the air cleaner base plates so heim joint ends could be bolted on. I did this about 7 years ago and have been really happy with it. There is absolutely no play in the linkage and the throttle butterflies open fully and at the same rate. This thread helped. http://www.914world.com/bbs2/index.php?sho...=91831&st=0
Attached image(s) 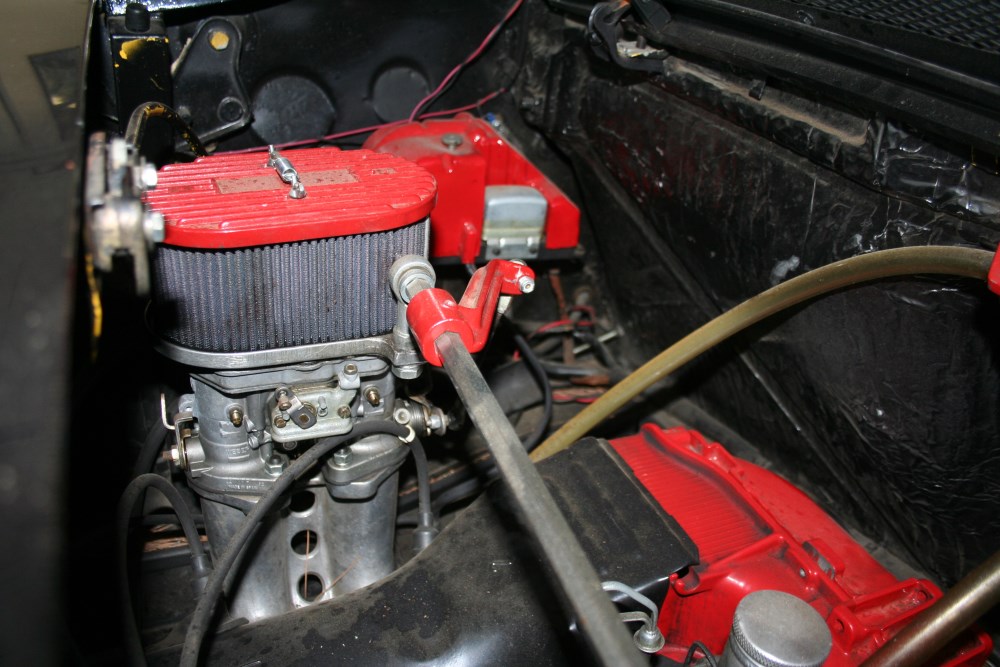 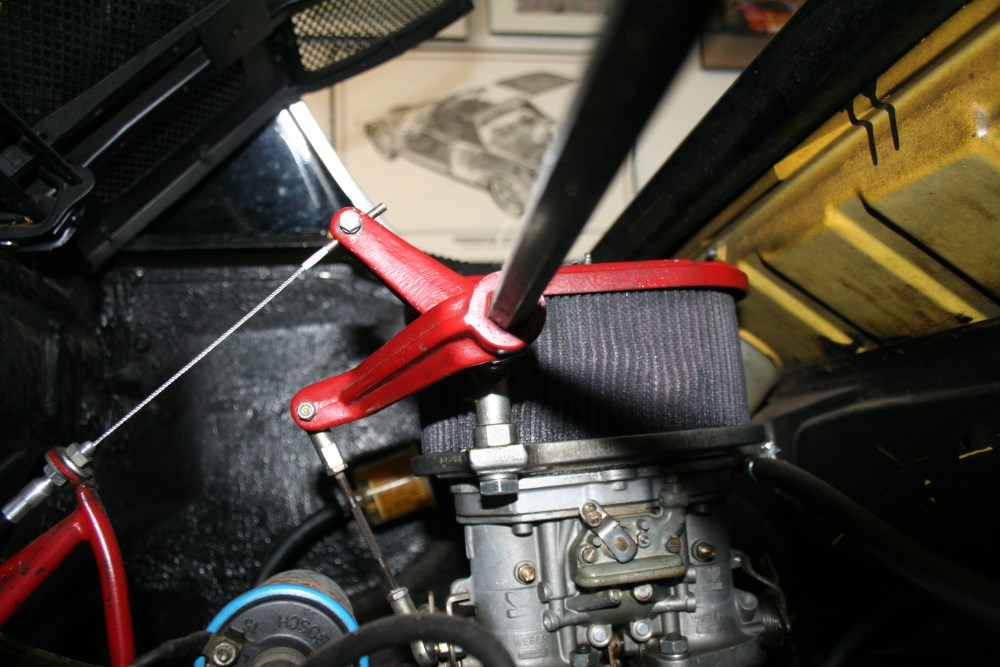
|
| mobymutt |
 Sep 18 2016, 03:34 PM Sep 18 2016, 03:34 PM
Post
#12
|
|
Senior Member    Group: Members Posts: 553 Joined: 16-December 13 From: Kingston, Ontario, Canada Member No.: 16,770 Region Association: Canada |
They also have some strange base plates that I have not seen before. I think these base plates allow the hex bar linkage to be installed such that is straight across the engine as opposed to slightly askew? Do we have thoughts or feelings on these base plates? Still wondering about a throttle cable "locator"? Do I need to make one of these or does someone have one off the shelf? The baseplates are different for left and right sides -- they correct for the offset of the cylinders and allow the hex bar to run straight across the engine, just as you thought. I don't know what linkage system those ones are meant for though. Here is my setup (excuse the dirt): 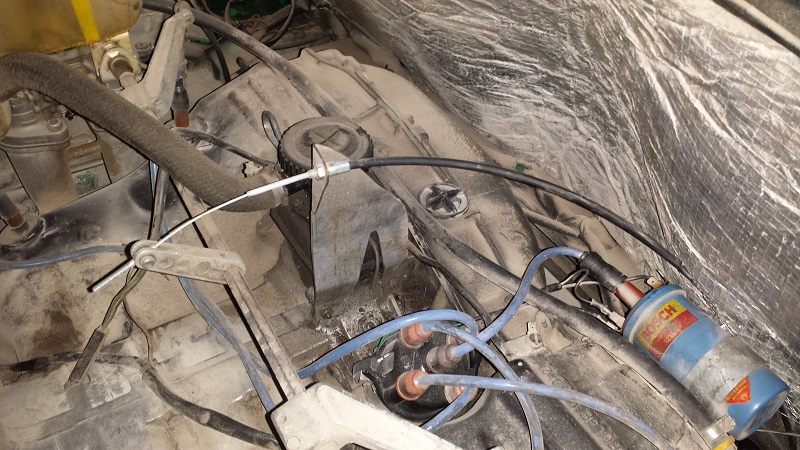 I received the car with this setup, so I don't know whether the throttle cable bracket is DIY, or if it was purchased. I just wanted to note that it does use the stock throttle cable. Also, don't copy this setup, because it makes the throttle cable bend too sharply as it goes around the engine, and it almost binds and is certain to wear out very fast. The setup in the post above looks much nicer! |
| anderssj |
 Sep 18 2016, 03:43 PM Sep 18 2016, 03:43 PM
Post
#13
|
|
Dog is my copilot...    Group: Members Posts: 1,716 Joined: 28-January 03 From: VA Member No.: 207 Region Association: MidAtlantic Region 
|
Getting ready to rebuild carbs for my 2056. Carbs on the right operate better than the ones on the left. So I have the CB upgrade kit(s) ready to install.  Carbs on left already have the upgrade kits installed, but the throttle shaft is quite sticky. They also have some strange base plates that I have not seen before. I think these base plates allow the hex bar linkage to be installed such that is straight across the engine as opposed to slightly askew? Do we have thoughts or feelings on these base plates? I will run the hexbar linkage for now. I am familiar with it and it works well so long as it is cared for. Still wondering about a throttle cable "locator"? Do I need to make one of these or does someone have one off the shelf? A couple of thoughts--I installed the CB upgrade kits a few years ago (I think the kit was referred to as "Dell Doctor"). I found that the performance of the "doctored" carbs wasn't as good as before (though your experience may vary). I discussed this with Art Thraen a few years later when I was getting ready to have Air Cooled Engineering rebuild the carbs; he recommended NOT using the Dell Doctor kits. He explained why, but I can't remember the specifics just now (sorry). As I said, your experience may vary. I've been running the hex bar linkage since first installing the Dells back in the early 1980s. It has worked pretty well as long as the ball ends were in good shape (not sure how many pairs I've been through). Elliot, thanks for the picture of your Heim joint-modified linkage. Definitely food for thought. Your throttle cable guide/fixture also looks nice. Can you provide an additional picture or two when you get a chance? THANKS! |
| sdoolin |
 Sep 19 2016, 06:51 AM Sep 19 2016, 06:51 AM
Post
#14
|
|
Member   Group: Members Posts: 384 Joined: 1-May 14 From: LouKY Member No.: 17,299 Region Association: None |
Interesting about the Dell Doctor kits - thanks for your thoughts. I was inspecting the kit last night and the new venturis are not marked for size and so I wonder if different sizes are even available. I haven't measured what comes with the kit yet, will do so soon.
I am after a specific venturi size (I can't recall exactly which, but I have it noted in my build plans) so I am actually hesitant to install the kits. The Dells I ran on my bus engine were never updated and they did quite nicely. I agree that Elliot's throttle cable locator seems nice. Would like more pics of that. Mobymutt your engine looks like a fire extinguisher let go on it, thanks for the pic. Thanks for all of the posts, viewpoints and pics, it does help out. |
| mobymutt |
 Sep 19 2016, 06:40 PM Sep 19 2016, 06:40 PM
Post
#15
|
|
Senior Member    Group: Members Posts: 553 Joined: 16-December 13 From: Kingston, Ontario, Canada Member No.: 16,770 Region Association: Canada |
|
| sdoolin |
 Sep 19 2016, 06:43 PM Sep 19 2016, 06:43 PM
Post
#16
|
|
Member   Group: Members Posts: 384 Joined: 1-May 14 From: LouKY Member No.: 17,299 Region Association: None |
Calling all Dell/Carb gurus. The rebuild guide and the schematic in the Dellorto Superperformance book call for a washer, an O-Ring and a spring for the mixture needle(s). On all 4 carbs that I currently have, there is no washer in front of the mixture needle. There is an O-Ring, then the spring, then the needle.
Anyone know how bad it is that I don't have the washer? My rebuild kits have the O-Ring, but not a washer. Also, I have it on good word that I should run 34 Venturis for this build. The vents in the Dell Doctor kit measure 38. So I am not gonna install the kit. I do kind of like the idea of the re-located air inlet for the idle jets with the kit, so am curious about using that part of the kit, just not the rest? Do we have thoughts or feelings on that? As always, any/all input appreciated. |
| Elliot Cannon |
 Sep 19 2016, 07:15 PM Sep 19 2016, 07:15 PM
Post
#17
|
|
914 Guru      Group: Retired Members Posts: 8,487 Joined: 29-December 06 From: Paso Robles Ca. (Central coast) Member No.: 7,407 Region Association: None 

|
Interesting about the Dell Doctor kits - thanks for your thoughts. I was inspecting the kit last night and the new venturis are not marked for size and so I wonder if different sizes are even available. I haven't measured what comes with the kit yet, will do so soon. I am after a specific venturi size (I can't recall exactly which, but I have it noted in my build plans) so I am actually hesitant to install the kits. The Dells I ran on my bus engine were never updated and they did quite nicely. I agree that Elliot's throttle cable locator seems nice. Would like more pics of that. Mobymutt your engine looks like a fire extinguisher let go on it, thanks for the pic. Thanks for all of the posts, viewpoints and pics, it does help out. As requested. Attached image(s) 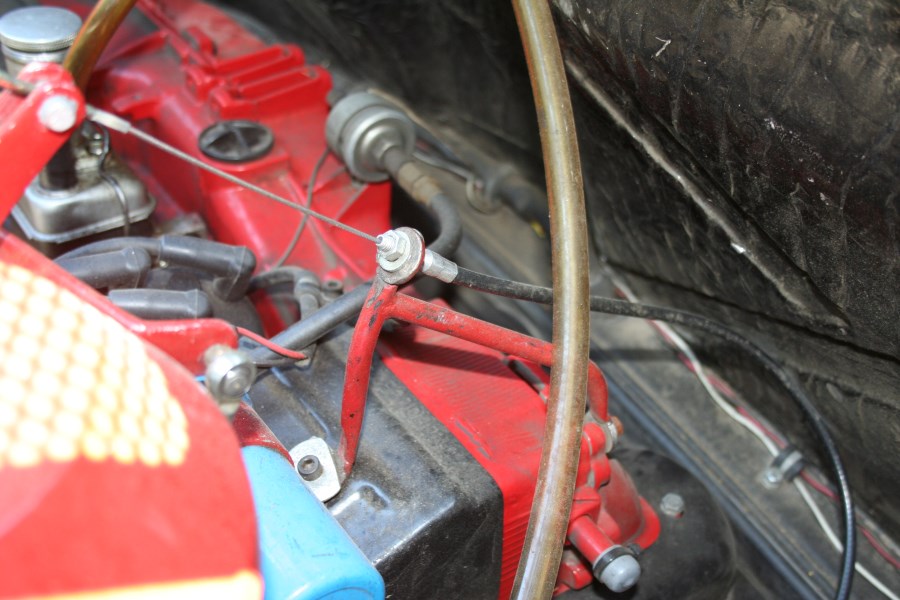 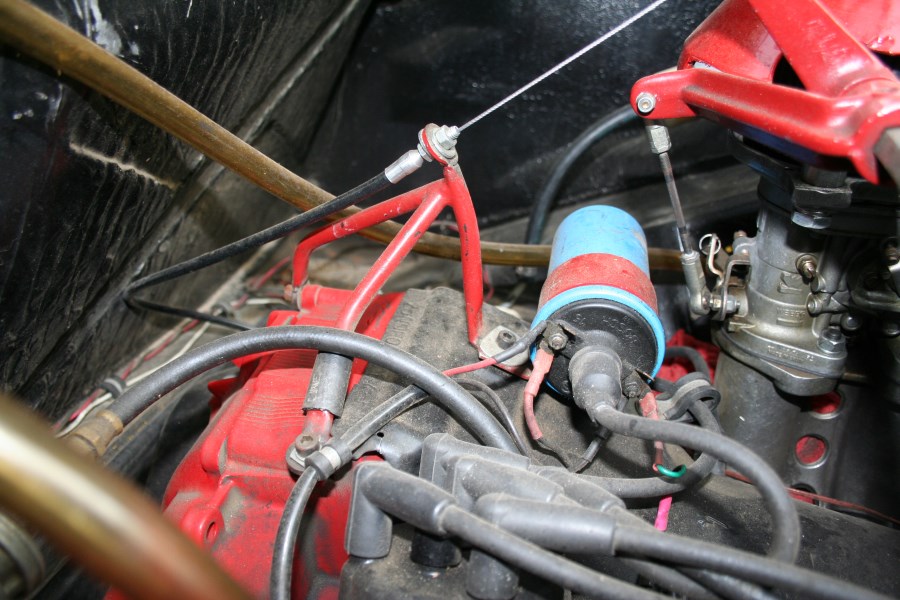
|
| iankarr |
 Sep 19 2016, 07:48 PM Sep 19 2016, 07:48 PM
Post
#18
|
|
The wrencher formerly known as Cuddy_K     Group: Members Posts: 2,528 Joined: 22-May 15 From: Heber City, UT Member No.: 18,749 Region Association: Intermountain Region 
|
I had a hex bar setup and phenolic spacers on my 2056 with IDF 40s. The PO had a fabricated bracket much like the one Elliot posted. The hex bar seemed to require adjustment every 100 miles, so I bought the Tangerine cable linkage. The plate for the linkage was too thick to keep the spacers (and not use longer carb studs), so I ditched em for now. The Tangerine linkage has a throttle cable mount built-in, so I also didn't need the fabricated holder. I just needed to route the cable a bit differently.
Results? Throttle feel is night and day better. Carbs stay in sync way longer without adjustment, haven't experienced any fuel boiling, and engine bay is tidier. Highly recommended. PM me if you have any questions. Good luck! |
| anderssj |
 Sep 19 2016, 07:49 PM Sep 19 2016, 07:49 PM
Post
#19
|
|
Dog is my copilot...    Group: Members Posts: 1,716 Joined: 28-January 03 From: VA Member No.: 207 Region Association: MidAtlantic Region 
|
Calling all Dell/Carb gurus. The rebuild guide and the schematic in the Dellorto Superperformance book call for a washer, an O-Ring and a spring for the mixture needle(s). On all 4 carbs that I currently have, there is no washer in front of the mixture needle. There is an O-Ring, then the spring, then the needle. Anyone know how bad it is that I don't have the washer? My rebuild kits have the O-Ring, but not a washer. Also, I have it on good word that I should run 34 Venturis for this build. The vents in the Dell Doctor kit measure 38. So I am not gonna install the kit. I do kind of like the idea of the re-located air inlet for the idle jets with the kit, so am curious about using that part of the kit, just not the rest? Do we have thoughts or feelings on that? As always, any/all input appreciated. OK, I've got a .pdf copy of the 6-7 pages of instructions that came with my CB Dell kit, along with my notes from my early- to mid-1980s installation. I also have both of the 6+ page articles from "Dunebuggies and Hot VWs" (May and June 1983), and another from "VW Trends." All provide pretty good rules of thumb on set-up, jet sizing, etc. Is there a way to post these here? Even if not, I'm willing to email them to anyone that wants them--PM me if that's the case. FWIW, my DRLA40s are set up with 30mm main venturis, 55 idle jets, 135 main jets, 180 air correction jets, and 9164.2 emulsion tubes. I know these are a little smaller than the factory settings, but they seem to work well with the current engine rebuild (balanced "GA" 2.0L, Elgin 7008-4 cam [280* duration, .332 lobe lift], Mahle Euro PC set [8.0:1]). Not sure of the HP numbers, etc., but this set-up let me max out the 120 mph speedometer at the end of the long straight at Seattle International Raceway. (IMG:style_emoticons/default/smile.gif) Hope this helps. Elliot and CuddyK, thanks pictures of the cable holder and the input on the Tangerine cable set-up! |
| sdoolin |
 Sep 20 2016, 06:20 AM Sep 20 2016, 06:20 AM
Post
#20
|
|
Member   Group: Members Posts: 384 Joined: 1-May 14 From: LouKY Member No.: 17,299 Region Association: None |
Yes Elliot, thanks for the pics. I am going to have a look at the Tangerine linkage. If nothing else it is worth it to me for a throttle cable locator, I am after an OE type mount/locator (yes I know there were never carbs offered as OE) to go with my super sano build.
While I am clear on the jet, venture and emulsion tube sizes I am after, and I have 2 copies of the Dellorto Superperformance book that is an excellent reference guide, I'd like to see those articles, will PM you for details. Anyone have any ideas on the washers for the mixture needles? It would seem a good idea otherwise all needle adjustments are being made against a soft(ish) O-Ring and that seems, well, temporary at best. |
  |
1 User(s) are reading this topic (1 Guests and 0 Anonymous Users)
0 Members:

|
Lo-Fi Version | Time is now: 6th January 2025 - 06:12 PM |
Invision Power Board
v9.1.4 © 2025 IPS, Inc.


