|
|

|
Porsche, and the Porsche crest are registered trademarks of Dr. Ing. h.c. F. Porsche AG.
This site is not affiliated with Porsche in any way. Its only purpose is to provide an online forum for car enthusiasts. All other trademarks are property of their respective owners. |
|
|
  |
| tygaboy |
 Dec 17 2016, 05:37 PM Dec 17 2016, 05:37 PM
Post
#121
|
|
914 Guru      Group: Members Posts: 5,543 Joined: 6-October 15 From: Petaluma, CA Member No.: 19,241 Region Association: Northern California 
|
It's all fitting just as planned. I (IMG:style_emoticons/default/wub.gif) how the roll bend of the hoop matches the curve of the window and how the hoop all but disappears.
It'll really disappear once I patch in the fire wall around each side. Can't hardly wait! Attached thumbnail(s) 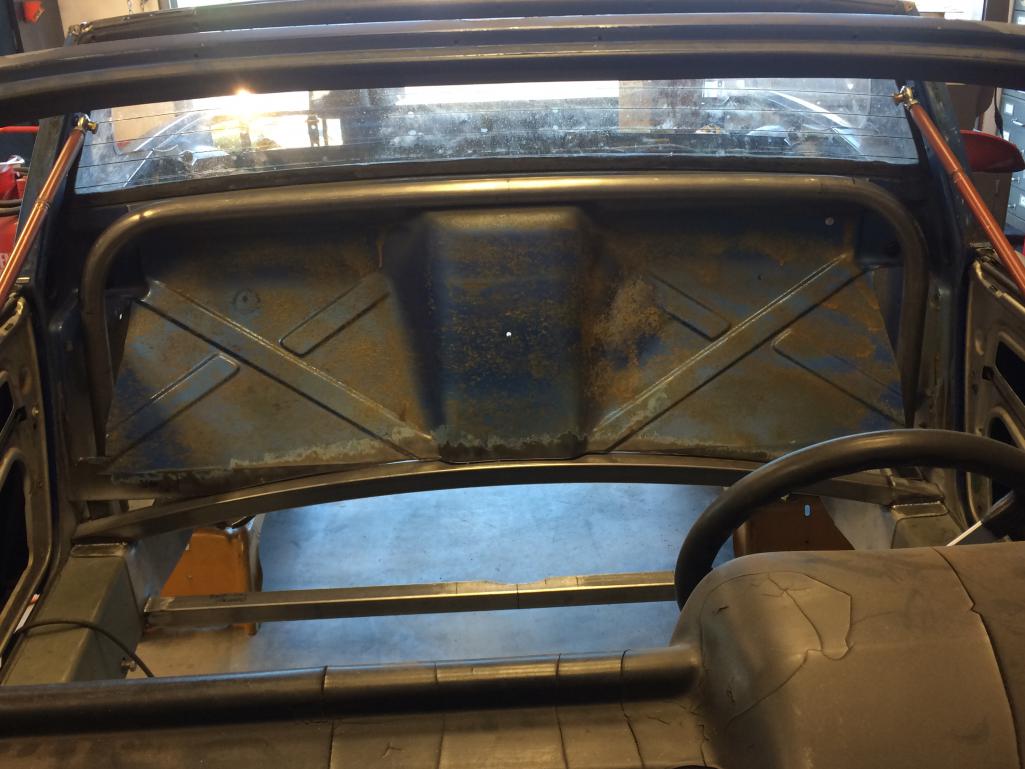
|
| napasteve |
 Dec 17 2016, 05:51 PM Dec 17 2016, 05:51 PM
Post
#122
|
|
914 driving winemaker    Group: Members Posts: 510 Joined: 2-January 13 From: Napa, CA Member No.: 15,327 Region Association: Northern California 
|
Amazing work Chris. It's going to be a rocket ship. BTW that dash looks a little tired..(IMG:style_emoticons/default/smile.gif)
|
| tygaboy |
 Dec 17 2016, 06:03 PM Dec 17 2016, 06:03 PM
Post
#123
|
|
914 Guru      Group: Members Posts: 5,543 Joined: 6-October 15 From: Petaluma, CA Member No.: 19,241 Region Association: Northern California 
|
Amazing work Chris. It's going to be a rocket ship. BTW that dash looks a little tired..(IMG:style_emoticons/default/smile.gif) Hey, I resemble that remark! I prefer "vintage" or "patina"! |
| Dion |
 Dec 17 2016, 06:45 PM Dec 17 2016, 06:45 PM
Post
#124
|
|
RN     Group: Members Posts: 2,837 Joined: 16-September 04 From: Audubon,PA Member No.: 2,766 Region Association: MidAtlantic Region 

|
Sweet work Chris. Really nice. You are kickin it out!
|
| mgp4591 |
 Dec 17 2016, 07:14 PM Dec 17 2016, 07:14 PM
Post
#125
|
|
914 Guru      Group: Members Posts: 5,601 Joined: 1-August 12 From: Salt Lake City Ut Member No.: 14,748 Region Association: Intermountain Region 
|
Amazing work Chris. It's going to be a rocket ship. BTW that dash looks a little tired..(IMG:style_emoticons/default/smile.gif) Hey, I resemble that remark! I prefer "vintage" or "patina"! That's a great way to describe a lot of us AND our cars - I prefer "vintage" or "patinaed" to "old"... (IMG:style_emoticons/default/biggrin.gif) |
| tygaboy |
 Dec 18 2016, 03:55 PM Dec 18 2016, 03:55 PM
Post
#126
|
|
914 Guru      Group: Members Posts: 5,543 Joined: 6-October 15 From: Petaluma, CA Member No.: 19,241 Region Association: Northern California 
|
Did I say I wasn't efficient? Well, turns out I thought I should check to be sure my fabulous gussets would work... They wouldn't. They need to be flat for the first ~3" to clear the engine mount on the chassis. So that earlier work is throw-away. (IMG:style_emoticons/default/headbang.gif) My own dang fault but, oh well.
So, I opted to design up the new gussets and cut them on the plasma table. The trellis look is more in keeping with the theme I have planned for the car so it's out with the holes and in with the triangles (ish). Another part of the car that will go unseen by essentially everyone but I do like these better than the first design. That existing bracket is the electric water pump mount. I figured I'd just tie into it. I hope to have it welded tomorrow. Then it's on to the transmission mounting brackets and updating them to address the 1 1/2" forward position. I have what I think is a pretty good design. More on that in the next few days. Attached thumbnail(s) 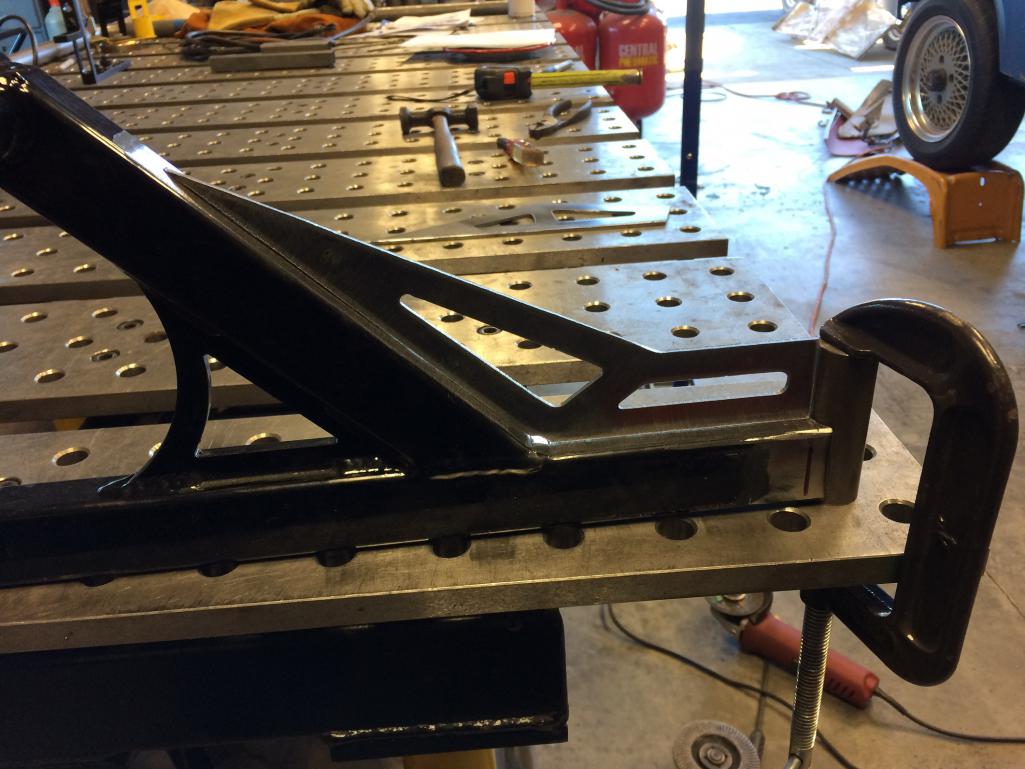 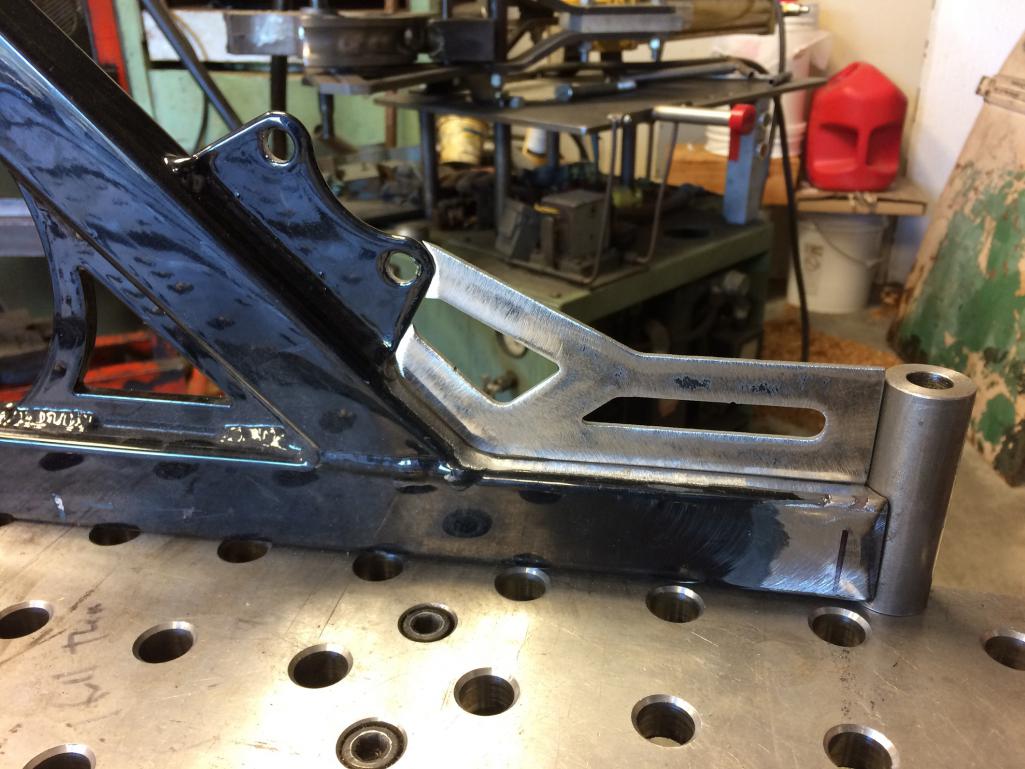 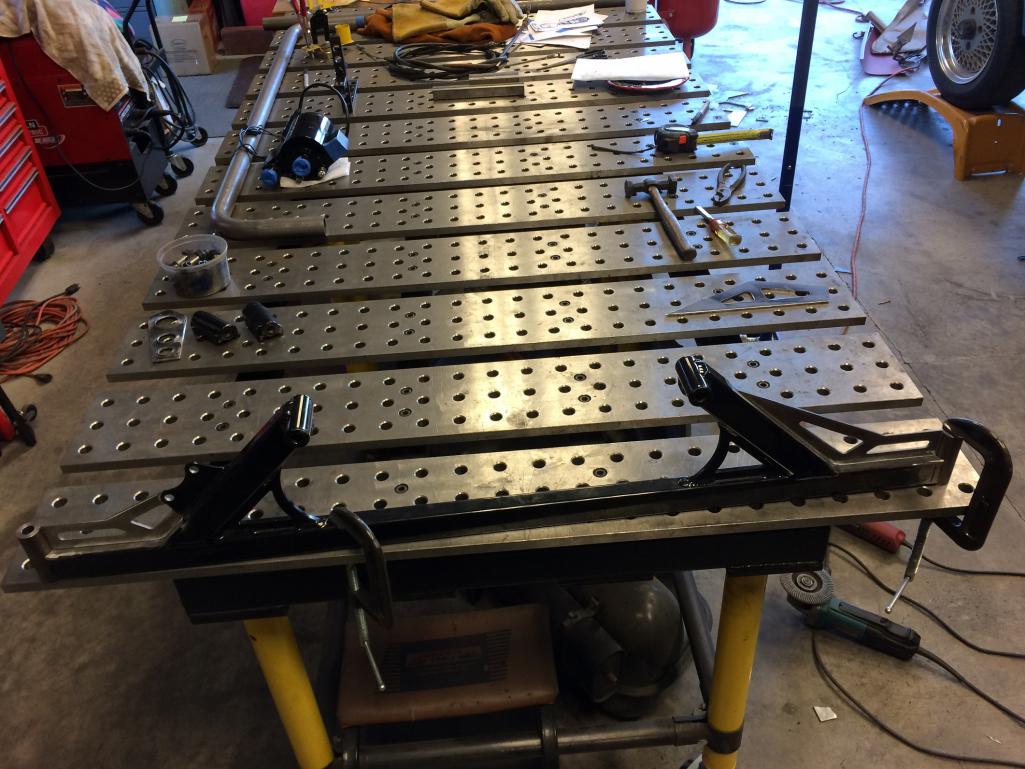
|
| sixnotfour |
 Dec 18 2016, 04:57 PM Dec 18 2016, 04:57 PM
Post
#127
|
|
914 Wizard           Group: Members Posts: 10,771 Joined: 12-September 04 From: Life Elevated..planet UT. Member No.: 2,744 Region Association: Rocky Mountains 

|
I applauded your effort,, and follow it ,,my question is ...Roll bar,,why not like this but just tall enough for a top..its my next roll bar.. right behind the latch.. (IMG:style_emoticons/default/beerchug.gif)
Attached image(s) 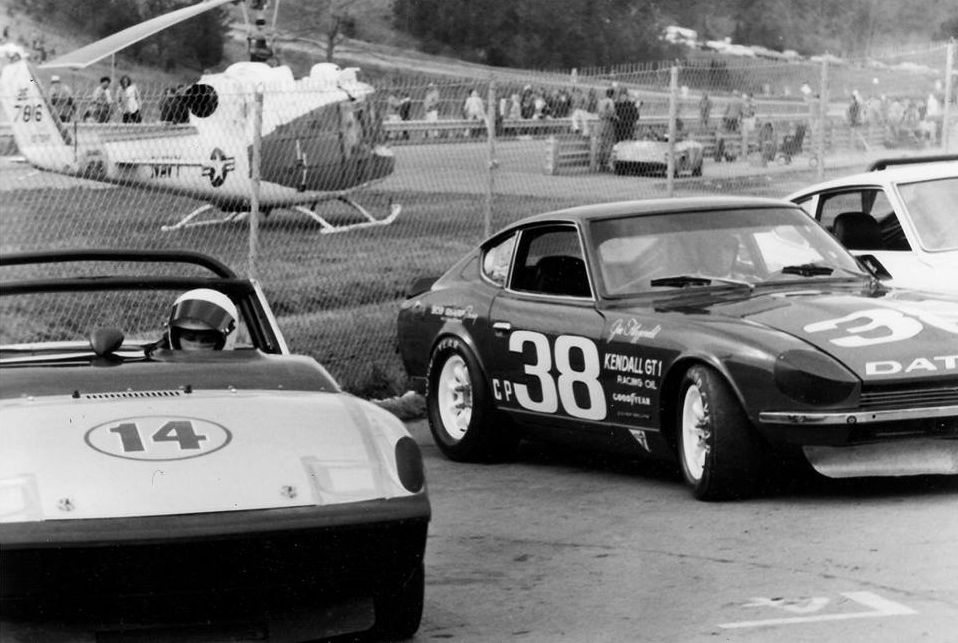
|
| Rand |
 Dec 18 2016, 05:22 PM Dec 18 2016, 05:22 PM
Post
#128
|
|
Cross Member      Group: Members Posts: 7,410 Joined: 8-February 05 From: OR Member No.: 3,573 Region Association: None |
Because it sticks out like a sore thumb? I appreciate it when the original lines are preserved. (I know, aesthetics go out the window with race cars because function first, but if they don't have to, all the better.) His car is going to be plenty stiff. Are you concerned with rollover protection beyond the stock hoop? (I know, I'm full of opinions, but I ask because I want to learn.)
(IMG:style_emoticons/default/beer.gif) |
| Cracker |
 Dec 18 2016, 07:13 PM Dec 18 2016, 07:13 PM
Post
#129
|
|
Advanced Member     Group: Members Posts: 2,148 Joined: 2-February 10 From: Atlanta (area) Member No.: 11,316 Region Association: South East States 
|
That bar is at a functional height due to a safety standard. Damn with originality if its not legal and not safe if not legal. Many race cars are driven at speed with non-compliant upper roll hoops (which equals stupid in my book).
Nice work Chris! Make sure I fit - I want to take it for a spin this Summer! No breaks for you... (IMG:style_emoticons/default/beerchug.gif) Tony |
| tygaboy |
 Dec 18 2016, 07:15 PM Dec 18 2016, 07:15 PM
Post
#130
|
|
914 Guru      Group: Members Posts: 5,543 Joined: 6-October 15 From: Petaluma, CA Member No.: 19,241 Region Association: Northern California 
|
I applauded your effort,, and follow it ,,my question is ...Roll bar,,why not like this but just tall enough for a top..its my next roll bar.. right behind the latch.. (IMG:style_emoticons/default/beerchug.gif) What Rand said. I want to stiffen the chassis and preserve, as much as I can, a non-race car look. Plus, I have a defective gene that manifests itself through me wanting to try things that you don't see every day. What can I say? I like unique! |
| tygaboy |
 Dec 18 2016, 07:28 PM Dec 18 2016, 07:28 PM
Post
#131
|
|
914 Guru      Group: Members Posts: 5,543 Joined: 6-October 15 From: Petaluma, CA Member No.: 19,241 Region Association: Northern California 
|
Do I have ADD? Maybe. Today, for sure. Too many things going at once! After I cut the gussets, I got distracted by the main hoop again.
I can't get the hoop into place with the final interior sheet metal in place - the shape of the hoop and angle it has to be at to be fit into the car don't allow it. Before the hoop can be welded in, I have to fab a bunch of pieces of sheet metal that will be slipped onto the hoop, slid out of the way while it's set in place and welded in. Then all the sheet metal will slid into place to be welded. It's hard to explain but maybe this series of pics will help. This is the early fab and fitting of how I plan to close in the hoop. I punched and dimple died that top piece and started messing with rolling the other piece and using the bead roller to form the flange. I'll use a combination of fabricated pieces and some of the stock firewall from the parts car. So at this point, it's really at the "see how this fits/looks, try again if I don't like it" stage. By the way, I don't like this. It'll be MUCH tidier, the stamped elements in the fire wall will terminate in an attractive way, etc. But you get the idea. Attached thumbnail(s) 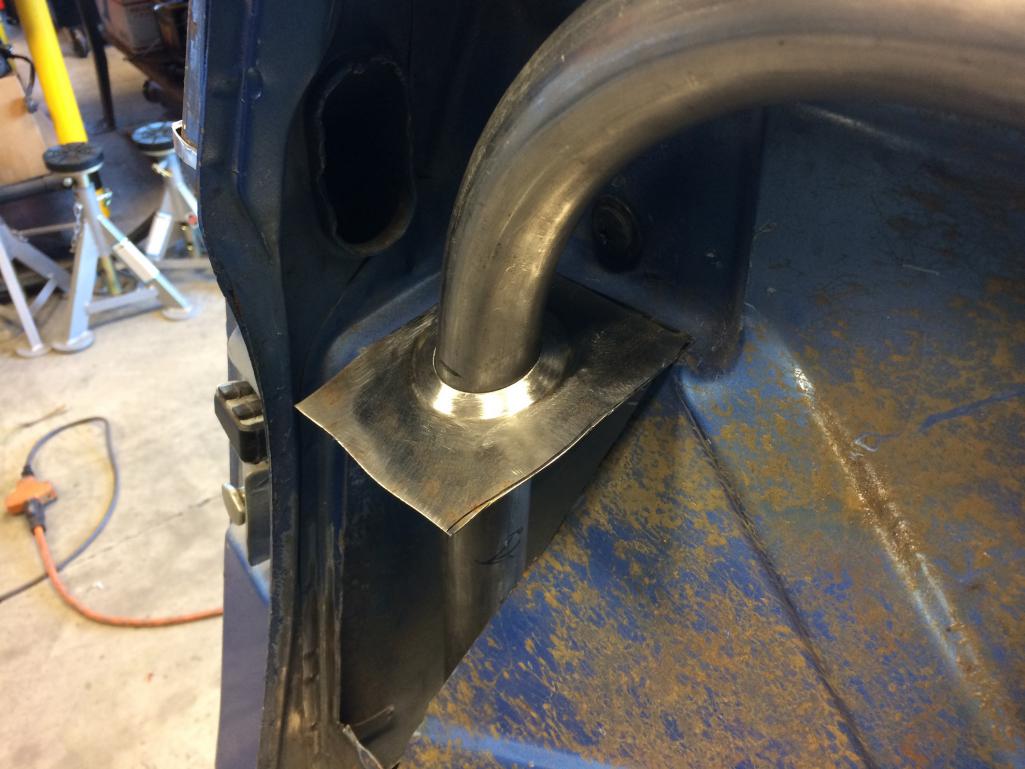 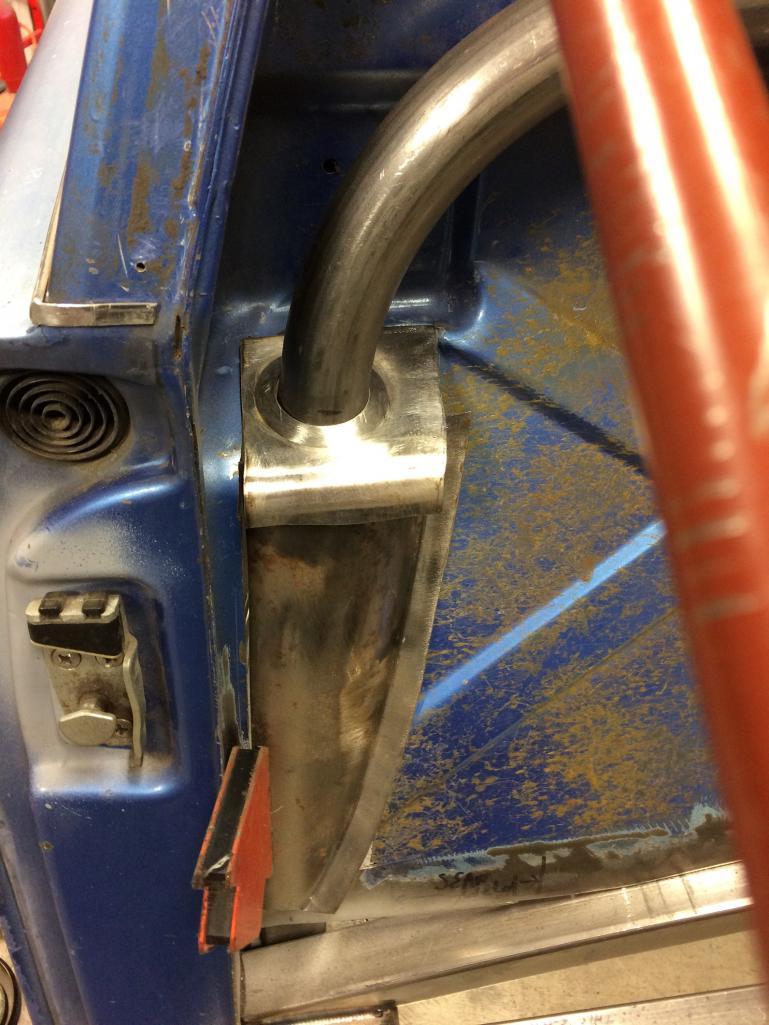
|
| sixnotfour |
 Dec 19 2016, 01:22 AM Dec 19 2016, 01:22 AM
Post
#132
|
|
914 Wizard           Group: Members Posts: 10,771 Joined: 12-September 04 From: Life Elevated..planet UT. Member No.: 2,744 Region Association: Rocky Mountains 

|
its all good , I did not I'mply for it to stick out like a sore thumb , just integrated into the body ,similar to the pic but at the og body height with his small bend radius it would blend in...no race car...
|
| tygaboy |
 Dec 19 2016, 09:58 AM Dec 19 2016, 09:58 AM
Post
#133
|
|
914 Guru      Group: Members Posts: 5,543 Joined: 6-October 15 From: Petaluma, CA Member No.: 19,241 Region Association: Northern California 
|
its all good , I did not I'mply for it to stick out like a sore thumb , just integrated into the body ,similar to the pic but at the og body height with his small bend radius it would blend in...no race car... I bent up a more traditional main hoop before deciding to go with the low hoop. This would make a great start for a non-race car. Know anyone who'd want it? (IMG:style_emoticons/default/biggrin.gif) Attached image(s) 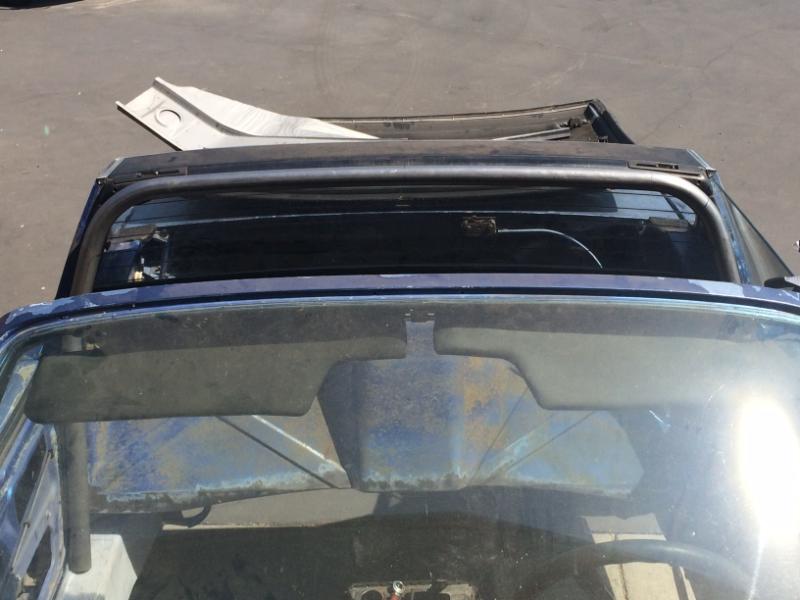 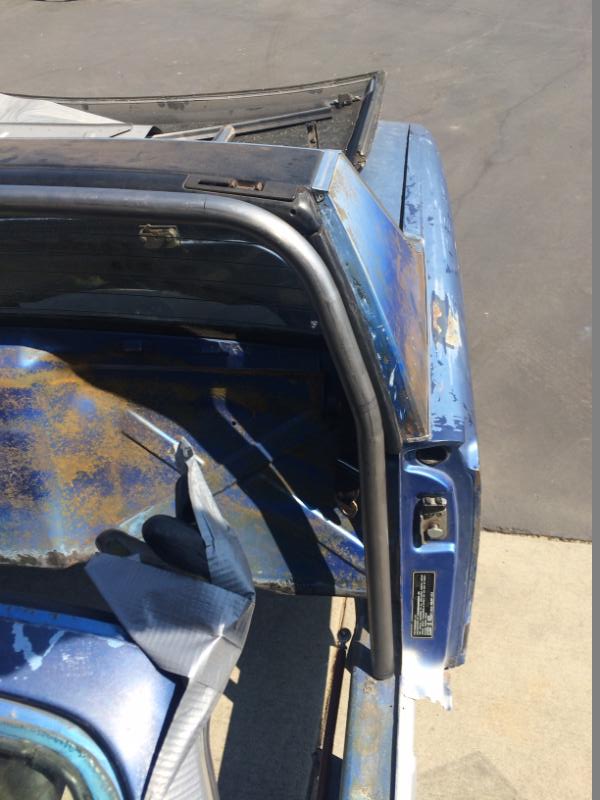
|
| 3d914 |
 Dec 19 2016, 06:44 PM Dec 19 2016, 06:44 PM
Post
#134
|
|
Senior Member    Group: Members Posts: 1,275 Joined: 24-September 03 From: Benson, AZ Member No.: 1,191 Region Association: Southwest Region |
Chris, so you're not going to use that good-looking roll-bar? You're engine bar (cross-bar) looks really nice too!
|
| waltonsm |
 Dec 19 2016, 10:18 PM Dec 19 2016, 10:18 PM
Post
#135
|
|
Member   Group: Members Posts: 93 Joined: 27-June 14 From: United States Member No.: 17,561 Region Association: Pacific Northwest 
|
its all good , I did not I'mply for it to stick out like a sore thumb , just integrated into the body ,similar to the pic but at the og body height with his small bend radius it would blend in...no race car... I bent up a more traditional main hoop before deciding to go with the low hoop. This would make a great start for a non-race car. Know anyone who'd want it? :D Chris, I am following your posts closely as I am about to embark on some very nearly identical chassis work, and street roll bar and door bar. I am interested in the bar and other parts you may have fabbed and chosen not to use along the way. My plan is to bring the complete harnesses, chassis, and engine computers (and modified steering column and controls from the 2011 WRX I have mostly next to it in the garage. Steve |
| tygaboy |
 Dec 20 2016, 08:42 AM Dec 20 2016, 08:42 AM
Post
#136
|
|
914 Guru      Group: Members Posts: 5,543 Joined: 6-October 15 From: Petaluma, CA Member No.: 19,241 Region Association: Northern California 
|
Chris, I am following your posts closely as I am about to embark on some very nearly identical chassis work, and street roll bar and door bar. I am interested in the bar and other parts you may have fabbed and chosen not to use along the way. My plan is to bring the complete harnesses, chassis, and engine computers (and modified steering column and controls from the 2011 WRX I have mostly next to it in the garage. Steve Hi Steve, PM sent. |
| tygaboy |
 Dec 20 2016, 07:15 PM Dec 20 2016, 07:15 PM
Post
#137
|
|
914 Guru      Group: Members Posts: 5,543 Joined: 6-October 15 From: Petaluma, CA Member No.: 19,241 Region Association: Northern California 
|
Finished the modification of the engine mount - gusset final welding complete!
I plan to get everything modified, installed and get the car running then blow it apart and do the powder coating, etc. So for now, I'll just rattle can primer parts like this. Attached thumbnail(s) 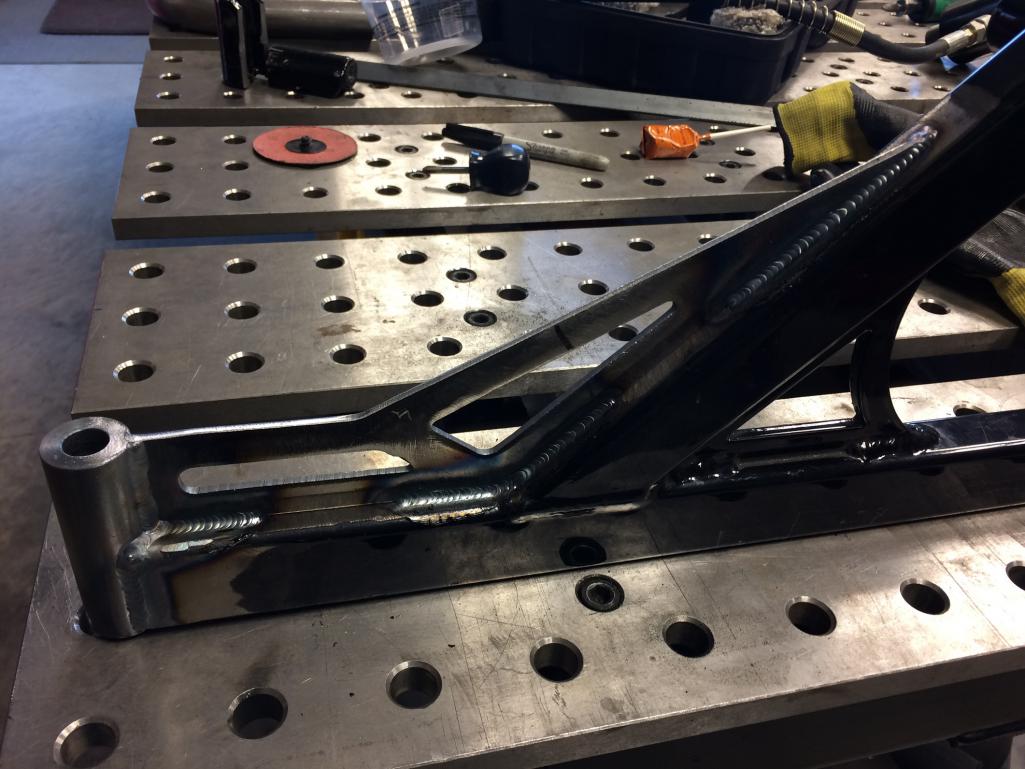 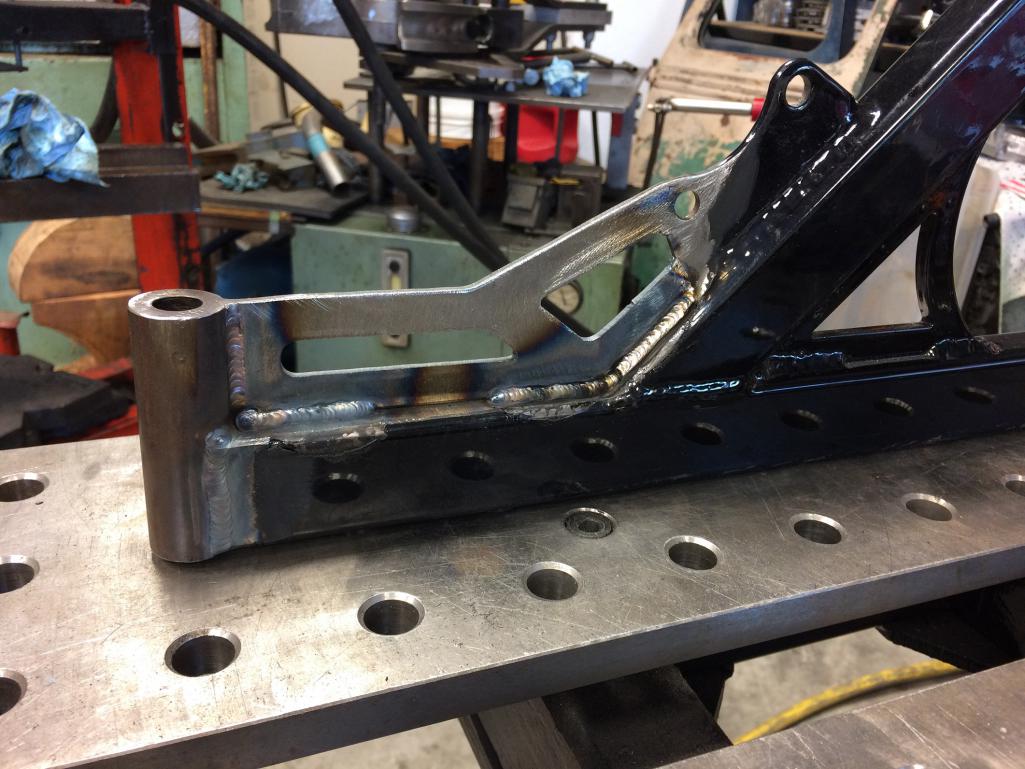
|
| tygaboy |
 Dec 20 2016, 07:23 PM Dec 20 2016, 07:23 PM
Post
#138
|
|
914 Guru      Group: Members Posts: 5,543 Joined: 6-October 15 From: Petaluma, CA Member No.: 19,241 Region Association: Northern California 
|
With the engine mount complete, it's time to deal with the 1.5" position change on the trans mounts. The good news is that the Renegade mount is made of multiple parts and thankfully, their design allows for a pretty simple solution: make a couple spacers. 1 1/2 " spacers, but spacers, nonetheless.
Nothing like finding a block of aluminum that happens to be the exact right thickness! Got lucky on that one, for sure. So here's an action shot of the worlds most kick-ass band saw making short work of roughing out said spacers. (IMG:style_emoticons/default/sawzall-smiley.gif) It cut through that block "like butta..." (IMG:style_emoticons/default/aktion035.gif) Yes, this spacer means there's a big increase in the leverage on the mount. But fear not! The Boxster trans has a mount on the end that I'm going to use to add a 3rd trans mount. In all, the drive train should be well secured in it's new, forward position. I hope to get it test fit in the next day or so. Once I've verified all the clearances, I'll go after closing in the fire wall and floor. I'll claim MAJOR MILESTONE at that point. Attached thumbnail(s) 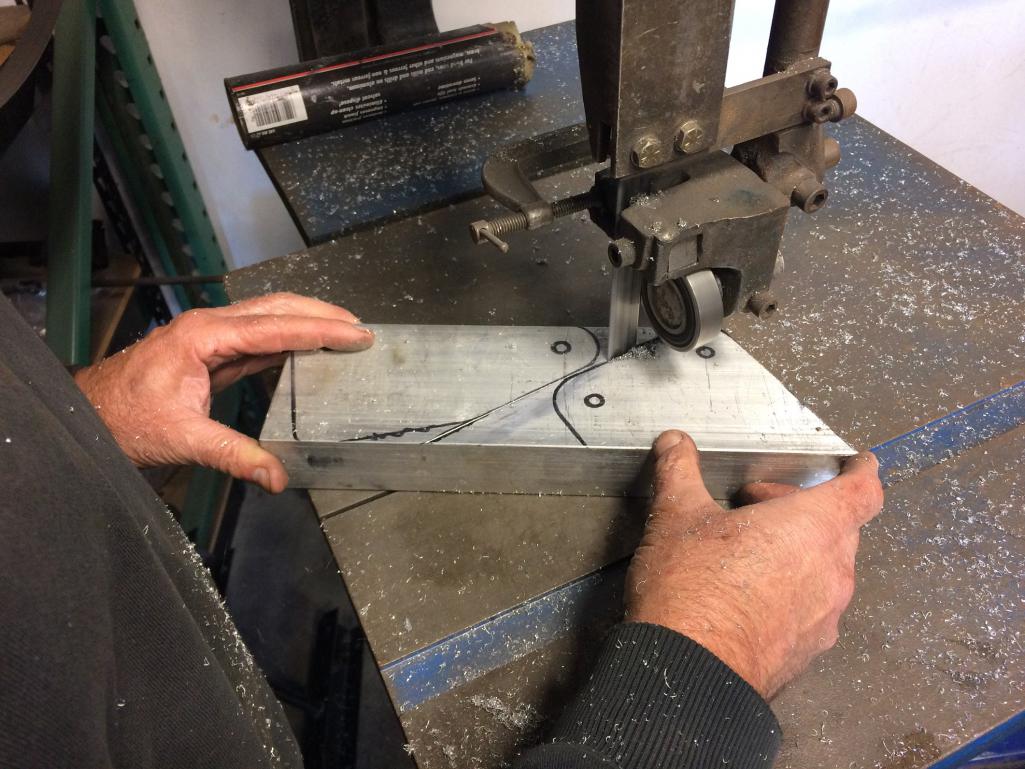
|
| tygaboy |
 Dec 20 2016, 07:34 PM Dec 20 2016, 07:34 PM
Post
#139
|
|
914 Guru      Group: Members Posts: 5,543 Joined: 6-October 15 From: Petaluma, CA Member No.: 19,241 Region Association: Northern California 
|
With solid progress on the mounts, I went back to working on the main hoop fitment.
I'm sure I'm not alone in laying awake at night, running through "... now how am I gonna make this work...? If it have to make tab A fit into slot B, first I'd need to..." You know what I'm taking about, don't you? (IMG:style_emoticons/default/biggrin.gif) So, after many sleepless hours, I figured if I split the hole the hoop goes through, I'd be able to finish weld the area that will end up being behind the hoop. This does 2 things: 1. it perfectly locates the hoop every time I remove it / replace it to do whatever needs doing, and, 2. it allows me full access to metal finish every bit of welding I need to do to close it in! Again, no one but me may ever see this part of the car but I want it to look as factory as possible. So far, I'm happy with how this part is turning out. Attached thumbnail(s) 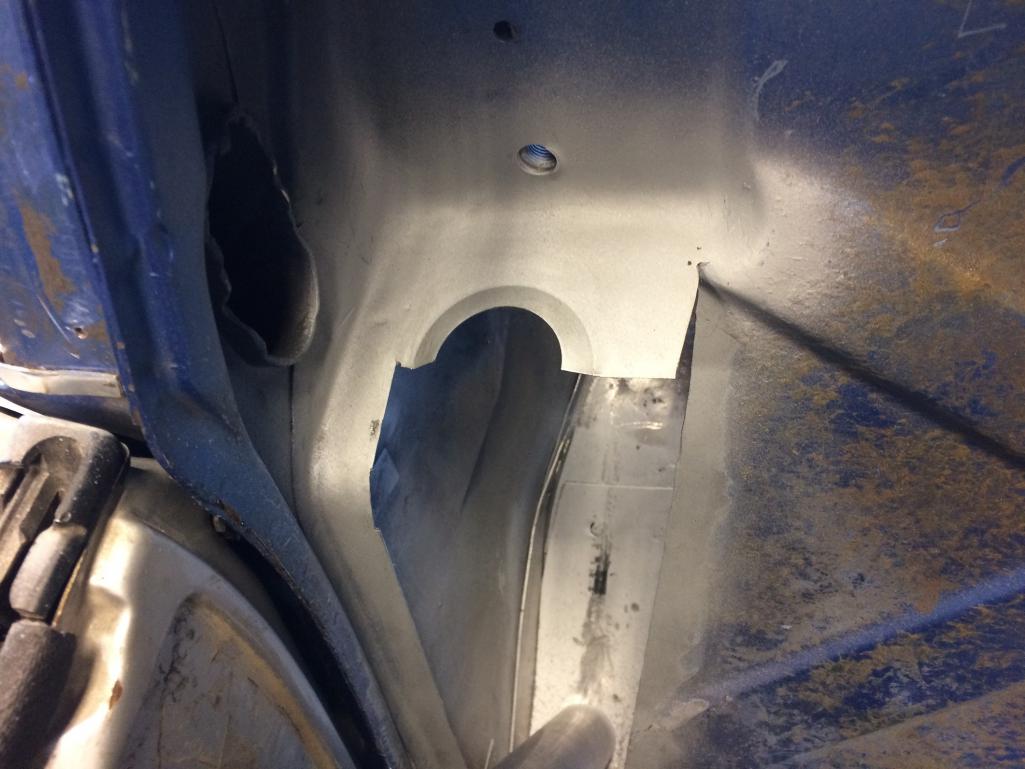 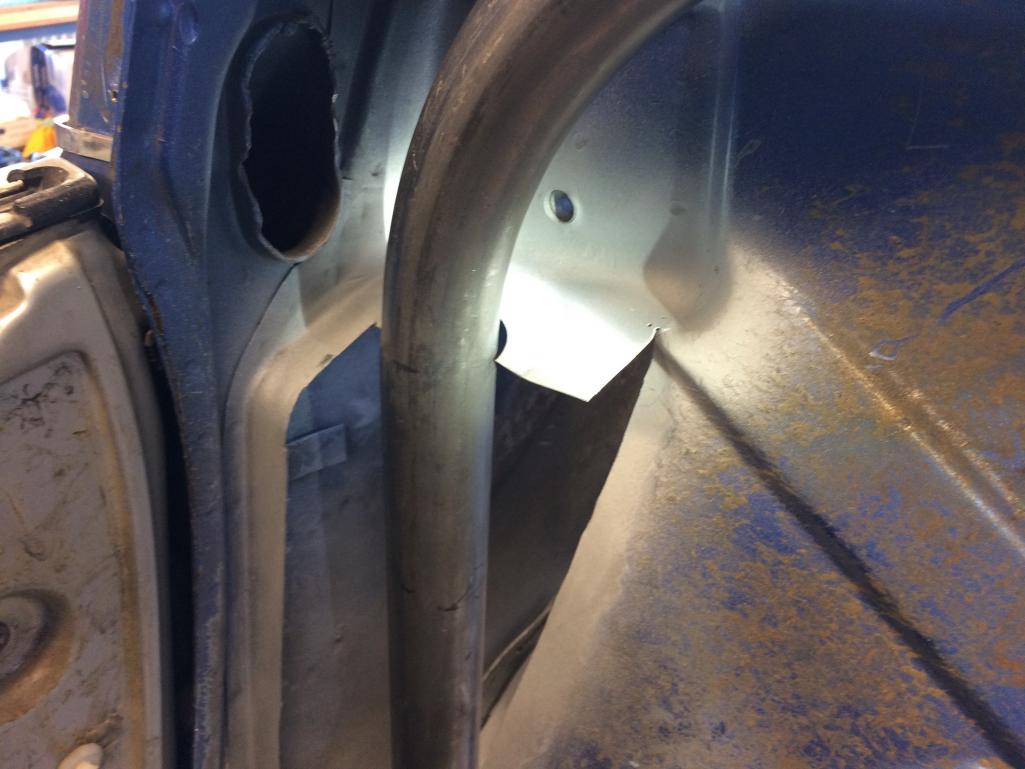
|
| Rand |
 Dec 20 2016, 07:47 PM Dec 20 2016, 07:47 PM
Post
#140
|
|
Cross Member      Group: Members Posts: 7,410 Joined: 8-February 05 From: OR Member No.: 3,573 Region Association: None |
Totally enjoying your build thread. It's so great to see thoughtful fabrication, attention to detail, and... quality welds! (Nice scales instead of straight blobs laid on top, or worse, what I jokingly call "eagle crap" lol)
(IMG:style_emoticons/default/smilie_pokal.gif) |
  |
1 User(s) are reading this topic (1 Guests and 0 Anonymous Users)
0 Members:

|
Lo-Fi Version | Time is now: 9th April 2025 - 10:58 PM |
Invision Power Board
v9.1.4 © 2025 IPS, Inc.


