|
|

|
Porsche, and the Porsche crest are registered trademarks of Dr. Ing. h.c. F. Porsche AG.
This site is not affiliated with Porsche in any way. Its only purpose is to provide an online forum for car enthusiasts. All other trademarks are property of their respective owners. |
|
|
  |
| tygaboy |
 Nov 6 2019, 05:14 PM Nov 6 2019, 05:14 PM
Post
#1981
|
|
914 Guru      Group: Members Posts: 5,552 Joined: 6-October 15 From: Petaluma, CA Member No.: 19,241 Region Association: Northern California 
|
Rod Stewart sang that "the first cut is the deepest..." I would suggest that the 2nd and 3rd cuts were pretty f-ing deep, too! (IMG:style_emoticons/default/lol-2.gif)
And actually, not deep enough. You can see there's a piece of the inner structure that my cut-off wheel couldn't reach. I was desperate to get the new pick up placed in there, just to see it, so I just bent it out of the way. Have no fear, I'll get in there and remove it before things get buttoned up. Attached thumbnail(s) 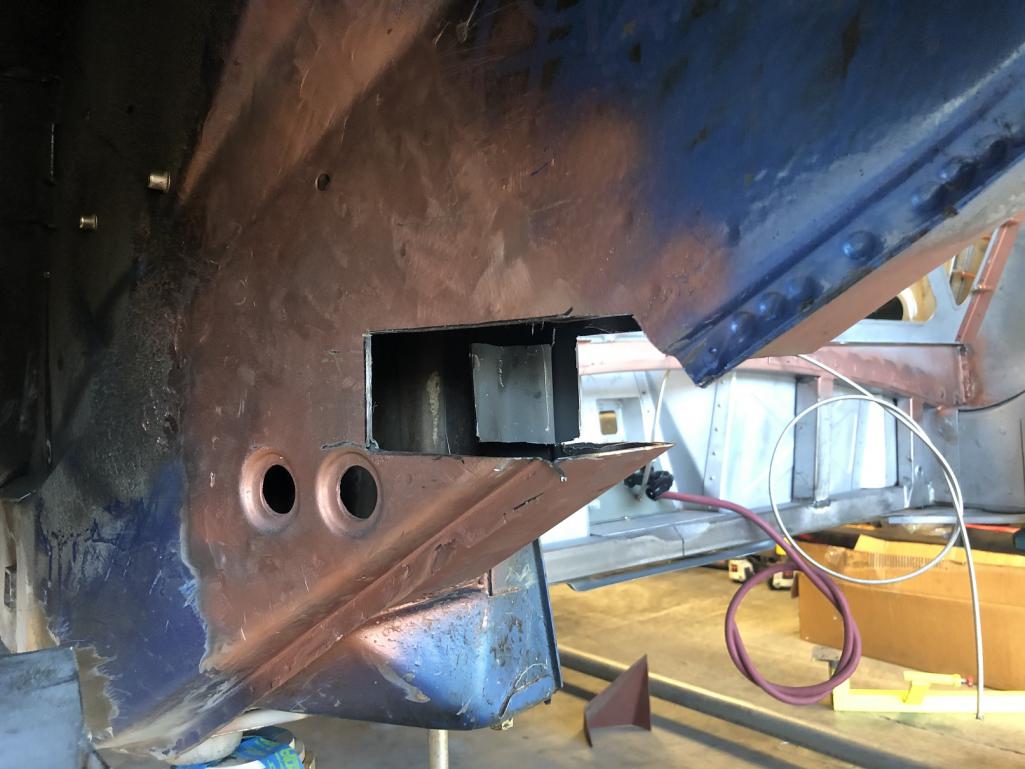 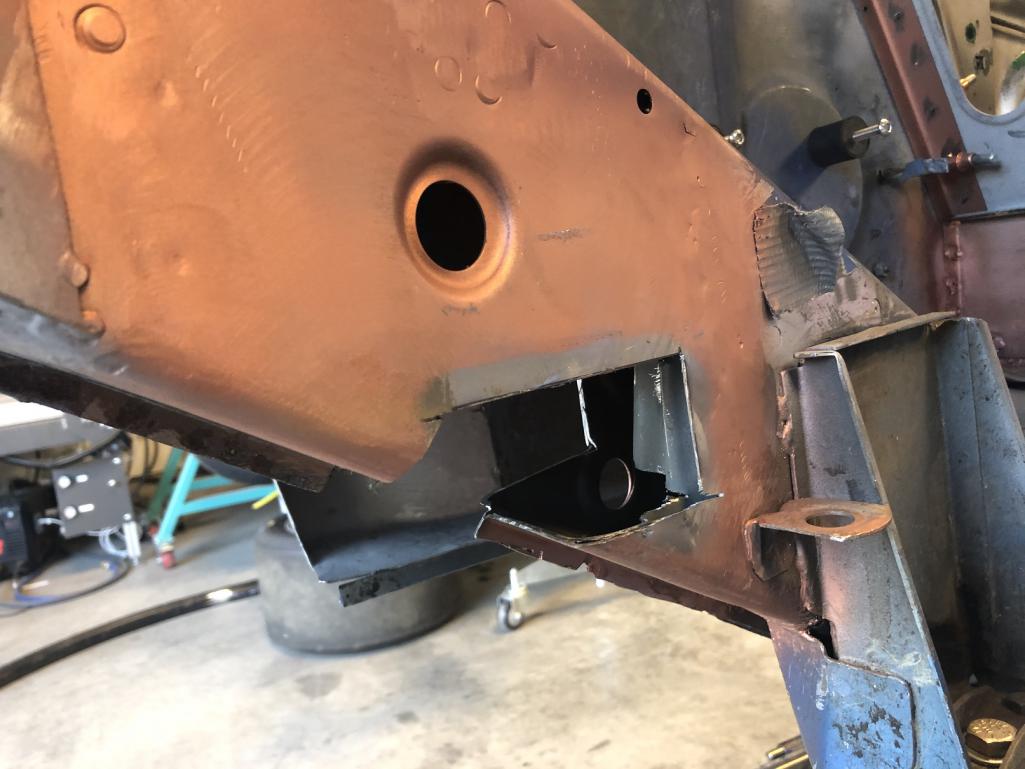
|
| tygaboy |
 Nov 6 2019, 05:25 PM Nov 6 2019, 05:25 PM
Post
#1982
|
|
914 Guru      Group: Members Posts: 5,552 Joined: 6-October 15 From: Petaluma, CA Member No.: 19,241 Region Association: Northern California 
|
So far, this part is moving along far more quickly than removing the stock pick ups.
And as Jeff Hail pointed out in his resent post here, @ChrisFoley hit it out of the park with this set up. The parts fit so nicely that it almost assembles itself! Let me explain. The kit includes all the needed structural plating that gets welded in and helps support this main piece. In looking at them and comparing them to the pics in the instructions, I couldn't quite understand how things were supposed to fit. I was about to give Chris a call for some help. But once I got the main part set in place, it was instantly clear how things should fit and the plates essentially show you exactly what material needs to be removed to get everything just as it needs to be. It's all really, really well thought out and manufactured. Attached thumbnail(s) 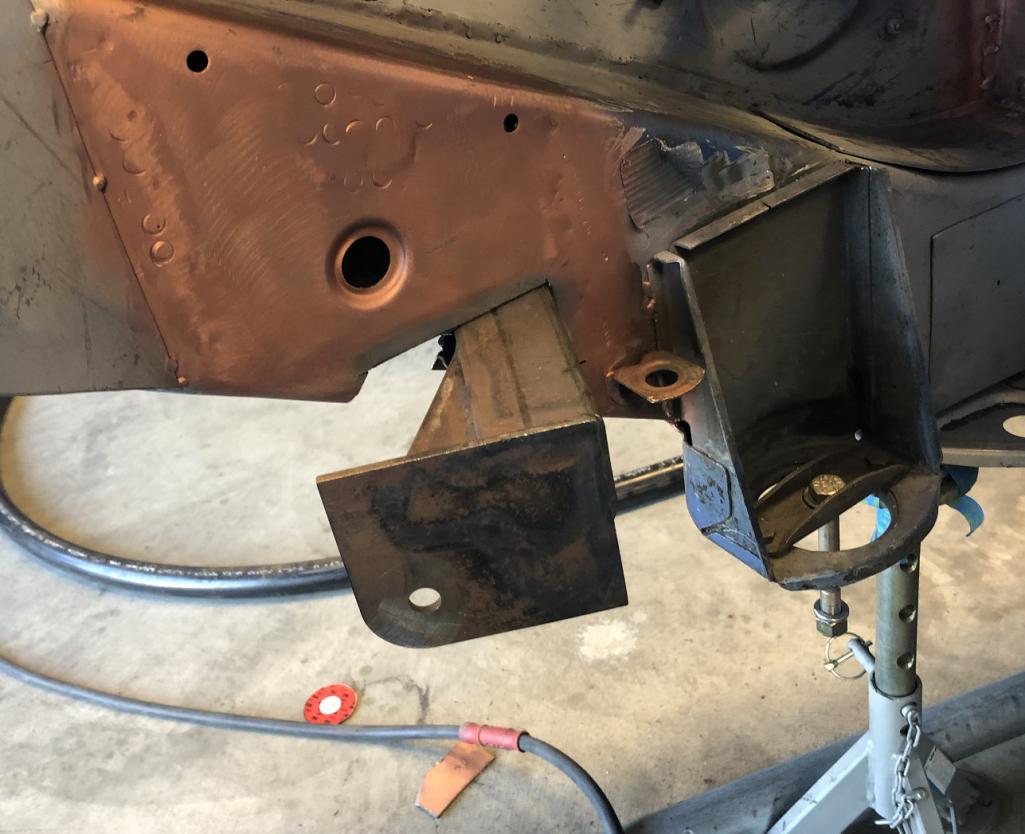 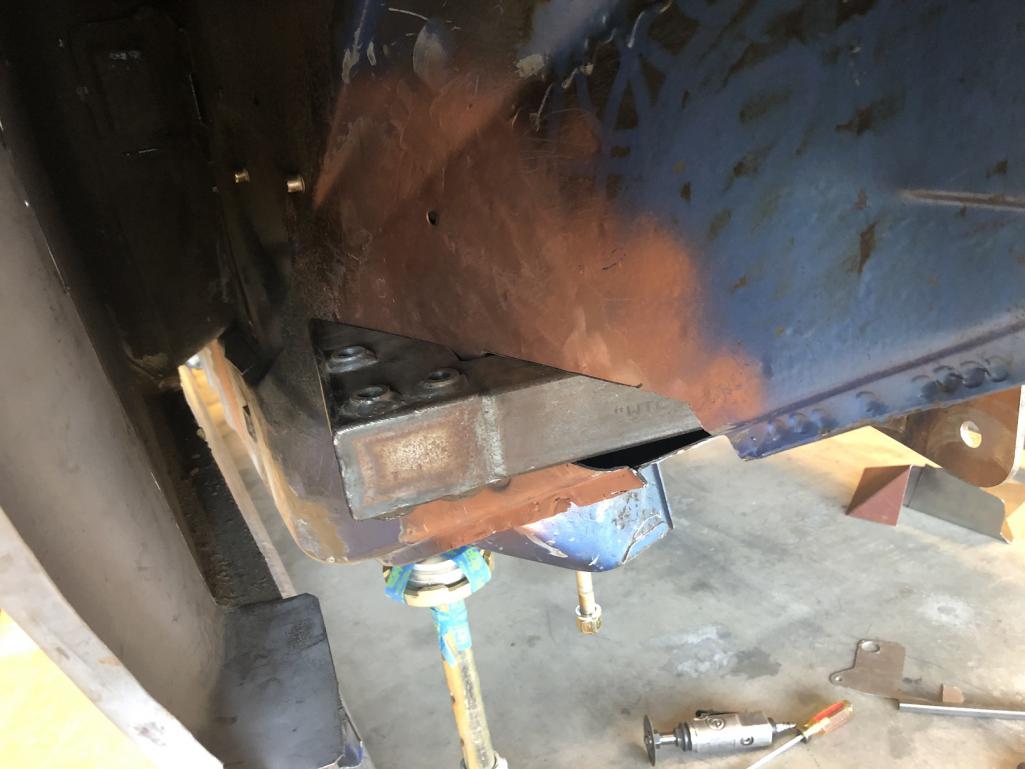 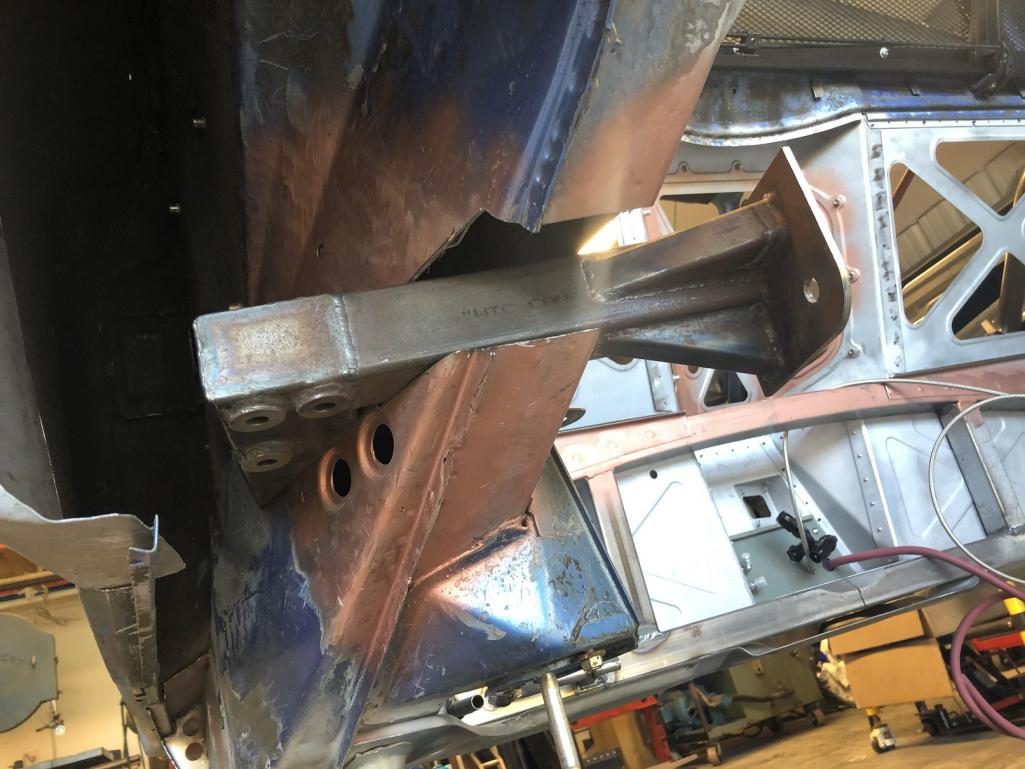
|
| tygaboy |
 Nov 6 2019, 05:36 PM Nov 6 2019, 05:36 PM
Post
#1983
|
|
914 Guru      Group: Members Posts: 5,552 Joined: 6-October 15 From: Petaluma, CA Member No.: 19,241 Region Association: Northern California 
|
Major milestone: 100 pages in the build log and the car isn't even a roller yet. (IMG:style_emoticons/default/blink.gif)
If this isn't the perfect example of "don't quit your day job", I don't know what is. |
| Dion |
 Nov 6 2019, 07:05 PM Nov 6 2019, 07:05 PM
Post
#1984
|
|
RN     Group: Members Posts: 2,839 Joined: 16-September 04 From: Audubon,PA Member No.: 2,766 Region Association: MidAtlantic Region 

|
I was a just gonna type, wow 100 pages of the art of metal. Looks great Chris.
Cool set up from C. Foley. Looking forward to how all this is placed. |
| Rand |
 Nov 6 2019, 07:41 PM Nov 6 2019, 07:41 PM
Post
#1985
|
|
Cross Member      Group: Members Posts: 7,410 Joined: 8-February 05 From: OR Member No.: 3,573 Region Association: None |
I have something that could use your laser table expertise as well, it’s just that that damned mountain between us has snow on it... (IMG:style_emoticons/default/sad.gif) This is when you also drive a 4x with mud/snow tires where you live. (IMG:style_emoticons/default/wink.gif) The only time I've ever dealt with chains on the pass was in a big uhaul. That was fun. (IMG:style_emoticons/default/beerchug.gif) |
| bbrock |
 Nov 6 2019, 09:31 PM Nov 6 2019, 09:31 PM
Post
#1986
|
|
914 Guru      Group: Members Posts: 5,269 Joined: 17-February 17 From: Montana Member No.: 20,845 Region Association: Rocky Mountains 
|
Rod Stewart sang that "the first cut is the deepest..." I would suggest that the 2nd and 3rd cuts were pretty f-ing deep, too! (IMG:style_emoticons/default/lol-2.gif) He sang it, but Cat Stevens wrote it, and sang it long before Rod. (IMG:style_emoticons/default/whistle[1].gif) That is a sweet piece of work you are doing. Congrats on the 100 page milestone. (IMG:style_emoticons/default/aktion035.gif) |
| tygaboy |
 Nov 7 2019, 12:36 PM Nov 7 2019, 12:36 PM
Post
#1987
|
|
914 Guru      Group: Members Posts: 5,552 Joined: 6-October 15 From: Petaluma, CA Member No.: 19,241 Region Association: Northern California 
|
Passenger's side cuts made and both sides now mocked in. The kit includes a fixture that ties both sides together and is used to help set width and level.
Beyond raising the pick up points, the kit allows for the pick ups to be moved outboard, generating a wider track. Doing so also creates additional inboard clearance to help things like engine access for you /6 conversion folks. I plan to use this capability to see if I can optimize how the wheels fill up the flares. If you look back in the thread, you can see they look pretty good on the stock set up but I think I can push them out a bit more. We'll see. Anyway, I couldn't resist a quick check of level with the components just set in place. Remember, this is just resting them on the cut outs that were made using the kit templates. Gotta say, pretty encouraging! Attached thumbnail(s) 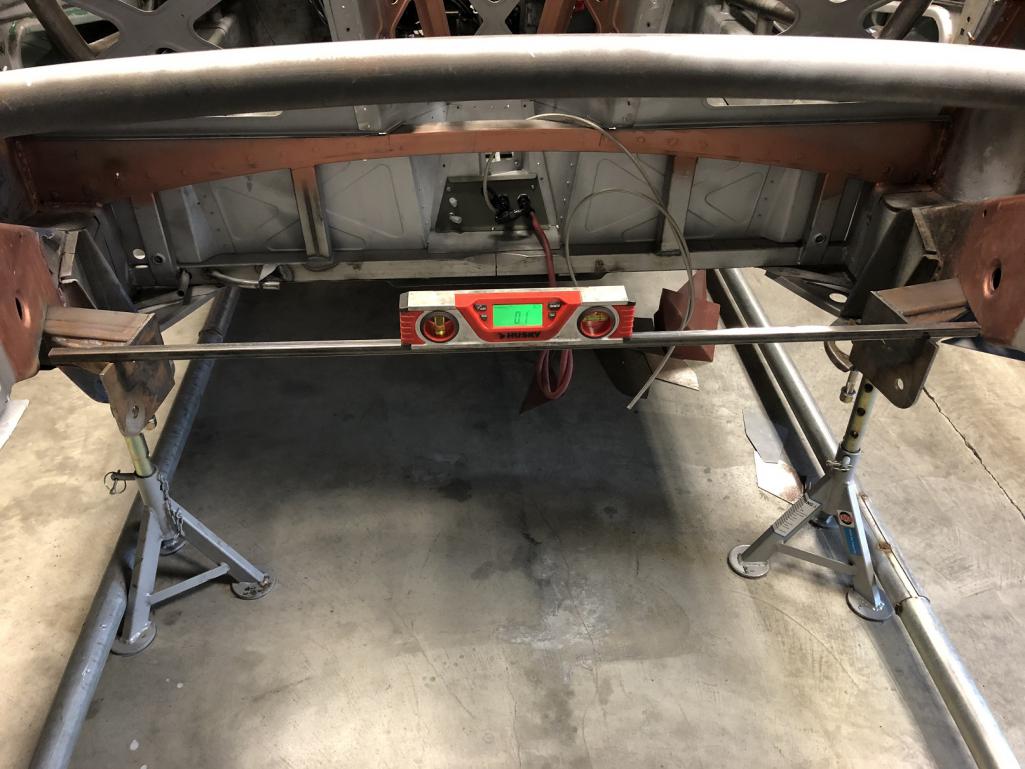
|
| Andyrew |
 Nov 7 2019, 12:40 PM Nov 7 2019, 12:40 PM
Post
#1988
|
|
Spooling.... Please wait           Group: Members Posts: 13,377 Joined: 20-January 03 From: Riverbank, Ca Member No.: 172 Region Association: Northern California 
|
Passenger's side cuts made and both sides now mocked in. The kit includes a fixture that ties both sides together and is used to help set width and level. Beyond raising the pick up points, the kit allows for the pick ups to be moved outboard, generating a wider track, as well as additional clearance to help things like engine access for you /6 conversion folks. I plan to use this capability to see if I can optimize how the wheels fill up the flares. If you look back in the thread, you can see they look pretty good on the stock set up but I think I can push them out a bit more. We'll see. Anyway, I couldn't resist a quick check of level with the components just set in place. Remember, this is just resting on the cut outs that were made using the kit templates. Gotta say, pretty encouraging! "Make the Noise....!" (IMG:style_emoticons/default/biggrin.gif) |
| tygaboy |
 Nov 7 2019, 05:33 PM Nov 7 2019, 05:33 PM
Post
#1989
|
|
914 Guru      Group: Members Posts: 5,552 Joined: 6-October 15 From: Petaluma, CA Member No.: 19,241 Region Association: Northern California 
|
Cutting into the longs means a lot of the kerf material ends up inside them. I run an extendable magnet back and forth, side to side at various lengths, getting up as far forward as I can.
I pulled probably 10 blobs like this from each side. I'll see if I can get a skinny shop vac hose in there, too. Attached thumbnail(s) 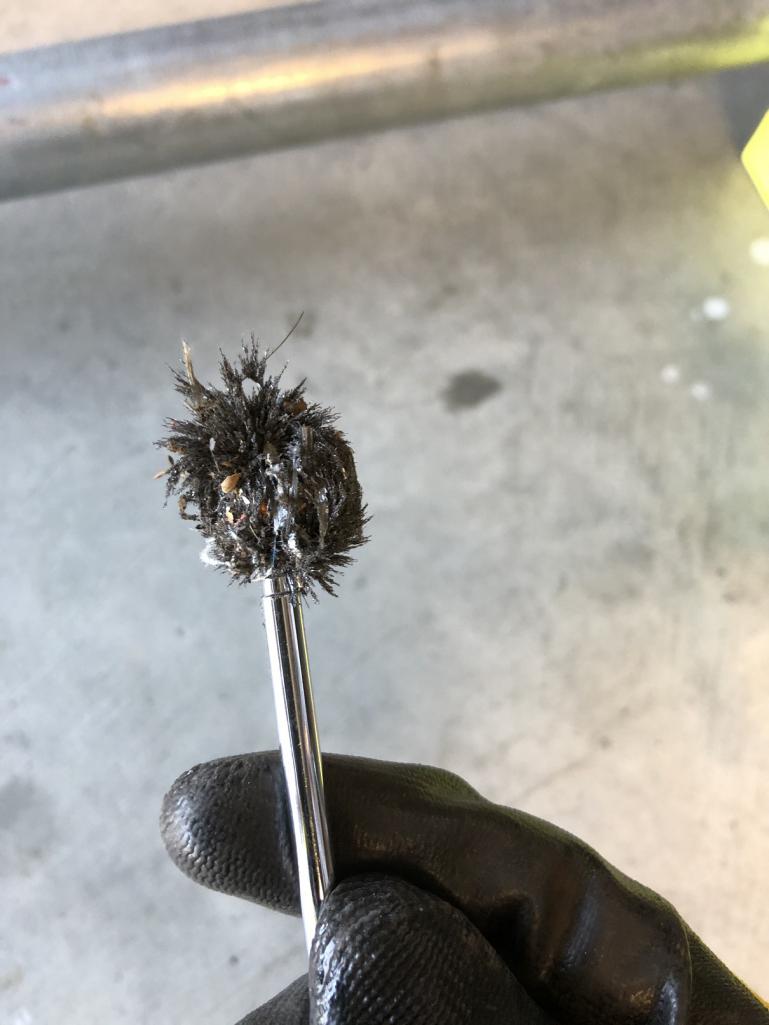
|
| tygaboy |
 Nov 7 2019, 05:38 PM Nov 7 2019, 05:38 PM
Post
#1990
|
|
914 Guru      Group: Members Posts: 5,552 Joined: 6-October 15 From: Petaluma, CA Member No.: 19,241 Region Association: Northern California 
|
I happily confess, I did call Mr. Foley, just to verify my thinking on a couple items. One was that I needed to remove more material from the longs.
As I mentioned, the support plates pretty much dictate what needs to go, but I figured it couldn't hurt to talk with the expert! Here, you can see that the cut lines do need to go all the way straight back. So as you can see, I went ahead and did that. It's hard to tell in the pic, but I still have a bit to remove on the lower, outside corner of the long in order to gain the clearance needed for one of the plates. Getting there... Attached thumbnail(s) 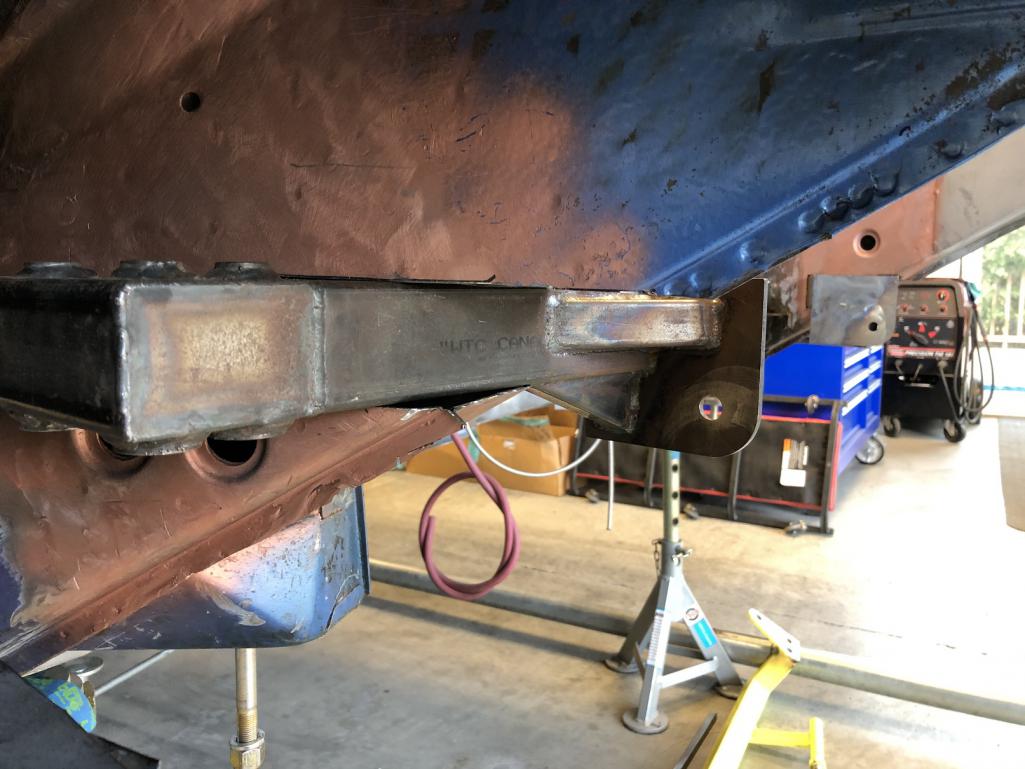
|
| Krieger |
 Nov 7 2019, 09:15 PM Nov 7 2019, 09:15 PM
Post
#1991
|
|
Advanced Member     Group: Members Posts: 4,800 Joined: 24-May 04 From: Santa Rosa CA Member No.: 2,104 Region Association: None 
|
Stick an air nozzle in the front section of the longs and blow it towards the aft end of the longs. Then vacuum /magnet it. Blow/suck, repeat. Yes a good joke, but also effective. I used to restore B-25 aircraft. We'd walnut shell blast the airframes. That was the easy part. Clean up could take days.
|
| tygaboy |
 Nov 8 2019, 04:37 PM Nov 8 2019, 04:37 PM
Post
#1992
|
|
914 Guru      Group: Members Posts: 5,552 Joined: 6-October 15 From: Petaluma, CA Member No.: 19,241 Region Association: Northern California 
|
I mentioned the fixturing jig. Here it is with the new pick ups bolted in place. What you can't see in these pics is that the fixture is actually two pieces with a sleeve in the middle so you can widen things, as I described above.
The instructions call for things to be bolted up and then slid into the slots cut in the longs. Well, OK then, let's get this party started. Attached thumbnail(s) 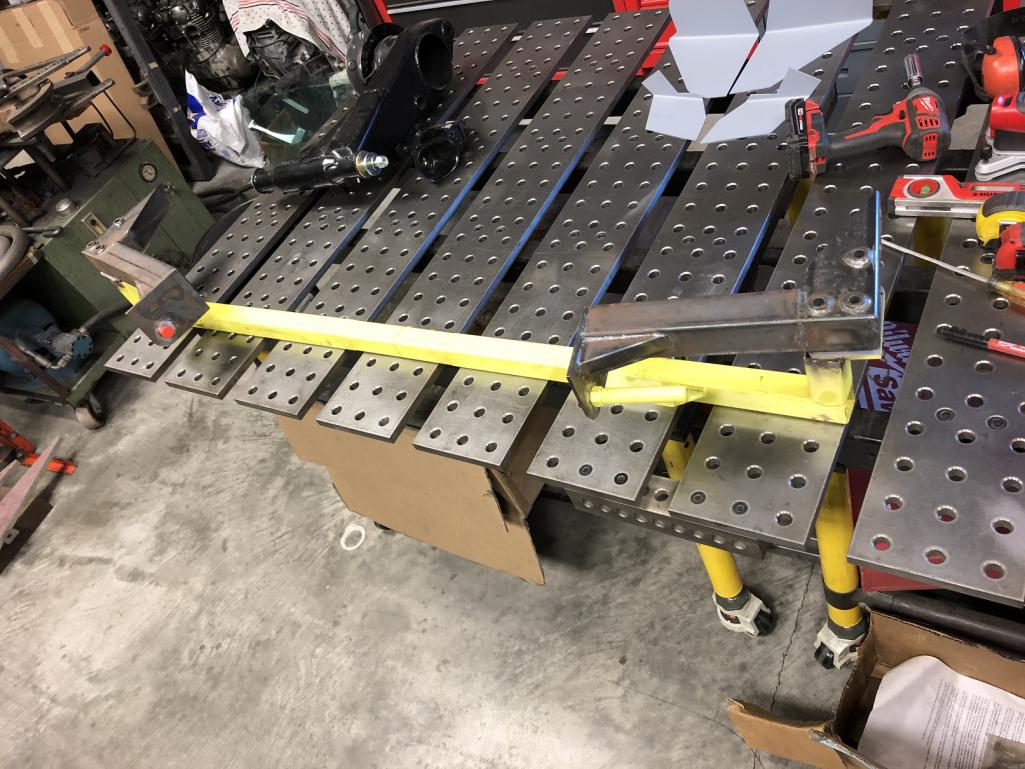 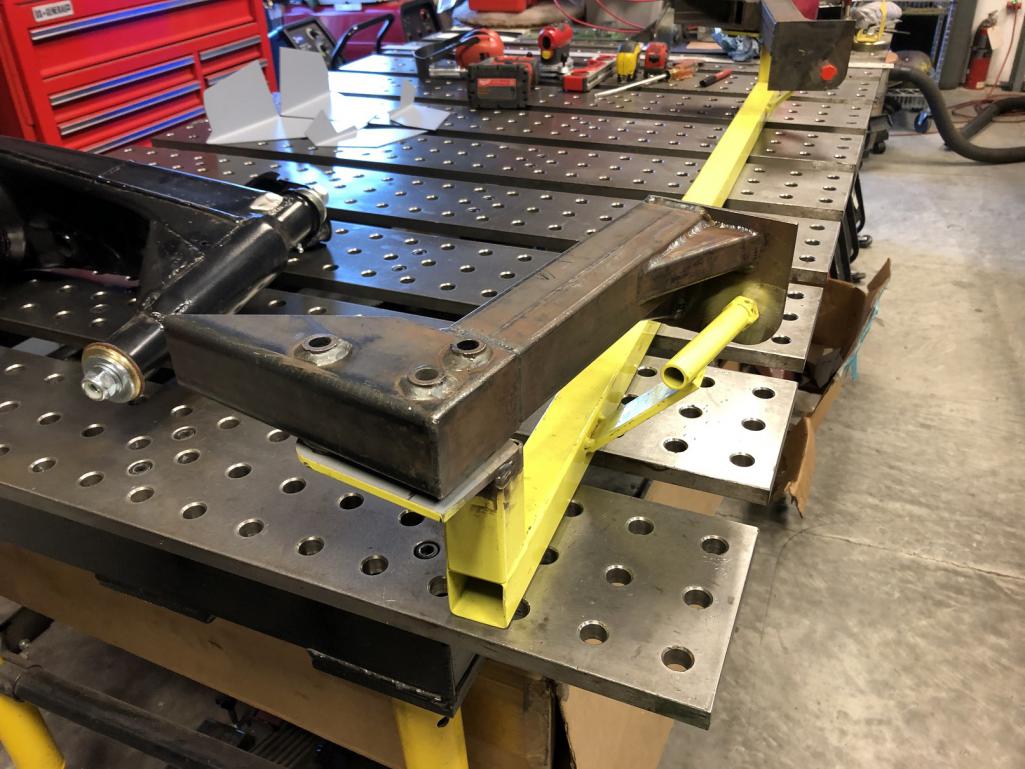
|
| tygaboy |
 Nov 8 2019, 04:42 PM Nov 8 2019, 04:42 PM
Post
#1993
|
|
914 Guru      Group: Members Posts: 5,552 Joined: 6-October 15 From: Petaluma, CA Member No.: 19,241 Region Association: Northern California 
|
Believe it or not, it basically slid right in. I had to bonk one side with my hand to get it past a tight spot at the front of the slot but that was it and in it went.
Now, moment of truth. How close are things to where they're supposed to be? (IMG:style_emoticons/default/idea.gif) Attached thumbnail(s) 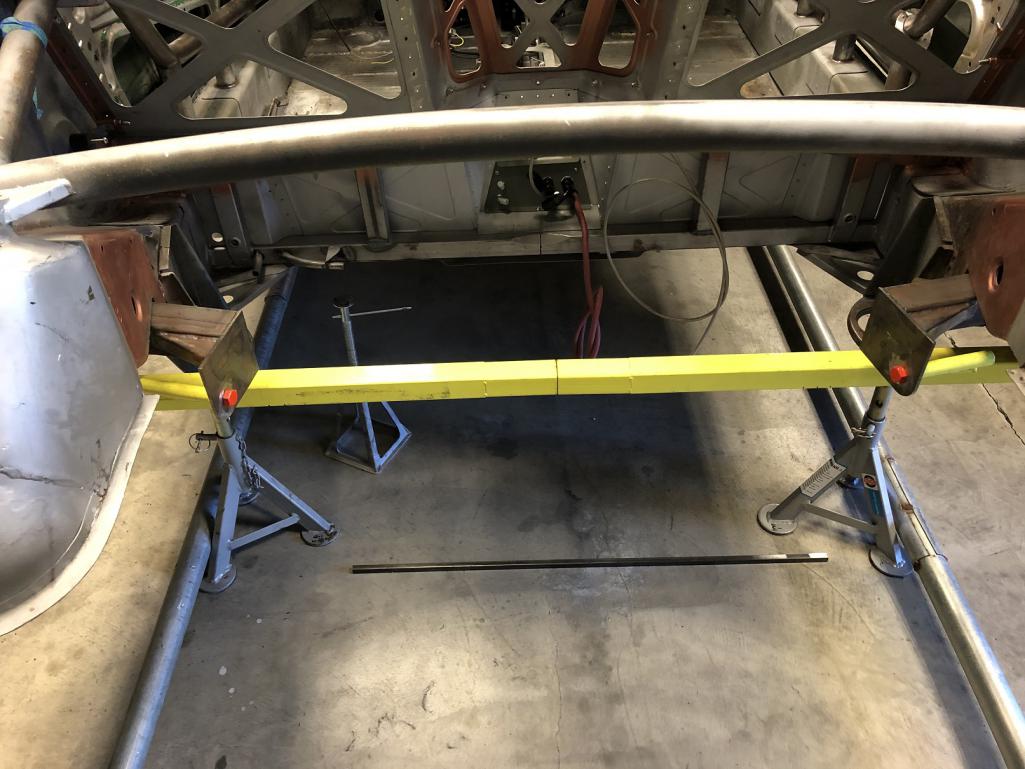
|
| tygaboy |
 Nov 8 2019, 04:47 PM Nov 8 2019, 04:47 PM
Post
#1994
|
|
914 Guru      Group: Members Posts: 5,552 Joined: 6-October 15 From: Petaluma, CA Member No.: 19,241 Region Association: Northern California 
|
Are you f-ing kidding me? @ChrisFoley has this dialed! (IMG:style_emoticons/default/aktion035.gif) I guess I get a couple points for being a good little instruction follower, and yes, I have to get the fore/aft placement set but holy moley!
Man, I just love it when a plan comes together. Attached thumbnail(s) 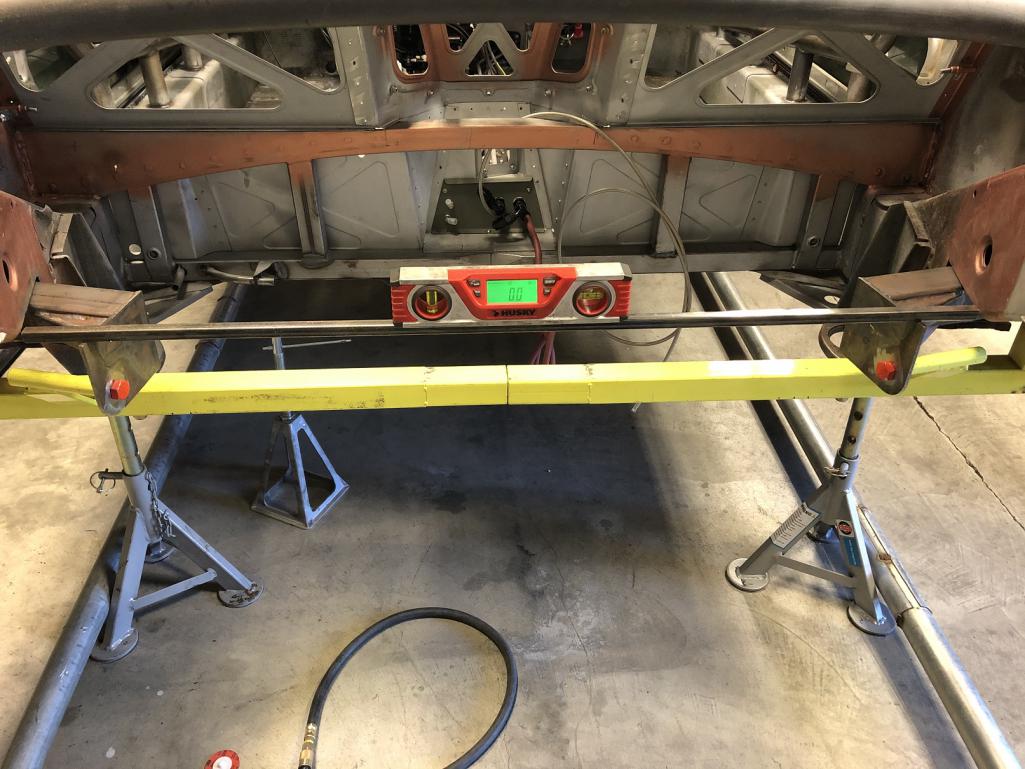
|
| tygaboy |
 Nov 8 2019, 04:51 PM Nov 8 2019, 04:51 PM
Post
#1995
|
|
914 Guru      Group: Members Posts: 5,552 Joined: 6-October 15 From: Petaluma, CA Member No.: 19,241 Region Association: Northern California 
|
But then I thought, "I wonder if those end plates are the best location to use for measuring...".
OK, what about the main pickup bar? YES! (IMG:style_emoticons/default/first.gif) I'll probably find 12 other locations to measure from but so far, things couldn't be going better. Attached thumbnail(s) 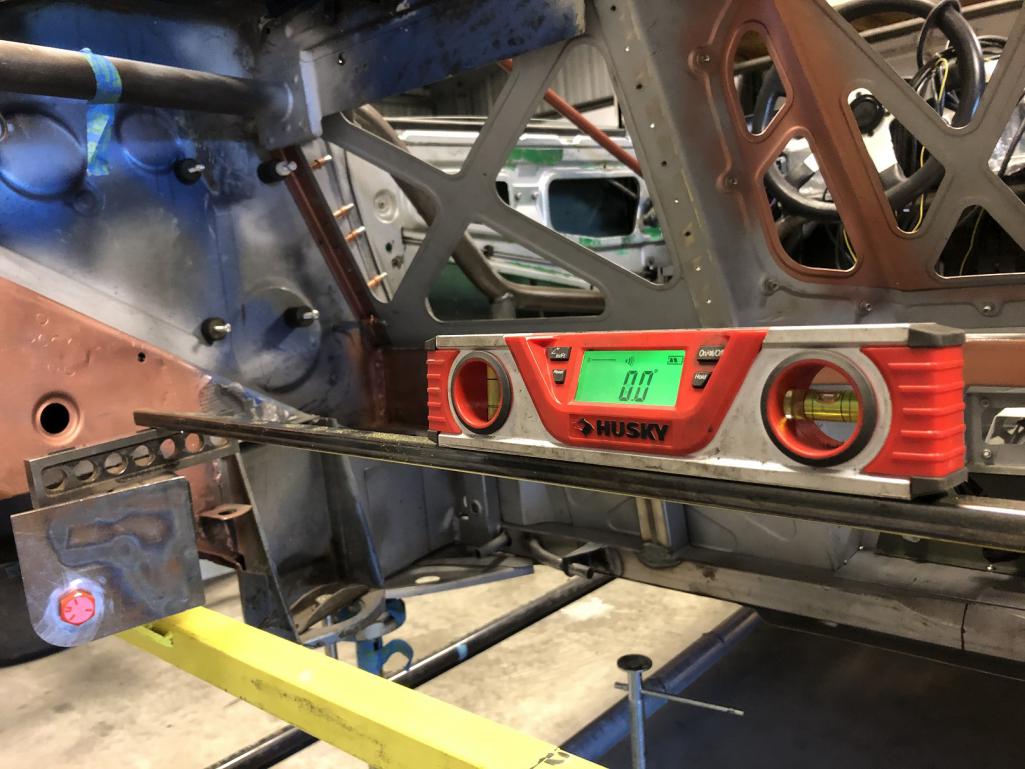
|
| Andyrew |
 Nov 8 2019, 05:13 PM Nov 8 2019, 05:13 PM
Post
#1996
|
|
Spooling.... Please wait           Group: Members Posts: 13,377 Joined: 20-January 03 From: Riverbank, Ca Member No.: 172 Region Association: Northern California 
|
|
| tygaboy |
 Nov 8 2019, 05:29 PM Nov 8 2019, 05:29 PM
Post
#1997
|
|
914 Guru      Group: Members Posts: 5,552 Joined: 6-October 15 From: Petaluma, CA Member No.: 19,241 Region Association: Northern California 
|
WooHoo, indeed! Thanks @Andyrew .
But now the real fun begins: fore/aft to get it matchy-match to what it was. I see now that installing the flares prior to getting the pick up mod done is less than optimal. It means I REALLY have to get the wheel position right since I can no longer rely on cheating the flares one way or the other. Ah well, lesson learned for you others considering this. Sort of like the ol' "Pants first, then shoes." |
| tygaboy |
 Nov 8 2019, 05:31 PM Nov 8 2019, 05:31 PM
Post
#1998
|
|
914 Guru      Group: Members Posts: 5,552 Joined: 6-October 15 From: Petaluma, CA Member No.: 19,241 Region Association: Northern California 
|
Thankfully, I remembered to get some triangulated measurements that I can use to replicate the locations of the pick ups.
PF = Passenger Front, DR = Driver Rear. The little drawing is to be sure I know which hole is which. Attached thumbnail(s) 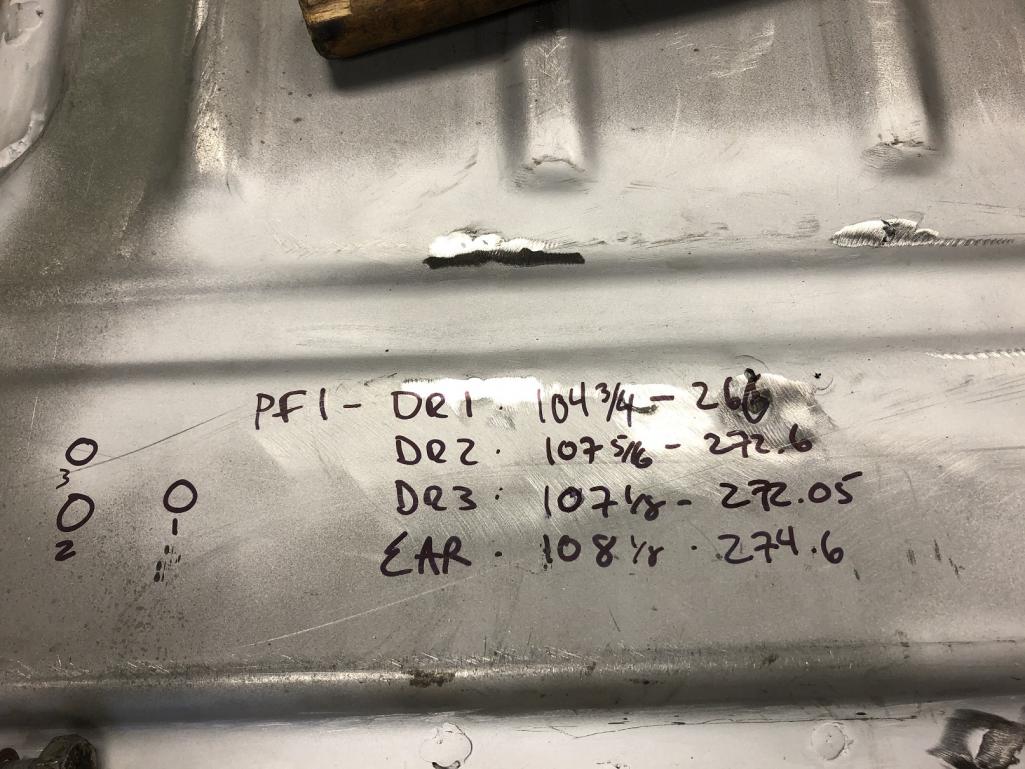
|
| tygaboy |
 Nov 8 2019, 05:34 PM Nov 8 2019, 05:34 PM
Post
#1999
|
|
914 Guru      Group: Members Posts: 5,552 Joined: 6-October 15 From: Petaluma, CA Member No.: 19,241 Region Association: Northern California 
|
This is PF1 to DR1. Close, but I'll need to move things forward to get this to 266 cm.
The other good news is it's exactly the same from DF1 to PR1. Consistent side to side triangulation means things remain square. All things considered with '70s build technology and the variances we know are built into these cars, this isn't bad at all. I'll take it! This was a good day at the Red Barn. Attached thumbnail(s) 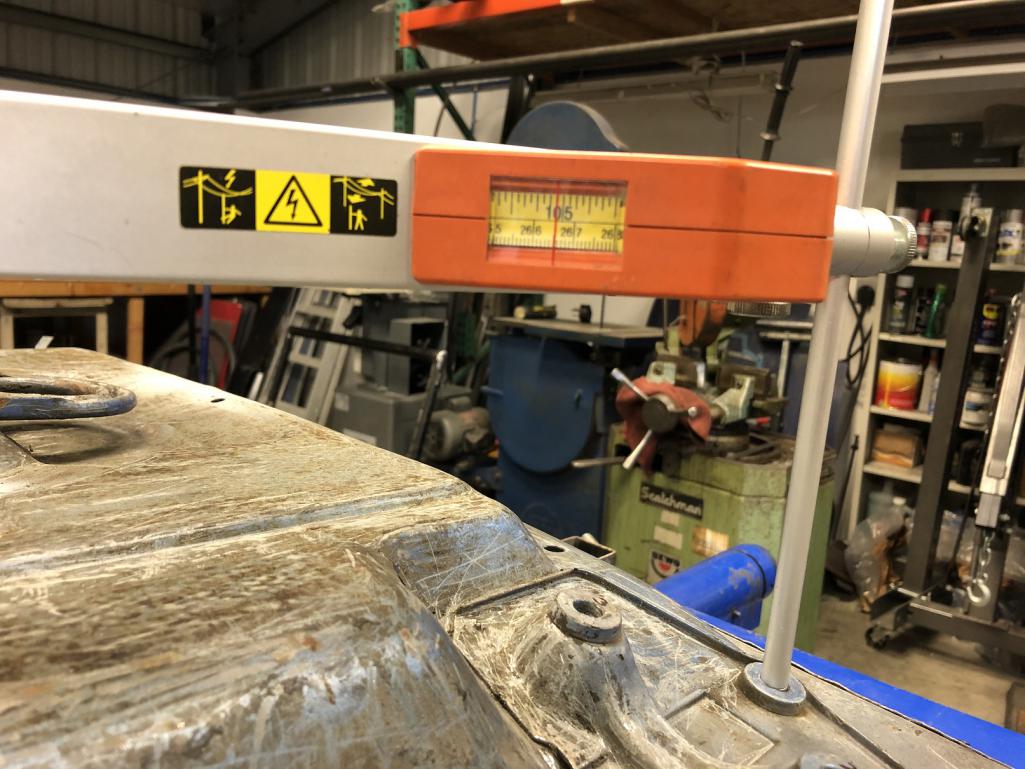
|
| ChrisFoley |
 Nov 9 2019, 10:07 AM Nov 9 2019, 10:07 AM
Post
#2000
|
|
I am Tangerine Racing      Group: Members Posts: 7,981 Joined: 29-January 03 From: Bolton, CT Member No.: 209 Region Association: None 
|
... Sort of like the ol' "Pants first, then shoes." Well at least they're bellbottoms. (IMG:style_emoticons/default/biggrin.gif) |
  |
2 User(s) are reading this topic (1 Guests and 0 Anonymous Users)
1 Members: tygaboy

|
Lo-Fi Version | Time is now: 24th April 2025 - 05:35 PM |
Invision Power Board
v9.1.4 © 2025 IPS, Inc.


