|
|

|
Porsche, and the Porsche crest are registered trademarks of Dr. Ing. h.c. F. Porsche AG.
This site is not affiliated with Porsche in any way. Its only purpose is to provide an online forum for car enthusiasts. All other trademarks are property of their respective owners. |
|
|
  |
| sixnotfour |
 Nov 19 2019, 05:15 AM Nov 19 2019, 05:15 AM
Post
#2041
|
|
914 Wizard           Group: Members Posts: 10,798 Joined: 12-September 04 From: Life Elevated..planet UT. Member No.: 2,744 Region Association: Rocky Mountains 

|
check out Ring Brothers SEMA Camaro..... lots of similar open pattern panels/stiffeners (IMG:style_emoticons/default/beerchug.gif)
|
| tygaboy |
 Nov 19 2019, 08:27 AM Nov 19 2019, 08:27 AM
Post
#2042
|
|
914 Guru      Group: Members Posts: 5,552 Joined: 6-October 15 From: Petaluma, CA Member No.: 19,241 Region Association: Northern California 
|
Carbon, oh heck yeah, depending on price I would be interested in ..... Oh wait not on the 914-6 build, it was meant to be period correct parts build..... Oh do I love good Carbon Carbon Fiber Mini-Lights he can call them Ubber-lites. Wonder if the design is still protected, as I prefer the originals over all the copies with their odd spoke with a lug hole in them. That would be one place I would deviate on, Reduce unsprung weight is always a goal for me. Cool facility looks like he has the right stuff, if he has a large 3D Scanner, then you are golden, and should be able to calculate the shrink rate, and build a great part. Since he is building wheels I think he has composite down to a bit of a science. That is unless he is doing these for wall clocks. In which case still very cool. @914forme Stephen. Not wall clocks. He stress tested his wheels, made improvements and ultimately ran them on his 750hp Mustang. Beat the crap out of them, heat warped rotors, things like that, and had no issues with the wheels. I've played with composites enough that I'm of the opinion that there's no reason we should have to struggle with crap fit and tons of prep, just to get light weight parts on our cars. After seeing the level of quality available here (skill, experience, plus proper tools and equipment), I'm entertaining the possibility of partnering with him to make bumpers, hoods and trunk lids that are "ready to run", just bolt on and go. Or paint. I'll post updates as things happen - or don't. |
| sb914 |
 Nov 19 2019, 08:53 AM Nov 19 2019, 08:53 AM
Post
#2043
|
|
Surf Guru     Group: Members Posts: 4,481 Joined: 25-November 12 From: Brookings,Oregon Member No.: 15,191 Region Association: Southern California 
|
Quote : tygaboy After seeing the level of quality available here (skill, experience, plus proper tools and equipment), I'm entertaining the possibility of partnering with him to make bumpers, hoods and trunk lids that are "ready to run", just bolt on and go. Or paint.
I'll post updates as things happen - or don't. [/quote] (IMG:style_emoticons/default/first.gif) (IMG:style_emoticons/default/smilie_pokal.gif) (IMG:style_emoticons/default/wub.gif) That would be incredible! Sign me up. First in line . |
| Andyrew |
 Nov 19 2019, 10:48 AM Nov 19 2019, 10:48 AM
Post
#2044
|
|
Spooling.... Please wait           Group: Members Posts: 13,377 Joined: 20-January 03 From: Riverbank, Ca Member No.: 172 Region Association: Northern California 
|
[quote name='sb914' date='Nov 19 2019, 06:53 AM' post='2763282']
Quote : tygaboy After seeing the level of quality available here (skill, experience, plus proper tools and equipment), I'm entertaining the possibility of partnering with him to make bumpers, hoods and trunk lids that are "ready to run", just bolt on and go. Or paint. I'll post updates as things happen - or don't. [/quote] (IMG:style_emoticons/default/first.gif) (IMG:style_emoticons/default/smilie_pokal.gif) (IMG:style_emoticons/default/wub.gif) That would be incredible! Sign me up. First in line . [/quote] (IMG:style_emoticons/default/agree.gif) |
| tygaboy |
 Nov 19 2019, 03:06 PM Nov 19 2019, 03:06 PM
Post
#2045
|
|
914 Guru      Group: Members Posts: 5,552 Joined: 6-October 15 From: Petaluma, CA Member No.: 19,241 Region Association: Northern California 
|
Arrrg. The initial tacking in was done and I thought I had things all set... But no.
I was doing some final verification, I noticed a gap where the pick up points will be welded to the angled part of the longs. The arrow points at where I ended up with a gap. Note this is pre-tacking and shows how things should look. The gap was maybe 1/16 - 3/32". After all this work, I wasn't going to accept that. So I ended up cutting the tacks, pulling everything out and starting over. Maybe the 4th time is the charm? NOTE to others who may be doing this mod: Once you get the pick ups positioned fore and aft, and have determined the width of the gap you'll have between the two main parts of the fixture, consider clamping a strap to both sides of the fixture to prevent it from opening up. Or at the very least, pay more attention than I did and triple check the position ahead of tacking! Attached thumbnail(s) 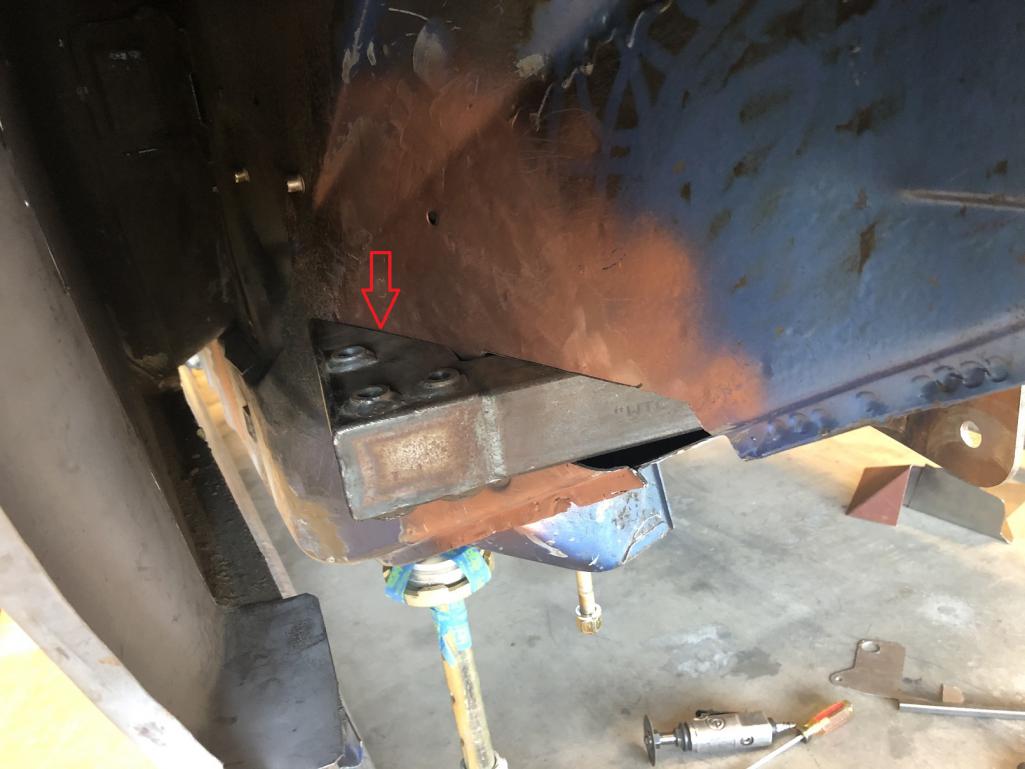
|
| tygaboy |
 Nov 19 2019, 03:09 PM Nov 19 2019, 03:09 PM
Post
#2046
|
|
914 Guru      Group: Members Posts: 5,552 Joined: 6-October 15 From: Petaluma, CA Member No.: 19,241 Region Association: Northern California 
|
OK, so I leveled the car again. And this time, I checked level across two of the front suspension attachment points.
Hooray, my car isn't twisted... Attached thumbnail(s) 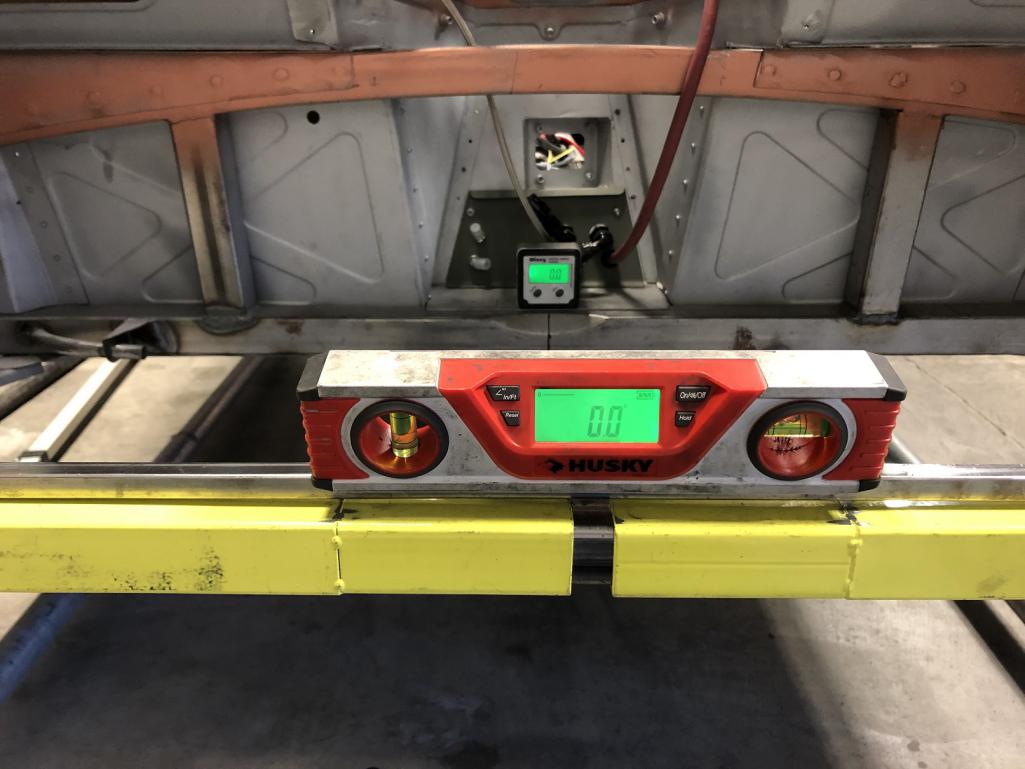 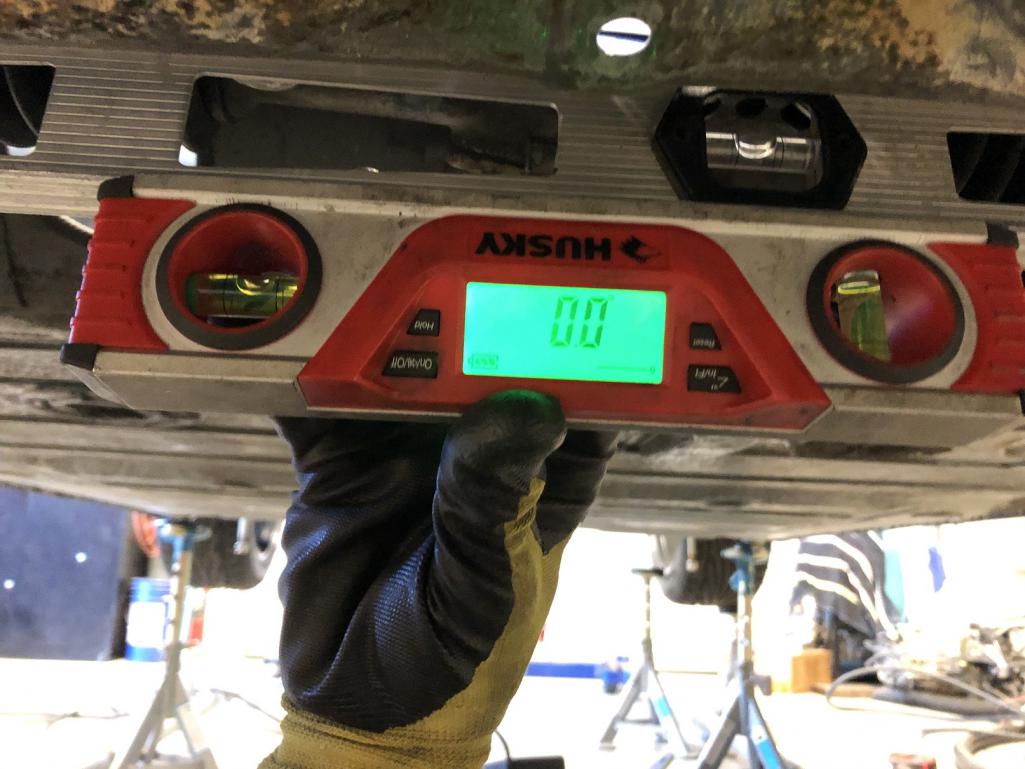
|
| tygaboy |
 Nov 19 2019, 03:11 PM Nov 19 2019, 03:11 PM
Post
#2047
|
|
914 Guru      Group: Members Posts: 5,552 Joined: 6-October 15 From: Petaluma, CA Member No.: 19,241 Region Association: Northern California 
|
I won't bore you with a repeat of all the steps.
Follow the Tangerine instructions, check for square, check for level, tack in. Fit the arms, snug things up, set to ride height. Wheel-in-flare fitment. CHECK! Attached thumbnail(s) 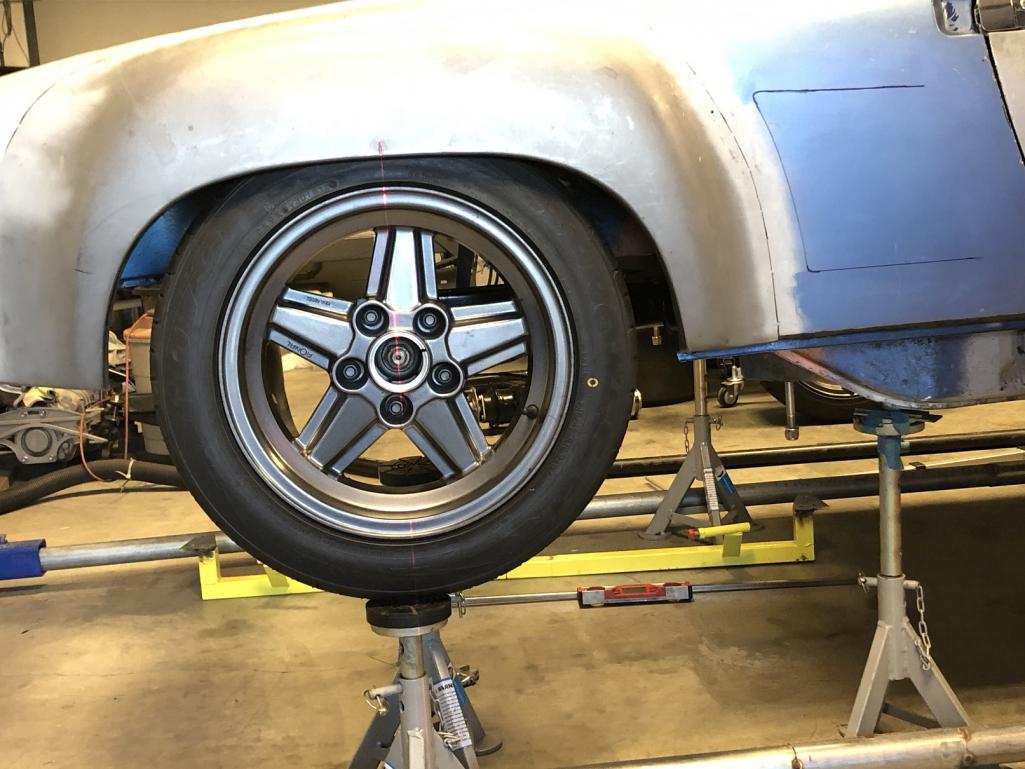
|
| tygaboy |
 Nov 19 2019, 03:17 PM Nov 19 2019, 03:17 PM
Post
#2048
|
|
914 Guru      Group: Members Posts: 5,552 Joined: 6-October 15 From: Petaluma, CA Member No.: 19,241 Region Association: Northern California 
|
Check for camber. No shims.
I'm within about 1/4 degree side to side. Following in Mr. Hail's footsteps, I plan to follow a weld sequence of "outside top, inside bottom" first so any distortion that happens will add additional negative camber. On to checking that I can achieve proper toe. Assuming so, weld all this in then add the sheet metal plating. Attached thumbnail(s) 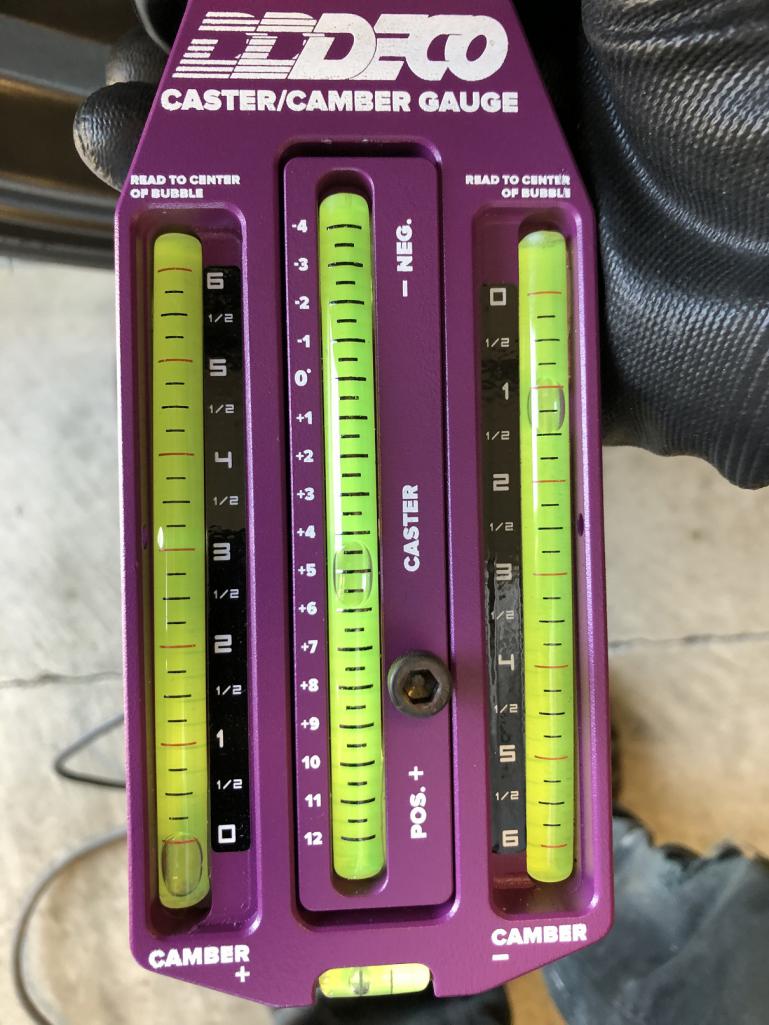 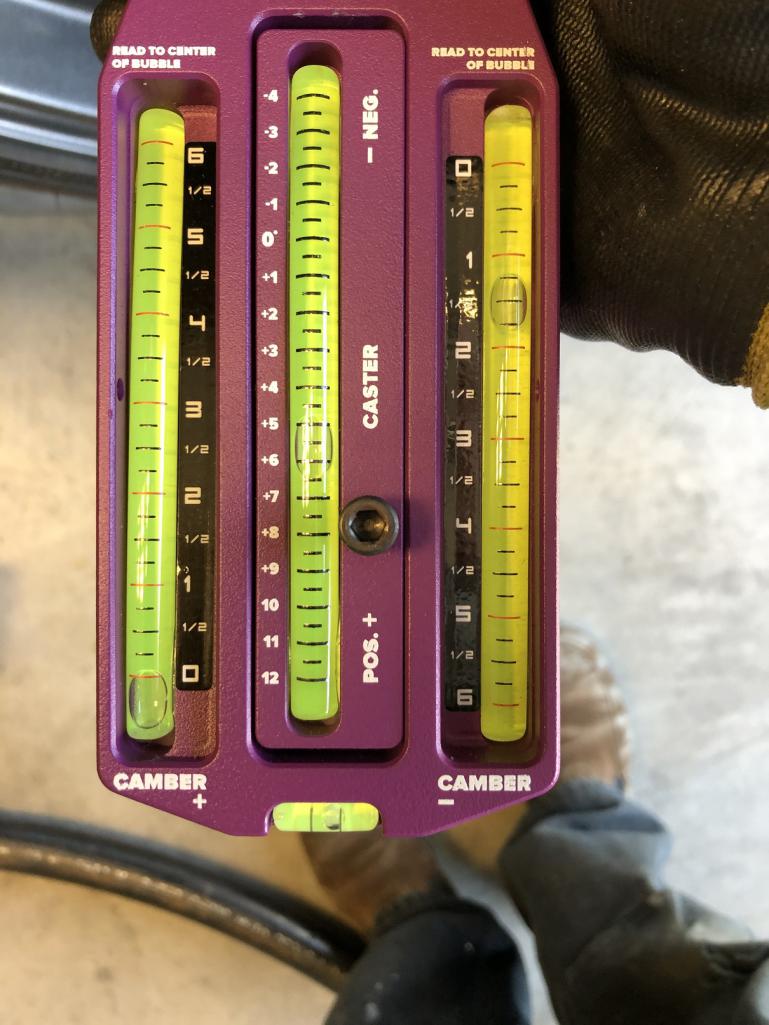
|
| tygaboy |
 Nov 19 2019, 06:01 PM Nov 19 2019, 06:01 PM
Post
#2049
|
|
914 Guru      Group: Members Posts: 5,552 Joined: 6-October 15 From: Petaluma, CA Member No.: 19,241 Region Association: Northern California 
|
My first attempt at checking toe. I ran out of jack stands so just used some scrap perforated material to form a set of parallel string lines around the car. Not too sexy but it works.
With the outer mount moved all the way back, I can just get a bit of toe out so I'm calling the pick up points "in the correct (enough) position"! Time to final weld all the pieces. Attached thumbnail(s) 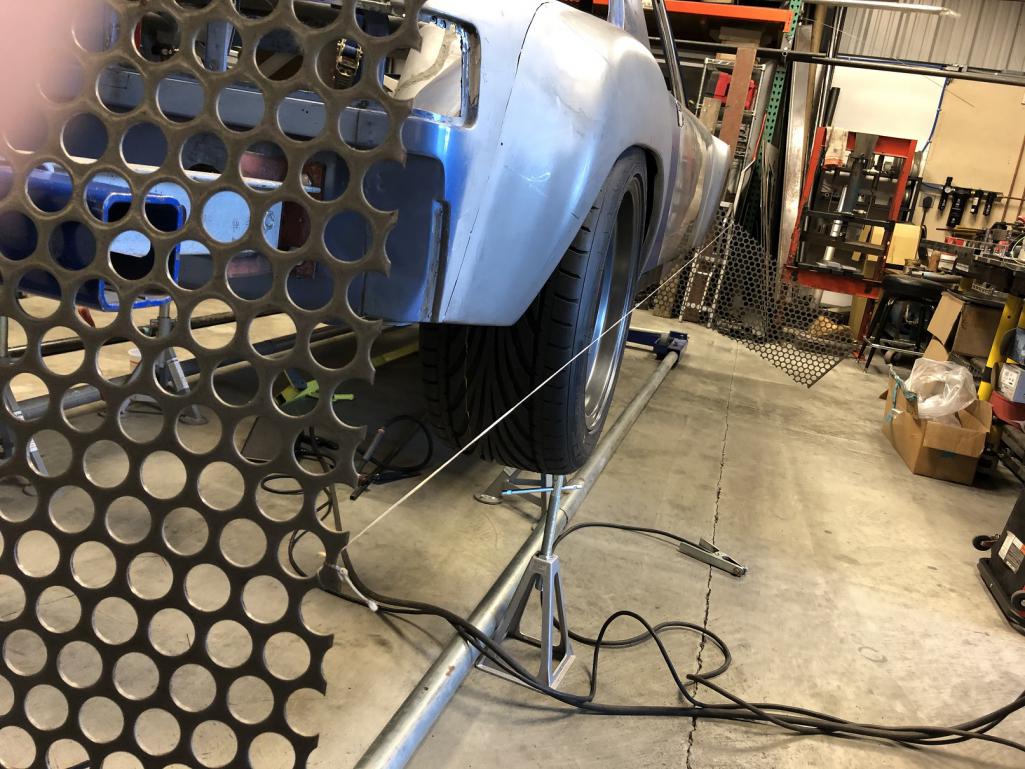
|
| trojanhorsepower |
 Nov 19 2019, 06:39 PM Nov 19 2019, 06:39 PM
Post
#2050
|
|
Senior Member    Group: Members Posts: 867 Joined: 21-September 03 From: Marion, NC Member No.: 1,179 Region Association: None |
|
| 914forme |
 Nov 19 2019, 06:52 PM Nov 19 2019, 06:52 PM
Post
#2051
|
|
Times a wastin', get wrenchin'!     Group: Members Posts: 3,896 Joined: 24-July 04 From: Dayton, Ohio Member No.: 2,388 Region Association: None 
|
Scott PORSTI Fame made a set of string holders for his car, pretty slick, well with in your talents.
Enjoy Chris |
| bbrock |
 Nov 20 2019, 04:15 PM Nov 20 2019, 04:15 PM
Post
#2052
|
|
914 Guru      Group: Members Posts: 5,269 Joined: 17-February 17 From: Montana Member No.: 20,845 Region Association: Rocky Mountains 
|
Scott PORSTI Fame made a set of string holders for his car, pretty slick, well with in your talents. Enjoy Chris There's another version here: http://www.914world.com/bbs2/index.php?s=&...t&p=1808793 |
| 914forme |
 Nov 20 2019, 06:06 PM Nov 20 2019, 06:06 PM
Post
#2053
|
|
Times a wastin', get wrenchin'!     Group: Members Posts: 3,896 Joined: 24-July 04 From: Dayton, Ohio Member No.: 2,388 Region Association: None 
|
(IMG:style_emoticons/default/av-943.gif) I don't see Chris doing PVC.
I do see him, building the entire thing out of Aluminum using A CNC laser cutter, then TIG welding the brackets. Then making it all fit in a USPS flat rate box and selling the kits all over the world to people who want the best. The nice thing about PVC it is simple, the bad thing is it bends. I know it is all reference, and as long as it is square and equal off center you are good. What I don't like is the lack of artistry it takes to make them. Ingenuity maybe but no artistry. Chris I already have this drawn up in my head, hard anodized please with mill cut reliefs and radiuses edges. You can read my mind right (IMG:style_emoticons/default/lol-2.gif) |
| Andyrew |
 Nov 20 2019, 06:33 PM Nov 20 2019, 06:33 PM
Post
#2054
|
|
Spooling.... Please wait           Group: Members Posts: 13,377 Joined: 20-January 03 From: Riverbank, Ca Member No.: 172 Region Association: Northern California 
|
(IMG:style_emoticons/default/av-943.gif) I don't see Chris doing PVC. I do see him, building the entire thing out of Aluminum using A CNC laser cutter, then TIG welding the brackets. Then making it all fit in a USPS flat rate box and selling the kits all over the world to people who want the best. The nice thing about PVC it is simple, the bad thing is it bends. I know it is all reference, and as long as it is square and equal off center you are good. What I don't like is the lack of artistry it takes to make them. Ingenuity maybe but no artistry. Chris I already have this drawn up in my head, hard anodized please with mill cut reliefs and radiuses edges. You can read my mind right (IMG:style_emoticons/default/lol-2.gif) (IMG:style_emoticons/default/lol-2.gif) You forgot that he would go through 4 design trials and still wouldn't be happy with it (IMG:style_emoticons/default/smile.gif) |
| bbrock |
 Nov 20 2019, 09:33 PM Nov 20 2019, 09:33 PM
Post
#2055
|
|
914 Guru      Group: Members Posts: 5,269 Joined: 17-February 17 From: Montana Member No.: 20,845 Region Association: Rocky Mountains 
|
(IMG:style_emoticons/default/av-943.gif) I don't see Chris doing PVC. I do see him, building the entire thing out of Aluminum using A CNC laser cutter, then TIG welding the brackets. Then making it all fit in a USPS flat rate box and selling the kits all over the world to people who want the best. The nice thing about PVC it is simple, the bad thing is it bends. I know it is all reference, and as long as it is square and equal off center you are good. What I don't like is the lack of artistry it takes to make them. Ingenuity maybe but no artistry. Chris I already have this drawn up in my head, hard anodized please with mill cut reliefs and radiuses edges. You can read my mind right (IMG:style_emoticons/default/lol-2.gif) Thought the same thing. (IMG:style_emoticons/default/lol-2.gif) However, I should point out that the design I linked uses steel conduit for the bars. He just used PVC fittings to hold stuff together. Chris can always sub titanium and carbon fiber as need. (IMG:style_emoticons/default/smile.gif) |
| tygaboy |
 Nov 21 2019, 01:31 PM Nov 21 2019, 01:31 PM
Post
#2056
|
|
914 Guru      Group: Members Posts: 5,552 Joined: 6-October 15 From: Petaluma, CA Member No.: 19,241 Region Association: Northern California 
|
I called my Mom and (sniff), told her the other boys were (sniff, sniff) picking on me... (IMG:style_emoticons/default/sad.gif)
(IMG:style_emoticons/default/lol-2.gif) |
| Rand |
 Nov 21 2019, 02:00 PM Nov 21 2019, 02:00 PM
Post
#2057
|
|
Cross Member      Group: Members Posts: 7,410 Joined: 8-February 05 From: OR Member No.: 3,573 Region Association: None |
No sniffing in the garge. You are rocking this.
|
| tygaboy |
 Nov 21 2019, 02:00 PM Nov 21 2019, 02:00 PM
Post
#2058
|
|
914 Guru      Group: Members Posts: 5,552 Joined: 6-October 15 From: Petaluma, CA Member No.: 19,241 Region Association: Northern California 
|
Back on post #2026, I speculated that I'd make a thinner "large stainless washer" to help with outboard tire clearance. I decided I would go ahead with that.
Here's a comparo. Note the one I made is fresh off the plasma table and will be dressed and deburred, but you get the idea. Thinner means the trailing arm moves inboard by the difference. Frankly, when I look at the Elephant install instructions, I wonder why I need this at all. I have a call in to Elephant to ask if I can just eliminate it altogether. When you see how this contraption goes together, you see there's a shoulder on the pivot shaft that ends up bolted hard against the washer anyway. Why can't I just let it go hard up against the inner ear of the new suspension console? It's not a bearing surface... Yes, I know there'a an overall width dimension but if I make it up on the other side, why wouldn't that be OK? Attached thumbnail(s) 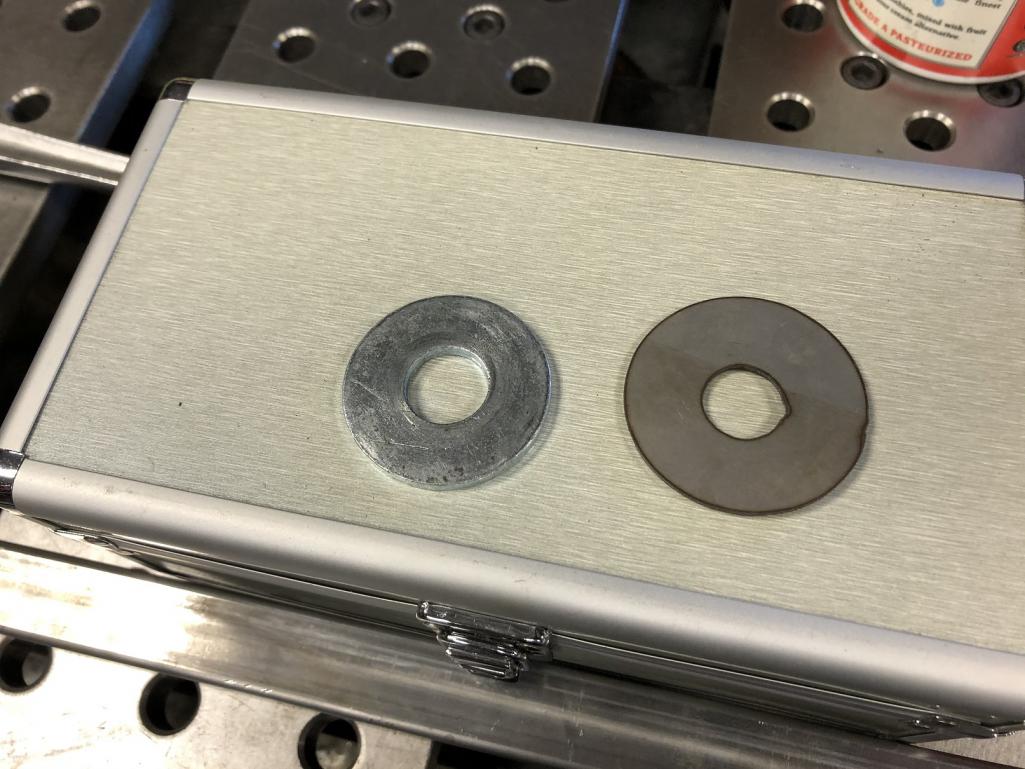 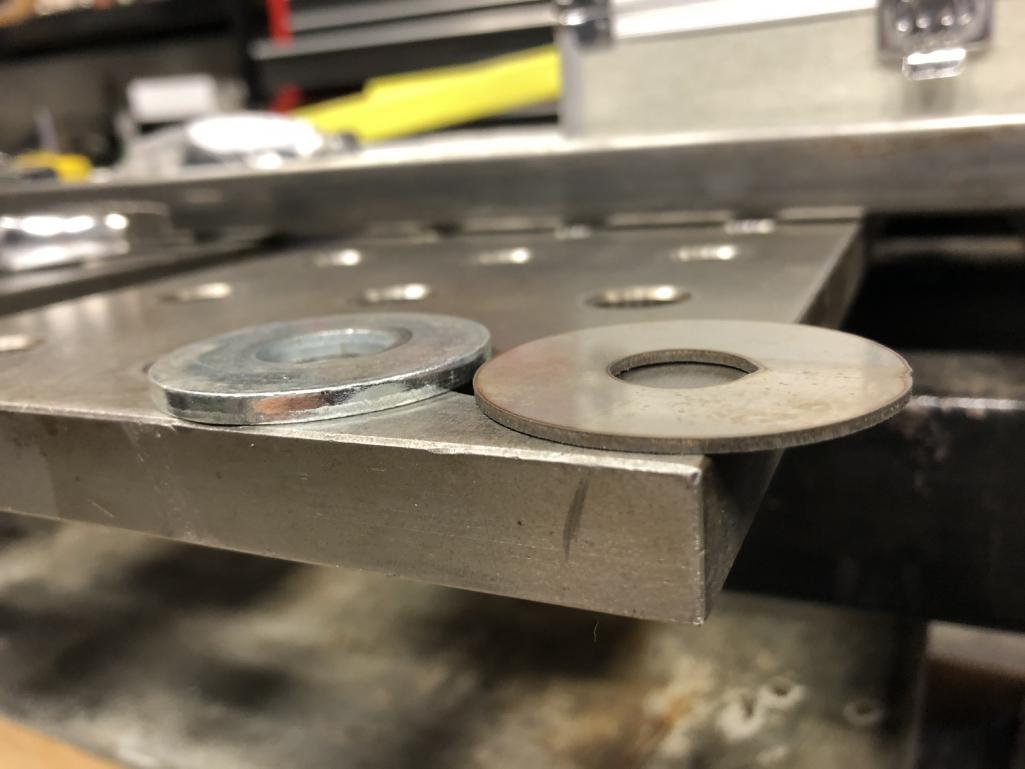
|
| TargaToy |
 Nov 21 2019, 02:01 PM Nov 21 2019, 02:01 PM
Post
#2059
|
|
-NONSOLIS RADIOS SEDIOUIS FULMINA MITTO-    Group: Members Posts: 711 Joined: 26-March 10 From: DelMarVa Peninsula Member No.: 11,509 Region Association: MidAtlantic Region 
|
|
| tygaboy |
 Nov 21 2019, 02:04 PM Nov 21 2019, 02:04 PM
Post
#2060
|
|
914 Guru      Group: Members Posts: 5,552 Joined: 6-October 15 From: Petaluma, CA Member No.: 19,241 Region Association: Northern California 
|
Triple double checking all the measurements. In order to do that, and because I'm running late Carrera hub-centric hubs, I have to install the axles in order to ensure there's no play in the position of the wheel.
To do all this work, you have to climb in and out from under the car 3486 times. How may times did I smack my head on the inner CV joints? I don't know because I have amnesia from multiple blunt force head traumas... (literally = (IMG:style_emoticons/default/headbang.gif) ) Attached thumbnail(s) 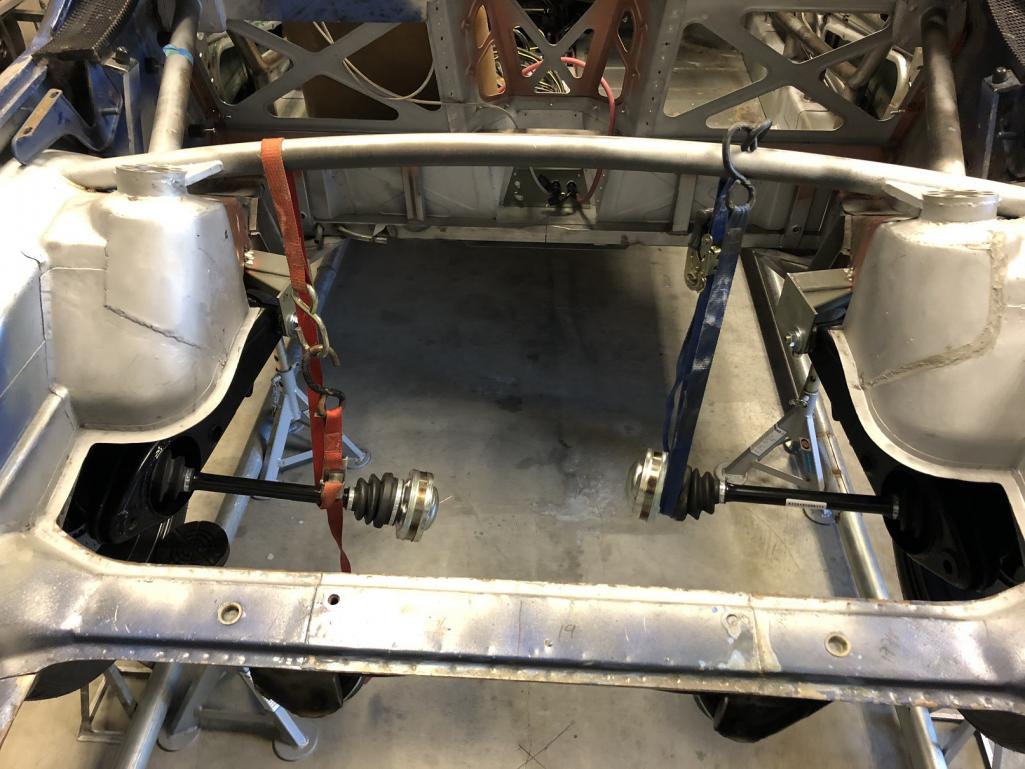
|
  |
1 User(s) are reading this topic (1 Guests and 0 Anonymous Users)
0 Members:

|
Lo-Fi Version | Time is now: 25th April 2025 - 01:53 AM |
Invision Power Board
v9.1.4 © 2025 IPS, Inc.


