|
|
|
Porsche, and the Porsche crest are registered trademarks of Dr. Ing. h.c. F. Porsche AG.
This site is not affiliated with Porsche in any way. Its only purpose is to provide an online forum for car enthusiasts. All other trademarks are property of their respective owners. |
|
|

  |

| AZBanks |
 Mar 23 2020, 10:58 AM Mar 23 2020, 10:58 AM
Post
#2401
|
|
Senior Member  Group: Members Posts: 1,064 Joined: 7-December 05 From: New River, AZ Member No.: 5,245 Region Association: Southwest Region |
Chris you are an inspiration. The quality of your work and your creativity are top level.
|
   |

 
|
| bbrock |
Mar 23 2020, 02:19 PM
Post
#2402
|
|
914 Guru Group: Members Posts: 5,269 Joined: 17-February 17 From: Montana Member No.: 20,845 Region Association: Rocky Mountains |
I'm just in awe of your work as usual. That plumbing solution is incredible. Only thing is... what's the deal with that buggered rivnut? (IMG:style_emoticons/default/av-943.gif)
|
|
|
|
| dr.tim |
Mar 23 2020, 02:59 PM
Post
#2403
|
|
Member Group: Members Posts: 101 Joined: 17-December 11 From: Butte, America Member No.: 13,907 Region Association: Rocky Mountains |
A few thoughts having gone through a few iterations of this.
Consider moving the bend points further up the vane. You don't need to have much, if any of it sticking up above the hood: air flow from the front will still find most of the face due to rake of the hood. Use large radii on the twisted points to reduce tendency to tear. Be aware of the crown of the hood and where that will put the trailing (upper) edge of the vanes. With the curvature in the direction you have it, the trailing edge of each vane will be proud of the hood on either end and low in the middle. This is what I am running, with the trailing edge of each vane the same height from the hood, uniformly 3/16" higher than the top of the surrounding frame. That required I run the vane curvature in the opposite direction from what you are. 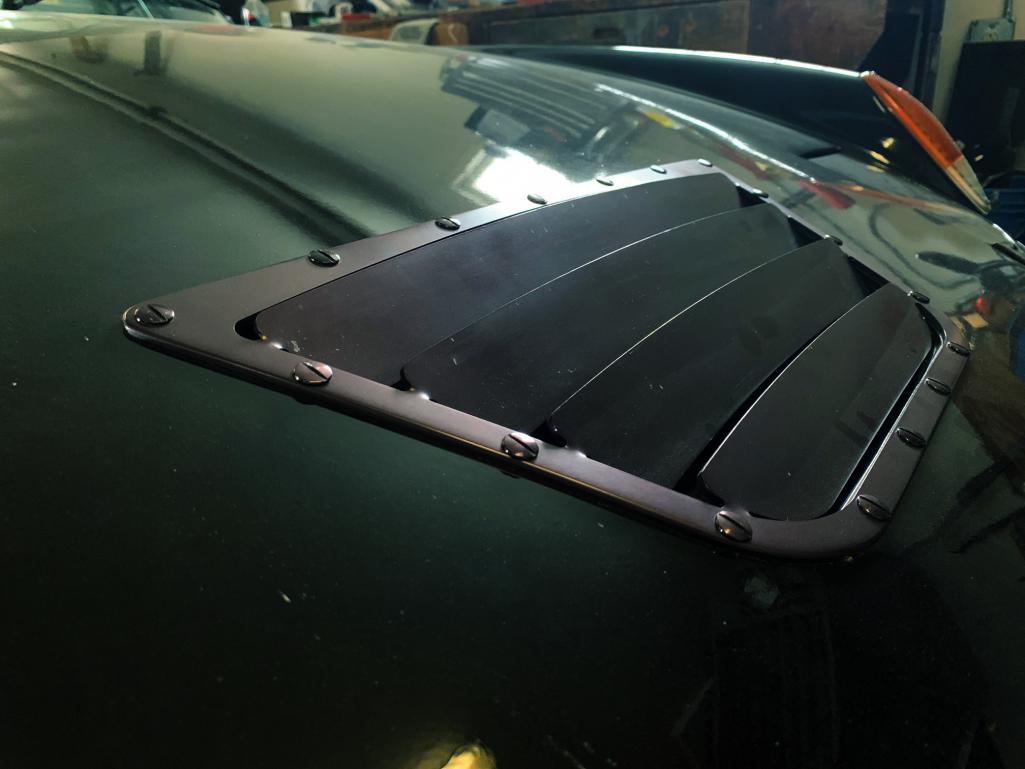 |
|
|
|
| tygaboy |
Mar 23 2020, 03:10 PM
Post
#2404
|
|
914 Guru Group: Members Posts: 5,554 Joined: 6-October 15 From: Petaluma, CA Member No.: 19,241 Region Association: Northern California |
QUOTE(bbrock @ Mar 23 2020, 01:19 PM)  I'm just in awe of your work as usual. That plumbing solution is incredible. Only thing is... what's the deal with that buggered rivnut? (IMG:style_emoticons/default/av-943.gif) @bbrock - As promised: Brent, You, Sir, are a dick! And I'm giving myself bonus points for nearing your comma-to-word count per sentence ratio! (IMG:style_emoticons/default/poke.gif) (IMG:style_emoticons/default/lol-2.gif) |
 |
|
| tygaboy |
Mar 23 2020, 03:16 PM
Post
#2405
|
|
914 Guru Group: Members Posts: 5,554 Joined: 6-October 15 From: Petaluma, CA Member No.: 19,241 Region Association: Northern California |
QUOTE(dr.tim @ Mar 23 2020, 01:59 PM) A few thoughts having gone through a few iterations of this. Consider moving the bend points further up the vane. You don't need to have much, if any of it sticking up above the hood: air flow from the front will still find most of the face due to rake of the hood. Use large radii on the twisted points to reduce tendency to tear. Be aware of the crown of the hood and where that will put the trailing (upper) edge of the vanes. With the curvature in the direction you have it, the trailing edge of each vane will be proud of the hood on either end and low in the middle. This is what I am running, with the trailing edge of each vane the same height from the hood, uniformly 3/16" higher than the top of the surrounding frame. That required I run the vane curvature in the opposite direction from what you are. @dr.tim - Triple bonus points to you for saving me at least one iteration! I totally didn't think about my curvature being 180 out! And on the location of the bend points, I wasn't sure exactly where to place them so was planning to cut a test piece of just a couple vanes. Looking at yours, maybe I'll move my bend points up by one attachment point width. But before I can do any cutting, it's back to the drawing board! Thanks again, I owe you one... |
|
|
|
| dr.tim |
Mar 24 2020, 07:46 AM
Post
#2406
|
|
Member Group: Members Posts: 101 Joined: 17-December 11 From: Butte, America Member No.: 13,907 Region Association: Rocky Mountains |
QUOTE(tygaboy @ Mar 23 2020, 03:16 PM) Thanks again, I owe you one... I may claim that when I make it back to Sears Point. (IMG:style_emoticons/default/smile.gif) |
|
|
|
| MichiganMat |
Mar 24 2020, 08:33 AM
Post
#2407
|
|
Member Group: Members Posts: 114 Joined: 14-June 06 From: San Jose, CA Member No.: 6,222 Region Association: Northern California |
QUOTE(tygaboy @ Mar 23 2020, 09:02 AM) With my current focus seemingly "all things radiator", I went back to thinking about venting. I really don't want to open up the fenders so I figured I'd better prove out the hood vent, one way or the other. No offense to the approach of "cut the front and sides then bend down the flap to create the vent". I just wanted something different from that so it was back to CAD to see what I could come up with. The first pic is a piece I made just to get a REALLY rough idea of what things might look like. The CAD drawing is what I'm going to cut later today. Note the vents remain attached to the frame via those small-ish connections on each side. The vents will be twisted at those points and set to the proper angle. The small notches at the front edge of the vents is where a piece will fit in that locks them to the desired angle and adds stability. The whole contraption will attach to the underside of the hood. Let's see how this works out. If I may offer a point of criticism (or at least, an opinion): The square shapes and 90 degree angles of the 914 don't lend well to triangles or curvy accents. I used a more brutalistic square shape for my front hood opening and, as simple as it is, the straight lines lend themselves to the rest of the body features. Scoopes, bezier curves, triangles, anything 'organic' really goes against the taxonomy of the design, in my humble opinion. |
|
|
|
| tygaboy |
Mar 24 2020, 09:08 AM
Post
#2408
|
|
914 Guru Group: Members Posts: 5,554 Joined: 6-October 15 From: Petaluma, CA Member No.: 19,241 Region Association: Northern California |
QUOTE(MichiganMat @ Mar 24 2020, 07:33 AM) If I may offer a point of criticism (or at least, an opinion): The square shapes and 90 degree angles of the 914 don't lend well to triangles or curvy accents. I used a more brutalistic square shape for my front hood opening and, as simple as it is, the straight lines lend themselves to the rest of the body features. Scoopes, bezier curves, triangles, anything 'organic' really goes against the taxonomy of the design, in my humble opinion. @MichiganMat - Thanks for the input. I took a look at your hood vent and I think I can come up with a happy medium that integrates with the theme of my build. If not, well, I'll have to see what I think at that point. Plus, I have a paint scheme in mind that goes a ways toward de-emphasizing the vent. Keep the cards and letters coming! |
|
|
|
| tygaboy |
Mar 24 2020, 01:34 PM
Post
#2409
|
|
914 Guru Group: Members Posts: 5,554 Joined: 6-October 15 From: Petaluma, CA Member No.: 19,241 Region Association: Northern California |
Latest design, incorporating @dr.tim 's pointers. (IMG:style_emoticons/default/aktion035.gif)
I agree with @MichiganMat and have the same concerns about if it'll look "right". My thinking on the overall shape? - the vent's leading edge radius matches the hood's front and rear edge radii - the vent's trailing edge curve matches the side-to-side curve across the hood - the narrow-at-the-front to wide rear matches the under hood support structure, giving me the largest air exit I can fit in that area of the hood. I'll cut this one and see what I think. Attached thumbnail(s) 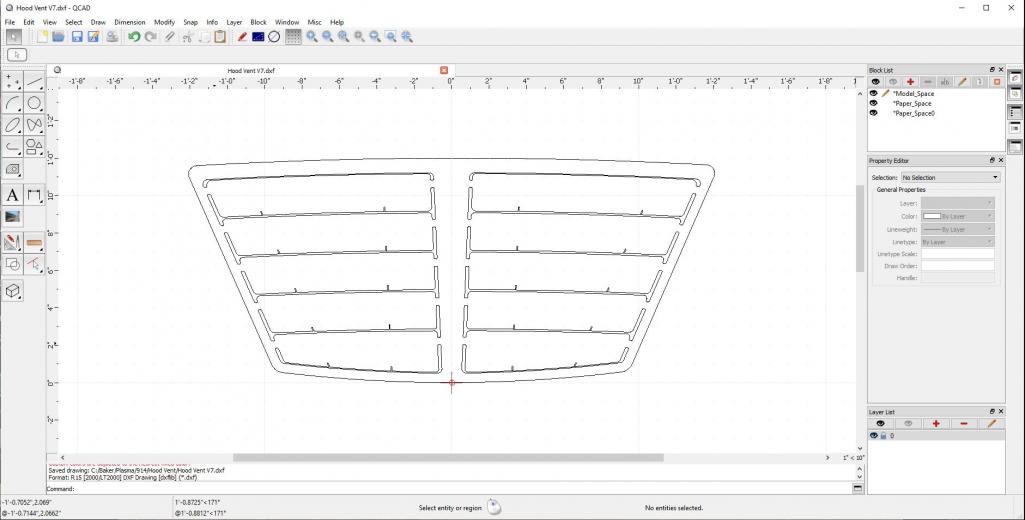
|
|
|
|
| sixnotfour |
Mar 24 2020, 02:36 PM
Post
#2410
|
|
914 Wizard Group: Members Posts: 10,807 Joined: 12-September 04 From: Life Elevated..planet UT. Member No.: 2,744 Region Association: Rocky Mountains |
(IMG:style_emoticons/default/beerchug.gif) more fuel
Attached image(s) 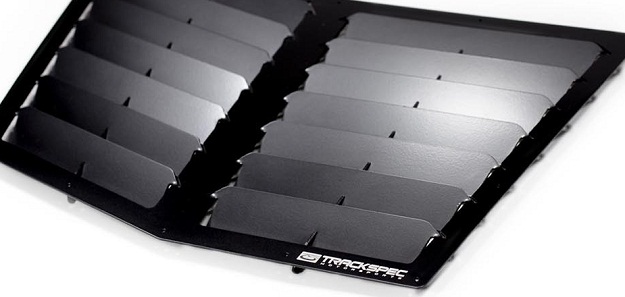
|
|
|
|
| tygaboy |
Mar 24 2020, 03:50 PM
Post
#2411
|
|
914 Guru Group: Members Posts: 5,554 Joined: 6-October 15 From: Petaluma, CA Member No.: 19,241 Region Association: Northern California |
QUOTE(sixnotfour @ Mar 24 2020, 01:36 PM) @sixnotfour Yeah, like that. But I mean, I can't just BUY one! You guys would never let me get away with that... (IMG:style_emoticons/default/poke.gif) And so, I went ahead with a first effort. This is 20 ga, which may be too thin and the dimension of the frame around the front and sides may need to be wider. It's .5" in this version. I think once I get things dialed in, I may try doing one in al-u-mini-um. I will say, I'm pleased at what a tight dimension the plasma can cut. Look at how thin the center sections of those drops are! Attached thumbnail(s) 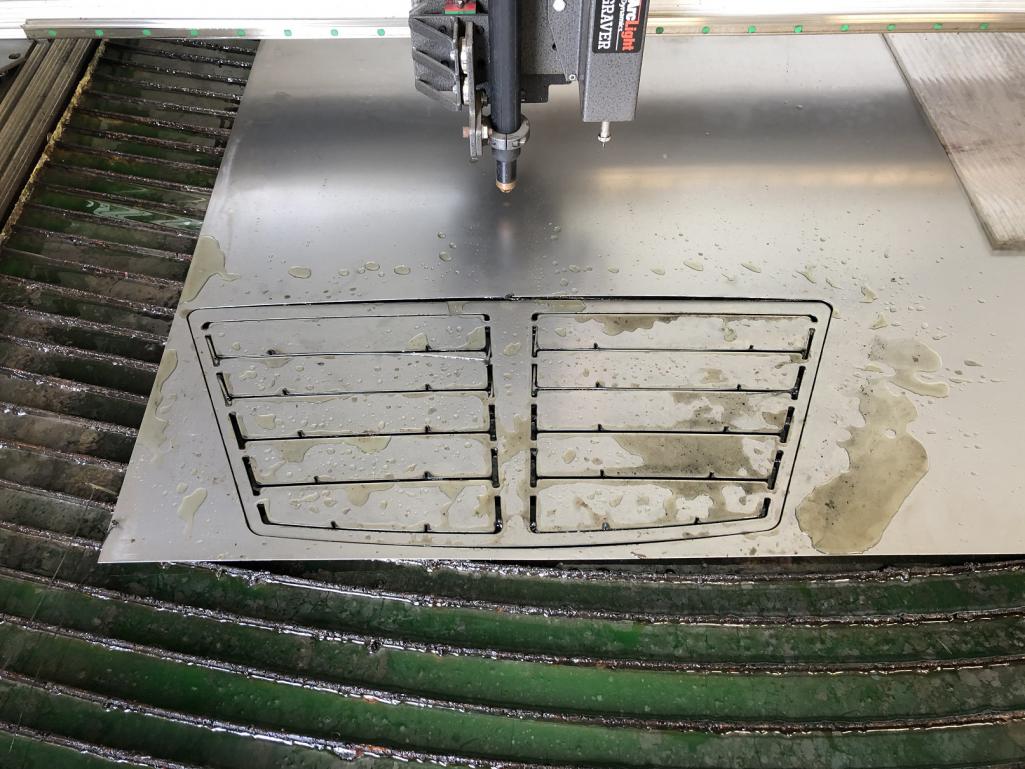 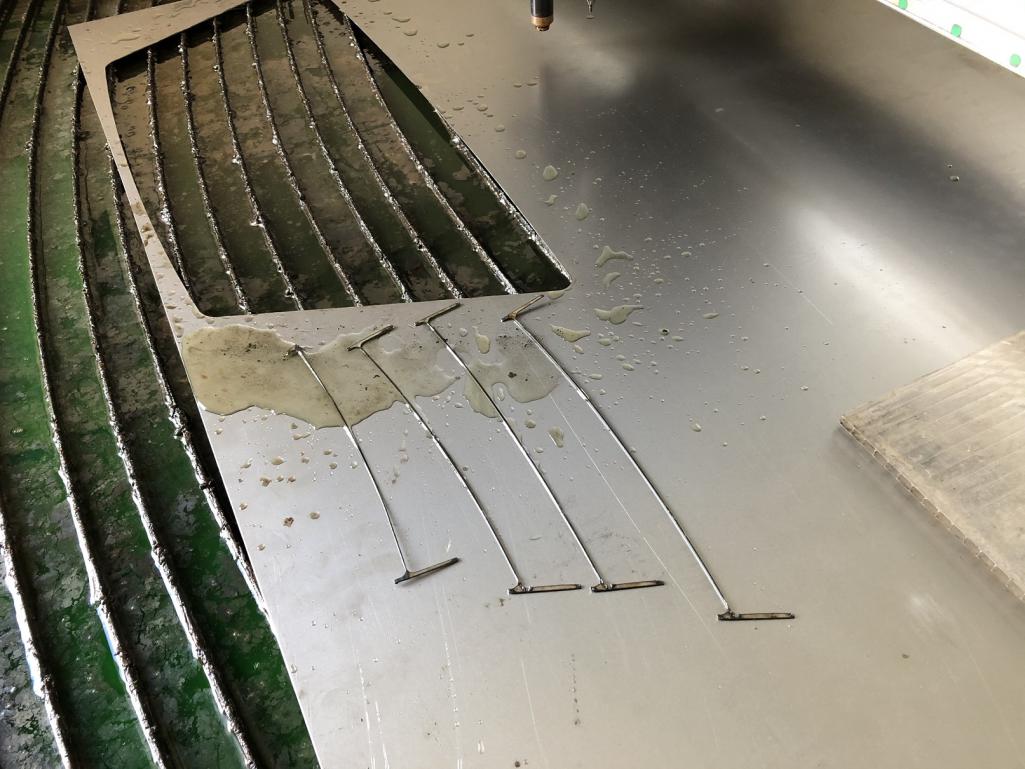
|
|
|
|
| tygaboy |
Mar 24 2020, 03:52 PM
Post
#2412
|
|
914 Guru Group: Members Posts: 5,554 Joined: 6-October 15 From: Petaluma, CA Member No.: 19,241 Region Association: Northern California |
Hmmm. I think I like it better than the earlier one with the rear edge that curved in parallel with the front.
Attached thumbnail(s) 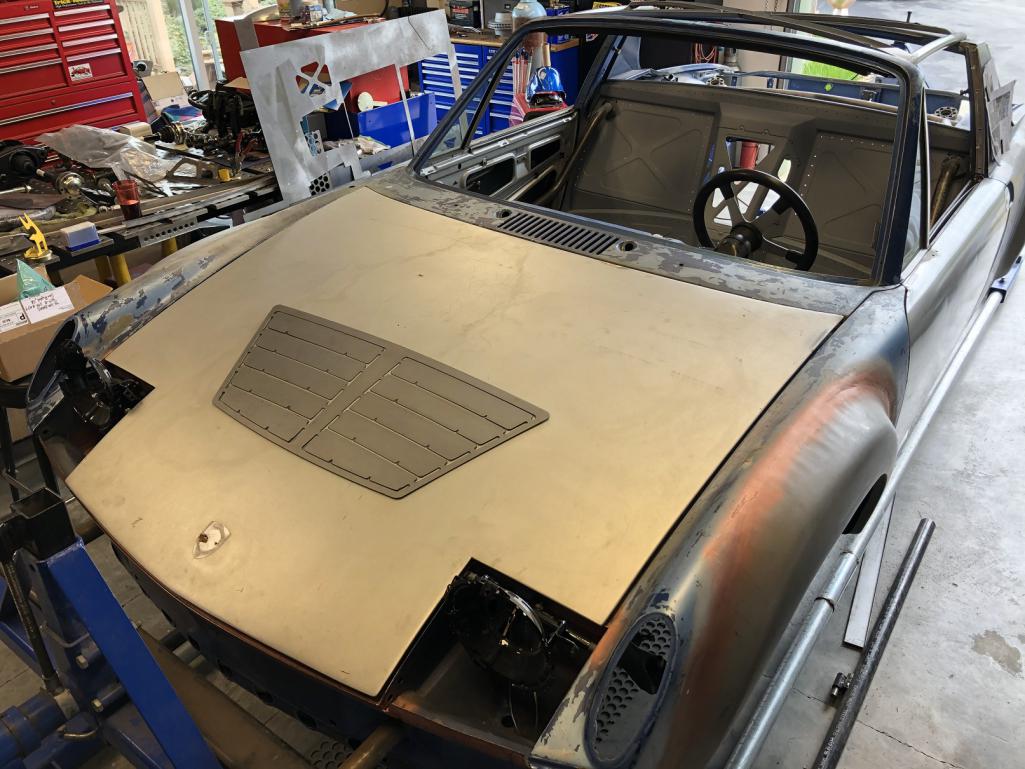 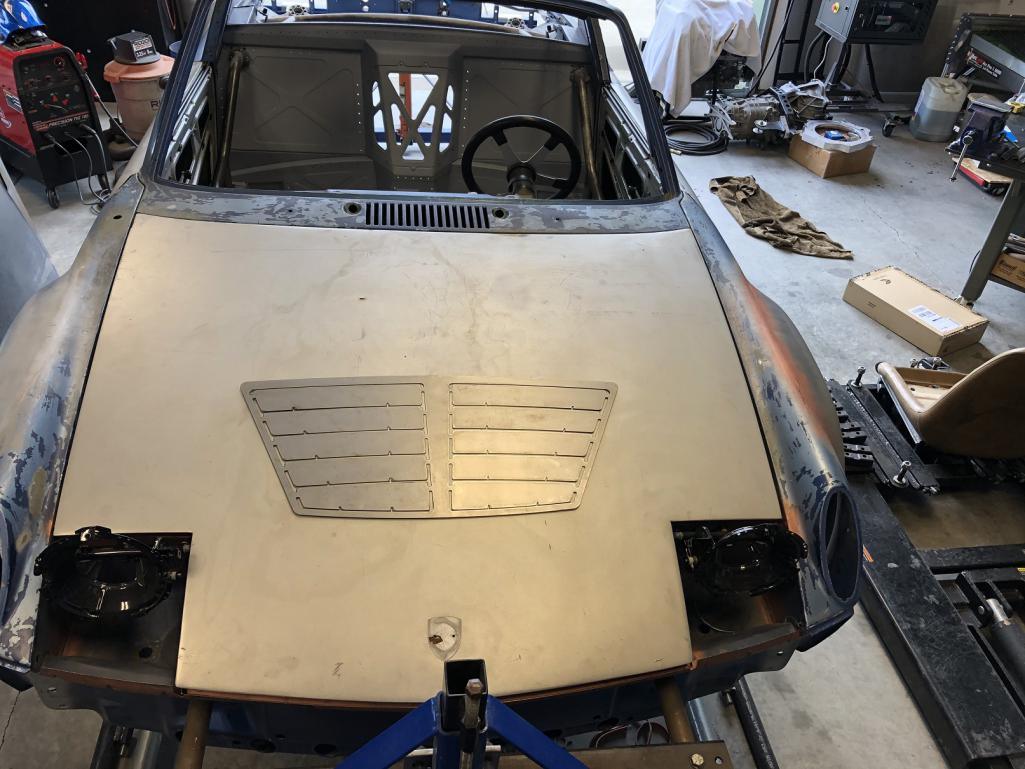
|
|
|
|
| tygaboy |
Mar 24 2020, 03:57 PM
Post
#2413
|
|
914 Guru Group: Members Posts: 5,554 Joined: 6-October 15 From: Petaluma, CA Member No.: 19,241 Region Association: Northern California |
It really takes on a totally different look once the vanes are tipped.
Now to cut the opening in the hood. And before you give me a hard time about sacrificing a hood, the one I'm using for this was in an accident that bent its support structure, it's got a bunch of filler on it and it has rot in a number of places. Attached thumbnail(s) 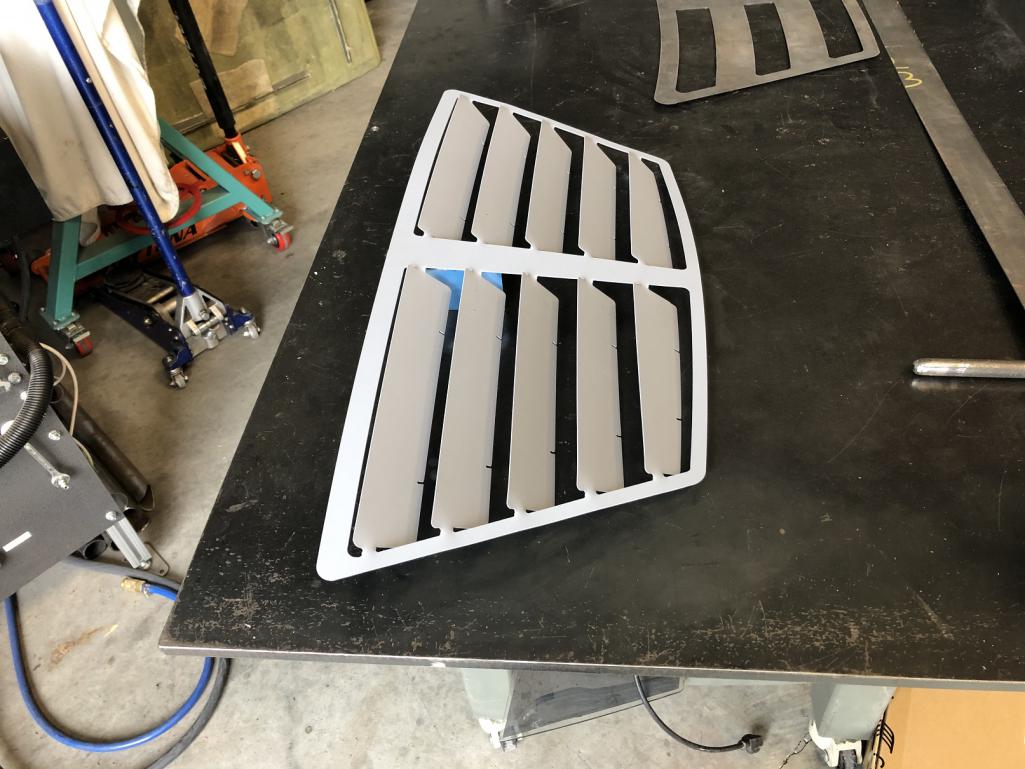 
|
|
|
|
| tygaboy |
Mar 24 2020, 04:07 PM
Post
#2414
|
|
914 Guru Group: Members Posts: 5,554 Joined: 6-October 15 From: Petaluma, CA Member No.: 19,241 Region Association: Northern California |
QUOTE(AZBanks @ Mar 23 2020, 09:58 AM) Chris you are an inspiration. The quality of your work and your creativity are top level. @AZBanks - Thanks so much for your kind words. I really appreciate it. |
|
|
|
| Krieger |
Mar 24 2020, 05:00 PM
Post
#2415
|
|
Advanced Member Group: Members Posts: 4,802 Joined: 24-May 04 From: Santa Rosa CA Member No.: 2,104 Region Association: None |
QUOTE(tygaboy @ Mar 24 2020, 02:57 PM) It really takes on a totally different look once the vanes are tipped. Now to cut the opening in the hood. And before you give me a hard time about sacrificing a hood, the one I'm using for this was in an accident that bent its support structure, it's got a bunch of filler on it and it has rot in a number of places. Why don't you just put your hood on the plasma table and have at it!? |
|
|
|
| Andyrew |
Mar 24 2020, 05:33 PM
Post
#2416
|
|
Spooling.... Please wait Group: Members Posts: 13,377 Joined: 20-January 03 From: Riverbank, Ca Member No.: 172 Region Association: Northern California |
Looks good!!!
Will you be welding it in place or bolting it to the hood? |
|
|
|
| sixnotfour |
Mar 24 2020, 05:44 PM
Post
#2417
|
|
914 Wizard Group: Members Posts: 10,807 Joined: 12-September 04 From: Life Elevated..planet UT. Member No.: 2,744 Region Association: Rocky Mountains |
QUOTE(Krieger @ Mar 24 2020, 05:00 PM) QUOTE(tygaboy @ Mar 24 2020, 02:57 PM) It really takes on a totally different look once the vanes are tipped. Now to cut the opening in the hood. And before you give me a hard time about sacrificing a hood, the one I'm using for this was in an accident that bent its support structure, it's got a bunch of filler on it and it has rot in a number of places. Why don't you just put your hood on the plasma table and have at it!? (IMG:style_emoticons/default/agree.gif) |
|
|
|
| djway |
Mar 24 2020, 10:01 PM
Post
#2418
|
|
Senior Member Group: Members Posts: 787 Joined: 16-October 15 From: Riverside Member No.: 19,266 Region Association: Southern California |
al-u-mini-um
Make it so. Jean Luc |
|
|
|
| tygaboy |
Mar 24 2020, 10:11 PM
Post
#2419
|
|
914 Guru Group: Members Posts: 5,554 Joined: 6-October 15 From: Petaluma, CA Member No.: 19,241 Region Association: Northern California |
QUOTE(Krieger @ Mar 24 2020, 04:00 PM) QUOTE(tygaboy @ Mar 24 2020, 02:57 PM) It really takes on a totally different look once the vanes are tipped. Now to cut the opening in the hood. And before you give me a hard time about sacrificing a hood, the one I'm using for this was in an accident that bent its support structure, it's got a bunch of filler on it and it has rot in a number of places. Why don't you just put your hood on the plasma table and have at it!? @Krieger @sixnotfour - I wouldn't say I'm an expert at anything but I'm getting pretty good with my plasma table. Early on, I'd thought about doing this very thing but a few things had me abandon it pretty quickly: - plasma puts a ton of heat into the material and there is a 100% chance the distortion to the hood would be significant - I'm not sure I'm skilled enough to correct it - support of some kind would still be needed so I'd be adding material anyway. - I'd have to get it right on the first try. Me? One try? We all know that's not my strong suit! (IMG:style_emoticons/default/laugh.gif) I've already made changes to the design that I think I like more. Give me a bit more time and I think I can come up with something that'll look right on this build. And remember, this vent is eventually going into a carbon hood so I need a stand alone component anyway. Bonus points if I can use it as a mold to make it in carbon and bond it to the carbon hood! |
|
|
|
| Krieger |
Mar 24 2020, 10:28 PM
Post
#2420
|
|
Advanced Member Group: Members Posts: 4,802 Joined: 24-May 04 From: Santa Rosa CA Member No.: 2,104 Region Association: None |
Chris, if you just borrowed a cryo chamber and put the plasma table and hood in it for 6 hours before the cutting began you'd be good! (IMG:style_emoticons/default/poke.gif) (IMG:style_emoticons/default/biggrin.gif)
|
|
|
|
|
1 User(s) are reading this topic (1 Guests and 0 Anonymous Users)
0 Members:

|
Lo-Fi Version | Time is now: 27th April 2025 - 03:26 PM |
Invision Power Board
v9.1.4 © 2025 IPS, Inc.