|
|
|
Porsche, and the Porsche crest are registered trademarks of Dr. Ing. h.c. F. Porsche AG.
This site is not affiliated with Porsche in any way. Its only purpose is to provide an online forum for car enthusiasts. All other trademarks are property of their respective owners. |
|
|

  |

| Andyrew |
 Jun 16 2020, 04:16 PM Jun 16 2020, 04:16 PM
Post
#2701
|
|
Spooling.... Please wait  Group: Members Posts: 13,377 Joined: 20-January 03 From: Riverbank, Ca Member No.: 172 Region Association: Northern California |
Dammn nice work on that shroud!
|
   |

 
|
| tygaboy |
Jun 17 2020, 05:07 PM
Post
#2702
|
|
914 Guru Group: Members Posts: 5,552 Joined: 6-October 15 From: Petaluma, CA Member No.: 19,241 Region Association: Northern California |
Radiator mount installed. The orange stuff is a stick-on rubber strip that I'm using as sort of a gasket/insulator between the mount and the radiator. The radiator sits on two small pads (you can see one there on the triangular section of the mount) so the lower cross bar of the mount doesn't need the strip.
Pic of the strip's McMaster-Carr part info included, in case you want some. It's available in various widths, non-sticky, etc. I also used it under areas of the fuel tank as it's just the right thickness to replace the stock material. Attached thumbnail(s) 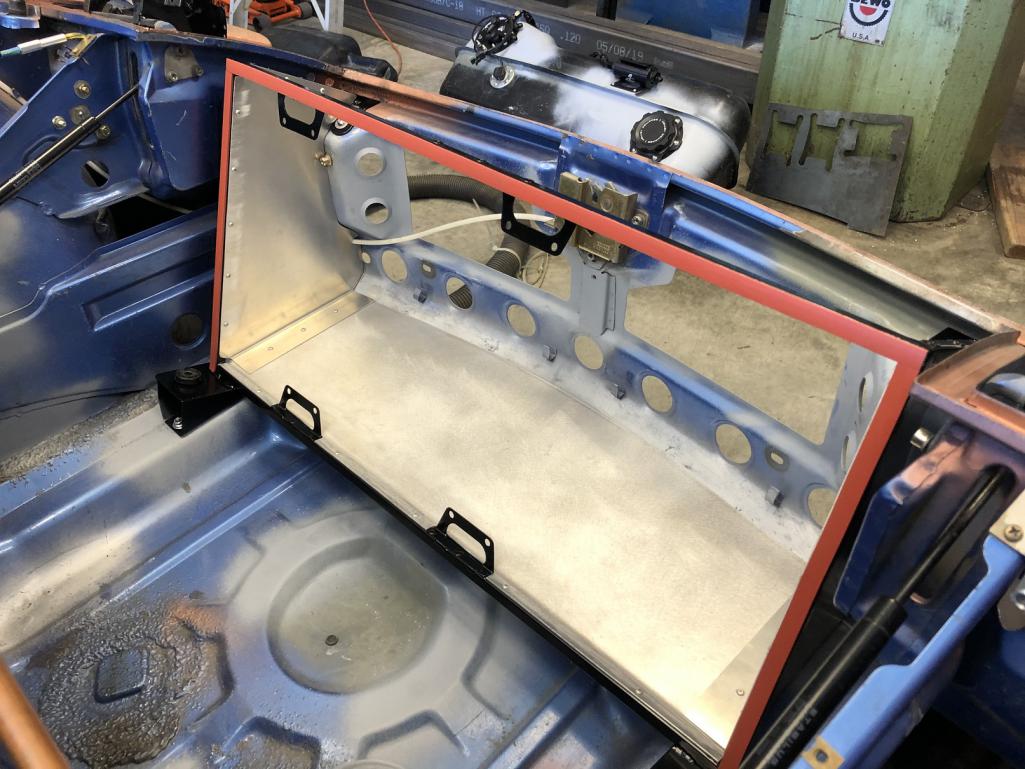 Attached image(s) 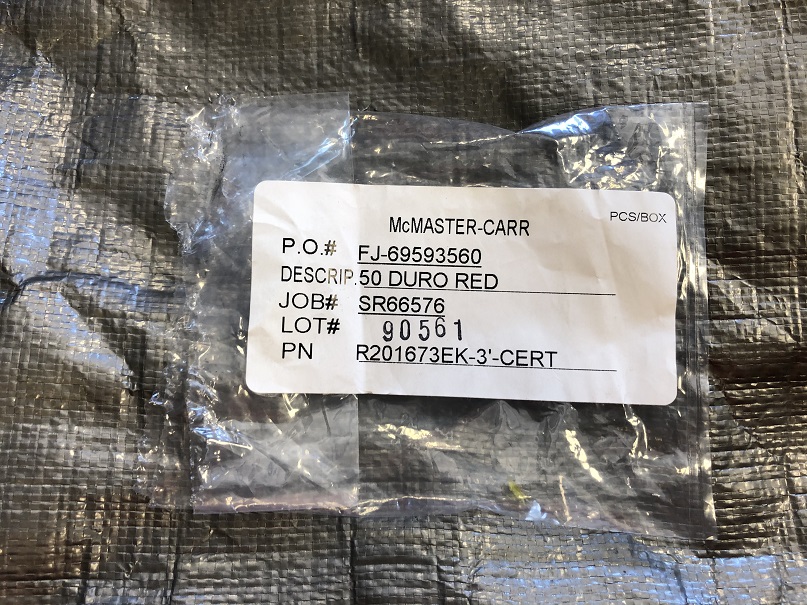
|
|
|
|
| Nogoodwithusernames |
Jun 18 2020, 10:37 AM
Post
#2703
|
|
Member Group: Members Posts: 286 Joined: 31-May 16 From: Sutter, CA Member No.: 20,051 Region Association: None |
That thing fits like a glove, color me impressed! Looks really good, as with every other detail on this thing of course. Gonna be one awesome 914 when you are done.
|
|
|
|
| KELTY360 |
Jun 18 2020, 11:40 AM
Post
#2704
|
|
914 Neferati Group: Members Posts: 5,124 Joined: 31-December 05 From: Pt. Townsend, WA Member No.: 5,344 Region Association: Pacific Northwest |
QUOTE(Nogoodwithusernames @ Jun 18 2020, 08:37 AM)  Gonna be one awesome 914 when you are done. (IMG:style_emoticons/default/lol-2.gif) (IMG:style_emoticons/default/av-943.gif) Yeah, like that’s gonna happen. |
|
|
|
| Nogoodwithusernames |
Jun 18 2020, 12:58 PM
Post
#2705
|
|
Member Group: Members Posts: 286 Joined: 31-May 16 From: Sutter, CA Member No.: 20,051 Region Association: None |
QUOTE(KELTY360 @ Jun 18 2020, 10:40 AM) QUOTE(Nogoodwithusernames @ Jun 18 2020, 08:37 AM) Gonna be one awesome 914 when you are done. (IMG:style_emoticons/default/lol-2.gif) (IMG:style_emoticons/default/av-943.gif) Yeah, like that’s gonna happen. Hey I gotta be nice to him still, he's cutting out some exhaust flanges for me with his plasma table (IMG:style_emoticons/default/biggrin.gif) (IMG:style_emoticons/default/beerchug.gif) |
|
|
|
| tygaboy |
Jun 18 2020, 01:29 PM
Post
#2706
|
|
914 Guru Group: Members Posts: 5,552 Joined: 6-October 15 From: Petaluma, CA Member No.: 19,241 Region Association: Northern California |
QUOTE(Nogoodwithusernames @ Jun 18 2020, 11:58 AM) QUOTE(KELTY360 @ Jun 18 2020, 10:40 AM) QUOTE(Nogoodwithusernames @ Jun 18 2020, 08:37 AM) Gonna be one awesome 914 when you are done. (IMG:style_emoticons/default/lol-2.gif) (IMG:style_emoticons/default/av-943.gif) Yeah, like that’s gonna happen. Hey I gotta be nice to him still, he's cutting out some exhaust flanges for me with his plasma table (IMG:style_emoticons/default/biggrin.gif) (IMG:style_emoticons/default/beerchug.gif) I could finish if I wasn't making stuff for other folks... (IMG:style_emoticons/default/poke.gif) Attached thumbnail(s) 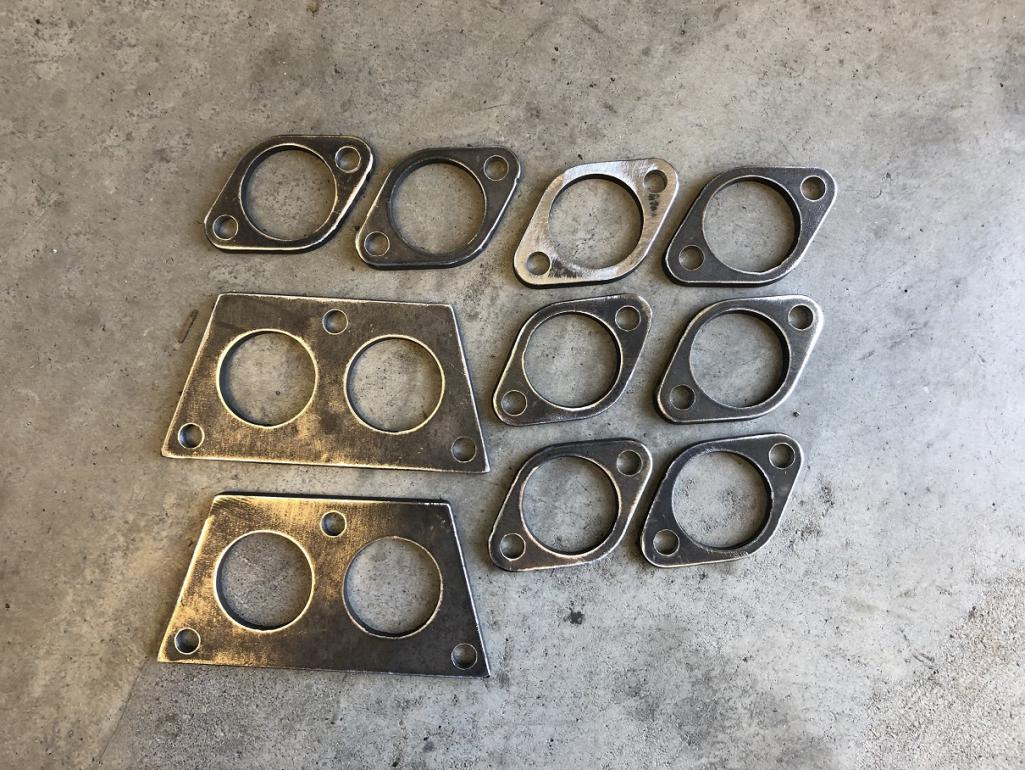
|
|
|
|
| tygaboy |
Jun 18 2020, 05:06 PM
Post
#2707
|
|
914 Guru Group: Members Posts: 5,552 Joined: 6-October 15 From: Petaluma, CA Member No.: 19,241 Region Association: Northern California |
Let's get back to MY build, shall we? (IMG:style_emoticons/default/biggrin.gif)
Another do-over. The move to using my custom water collector means the battery has to move. I need to fit a bunch of stuff in this general area: - battery - water collector/thermostat ( @Andyrew , I decided to allow for one, even if I opt to run without) - AC compressor and lines - ECU - engine harness - This large-ish harness needs room to exit the ECU, get to the fire wall, turn left and route under the battery box. Here's the first effort at the 2nd mock up. Wait... what? (IMG:style_emoticons/default/blink.gif) It moves the battery up but this seems the best I can do, given the requirements. In this configuration, it looks like everything fits. And yes, I still have to make a couple braces for the rear-most edge of the battery box. Attached thumbnail(s) 
|
|
|
|
| Cairo94507 |
Jun 18 2020, 05:09 PM
Post
#2708
|
|
Michael Group: Members Posts: 10,300 Joined: 1-November 08 From: Auburn, CA Member No.: 9,712 Region Association: Northern California |
I wish I had the $$$$ for you to build me a custom 914......Just amazing skills. (IMG:style_emoticons/default/beerchug.gif)
|
 |
|
| Andyrew |
Jun 18 2020, 05:21 PM
Post
#2709
|
|
Spooling.... Please wait Group: Members Posts: 13,377 Joined: 20-January 03 From: Riverbank, Ca Member No.: 172 Region Association: Northern California |
^
Same!!! He's been putting the rest of us to shame since day one!! |
|
|
|
| Krieger |
Jun 18 2020, 11:51 PM
Post
#2710
|
|
Advanced Member Group: Members Posts: 4,801 Joined: 24-May 04 From: Santa Rosa CA Member No.: 2,104 Region Association: None |
Perfect!
|
|
|
|
| tygaboy |
Jun 19 2020, 09:51 AM
Post
#2711
|
|
914 Guru Group: Members Posts: 5,552 Joined: 6-October 15 From: Petaluma, CA Member No.: 19,241 Region Association: Northern California |
A bit off topic but fellow tool whores will likely enjoy:
A 914 World member asked if I could make a panel with a few beads rolled into it. I figured why not try and copy the factory's reinforcement rib, at least as best I could with the beading dies I have. I don't have a stepping die set but I was betting I could do some mix/match to get close. You can see the curved die's match on the bench. So, here's the die set up I used, as well as a quick video of a test roll to prove out the setting needed to get the desired result. Note I was videoing with one hand, and guiding the panel with the other so no comments about accuracy! Also, this was a scrap/test piece and I curved the bead only to miss that cut area in the panel - but it gives you an idea of the sorts of details that bead rollers can add. Could this be done by hand? Yes. By me? No. Yet another example of "the right tool for the job". https://www.youtube.com/watch?v=Bf9Dw42XqaA Attached thumbnail(s) 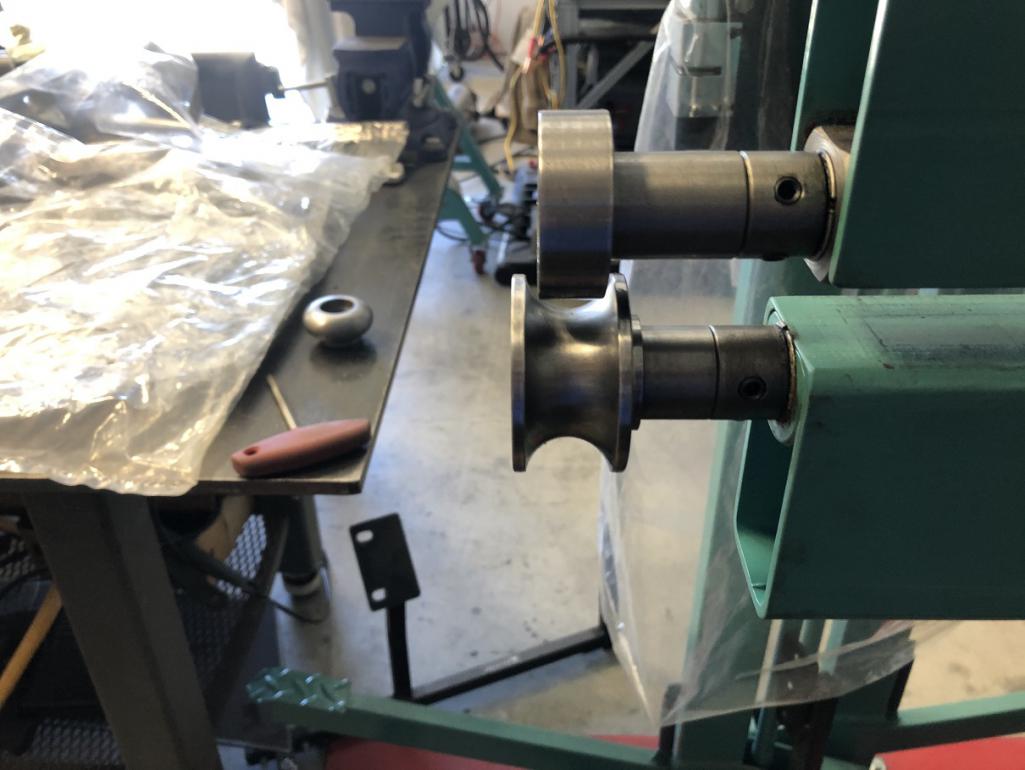
|
|
|
|
| willieg |
Jun 19 2020, 12:57 PM
Post
#2712
|
|
Member Group: Members Posts: 146 Joined: 13-August 18 From: Pleasant Hill Member No.: 22,389 Region Association: Northern California |
I have seen the quality of Chris's work in person. And it is real and it is spectacular.
|
|
|
|
| Nogoodwithusernames |
Jun 19 2020, 12:58 PM
Post
#2713
|
|
Member Group: Members Posts: 286 Joined: 31-May 16 From: Sutter, CA Member No.: 20,051 Region Association: None |
QUOTE(tygaboy @ Jun 19 2020, 08:51 AM) A bit off topic but fellow tool whores will likely enjoy: A 914 World member asked if I could make a panel with a few beads rolled into it. I figured why not try and copy the factory's reinforcement rib, at least as best I could with the beading dies I have. I don't have a stepping die set but I was betting I could do some mix/match to get close. You can see the curved die's match on the bench. So, here's the die set up I used, as well as a quick video of a test roll to prove out the setting needed to get the desired result. Note I was videoing with one hand, and guiding the panel with the other so no comments about accuracy! Also, this was a scrap/test piece and I curved the bead only to miss that cut area in the panel - but it gives you an idea of the sorts of details that bead rollers can add. Could this be done by hand? Yes. By me? No. Yet another example of "the right tool for the job". (IMG:style_emoticons/default/drooley.gif) I need a bigger garage |
|
|
|
| tygaboy |
Jun 20 2020, 09:21 AM
Post
#2714
|
|
914 Guru Group: Members Posts: 5,552 Joined: 6-October 15 From: Petaluma, CA Member No.: 19,241 Region Association: Northern California |
@Cairo94507 @Andyrew @Nogoodwithusernames @willieg @Krieger
Thank you. I'm humbled by your kind words. |
|
|
|
| Andyrew |
Jun 20 2020, 10:05 AM
Post
#2715
|
|
Spooling.... Please wait Group: Members Posts: 13,377 Joined: 20-January 03 From: Riverbank, Ca Member No.: 172 Region Association: Northern California |
Wow!!! We're gonna have to talk (IMG:style_emoticons/default/smile.gif)
That bead is perfect for what I'm looking for for my rear trunk firewall! |
|
|
|
| tygaboy |
Jun 20 2020, 11:06 AM
Post
#2716
|
|
914 Guru Group: Members Posts: 5,552 Joined: 6-October 15 From: Petaluma, CA Member No.: 19,241 Region Association: Northern California |
QUOTE(Andyrew @ Jun 20 2020, 09:05 AM) Wow!!! We're gonna have to talk (IMG:style_emoticons/default/smile.gif) That bead is perfect for what I'm looking for for my rear trunk firewall! @Andyrew - give me a call at your convenience. The bead roller is still set up to roll that detail... |
|
|
|
| Rand |
Jun 20 2020, 11:20 AM
Post
#2717
|
|
Cross Member Group: Members Posts: 7,410 Joined: 8-February 05 From: OR Member No.: 3,573 Region Association: None |
So cool that Chris shares. You peeps who live in his area have a huge blessing.
|
|
|
|
| tygaboy |
Jun 20 2020, 05:05 PM
Post
#2718
|
|
914 Guru Group: Members Posts: 5,552 Joined: 6-October 15 From: Petaluma, CA Member No.: 19,241 Region Association: Northern California |
First attempt at the rear battery tray support brace. It has a stiffening flange running up the left side that snugs up against and locates it against the engine mount's flange. Style points for the triangular cut out that echos the fire wall stamping design.
I'll use a couple bolts to secure this brace to the engine mount and either bolt it or spot weld it to the battery tray. Again, the whole contraption has to be removable to allow for servicing other components in this area. I'll remake the battery tray, too. Now that it won't be sitting on those two braces (which will be removed), I need to relocate the speed holes. In all, I think I like this brace design - it just needs a few tweaks. Attached thumbnail(s) 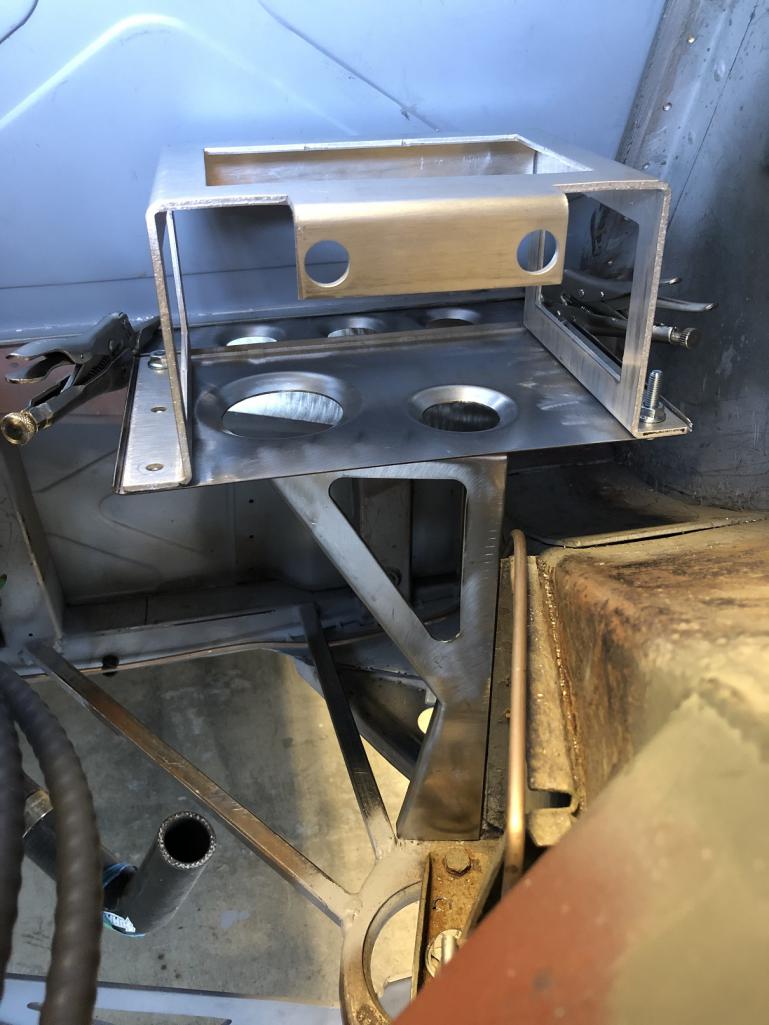
|
|
|
|
| tygaboy |
Jun 21 2020, 02:23 PM
Post
#2719
|
|
914 Guru Group: Members Posts: 5,552 Joined: 6-October 15 From: Petaluma, CA Member No.: 19,241 Region Association: Northern California |
New version of the rear brace attached to the engine mount and updated battery tray design fabbed. Next, it's weld the front support bracket to the chassis and spot weld the tray to the brace.
Attached thumbnail(s) 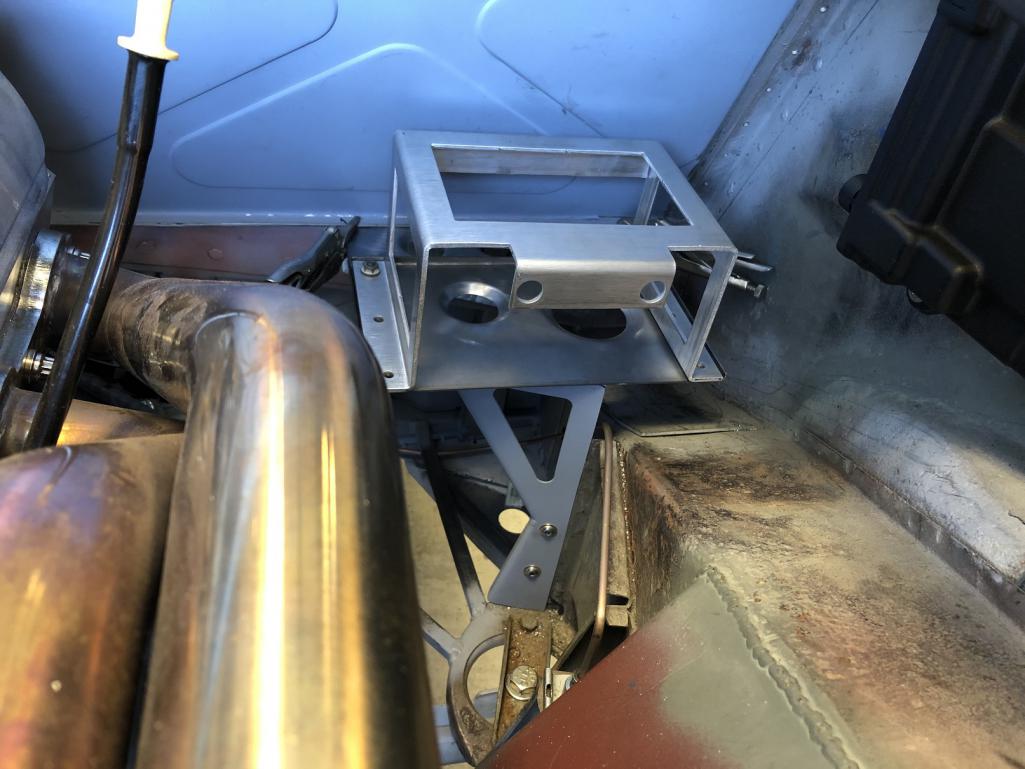
|
|
|
|
| tygaboy |
Jun 21 2020, 03:25 PM
Post
#2720
|
|
914 Guru Group: Members Posts: 5,552 Joined: 6-October 15 From: Petaluma, CA Member No.: 19,241 Region Association: Northern California |
As mentioned, even though I could control the electric water pump on/off based on temp via the ECU, I decided to allow for an in-line thermostat so I don't HAVE to do that. I like the option, @Andyrew .
Anyway, Martin again comes through with killer TIG skills. It's a shame this isn't more visible, once installed. Attached thumbnail(s) 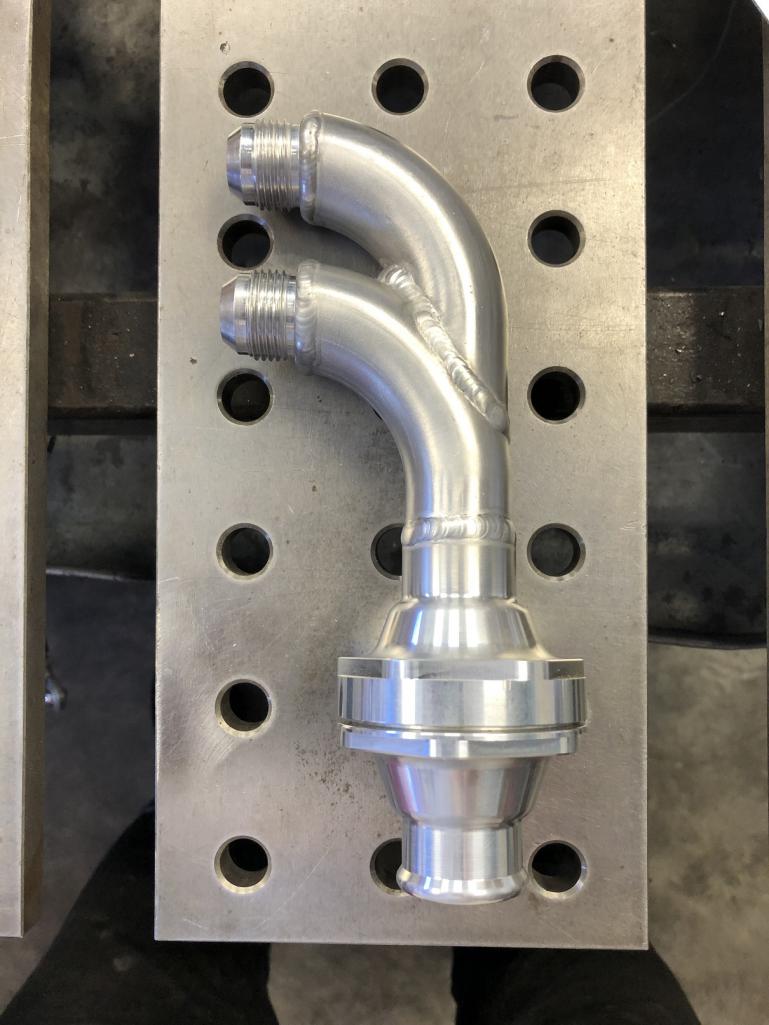
|
|
|
|
|
1 User(s) are reading this topic (1 Guests and 0 Anonymous Users)
0 Members:

|
Lo-Fi Version | Time is now: 25th April 2025 - 10:48 AM |
Invision Power Board
v9.1.4 © 2025 IPS, Inc.