|
|

|
Porsche, and the Porsche crest are registered trademarks of Dr. Ing. h.c. F. Porsche AG.
This site is not affiliated with Porsche in any way. Its only purpose is to provide an online forum for car enthusiasts. All other trademarks are property of their respective owners. |
|
|
  |
| tygaboy |
 Oct 27 2020, 05:06 PM Oct 27 2020, 05:06 PM
Post
#3081
|
|
914 Guru      Group: Members Posts: 5,552 Joined: 6-October 15 From: Petaluma, CA Member No.: 19,241 Region Association: Northern California 
|
Glued and screwed! Well, bonded and cleco'd anyway. This is the same structural panel bond I used on the fire wall components.
But more importantly: The throttle cable parts came in. I made the cable. Then I (IMG:style_emoticons/default/driving.gif) (IMG:style_emoticons/default/driving.gif) (IMG:style_emoticons/default/driving.gif) The new bell crank cam worked WONDERS! The throttle response has been transformed and I actually enjoyed my run around the block. It's not perfect and I'm going to see if I can come up with something at the pedal end of things to get a bit more off idle progression. But even if I can't, I think I could live with what I have now. Especially once I swap out to the smaller bore clutch master. So. It seems my car will make at least a brief appearance at WCR after all. Attached thumbnail(s) 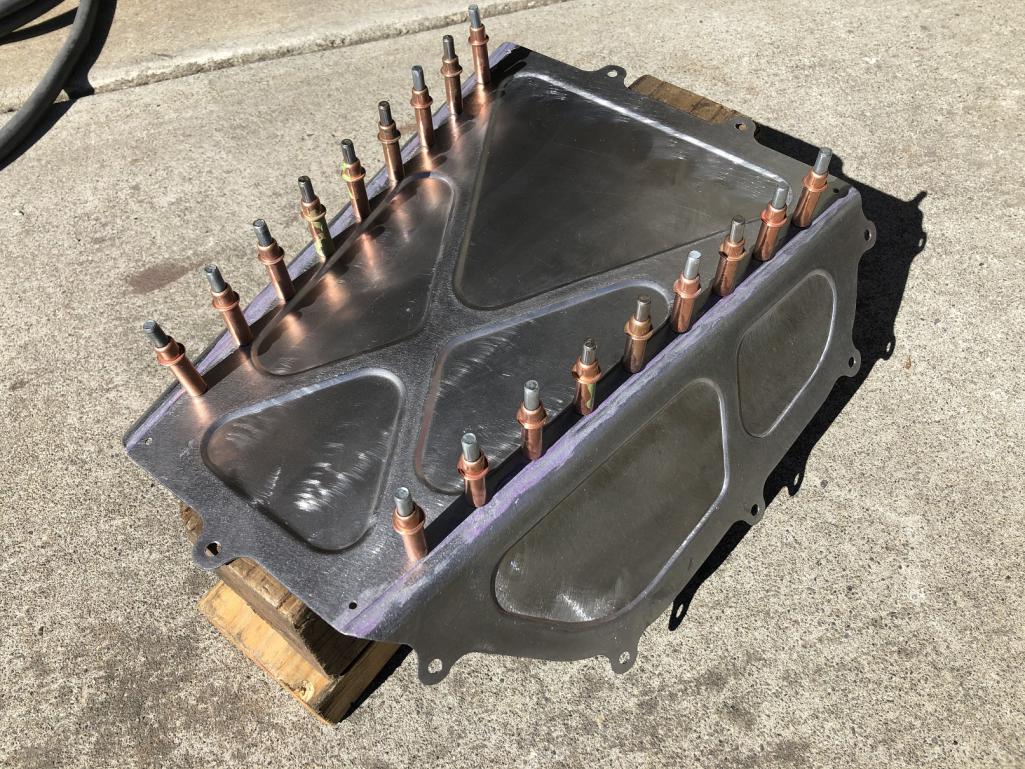
|
| Matty900 |
 Oct 27 2020, 05:49 PM Oct 27 2020, 05:49 PM
Post
#3082
|
|
Senior Member    Group: Members Posts: 1,291 Joined: 21-February 15 From: Oregon Member No.: 18,454 Region Association: Pacific Northwest |
Definitely more steam punk. Now you just need to redo everything again and use more copper this time (IMG:style_emoticons/default/idea.gif)
Seriously cool. Can't wait to see this in person |
| Matty900 |
 Oct 27 2020, 05:51 PM Oct 27 2020, 05:51 PM
Post
#3083
|
|
Senior Member    Group: Members Posts: 1,291 Joined: 21-February 15 From: Oregon Member No.: 18,454 Region Association: Pacific Northwest |
It's good to have options. (IMG:style_emoticons/default/laugh.gif) - The one on the left is a pure temporary that I can run while doing all the "get it running and driving" stuff. It'll never be worked to any higher finish. - The middle one will be finished, painted and have the carbon inserts bonded into the openings. This will be the "fancy" one. - The one on the right? I'll use panel bond, same as I did on the other fire wall panels. It'll then be painted and get the same structural rivets as the rest of the fire wall. Now what can I re-do? (IMG:style_emoticons/default/happy11.gif) Re do the one in the middle in copper and chrome the one on the right and then join them together (IMG:style_emoticons/default/poke.gif) |
| Cairo94507 |
 Oct 28 2020, 06:43 AM Oct 28 2020, 06:43 AM
Post
#3084
|
|
Michael           Group: Members Posts: 10,300 Joined: 1-November 08 From: Auburn, CA Member No.: 9,712 Region Association: Northern California 
|
Outstanding Chris. I am looking forward to seeing and hearing it in person. (IMG:style_emoticons/default/smilie_pokal.gif) (IMG:style_emoticons/default/popcorn[1].gif) (IMG:style_emoticons/default/beerchug.gif)
|
| Andyrew |
 Oct 28 2020, 08:11 AM Oct 28 2020, 08:11 AM
Post
#3085
|
|
Spooling.... Please wait           Group: Members Posts: 13,377 Joined: 20-January 03 From: Riverbank, Ca Member No.: 172 Region Association: Northern California 
|
Glued and screwed! Well, bonded and cleco'd anyway. This is the same structural panel bond I used on the fire wall components. But more importantly: The throttle cable parts came in. I made the cable. Then I (IMG:style_emoticons/default/driving.gif) (IMG:style_emoticons/default/driving.gif) (IMG:style_emoticons/default/driving.gif) The new bell crank cam worked WONDERS! The throttle response has been transformed and I actually enjoyed my run around the block. It's not perfect and I'm going to see if I can come up with something at the pedal end of things to get a bit more off idle progression. But even if I can't, I think I could live with what I have now. Especially once I swap out to the smaller bore clutch master. So. It seems my car will make at least a brief appearance at WCR after all. (IMG:style_emoticons/default/aktion035.gif) (IMG:style_emoticons/default/driving.gif) |
| BuddyV |
 Oct 28 2020, 08:26 AM Oct 28 2020, 08:26 AM
Post
#3086
|
|
Robert    Group: Members Posts: 566 Joined: 8-April 05 From: Santa Rosa, CA Member No.: 3,898 Region Association: Northern California 
|
Chris - I am near your place this afternoon..... I want to see it!!!!!
(IMG:style_emoticons/default/beerchug.gif) |
| tygaboy |
 Oct 29 2020, 06:08 PM Oct 29 2020, 06:08 PM
Post
#3087
|
|
914 Guru      Group: Members Posts: 5,552 Joined: 6-October 15 From: Petaluma, CA Member No.: 19,241 Region Association: Northern California 
|
I wire wheeled the panel bond out of the visible areas of the seams, hit it with a lick of primer and added temporary rivets. These are regular ol' pop rivets, not the structural ones I'll use once everything is painted. They're easy enough to remove and I just had to see what the cover would look like a bit more complete.
Note that the upper and lower most rivets are missing since they're only decorative - the area behind them is where the dog house needs to be notched to clear the back of the rivet. Anyway... Gotta say, I'm happy with how this turned out. Attached thumbnail(s) 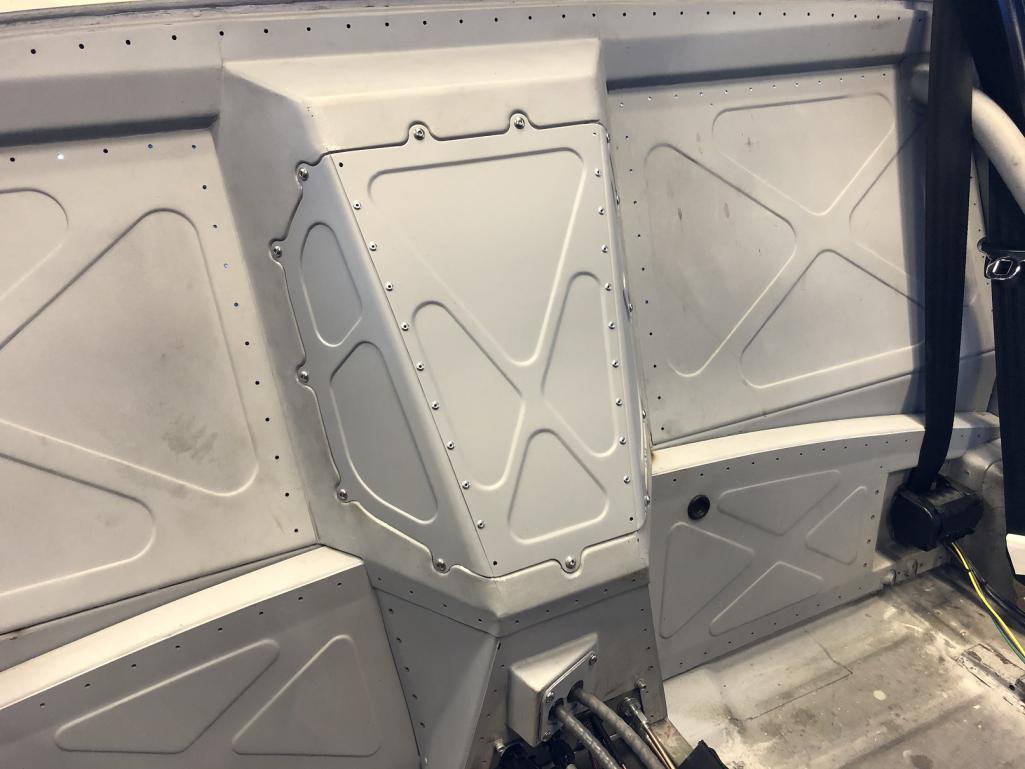
|
| dan10101 |
 Oct 29 2020, 06:54 PM Oct 29 2020, 06:54 PM
Post
#3088
|
|
TORQUE-o-holic    Group: Members Posts: 1,140 Joined: 29-April 03 From: Eagle Point, Or Member No.: 626 Region Association: Pacific Northwest |
I wire wheeled the panel bond out of the visible areas of the seams, hit it with a lick of primer and added temporary rivets. These are regular ol' pop rivets, not the structural ones I'll use once everything is painted. They're easy enough to remove and I just had to see what the cover would look like a bit more complete. Note that the upper and lower most rivets are missing since they're only decorative - the area behind them is where the dog house needs to be notched to clear the back of the rivet. Anyway... Gotta say, I'm happy with how this turned out. I love how this is your 'it'll do..." which for me would be "this is amazing!" It's going to be a shame to cover it all up with stupid fabric, or leather, or anything else. I'm glad that we'll all get to see it first. |
| Dion |
 Oct 29 2020, 07:01 PM Oct 29 2020, 07:01 PM
Post
#3089
|
|
RN     Group: Members Posts: 2,839 Joined: 16-September 04 From: Audubon,PA Member No.: 2,766 Region Association: MidAtlantic Region 

|
I wire wheeled the panel bond out of the visible areas of the seams, hit it with a lick of primer and added temporary rivets. These are regular ol' pop rivets, not the structural ones I'll use once everything is painted. They're easy enough to remove and I just had to see what the cover would look like a bit more complete. Note that the upper and lower most rivets are missing since they're only decorative - the area behind them is where the dog house needs to be notched to clear the back of the rivet. Anyway... Gotta say, I'm happy with how this turned out. I love how this is your 'it'll do..." which for me would be "this is amazing!" It's going to be a shame to cover it all up with stupid fabric, or leather, or anything else. I'm glad that we'll all get to see it first. (IMG:style_emoticons/default/agree.gif) There should be a clear soundproof material to apply and preserve. The structural designs on this car are constantly intriguing. |
| bkrantz |
 Oct 29 2020, 07:24 PM Oct 29 2020, 07:24 PM
Post
#3090
|
|
914 Guru      Group: Members Posts: 8,343 Joined: 3-August 19 From: SW Colorado Member No.: 23,343 Region Association: Rocky Mountains 
|
Very tidy.
|
| tygaboy |
 Oct 29 2020, 07:44 PM Oct 29 2020, 07:44 PM
Post
#3091
|
|
914 Guru      Group: Members Posts: 5,552 Joined: 6-October 15 From: Petaluma, CA Member No.: 19,241 Region Association: Northern California 
|
Everyone keeps talking about how I'm going to cover up the fire wall. At this point, the plan is to NOT cover it. I'll use some sort of heat/sound material on the engine side but I want to leave the fire wall and console viewable. Painted, but viewable.
The real issue is whether to paint the interior body color, black or maybe something that works with the body color... But until I prove it's not going to work due to sound volume or some sort of resonance, I want all this stuff to be "in plain sight". |
| djway |
 Oct 29 2020, 08:45 PM Oct 29 2020, 08:45 PM
Post
#3092
|
|
Senior Member    Group: Members Posts: 787 Joined: 16-October 15 From: Riverside Member No.: 19,266 Region Association: Southern California |
I have no insulation on the motor side of my firewall. Now it ain't no V8 but I can't really hear the engine over the normal wind noise at speed.
Just get noise cancelling headphones. |
| bbrock |
 Oct 29 2020, 10:04 PM Oct 29 2020, 10:04 PM
Post
#3093
|
|
914 Guru      Group: Members Posts: 5,269 Joined: 17-February 17 From: Montana Member No.: 20,845 Region Association: Rocky Mountains 
|
The real issue is whether to paint the interior body color, black or maybe something that works with the body color... That metal work screams for gun metal gray to me. Refined high tech industrial... (IMG:style_emoticons/default/idea.gif) |
| AZBanks |
 Oct 29 2020, 10:50 PM Oct 29 2020, 10:50 PM
Post
#3094
|
|
Senior Member    Group: Members Posts: 1,064 Joined: 7-December 05 From: New River, AZ Member No.: 5,245 Region Association: Southwest Region 
|
The real issue is whether to paint the interior body color, black or maybe something that works with the body color... That metal work screams for gun metal gray to me. Refined high tech industrial... (IMG:style_emoticons/default/idea.gif) (IMG:style_emoticons/default/agree.gif) |
| tygaboy |
 Oct 30 2020, 08:43 AM Oct 30 2020, 08:43 AM
Post
#3095
|
|
914 Guru      Group: Members Posts: 5,552 Joined: 6-October 15 From: Petaluma, CA Member No.: 19,241 Region Association: Northern California 
|
The real issue is whether to paint the interior body color, black or maybe something that works with the body color... That metal work screams for gun metal gray to me. Refined high tech industrial... (IMG:style_emoticons/default/idea.gif) @bbrock - Great minds... I've been noodling on doing the wheels, fire wall, console and dash switch panel/glove box area in anthracite. Do a lighter grey carpet and leave the seats, dash pads and door bars in black. The structural rivets are sort of a dull grey with a hint of bronze in the stem - that, and things like the shifter serve as the jewelry. Like a proper Victorian home paint job, you gotta have at least three colors and some "gingerbread"! |
| AZBanks |
 Oct 30 2020, 11:07 AM Oct 30 2020, 11:07 AM
Post
#3096
|
|
Senior Member    Group: Members Posts: 1,064 Joined: 7-December 05 From: New River, AZ Member No.: 5,245 Region Association: Southwest Region 
|
You do amazing work.
I should probably keep my trap shut but I never do so here goes. There is one thing I noticed about that picture. The "X" section of the upper panels is raised but the "X" section of the two lower panels is depressed. It is a minor thing and doesn't take away from your craftsmanship in the least, but to my eye, it looks a little inconsistent. |
| tygaboy |
 Oct 30 2020, 11:53 AM Oct 30 2020, 11:53 AM
Post
#3097
|
|
914 Guru      Group: Members Posts: 5,552 Joined: 6-October 15 From: Petaluma, CA Member No.: 19,241 Region Association: Northern California 
|
You do amazing work. I should probably keep my trap shut but I never do so here goes. There is one thing I noticed about that picture. The "X" section of the upper panels is raised but the "X" section of the two lower panels is depressed. It is a minor thing and doesn't take away from your craftsmanship in the least, but to my eye, it looks a little inconsistent. @AZBanks Thanks for the kind words. On the lower area: I know, right? Almost looks like I made a mistake and pressed them backwards... BUT: there are two vertical supports that are flush to the plane of the lower firewall. In order to get the lower panel to fit flush to the upper arch and lower cross member, and against the supports, the stamping needed to go forward, else they'd interfere. I liked the symmetric look of the stampings across the upper and lower panels vs something different on the lower to clear the supports. Plus, you can't see any of this once the seats are installed. But I do appreciate your sharp eye! Attached thumbnail(s) 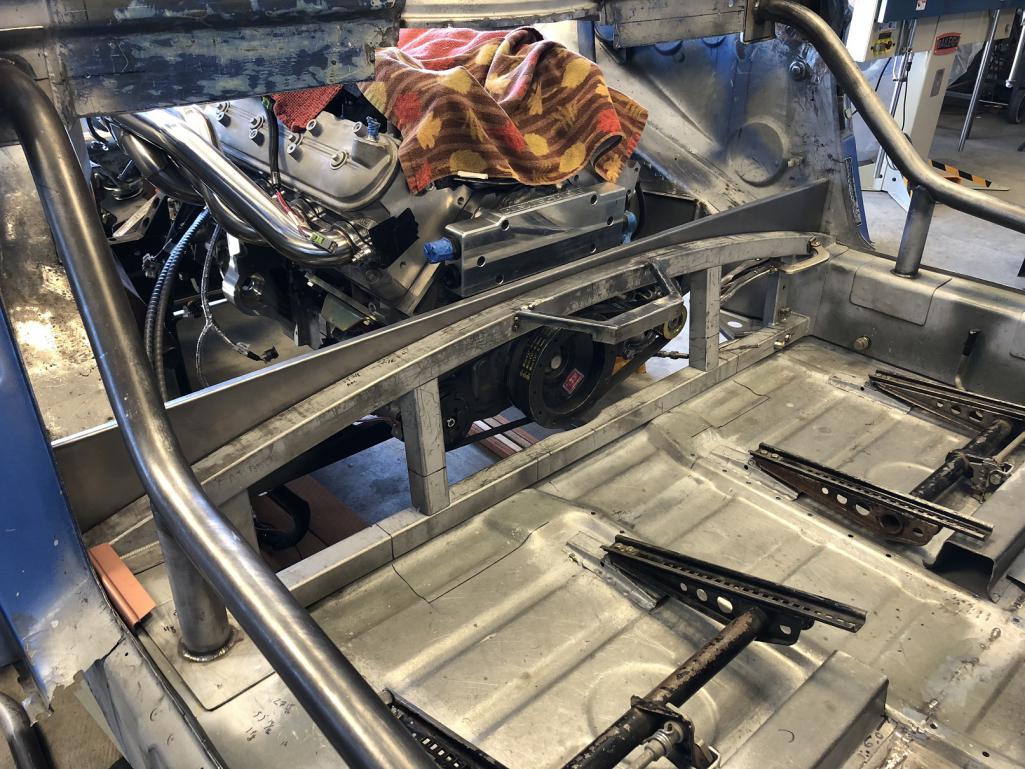 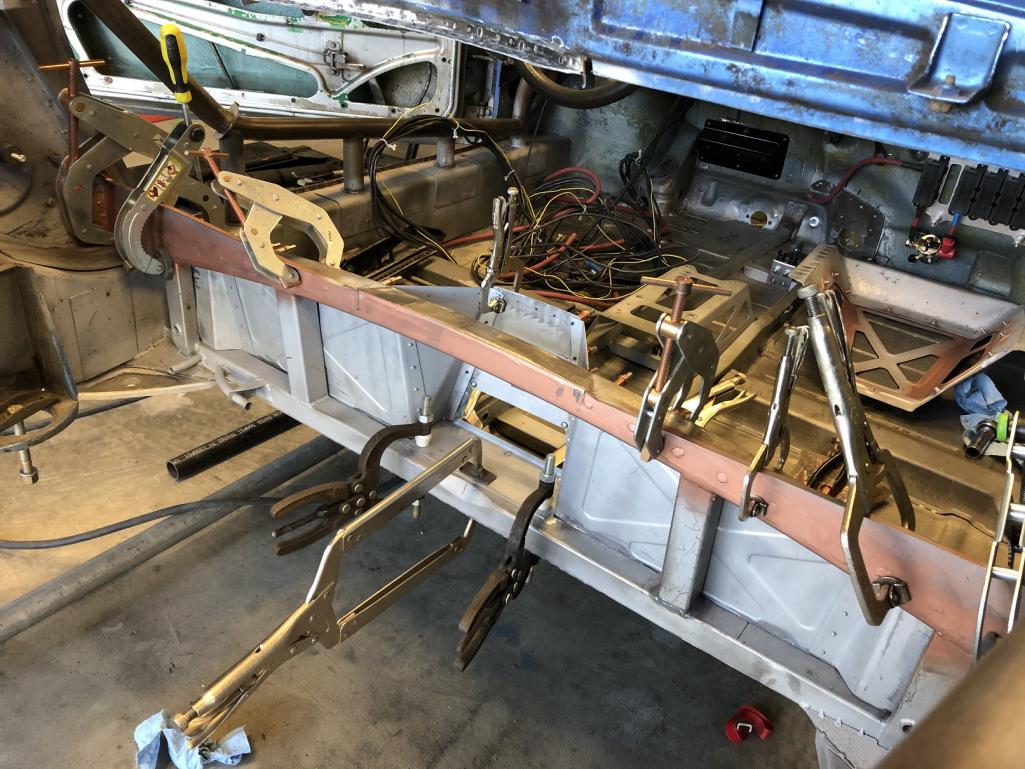
|
| tygaboy |
 Nov 10 2020, 06:27 PM Nov 10 2020, 06:27 PM
Post
#3098
|
|
914 Guru      Group: Members Posts: 5,552 Joined: 6-October 15 From: Petaluma, CA Member No.: 19,241 Region Association: Northern California 
|
I spent some time and have done all I can to optimize the set up of the new bell crank and am happy to report I think I've achieved a throttle pedal feel I can live with. I think it's pretty good but to verify I'm not just used to some horrible pedal, @markhoward has agreed to take my car for a test drive (hopefully tomorrow!) and report back if the pedal feel meets his high standards. (IMG:style_emoticons/default/driving.gif)
Thanks Mark! If it needs more progression, I'm back to trying to add some sort of linkage at the pedal end of things or making my own bell crank... Hopefully, Mark will find it "good to go". Fingers crossed. |
| tygaboy |
 Nov 10 2020, 06:31 PM Nov 10 2020, 06:31 PM
Post
#3099
|
|
914 Guru      Group: Members Posts: 5,552 Joined: 6-October 15 From: Petaluma, CA Member No.: 19,241 Region Association: Northern California 
|
With the throttle issue awaiting 3rd party testing, I found myself staring at the hood vent and feeling no better about it. I went back to that part of this build thread (page 130) and reviewed Tony's @RetroRacer design.
I REALLY like it and IMO, it's the best looking 914 hood vent design I've ever seen. So, I gave Tony a call and we talked through how we might get from his drawn design to my car's hood. Tape seemed like a good start. Note this was my initial rough-out. Things changed as Tony and I talked. Attached thumbnail(s) 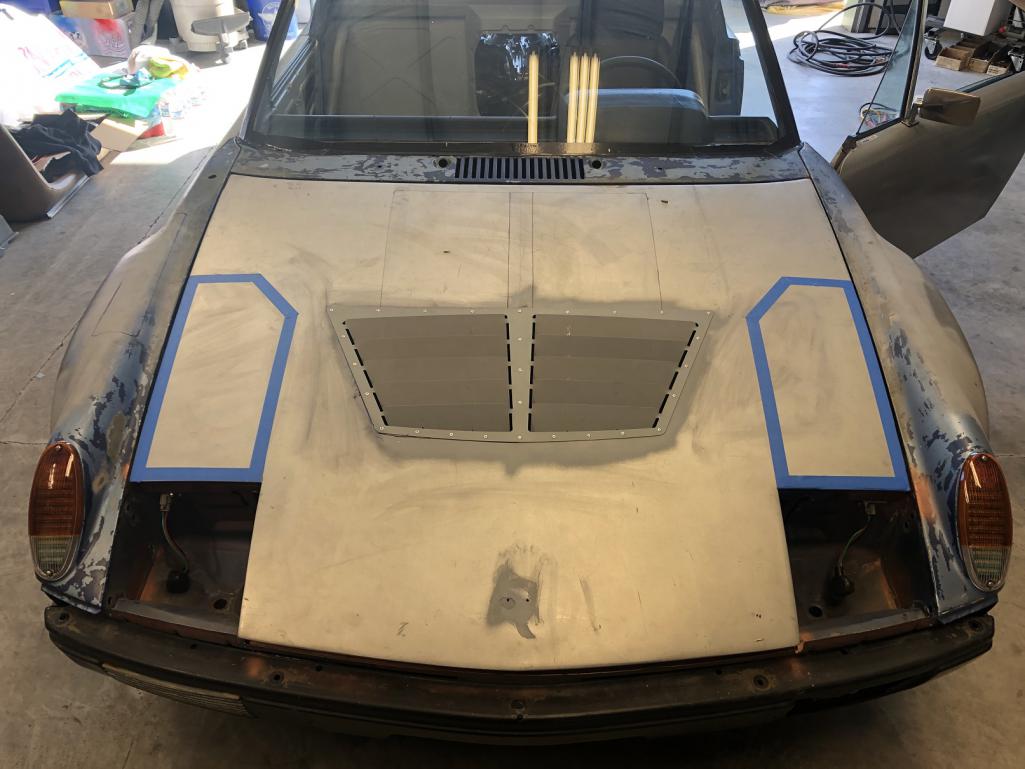
|
| tygaboy |
 Nov 10 2020, 06:35 PM Nov 10 2020, 06:35 PM
Post
#3100
|
|
914 Guru      Group: Members Posts: 5,552 Joined: 6-October 15 From: Petaluma, CA Member No.: 19,241 Region Association: Northern California 
|
One of the first issues is that the underside support structure prevents this wonderful shape from being sliced out. Here's the best I can get with NO mods to the support structure.
You can see by the holes that I've committed to giving this a full-on attempt. Attached thumbnail(s) 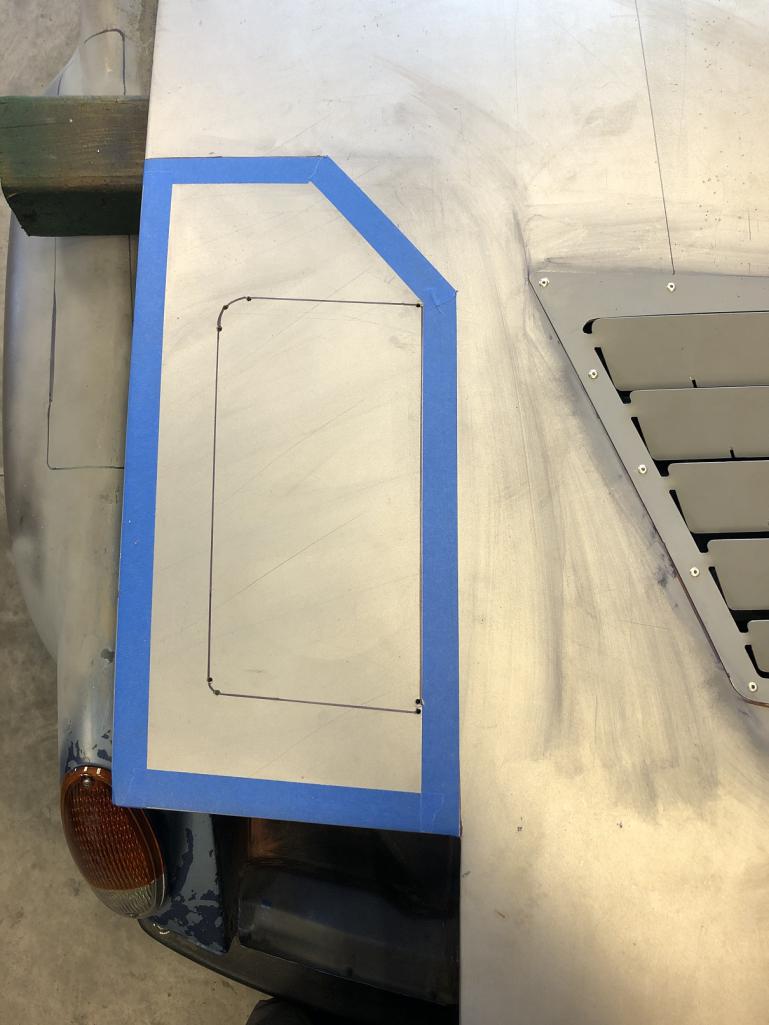
|
  |
3 User(s) are reading this topic (2 Guests and 0 Anonymous Users)
1 Members: dwillouby

|
Lo-Fi Version | Time is now: 23rd April 2025 - 06:30 PM |
Invision Power Board
v9.1.4 © 2025 IPS, Inc.


