|
|

|
Porsche, and the Porsche crest are registered trademarks of Dr. Ing. h.c. F. Porsche AG.
This site is not affiliated with Porsche in any way. Its only purpose is to provide an online forum for car enthusiasts. All other trademarks are property of their respective owners. |
|
|
  |
| tygaboy |
 Dec 9 2020, 06:27 PM Dec 9 2020, 06:27 PM
Post
#3341
|
|
914 Guru      Group: Members Posts: 5,722 Joined: 6-October 15 From: Petaluma, CA Member No.: 19,241 Region Association: Northern California 
|
Since I'm nothing if not accommodating, and since Rand and AzBanks got to see their suggestions in metal, I figured it was only fair to take a swing at @Cracker Tony (not the vent designer Tony) and @914forme and Stephen's suggestions.
And thanks also, Dan @dan10101 ,for the link to Race Louvers. I read through the data and looked at their various designs. It was that additional info, on top of Tony and Stehpen's prodding that tipped things toward another iteration. I'm calling these the "all business" version, vs the "form over function" RandAzBanks model. Anyway, here's the initial go, unpainted so it's easier to see the details, and CAD of the 2nd version that fixes a couple of "oops, I shoulda seen that before making the part". Key changes: - a near vertical .75" wicker right at the front. - all the vents run straight across, no more fancy, changing angles - V2 CAD vanes: after bending, each subsequent vane is .05" shorter (from .6" down to .3") - the 45 notch in the front corner is modified to allow the wicker to be as wide as possible while still not interfering with that hood rubber nubber thing. It'll be interesting to see if there's any detectable difference when I yarn test this one. Attached thumbnail(s) 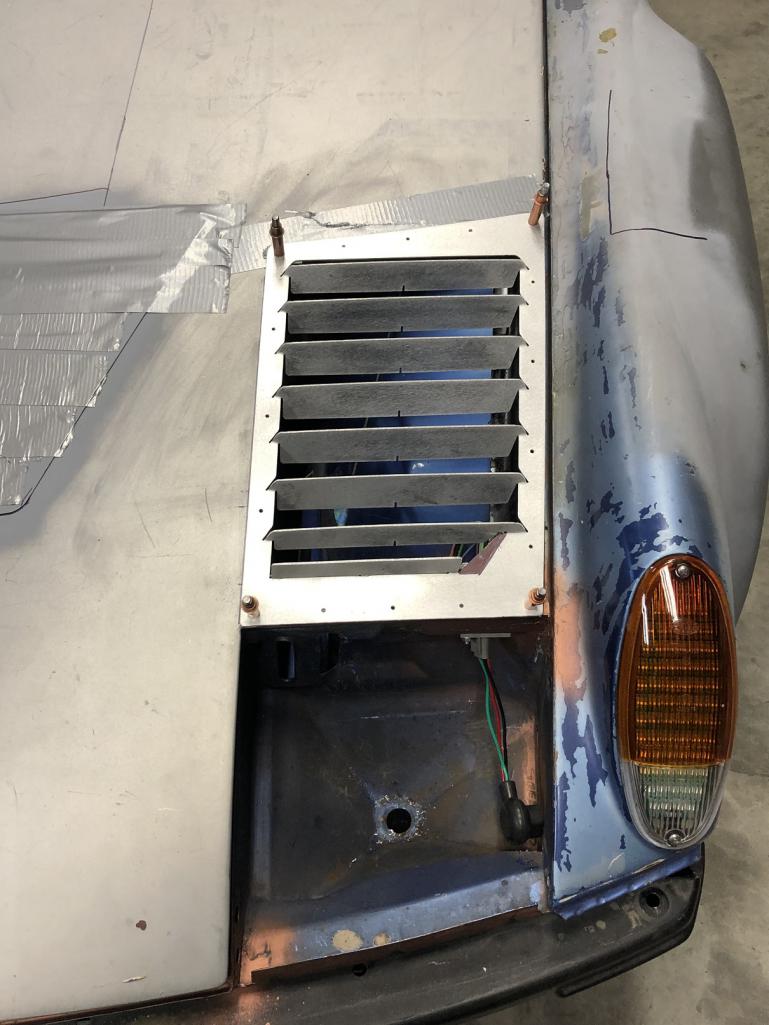 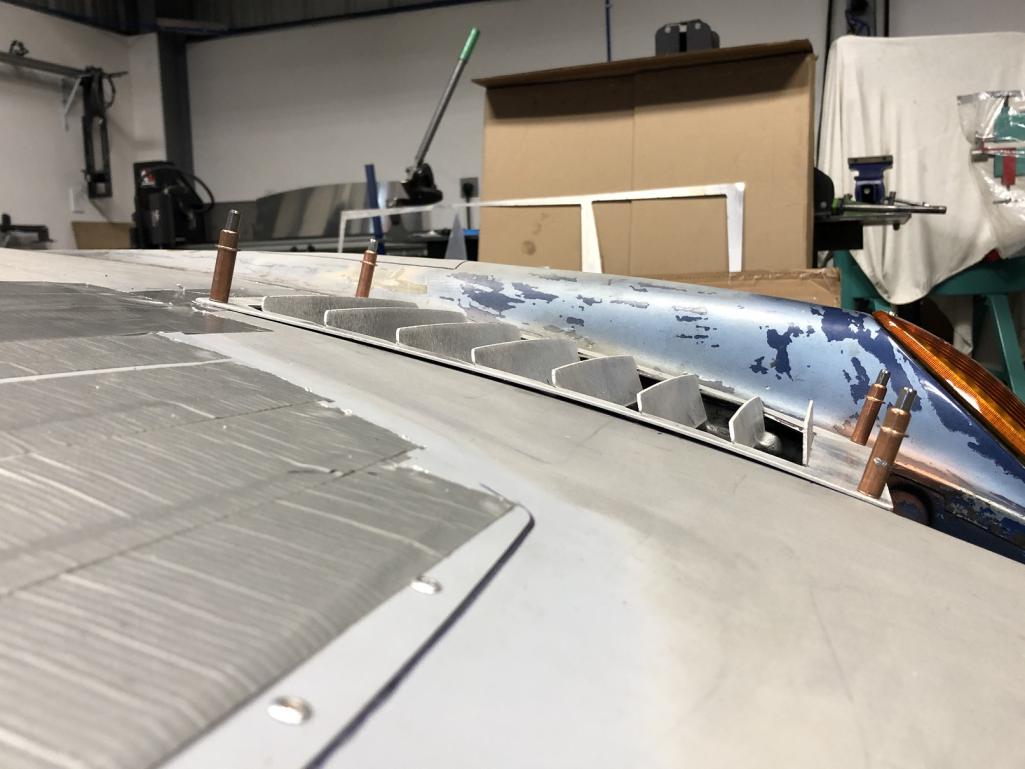 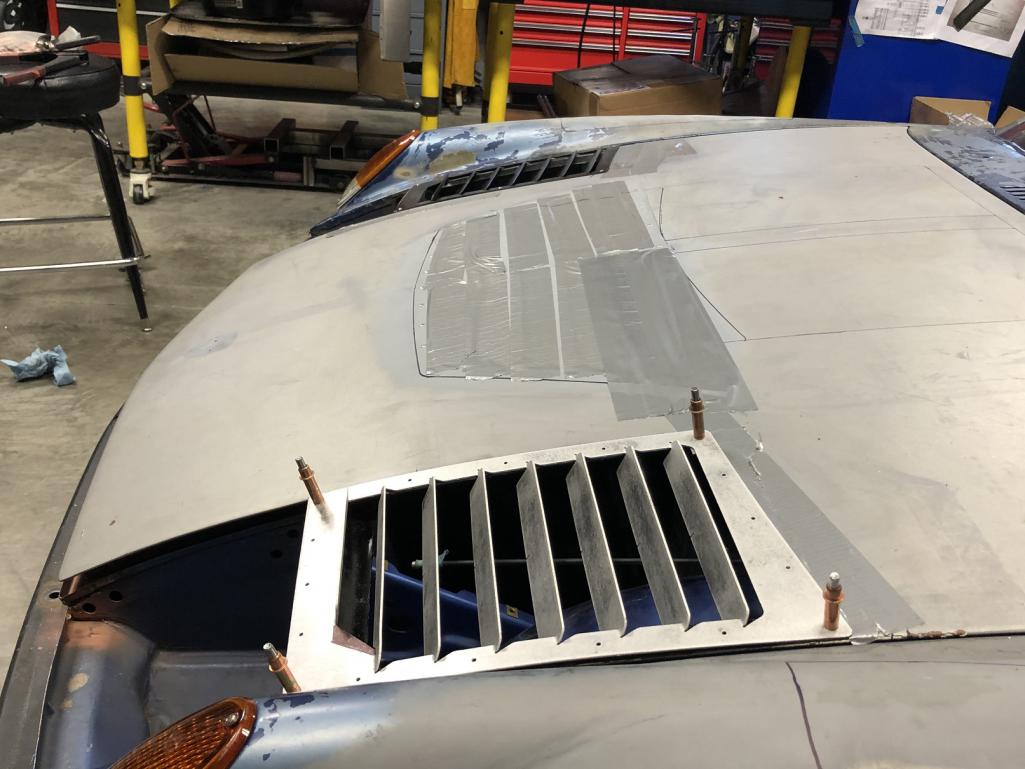 Attached image(s) 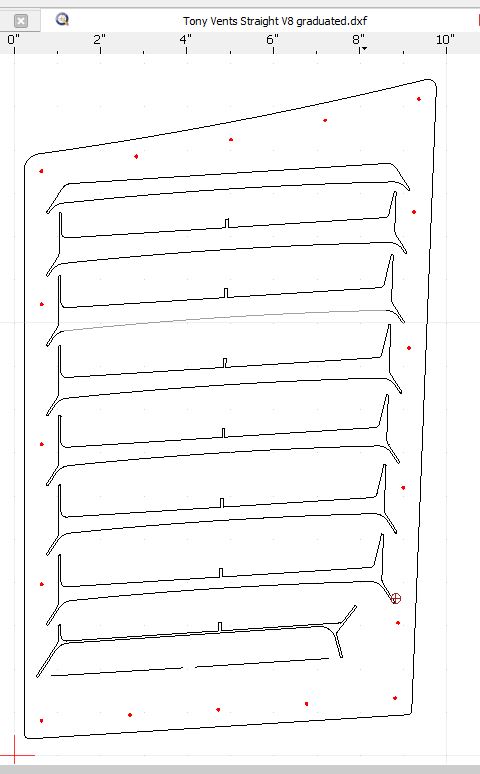
|
| 914forme |
 Dec 9 2020, 09:56 PM Dec 9 2020, 09:56 PM
Post
#3342
|
|
Times a wastin', get wrenchin'!     Group: Members Posts: 3,896 Joined: 24-July 04 From: Dayton, Ohio Member No.: 2,388 Region Association: None 
|
|
| Cracker |
 Dec 10 2020, 05:19 AM Dec 10 2020, 05:19 AM
Post
#3343
|
|
Advanced Member     Group: Members Posts: 2,148 Joined: 2-February 10 From: Atlanta (area) Member No.: 11,316 Region Association: South East States 
|
Atta-boy... (IMG:style_emoticons/default/beerchug.gif)
|
| Cairo94507 |
 Dec 10 2020, 07:22 AM Dec 10 2020, 07:22 AM
Post
#3344
|
|
Michael           Group: Members Posts: 10,522 Joined: 1-November 08 From: Auburn, CA Member No.: 9,712 Region Association: Northern California 
|
I think that is my favorite of all of them. It's clean and simple in appearance. (IMG:style_emoticons/default/beerchug.gif)
|
| tygaboy |
 Dec 10 2020, 11:02 AM Dec 10 2020, 11:02 AM
Post
#3345
|
|
914 Guru      Group: Members Posts: 5,722 Joined: 6-October 15 From: Petaluma, CA Member No.: 19,241 Region Association: Northern California 
|
I figured I may as well work out a possible next step: Adding the shop name!
My plasma table has an engraver attachment that can scribe the metal so why not? If I like it, I'll only add it on the driver side vent. For the tool whores: All that's needed is to establish the separate layers in CAD then set up the G-code to run the appropriate operation for each layer. I color-code each layer so it's easier for me to see: - first run the engraver on the text (in blue) - switch to the plasma torch to "drill" the holes (in red) - cut the vent (in black) Be sure to get the order right so you don't cut an outside shape then come back and try another operation on a "floating" part! Not that I've ever done that... (IMG:style_emoticons/default/headbang.gif) The 2nd pic is a snip visual of the overall cut program. This is what generates the code that runs the plasma table. Note that it shows I'm cutting 16ga stainless. That's just the "tool" I use to cut .063 aluminum. The "tools" are just presets for voltage, cut height, travel speed, etc. It has nothing to do with the actual material being cut. Attached thumbnail(s) 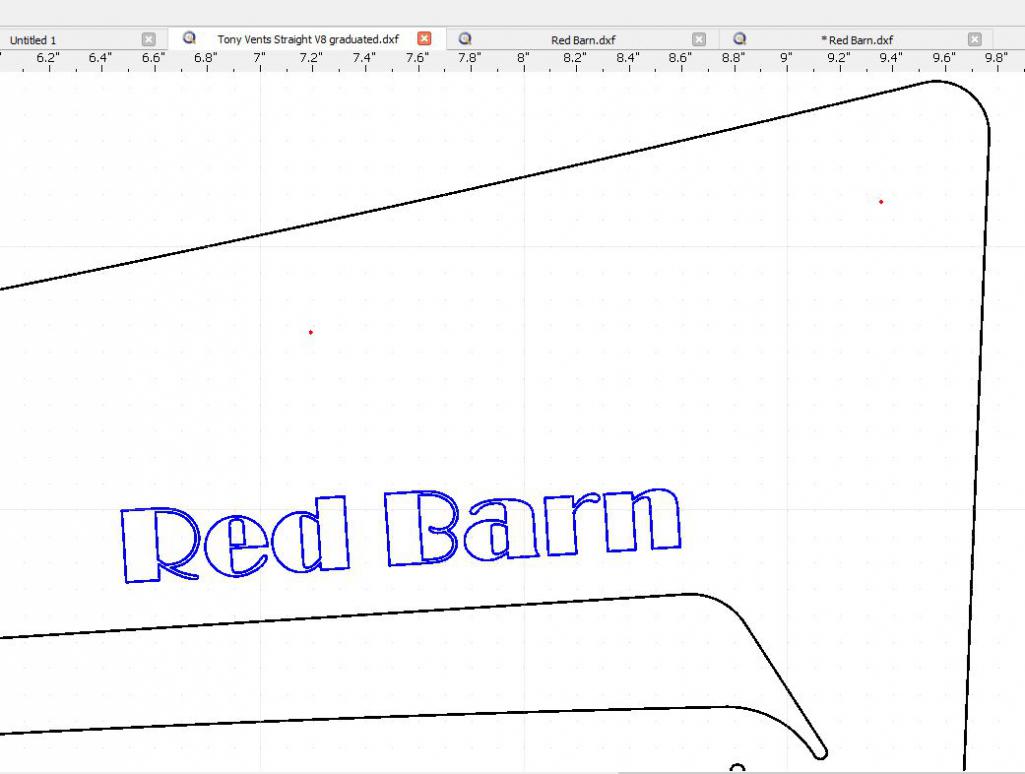 Attached image(s) 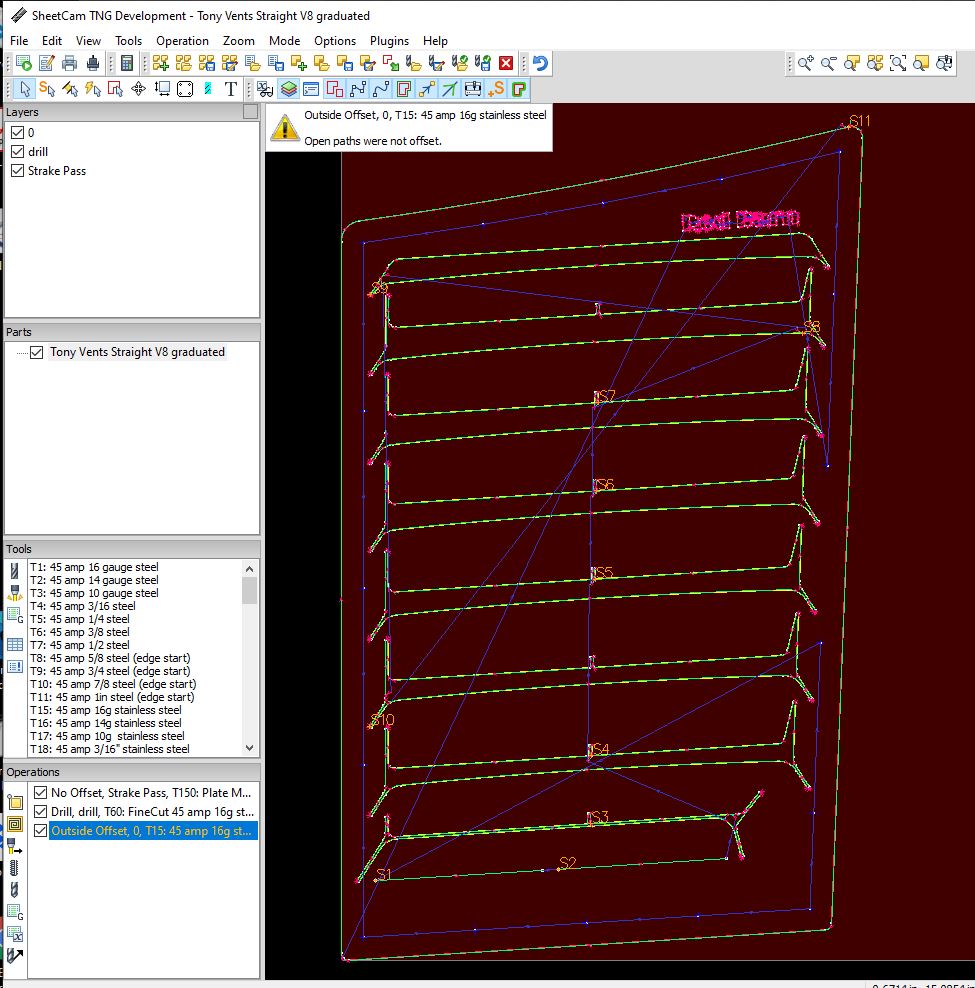
|
| mikey63 |
 Dec 10 2020, 11:07 AM Dec 10 2020, 11:07 AM
Post
#3346
|
|
Member   Group: Members Posts: 130 Joined: 30-March 10 From: Windsor,Ca Member No.: 11,529 Region Association: Northern California 
|
Very cool feature! Adds a nice custom touch to your car. (IMG:style_emoticons/default/aktion035.gif)
|
| burton73 |
 Dec 10 2020, 11:27 AM Dec 10 2020, 11:27 AM
Post
#3347
|
|
Senior member, and old dude     Group: Members Posts: 3,925 Joined: 2-January 07 From: Los Angeles Member No.: 7,414 Region Association: Southern California 
|
Chris,
Your skill set is unreal. A true artist! No need to BS you, so many ideas from your build. Thanks for sharing it with us. Bob B |
| tygaboy |
 Dec 10 2020, 12:01 PM Dec 10 2020, 12:01 PM
Post
#3348
|
|
914 Guru      Group: Members Posts: 5,722 Joined: 6-October 15 From: Petaluma, CA Member No.: 19,241 Region Association: Northern California 
|
If you have ~ 1 minute to waste and you care to see how I spend part of my day, here's a quick video that shows how I preview the various operations ahead of cutting. Note this is sped up a bunch, just to shorten the video.
When I create the CAD drawings, I end up doing a ton of editing, copying, moving, rotating, snipping off end bits of line, etc. So before I cut the part, I use "single step" in this simulation mode (you can see the options on the right side) and preview each move and cut the torch will make to double check there are no straggler bits in the drawing that are asking to be cut. Anyway, there you go. https://www.youtube.com/watch?v=2LgCySbyspQ |
| tygaboy |
 Dec 10 2020, 04:24 PM Dec 10 2020, 04:24 PM
Post
#3349
|
|
914 Guru      Group: Members Posts: 5,722 Joined: 6-October 15 From: Petaluma, CA Member No.: 19,241 Region Association: Northern California 
|
This is getting way far away from anything 914 related so feel free to skip!
I haven't used the engraver for anything yet. And of course, it's adjustable for things like downward pressure, so I figured I'd better test it a bit first. I'm not happy with the "punch" it leaves when it first drops onto the material so I'm still working on that. But it'll be pretty cool if I can get to look the way I want. Attached image(s) 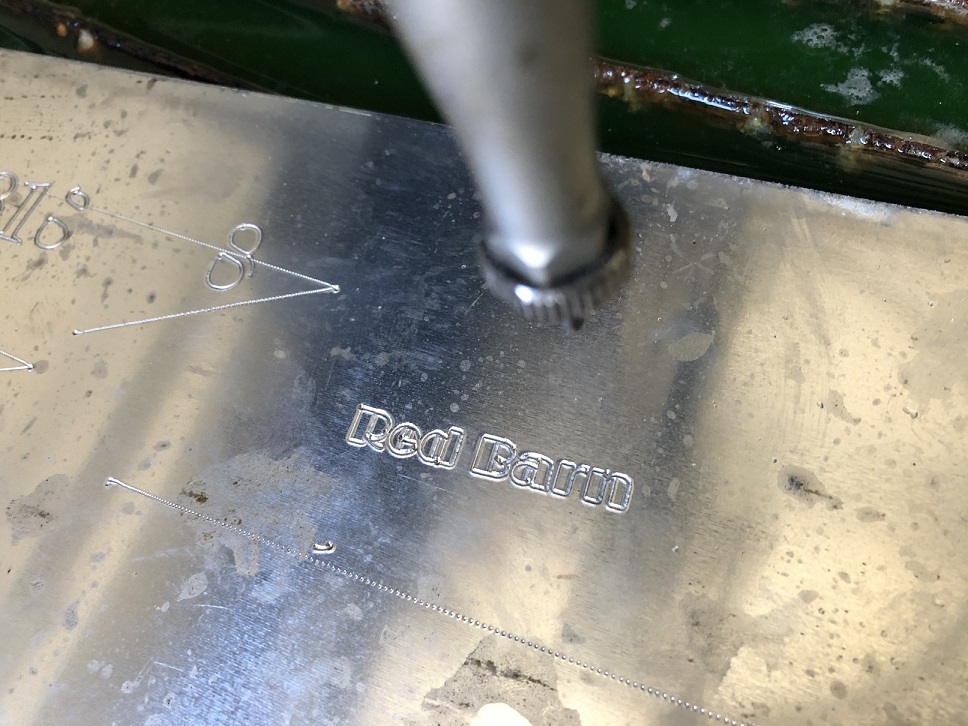 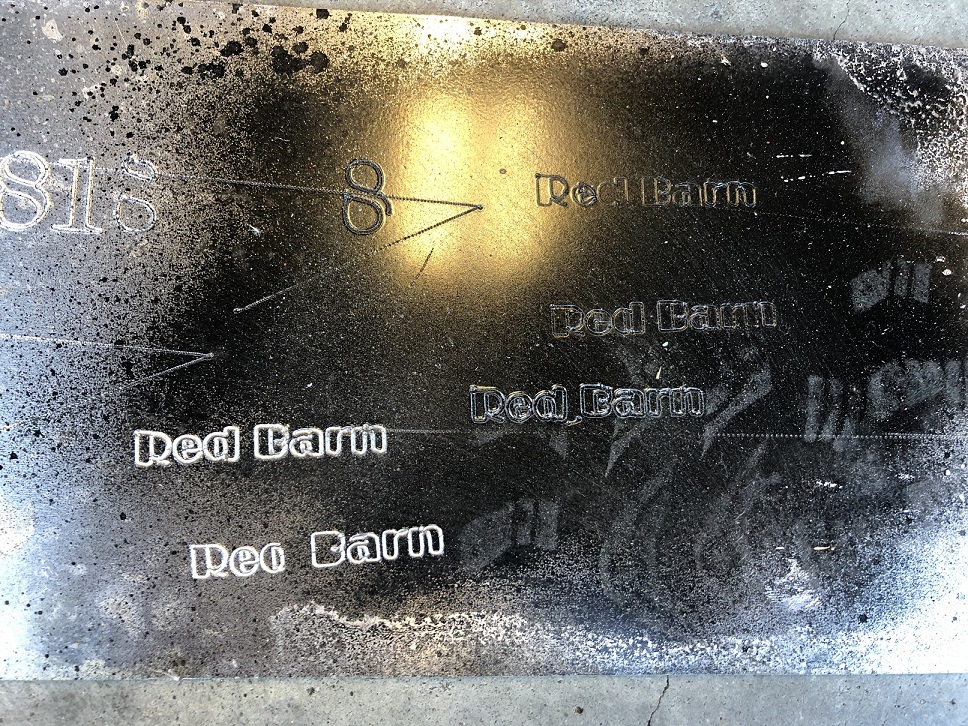
|
| tygaboy |
 Dec 10 2020, 04:44 PM Dec 10 2020, 04:44 PM
Post
#3350
|
|
914 Guru      Group: Members Posts: 5,722 Joined: 6-October 15 From: Petaluma, CA Member No.: 19,241 Region Association: Northern California 
|
Max fail of the day: My engraver offset setting somehow got out of whack!
Man, I hate it when that happens... Oh well, a good reason to do a little maintenance on the table. Note that this part looks messy because once I realized the engraving wasn't in the right place, I didn't bother cleaning it up. Attached thumbnail(s) 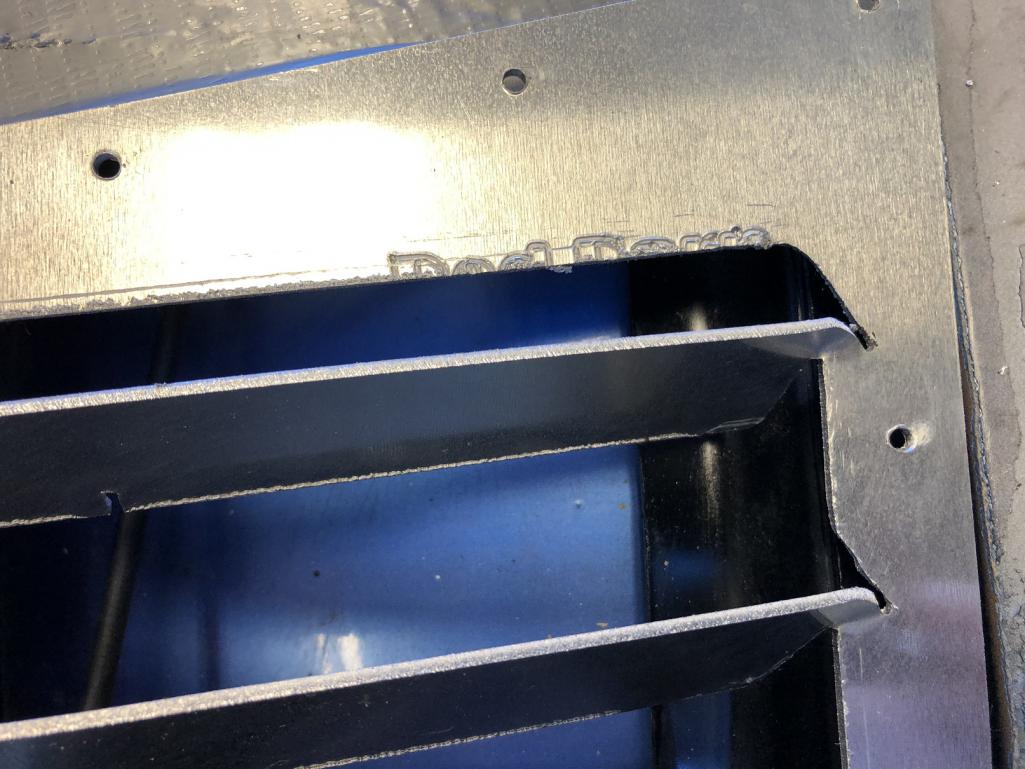
|
| tygaboy |
 Dec 10 2020, 04:49 PM Dec 10 2020, 04:49 PM
Post
#3351
|
|
914 Guru      Group: Members Posts: 5,722 Joined: 6-October 15 From: Petaluma, CA Member No.: 19,241 Region Association: Northern California 
|
Fail aside, this is the latest vent design and here you can see the "graduated" vanes going higher to lower as they move rearward.
Attached thumbnail(s) 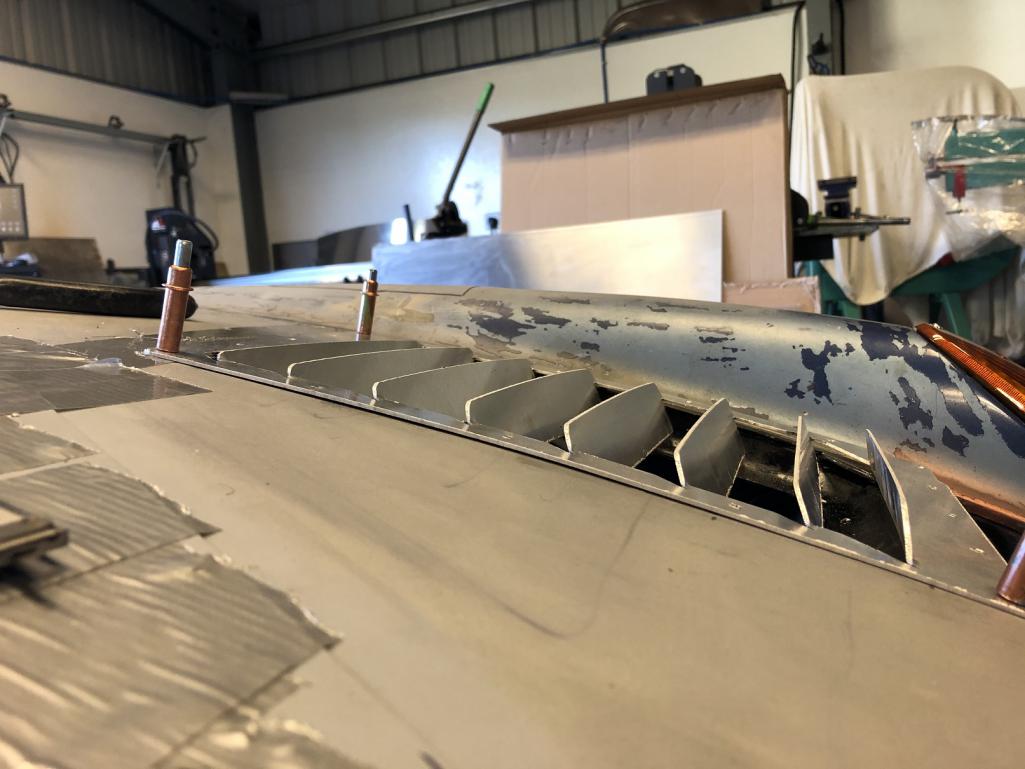
|
| Rand |
 Dec 10 2020, 04:52 PM Dec 10 2020, 04:52 PM
Post
#3352
|
|
Cross Member      Group: Members Posts: 7,413 Joined: 8-February 05 From: OR Member No.: 3,573 Region Association: None |
Listening. Not to your engraver.
|
| mikey63 |
 Dec 10 2020, 04:54 PM Dec 10 2020, 04:54 PM
Post
#3353
|
|
Member   Group: Members Posts: 130 Joined: 30-March 10 From: Windsor,Ca Member No.: 11,529 Region Association: Northern California 
|
I like how it mimics the fender top...high at the front fading out as it goes back.
|
| AZBanks |
 Dec 10 2020, 05:24 PM Dec 10 2020, 05:24 PM
Post
#3354
|
|
Senior Member    Group: Members Posts: 1,069 Joined: 7-December 05 From: New River, AZ Member No.: 5,245 Region Association: Southwest Region 
|
You should combine the angled vanes with the graduated vane height.
It would be the ( R)and, (A)zBanks, ( C)racker, 914form(e) design or just RACe design for short. (IMG:style_emoticons/default/piratenanner.gif) (IMG:style_emoticons/default/piratenanner.gif) (IMG:style_emoticons/default/stirthepot.gif) |
| tygaboy |
 Dec 10 2020, 05:35 PM Dec 10 2020, 05:35 PM
Post
#3355
|
|
914 Guru      Group: Members Posts: 5,722 Joined: 6-October 15 From: Petaluma, CA Member No.: 19,241 Region Association: Northern California 
|
You should combine the angled vanes with the graduated vane height. It would be the ( R)and, (A)zBanks, ( C)racker, 914form(e) design or just RACe design for short. (IMG:style_emoticons/default/piratenanner.gif) (IMG:style_emoticons/default/piratenanner.gif) (IMG:style_emoticons/default/stirthepot.gif) @AZBanks RACe! I like it! But here's the bad news on the angled vanes: No matter which screening I use under them, it's impossible to have the screen pattern align with each vane. I test fitted the material I want to use and it looks like crap. If it's angled vanes, it's no screen. And I really like the screen. I'll post a pic of it but I suspect I can't live with it. Oh, I know! I could commission a custom, varying angle pattern screen... (IMG:style_emoticons/default/shades.gif) |
| bbrock |
 Dec 10 2020, 05:41 PM Dec 10 2020, 05:41 PM
Post
#3356
|
|
914 Guru      Group: Members Posts: 5,269 Joined: 17-February 17 From: Montana Member No.: 20,845 Region Association: Rocky Mountains 
|
Oh, I know! I could commission a custom, varying angle pattern screen... (IMG:style_emoticons/default/shades.gif) Or you could install lights that project a holographic hula girl dancing over each grill. Nobody will notice the screens. (IMG:style_emoticons/default/idea.gif) |
| Rand |
 Dec 10 2020, 08:59 PM Dec 10 2020, 08:59 PM
Post
#3357
|
|
Cross Member      Group: Members Posts: 7,413 Joined: 8-February 05 From: OR Member No.: 3,573 Region Association: None |
OMG. the can too far open. Sorry Chris.
I think enough is enough from our gallery... Once it's out, it's this. You got this. |
| Cracker |
 Dec 10 2020, 09:04 PM Dec 10 2020, 09:04 PM
Post
#3358
|
|
Advanced Member     Group: Members Posts: 2,148 Joined: 2-February 10 From: Atlanta (area) Member No.: 11,316 Region Association: South East States 
|
Well, I rarely occupy anything but first and certainly wouldn't finish third to Rand in anything automotive. I'm swapping orders...congrats on bronze, Rand. (IMG:style_emoticons/default/rolleyes.gif)
I suggest I have offered my opinion because I CARe. (IMG:style_emoticons/default/biggrin.gif) Cracker You should combine the angled vanes with the graduated vane height. It would be the ( R)and, (A)zBanks, ( C)racker, 914form(e) design or just RACe design for short. (IMG:style_emoticons/default/piratenanner.gif) (IMG:style_emoticons/default/piratenanner.gif) (IMG:style_emoticons/default/stirthepot.gif) |
| Rand |
 Dec 10 2020, 10:20 PM Dec 10 2020, 10:20 PM
Post
#3359
|
|
Cross Member      Group: Members Posts: 7,413 Joined: 8-February 05 From: OR Member No.: 3,573 Region Association: None |
It's sofa frusraighting Tony cracker. So vein. Vane. Vaughn. Vince? Who next? Who who? Who are you?
What I know is Chris has it in the bag. And now for something completely the same... https://www.youtube.com/watch?v=oyR3TzIgi-U |
| AZBanks |
 Dec 10 2020, 10:54 PM Dec 10 2020, 10:54 PM
Post
#3360
|
|
Senior Member    Group: Members Posts: 1,069 Joined: 7-December 05 From: New River, AZ Member No.: 5,245 Region Association: Southwest Region 
|
Well, I rarely occupy anything but first and certainly wouldn't finish third to Rand in anything automotive. I'm swapping orders...congrats on bronze, Rand. (IMG:style_emoticons/default/rolleyes.gif) I suggest I have offered my opinion because I CARe. (IMG:style_emoticons/default/biggrin.gif) Cracker You should combine the angled vanes with the graduated vane height. It would be the ( R)and, (A)zBanks, ( C)racker, 914form(e) design or just RACe design for short. (IMG:style_emoticons/default/piratenanner.gif) (IMG:style_emoticons/default/piratenanner.gif) (IMG:style_emoticons/default/stirthepot.gif) LOL!!!!!!!! |
  |
3 User(s) are reading this topic (3 Guests and 0 Anonymous Users)
0 Members:

|
Lo-Fi Version | Time is now: 14th December 2025 - 05:06 AM |
Invision Power Board
v9.1.4 © 2025 IPS, Inc.


