|
|

|
Porsche, and the Porsche crest are registered trademarks of Dr. Ing. h.c. F. Porsche AG.
This site is not affiliated with Porsche in any way. Its only purpose is to provide an online forum for car enthusiasts. All other trademarks are property of their respective owners. |
|
|
  |
| seanpaulmc |
 Dec 25 2016, 04:26 PM Dec 25 2016, 04:26 PM
Post
#1
|
|
Member   Group: Members Posts: 373 Joined: 6-December 16 From: Orlando, FL Member No.: 20,649 Region Association: South East States 
|
I've just purchased a '73 914 and owned it long enough to ship it to Orlando and take it to go get titled. With only having it for this short period my list of concerns is growing. I have no intentions of driving the car around until I can assess how rusty it is. I appreciate the support and responses to the questions about transportation and engine identification. This is a superb community.
What advice do you have for lifting the car to inspect underneath and such without having access to a lift? I have read some of the build threads on here and you guys have some amazing shops and do incredible work! ...one day. But, at this point I don't have that. For now I'd like to lift the car, take the wheels off, and take the longitudinal covers off to get a good look at the structural areas of the car. However, I have concerns because this is a snowbelt car and I've read the stories about putting a floor jack through a rusted out car. Where should I lift with the floor jack (trust the jacking points?, other areas) and where should I put the jack stands so that I can poke around some and get pictures? Merry Christmas!!! |
| Rand |
 Dec 25 2016, 04:34 PM Dec 25 2016, 04:34 PM
Post
#2
|
|
Cross Member      Group: Members Posts: 7,409 Joined: 8-February 05 From: OR Member No.: 3,573 Region Association: None |
Don't worry about lifts and jacks yet. Just start sharing lots of pics here to get some meaningful help. Start with engine compartment, battery tray and below. Share what's easy to share. Then pull the rocker covers off and examine the jack points or anything that looks questionable. Bring the pics, get the feedback.
|
| mepstein |
 Dec 25 2016, 04:59 PM Dec 25 2016, 04:59 PM
Post
#3
|
|
914-6 GT in waiting                Group: Members Posts: 19,608 Joined: 19-September 09 From: Landenberg, PA/Wilmington, DE Member No.: 10,825 Region Association: MidAtlantic Region 
|
Start cleaning the trunks and interior of your car. Take out the upholstery and the carpet. As you go through the car you will be getting it cleaner and assessing the condition. Good luck.
|
| branston |
 Dec 25 2016, 10:01 PM Dec 25 2016, 10:01 PM
Post
#4
|
|
Member   Group: Members Posts: 89 Joined: 17-October 12 From: Michigan Member No.: 15,053 Region Association: Upper MidWest |
I don't jack my '74 under the body, I tend to use the engine cross member close to the outer mounting bolts or under the bolt itself, and use the front suspension to lift the front. My own car is a mid west car and in remarkably good shape for a car from this area.
However removal of the outer rockers revealed rust close to the jack points affecting the longs. this my first 914 and have learned much, a quick check if to insert a jack into the jack point and see how much it moves when you try to lift it, don't lift it just try to see how much it moves. To my horror the jack point moved freely by hand! Go ahead and remove the outer rockers, removing mine which on the surface showed little signs of rust revealed dirt trap Porsche designed, mud and moisture accumulate in this area and the rot starts, once inside it rots the underside of the longs. I've attached photos of what was hiding behind the outer rocker on my car you can see the mud accumulated between the jack point and the reinforcing gusset. Attached image(s) 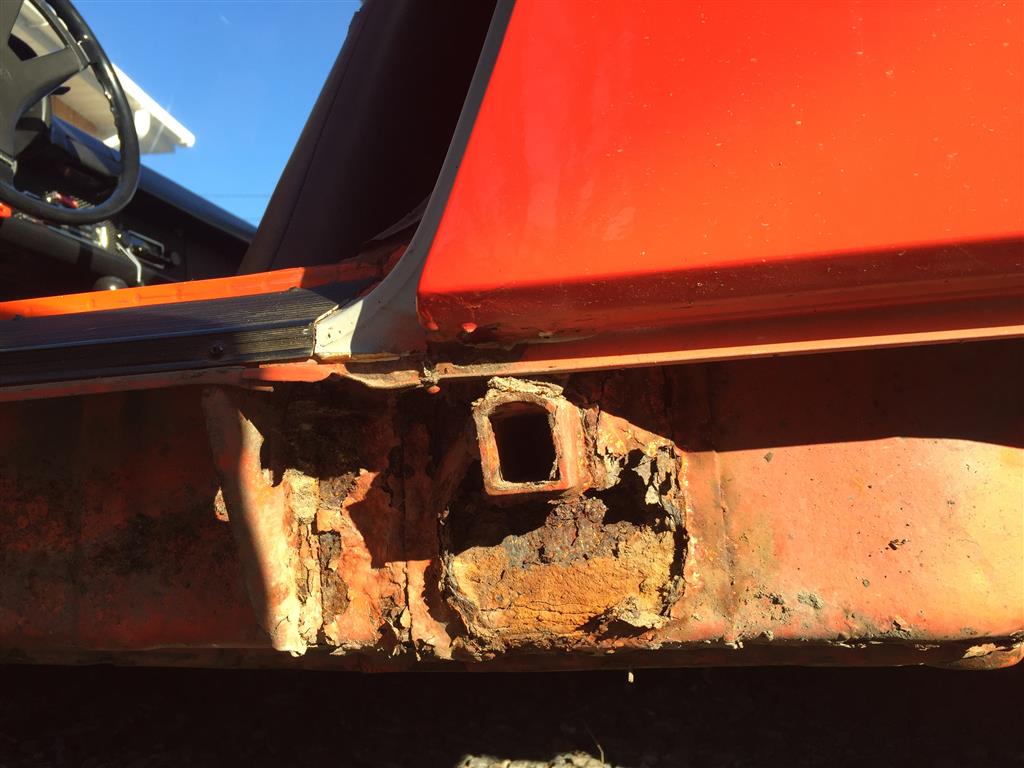 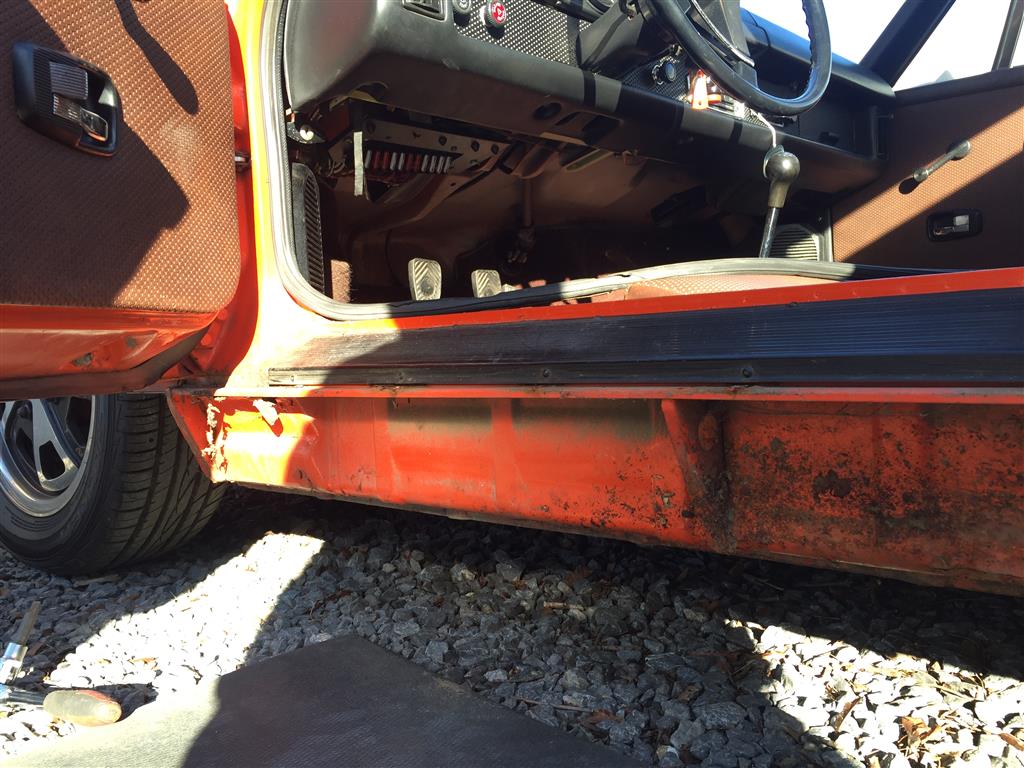 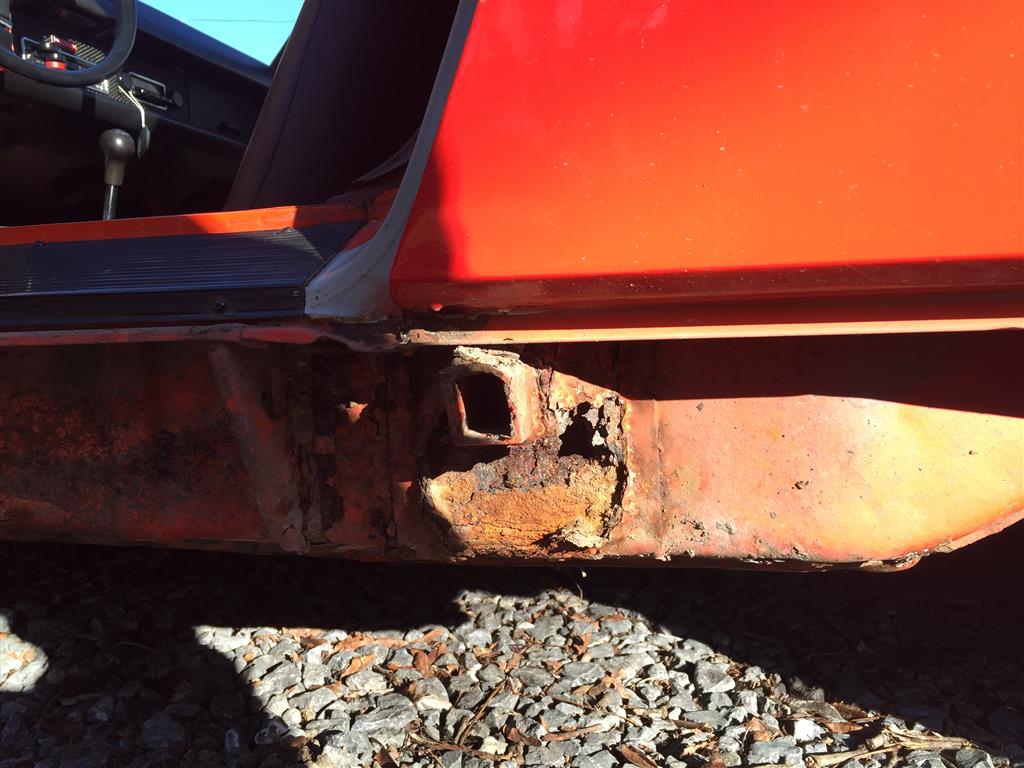 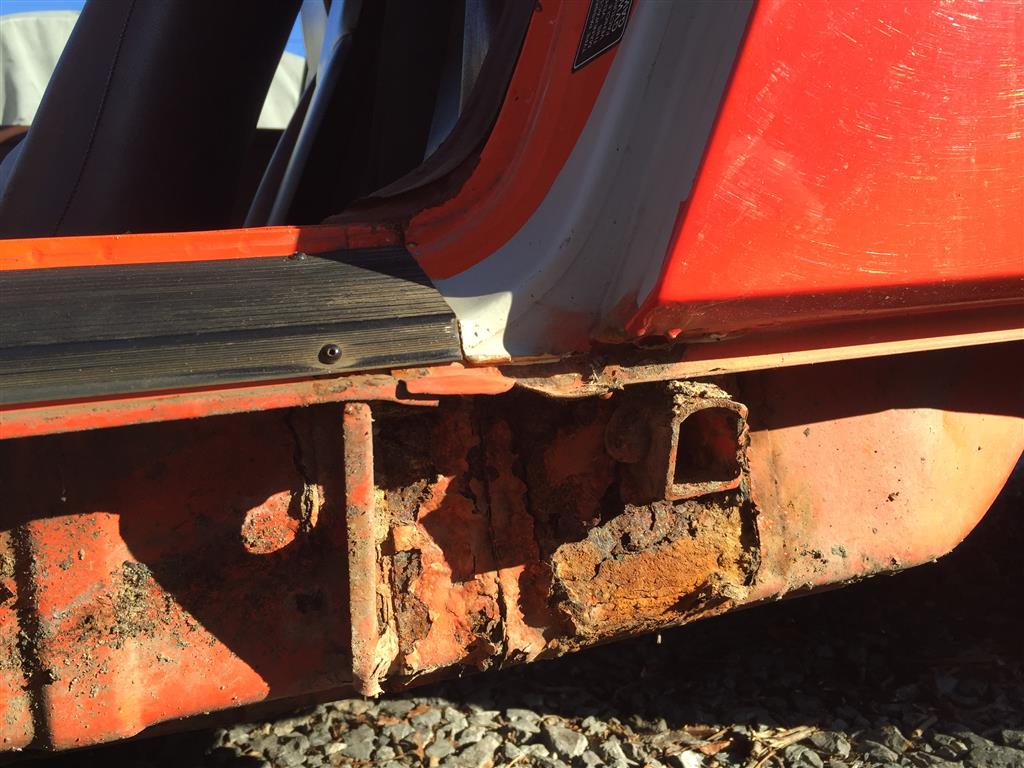 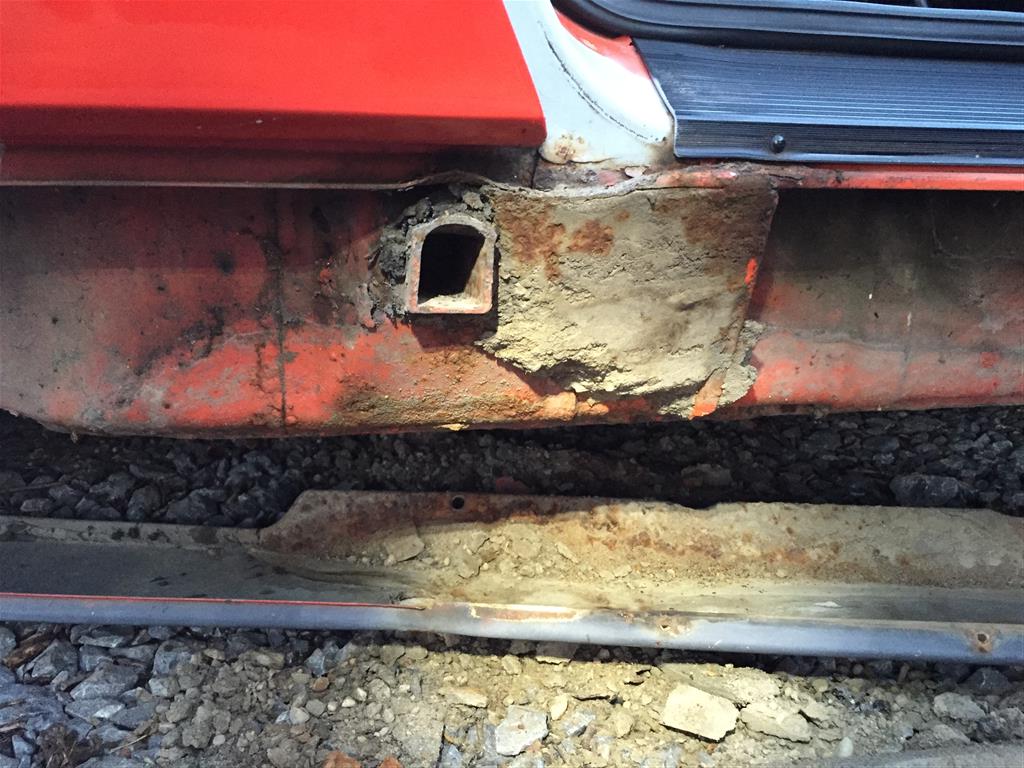
|
| seanpaulmc |
 Jan 31 2017, 05:01 PM Jan 31 2017, 05:01 PM
Post
#5
|
|
Member   Group: Members Posts: 373 Joined: 6-December 16 From: Orlando, FL Member No.: 20,649 Region Association: South East States 
|
I finally got some time and pulled the covers off the longs, and Branston, thanks for your pictures because it looks a lot like what I found. The pass side had been off before because of the hardware used to reattach it but the driver's had not. I drilled out the rivets and broke all the undercarriage bolts when taking off the driver's side cover.
I also started pulling out the carpet, interior, and began chipping away at the floor pan on the passenger side. Not liking what I'm finding. When I get back to it I'll pull the plugs from the insides of the longitudinal but for now here are some pictures of what I'm finding. So, what does the group think thus far? Passenger side: 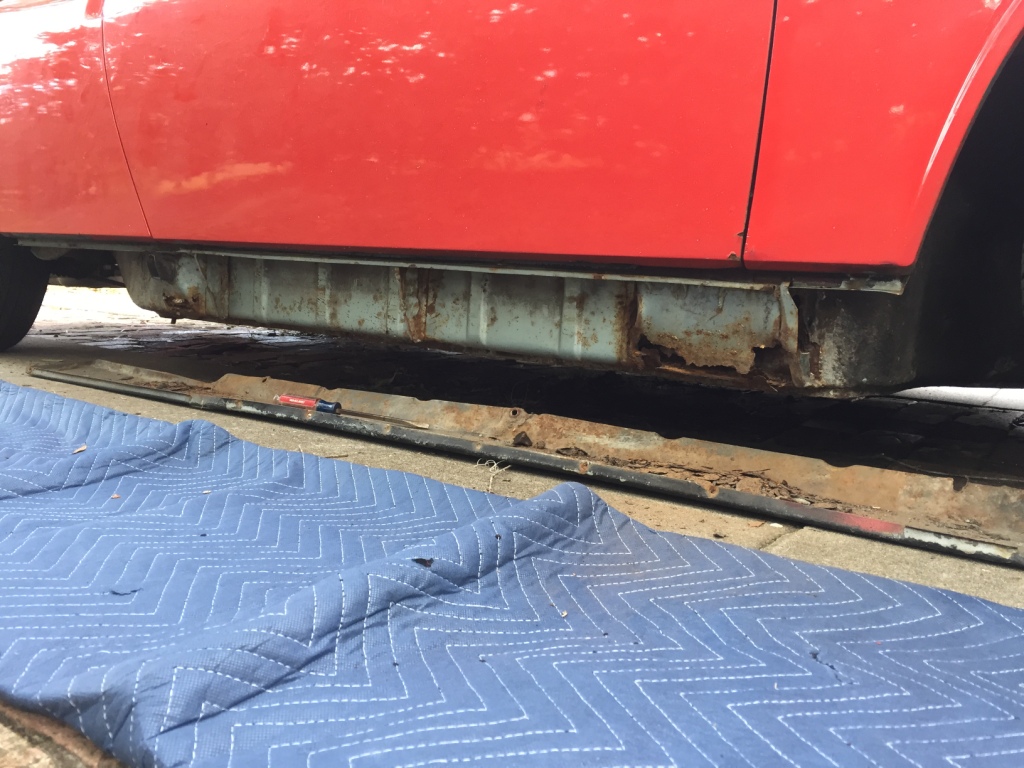 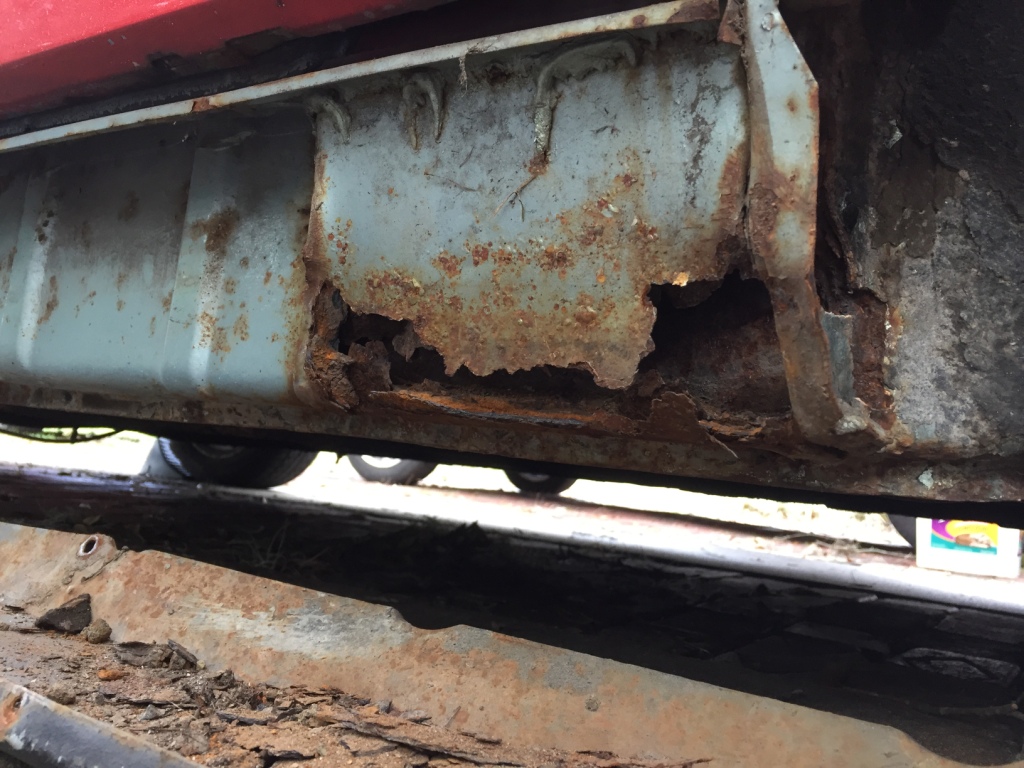 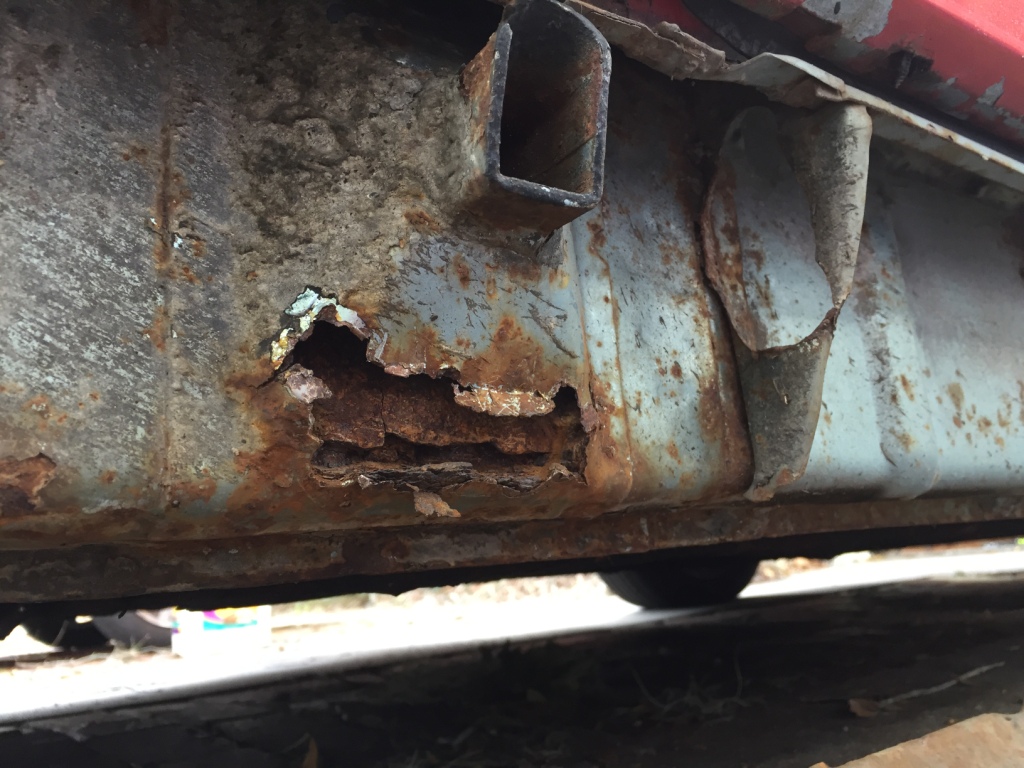 Driver side: 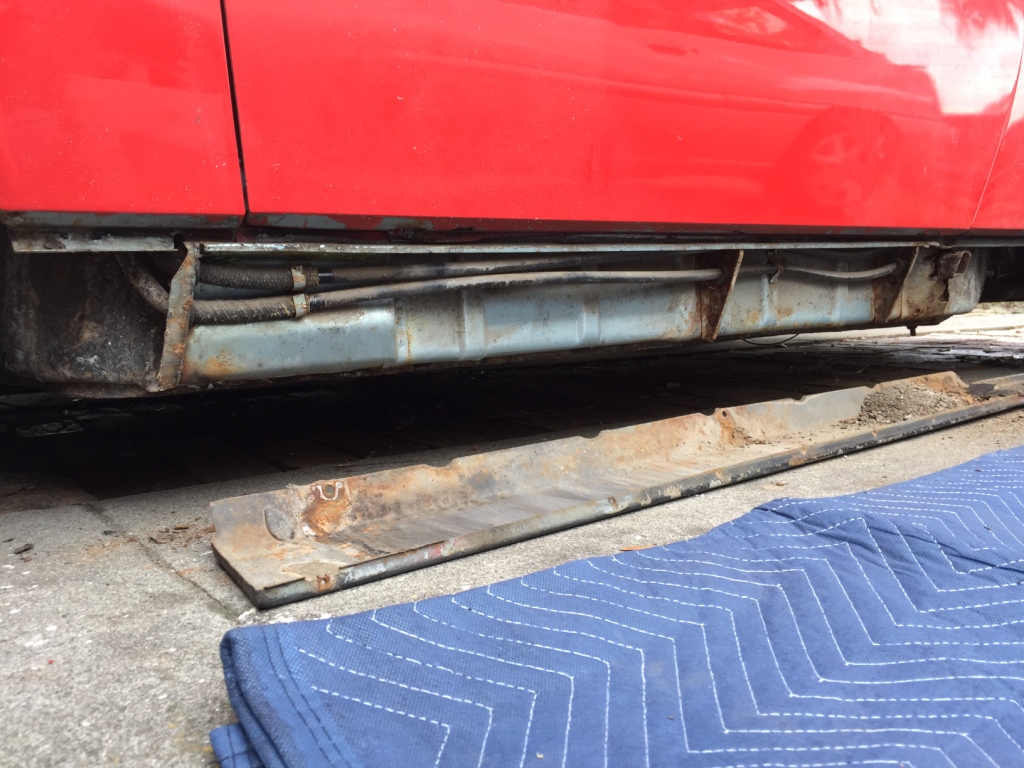 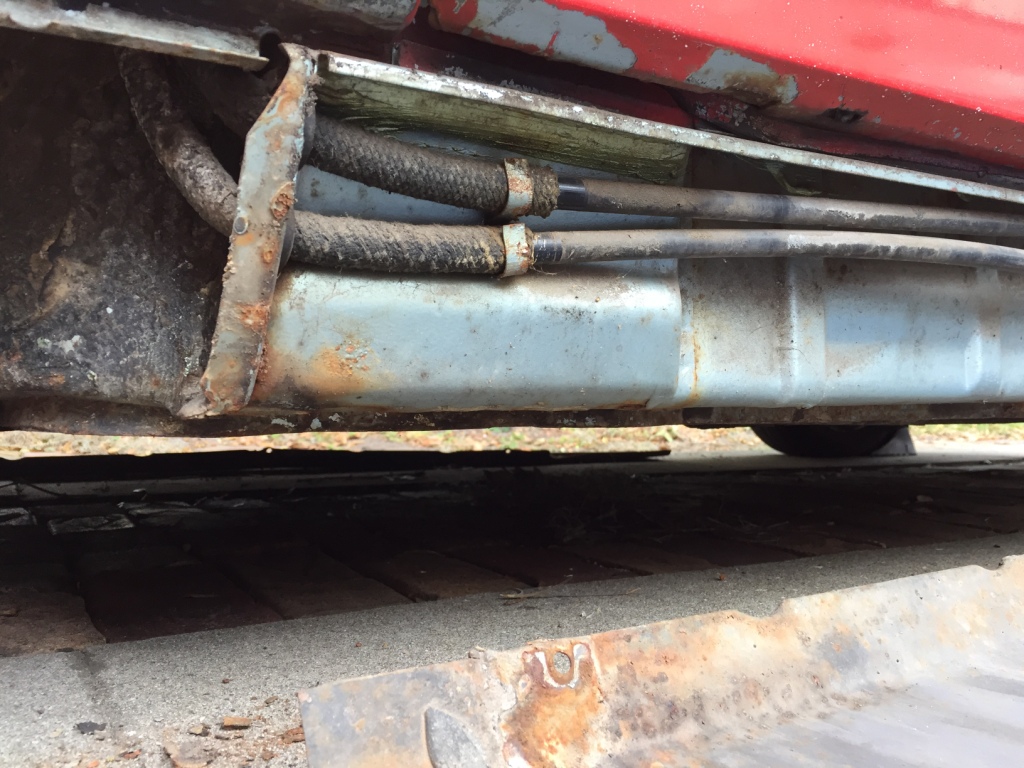 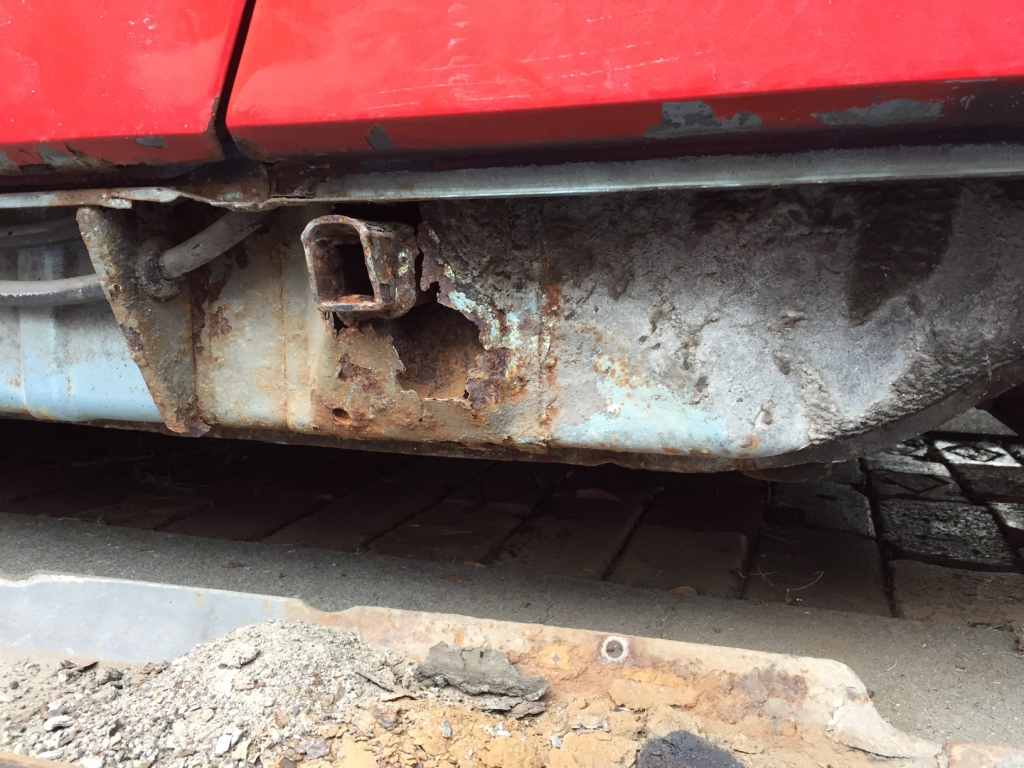 Inside: 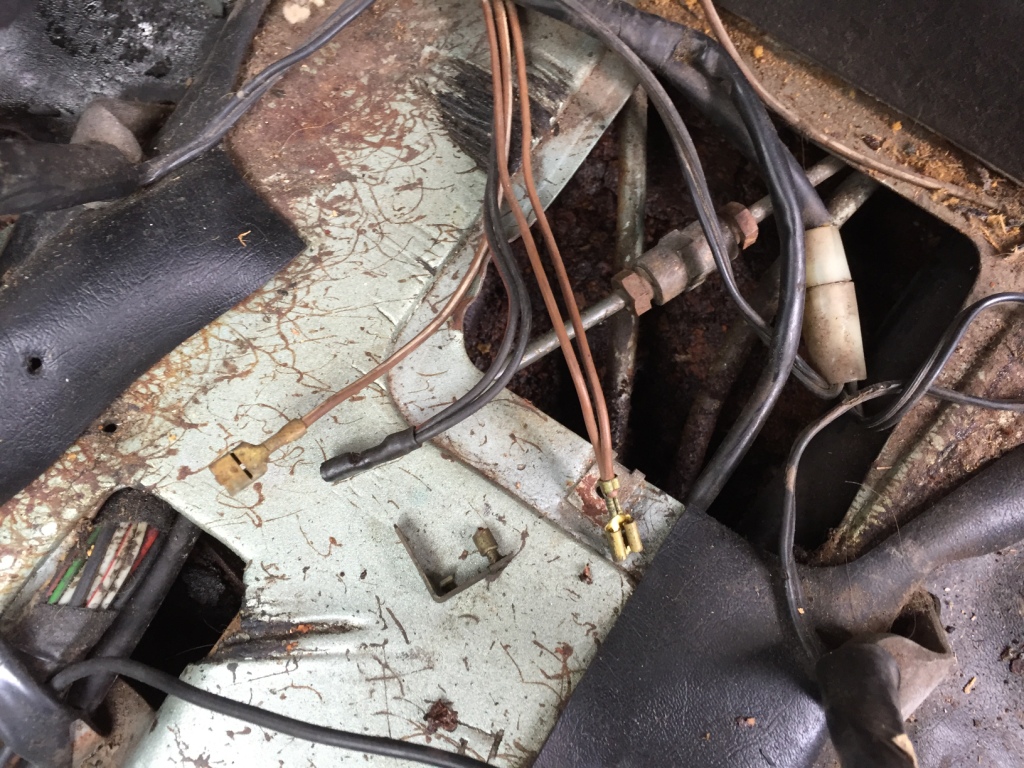 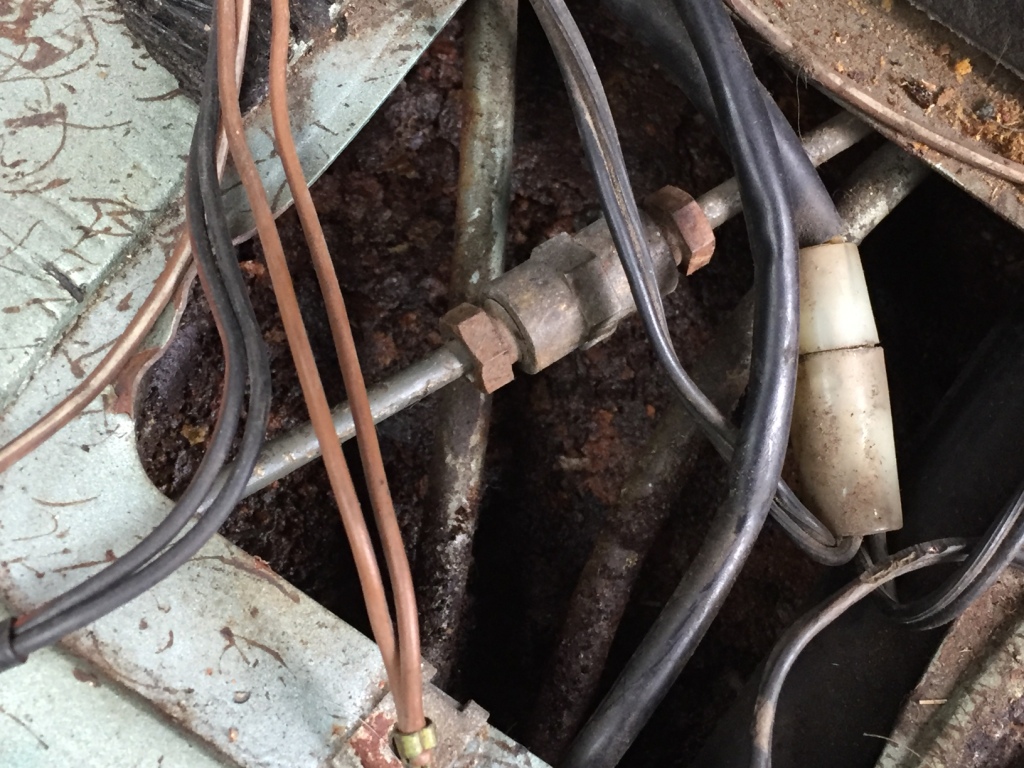 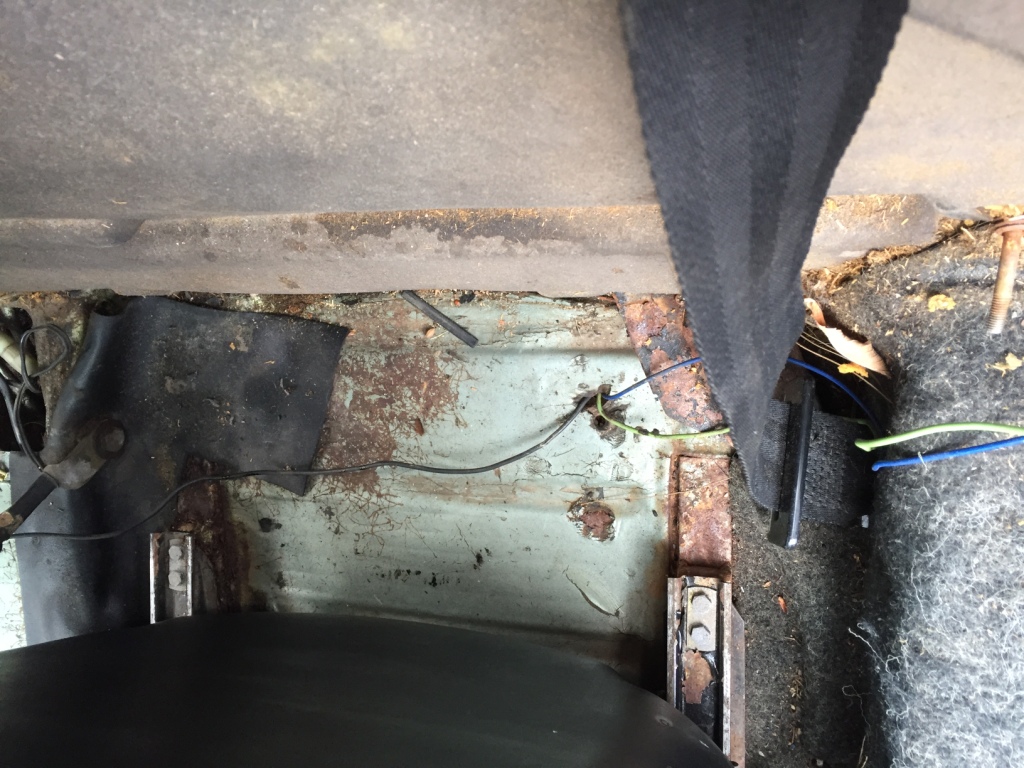 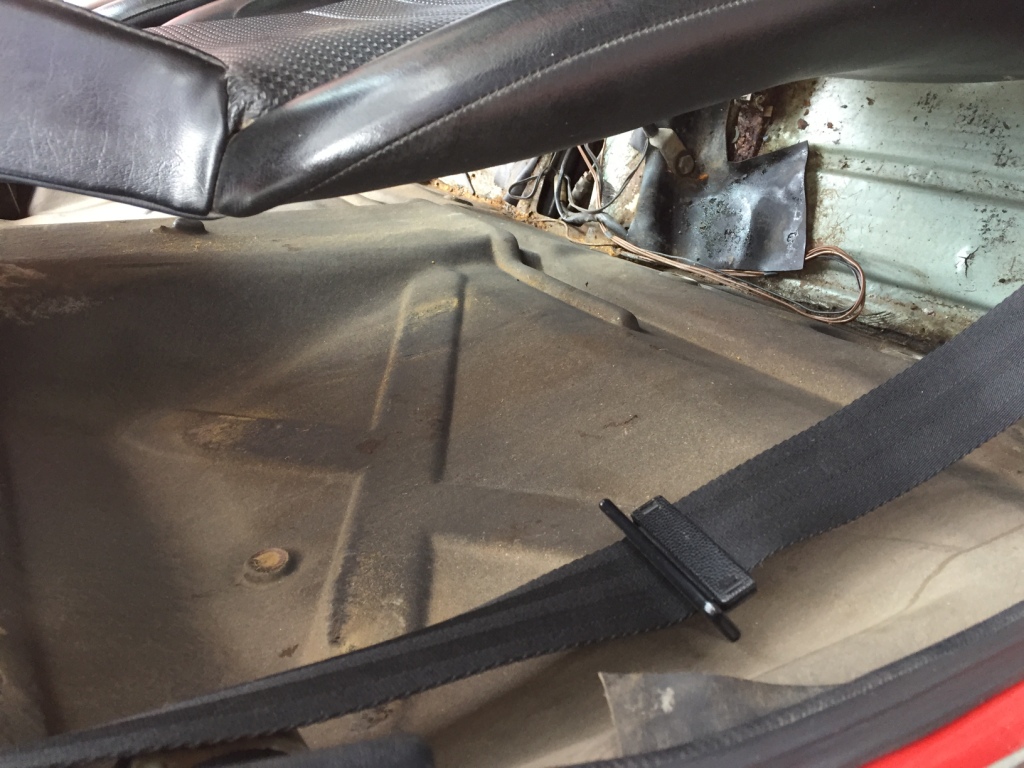 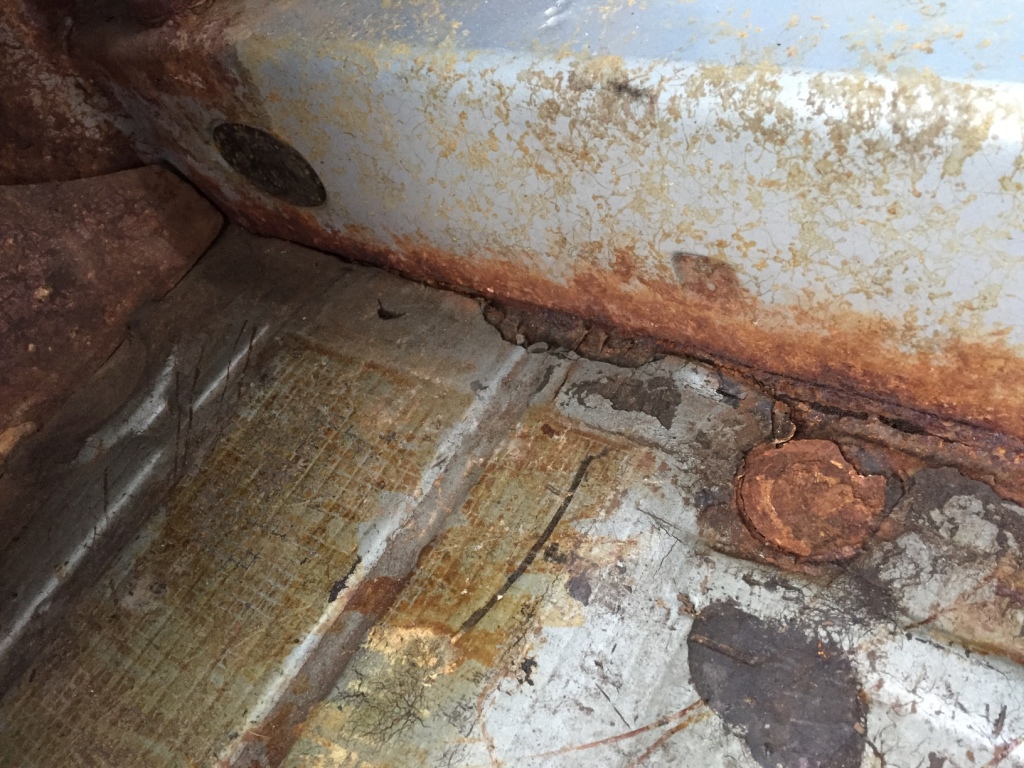 A few questions/observations: 1. Are those unconnected wires laying at the back of the tunnel (brown and black) for the light that is supposed to be in the backpad? (Missing) 2. Any idea what the little brass metal piece laying next to the wires is for? It doesn't seem to be for the light. 3. Looks moist and nasty inside that tunnel. 4. How is the pad affixed to the firewall? How is it removed? Should it be retained and reused? 5. Behind the driver's seat you can see three new wires (black, green, and blue) going through the floor to routed to the engine bypassing whatever original equipment isn't working. 6. After chipping away at the loose material on the floor daylight is observed along the passenger long. 7. Retaining bolt for the passenger seatbelt at the floor was a total PITA to get out. 8. How does the wooded piece on the passenger footwell come out? Seems brittle. Thanks in advance! Attached image(s) 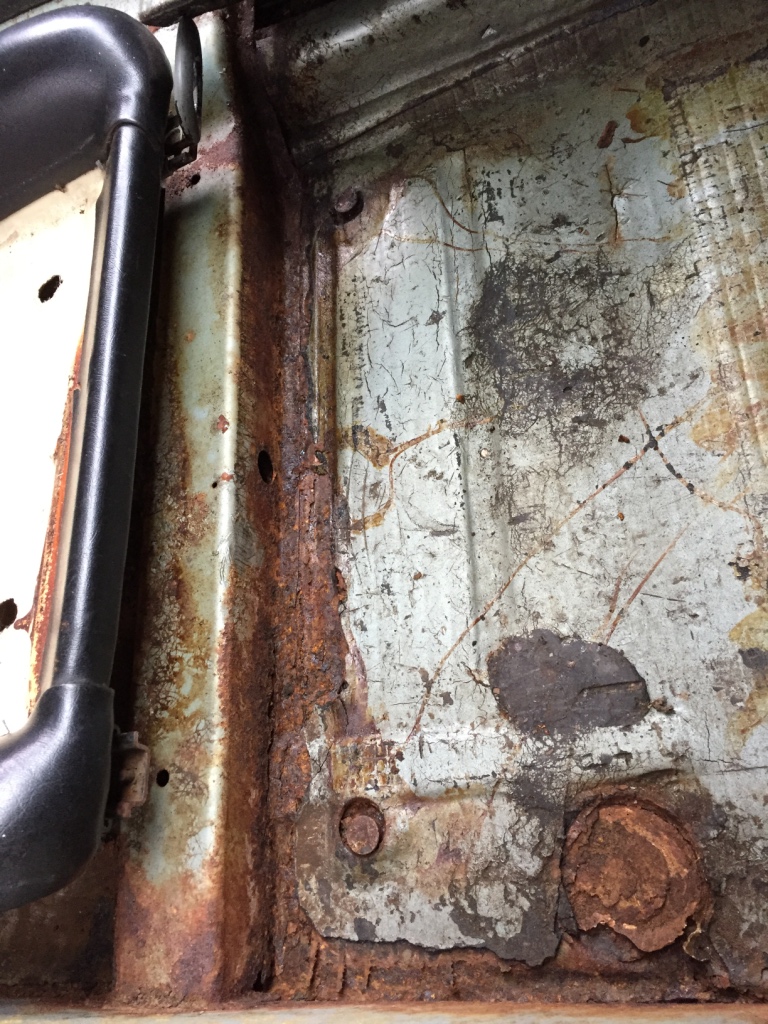
|
| JoeDees |
 Jan 31 2017, 05:11 PM Jan 31 2017, 05:11 PM
Post
#6
|
|
Senior Member    Group: Members Posts: 515 Joined: 10-November 14 From: Northern Kentucky Member No.: 18,106 Region Association: None |
You're gonna need to buy a welder.
|
| mepstein |
 Jan 31 2017, 05:16 PM Jan 31 2017, 05:16 PM
Post
#7
|
|
914-6 GT in waiting                Group: Members Posts: 19,608 Joined: 19-September 09 From: Landenberg, PA/Wilmington, DE Member No.: 10,825 Region Association: MidAtlantic Region 
|
You need long and floor pan repair. Once you scrape off the tar, the floor will look worse. You really need to check out the hell hole and the rear passenger suspension console. Those are the two areas most affected by battery acid and water and the rear long also reaches into that area. There's a good chance it's going to be a mess and make these pictures look tame.
|
| Dave_Darling |
 Jan 31 2017, 05:39 PM Jan 31 2017, 05:39 PM
Post
#8
|
|
914 Idiot                Group: Members Posts: 15,062 Joined: 9-January 03 From: Silicon Valley / Kailua-Kona Member No.: 121 Region Association: Northern California 
|
A 2x4 can distribute the load from the jack across a larger area of the floor pan. You can try that if you want to lift the car.
A few questions/observations: 1. Are those unconnected wires laying at the back of the tunnel (brown and black) for the light that is supposed to be in the backpad? (Missing) Yes, that's what they're for. Tape up the black wire to keep it from shorting to ground; it should be "live" all the time. QUOTE 2. Any idea what the little brass metal piece laying next to the wires is for? It doesn't seem to be for the light. It isn't for the light. Not sure what it might be for, possibly something inside the turn signal switch mechanism? There is an angled brass piece in there that loves to go AWOL when the steering column is taken apart. QUOTE 3. Looks moist and nasty inside that tunnel. Kinda typical. Worse than most I've seen here in CA, but we are a bit less rust-prone than many other areas. QUOTE 4. How is the pad affixed to the firewall? How is it removed? Should it be retained and reused? Which pad? There are three that I can think of. 1- The "back pad" that is the upholstered part that sits on the firewall. The interior light snaps into this part. It is held on by a pair of clips and four screws. The screws are about 6" up from the floor, I think, two in each seat well. Remove those screws, remove the engine-lid pull knob and the "escutcheon" around the knob, slide the bottom of the back pad forward and push the top of the pad down. It should come away from the firewall. (The seats need to be out, obviously.) 2- The tar insulation on the interior of the firewall, that is uncovered when the back pad is removed. This must be scraped off, like the other insulation. 3- The heavy rubber-covered mat on the engine side of the firewall. This is held in with a combination of glue and screws with very large plastic washers, and metal tabs on the edges. The actual function of this pad is to trap water against the firewall, leading to rust perforations. Ditch it. QUOTE 5. Behind the driver's seat you can see three new wires (black, green, and blue) going through the floor to routed to the engine bypassing whatever original equipment isn't working. Learn the acronym DAPO. (The PO stands for "previous owner". I'll let you guess the rest.) You may wind up using it a lot. QUOTE 6. After chipping away at the loose material on the floor daylight is observed along the passenger long. Never a good thing. I see door braces and welding in your future... QUOTE 7. Retaining bolt for the passenger seatbelt at the floor was a total PITA to get out. Penetrating oil, like PB Blaster or Aero Kroyl, can help a lot. WD-40 is a lousy penetrating oil, BTW. QUOTE 8. How does the wooded piece on the passenger footwell come out? Seems brittle. Wooded? Do you mean the styrofoam plug in the front of the passenger footwell? I think that may be glued in--I haven't messed with it myself, but have seen several out of the car. The wood floorboard on the driver's side is held in with two or three bolts (likely Allen-head) and has to be turned to a fairly specific angle in order to maneuver it off of the pedals. --DD |
| seanpaulmc |
 Feb 1 2017, 04:49 PM Feb 1 2017, 04:49 PM
Post
#9
|
|
Member   Group: Members Posts: 373 Joined: 6-December 16 From: Orlando, FL Member No.: 20,649 Region Association: South East States 
|
Thanks for the feedback, All.
About that welder, is there advice for a recommended welder for a novice on here? Likewise, on what to stay away from? DD - thanks for breaking down the Q&A like that. Really easy to follow. I'll have to learn how to do that. The actual pad I meant in my question was the pad affixed to the firewall behind the seat backpad. I was able to get the upholstered seat backpad out of car without removing the seats. What was left is stuck to the firewall but I'm not sure how. Seems like a kind of fiberboard. Should this be kept and retained for future use or removed no matter the cost and discarded? 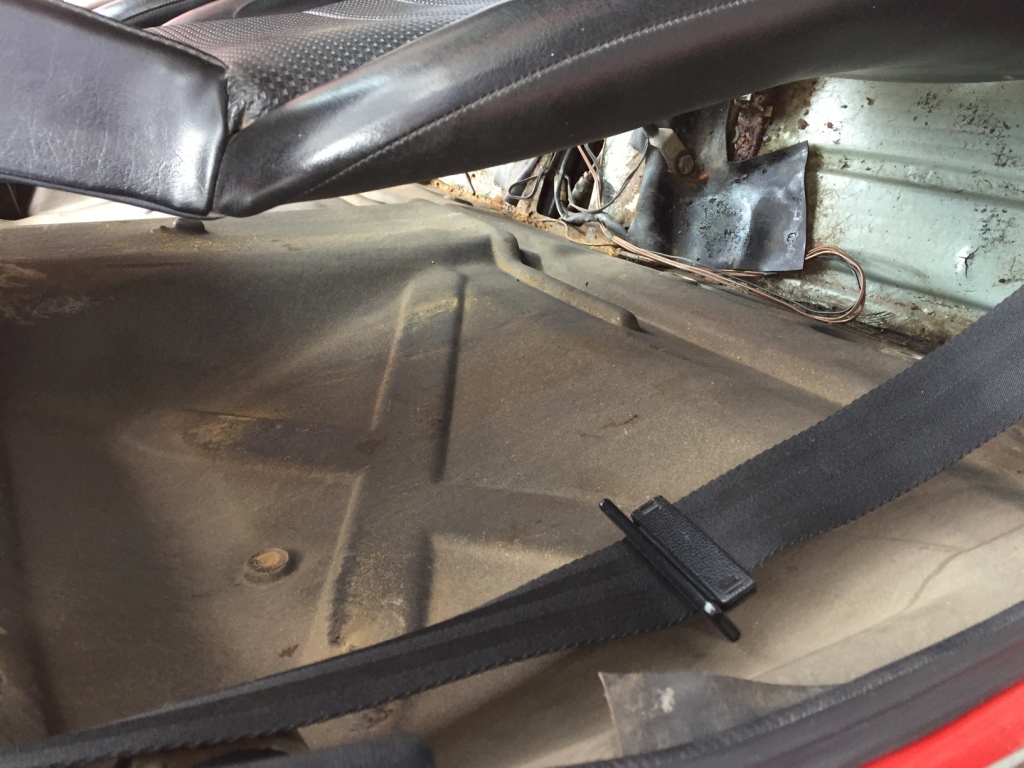 Here's the condition of the seat backpad which looks salvageable. It clearly shows water damage at the bottom. 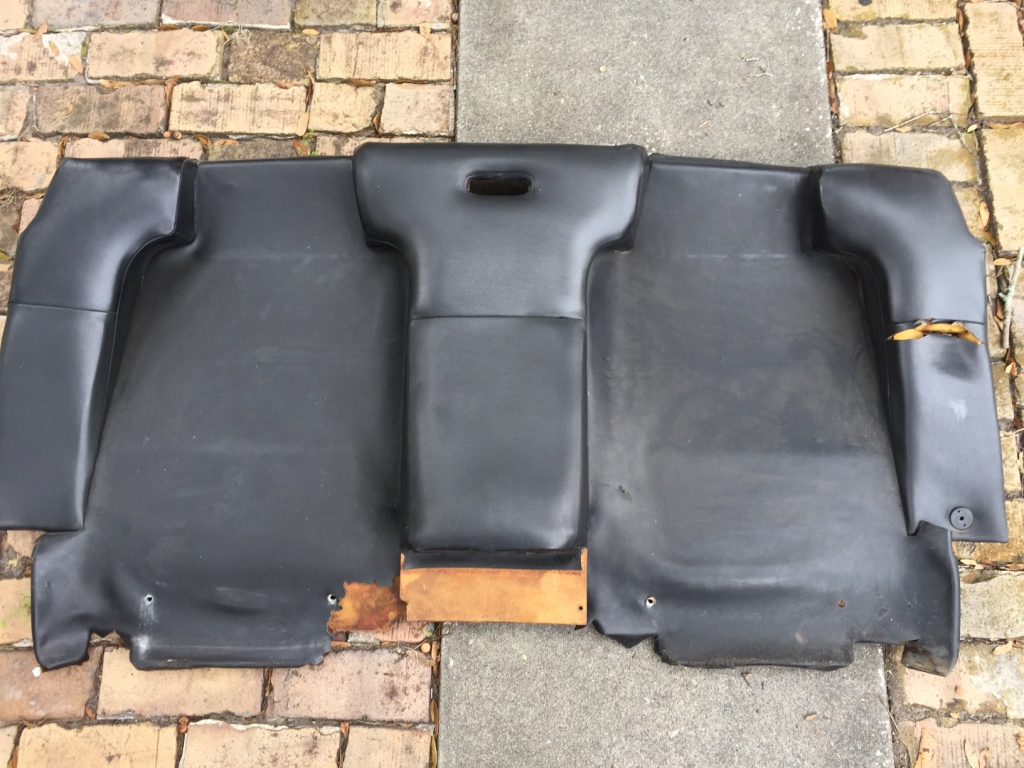 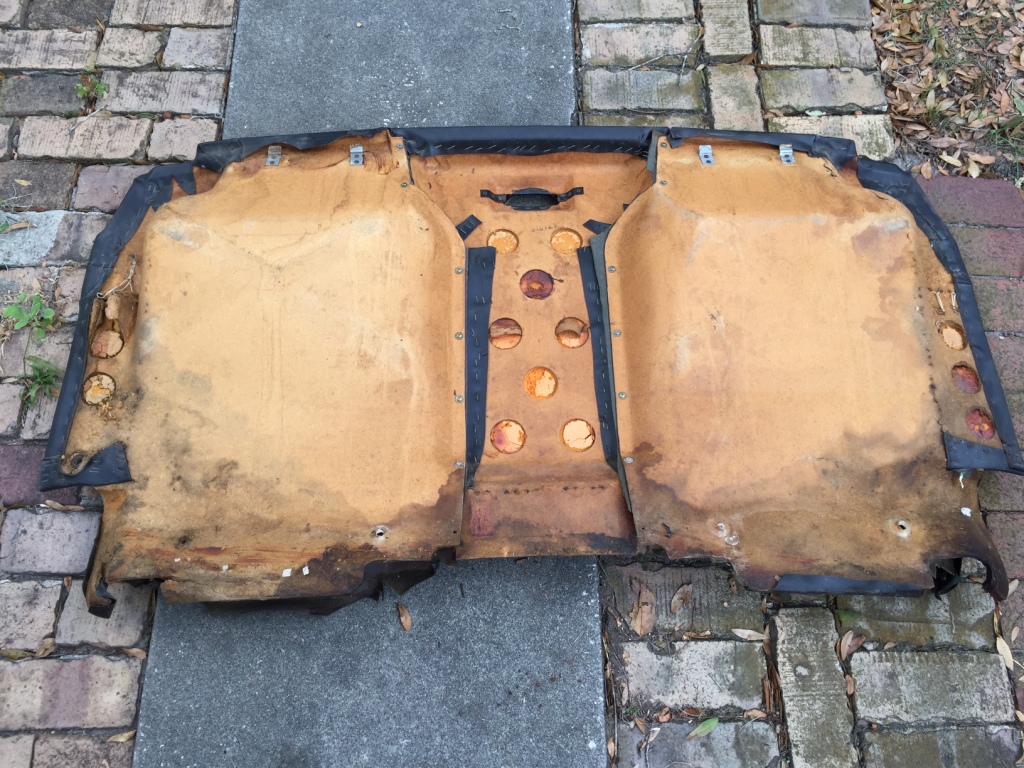 Thank you! |
| Ferg |
 Feb 1 2017, 04:57 PM Feb 1 2017, 04:57 PM
Post
#10
|
|
914 Guru      Group: Members Posts: 5,948 Joined: 8-January 03 From: Boulder CO Member No.: 116 Region Association: None 
|
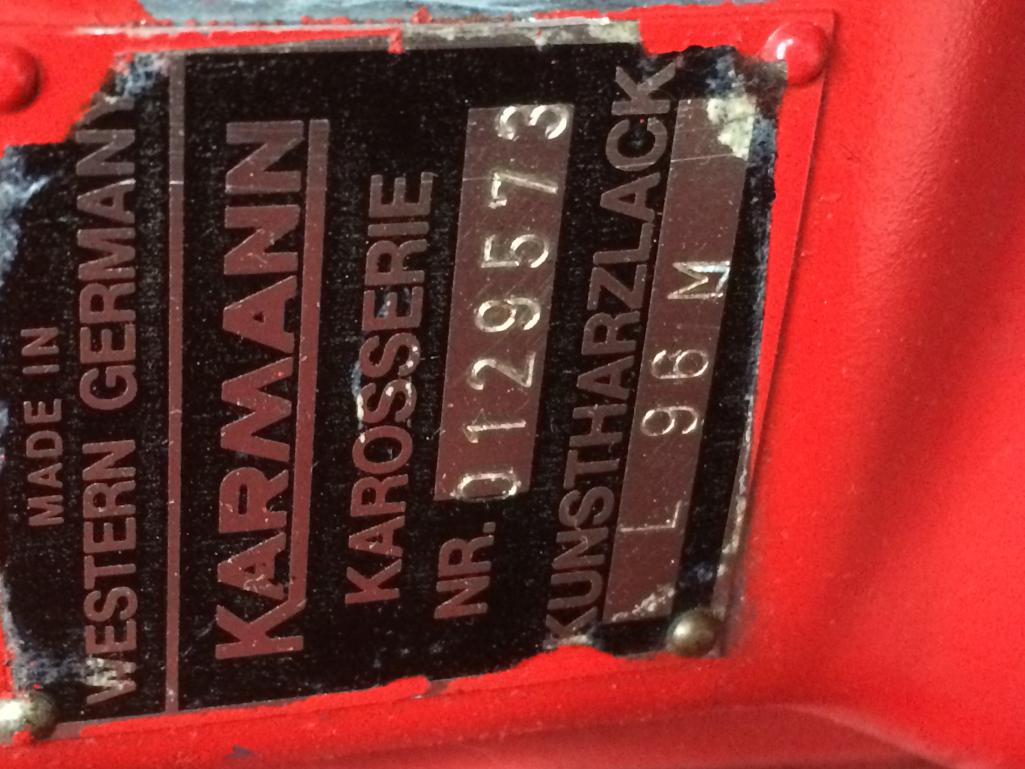
Whats the code for the original color on this car? My monitor makes it look like a light green metallic aka special order...
|
| seanpaulmc |
 Feb 1 2017, 05:35 PM Feb 1 2017, 05:35 PM
Post
#11
|
|
Member   Group: Members Posts: 373 Joined: 6-December 16 From: Orlando, FL Member No.: 20,649 Region Association: South East States 
|
|
| Ferg |
 Feb 1 2017, 05:47 PM Feb 1 2017, 05:47 PM
Post
#12
|
|
914 Guru      Group: Members Posts: 5,948 Joined: 8-January 03 From: Boulder CO Member No.: 116 Region Association: None 
|
|
| amfab |
 Feb 1 2017, 05:52 PM Feb 1 2017, 05:52 PM
Post
#13
|
|
Member   Group: Members Posts: 401 Joined: 17-May 16 From: Los Angeles Member No.: 20,004 Region Association: None 
|
Your longs and pans look like they have similar issues to mine.
Its a lot of work. Im about 6 weeks ahead of you. Check my thread in my signature. There is so much help here. I would be freaking out if it weren't for all the people here who have been here before who are willing to help. At least you only have rust to deal with and not others who have worked on the car before and made it worse. |
| JoeDees |
 Feb 1 2017, 06:06 PM Feb 1 2017, 06:06 PM
Post
#14
|
|
Senior Member    Group: Members Posts: 515 Joined: 10-November 14 From: Northern Kentucky Member No.: 18,106 Region Association: None |
There will be a lot of opinions on the welder (and there are many, many threads), but if you're just a hobbyist planning to weld little more than this car and only have 110 wiring in your garage and what not, I think your best deal is the Eastwood MIG 135. Don't weld flux, get the gas, practice and learn the right heat and wire speeds. Stay away from the Harbor Freight, if you're needing cheap but good enough, this Eastwood will do the job.
|
| PanelBilly |
 Feb 1 2017, 07:29 PM Feb 1 2017, 07:29 PM
Post
#15
|
|
914 Guru      Group: Members Posts: 5,861 Joined: 23-July 06 From: Kent, Wa Member No.: 6,488 Region Association: Pacific Northwest 
|
There's some smart people with the skills to help not all that far from you. Start making friends and bribe them with food and beer to come over and ponder how to attack the project. With any luck, you'll get a hand and the car will be driveable in no time.
|
| mepstein |
 Feb 1 2017, 08:03 PM Feb 1 2017, 08:03 PM
Post
#16
|
|
914-6 GT in waiting                Group: Members Posts: 19,608 Joined: 19-September 09 From: Landenberg, PA/Wilmington, DE Member No.: 10,825 Region Association: MidAtlantic Region 
|
How about the hell hole?
You can see the suspension console without a lift. You just need a flashlight. |
| Larmo63 |
 Feb 1 2017, 08:10 PM Feb 1 2017, 08:10 PM
Post
#17
|
|
Advanced Member     Group: Members Posts: 4,267 Joined: 3-March 14 From: San Clemente, Ca Member No.: 17,068 Region Association: Southern California |
You should assess everything under the tar padding on the floor before you go any further in buying a welder. It looks like rain water has infected the lower part of this car's interior by the looks of the backpad.
Make sure you have a chassis that is worth the effort and cash outlay. It will take a lot of work and patience to fix these issues. I wish you the very best, but this is going to be a project. and, (IMG:style_emoticons/default/welcome.png) |
| seanpaulmc |
 Apr 1 2017, 06:52 PM Apr 1 2017, 06:52 PM
Post
#18
|
|
Member   Group: Members Posts: 373 Joined: 6-December 16 From: Orlando, FL Member No.: 20,649 Region Association: South East States 
|
Here's the initial look underneath. I'm pretty sure the duct tape shouldn't be there. (IMG:style_emoticons/default/WTF.gif)
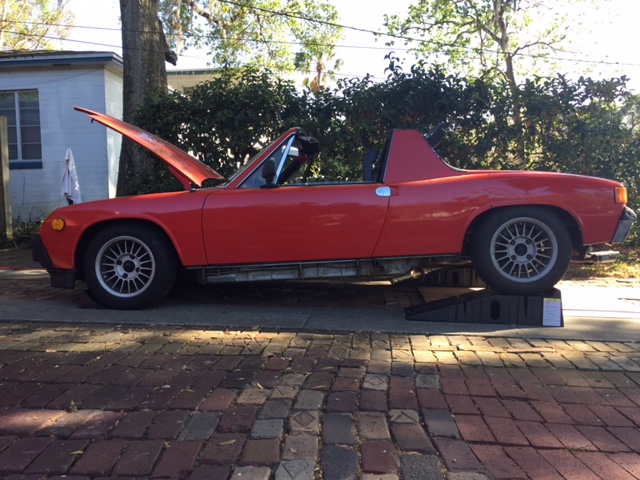 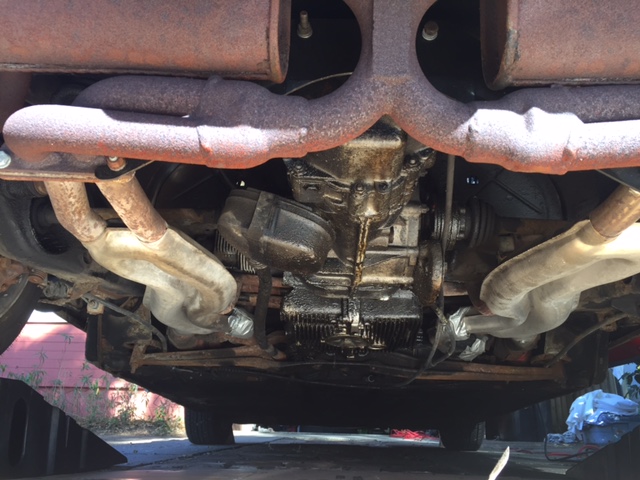 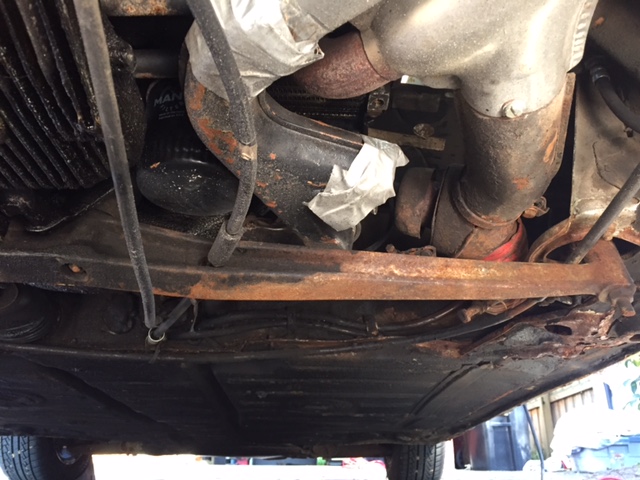 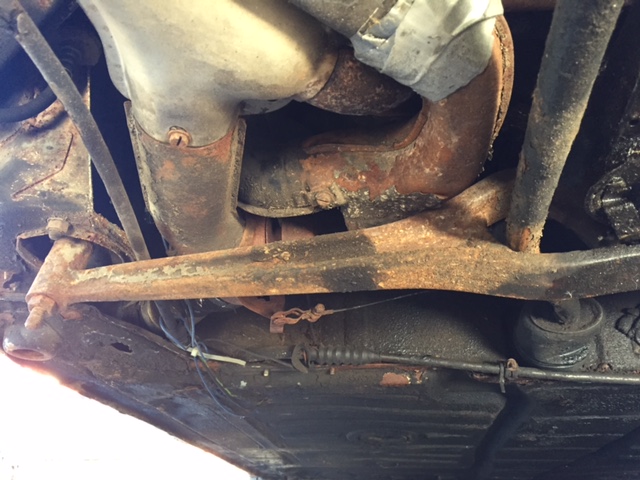 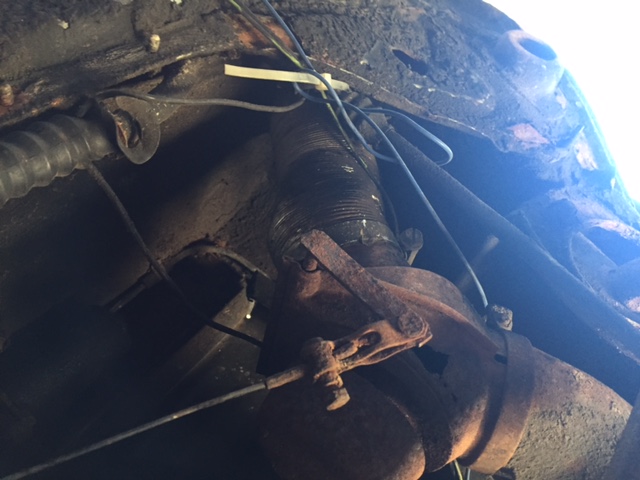 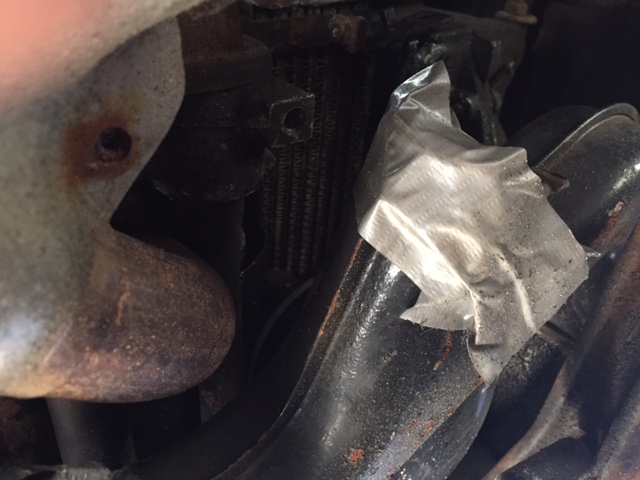 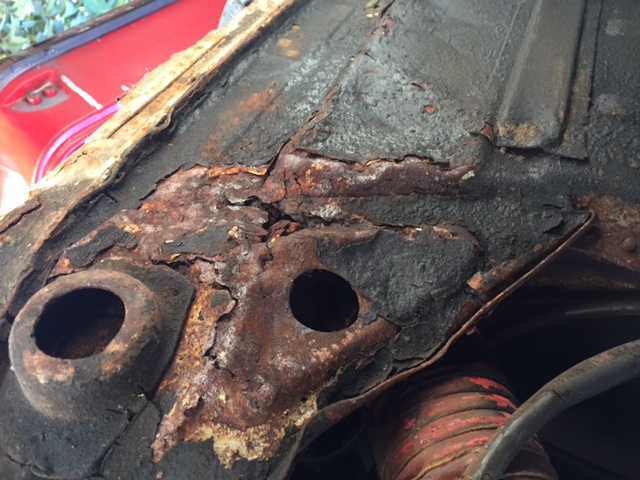 The engine cradle is cockeyed (i.e. not vertical), should it be? Also, I started in on the removing the tar from the floor pans. The oscillating multi-tool with scraper blade works great. Didn't get very far since I started late in the day. Spent three hours doing yard work first. Will show the floor carnage after a little more progress tomorrow. Findings to date: Seat belts do not work well at all. Replace or refurbish? Has original fuel lines. I bought a fire extinguisher just in case. Rust in the longs and floor pans. Windshield washer switch arm broken. Horn moved to a button on the dash (push button). Ignition moved to a button on the dash (push button). Low beam headlights don't work but Highs do. I did put in LED bulbs if that means anything. Speedometer does not work; it is hooked up at both ends. Broken engine lid bracket (LS). No rear trunk springs (broom handle). Lots of rust in the rear jack points. The hunt goes on. Thoughts? |
| branston |
 Apr 1 2017, 07:32 PM Apr 1 2017, 07:32 PM
Post
#19
|
|
Member   Group: Members Posts: 89 Joined: 17-October 12 From: Michigan Member No.: 15,053 Region Association: Upper MidWest |
There will be a lot of opinions on the welder (and there are many, many threads), but if you're just a hobbyist planning to weld little more than this car and only have 110 wiring in your garage and what not, I think your best deal is the Eastwood MIG 135. Don't weld flux, get the gas, practice and learn the right heat and wire speeds. Stay away from the Harbor Freight, if you're needing cheap but good enough, this Eastwood will do the job. I Agree the Eastwood MIG 135 is an awesome little welder, I have doen all my bodywork on my other cars with it. yes get the gas for sure don't waste your time with flux wire. Good advise from JoeDees |
| Dave_Darling |
 Apr 2 2017, 01:16 PM Apr 2 2017, 01:16 PM
Post
#20
|
|
914 Idiot                Group: Members Posts: 15,062 Joined: 9-January 03 From: Silicon Valley / Kailua-Kona Member No.: 121 Region Association: Northern California 
|
The engine cradle is cockeyed (i.e. not vertical), should it be? If you mean that the bottom of the bar leans back toward the rear of the car, this is fairly common. Someone ran over something, and the mounting bolts for the bar or the outer plates that those bolts go through are bent. Replace them. QUOTE Seat belts do not work well at all. Replace or refurbish? Cleaning the webbing can do wonders! Be very very very very careful if you remove the side covers from the retractors, the spring inside has sharp edges and is under a lot of tension. At least the scars fade over the course of a decade or two. (IMG:style_emoticons/default/wink.gif) QUOTE Low beam headlights don't work but Highs do. I did put in LED bulbs if that means anything. There is a high/low relay on top of the fuse panel. It chooses where the headlight current goes, to the high beam circuit or the low beam one. Note that each headlight filament has its own fuse, so there are four: high beam left, high beam right, low beam left, low beam right. Double-check the fuses, but with both low beams out it is more likely to be the relay or something between the fuse and the relay. Though it could be the filaments. Worth checking that you have voltage at the low beam pin of the headlight connector. QUOTE Speedometer does not work; it is hooked up at both ends. Does the dashboard end of the cable spin when the car is in gear and moving? Everything is fixable. Lots of work to do on this one. Depending on where you are and how available 914s are there, it might be $$ ahead to part this and buy a different one. But $$ is not always the only determinant... --DD |
  |
25 User(s) are reading this topic (25 Guests and 0 Anonymous Users)
0 Members:

|
Lo-Fi Version | Time is now: 28th November 2024 - 07:42 AM |
Invision Power Board
v9.1.4 © 2024 IPS, Inc.


