|
|
|
Porsche, and the Porsche crest are registered trademarks of Dr. Ing. h.c. F. Porsche AG.
This site is not affiliated with Porsche in any way. Its only purpose is to provide an online forum for car enthusiasts. All other trademarks are property of their respective owners. |
|
|

  |

| PCA7GGR |
 Aug 11 2019, 03:34 PM Aug 11 2019, 03:34 PM
Post
#1161
|
|
Member  Group: Members Posts: 254 Joined: 3-October 03 From: Dublin, CA Member No.: 1,219 |
FYI
We’re losing and source for “previously tested” parts. Little Al is closing PartsHeaven as soon as he finds a buyer for his inventory. So if you need anything, now’s the time. |
   |

 
|
| bbrock |
Aug 11 2019, 05:28 PM
Post
#1162
|
|
914 Guru Group: Members Posts: 5,269 Joined: 17-February 17 From: Montana Member No.: 20,845 Region Association: Rocky Mountains |
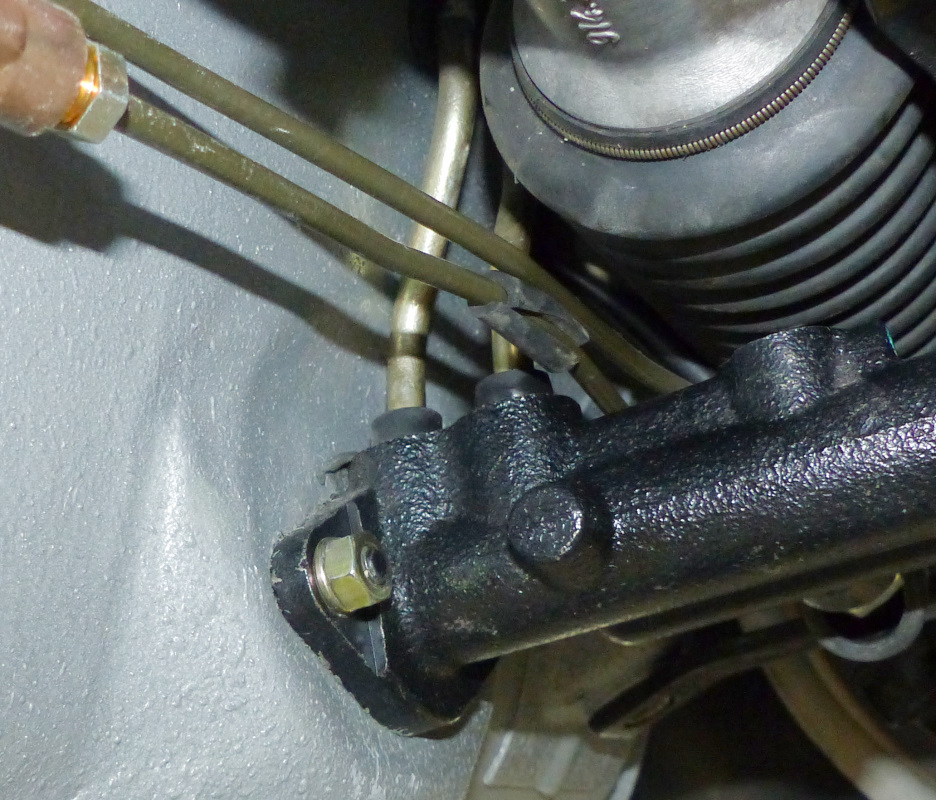
I think I found the brake leak. Snugged up all the fittings and put a clean paper towel on the floor and waited. Thirty minutes went by and then..... drip. Shit! Took another look with a flashlight and saw one of the inlet grommets was wet. The brake line that feeds the rear circuit does a u-turn where it attaches to the MC and then crosses over the top of the MC. It was pushing against the grommet enough to distort it and allow a very slow seep. I adjusted the line with thumb pressure and dried everything off. So far, so good. I'll let it sit over night before putting the pan back on. This pic is after the adjustment.
 |
|
|
|
| Superhawk996 |
Aug 12 2019, 01:43 PM
Post
#1163
|
|
914 Guru Group: Members Posts: 6,973 Joined: 25-August 18 From: Woods of N. Idaho Member No.: 22,428 Region Association: Galt's Gulch |
QUOTE(bbrock @ Aug 11 2019, 05:29 PM)  Can't say I'm proud of these pics because I was envisioning a lot more bare metal showing after blocking the filler. You're being too hard on yourself. Especially given your starting point. Well done Bret. (IMG:style_emoticons/default/aktion035.gif) You are absolutely correct in saying that there are collision shops out there that would use more. (IMG:style_emoticons/default/sad.gif) I was watching one of those stupid Man Opera's a few months back that restored a VW Bus. I was yelling at the TV over how much filler they left on it. (IMG:style_emoticons/default/headbang.gif) |
|
|
|
| mb911 |
Aug 12 2019, 01:59 PM
Post
#1164
|
|
914 Guru Group: Members Posts: 7,545 Joined: 2-January 09 From: Burlington wi Member No.: 9,892 Region Association: Upper MidWest |
QUOTE(bbrock @ Aug 11 2019, 01:29 PM) Got filler applied and sanded on the passenger side. Can't say I'm proud of these pics because I was envisioning a lot more bare metal showing after blocking the filler. The filler is a max of 1/16" deep except for one small area on the rear quarter where the filler is closer to 1/8." That was after spending probably 40 hours trying to straighten both quarters after all the cutting and welding. What can I say? I'm an amateur. It is still WAY better than most collision shops would do and far less filler than I took off the car. I was surprised and a little disappointed to find the sail panel had a slight concavity to it from the stamping. I guess I should have spent some time prepping that panel to make sure it was flat before welding it on. Since my car will have painted sails, I didn't think I had a choice but to fill it. Again, it only took 1/16" to bring it true but I hate seeing all that filler over a brand new panel. The rest of the afternoon will be spent tracking down a small brake fluid leak from the master cylinder area. I'll have to pull the gravel pan off to see exactly where. Hopefully, it is something simple. It could turn into a really bad day. What's worrisome is that I let the car sit overnight with fluid before putting the pan on, and there were no drips. (IMG:style_emoticons/default/mad.gif) Some very hi end shop skim coat the entire car with mud.. I like to block like you then 3-4 coats of primer/surfaced and block that with guide coat 180 then 320. Then let sit to shrink some. Then reblock with 400 before sealer and base.. |
|
|
|
| bbrock |
Aug 12 2019, 03:04 PM
Post
#1165
|
|
914 Guru Group: Members Posts: 5,269 Joined: 17-February 17 From: Montana Member No.: 20,845 Region Association: Rocky Mountains |
QUOTE(mb911 @ Aug 12 2019, 01:59 PM) QUOTE(bbrock @ Aug 11 2019, 01:29 PM) Got filler applied and sanded on the passenger side. Can't say I'm proud of these pics because I was envisioning a lot more bare metal showing after blocking the filler. The filler is a max of 1/16" deep except for one small area on the rear quarter where the filler is closer to 1/8." That was after spending probably 40 hours trying to straighten both quarters after all the cutting and welding. What can I say? I'm an amateur. It is still WAY better than most collision shops would do and far less filler than I took off the car. I was surprised and a little disappointed to find the sail panel had a slight concavity to it from the stamping. I guess I should have spent some time prepping that panel to make sure it was flat before welding it on. Since my car will have painted sails, I didn't think I had a choice but to fill it. Again, it only took 1/16" to bring it true but I hate seeing all that filler over a brand new panel. The rest of the afternoon will be spent tracking down a small brake fluid leak from the master cylinder area. I'll have to pull the gravel pan off to see exactly where. Hopefully, it is something simple. It could turn into a really bad day. What's worrisome is that I let the car sit overnight with fluid before putting the pan on, and there were no drips. (IMG:style_emoticons/default/mad.gif) Some very hi end shop skim coat the entire car with mud.. I like to block like you then 3-4 coats of primer/surfaced and block that with guide coat 180 then 320. Then let sit to shrink some. Then reblock with 400 before sealer and base.. That's almost exactly the plan. The only additional step is that I'm going to shoot this with epoxy primer again before building up the surfacer. I applied the filler over epoxy cleaned and sanded to 400. I don't like the idea of absorbent filler sitting next to bare metal. I'll shoot epoxy again just to make sure all the exposed metal is sealed with epoxy. Only other change will be that I will take the surfacer to 600 before sealer and base. That may be overkill but I've read that when spraying silver metallic, going to 600 is a good idea. I'm not proud of the extent of filler, but I am happy. Most of the filler is thin enough you can see the epoxy primer underneath. I'm confident I'm well within the limits of what would qualify for a "high end" job. The lack of pride comes from having a fantasy of meticulously working every panel to perfectly straight. Reality quickly set in when I realized I have neither the skill or time for that. Last fall I had to make a choice of continuing to dink with that or get the undercoat and interior sprayed while I still had good weather. I made the smart choice. My biggest problem now is this damn master cylinder leak. I'm getting about 1 drop per hour from the forward inlet grommet and it's pissing me off. I'm kicking myself for not ordering the "easy option" on the 914Rubber MC. I wanted to stay as original as possible and knew installing those lines would be easy with the car up in the air and stripped down. I did not appreciate how Mickey Mouse the original setup is. Hopefully I can get that little a-hole to seat without draining the system and pulling the MC. |
|
|
|
| Superhawk996 |
Aug 12 2019, 03:19 PM
Post
#1166
|
|
914 Guru Group: Members Posts: 6,973 Joined: 25-August 18 From: Woods of N. Idaho Member No.: 22,428 Region Association: Galt's Gulch |
I probably need to spend more time over on 914Rubber's site.
I remember you struggling to get the metal grommets pushed into the plastic tube. What is the easy option? Hopefully not a different M/C because I have a really nice NOS in the parts stash. |
|
|
|
| bbrock |
Aug 12 2019, 03:27 PM
Post
#1167
|
|
914 Guru Group: Members Posts: 5,269 Joined: 17-February 17 From: Montana Member No.: 20,845 Region Association: Rocky Mountains |
QUOTE(Superhawk996 @ Aug 12 2019, 03:19 PM) I probably need to spend more time over on 914Rubber's site. I remember you struggling to get the metal grommets pushed into the plastic tube. What is the easy option? Hopefully not a different M/C because I have a really nice NOS in the parts stash. Unfortunately, yes, it's another MC. IIRC, for the easy option, they tap the inlets for barbed hose fittings and then provide hose and clamps to connect the MC to the plastic line the same way those lines connects to the reservoir. If only it were a retrofit option. (IMG:style_emoticons/default/sad.gif) Don't get me started on those plastic tubes. They are a real curse factory. At least they are leak free though. |
|
|
|
| raynekat |
Aug 12 2019, 03:28 PM
Post
#1168
|
|
Advanced Member Group: Members Posts: 2,169 Joined: 30-December 14 From: Coeur d'Alene, Idaho Member No.: 18,263 Region Association: Pacific Northwest |
Brent....do you have the 2 small washers under the 2 lines that go into the top of the master cylinder?
When I inserted the 2 inlet lines into the top of the master cylinder, I did it on the bench...out of the car. Really tough to do with the master already bolted in place. Takes quite a bit of force to get those lines to seat correctly. I have no leaks on my master. These are just my experiences. |
|
|
|
| mepstein |
Aug 12 2019, 03:44 PM
Post
#1169
|
|
914-6 GT in waiting Group: Members Posts: 19,844 Joined: 19-September 09 From: Landenberg, PA/Wilmington, DE Member No.: 10,825 Region Association: MidAtlantic Region |
QUOTE(raynekat @ Aug 12 2019, 05:28 PM) Brent....do you have the 2 small washers under the 2 lines that go into the top of the master cylinder? When I inserted the 2 inlet lines into the top of the master cylinder, I did it on the bench...out of the car. Really tough to do with the master already bolted in place. Takes quite a bit of force to get those lines to seat correctly. I have no leaks on my master. These are just my experiences. I was just going to ask about the washers. They are mandatory but not included with every MC. |
|
|
|
| mb911 |
Aug 12 2019, 03:47 PM
Post
#1170
|
|
914 Guru Group: Members Posts: 7,545 Joined: 2-January 09 From: Burlington wi Member No.: 9,892 Region Association: Upper MidWest |
QUOTE(bbrock @ Aug 12 2019, 01:04 PM) QUOTE(mb911 @ Aug 12 2019, 01:59 PM) QUOTE(bbrock @ Aug 11 2019, 01:29 PM) Got filler applied and sanded on the passenger side. Can't say I'm proud of these pics because I was envisioning a lot more bare metal showing after blocking the filler. The filler is a max of 1/16" deep except for one small area on the rear quarter where the filler is closer to 1/8." That was after spending probably 40 hours trying to straighten both quarters after all the cutting and welding. What can I say? I'm an amateur. It is still WAY better than most collision shops would do and far less filler than I took off the car. I was surprised and a little disappointed to find the sail panel had a slight concavity to it from the stamping. I guess I should have spent some time prepping that panel to make sure it was flat before welding it on. Since my car will have painted sails, I didn't think I had a choice but to fill it. Again, it only took 1/16" to bring it true but I hate seeing all that filler over a brand new panel. The rest of the afternoon will be spent tracking down a small brake fluid leak from the master cylinder area. I'll have to pull the gravel pan off to see exactly where. Hopefully, it is something simple. It could turn into a really bad day. What's worrisome is that I let the car sit overnight with fluid before putting the pan on, and there were no drips. (IMG:style_emoticons/default/mad.gif) Some very hi end shop skim coat the entire car with mud.. I like to block like you then 3-4 coats of primer/surfaced and block that with guide coat 180 then 320. Then let sit to shrink some. Then reblock with 400 before sealer and base.. That's almost exactly the plan. The only additional step is that I'm going to shoot this with epoxy primer again before building up the surfacer. I applied the filler over epoxy cleaned and sanded to 400. I don't like the idea of absorbent filler sitting next to bare metal. I'll shoot epoxy again just to make sure all the exposed metal is sealed with epoxy. Only other change will be that I will take the surfacer to 600 before sealer and base. That may be overkill but I've read that when spraying silver metallic, going to 600 is a good idea. I'm not proud of the extent of filler, but I am happy. Most of the filler is thin enough you can see the epoxy primer underneath. I'm confident I'm well within the limits of what would qualify for a "high end" job. The lack of pride comes from having a fantasy of meticulously working every panel to perfectly straight. Reality quickly set in when I realized I have neither the skill or time for that. Last fall I had to make a choice of continuing to dink with that or get the undercoat and interior sprayed while I still had good weather. I made the smart choice. My biggest problem now is this damn master cylinder leak. I'm getting about 1 drop per hour from the forward inlet grommet and it's pissing me off. I'm kicking myself for not ordering the "easy option" on the 914Rubber MC. I wanted to stay as original as possible and knew installing those lines would be easy with the car up in the air and stripped down. I did not appreciate how Mickey Mouse the original setup is. Hopefully I can get that little a-hole to seat without draining the system and pulling the MC. I shoot thinned epoxy as my sealer .. It works well. |
|
|
|
| bbrock |
Aug 12 2019, 04:47 PM
Post
#1171
|
|
914 Guru Group: Members Posts: 5,269 Joined: 17-February 17 From: Montana Member No.: 20,845 Region Association: Rocky Mountains |
QUOTE(raynekat @ Aug 12 2019, 03:28 PM) Brent....do you have the 2 small washers under the 2 lines that go into the top of the master cylinder? I do but can't say for sure they are installed correctly. I seem to recall they just dropped into the openings before pressing the grommets in. I guess to just create a surface for the grommets to seal against? (IMG:style_emoticons/default/confused24.gif) |
|
|
|
| bbrock |
Aug 12 2019, 04:49 PM
Post
#1172
|
|
914 Guru Group: Members Posts: 5,269 Joined: 17-February 17 From: Montana Member No.: 20,845 Region Association: Rocky Mountains |
QUOTE(mb911 @ Aug 12 2019, 03:47 PM) QUOTE(bbrock @ Aug 12 2019, 01:04 PM) QUOTE(mb911 @ Aug 12 2019, 01:59 PM) QUOTE(bbrock @ Aug 11 2019, 01:29 PM) Got filler applied and sanded on the passenger side. Can't say I'm proud of these pics because I was envisioning a lot more bare metal showing after blocking the filler. The filler is a max of 1/16" deep except for one small area on the rear quarter where the filler is closer to 1/8." That was after spending probably 40 hours trying to straighten both quarters after all the cutting and welding. What can I say? I'm an amateur. It is still WAY better than most collision shops would do and far less filler than I took off the car. I was surprised and a little disappointed to find the sail panel had a slight concavity to it from the stamping. I guess I should have spent some time prepping that panel to make sure it was flat before welding it on. Since my car will have painted sails, I didn't think I had a choice but to fill it. Again, it only took 1/16" to bring it true but I hate seeing all that filler over a brand new panel. The rest of the afternoon will be spent tracking down a small brake fluid leak from the master cylinder area. I'll have to pull the gravel pan off to see exactly where. Hopefully, it is something simple. It could turn into a really bad day. What's worrisome is that I let the car sit overnight with fluid before putting the pan on, and there were no drips. (IMG:style_emoticons/default/mad.gif) Some very hi end shop skim coat the entire car with mud.. I like to block like you then 3-4 coats of primer/surfaced and block that with guide coat 180 then 320. Then let sit to shrink some. Then reblock with 400 before sealer and base.. That's almost exactly the plan. The only additional step is that I'm going to shoot this with epoxy primer again before building up the surfacer. I applied the filler over epoxy cleaned and sanded to 400. I don't like the idea of absorbent filler sitting next to bare metal. I'll shoot epoxy again just to make sure all the exposed metal is sealed with epoxy. Only other change will be that I will take the surfacer to 600 before sealer and base. That may be overkill but I've read that when spraying silver metallic, going to 600 is a good idea. I'm not proud of the extent of filler, but I am happy. Most of the filler is thin enough you can see the epoxy primer underneath. I'm confident I'm well within the limits of what would qualify for a "high end" job. The lack of pride comes from having a fantasy of meticulously working every panel to perfectly straight. Reality quickly set in when I realized I have neither the skill or time for that. Last fall I had to make a choice of continuing to dink with that or get the undercoat and interior sprayed while I still had good weather. I made the smart choice. My biggest problem now is this damn master cylinder leak. I'm getting about 1 drop per hour from the forward inlet grommet and it's pissing me off. I'm kicking myself for not ordering the "easy option" on the 914Rubber MC. I wanted to stay as original as possible and knew installing those lines would be easy with the car up in the air and stripped down. I did not appreciate how Mickey Mouse the original setup is. Hopefully I can get that little a-hole to seat without draining the system and pulling the MC. I shoot thinned epoxy as my sealer .. It works well. Yep. Nice thing about the PPG DPLF epoxy is that acetone is the reducer to change it to a sealer. At least one component of the paint is cheap. |
|
|
|
| raynekat |
Aug 12 2019, 04:52 PM
Post
#1173
|
|
Advanced Member Group: Members Posts: 2,169 Joined: 30-December 14 From: Coeur d'Alene, Idaho Member No.: 18,263 Region Association: Pacific Northwest |
Brent, did you install the 2 lines while the master cylinder was in the car....or out of the car?
|
|
|
|
| Superhawk996 |
Aug 12 2019, 04:53 PM
Post
#1174
|
|
914 Guru Group: Members Posts: 6,973 Joined: 25-August 18 From: Woods of N. Idaho Member No.: 22,428 Region Association: Galt's Gulch |
QUOTE(bbrock @ Aug 12 2019, 05:27 PM) QUOTE(Superhawk996 @ Aug 12 2019, 03:19 PM) I probably need to spend more time over on 914Rubber's site. I remember you struggling to get the metal grommets pushed into the plastic tube. What is the easy option? Hopefully not a different M/C because I have a really nice NOS in the parts stash. Unfortunately, yes, it's another MC. IIRC, for the easy option, they tap the inlets for barbed hose fittings and then provide hose and clamps to connect the MC to the plastic line the same way those lines connects to the reservoir. If only it were a retrofit option. (IMG:style_emoticons/default/sad.gif) Don't get me started on those plastic tubes. They are a real curse factory. At least they are leak free though. (IMG:style_emoticons/default/happy11.gif) "Dude we can fix it, my dad's got an awesome set of tools." -- J. Spicoli I have a mill . . . . and I'm not nearly as attached to Original as you. Though I don't think I could bring myself to do that to a NOS M/C. |
|
|
|
| bbrock |
Aug 13 2019, 09:36 AM
Post
#1175
|
|
914 Guru Group: Members Posts: 5,269 Joined: 17-February 17 From: Montana Member No.: 20,845 Region Association: Rocky Mountains |
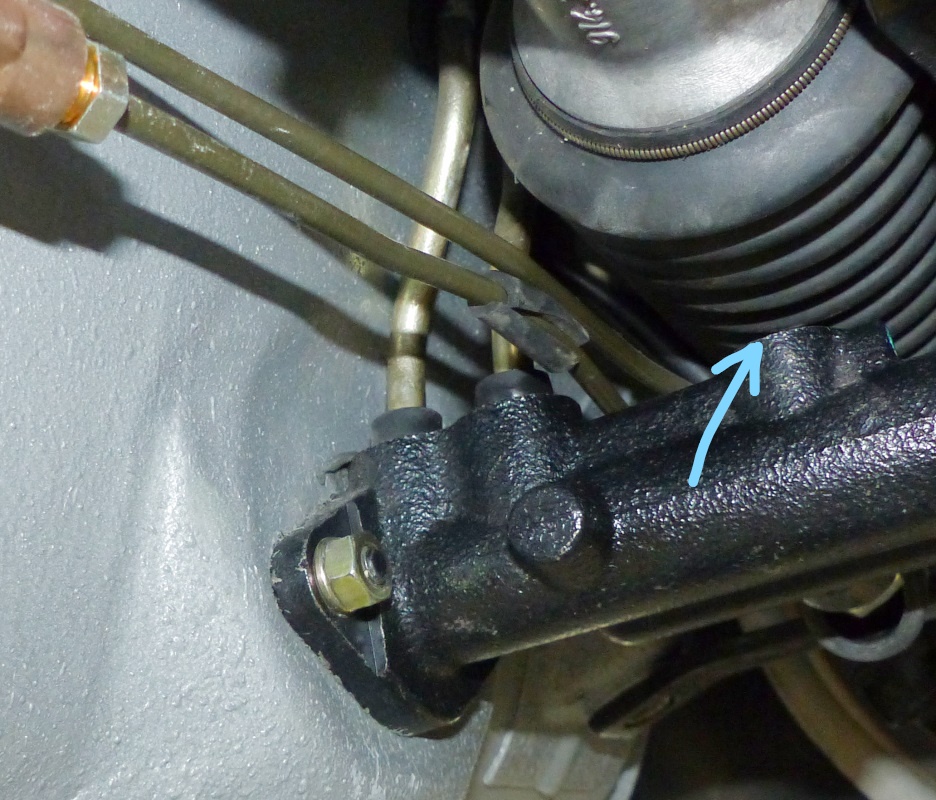
Well shit! Last night I carefully dried all the fluid off the MC and then tilted the car to the side to make it easier to trace where drips were coming from. This morning I checked. Inlet grommets - DRY --- Banjo fitting - DRY --- Welch plug on top of the cylinder - WET (IMG:style_emoticons/default/headbang.gif) Looks like that plug didn't seal during manufacture. Before this test, I thought fluid was leaking from the grommet across the top of the MC and pooling around the welch plug. NOPE. I've dried everything off to double check but might have to contact Mark about replacing the MC. Fuch, fuch, fuch.
 |
|
|
|
| tygaboy |
Aug 13 2019, 09:56 AM
Post
#1176
|
|
914 Guru Group: Members Posts: 5,550 Joined: 6-October 15 From: Petaluma, CA Member No.: 19,241 Region Association: Northern California |
Sorry to hear about the MC.
It's hard enough getting the self-made parts and other repairs to fit/work so it's doubly frustrating when a purchased component does this sort of thing - particularly when it's such a fun part to replace. (IMG:style_emoticons/default/headbang.gif) Whenever I run into crap setbacks or non-self-inflicted do-overs like this, I try and remember to step back and take in the whole picture. In your case, your car is looking great! |
|
|
|
| bbrock |
Aug 13 2019, 10:40 AM
Post
#1177
|
|
914 Guru Group: Members Posts: 5,269 Joined: 17-February 17 From: Montana Member No.: 20,845 Region Association: Rocky Mountains |
QUOTE(tygaboy @ Aug 13 2019, 09:56 AM) Sorry to hear about the MC. It's hard enough getting the self-made parts and other repairs to fit/work so it's doubly frustrating when a purchased component does this sort of thing - particularly when it's such a fun part to replace. (IMG:style_emoticons/default/headbang.gif) Whenever I run into crap setbacks or non-self-inflicted do-overs like this, I try and remember to step back and take in the whole picture. In your case, your car is looking great! Thanks Chris. It could have been WAY worse if I had taken the car off the rotisserie before discovering the leak. Then I would have been lying on my back with brake fluid dripping on my face and cussing mightily! At least this way, I have plenty of room to work. I have confirmed three times now that it is indeed the plug that is leaking. I can't see the top well enough with the MC installed, but feeling around, it almost feels like the plug never got pressed in. If that is the case, I can probably fix it myself but will contact Mark before doing anything. He may want to inspect for QC purposes. My biggest worry at this point is that all these delays are pushing me up against my weather window for paint. I only have about 2 months before that window closes. |
|
|
|
| raynekat |
Aug 13 2019, 11:05 AM
Post
#1178
|
|
Advanced Member Group: Members Posts: 2,169 Joined: 30-December 14 From: Coeur d'Alene, Idaho Member No.: 18,263 Region Association: Pacific Northwest |
So this is a 914 Rubber master cylinder that's leaking?
Guess that's why I ponied up the extra to buy an ATE. QUOTE(bbrock @ Aug 13 2019, 09:40 AM) QUOTE(tygaboy @ Aug 13 2019, 09:56 AM) Sorry to hear about the MC. It's hard enough getting the self-made parts and other repairs to fit/work so it's doubly frustrating when a purchased component does this sort of thing - particularly when it's such a fun part to replace. (IMG:style_emoticons/default/headbang.gif) Whenever I run into crap setbacks or non-self-inflicted do-overs like this, I try and remember to step back and take in the whole picture. In your case, your car is looking great! Thanks Chris. It could have been WAY worse if I had taken the car off the rotisserie before discovering the leak. Then I would have been lying on my back with brake fluid dripping on my face and cussing mightily! At least this way, I have plenty of room to work. I have confirmed three times now that it is indeed the plug that is leaking. I can't see the top well enough with the MC installed, but feeling around, it almost feels like the plug never got pressed in. If that is the case, I can probably fix it myself but will contact Mark before doing anything. He may want to inspect for QC purposes. My biggest worry at this point is that all these delays are pushing me up against my weather window for paint. I only have about 2 months before that window closes. |
|
|
|
| bbrock |
Aug 13 2019, 11:53 AM
Post
#1179
|
|
914 Guru Group: Members Posts: 5,269 Joined: 17-February 17 From: Montana Member No.: 20,845 Region Association: Rocky Mountains |
QUOTE(raynekat @ Aug 13 2019, 11:05 AM) So this is a 914 Rubber master cylinder that's leaking? Guess that's why I ponied up the extra to buy an ATE. Yep, and their very first batch to boot. I would have preferred a 17mm ATE but couldn't pass up the price. I knew it was a bit of a gamble but they look well made and I knew Mark would stand behind them. It's only brakes. What could possibly go wrong? (IMG:style_emoticons/default/driving.gif) (IMG:style_emoticons/default/yikes.gif) To be clear, I don't think this is a safety issue because that part of the MC does not appear to be on the pressure side. Well, I suppose it would be a safety issue if you let the car sit for a year and drove without noticing all the fluid had leaked out. (IMG:style_emoticons/default/unsure.gif) |
|
|
|
| bbrock |
Aug 13 2019, 05:35 PM
Post
#1180
|
|
914 Guru Group: Members Posts: 5,269 Joined: 17-February 17 From: Montana Member No.: 20,845 Region Association: Rocky Mountains |
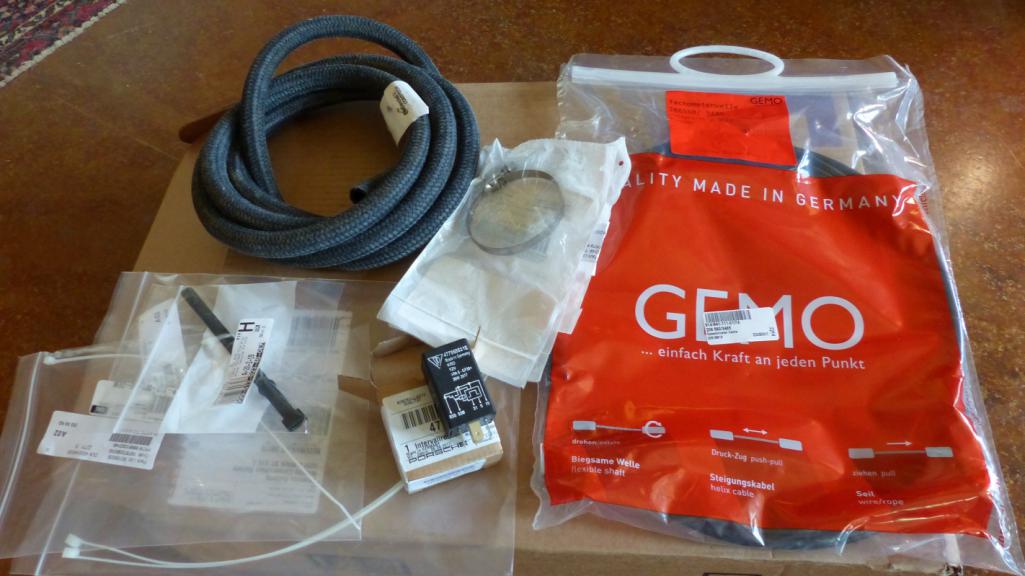
A Pelican dropped off a package today. Nothing exciting: OEM fuel vapor hose, intermittant wiper relay, cable management ties, OEM heat exchanger hose clamps... but check out that fancy little Gucci bag the GEMO speedo cable comes in. How posh is that!?
 |
|
|
|
|
1 User(s) are reading this topic (1 Guests and 0 Anonymous Users)
0 Members:

|
Lo-Fi Version | Time is now: 22nd April 2025 - 12:39 AM |
Invision Power Board
v9.1.4 © 2025 IPS, Inc.