|
|
|
Porsche, and the Porsche crest are registered trademarks of Dr. Ing. h.c. F. Porsche AG.
This site is not affiliated with Porsche in any way. Its only purpose is to provide an online forum for car enthusiasts. All other trademarks are property of their respective owners. |
|
|

  |

| Superhawk996 |
 Apr 23 2020, 05:08 AM Apr 23 2020, 05:08 AM
Post
#1561
|
|
914 Guru  Group: Members Posts: 6,968 Joined: 25-August 18 From: Woods of N. Idaho Member No.: 22,428 Region Association: Galt's Gulch |
Wow. That was quite a bit of work!
It's a good thing you left a bit of the origninal charcoal in there. That way the car stays original. (IMG:style_emoticons/default/biggrin.gif) Looks great and that is a great tutorial for how to refresh the early canisters. (IMG:style_emoticons/default/aktion035.gif) |
   |

 
|
| mb911 |
Apr 23 2020, 06:41 AM
Post
#1562
|
|
914 Guru Group: Members Posts: 7,544 Joined: 2-January 09 From: Burlington wi Member No.: 9,892 Region Association: Upper MidWest |
QUOTE(bbrock @ Apr 5 2020, 08:56 PM)  The pigtails on the sockets I bought were a tad too short so I had to splice on longer tails. I decided to hide the splices under the sockets. Pics of OEM Euro lights I've seen used white wire. The closes I had of the correct guage was white with yellow stripe. Close enough. I forgot to take a pic of the sockets soldered in place. My plan was to solder on the reflectors too and I'm embarrassed to say I didn't know you couldn't solder aluminum. Now I do. (IMG:style_emoticons/default/blush.gif) So out came the pop riveter and again, I forgot to snap a pic. Again in the interest of reversible mods, I crimped a piggyback connector to the pigtails so it becomes plug and play with no soldering. Here's the finished setup... almost. That isn't the correct bulb in there but it works for testing. You don't have to look hard to see these are homemade, but I'm not going to take the lenses off just so someone can make fun of me. If they ask me to, I'll call them a dick. Okay, after wrestling to get the wires hooked up and the boot on the back, the bucket is remounted with hardware for the first time in three decades. Just need to screw the lens on. A few light turns of the screw driver and... *tink* DOH! (IMG:style_emoticons/default/headbang.gif) Turns out that I got the back of these things just a scooch too high and snapped the lens right at the seam. It's not as bad as it looks. These are 914Rubber repros and I have the proper solvent to fuse them back together. I'm a little concerned at how little pressure it took to break them apart though and wonder how long the other lens will last. At any rate, I have some more filing to do but that's where I left things tonight. You can't win 'em all. (IMG:style_emoticons/default/beer3.gif) Mine broke just by handling them.. I then decided to buy NOS hella ones from 914sixer |
 |
|
| FlacaProductions |
Apr 23 2020, 11:17 AM
Post
#1563
|
|
Senior Member Group: Members Posts: 1,901 Joined: 24-November 17 From: LA Member No.: 21,628 Region Association: Southern California |
Interesting that your charcoal canister is crimped all the way around - Ian's YouTube video on refurbishing his canister shows a "removable" end:
https://www.youtube.com/watch?v=6C06XJgLhIc |
|
|
|
| bbrock |
Apr 23 2020, 11:30 AM
Post
#1564
|
|
914 Guru Group: Members Posts: 5,269 Joined: 17-February 17 From: Montana Member No.: 20,845 Region Association: Rocky Mountains |
QUOTE(FlacaProductions @ Apr 23 2020, 11:17 AM) Interesting that your charcoal canister is crimped all the way around - Ian's YouTube video on refurbishing his canister shows a "removable" end: https://www.youtube.com/watch?v=6C06XJgLhIc That is the late style (I think 75-76) plastic canister. Early in the vid I think he mentions that he bought that canister because the late style are refillable. The early canisters are all metal and crimped on both ends. They both work the same but I couldn't live with the horror of having a late style plastic canister in my nice 73. (IMG:style_emoticons/default/screwy.gif) |
|
|
|
| bbrock |
Apr 26 2020, 10:11 PM
Post
#1565
|
|
914 Guru Group: Members Posts: 5,269 Joined: 17-February 17 From: Montana Member No.: 20,845 Region Association: Rocky Mountains |
It's a Gas
Been working on the fuel tank. I posted this before, but my tank was shocking clean inside. I just gave it a short treatment with muriatic acid and then flushed it with a bit of gasoline to get any loose scale out. While we're looking at this, let's review why I don't think we should be so quick to dump the fuel return when converting to carbs. Notice that the supply drains from the center of the bowl inside the tank and the return refills the bowl.That means as the tank empties, the system continuously scavenges fuel from the tank and concentrates it in the reserve fuel bowl. That's how the system is able to use all the gas. Without the return, the supply would start sucking air before the tank is really empty. Something to think about... 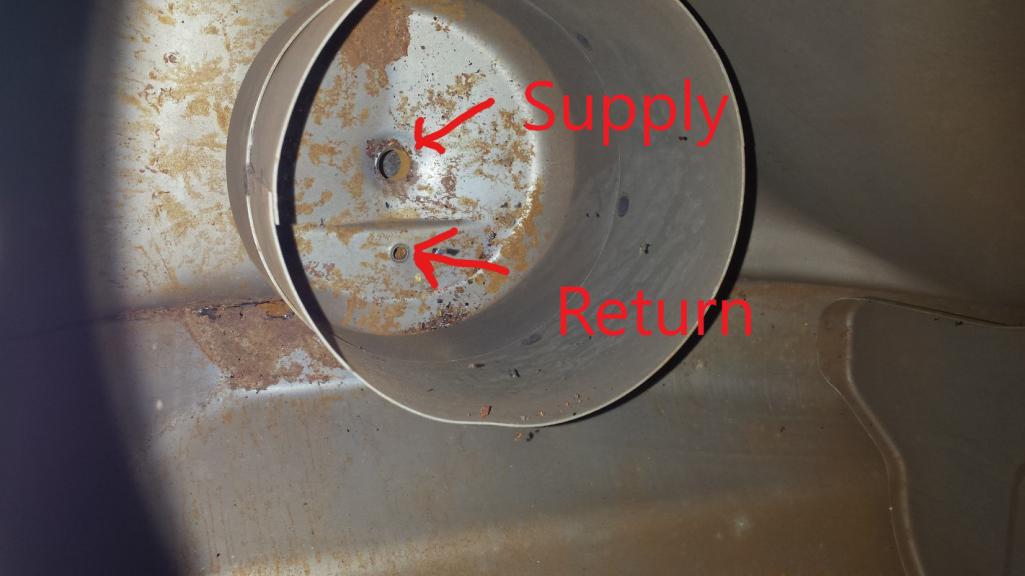 I didn't take any pics of the tank prep. I wound up media blasting everything to bare metal and painting with VHT epoxy paint. 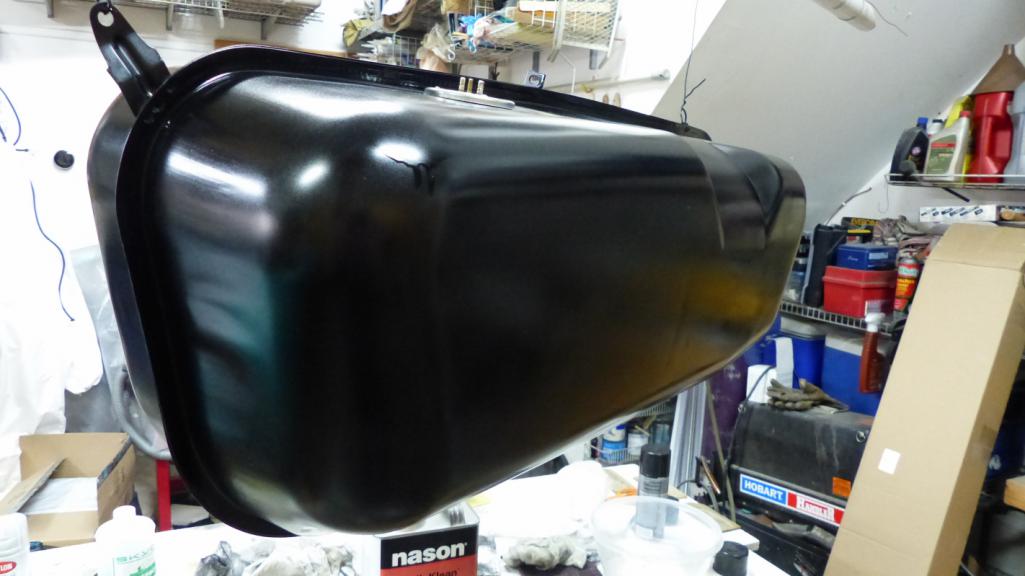 Installin this thing was a much bigger PITA than I expected. Tip: make sure to turn the wire hose clamps on the fresh air box to the side and tape the tank straps. Neglecting to do so will get you nice scratches down the backside of your freshly repainted tank. Ask me how I know. (IMG:style_emoticons/default/headbang.gif) 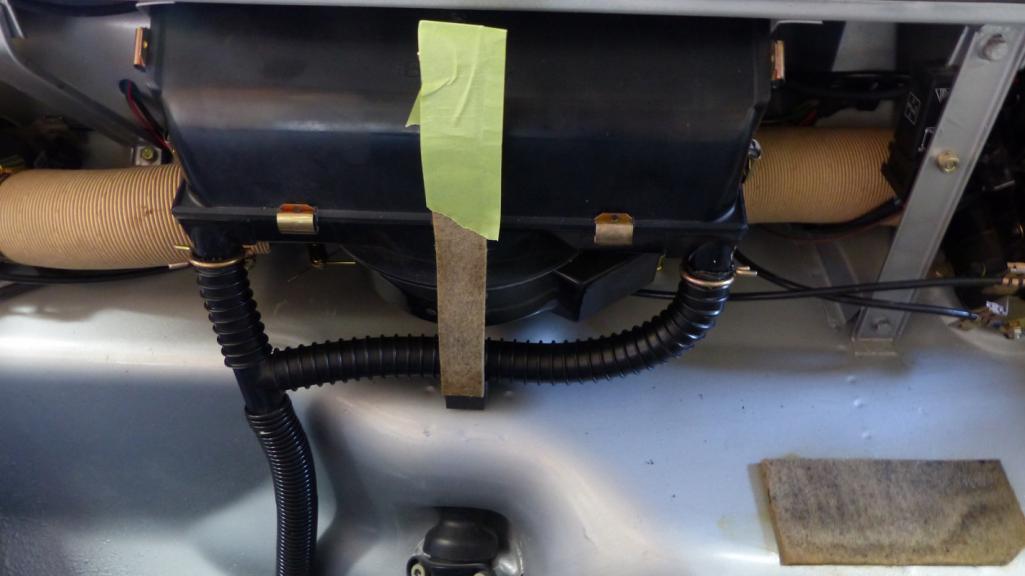 I know the felt pads under the tank are controversial but I don't like the idea of neoprene because I think it would trap moisture against the tank even worse than felt. So I had an idea. I don't know if this is a good idea or bad but I soaked the pads with fluid film anti-corrosion spray. It is just lanolin like what is in wool so I can't see that it will do any harm. Maybe a little extra protection where the tank rests on the pads. 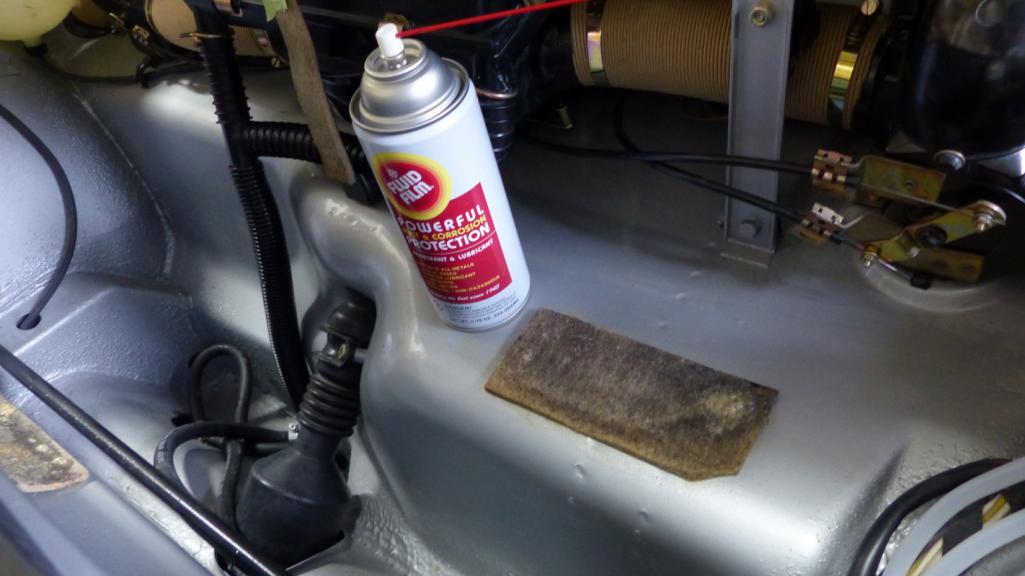 Another tip: Don't be a dumbass like me. Install the filler and expansion tank before putting the tank in. Giant PITA to install them afterward. I thought I'd spend an hour today putting the tank in and take the rest of the day off working on the car. Nope. Anyway, I finally got the bastard in. 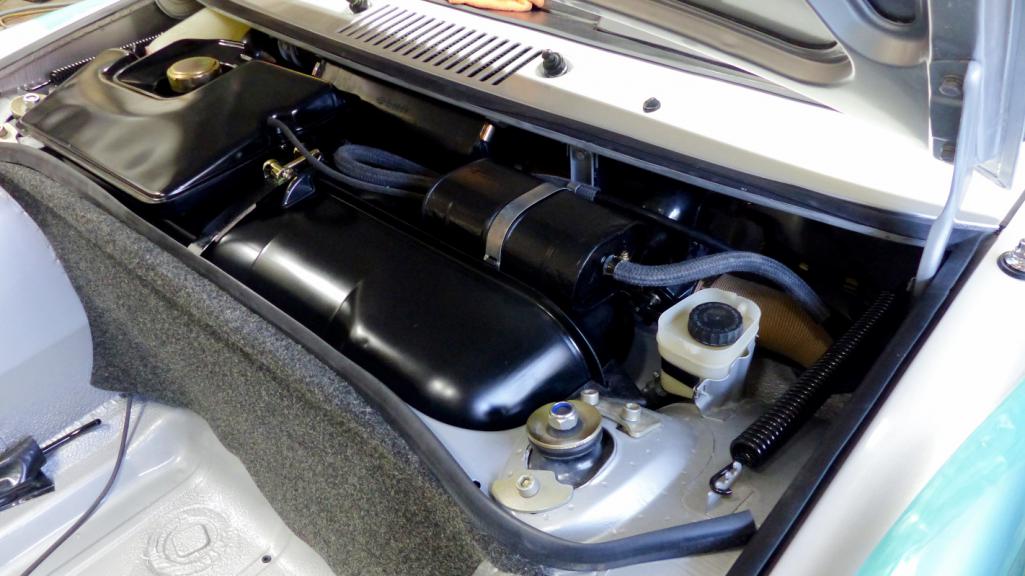 One last thing, @Superhawk996 and @914_7T3 very generously pitched in and bought me a set of decals for the car from Carbone. This included an expansion tank sticker. Actually two because their first attempt was quite far off the mark and Jeffrey had them try again. I don't want to look a gift horse in the mouth, but neither version is very close to the original. So I have three choices, the original sticker (lower right) which is showing its age but factory correct, or one of the two replicas that look new, but are not correct. Curious what you all would do? 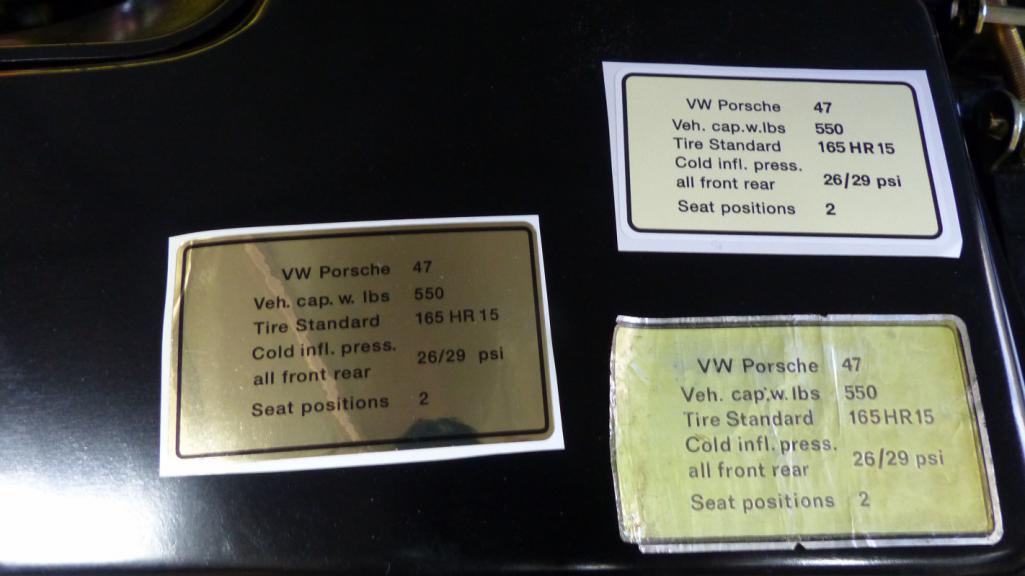 |
|
|
|
| KELTY360 |
Apr 26 2020, 11:23 PM
Post
#1566
|
|
914 Neferati Group: Members Posts: 5,121 Joined: 31-December 05 From: Pt. Townsend, WA Member No.: 5,344 Region Association: Pacific Northwest |
QUOTE(bbrock @ Apr 26 2020, 08:11 PM) It's a Gas One last thing, @Superhawk996 and @914_7T3 very generously pitched in and bought me a set of decals for the car from Carbone. This included an expansion tank sticker. Actually two because their first attempt was quite far off the mark and Jeffrey had them try again. I don't want to look a gift horse in the mouth, but neither version is very close to the original. So I have three choices, the original sticker (lower right) which is showing its age but factory correct, or one of the two replicas that look new, but are not correct. Curious what you all would do? That's a tough one. The repro above your old label is close, but it's not the same font, size, kerning or weight. Off by an RCH on all counts. I think I'd hold off installing that label and try to find the exact font. You can always install the repro later. I'll have a look through my font library to see if I can identify it. |
|
|
|
| Superhawk996 |
Apr 27 2020, 07:42 AM
Post
#1567
|
|
914 Guru Group: Members Posts: 6,968 Joined: 25-August 18 From: Woods of N. Idaho Member No.: 22,428 Region Association: Galt's Gulch |
@bbrock
Brent, what ever you decide is fine by me. (IMG:style_emoticons/default/happy11.gif) Sarcasm starts below: Given that this car started life as a weasel infested, rodent condominium 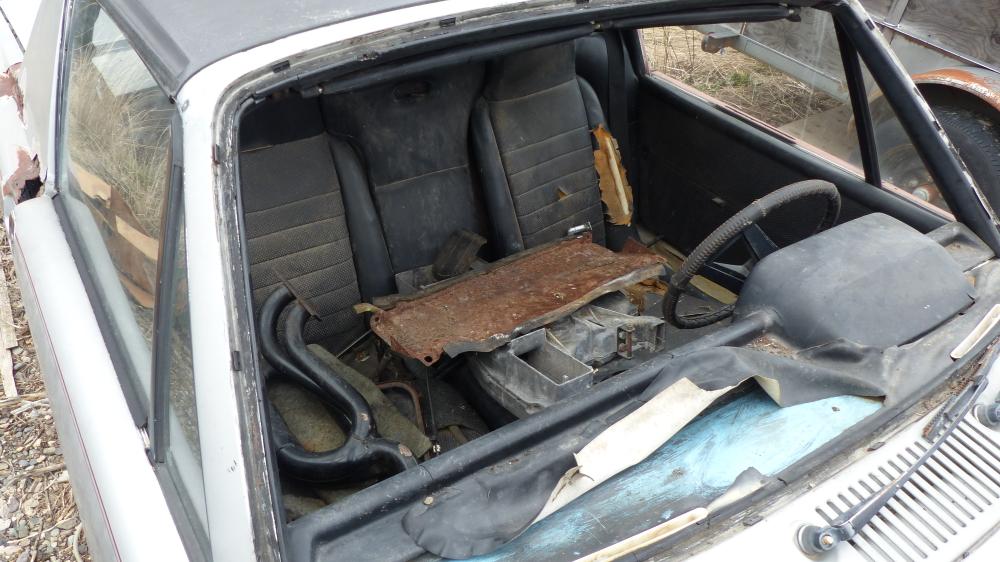 It seems to me like you ought to use the original sticker. I'm sure the mad scientist in you can figure out a way to reuse it. That sticker is largely complete and has a nice patina. So far your car is a 99 point restoration. However, that last point is going to be lost for lack of patina. Now, I'm sure you could rig up an array of heat lamps and UV lamps in the garage in order to impart a "fake" patina to the whole car and all the new paint in order to get that last point. But let's face it. That is lot of work. It would be a whole lot easier to just put a dab of contact cement on the back of the original sticker than try to "fake" the new Carbone sticker. (IMG:style_emoticons/default/lol-2.gif) Now you've created a real dilema for Jeffrey @914_7T3 . What is he supposed to do? (IMG:style_emoticons/default/shades.gif) He didn't get the opportunity to start with a weasel wagon! (IMG:style_emoticons/default/stirthepot.gif) (IMG:style_emoticons/default/av-943.gif) |
|
|
|
| bbrock |
Apr 27 2020, 07:59 AM
Post
#1568
|
|
914 Guru Group: Members Posts: 5,269 Joined: 17-February 17 From: Montana Member No.: 20,845 Region Association: Rocky Mountains |
Thanks Marc, Also, the original is printed on foil and it's a little hard to tell, but there is a silver foil border around the printing. The one to the left was the first that Jeffrey sent from Carbone and is on foil and the right size, but off on color and font.
My leaning is with Phil on re-using the original. I have cleaned the old adhesive off the back so it will lay smooth and just need to rubber cement it in place. I already did that with the octane sticker. (IMG:http://www.914world.com/bbs2/uploads/post-20845-1543040621_thumb.jpg) A pic of where this started. 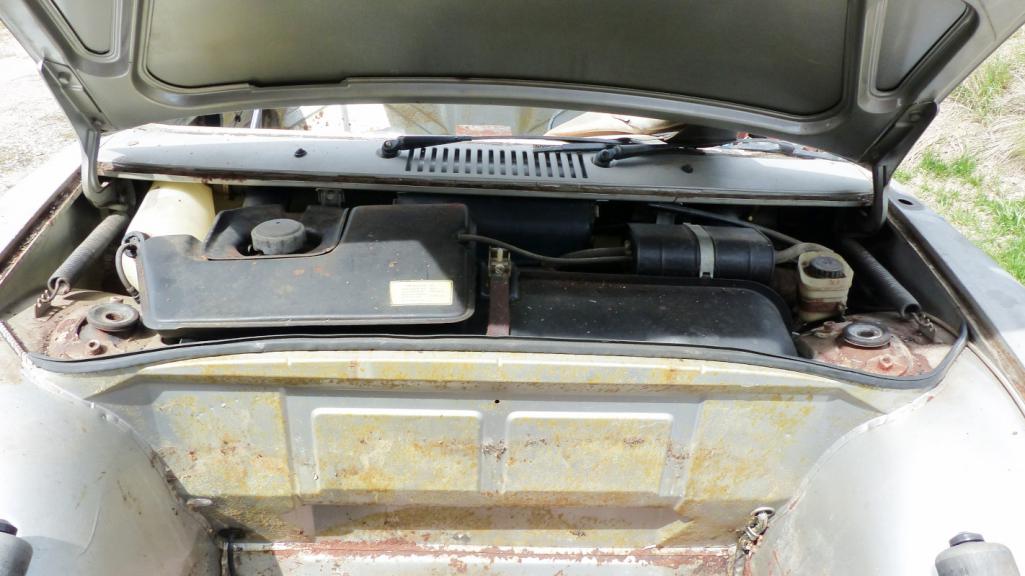 |
|
|
|
| Jamie |
Apr 27 2020, 09:27 AM
Post
#1569
|
|
Senior Member Group: Members Posts: 1,093 Joined: 13-October 04 From: Georgetown,KY Member No.: 2,939 Region Association: South East States |
QUOTE(bbrock @ Apr 26 2020, 08:11 PM) It's a Gas Been working on the fuel tank. I posted this before, but my tank was shocking clean inside. I just gave it a short treatment with muriatic acid and then flushed it with a bit of gasoline to get any loose scale out. While we're looking at this, let's review why I don't think we should be so quick to dump the fuel return when converting to carbs. Notice that the supply drains from the center of the bowl inside the tank and the return refills the bowl.That means as the tank empties, the system continuously scavenges fuel from the tank and concentrates it in the reserve fuel bowl. That's how the system is able to use all the gas. Without the return, the supply would start sucking air before the tank is really empty. Something to think about... I didn't take any pics of the tank prep. I wound up media blasting everything to bare metal and painting with VHT epoxy paint. Installin this thing was a much bigger PITA than I expected. Tip: make sure to turn the wire hose clamps on the fresh air box to the side and tape the tank straps. Neglecting to do so will get you nice scratches down the backside of your freshly repainted tank. Ask me how I know. (IMG:style_emoticons/default/headbang.gif) I know the felt pads under the tank are controversial but I don't like the idea of neoprene because I think it would trap moisture against the tank even worse than felt. So I had an idea. I don't know if this is a good idea or bad but I soaked the pads with fluid film anti-corrosion spray. It is just lanolin like what is in wool so I can't see that it will do any harm. Maybe a little extra protection where the tank rests on the pads. Another tip: Don't be a dumbass like me. Install the filler and expansion tank before putting the tank in. Giant PITA to install them afterward. I thought I'd spend an hour today putting the tank in and take the rest of the day off working on the car. Nope. Anyway, I finally got the bastard in. One last thing, @Superhawk996 and @914_7T3 very generously pitched in and bought me a set of decals for the car from Carbone. This included an expansion tank sticker. Actually two because their first attempt was quite far off the mark and Jeffrey had them try again. I don't want to look a gift horse in the mouth, but neither version is very close to the original. So I have three choices, the original sticker (lower right) which is showing its age but factory correct, or one of the two replicas that look new, but are not correct. Curious what you all would do? I had a real problem when I had the tank "professionally" cleaned and recoated. In the process they used the mounts for expansion tank and canister were removed, apparently soldered on as originally made. I also saturated my felt pads with good ol' WD 40, hoping to reduce amount of moisture retention and abrasion. |
|
|
|
| bbrock |
Apr 29 2020, 06:53 PM
Post
#1570
|
|
914 Guru Group: Members Posts: 5,269 Joined: 17-February 17 From: Montana Member No.: 20,845 Region Association: Rocky Mountains |
Quick one here for the dumbass files. I forgot to predrill for the threshold plates before painting the car, so YIPEEE I got to drill into new paint. As with all reassembly tasks, it got more involved than expected. I thought I could just use the plates as a template to mark the hole locations, drill them all out, and then install with the special plastic rivets. Not so easy. There is enough curve to the thresholds and stiffness to the plates that you can't just press them down to mark the drill holes accurately enough. Instead, I drilled the first hole and used a pop rivet to temporarily fasten the plate on. Then drilled a couple more holes. Then a few more pop rivets as needed to pull the plated down against the threshold until all the holes could be drilled accurately. Kind of nerve wracking because you have to worry about not ruining the new paint on the car, or the nice anodized finish on the plates. It's also not easy to center punch the hole locations with the plate in the way so fighing drill bit creep too. Not the worst job, but not fun.
Temporary attachment after all holes drilled. 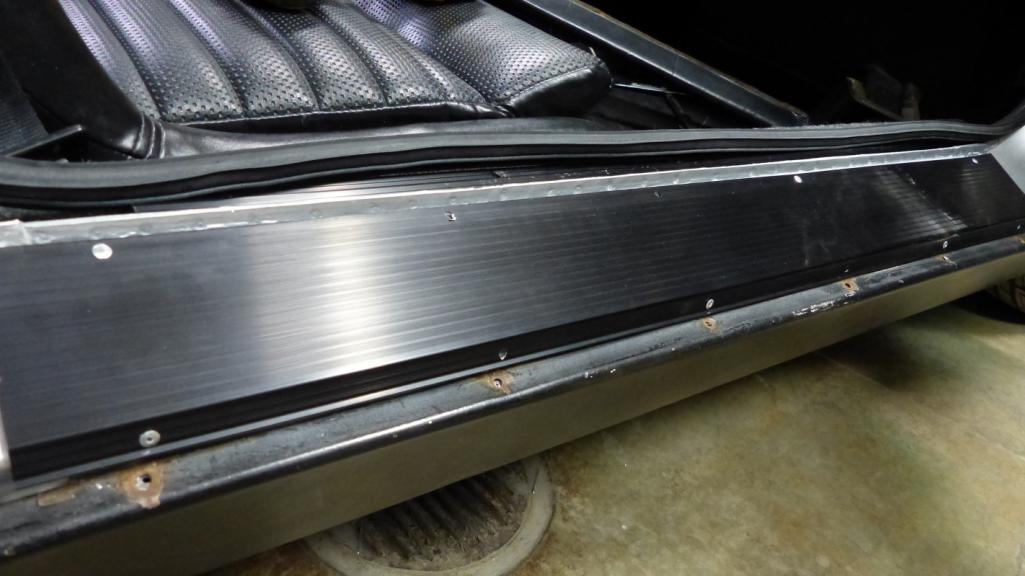 Then I got to drill out the pop rivets, dab the fresh holes with epoxy primer to seal them and install the plates with the correct plastic rivet fasteners. I'm skeptical those plastic fasteners will hold up over time but we'll see. If they start falling out, I'll replace with black aluminum pop rivets. Please ignore the ratty rocker covers. I'm also just now noticing the warble in the door seal. Will fix that pronto. 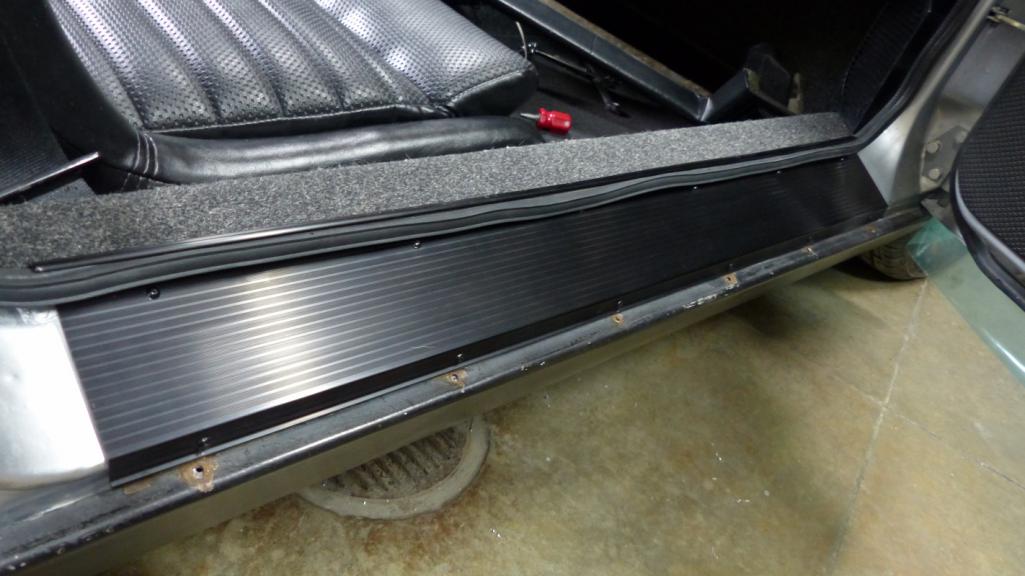 These 914Rubber plates are really nice repros and a nice upgrade to the warped plastic originals. I've noticed a couple small scuff marks on the weatherstrip trim strip just from getting in an out of the car so wondering about how thick the anodized coating it. Time will tell. |
|
|
|
| bbrock |
Apr 29 2020, 08:56 PM
Post
#1571
|
|
914 Guru Group: Members Posts: 5,269 Joined: 17-February 17 From: Montana Member No.: 20,845 Region Association: Rocky Mountains |
I Broke My Tit!!! (IMG:style_emoticons/default/yikes.gif)
I know some of you don't like the bumper tits on 73/74 cars but I think a nice set looks good on a lady. Besides, how else are aficionados to know I'm driving a a coveted model year? I pulled my bumpers out of the storage shed to start the resurrection. I knew those tits were going to fight me so three nights in a row I've soaked them down with penetrating oil and let them soak. Tonight I hit them with an impact wrench to try to break them loose quick without twisting anything off. Three nuts spun off like charms, but there's always that one little fucher. 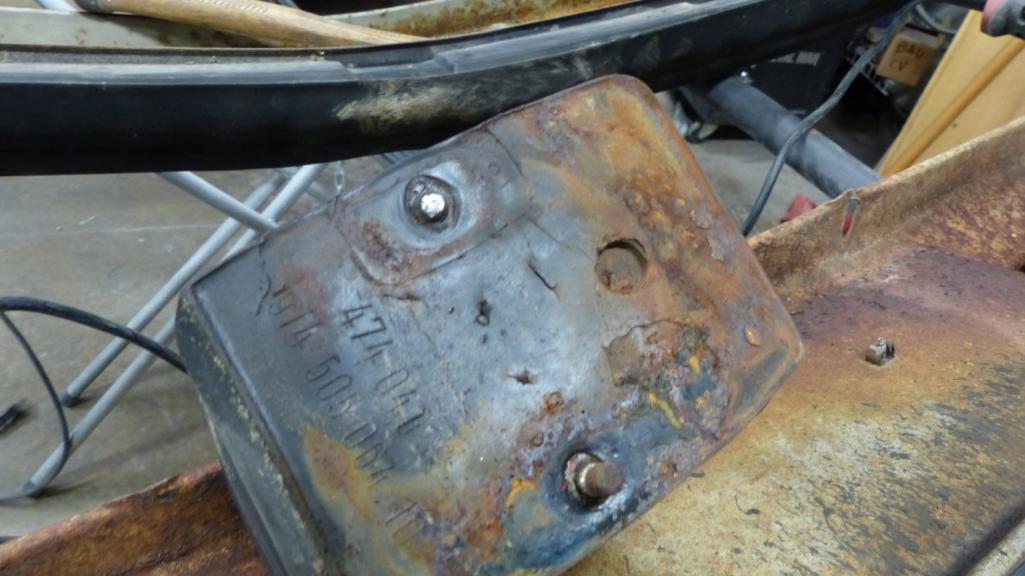 I'm not sure when the tits got used as a parking brake. Probably sometime in transit hauling this tub across the country. The broken tit is also mushed in. 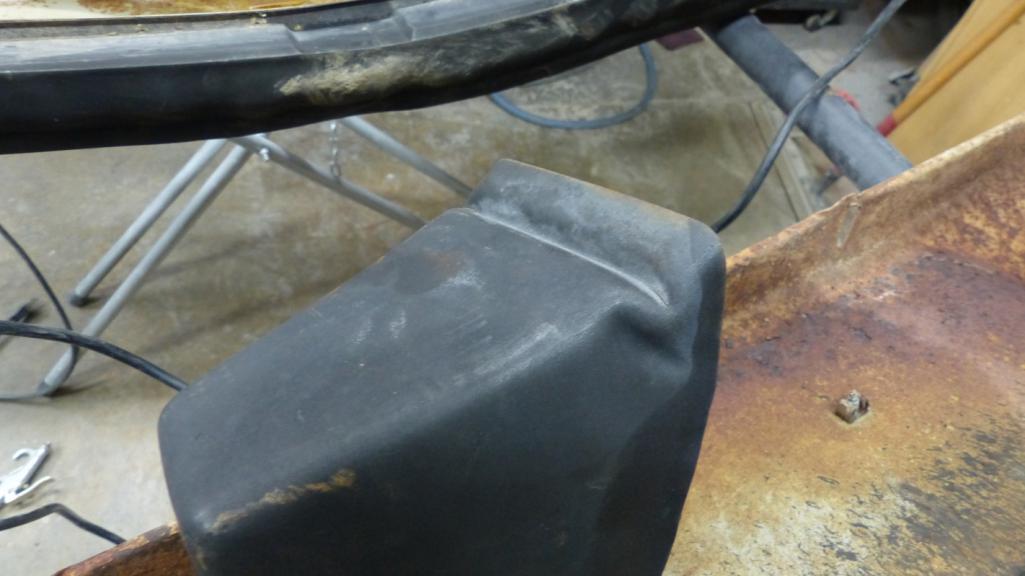 Anyone have suggestions on getting that boob to to pop back out? Figure I should see if it can be salvaged before even thinking about fixing the broken stud. Might as well show the general condition of the bumpers while I'm here. The rear is in pretty good shape. The front bumper looks like it's been to battle from the aforementioned parking brake service. Mostly pushed in at the tits but several other dents and dings to fix. 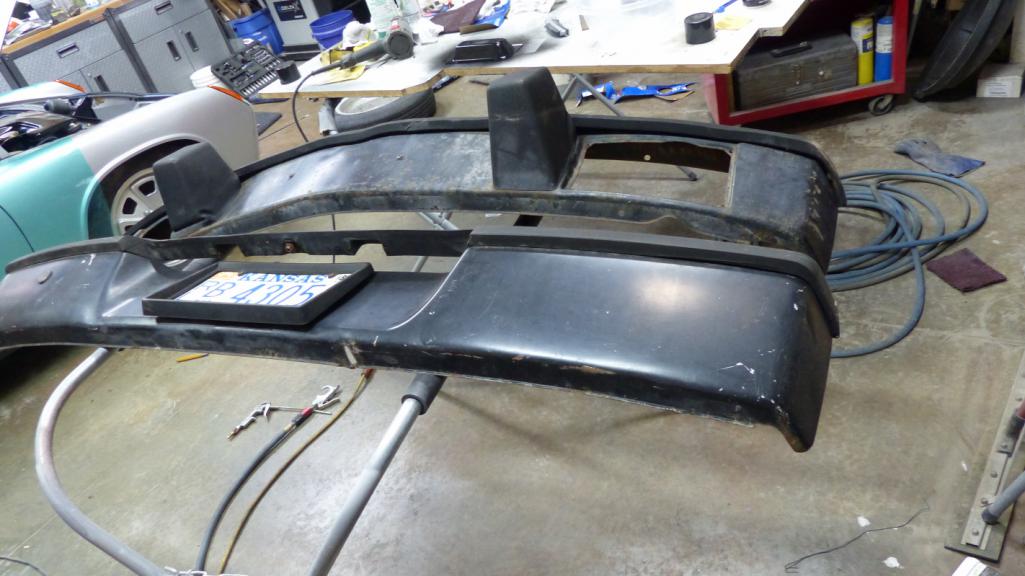 Just a couple things to fix on the rear. A mystery tear under the lower edge (crowbar?). 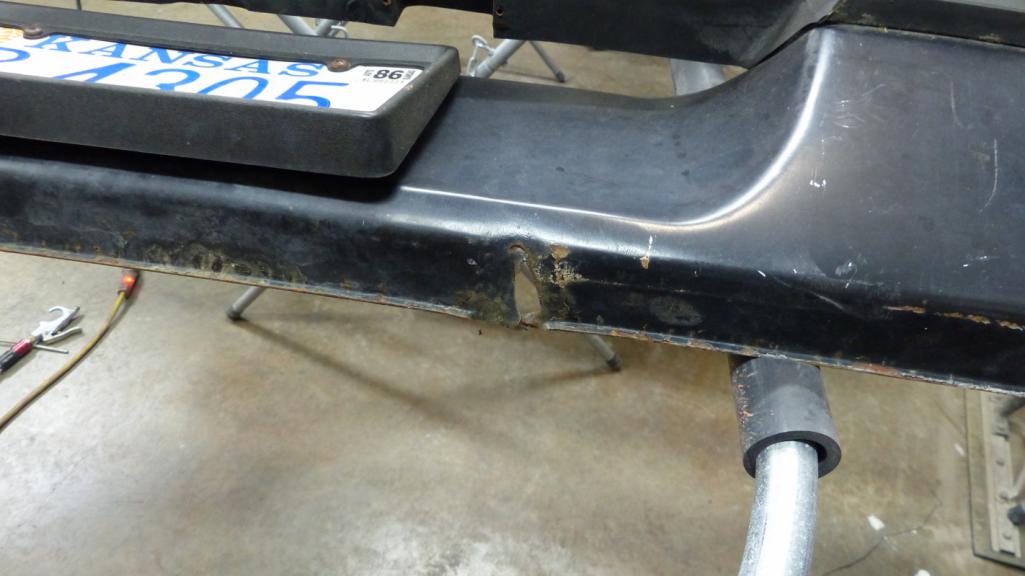 and a ding in the corner. 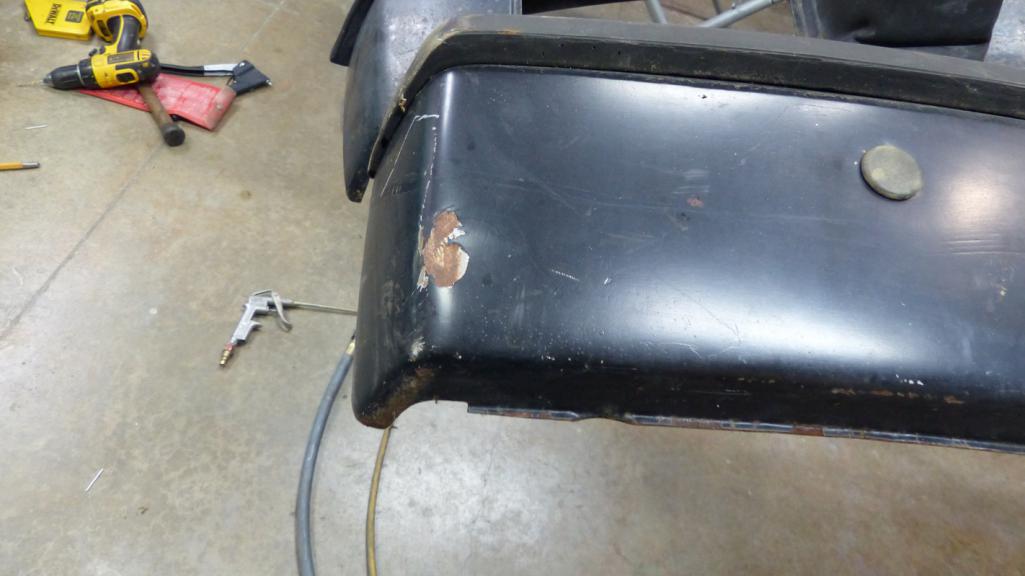 I've never tried to straighten a bumper before so not sure what I'm up against. Check out this vintage tag documenting the last time this crate was on the road. 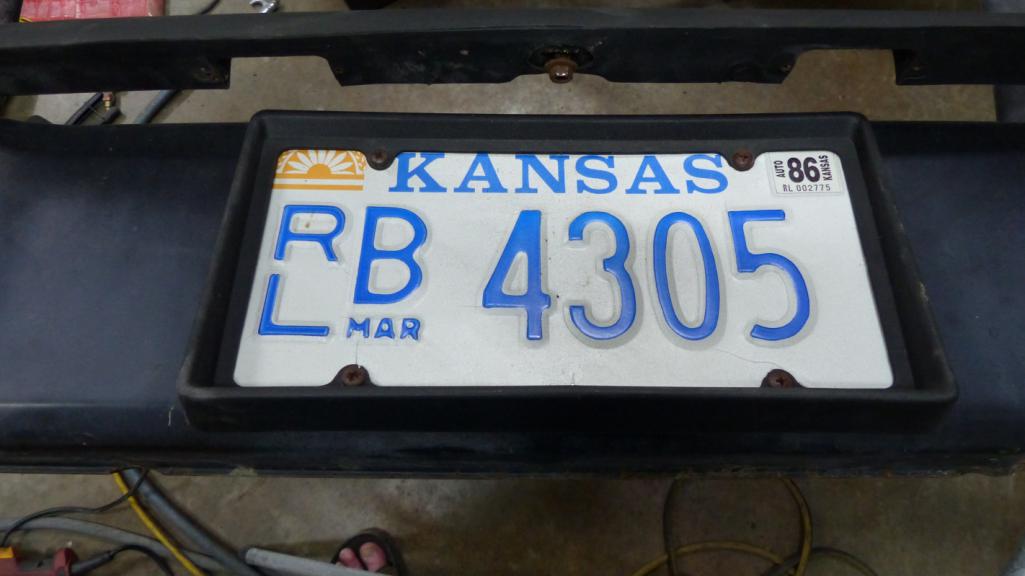 The bumper tops look salvageable. The rear just needs a clean and probably paint. The front looks like a pecker that's been slammed in a car door. I think that's because the bumper is bent so hoping it will straighten out. There is also a tear that was there when I got the car. I have a link bookmarked to an awesome repair a member did so I'll be digging that up. 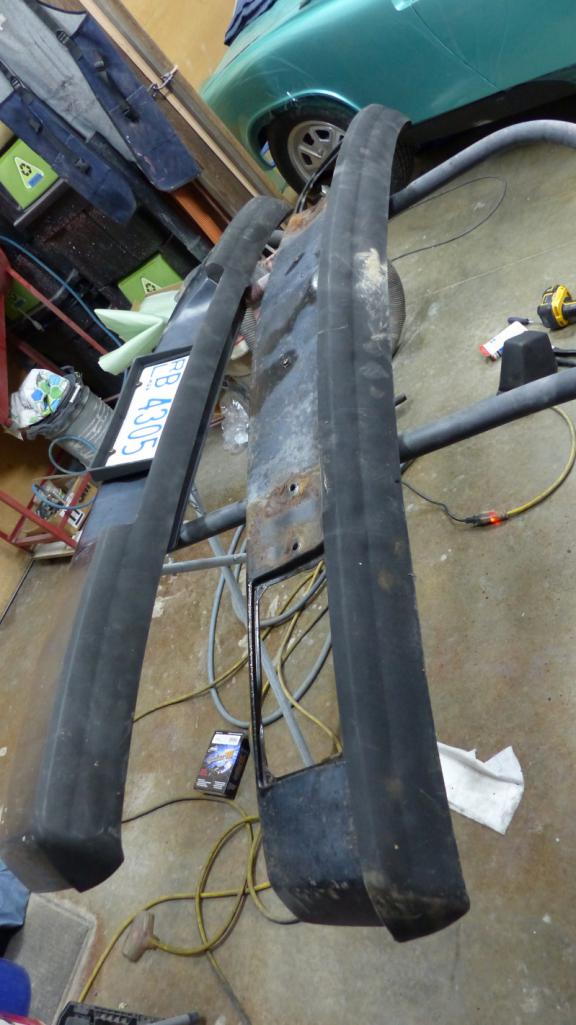 So that's a preview of what's ahead. |
|
|
|
| 914_7T3 |
Apr 29 2020, 09:39 PM
Post
#1572
|
|
Please forgive me, I'm new to all of this! Group: Members Posts: 1,875 Joined: 3-April 17 From: Los Angeles, CA Member No.: 20,991 Region Association: Southern California |
QUOTE(bbrock @ Apr 29 2020, 07:56 PM) So that's a preview of what's ahead. The great work continues and love the progress! As for the expansion tank decal, I'd run the original if I were you to make up for the lack of originality of your charcoal. (IMG:style_emoticons/default/smile.gif) If I didn't know better, I would have thought that your paint protection film is your solution for changing the paint color to either Marathon Blue or Ice Green Metallic (IMG:style_emoticons/default/lol-2.gif) |
|
|
|
| bbrock |
May 3 2020, 09:40 AM
Post
#1573
|
|
914 Guru Group: Members Posts: 5,269 Joined: 17-February 17 From: Montana Member No.: 20,845 Region Association: Rocky Mountains |
Jeffrey's Can of Worms
The last few days have been Ground Hog Day and it all started when @914_73 posted a thread about plugging a hole in the dash vinyl. I pointed that according to Dr. Johnson's restoration guide, his rear window defrost switch was in the wrong place. Jeffrey countered by saying the restoration guide was wrong and produced what I suspect was a doctored photo from the owner's manual proving his position on the position. Most impressive is that he somehow managed to doctor my personal copy of the manual (IMG:style_emoticons/default/happy11.gif) That sealed it and I ordered a new roll of basket weave vinyl from 914Rubber. I'll admit the defrost switch location tucked under the steering wheel was awkward and looked awkward too. Makes much more sense to have it out to the right of the cigarrette ligher. So the old new vinyl was stripped out but it is never as simple as that right? 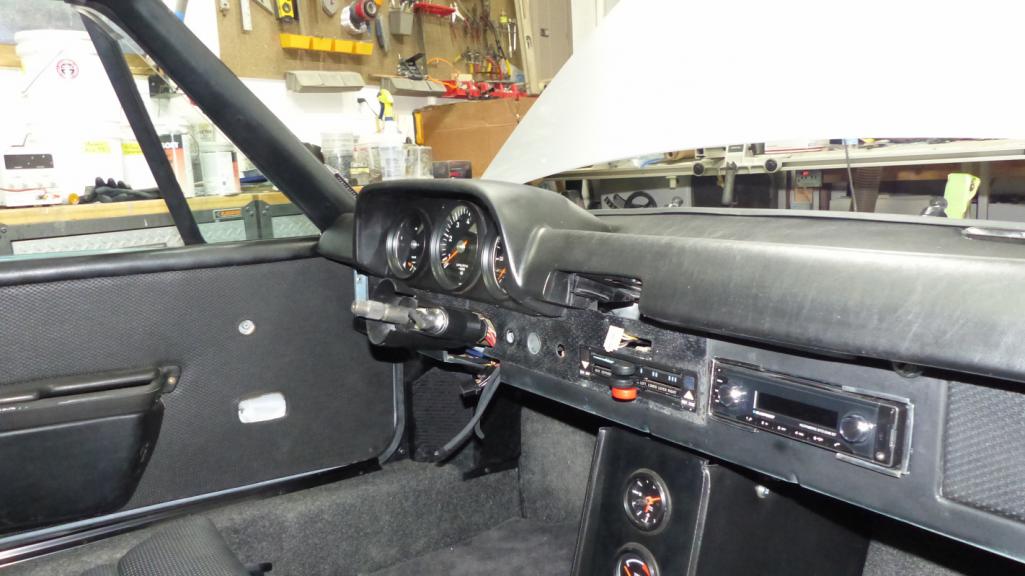 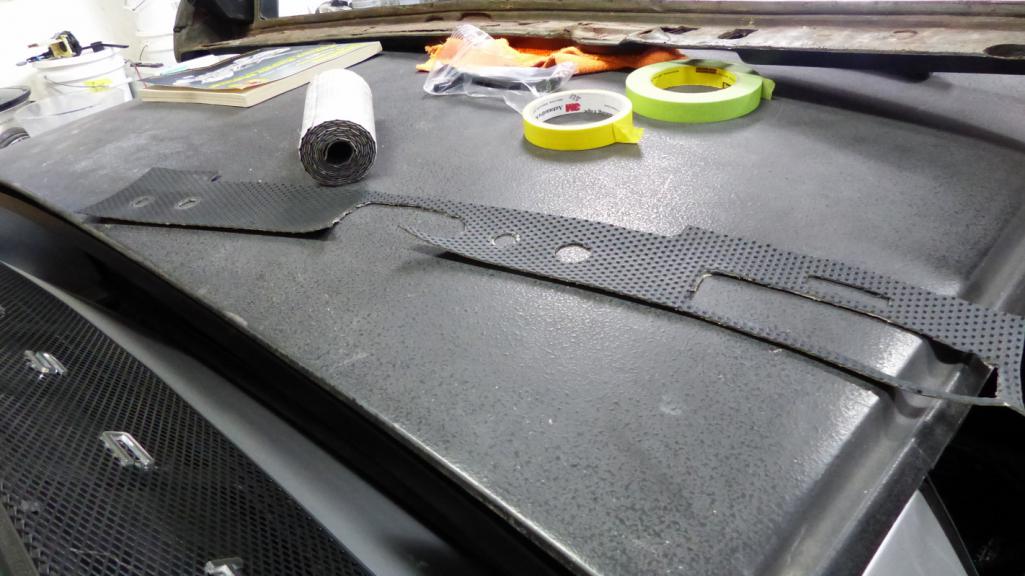 If assembling a 914 from scratch is fun, doing it four or five times is even more fun, right? (IMG:style_emoticons/default/blink.gif) So while I was there... My vent control panel was not sitting as flush to the dash face as i thought it should, so I took the opportunity to readjust. Sure enough, I was able to get it to nestle into the opening better. This pushed the control unit back about 1/8" which put compression pressure on the control cables. Well... that meant THOSE needed to be readjusted. But wait, you can't access them with the fuel tank in place so THAT came out again for the nth time. 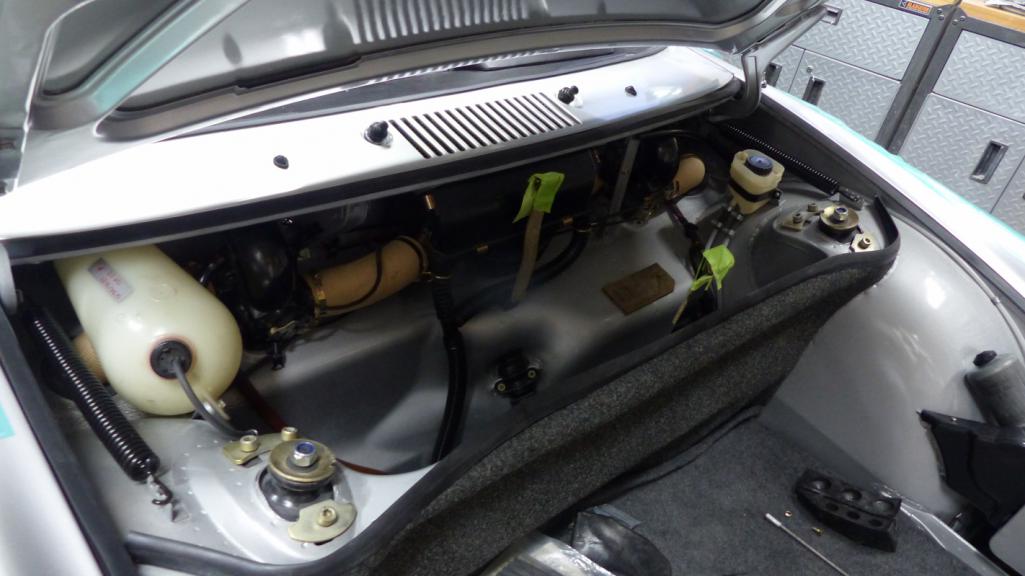 This do over gave me a chance to fix something else that was bugging me. My knee pad is missing (or maybe never had) the bright trim strip between the pad and dash face. The left the raw edge of the vinyl showing in spots where the pad meets the dash. This time, I ran the vinyl about 1/4" long on the bottom so it runs under the knee pad. I like the look without bright trim but does anyone know if all cars came with it? Oh, and the defrost is not in its correct location. (IMG:style_emoticons/default/rolleyes.gif) 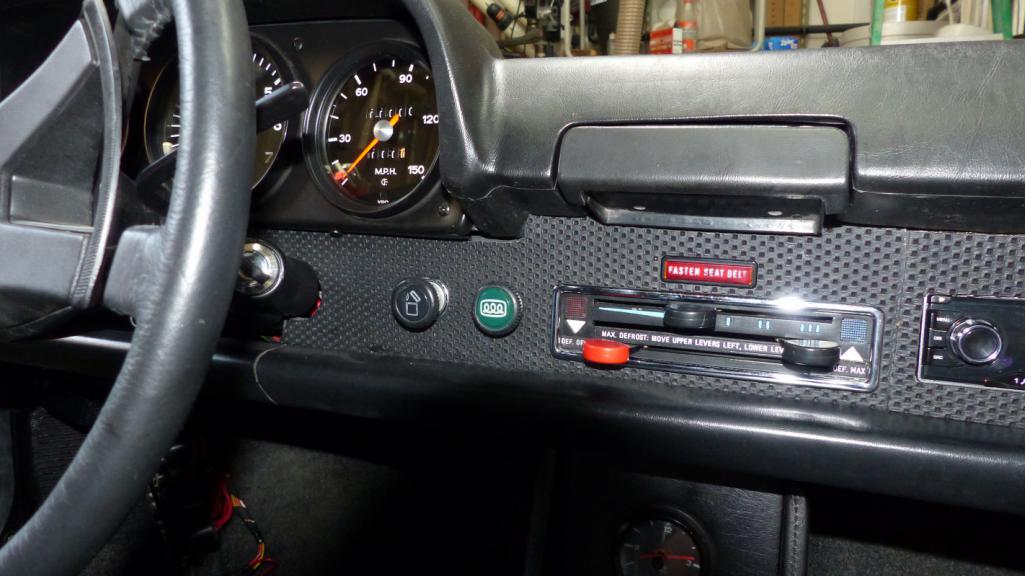 And the gas tank buttoned up again. It was unanimous on re-using the original decal so there it is.  It was work, but thanks to Jeffrey, my Marathon(ish) car is in better shape. The interior is close to being permanently buttoned up. 914Rubber did not send a replacement for the missing nylon dash top stud which is frustrating. I'm waiting for some nylon M8 bolts to arrive from ebay before I can install it followed by final install of the radio. The only things after that are needing the subwoofer box we are being promised from 914Rubber and a couple more bonus projects I've been contemplating. (IMG:style_emoticons/default/beerchug.gif) |
|
|
|
| KELTY360 |
May 3 2020, 10:43 AM
Post
#1574
|
|
914 Neferati Group: Members Posts: 5,121 Joined: 31-December 05 From: Pt. Townsend, WA Member No.: 5,344 Region Association: Pacific Northwest |
Hey Brent, I have a nice right tit you can have for: 1) the cost of shipping, and 2) due consideration of painting those bumpers body color instead of black. Not saying you have to actually decide on that change, just give it due consideration. IMO, black bumpers were a styling setback for cost considerations. The black makes the front and rear ends kind of disappear where the body color bumpers give shape and definition to the ends. It also gives an old school look to the car. In my observation, the lighter colors, like your silver, provide the biggest benefit.
Good call on the tank decal; if anybody gives you a hard time about it, just call them a dick. (IMG:style_emoticons/default/happy11.gif) |
|
|
|
| bbrock |
May 3 2020, 05:13 PM
Post
#1575
|
|
914 Guru Group: Members Posts: 5,269 Joined: 17-February 17 From: Montana Member No.: 20,845 Region Association: Rocky Mountains |
QUOTE(KELTY360 @ May 3 2020, 10:43 AM) Hey Brent, I have a nice right tit you can have for: 1) the cost of shipping, and 2) due consideration of painting those bumpers body color instead of black. Not saying you have to actually decide on that change, just give it due consideration. IMO, black bumpers were a styling setback for cost considerations. The black makes the front and rear ends kind of disappear where the body color bumpers give shape and definition to the ends. It also gives an old school look to the car. In my observation, the lighter colors, like your silver, provide the biggest benefit. Good call on the tank decal; if anybody gives you a hard time about it, just call them a dick. (IMG:style_emoticons/default/happy11.gif) Thanks Marc! I'd be honored to display your lovely tit on the front of my car! I'll PM you. I think we talked about the body colored bumpers when you were here. I actually like the black bumper look and even like it better than chrome. I like body painted bumpers too but will stick with how mine was born I think. Also, with all the respraying I had to do, I don't think I have enough paint left to do the bumpers in body color if I wanted and that stuff was expensive as hell. Okay, it's official. The fuel tank sticker comment policy is effective immediately. (IMG:style_emoticons/default/happy11.gif) |
|
|
|
| raynekat |
May 4 2020, 01:41 AM
Post
#1576
|
|
Advanced Member Group: Members Posts: 2,169 Joined: 30-December 14 From: Coeur d'Alene, Idaho Member No.: 18,263 Region Association: Pacific Northwest |
Oh Brent......I just noticed something you missed.
It WILL require removing the fuel tank again. But you're a pro at that by now I'll bet. There's a "special" decal that goes on the bottom of the tank....it says "you're at the bottom now." (IMG:style_emoticons/default/blink.gif) (IMG:style_emoticons/default/lol-2.gif) (IMG:style_emoticons/default/av-943.gif) (IMG:style_emoticons/default/bye1.gif) Looking good as always up there in Montana land. |
|
|
|
| bbrock |
May 4 2020, 01:14 PM
Post
#1577
|
|
914 Guru Group: Members Posts: 5,269 Joined: 17-February 17 From: Montana Member No.: 20,845 Region Association: Rocky Mountains |
QUOTE(raynekat @ May 4 2020, 01:41 AM) Oh Brent......I just noticed something you missed. It WILL require removing the fuel tank again. But you're a pro at that by now I'll bet. There's a "special" decal that goes on the bottom of the tank....it says "you're at the bottom now." (IMG:style_emoticons/default/blink.gif) (IMG:style_emoticons/default/lol-2.gif) (IMG:style_emoticons/default/av-943.gif) (IMG:style_emoticons/default/bye1.gif) Looking good as always up there in Montana land. You are pushing the line there Mr.! (IMG:style_emoticons/default/av-943.gif) |
|
|
|
| bbrock |
May 5 2020, 06:40 PM
Post
#1578
|
|
914 Guru Group: Members Posts: 5,269 Joined: 17-February 17 From: Montana Member No.: 20,845 Region Association: Rocky Mountains |
The bumper project is on hold because I'm out of blasting media and so is my only local source (other than HF which is surprisingly proud of their media). Turning my attention to some smaller projects that have needed attention. First up was fixing this cracked relay cover.
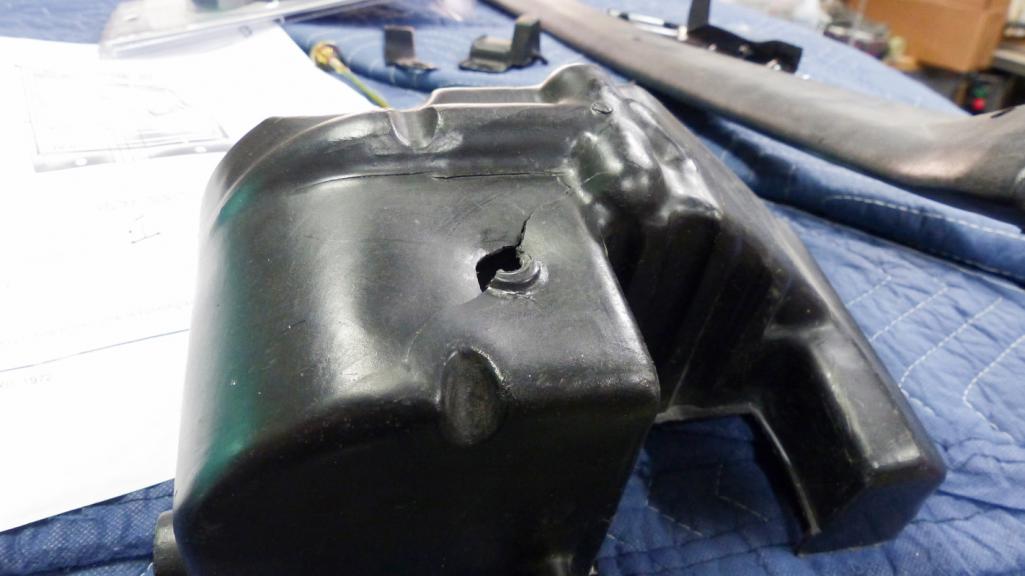 To try to keep this from happening again, I reinforced the top hole by gluing in a disc of ABS plastic. 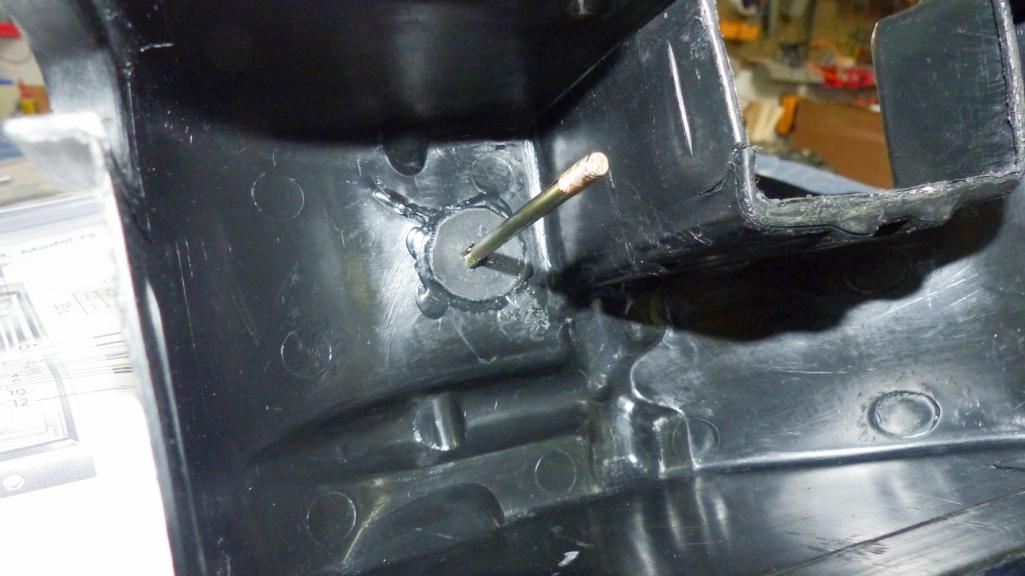 Th patch was the same drill as with the rain tray using a cut off piece of zip tie as filler only this time I used an old small soldering iron to melt the plastic because I'm still too cheap to by a plastic welding kit. Someone with more skill and patience, and maybe the right tools, could make this repair invisible. For some reason, I'm not in the mood to dick around with a part that gets buried in the engine bay so I'm calling this close enough. I probably don't need to remind anyone of the penalty for comment. (IMG:style_emoticons/default/dry.gif) 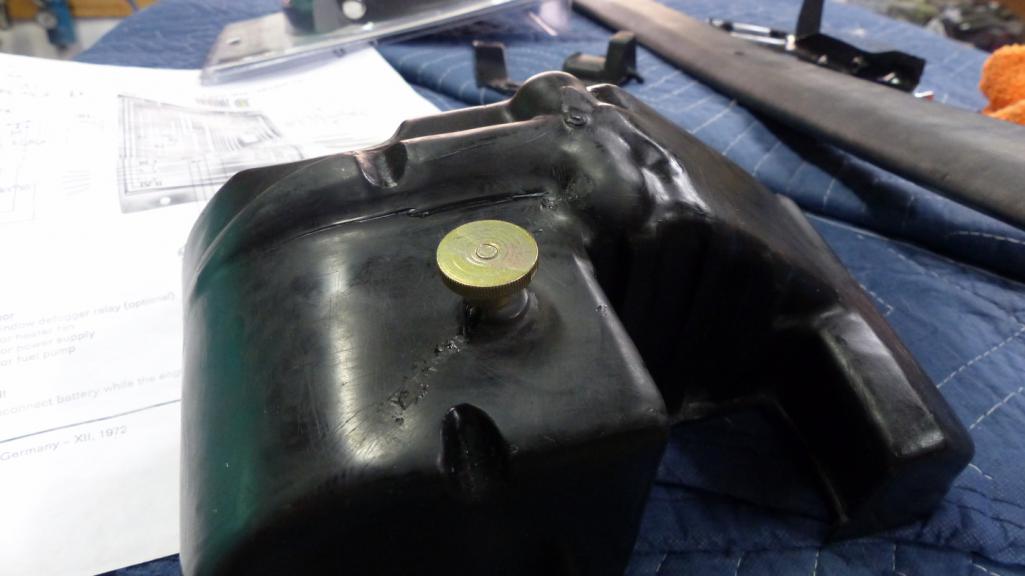 And nestled in place. That's 30 bucks saved. (IMG:style_emoticons/default/beer3.gif) 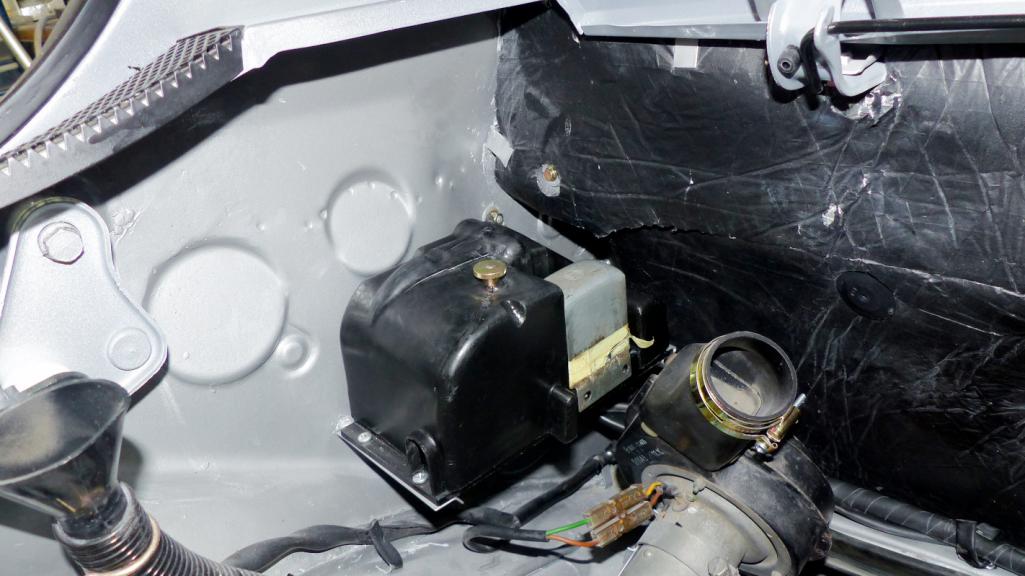 |
|
|
|
| raynekat |
May 5 2020, 09:46 PM
Post
#1579
|
|
Advanced Member Group: Members Posts: 2,169 Joined: 30-December 14 From: Coeur d'Alene, Idaho Member No.: 18,263 Region Association: Pacific Northwest |
That 30 bucks will buy you some beers my friend. (IMG:style_emoticons/default/wink.gif)
|
|
|
|
| Dion |
May 6 2020, 06:37 PM
Post
#1580
|
|
RN Group: Members Posts: 2,839 Joined: 16-September 04 From: Audubon,PA Member No.: 2,766 Region Association: MidAtlantic Region |
Ha! That’s the month & year I purchased mine!
Yours was being parked, mine was just beginning it’s journey with me (IMG:style_emoticons/default/beerchug.gif) Great progress as always Brent. Attached image(s) 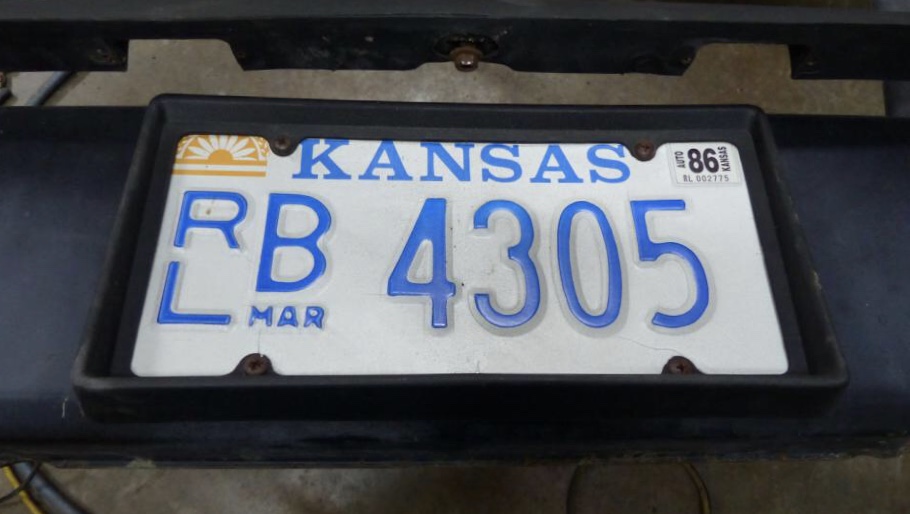
|
|
|
|
|
2 User(s) are reading this topic (2 Guests and 0 Anonymous Users)
0 Members:

|
Lo-Fi Version | Time is now: 20th April 2025 - 09:33 PM |
Invision Power Board
v9.1.4 © 2025 IPS, Inc.