|
|
|
Porsche, and the Porsche crest are registered trademarks of Dr. Ing. h.c. F. Porsche AG.
This site is not affiliated with Porsche in any way. Its only purpose is to provide an online forum for car enthusiasts. All other trademarks are property of their respective owners. |
|
|

  |

| 930cabman |
 Jan 2 2021, 03:55 PM Jan 2 2021, 03:55 PM
Post
#1801
|
|
Advanced Member  Group: Members Posts: 4,044 Joined: 12-November 20 From: Buffalo Member No.: 24,877 Region Association: North East States |
QUOTE(Superhawk996 @ Jan 2 2021, 02:56 PM)  Nice job with the cupholder. Always fascinated by the creativity Brent! (IMG:style_emoticons/default/aktion035.gif) Now about those gaps . . . I think the 1970's era fit and finish (i.e. crappy gaps) is all part of the 914 charm. (IMG:style_emoticons/default/shades.gif) We'll see how much I still feel that way when I get around to putting my interior back together. (IMG:style_emoticons/default/lol-2.gif) How did we live before cup holders? kinda like TV before remote |
   |

 
|
| bbrock |
Jan 2 2021, 05:55 PM
Post
#1802
|
|
914 Guru Group: Members Posts: 5,269 Joined: 17-February 17 From: Montana Member No.: 20,845 Region Association: Rocky Mountains |
QUOTE(930cabman @ Jan 2 2021, 02:55 PM) QUOTE(Superhawk996 @ Jan 2 2021, 02:56 PM) Nice job with the cupholder. Always fascinated by the creativity Brent! (IMG:style_emoticons/default/aktion035.gif) Now about those gaps . . . I think the 1970's era fit and finish (i.e. crappy gaps) is all part of the 914 charm. (IMG:style_emoticons/default/shades.gif) We'll see how much I still feel that way when I get around to putting my interior back together. (IMG:style_emoticons/default/lol-2.gif) How did we live before cup holders? kinda like TV before remote I don't smoke, but I do drink (IMG:style_emoticons/default/beer.gif) As for the gaps, I'm not the only one who has found a wonky gap around the ashtray with the 914Rubber dash top. The gaps with the same ash tray in my original dash before swapping looked good. The repro dash also lifts slightly over the side vents compared to the original. The 914Rubber dash is a good reproduction though and looks nicer than the cracked original. Overall, I'm actually pretty impressed with the fit and finish of these cars considering the era they were built and the market they were built for. |
|
|
|
| 76-914 |
Jan 2 2021, 06:55 PM
Post
#1803
|
|
Repeat Offender & Resident Subaru Antagonist Group: Members Posts: 13,698 Joined: 23-January 09 From: Temecula, CA Member No.: 9,964 Region Association: Southern California |
One of the cooler mods I've seen for the 914, Brett. Speaking of modifications:Proceed with caution. It's a slippery slope and you never know where that will lead you. All I did was to install an Alpine stereo in my '76 and look where that led me.
 |
|
|
|
| raynekat |
Jan 2 2021, 10:07 PM
Post
#1804
|
|
Advanced Member Group: Members Posts: 2,169 Joined: 30-December 14 From: Coeur d'Alene, Idaho Member No.: 18,263 Region Association: Pacific Northwest |
QUOTE(76-914 @ Jan 2 2021, 04:55 PM) One of the cooler mods I've seen for the 914, Brett. Speaking of modifications:Proceed with caution. It's a slippery slope and you never know where that will lead you. All I did was to install an Alpine stereo in my '76 and look where that led me. Brent is definitely in big trouble then.... |
|
|
|
| bbrock |
Jan 3 2021, 09:34 PM
Post
#1805
|
|
914 Guru Group: Members Posts: 5,269 Joined: 17-February 17 From: Montana Member No.: 20,845 Region Association: Rocky Mountains |
Adventures With Cup Holders
I thought there might be interest in my little cup holder so here are the painful details. Finding the right cup holder The cup holder I used was from an Audi A4 Quattro. I'm not sure what year but I think an early to mid-2000s model. The P/N on the cup holder is 4B0862634D. I confess that I found this by dumb luck. I went to the local pick-and-pull mainly on the hunt for a cup holder from a Subaru Forester because it looked promising from Internet searches. It's rare to come up with dimensions on these things though so I wound up search through every single vehicle in the salvage yard (it isn't a big yard) and found two cup holders worth pulling and paid $5 each for them. One was from the Audi and the other from a Forester (more on that one later). Later, I learned that the limitation is usually depth. The 914 dash pretty shallow by modern car standards and has only about 165 mm depth from the ash tray face to the bulkhead. Most cassette style couple holders appear to be about 185 mm deep so they won't work. Another problem is the angle the ashtray mounts so it slopes to the bottom. Cup holders that pull straight out will end up at a funky slant. Maybe not a deal killer but awkward and not very Feng Shui. The Audi cup holder checked off two boxes by being small enough to fit within the footprint of the stock ashtray and also has a cool spring loaded slider mechanism that pops out and then tilts down so winds up close to level mounted in the 914 ash tray opening. Again, it was simply dumb luck that I found this device in our tiny little salvage yard. Here's an ebay pic of the unit I got. Mine was missing the decorative face plate. More on that later. The dimension are 3-3/8W x 5-1/2D x 3/4T (IMG:http://www.914world.com/bbs2/uploads_offsite/i.ebayimg.com-20845-1609731240.1.jpg) Mounting the Cassette The original plan was to just fab a custom bracket to screw in in place of the ash tray hanger but the small footprint of the Audi cassette opened the possibility of a plug-and-play solution. A couple years ago I bought an extra ashtray from @bandjoey with this project in mind and knowing an ashtray would probably be sacrificed in the process. The only real challenge is that the ashtray is curved to sweep up at an angle and wind up close to level in the open position. The cup holder cassette, of course, is straight. The solution was to cut the top, front and bottom out of the ashtray to leave just the two sides as rails and the back to hold them together. A new cross piece across the top of the front was fabricated. 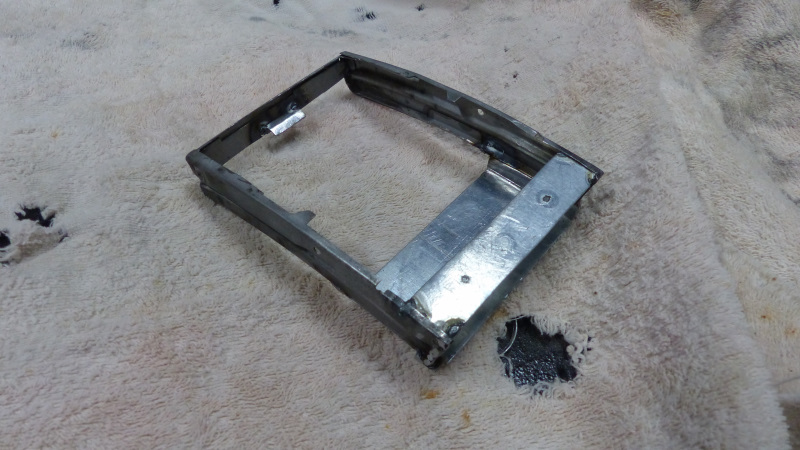 Then I tacked in a spacer on the front to hold the installed cassette in the right position. When installed, the cassette will rest on the dash face opening for the ash tray. The spacer holds it down so it doesn't pop up. 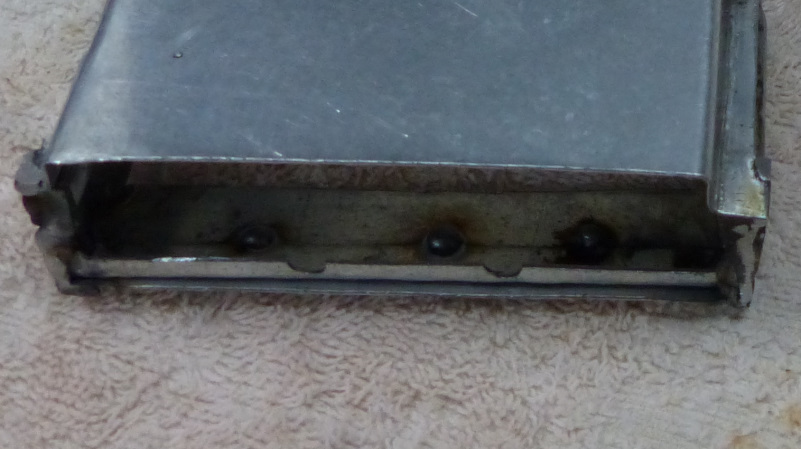 I added a little tab at the rear to support the cassette when installed. 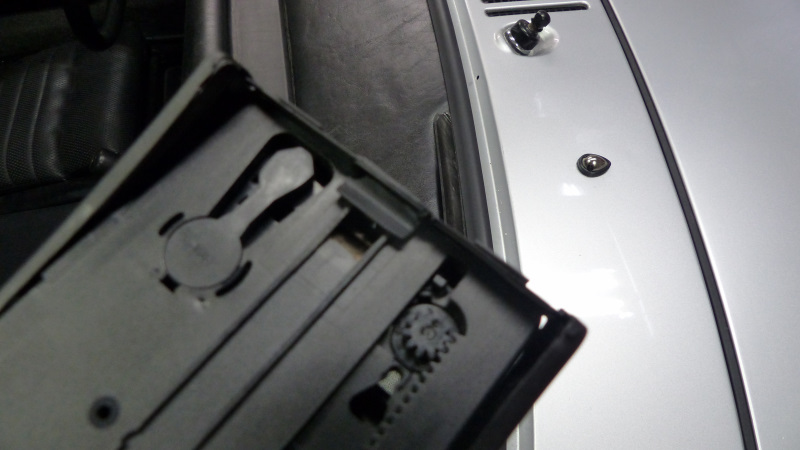 When the cassette slides into place the rear will be higher than the carrier like this. 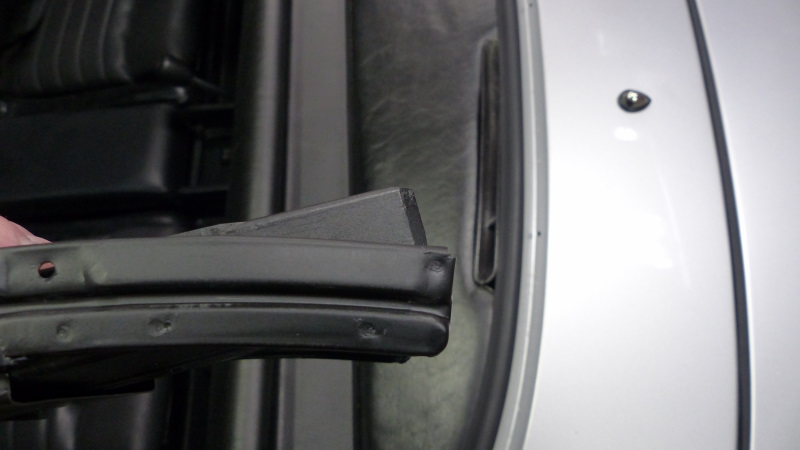 To slide the unit in place, you have to pull the cassette forward in the carrier to drop the rear so it will clear the dash opening. Then as the unit slides in, the cassette will slide rearward and up on the tab. The tab is bent to form a little ramp to guide the cassette into place. Back up front, I added a lower cover plate. This isn't completely necessary since the cassette will be supported by the dash face when installed, but it polishes off the look and helps to solidify the whole thing. The only other thing needed is to add stops at the front of the slider rail tracks so the unit doesn't slide in too deep. I just ran a weld bead along each side of the front corners and ground them flat. You can kind of see them in the pic of the front spacer. Finally, the whole thing got painted in satin trim black. 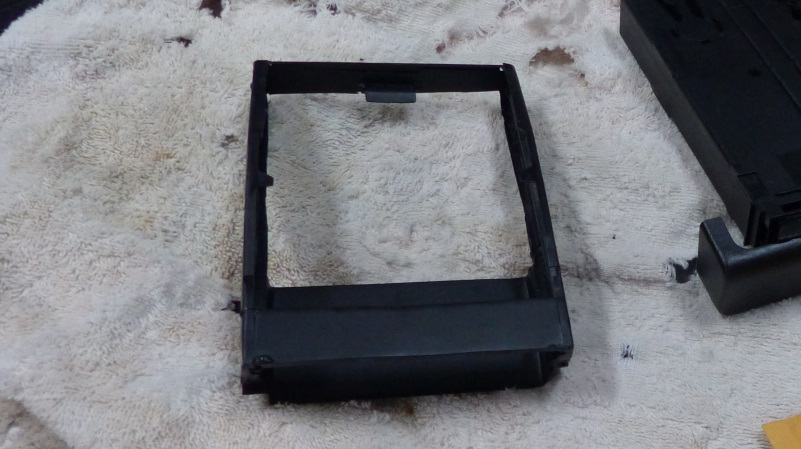 Modifying the Cup Holder There are just a couple small things that need removed from the cup holder. Mine came with a receptacle for a light at the rear and a light guide that ran to the front to an indicator. The receptacle needs to be removed so the cassette will slide all the way to the back of the carrier. I ground mine off but then discovered it just clipped on. I also had to grind off a couple ridges on the face of the drawer but as I mentioned, mine was missing the face plate. This makes a difference in the next step. I also had to make up some acrylic spacers that I solvent welded onto the drawer front. This was to create a surface to attach the ash tray front in the right position that it is flush with the dash when closed. It has to be done after the ash tray front is sculpted. If the face plate is still attached, I'm not sure if spacers will be needed. You might be able to sculpt the ash tray face to attache directly. 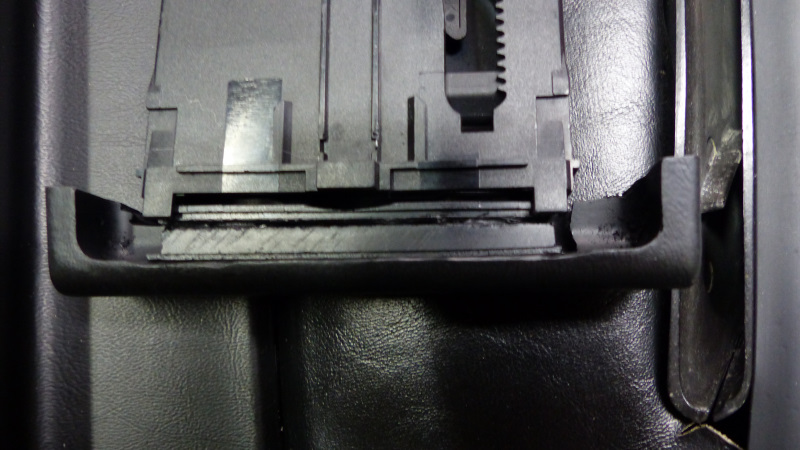 Sculpting the Ash Tray Front I didn't take any pics of this as it was a learn as you go process. You have to hollow out the recess on the back side of the ash tray front to create a flat surface to attach it to the front of the cup holder. You also have to grind down the depth so it will be flush with the dash when closed. You also have to thing the top lip so it will clear the space between the top of the cup holder drawer and padded dash opening. You might also have to remove a small amount of material on the back side of the lip to clear the circle of the cup holder opening. I did all this with a combination of a dremel, 2" angle grinder, belt sander, and oscillating spindle sander. The last was to clear the cup holder circle and isn't necessary. There is a metal frame inside the ash tray front so be prepared for that. After a lot of test fitting, grinding a little, and more fitting, the ash tray front was attached with 3M Trim Tape. Another Idea Back to that Subaru cup holder. It didn't work for the dash install but there is a place I think it would work. It isn't completely stealth, but could be interesting. 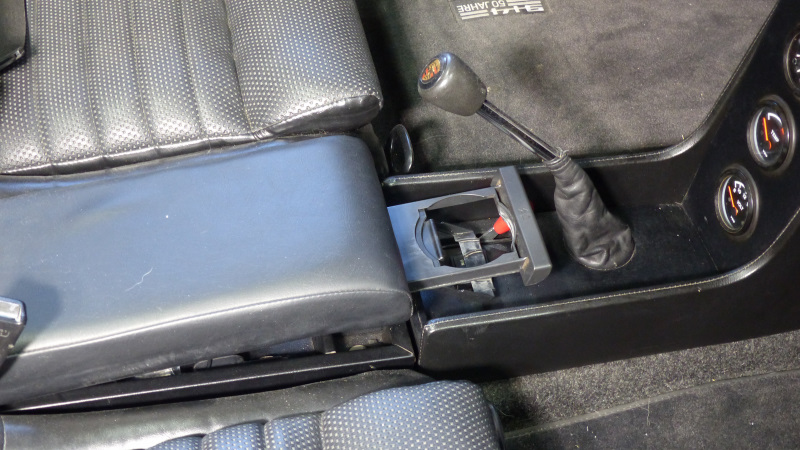 One reason I'm fascinated with the Forester cup holder is because they also make an interesting two cup version. I found one at the junk yard but it was all busted up and unusable. I did verify that the width is about the same as the 914 ash tray front. These holders also are adjustable for both small and large diameter cups. Here's the one I have. 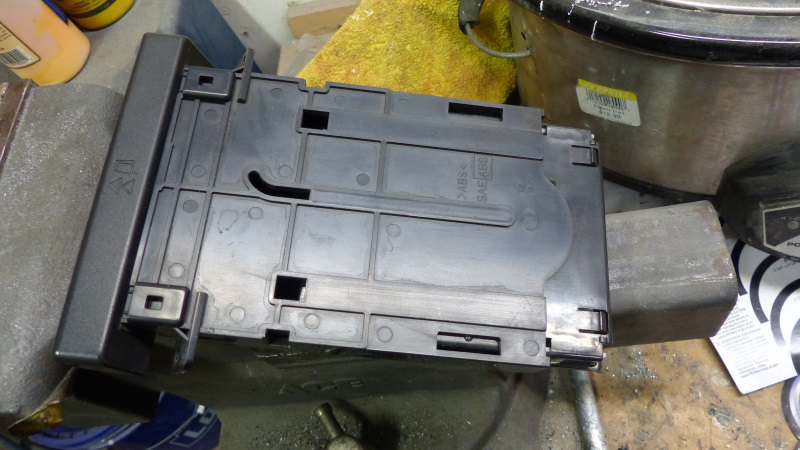 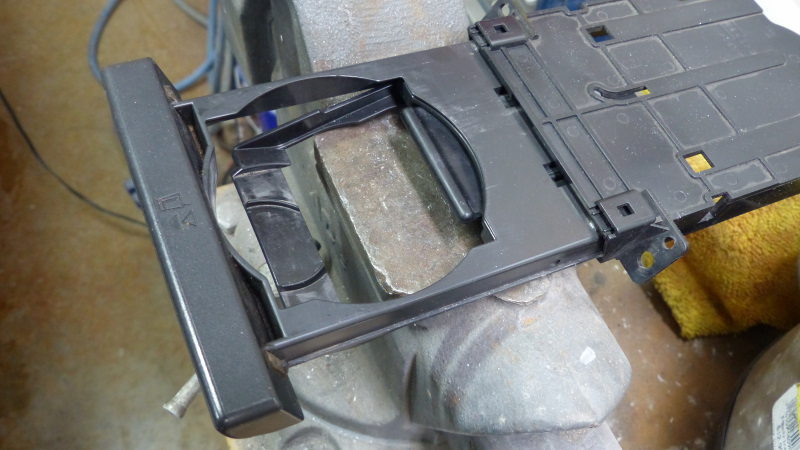 And here's what the two cup version looks like. 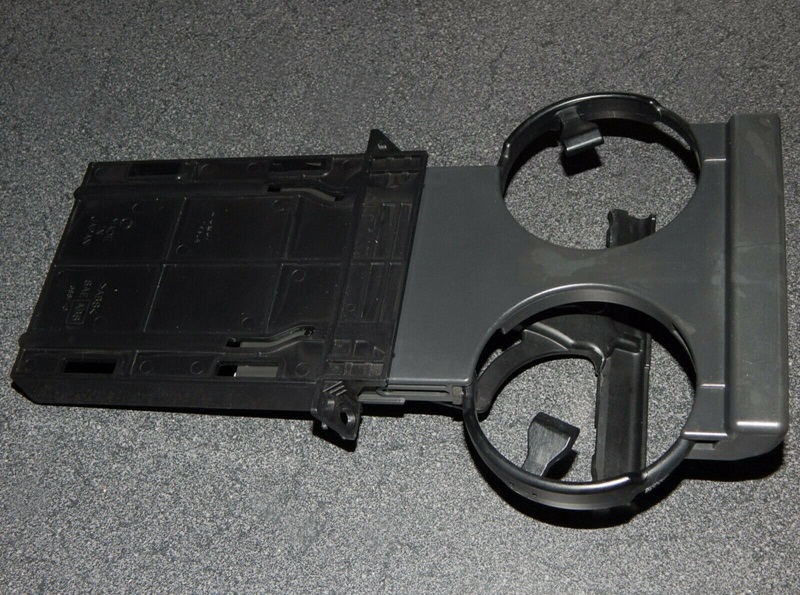 The single version would fit inside the center cushion for sure and I think the double version would too. It doesn't look like it would interfere with shifting but would block the heater lever a bit. Interesting idea anyway. |
|
|
|
| bbrock |
Jan 3 2021, 10:58 PM
Post
#1806
|
|
914 Guru Group: Members Posts: 5,269 Joined: 17-February 17 From: Montana Member No.: 20,845 Region Association: Rocky Mountains |
Shifting gears, I started preliminary setup of the valve train today in the final push to getting the engine back in the car.
I sent the rockers off to bugguy1967 on the Samba to have them machined for swivel foot adjusters. I also had the blocks milled for solid spacers. He supplied the spacers, shims, and adjusters. 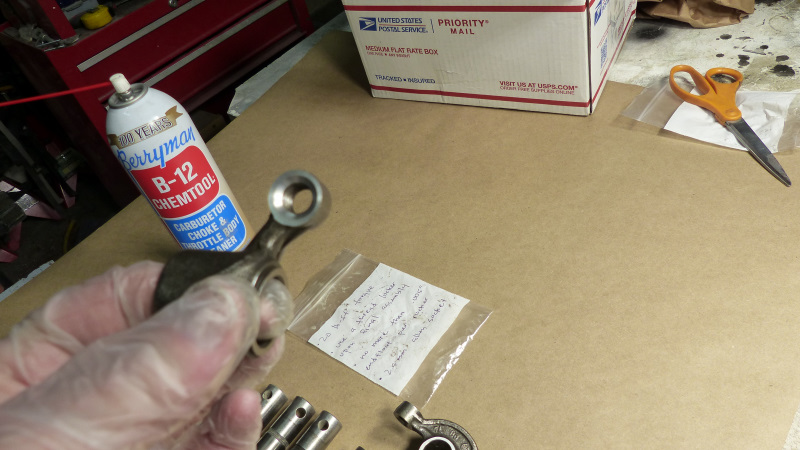 The adjusters are Thorsten Pieper German made adjusters which have gotten very good reviews including a few of our members here. These are 10mm so fit in the 2 liter rockers and are the same overall length as the stock adjusters so no issues with them banging against the valve covers. Here's the kit ready for assembly. 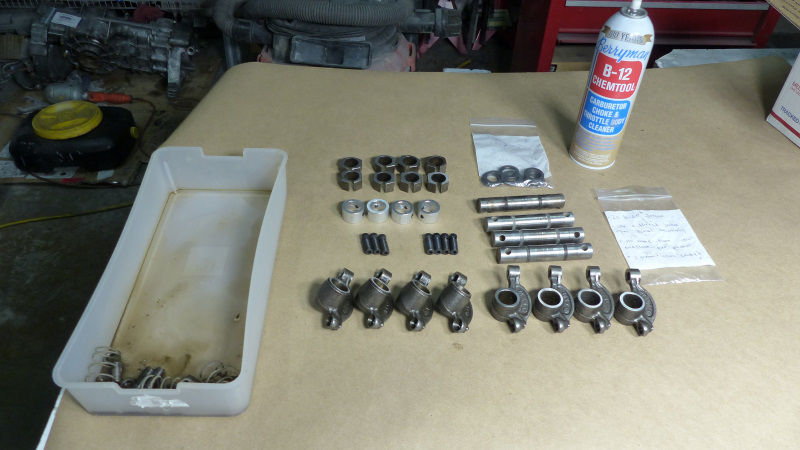 The goal is to set up the shims to align the rockers with the valves and have 0.005" of end float per rocker. I spent over 2 hours figuring out the first set. The rest took about 30 minutes each. I'm not sure my process is correct which is why this is preliminary, but here's how I did it. I started by shimming between the blocks and rockers to center the rocker over the valve stem. I left the adjusters out to sight through the center. 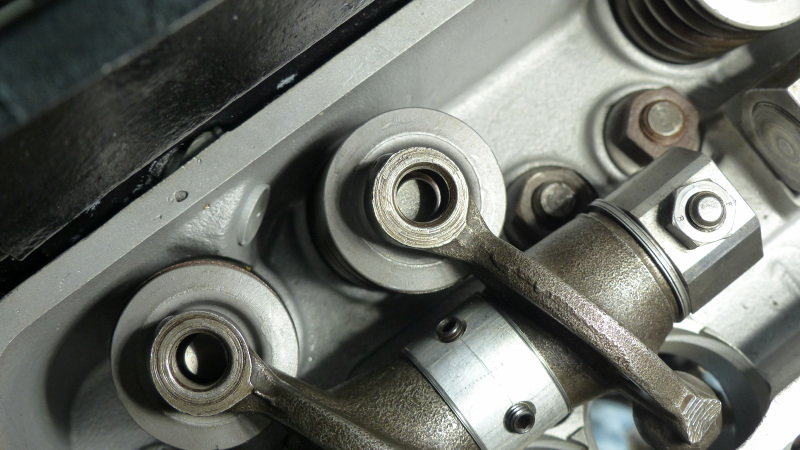 Now here is my question that I asked in another thread but no answers yet. I set up the rockers to be dead center over the valve stem. The guy who did the machine work says they should be offset about 1mm from the center line. I know the stock adjusters are supposed to be offset a little but I didn't think this applies to the swivel foot adjusters. I thought an advantage of swivel feet is to apply even distribution of force across the valves stem for less side load on guides and less wear on the stems. Would love to hear opinions on this. After setting the shims from block to rocker, I then filled in between rockers and the spacer, trying to keep the shims evenly split on each side of the spacer. I noticed that one end always needed a lot of shims due to the amount of material removed from the blocks. Note the stack of shims next to the right block. 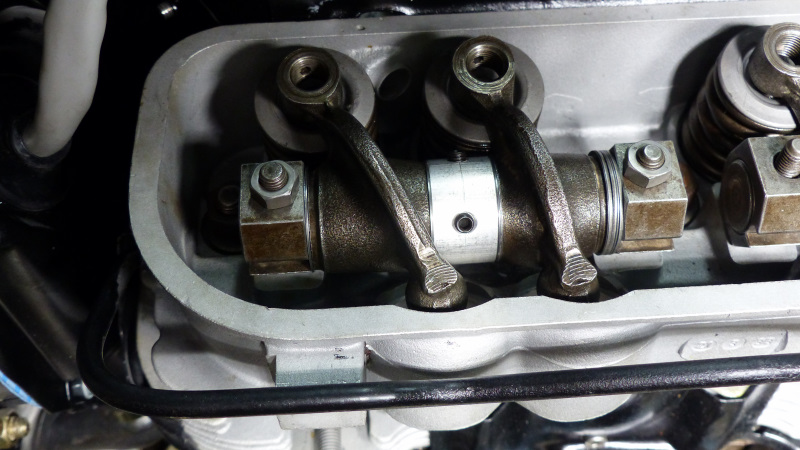 It seemed excessive so I fetched four unmilled blocks from my spare parts stash and swapped out half of the blocks. that filled in much of the space and seems more reasonable. I think it makes sense to mill only half of the blocks. Again, if anyone sees a problem with this, let me know. 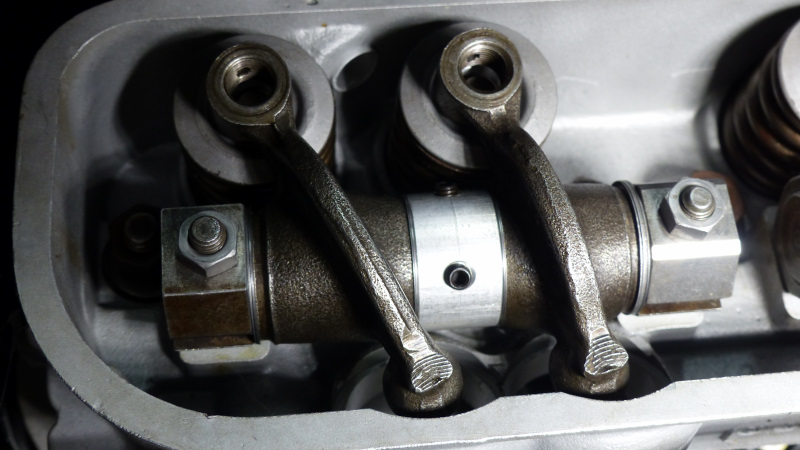 After that, the adjusters went in and it is starting to look like a running engine again. 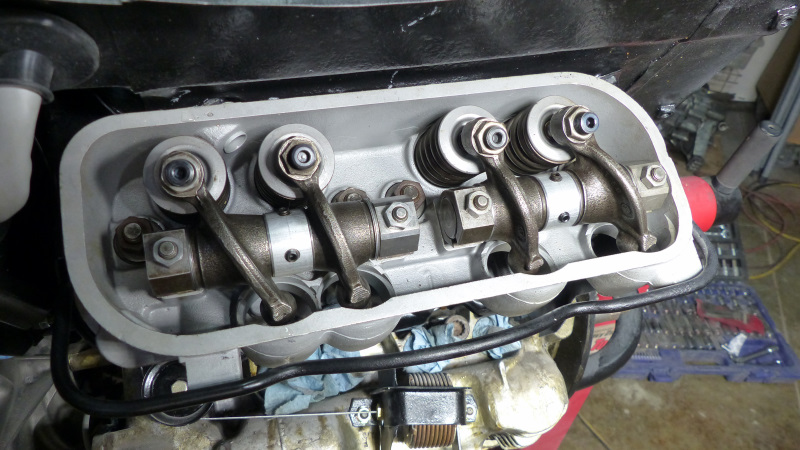 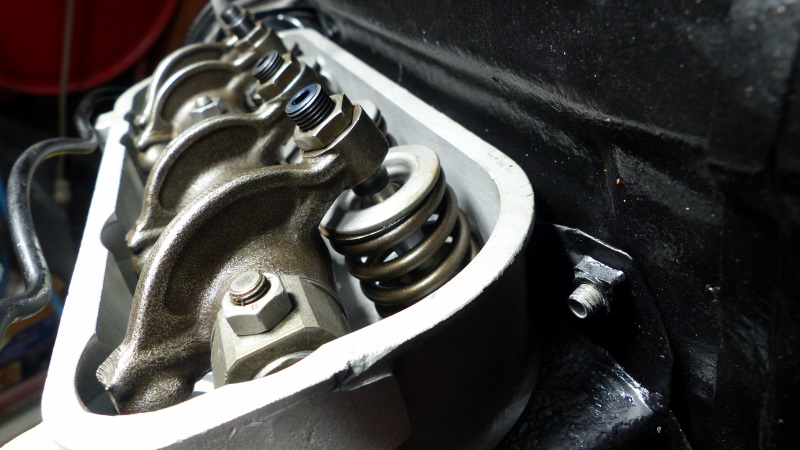 Once I confirm whether dead center alignment is okay, I'll move on to setting the push rod length following Jake's procedure. I'm going to run aluminum push rods to keep the noise down. It sounds like with this setup, there is a good chance the stock push rods can be shortened and reused. I learned the stock push rods have a .130" wall where the ACN aluminum rods are .080" so it will be nice to stick with the stock push rods. Once that is sorted, I'll disassemble the rockers for a final cleaning and lubing with assembly lube for final assembly. At that point, the engine will be complete. |
|
|
|
| Dave_Darling |
Jan 3 2021, 11:24 PM
Post
#1807
|
|
914 Idiot Group: Members Posts: 15,148 Joined: 9-January 03 From: Silicon Valley / Kailua-Kona Member No.: 121 Region Association: Northern California |
The adjusters should probably still be offset from the valve tips. That is done to help the valves rotate in their guides, evening out the wear and making everything last longer. I don't know how far they are supposed to be offset, but since the machinist says 1mm I'd be inclined to take him at his word.
--DD |
|
|
|
| 930cabman |
Jan 4 2021, 05:57 AM
Post
#1808
|
|
Advanced Member Group: Members Posts: 4,044 Joined: 12-November 20 From: Buffalo Member No.: 24,877 Region Association: North East States |
QUOTE(Dave_Darling @ Jan 4 2021, 12:24 AM) The adjusters should probably still be offset from the valve tips. That is done to help the valves rotate in their guides, evening out the wear and making everything last longer. I don't know how far they are supposed to be offset, but since the machinist says 1mm I'd be inclined to take him at his word. --DD +1, I would tend to agree. valve train geometry can be tricky, make sure you get it right |
|
|
|
| Superhawk996 |
Jan 4 2021, 07:30 AM
Post
#1809
|
|
914 Guru Group: Members Posts: 6,966 Joined: 25-August 18 From: Woods of N. Idaho Member No.: 22,428 Region Association: Galt's Gulch |
Looking forward to seeing it fire up for the first time.
|
 |
|
| bbrock |
Jan 4 2021, 11:37 PM
Post
#1810
|
|
914 Guru Group: Members Posts: 5,269 Joined: 17-February 17 From: Montana Member No.: 20,845 Region Association: Rocky Mountains |
Had a fun discussion on the other thread about swivel feet and offsets (at least for me). The upshot is that I'll be doing a bit of shim shifting to move the adjusters off center.
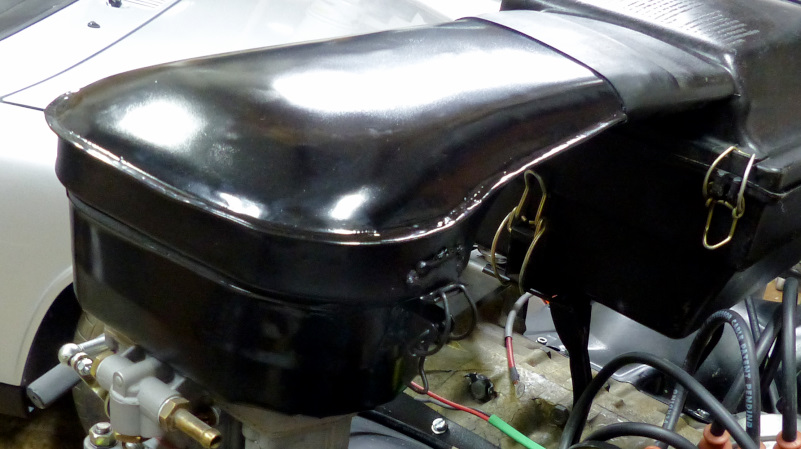
Got a few packages today. First up, a couple final details for the seat belts. 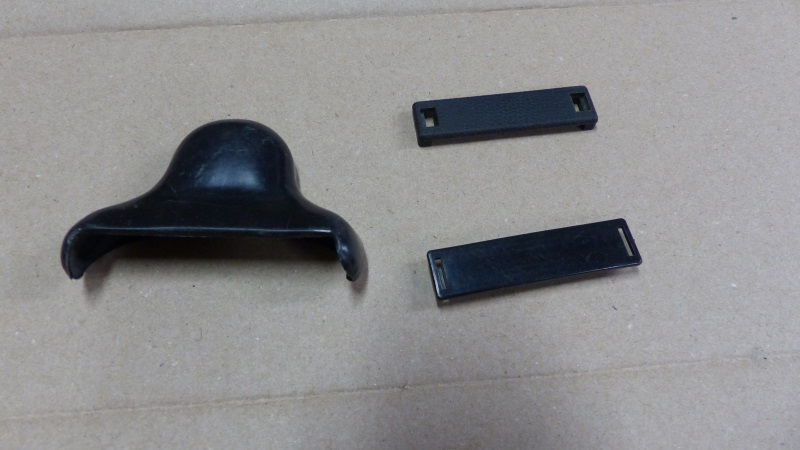 Also received my Sunset Porsche order of mostly transmission seals and parts. Unfortunately, I think I missed ordering one of the seals for the speedo drive. I also ordered a set of Genuine Porsche master cylinder grommets to replace the ones that came with my 914Rubber MC that allowed my expensive Pentosin brake fluid weep out all over the floor. These grommets are substantially beefier and stiffer than the ones that came with the MC. Really not cool (IMG:style_emoticons/default/mad.gif) 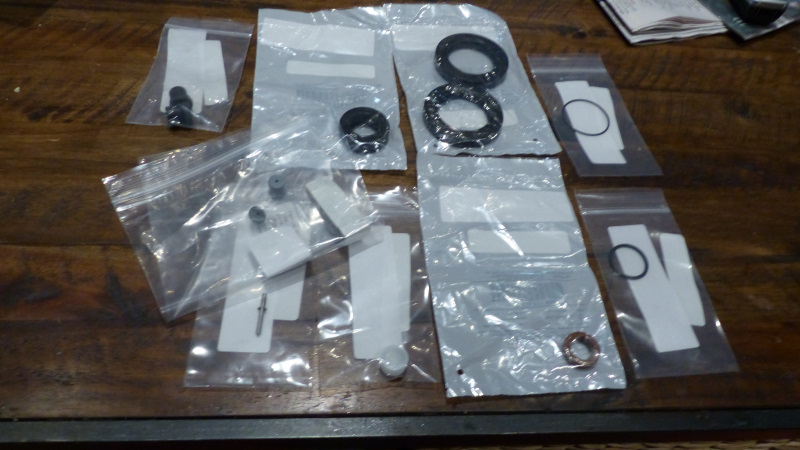 A couple weeks ago I repaired the corroded tip on my art hanger. I started by making a cardboard template of the good side. 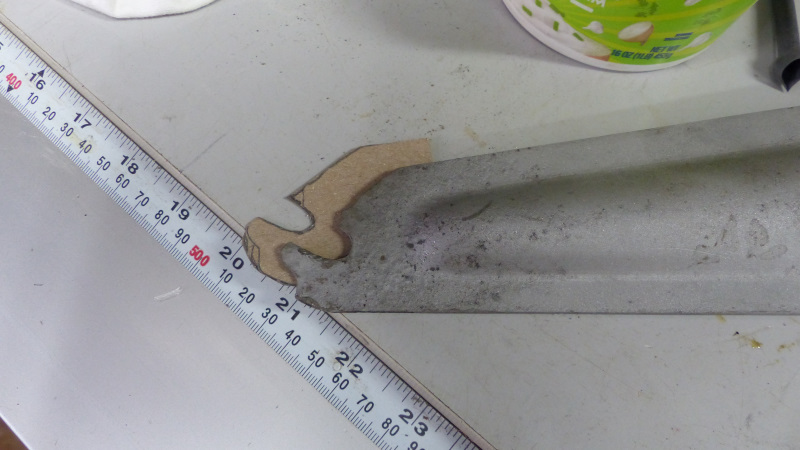 Then flipped it over to make a new tip for the corroded side. 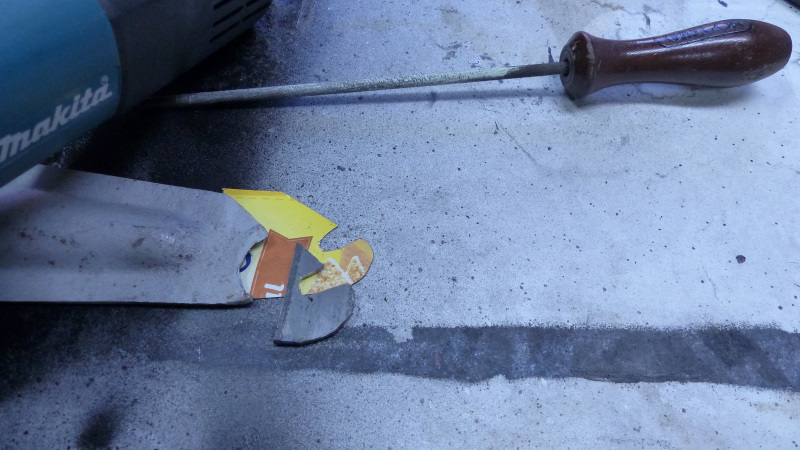 Welded it up. 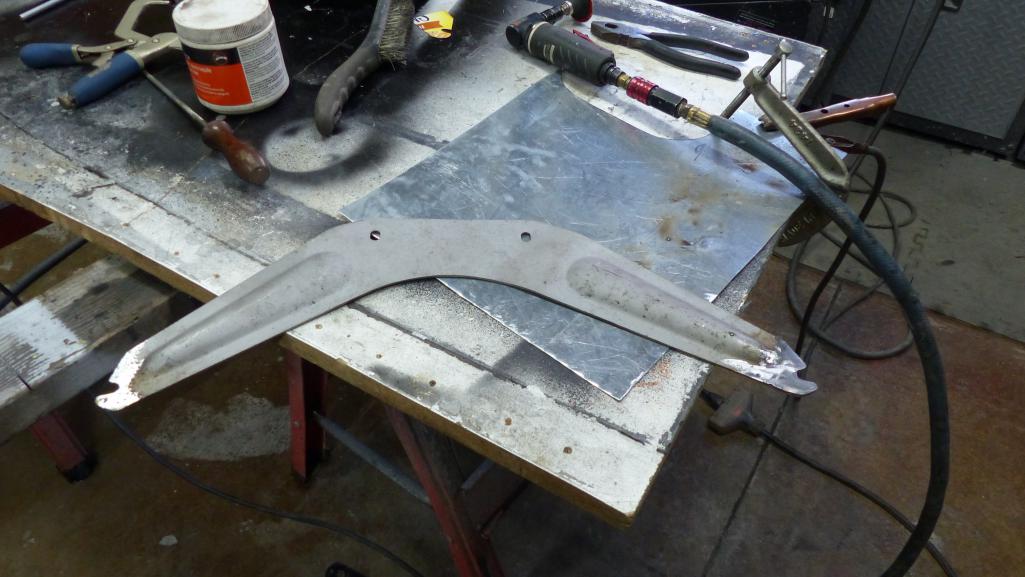 and a coat of paint. 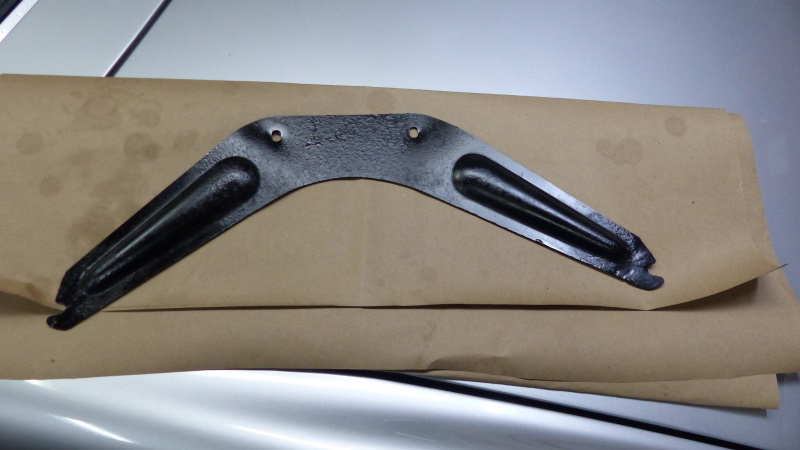 Why is he calling it an "art hanger?", you ask. That's just goofy. Well, today I received this work of art from @mb911 to hang on it. You have to see one of these in person to see what a true work of art this is. The welds!!! (IMG:style_emoticons/default/pray.gif) It's like he's some kind of high end professional or something.:wink:  Yes, this post was really just about showing off the new muffler... that, and getting one post closer to that sub @altitude411 promised. I hope that comes in yellow. (IMG:http://www.914world.com/bbs2/uploads_offsite/images.fineartamerica.com-20845-1609825048.1.jpg) |
|
|
|
| 930cabman |
Jan 5 2021, 05:58 AM
Post
#1811
|
|
Advanced Member Group: Members Posts: 4,044 Joined: 12-November 20 From: Buffalo Member No.: 24,877 Region Association: North East States |
Yes, agreed that is art. Does he make these from scratch?
|
|
|
|
| mb911 |
Jan 5 2021, 06:49 AM
Post
#1812
|
|
914 Guru Group: Members Posts: 7,544 Joined: 2-January 09 From: Burlington wi Member No.: 9,892 Region Association: Upper MidWest |
QUOTE(930cabman @ Jan 5 2021, 03:58 AM) Yes, agreed that is art. Does he make these from scratch? Yes we do and thanks everyone |
|
|
|
| Cairo94507 |
Jan 5 2021, 08:50 AM
Post
#1813
|
|
Michael Group: Members Posts: 10,297 Joined: 1-November 08 From: Auburn, CA Member No.: 9,712 Region Association: Northern California |
Here is Ben's little bit louder 2 in 1 out for the 6:
 |
|
|
|
| 930cabman |
Jan 5 2021, 10:32 AM
Post
#1814
|
|
Advanced Member Group: Members Posts: 4,044 Joined: 12-November 20 From: Buffalo Member No.: 24,877 Region Association: North East States |
I might order one and just hang it on the wall!!
|
|
|
|
| bbrock |
Jan 11 2021, 12:04 AM
Post
#1815
|
|
914 Guru Group: Members Posts: 5,269 Joined: 17-February 17 From: Montana Member No.: 20,845 Region Association: Rocky Mountains |
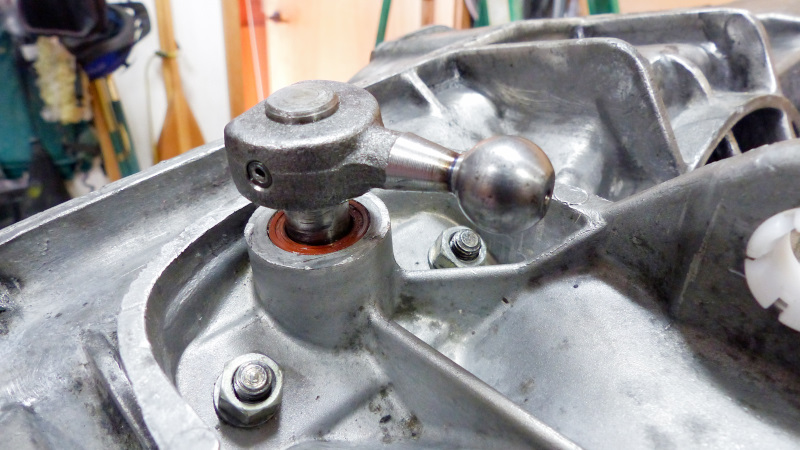
The Saturday plan was to replace all the transmission seals. I started by rebuilding the shift console. I started by removing the top shift ball fitting thingy that connects to the shift rod. It was a total PITA, took longer than expected, and I didn't get any pics as a result. Here's a tip. If you have Dr. Evil's transmission rebuild DVDs, watch them and PAY ATTENTION BEFORE taking the console apart. he tells you taking the top ball fitting thingy off is a PITA and don't do it. Instead, remove the toothed fork thingy at the bottom. Yep, that was much easier. Some people just have to learn the hard way. (IMG:style_emoticons/default/screwy.gif) Anyway, one O-ring and seal later and it was back together. Here is the only pic I took after the fact.
 Then I moved to the bell housing to replace the input shaft seal and rebuild the clutch fork. I pulled off the throw out bearing tube and noticed what looked like a hint of yellow cad around the rim. 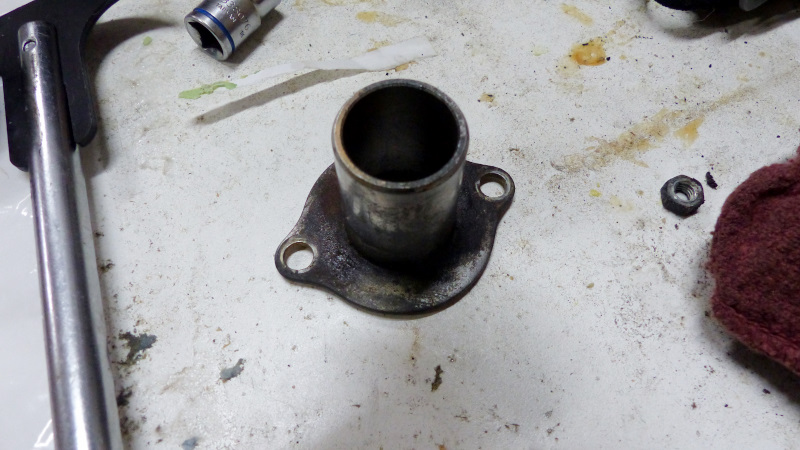 Flipped it over, and sure enough. 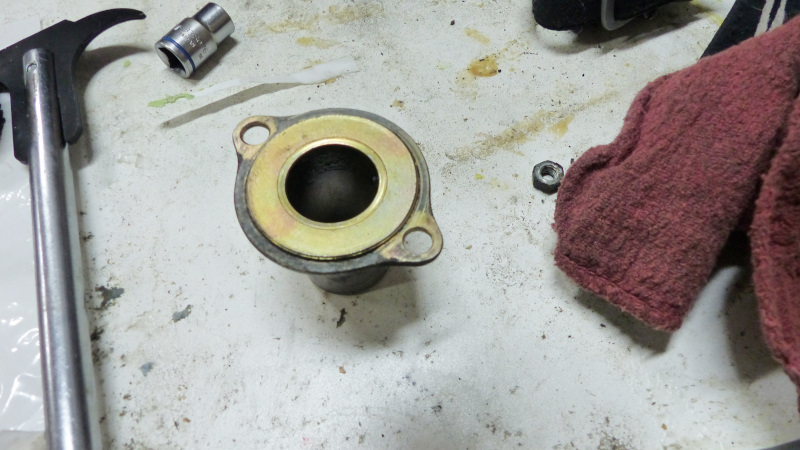 That changed the schedule for the day because now I had to dust off the old plating system and make a run to town for some copper wire to hang parts from. Then I did a short plating run including refreshing the T.O.B. Here it is on the bead blasted clutch fork with new ball cup bushing installed and a coat of Boeshield T-9 for protection. 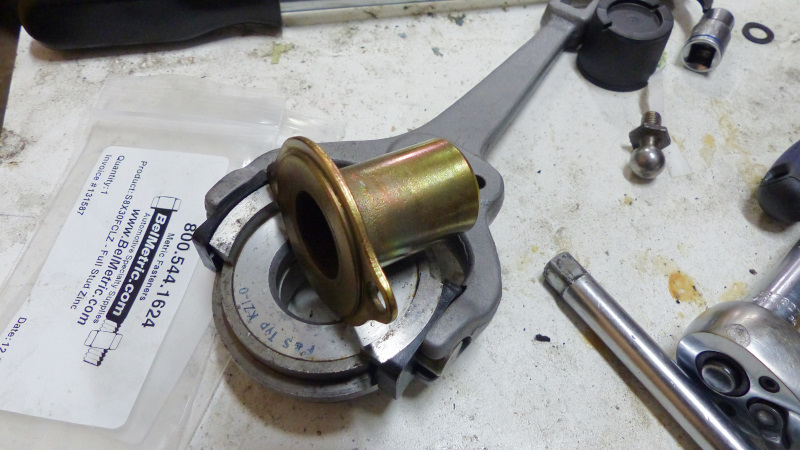 Today I finished transmission sealing (almost). The old input shaft seal was the factory installed original with the wide flange on the left and a nice new seal ready to go in. The old seal was brittle as hell and the new seal has a double sealing lip rather than single. Should seal better. 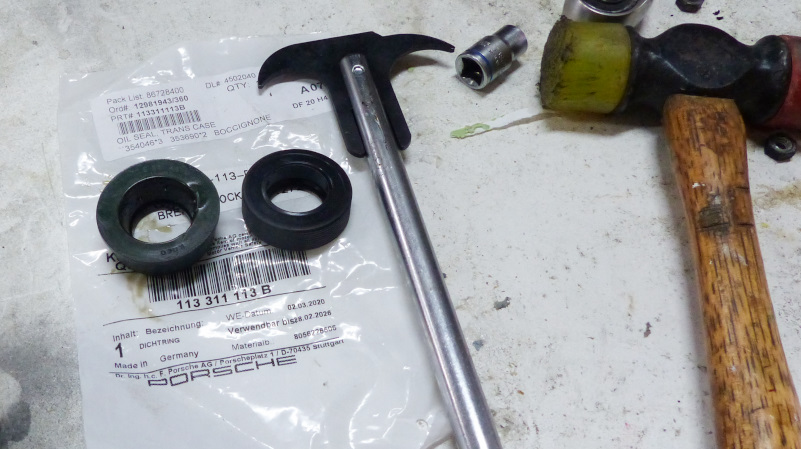 And installed. It looks like it is set a little deep in this pic but it isn't. It sits flush with the bottom of the old flange landing per Dr. Evil's instructions. 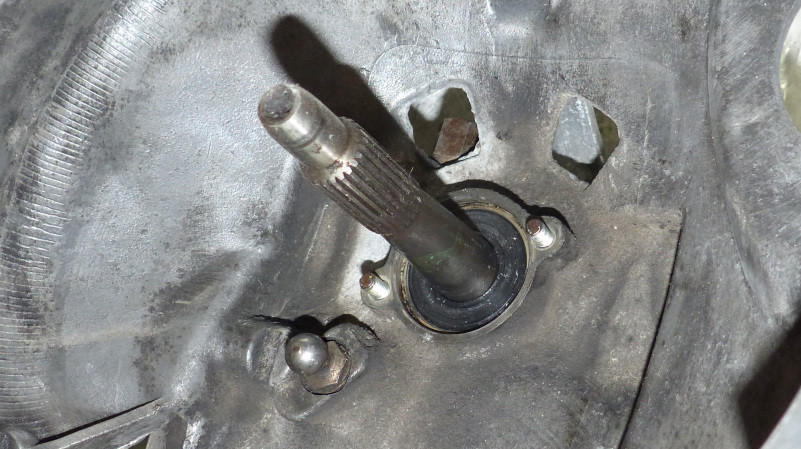 And here is the bell housing with clutch fork re-installed. 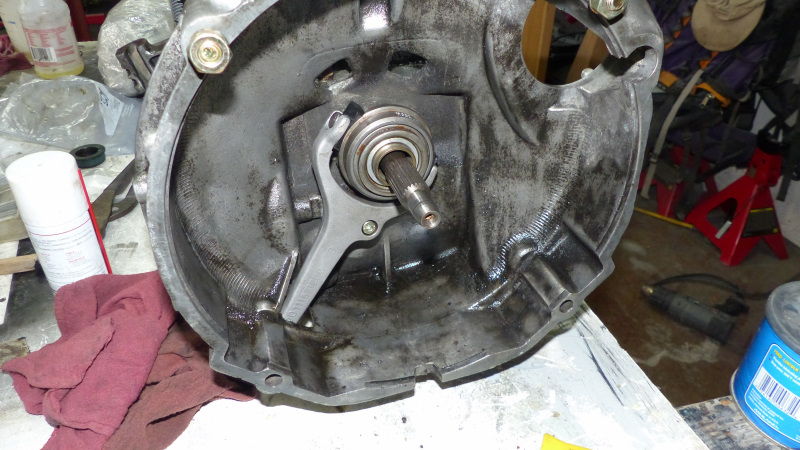 Next up were the drive seals. Again, the old seal were brittle and just crumbled when the seal puller touched them. Good thing that got replaced.  I got to used my fancy little bearing and seal driver set from HF. 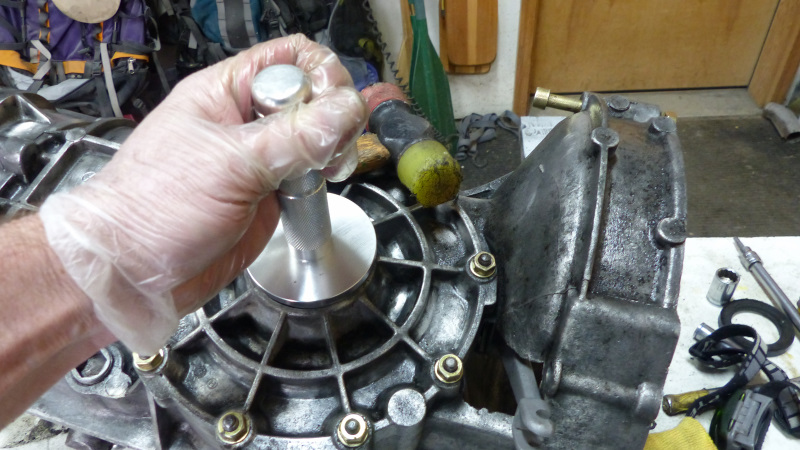 And a fine job it did.  The drive flanges needed a little TLC. They got cleaned and degreased. Then I dipped the flanges in muriatic acid for about 2 minutes dissolve all the rust out of the pores. I polished off the rusty area of the shaft just outside where it rode on the old seal with 600 grit wet/dry and sprayed the flange with T-9. Here is a before/after comparison. 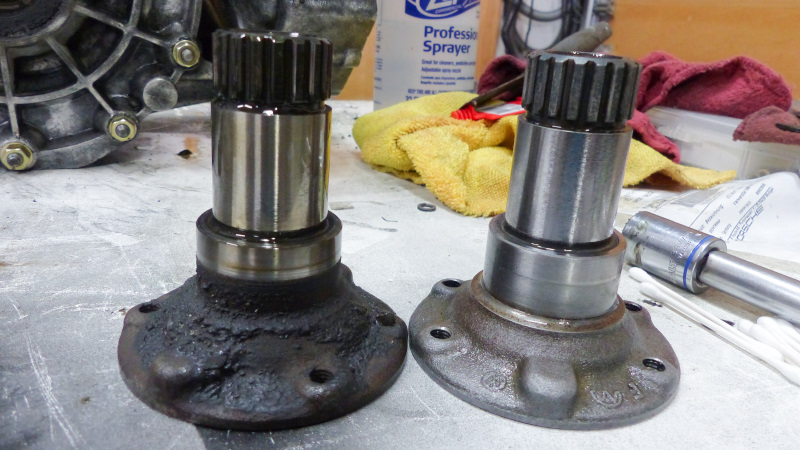 That almost completes all the seals but there are a few things missing. I ordered a new backup light switch from Amazon and last week it was delivered to an address in St. Louis (IMG:style_emoticons/default/blink.gif) I've sent two messages to the seller but no reply yet. If I don't hear from them tomorrow, I will request a refund through Amazon and order from someone else. For now, I have a new pin with no place to go. Also, I have a new O-ring for the speedo drive but did not learn about the gear shaft seal inside until my other seals had shipped. I placed a Pelican order tonight and padded it with extra filters and oil sump gaskets to get free shipping. I also ordered a new speedo angel drive on ebay. My old one has gone missing and I vaguely recall it was shot. Expensive little buggers! Anyway, here's the transmission almost ready to go back into service. 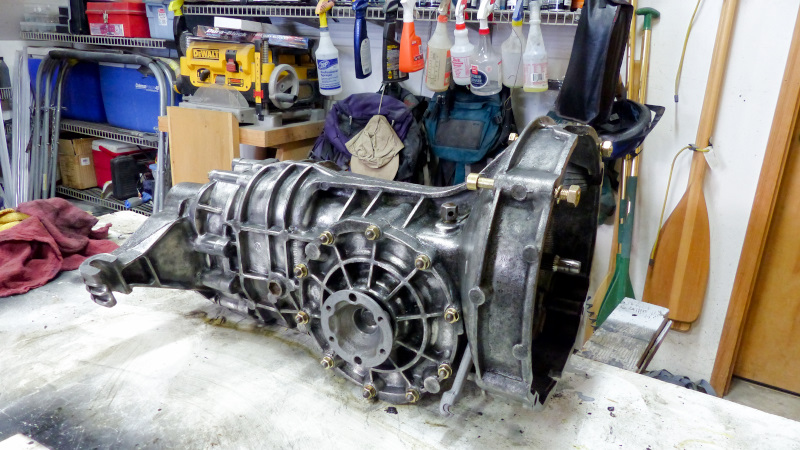 |
|
|
|
| bbrock |
Jan 11 2021, 12:19 AM
Post
#1816
|
|
914 Guru Group: Members Posts: 5,269 Joined: 17-February 17 From: Montana Member No.: 20,845 Region Association: Rocky Mountains |
The T.O.B. tube was not the only reason I fired up the Zinc-O-Matic yesterday. These black wire bale clips on the carb intakes have been bugging the (IMG:style_emoticons/default/stromberg.gif) out of me.
 MUCH better (IMG:style_emoticons/default/cheer.gif) 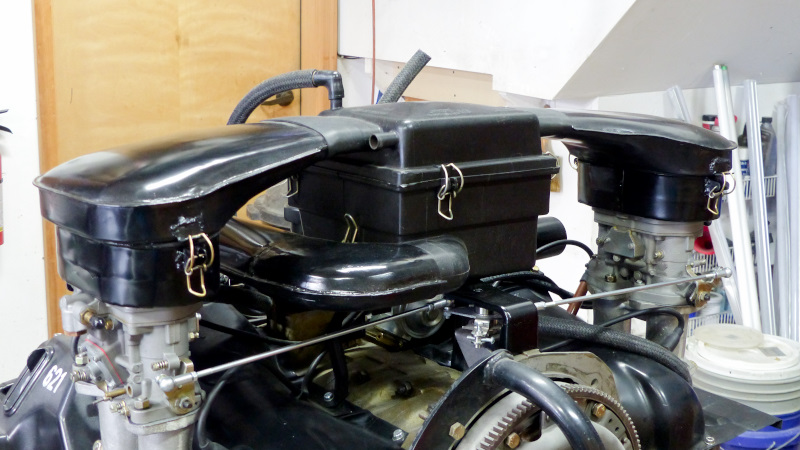 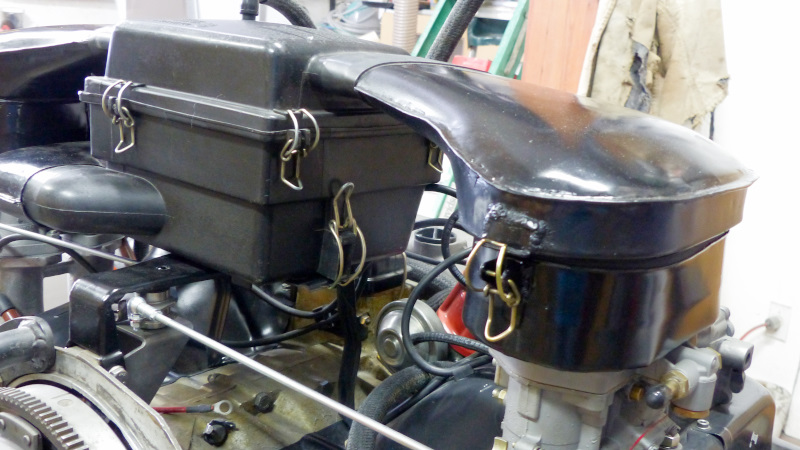 I finished the day putting the car back into its preferred habitat.  ... and tearing out the rear end. Boy. Had to use a flash on this shot and it sure picked up the dust on the trailing arms (IMG:style_emoticons/default/icon8.gif) 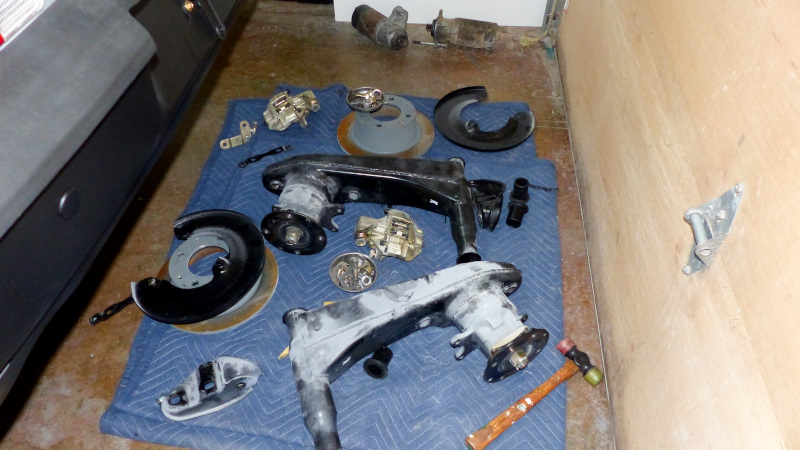 Why did I do this? Well... when I built my trailing arms, the only rubber bushings available were from Elephant Racing which I could not afford at the time so I bought a set of poly graphite from 914Rubber along with a set of their SS pivot shafts. Less than a year later they came out with their rubber bushings so the trailing arms would have to come out again. (IMG:style_emoticons/default/headbang.gif) Since I was replacing bushings, I also decided to ditch the SS pivots because they are heavy as a MoFo. Bruce Stone is swapping me straight up for a pair of plated OE shafts. I think that is a very good deal for both of us. I just don't see the point of that much extra weight. I didn't weigh them but am guessing 5lbs. each. 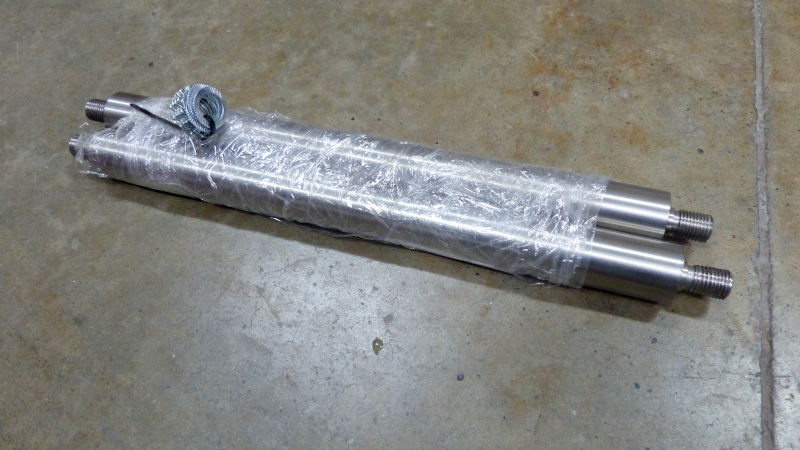 Hopefully I'll get the exchange pivots soon and get all this crap put back together. I have a couple other tasks to do while the car is on jack stands though. |
|
|
|
| Superhawk996 |
Jan 11 2021, 07:17 AM
Post
#1817
|
|
914 Guru Group: Members Posts: 6,966 Joined: 25-August 18 From: Woods of N. Idaho Member No.: 22,428 Region Association: Galt's Gulch |
(IMG:style_emoticons/default/aktion035.gif) Totally agree on the trailing arm pivots. No need to add unnecessary weight when originals have worked for 50 years and I'm not aware of many showing signs of fatigue.
Looking great. I'm getting really tempted to get a plating kit. There are so many little items here and there that could use a dip like you've done. Nice work! I previously used to use the Eastwood Tin Zinc on motorcycle fasteners that are silver but I really like the yellow cadmium look for the German stuff. What kit did you use? I apologize for asking. I know it's buried in your thread but let's be honest. I can't remember which page and now that you are up to 90 pages, it takes a while to find! (IMG:style_emoticons/default/laugh.gif) |
|
|
|
| rudedude |
Jan 11 2021, 08:33 AM
Post
#1818
|
|
Senior Member Group: Members Posts: 520 Joined: 1-January 05 From: minneapolis, mn Member No.: 3,387 Region Association: Upper MidWest |
Looking at your rocker arm setup are a couple of the end blocks on with the angled surface toward the head? I always thought the flat side went towards the head with the slot towards the pushrod.
|
|
|
|
| bbrock |
Jan 11 2021, 08:54 AM
Post
#1819
|
|
914 Guru Group: Members Posts: 5,269 Joined: 17-February 17 From: Montana Member No.: 20,845 Region Association: Rocky Mountains |
QUOTE(rudedude @ Jan 11 2021, 07:33 AM) Looking at your rocker arm setup are a couple of the end blocks on with the angled surface toward the head? I always thought the flat side went towards the head with the slot towards the pushrod. I think it is just goofy lighting from the camera flash. All of the slots are pointing toward the pushrods. @Superhawk996 I'm using the Caswell system. |
|
|
|
| bbrock |
Jan 11 2021, 09:11 AM
Post
#1820
|
|
914 Guru Group: Members Posts: 5,269 Joined: 17-February 17 From: Montana Member No.: 20,845 Region Association: Rocky Mountains |
QUOTE(rudedude @ Jan 11 2021, 07:33 AM) Looking at your rocker arm setup are a couple of the end blocks on with the angled surface toward the head? I always thought the flat side went towards the head with the slot towards the pushrod. Edit: Oh. I see what you are looking at now. Yes, some of those blocks will get flipped around the right way in final assembly. I was just looking at spacing for the shims here... which will also get shifted around to add some offset to the adjusters. |
|
|
|
|
1 User(s) are reading this topic (1 Guests and 0 Anonymous Users)
0 Members:

|
Lo-Fi Version | Time is now: 20th April 2025 - 02:59 AM |
Invision Power Board
v9.1.4 © 2025 IPS, Inc.