|
|
|
Porsche, and the Porsche crest are registered trademarks of Dr. Ing. h.c. F. Porsche AG.
This site is not affiliated with Porsche in any way. Its only purpose is to provide an online forum for car enthusiasts. All other trademarks are property of their respective owners. |
|
|

  |

| Mark Henry |
 Apr 24 2017, 05:12 AM Apr 24 2017, 05:12 AM
Post
#1
|
|
that's what I do!  Group: Members Posts: 20,065 Joined: 27-December 02 From: Port Hope, Ontario Member No.: 26 Region Association: Canada |
Because this comes up so often I decided to make a tutorial on how I install the Ford solenoid.
The Ford solenoid fixes the common hot start problem of Bosch starter solenoid and it also reduces the load on the ignition switch. Although these instructions are for the 914 all aircooled VW's and Porsche often suffer from this problem and with minor changes this can be done to any car. The issue occurs because the Bosch starter solenoid needs a full 9 volts to kick in. The combination of age, heat, corrosion, many connectors, a small ignition switch and wiring running to the dash and back can degrade the volts to less than the 9V required. The Ford solenoid only needs about 3 volts for the 12V version and even less for the 6V which for our purpose works no problem. My installation drills no holes in the car, not a single factory wire is cut, no in-line fuses, fully reversible and simple with no added bullshit. Please this is not a discussion on if you prefer the wimpy (IMO) Bosch horn relay, want to cut and hack in a new wire or believe throat singing Vajrayana chants is a better method, start you're own thread. Of course as with any electrical trouble shooting the first order of business is always clean all of your grounds and make sure the chassis to transmission ground strap is in place and in good condition. I'll start right away with the money shot of the completed installation to show how clean this can be done. Attached image(s) 
|
   |

 
|
| Mark Henry |
Apr 24 2017, 05:26 AM
Post
#2
|
|
that's what I do! Group: Members Posts: 20,065 Joined: 27-December 02 From: Port Hope, Ontario Member No.: 26 Region Association: Canada |
This is a Ford solenoid very common fender mounted unit available up to 1967 in a 6 volt one small post version and up to the end of the 80's as a 12 volt 2 small post unit.
I recommend the type that has the bracket, the ones with the tabs are a PITA as you have to make a bracket. This one is a used and 12V, but is nice because it is a made in USA solenoid. Now all the new ones are made in china. One person said they had a china made unit fail, but I've personally never seen it. I've only ever had one fail in close to 30 years of doing this and that was due to corrosion after 8 years of hard winter driving. Attached image(s) 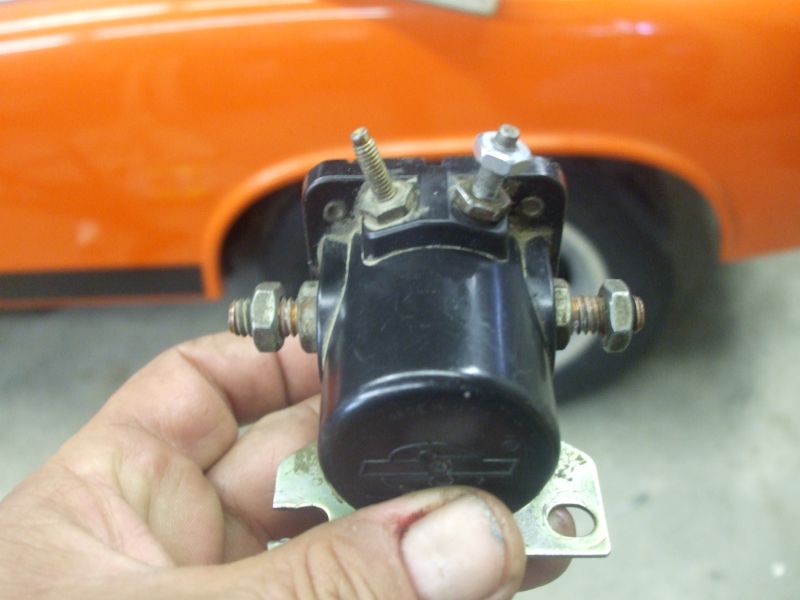
|
|
|
|
| Mark Henry |
Apr 24 2017, 05:30 AM
Post
#3
|
|
that's what I do! Group: Members Posts: 20,065 Joined: 27-December 02 From: Port Hope, Ontario Member No.: 26 Region Association: Canada |
First thing you need to do is enlarge the one hole so it fits onto the starter mount 10mm stud, you want to only cut the one side so you can't drill it. I use a burr on a die grinder, but this can be done with a round file.
Attached image(s) 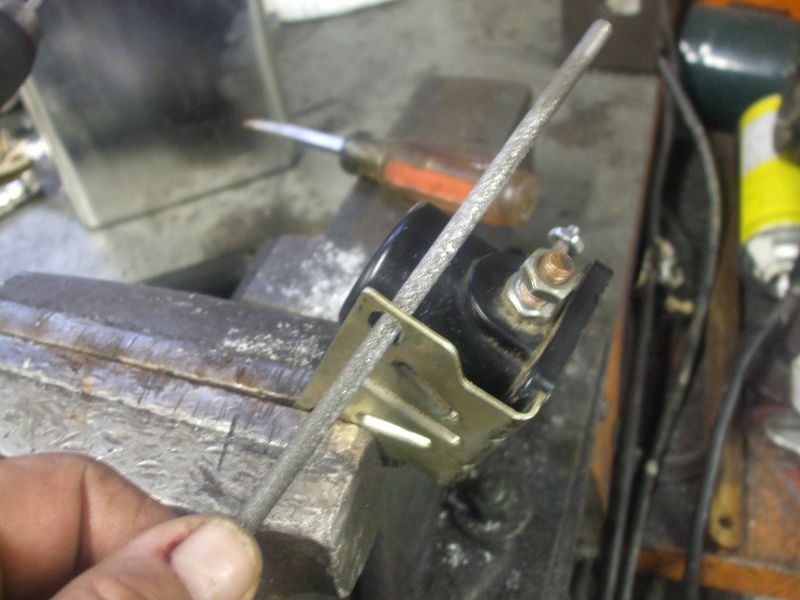
|
|
|
|
| Mark Henry |
Apr 24 2017, 05:39 AM
Post
#4
|
|
that's what I do! Group: Members Posts: 20,065 Joined: 27-December 02 From: Port Hope, Ontario Member No.: 26 Region Association: Canada |
Then cut the bracket about 3/4" to 1" as shown with a hacksaw.
I marked the bend and cut out to make sure it not only cleared the nut, but the socket as well, for ease of installation. When making the bend in the bracket it is very important that you DO NOT stress the plastic housing of the solenoid. I use two vice grips to start the bend, then finish it up in my vice. Attached image(s) 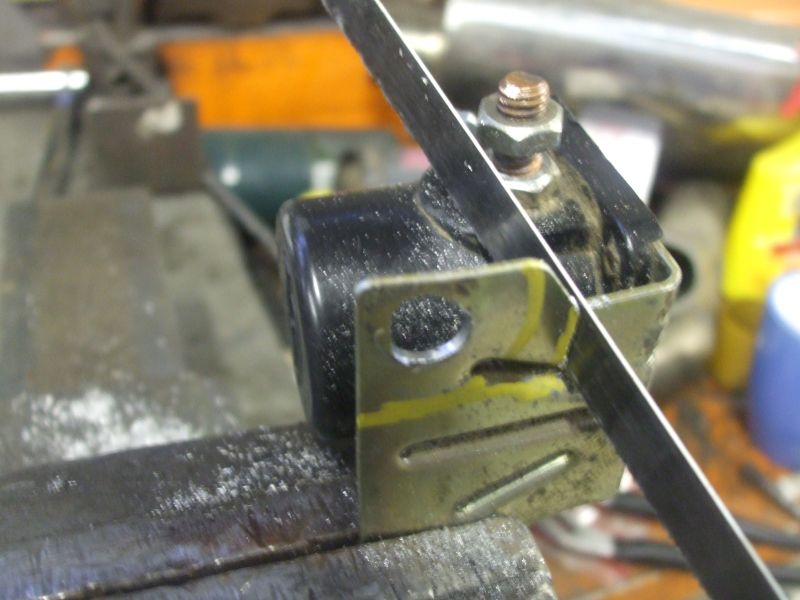 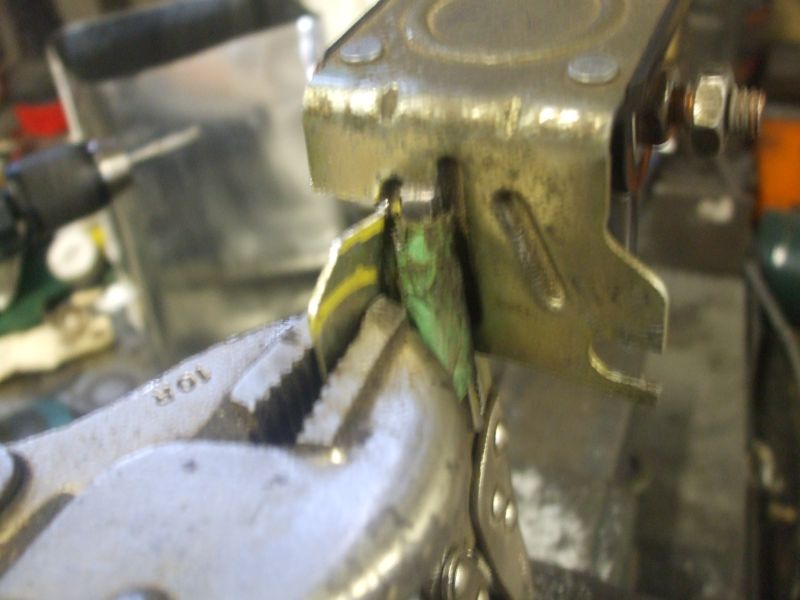
|
|
|
|
| Mark Henry |
Apr 24 2017, 05:42 AM
Post
#5
|
|
that's what I do! Group: Members Posts: 20,065 Joined: 27-December 02 From: Port Hope, Ontario Member No.: 26 Region Association: Canada |
Once done you can hang it off the bottom starter mount stud to start the nut, then if you did your bend job correctly you can get a 17mm deep socket on it to tighten it up.
I mount the solenoid plastic side up just in case water gets into the solenoid, so that it can drain back out. Attached image(s) 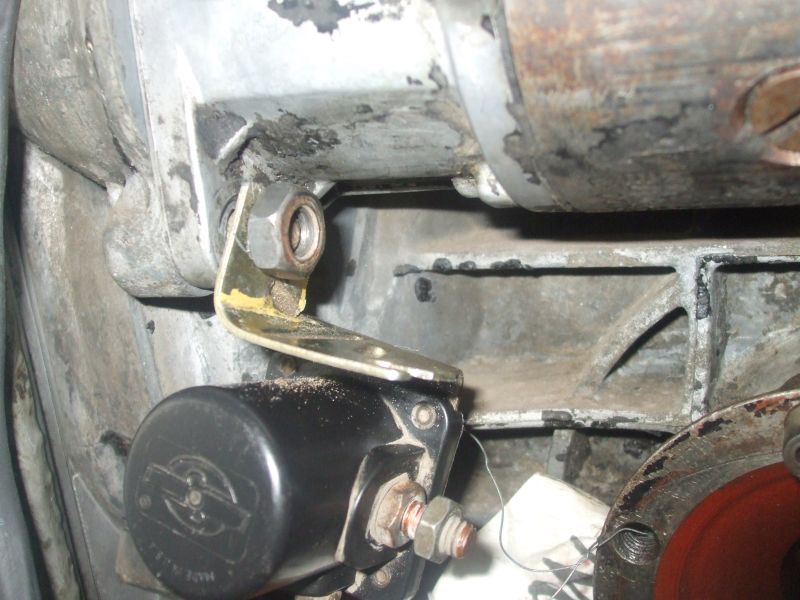 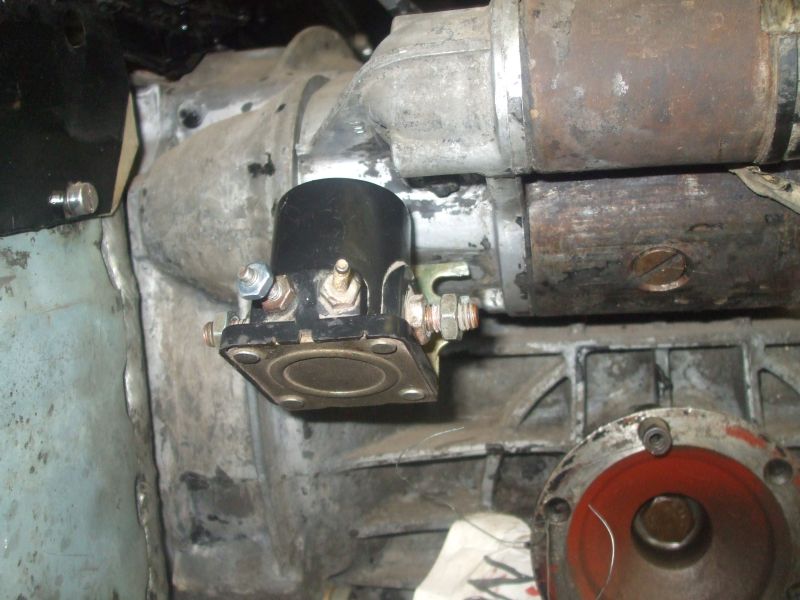
|
|
|
|
| Mark Henry |
Apr 24 2017, 05:46 AM
Post
#6
|
|
that's what I do! Group: Members Posts: 20,065 Joined: 27-December 02 From: Port Hope, Ontario Member No.: 26 Region Association: Canada |
Ring connectors from your local FLAPS seem to come in two sizes, way too big and too small. (IMG:style_emoticons/default/dry.gif)
Get the too small ones made for 10 gauge wire, with the yellow ends. Attached image(s) 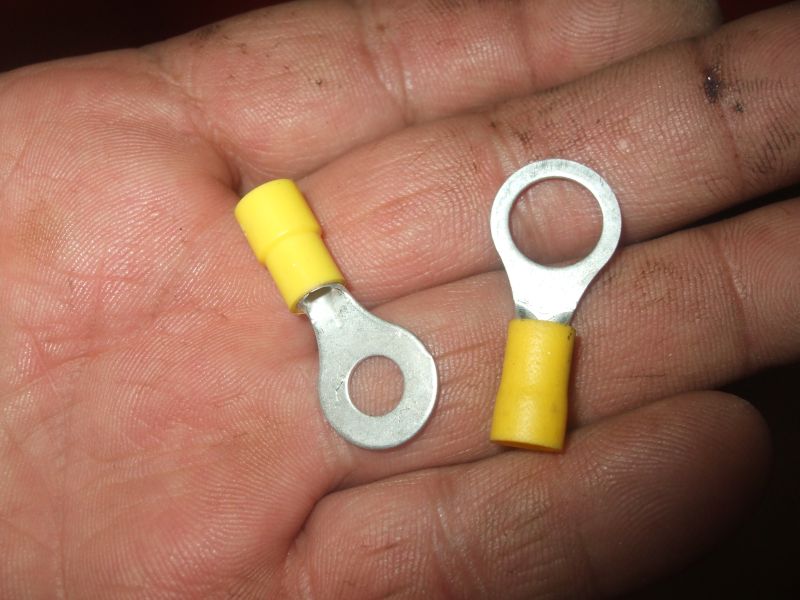
|
|
|
|
| Mark Henry |
Apr 24 2017, 06:01 AM
Post
#7
|
|
that's what I do! Group: Members Posts: 20,065 Joined: 27-December 02 From: Port Hope, Ontario Member No.: 26 Region Association: Canada |
The best method to enlarge the ring connector hole is to use a block of wood and a step drill bit as shown. Go slow and it does a nice job.
Note I have the connector upside down so that it catches on the end of the wood. I hate the plastic sleeves on generic connectors so I cut them off, I'll be using heat shrink tube to finish them off. Please be careful cutting them off. Attached image(s) 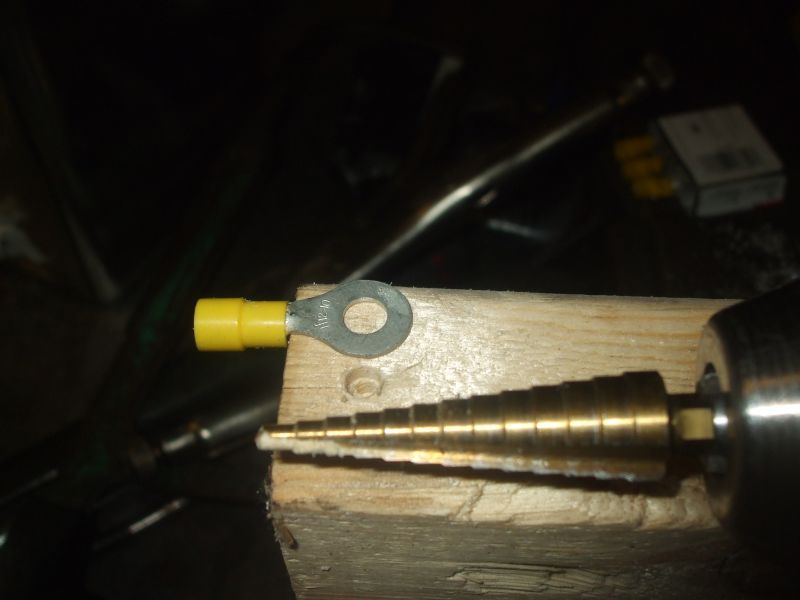 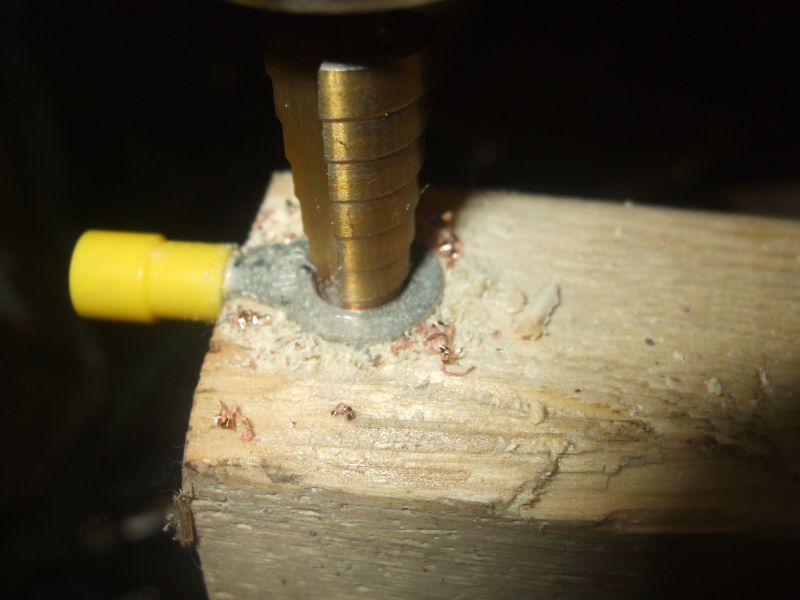 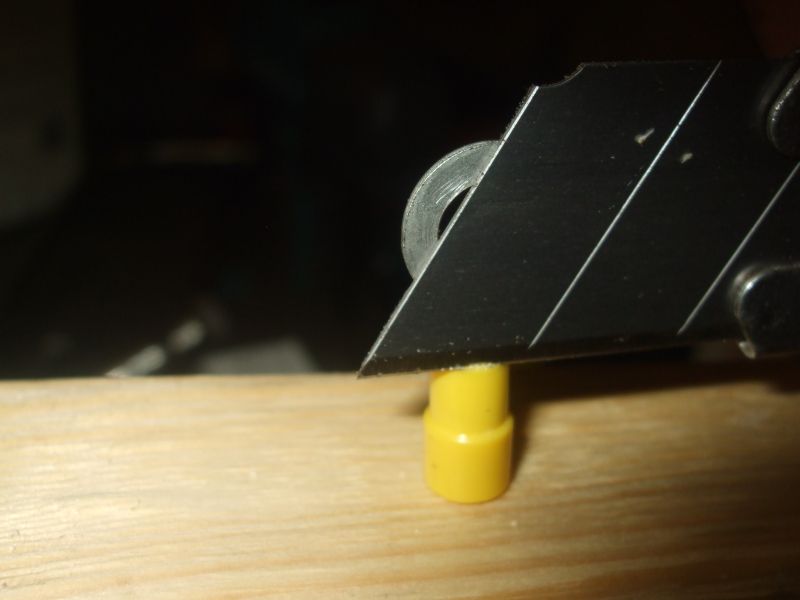
|
|
|
|
| Mark Henry |
Apr 24 2017, 06:12 AM
Post
#8
|
|
that's what I do! Group: Members Posts: 20,065 Joined: 27-December 02 From: Port Hope, Ontario Member No.: 26 Region Association: Canada |
So these are the connectors needed, but in a brain fart moment I forgot the one female quick connector that is also needed.
The tab connector I had, I think it was on an old VW wiper assembly. Likely you can get them from McMaster-Carr but I think they only come in boxes of 100. You can make one ghetto from a connector or fab one yourself by cut/drilling it out from some copper pipe although pipe is a bit too thick. The hacked up ring connector shows how bad it gets trying to drill them with regular drill bits. Rack your fingers a few times when the connector catches and spins and you'll be out picking up a step drill bit PDQ. Attached image(s) 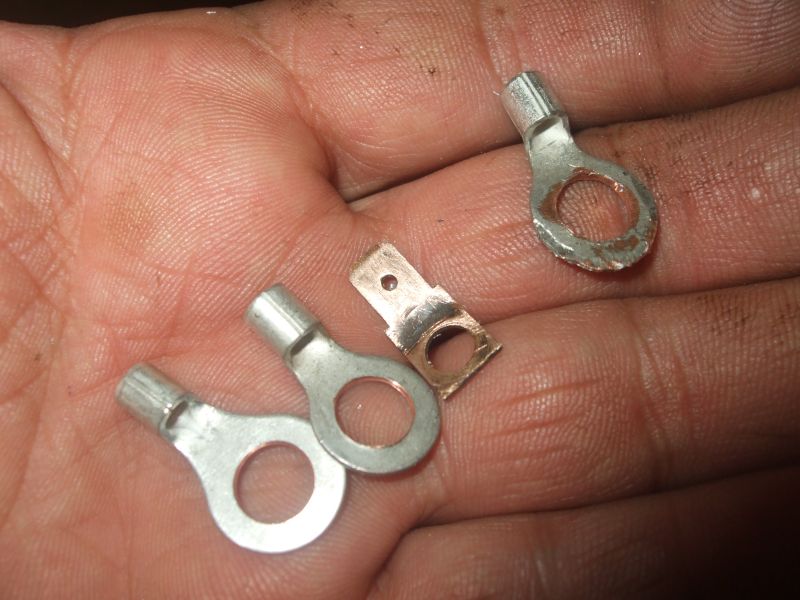
|
|
|
|
| Mark Henry |
Apr 24 2017, 06:18 AM
Post
#9
|
|
that's what I do! Group: Members Posts: 20,065 Joined: 27-December 02 From: Port Hope, Ontario Member No.: 26 Region Association: Canada |
For crimping the wires go out and get proper crimpers that put a dimple into the connector. Toss those POS cheap ass FLAPS or dollar store "crimpers" in the trash.
Here I'm using a fairly inexpensive Panduit crimper/stripper set I've had for years. Attached image(s) 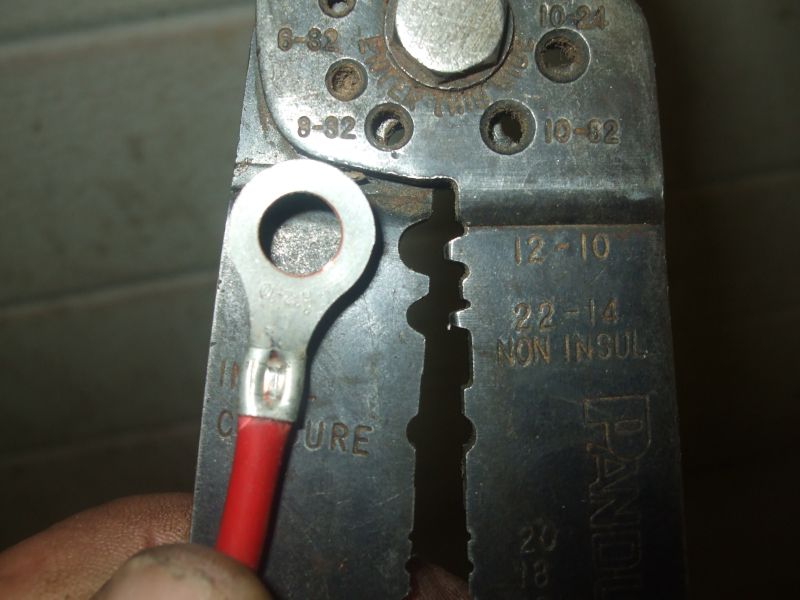
|
|
|
|
| Mark Henry |
Apr 24 2017, 06:24 AM
Post
#10
|
|
that's what I do! Group: Members Posts: 20,065 Joined: 27-December 02 From: Port Hope, Ontario Member No.: 26 Region Association: Canada |
For the wire I'm using 10 gauge multi-strand primary wire.
I slide on heat shrink tubing, then crimp the one end on, then bend it to the shape I like. Then I repeat for the other side. Don't forget to slide the tube on before crimping the connector. You want to bend it so it doesn't touch the starter, as that could rub through the plastic wire covering and cause a short. A tip to make a real nice job is to slide your HS tube on, bend your wire first and then heat shrink the tubing. Attached image(s) 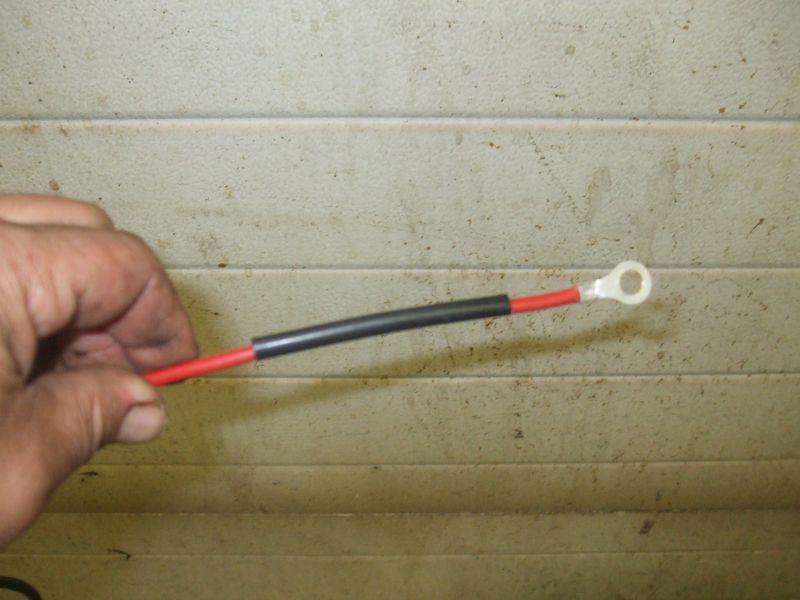 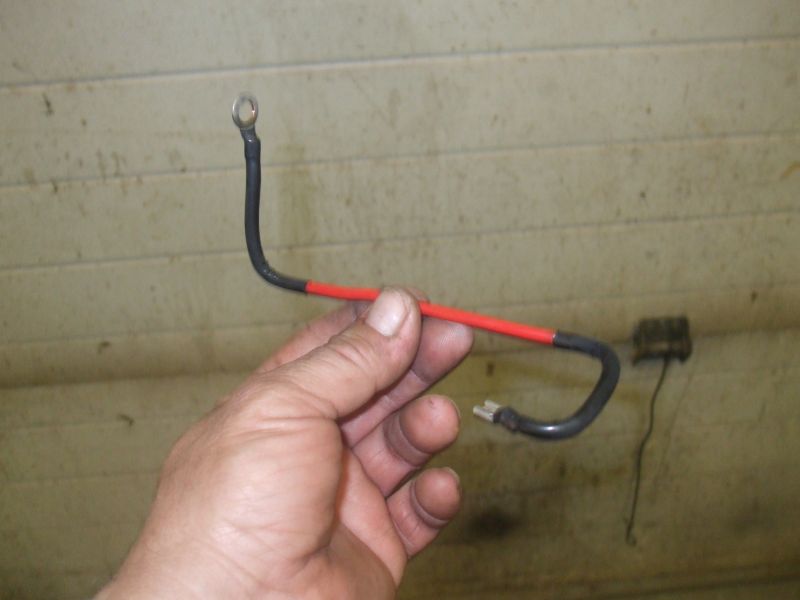
|
|
|
|
| Mark Henry |
Apr 24 2017, 06:32 AM
Post
#11
|
|
that's what I do! Group: Members Posts: 20,065 Joined: 27-December 02 From: Port Hope, Ontario Member No.: 26 Region Association: Canada |
This shows how to connect the wire to the solinoid, dead simple.
There is no right or wrong way to do this, it's a simple switch, it will work in either direction. Attached image(s) 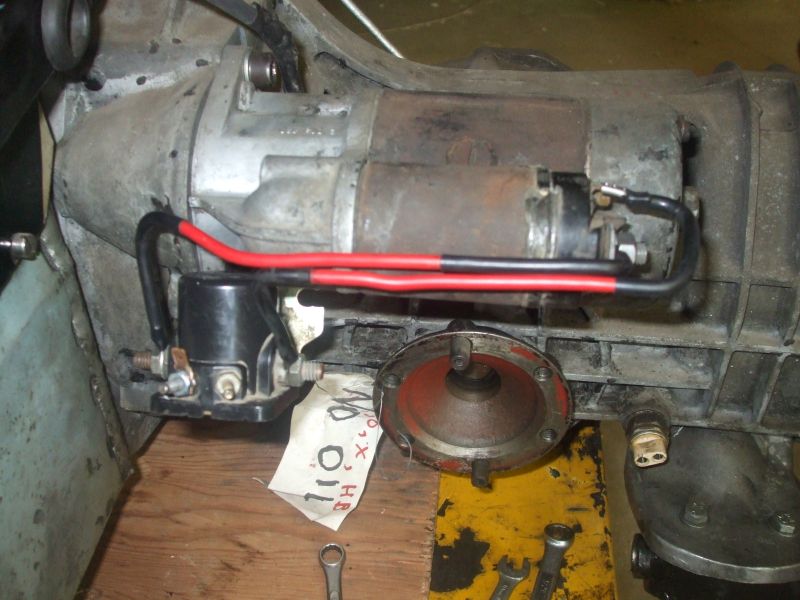 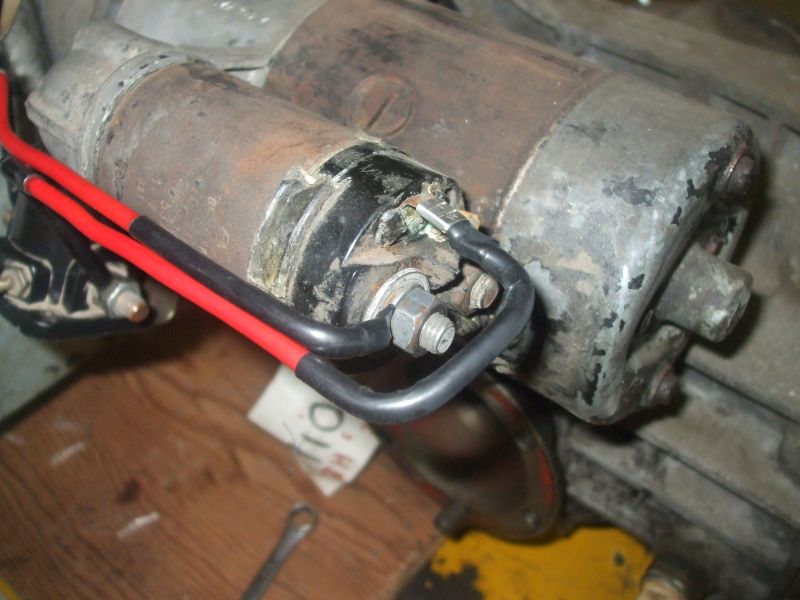 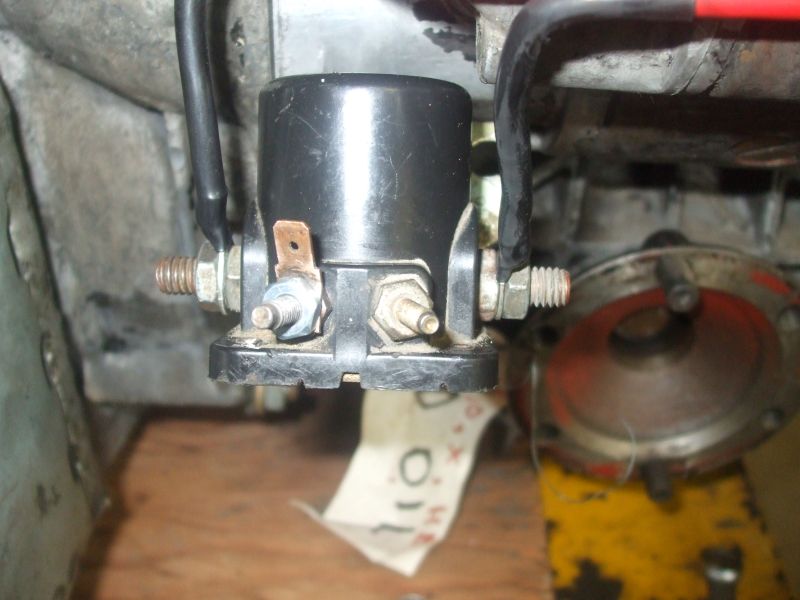
|
|
|
|
| Mark Henry |
Apr 24 2017, 06:35 AM
Post
#12
|
|
that's what I do! Group: Members Posts: 20,065 Joined: 27-December 02 From: Port Hope, Ontario Member No.: 26 Region Association: Canada |
if you are worried about the exposed hot positive you could find a boot that fits, here I used a simple end cap from a hardware store.
Attached image(s) 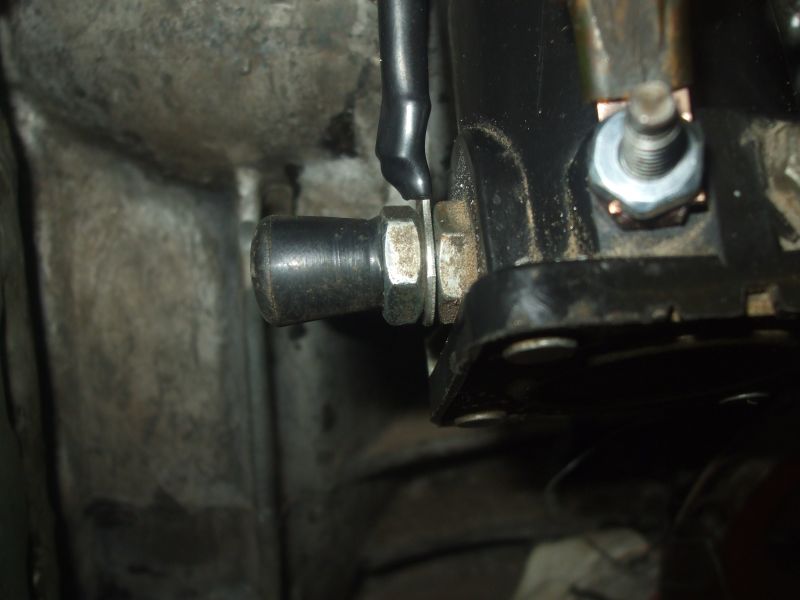
|
|
|
|
| Mark Henry |
Apr 24 2017, 06:38 AM
Post
#13
|
|
that's what I do! Group: Members Posts: 20,065 Joined: 27-December 02 From: Port Hope, Ontario Member No.: 26 Region Association: Canada |
This shows your existing main battery stock wire that comes directly from the battery to the starter.
Attached image(s) 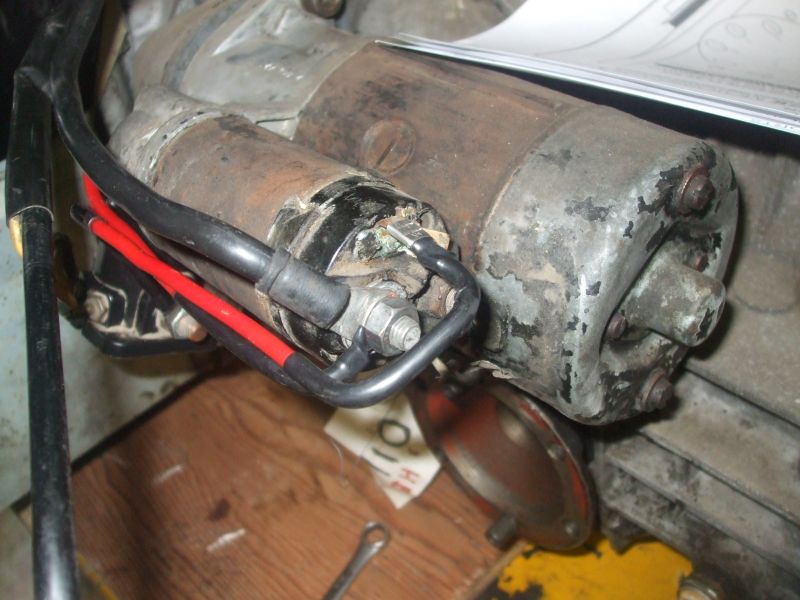
|
|
|
|
| Mark Henry |
Apr 24 2017, 06:41 AM
Post
#14
|
|
that's what I do! Group: Members Posts: 20,065 Joined: 27-December 02 From: Port Hope, Ontario Member No.: 26 Region Association: Canada |
The factory yellow wire that was on the Bosch starter now plugs directly into the Ford solenoid.
Note that this one has two small posts you only need to use the one, this one seems to be backwards from most of the solenoids I've used. Only one side will work, so if yours doesn't work first time flip these around. Attached image(s) 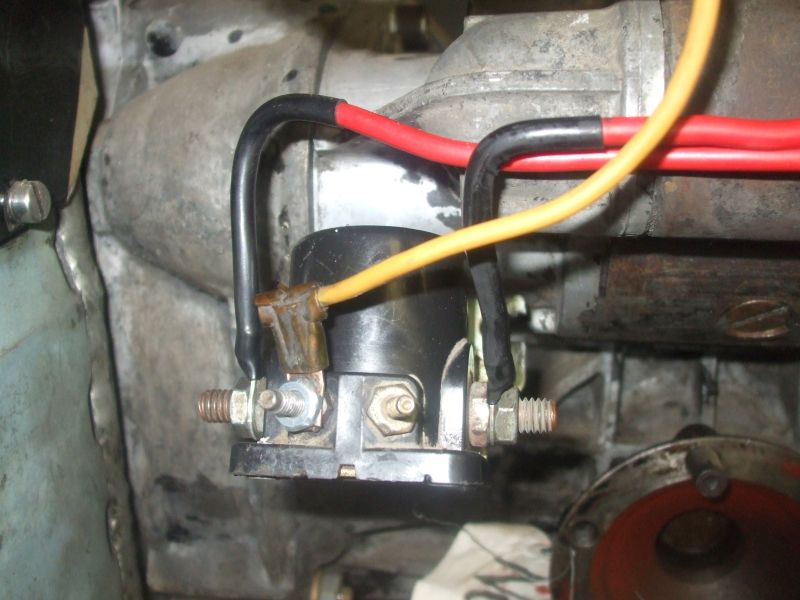
|
|
|
|
| Mark Henry |
Apr 24 2017, 06:43 AM
Post
#15
|
|
that's what I do! Group: Members Posts: 20,065 Joined: 27-December 02 From: Port Hope, Ontario Member No.: 26 Region Association: Canada |
A couple of zip ties and you're done. (IMG:style_emoticons/default/first.gif)
Attached image(s) 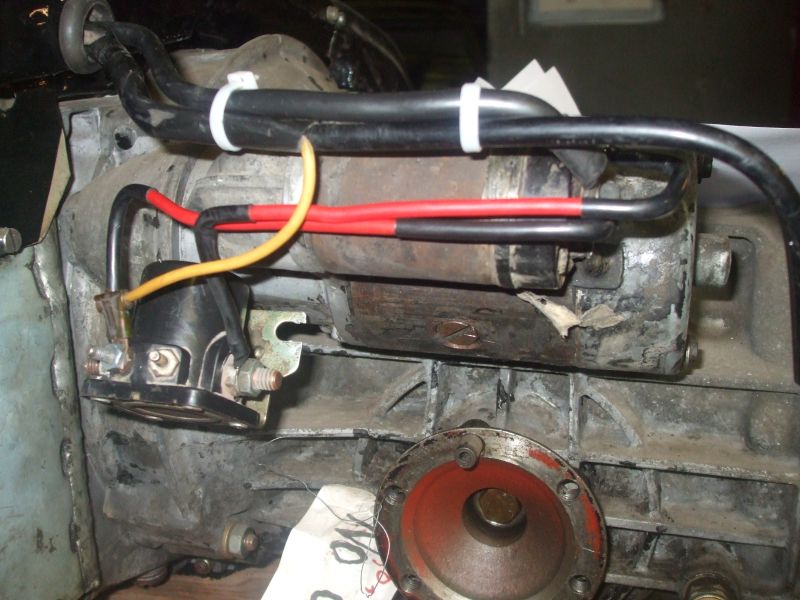
|
|
|
|
| Mark Henry |
Apr 24 2017, 06:54 AM
Post
#16
|
|
that's what I do! Group: Members Posts: 20,065 Joined: 27-December 02 From: Port Hope, Ontario Member No.: 26 Region Association: Canada |
This is real simple to make and crimpers should be a tool in every car guys tool kit, but if if you really think there's a demand for this I could offer a complete plug and play wiring kit for something like $30 shipped USA and Canada.
If I were to offer a kit I'd look into using better strain relief connectors. You would still have to buy a solenoid and do the mount mod. |
|
|
|
| jim_hoyland |
Apr 24 2017, 07:14 AM
Post
#17
|
|
Get that VIN ? Group: Members Posts: 9,577 Joined: 1-May 03 From: Sunset Beach, CA Member No.: 643 Region Association: Southern California |
Great write up- Admins, please add this to the Classics
One question: how is the Ford solenoid different from using a 50 amp relay. Many hot-start kits and threads in The Garage use the smaller relay. Just curious as to the pros and cons... (IMG:style_emoticons/default/smile.gif) |
|
|
|
| Kansas 914 |
Apr 24 2017, 07:14 AM
Post
#18
|
|
Advanced Member Group: Members Posts: 2,999 Joined: 1-March 03 From: Durango, Colorado Member No.: 373 Region Association: Rocky Mountains |
QUOTE(Mark Henry @ Apr 24 2017, 06:54 AM)  This is real simple to make and crimpers should be a tool in every car guys tool kit, but if if you really think there's a demand for this I could offer a complete plug and play wiring kit for something like $30 shipped USA and Canada. If I were to offer a kit I'd look into using better strain relief connectors. You would still have to buy a solenoid and do the mount mod. Mark - Thanks so much for the detailed documentation. It is indeed the RIGHT way to do it. ADMINS - How does this get moved to the Classics? Cheers! |
|
|
|
| shoguneagle |
Apr 24 2017, 07:43 AM
Post
#19
|
|
shoguneagle Group: Members Posts: 1,180 Joined: 3-January 03 From: CA, OR, AZ (CAZOR); New Mexico Member No.: 84 Region Association: Northern California |
It does belong in the Classics! Great job coming from a grump old rascal. Keep up the great work.
|
|
|
|
| Mark Henry |
Apr 24 2017, 09:49 AM
Post
#20
|
|
that's what I do! Group: Members Posts: 20,065 Joined: 27-December 02 From: Port Hope, Ontario Member No.: 26 Region Association: Canada |
QUOTE(jim_hoyland @ Apr 24 2017, 09:14 AM) Great write up- Admins, please add this to the Classics One question: how is the Ford solenoid different from using a 50 amp relay. Many hot-start kits and threads in The Garage use the smaller relay. Just curious as to the pros and cons... (IMG:style_emoticons/default/smile.gif) I don't want an argument as to which is better but this is my logic: 1/ I've been doing this forever, not about to change. Before me guy's like Gene Berg have been doing it since the 60's, so this has been a mod done for over 50 years. 2/ The Ford solenoid is waterproof, at least damn water resistant, the SPST relay is not at all. So you must mount the bosch horn relay in the engine bay, run wires through the grommet, tap into a power source, use a fuse, drill a mounting hole and cut the factory wire or at least make an extension/adaptor. 3/ the SPST relay (bosch horn relay) may be 30-50amp which should be enough on paper, but it still has very small contacts. The Ford solenoid must be rated for at least 500 cranking amps, likely much more. 4/ I've personally only had one failure, one that was so badly corroded after 8 winters that the bracket/bottom rusted right off at the rivets and the solenoid literally spilled it's guts in my hand when I took it off. I've replaced several perfectly good looking SPST relays with a ford unit. Technically I guess you can say I've had two failures, as a rookie I bent the mount by reefing on the plastic housing and broke one. That's why I instruct you to only bend the mount using two pliers, experience. 5/ The solenoid is fastened to the transmission starter bolt, not the body, so there's almost no vibration strain on the wires. 6/Unless you run across a concours weenie who likes to crawl under cars, just to be an ass pointing out everything that is not factory on a person's 914, you're the only person that will ever know. 7/ When I turn the key the first thing I like to hear is a spinning starter. 8/ I'll think of more reasons, hold my beer. 9/ KISS, this is such a simple fix. If any of you guys who can't stand the thought of a Ford part on a Porsche, but have a Rennshifter, well you better toss that puppy in the trash. Jwest now makes all his parts, but the early versions were a modified Ford Mustang shifter. The basic design has not changed. So send that puppy to me and I'll dispose of it properly, I hate them so much I'll even pay you the shipping. (IMG:style_emoticons/default/biggrin.gif) |
|
|
|
|
1 User(s) are reading this topic (1 Guests and 0 Anonymous Users)
0 Members:

|
Lo-Fi Version | Time is now: 14th January 2025 - 11:17 PM |
Invision Power Board
v9.1.4 © 2025 IPS, Inc.