|
|

|
Porsche, and the Porsche crest are registered trademarks of Dr. Ing. h.c. F. Porsche AG.
This site is not affiliated with Porsche in any way. Its only purpose is to provide an online forum for car enthusiasts. All other trademarks are property of their respective owners. |
|
|
  |
| bbrock |
 Jun 12 2017, 11:00 AM Jun 12 2017, 11:00 AM
Post
#1
|
|
914 Guru      Group: Members Posts: 5,269 Joined: 17-February 17 From: Montana Member No.: 20,845 Region Association: Rocky Mountains 
|
I'm trying to elevate my welding/patching skills and chasing that (so far) elusive invisible butt weld. (IMG:style_emoticons/default/welder.gif) I'm working on the front wheel well and would like to get this down before moving on to outer body panels where it will really count. I'm hoping to get some advise/critique from the experts what to do next and when to call it good enough for a little FG filler. And also what to change for the next time. This is all being done with my trusty, 30-year old, original 120v Hobart Handler MIG welder. Also, this will be a rotisserie job so the whole car will be blasted and primered before any fill goes on. So when I ask about being ready for filler, I mean AFTER proper prep.
Here's where things stand. This is the backside of the weld. 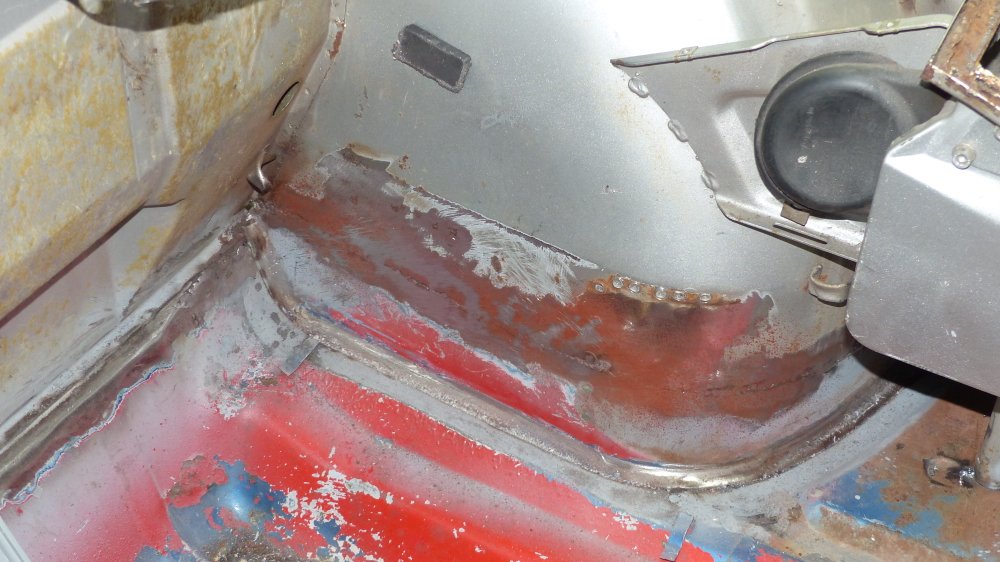 And here is a close up of what I'm dealing with. It looks to me like I didn't quite get complete penetration on the weld, possibly combined with shrinkage around the filler, causing the metal to sink a little. 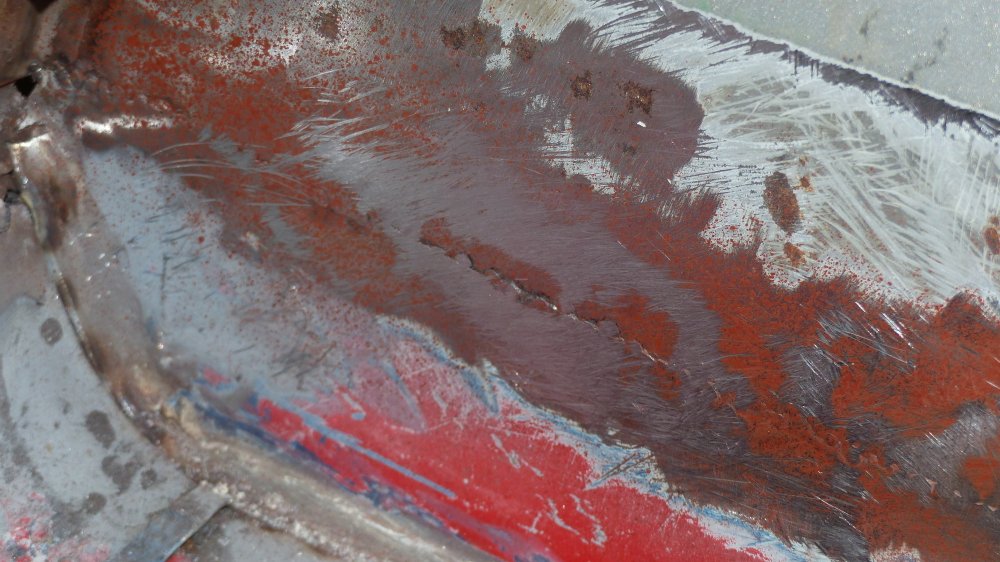 I've read that the way to handle the shrinkage is to hammer the weld on dolly to planish and stretch the metal. I've tried the best I could, but this is a tough area to reach around. More, I'm thinking I need to turn up the heat on the welder a little for future welds but would appreciate thoughts. So now the questions:
And here is a pic of the other side - the front of the weld. 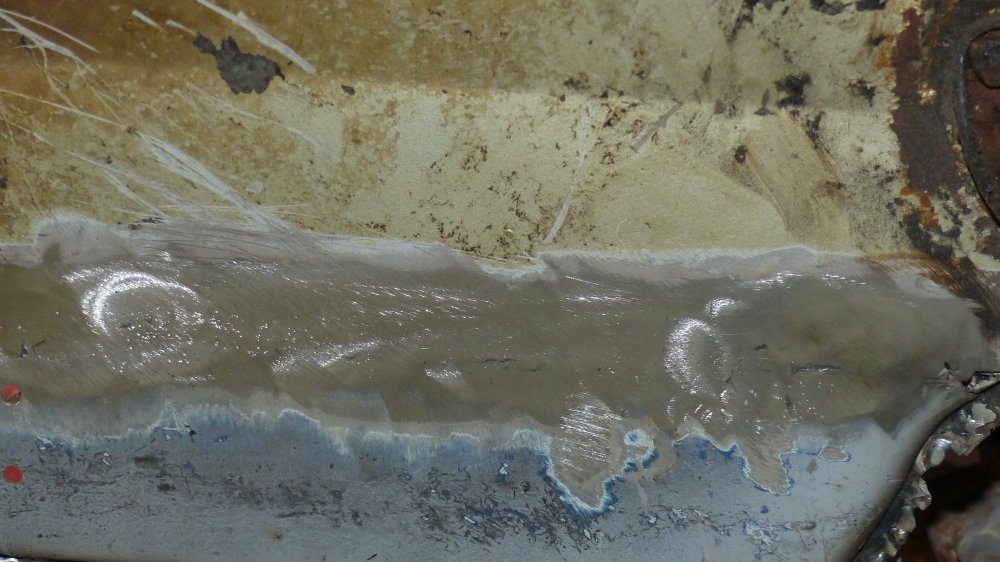 Just a few shallow low spots that I think would come out with some additional 80 grit sanding. But I'm thinking maybe it is better to call it good? (IMG:style_emoticons/default/confused24.gif) I've done a lot of searching and reading on welding forums but it seems that people like to post pics of their perfect, invisible welds that need no filler, or pics after filler. I haven't found examples of what good welds that need a touch of filler look like. I'm not going for "no filler perfection" but I do want to maintain a high quality standard. Not that a no filler perfect patch wouldn't make me happy, but I would like to actually drive this car some day. (IMG:style_emoticons/default/driving.gif) Thanks in advance for any suggestions. |
| rgalla9146 |
 Jun 12 2017, 11:22 AM Jun 12 2017, 11:22 AM
Post
#2
|
|
Advanced Member     Group: Members Posts: 4,671 Joined: 23-November 05 From: Paramus NJ Member No.: 5,176 Region Association: None 
|
No suggestions.
You're in the 90th percentile |
| McMark |
 Jun 12 2017, 11:56 AM Jun 12 2017, 11:56 AM
Post
#3
|
|
914 Freak!                Group: Retired Admin Posts: 20,179 Joined: 13-March 03 From: Grand Rapids, MI Member No.: 419 Region Association: None |
I weld at high power, so the weld penetrates quickly, and just do tack welds. That looks like how you're doing it as well, but if you're worried about penetration you may need to step up a bit on power. Pictures of unground welds would help as well.
You're well along the way to making invisible welds. One very important thing to keep in mind is that the perfect weld (like most things) happens in the prep phase. Make sure both sides of the metal are ground clean and bare, make sure that the patch piece is well fit before you start. Never try to work the metal into place as you weld. And finally, be very careful about how much you grind your welds. You can't MAKE a bad weld into a good one by grinding more. You'll end up with paper thing metal that looks good when you're done but will crack or if you have to weld near those grinds again you blow right through. It can help to think of it this way -- you never want to grind the base metal (the sheet metal), you only want to grind the weld material. And then it looks how it looks. Just throw another few hundred hours at it and you'll get it. (IMG:style_emoticons/default/shades.gif) |
| bbrock |
 Jun 12 2017, 12:40 PM Jun 12 2017, 12:40 PM
Post
#4
|
|
914 Guru      Group: Members Posts: 5,269 Joined: 17-February 17 From: Montana Member No.: 20,845 Region Association: Rocky Mountains 
|
I weld at high power, so the weld penetrates quickly, and just do tack welds. That looks like how you're doing it as well, but if you're worried about penetration you may need to step up a bit on power. Pictures of unground welds would help as well. You're well along the way to making invisible welds. One very important thing to keep in mind is that the perfect weld (like most things) happens in the prep phase. Make sure both sides of the metal are ground clean and bare, make sure that the patch piece is well fit before you start. Never try to work the metal into place as you weld. And finally, be very careful about how much you grind your welds. You can't MAKE a bad weld into a good one by grinding more. You'll end up with paper thing metal that looks good when you're done but will crack or if you have to weld near those grinds again you blow right through. It can help to think of it this way -- you never want to grind the base metal (the sheet metal), you only want to grind the weld material. And then it looks how it looks. Just throw another few hundred hours at it and you'll get it. (IMG:style_emoticons/default/shades.gif) Thanks for the tips! Here's a pic of the weld with maybe 25-30% of the tack welds complete and before any grinding. 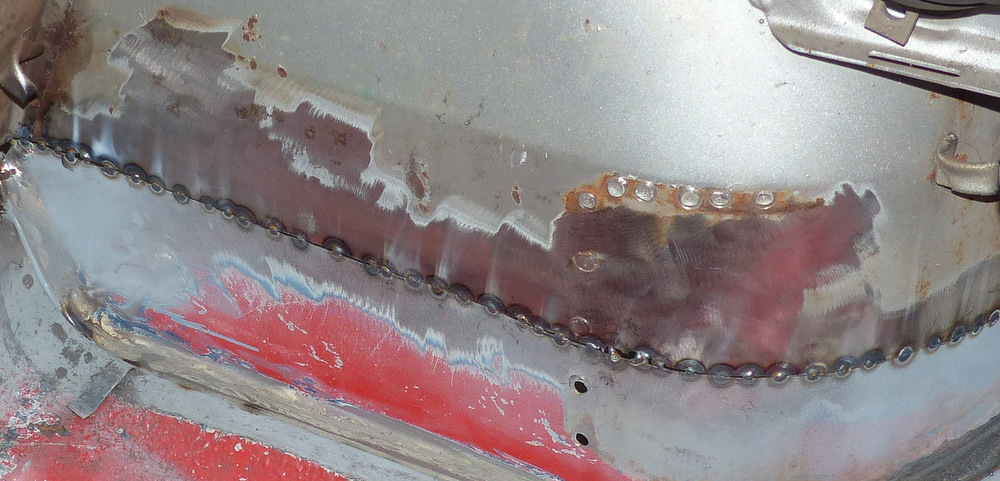 Like a dummy, I forgot to get pics after all the tacks were in, or of the front of the weld. (IMG:style_emoticons/default/headbang.gif) That googe in front of the reinforcement brace weld points is because there was still some minor rust pitting in a small area and the fender scrap I had for the patch didn't quite reach. My process was to make a dozen or less tacks skipping around the panel and then going off to do something else while everything cooled down before going another round. When finished, I used a cuttoff wheel held perpendicular to grind half inch segments of the weld heads, again skipping around and taking breaks to let things cool down. I ground the heads to just barely proud of the parent material and then finished with a 3" sanding disc. 36 grit just enough to bring the weld flush and then 80 grit. At the stage of this pic, it looks like the penetration is pretty good with a couple exceptions at the radius. I think the penetration issue happened as I was closing up the gaps and there was more material to suck heat away. I'll experiment on some scrap with higher power settings. For this particular weld, is it time to stop futzing with it? Seems like any more work risks either getting into parent metal or adding heat to warp things. Thanks again for the help. Much appreciated! (IMG:style_emoticons/default/aktion035.gif) |
| Andyrew |
 Jun 12 2017, 01:16 PM Jun 12 2017, 01:16 PM
Post
#5
|
|
Spooling.... Please wait           Group: Members Posts: 13,377 Joined: 20-January 03 From: Riverbank, Ca Member No.: 172 Region Association: Northern California 
|
Thats about as good as it gets, especially on curves like that.
I did butt welding/grinding for 2 years straight at work and got to the point that the metal pieces wouldnt ever need filler. But that was only on 2" sections at a time. Today your work is about what I would expect out of myself, and far better than I would expect out of most pro hot rod body shops. |
| IronHillRestorations |
 Jun 12 2017, 01:21 PM Jun 12 2017, 01:21 PM
Post
#6
|
|
I. I. R. C.      Group: Members Posts: 6,793 Joined: 18-March 03 From: West TN Member No.: 439 Region Association: None 
|
One thing that will help from blowing through is spooling out about 1/2-3/4" of wire. A copper spoon behind the weld will help too, but often that requires two people.
In a perfect scenario your gap between the two panels will be about 1/32", or about the thickness of the metal. If you don't have a gap it will warp more. On your subsequent welds, start the bead on one of your previous beads. |
| LowBridge |
 Jun 12 2017, 01:23 PM Jun 12 2017, 01:23 PM
Post
#7
|
|
Member   Group: Members Posts: 370 Joined: 10-August 15 From: Lunenburg, MA Member No.: 19,045 Region Association: North East States |
you are well on your way... nicely done. Start with a great fit and very clean metal and then just TAKE YOUR TIME... no rushing it along...
|
| bbrock |
 Jun 12 2017, 02:41 PM Jun 12 2017, 02:41 PM
Post
#8
|
|
914 Guru      Group: Members Posts: 5,269 Joined: 17-February 17 From: Montana Member No.: 20,845 Region Association: Rocky Mountains 
|
Thanks everyone. I'm feeling much better about this now, and thanks for the compliments! McMark mentioned being able to MAKE good welds out of bad with grinding. The other way to do it is with body filler and I don't want to be "that guy." "That guy" already left his mark in the hell hole of this car which I will have to sort out. But I can't blame the PO because "that guy" was me, 25 years ago! (IMG:style_emoticons/default/dumbass.gif)
One thing that will help from blowing through is spooling out about 1/2-3/4" of wire. A copper spoon behind the weld will help too, but often that requires two people. I was just reading a tip last night about angling the nozzle to increase stickout and reduce blowout. I'll give that a try. Here's a shot of my hillbilly substitute for a copper spoon assistant (IMG:style_emoticons/default/tooth.gif) : 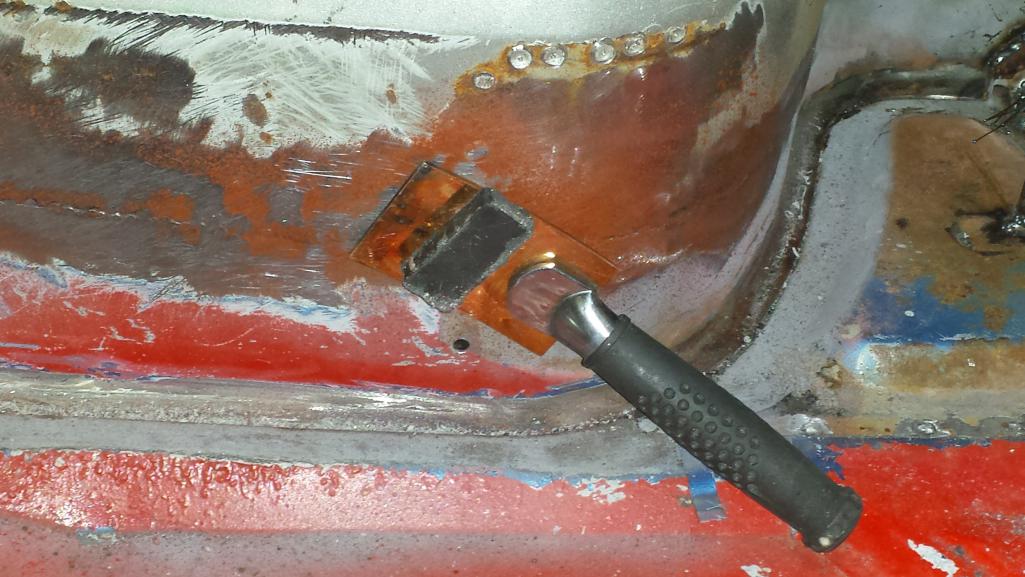 |
  |
1 User(s) are reading this topic (1 Guests and 0 Anonymous Users)
0 Members:

|
Lo-Fi Version | Time is now: 2nd January 2025 - 01:32 PM |
Invision Power Board
v9.1.4 © 2025 IPS, Inc.


