|
|

|
Porsche, and the Porsche crest are registered trademarks of Dr. Ing. h.c. F. Porsche AG.
This site is not affiliated with Porsche in any way. Its only purpose is to provide an online forum for car enthusiasts. All other trademarks are property of their respective owners. |
|
|
  |
| Dr. Roger |
 Jan 30 2006, 02:40 AM Jan 30 2006, 02:40 AM
Post
#241
|
||
|
A bat out of hell.     Group: Members Posts: 3,944 Joined: 31-January 05 From: Hercules, California Member No.: 3,533 Region Association: Northern California |
oh yea', you can't create dir's. only drop files.... note where it pooped out... =-) roger |
||
| racerx7 |
 Jan 30 2006, 02:42 AM Jan 30 2006, 02:42 AM
Post
#242
|
|
Member   Group: Members Posts: 119 Joined: 28-January 06 From: Belmont, CA 94002 Member No.: 5,489 |
I need to be able to upload a 155 folders and 955 files 175mb. |
| racerx7 |
 Jan 30 2006, 02:45 AM Jan 30 2006, 02:45 AM
Post
#243
|
|
Member   Group: Members Posts: 119 Joined: 28-January 06 From: Belmont, CA 94002 Member No.: 5,489 |
Is it your machine? Can you change the ftp server?
Never mind. I will try and zip it to one big file. You can just unzip when you want it. |
| Dr. Roger |
 Jan 30 2006, 02:45 AM Jan 30 2006, 02:45 AM
Post
#244
|
|
A bat out of hell.     Group: Members Posts: 3,944 Joined: 31-January 05 From: Hercules, California Member No.: 3,533 Region Association: Northern California |
in all seriousness tony, i saw a jag prototype earlier today that had a great belly pan/rear diffuser combo that looked so bad-ass and i cant' find the link to it now.... grrrrrrrrrrrrrrr. (IMG:http://www.914world.com/bbs2/html/emoticons/headbang.gif)
you know that setup would lower drag on our 914's big time... (IMG:http://www.914world.com/bbs2/html/emoticons/smilie_pokal.gif) keep up the great new designs. A+ on the exhaust dumping thru the bumper... |
| racerx7 |
 Jan 30 2006, 03:03 AM Jan 30 2006, 03:03 AM
Post
#245
|
|
Member   Group: Members Posts: 119 Joined: 28-January 06 From: Belmont, CA 94002 Member No.: 5,489 |
Uploaded started. File is called manual.zip |
| speedster356 |
 Feb 2 2006, 01:56 AM Feb 2 2006, 01:56 AM
Post
#246
|
|
Newbie  Group: Members Posts: 20 Joined: 17-January 06 From: Sydney Australia Member No.: 5,429 |
Re: the rear radiator setup. I have a 550 Spyder replica with the same setup (picking up air from the belly pan). I'm running non standard EJ20T turbo engine, 16psi boost with 8.5:1 comp. Mild tune gives me 248 HP at the rear wheels. I've found that the current config will not handle long on boost laps and gets to very high temps very quickly. The first setup had only approx a 70 mm gap in the pan for pickup the full width of the radiator (standrd WRX 21mm thk single row 770mm x 500mm I think).
Results were: on the track (1) 70mm slot only, no scoop, standard 2 speed fans running on high 100%.........................overheating (2) 50mm deflector plate along bottom of radiator and into airflow and fans..........................overheating (3) cut out the firewall and have two 300 x 300 holes in belly pan in front of the radiator with composite ducting, fans ............................................................................................................................didn't overheat until well heat soaked after more laps, then overheated. (4) 700mm wide scoop with a 40 mm mouth opening from light weight aluminium sheet.........best resistence to overheating but lasted one touch of the ripple strip! (5) spring loaded scoop, as suggested above it needs to be tensioned , ....................................started to osolate at 130MPH and self destructed. (6) last week failed #4 forged piston due high temp. (7) yesterday started to fab front mounted radiator. Your engine won't be generating as much heat so you will most likely be OK with the setup. There are a few guys here running japanese engines in VWs and the NA cars have run radiators slanted above the gearbox with no problems. Have fun (IMG:http://www.914world.com/bbs2/html/emoticons/biggrin.gif) |
| TonyAKAVW |
 Feb 2 2006, 12:01 PM Feb 2 2006, 12:01 PM
Post
#247
|
|
That's my ride.     Group: Members Posts: 2,151 Joined: 17-January 03 From: Redondo Beach, CA Member No.: 166 Region Association: None |
Thats some really good information! What sort of ground clearance does your car have? I'm curious what sort of airflow you actually get under your car.
Also, how do you exhaust the heated air? My current plan is not to take air from under the car, but instead from above. I will have some kind of subtle scoop integrated into the trailing edge of the roof line. To exhaust the heated air I am going to suck it out the bottom of the car by means of accelerated air flow created by a flat bottom and rear diffusor. Thats the theory at least (IMG:http://www.914world.com/bbs2/html/emoticons/biggrin.gif) I really want to develop something for the engine bay that can handle more than just a naturally aspirated EJ25. Someday I may want to put in a turbo motor. -Tony |
| TonyAKAVW |
 Feb 2 2006, 12:36 PM Feb 2 2006, 12:36 PM
Post
#248
|
|
That's my ride.     Group: Members Posts: 2,151 Joined: 17-January 03 From: Redondo Beach, CA Member No.: 166 Region Association: None |
Here's the basic idea... I have no idea if it will work (IMG:http://www.914world.com/bbs2/html/emoticons/wacko.gif)
Attached thumbnail(s) 
|
| d914 |
 Feb 2 2006, 12:39 PM Feb 2 2006, 12:39 PM
Post
#249
|
|
Advanced Member     Group: Members Posts: 2,349 Joined: 12-July 03 From: Atlanta, ga Member No.: 904 Region Association: South East States |
well hurry then, my plan is for a turbo, and I don't have to be subtle with the scoop.... How about a reverse scoop like the suby hood scoop turned 180???
|
| tat2dphreak |
 Feb 2 2006, 01:17 PM Feb 2 2006, 01:17 PM
Post
#250
|
|
stoya, stoya, stoya      Group: Benefactors Posts: 8,797 Joined: 6-June 03 From: Wylie, TX Member No.: 792 Region Association: Southwest Region  |
IIRC the porscheru had a scoop hanging down below the car to grab more air for the radiator... also, why not vent the front firewall and use the heat tubes to carry more air back...
|
| speedster356 |
 Feb 2 2006, 02:33 PM Feb 2 2006, 02:33 PM
Post
#251
|
|
Newbie  Group: Members Posts: 20 Joined: 17-January 06 From: Sydney Australia Member No.: 5,429 |
I had quite a good air flow under the car but still a low pressure area. The cars sitting with about 80mm clearance between road and belly pan, much less under heavy braking, I think with the bigger scoop it would have been no problem for cooling. Air exit was just via the engine area in the rear, very turbulant area so not the best exit conditions. The 2 grills at the back were used for intercooler air exit. The intercooler picked up ducted air from just inside the rear wheels, in this position (above the gearbox) it was open to heat sink problems in the engine compartment . The new setup will have the interccoler mounted in the old radiator position (in the front of the engine) as I don't think it's as critical for air delivery as the radiator, all headers the turbo and exhausts ceramic coated, 2.5 STI block with 2.0l heads etc. detuned to 260 HP at the rear wheels on low boost ( not the crazy 330+ they get here with these engines). This should give me a low stress engine and the best conditions for cooling.
I like your idea of a roof scoop, air delivery was one of the hardest things I found on my car as I didn't want to have big cutouts on the topside of the body so as to retain the original look of the car. Nothing better than smoking a thumping V8 at the drags in an "old timer car"...... |
| TonyAKAVW |
 Feb 5 2006, 11:59 PM Feb 5 2006, 11:59 PM
Post
#252
|
|
That's my ride.     Group: Members Posts: 2,151 Joined: 17-January 03 From: Redondo Beach, CA Member No.: 166 Region Association: None |
So I neded up doing a water test of the oil pan. I filled the pan with soapy water and let it sit for a few hours. The pan ended up having two small pinholes, which I fixed by filling them with braze. I bought a MAAP Gas torch and brazing rod at the hardware store which worked well. The leaks are gone and so yesterday I did some serious powder coating.
The oilpan will probably need some more powder, as I couldn't get full coverage inside. If I can't get powder to work I'll slosh around some POR-15. The bottom of the pan on the outside ended up a little thin on the powder so I'll add some more and re-bake. The engine bar came out perfectly, and I drilled holes through the almunim blocks to finish it up. The inside of the bar still needs some POR-15 and a drain hole at the bottom, but otherwise its done. -Tony Attached image(s) 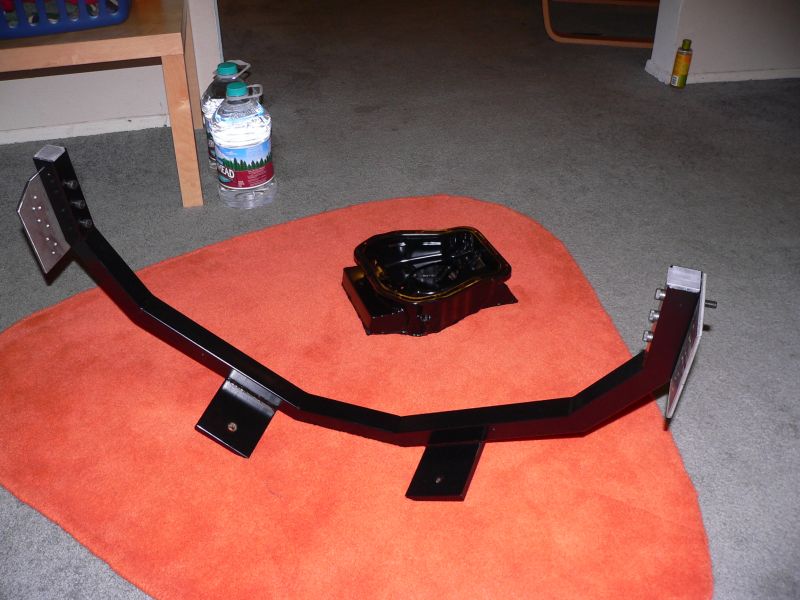
|
| TonyAKAVW |
 Feb 6 2006, 12:00 AM Feb 6 2006, 12:00 AM
Post
#253
|
|
That's my ride.     Group: Members Posts: 2,151 Joined: 17-January 03 From: Redondo Beach, CA Member No.: 166 Region Association: None |
..
Attached image(s) 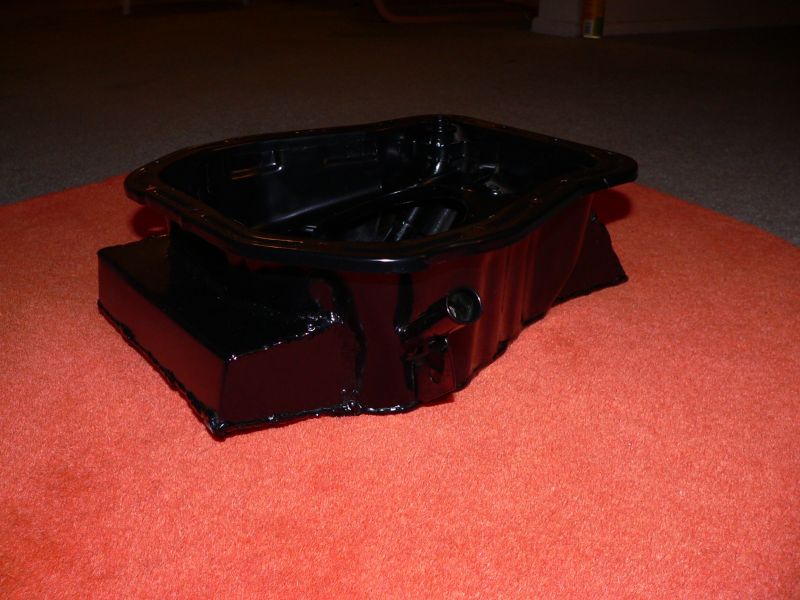
|
| TonyAKAVW |
 Feb 6 2006, 12:00 AM Feb 6 2006, 12:00 AM
Post
#254
|
|
That's my ride.     Group: Members Posts: 2,151 Joined: 17-January 03 From: Redondo Beach, CA Member No.: 166 Region Association: None |
...
Attached image(s) 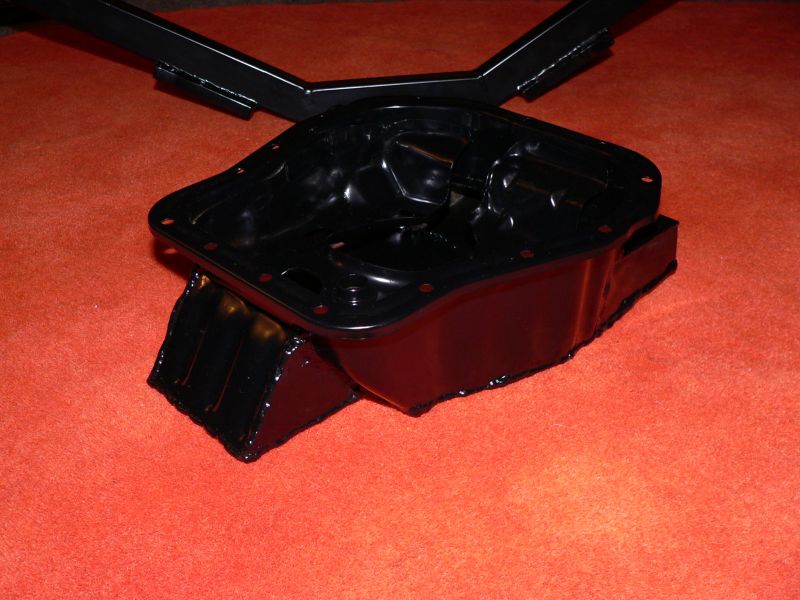
|
| TonyAKAVW |
 Feb 6 2006, 12:01 AM Feb 6 2006, 12:01 AM
Post
#255
|
|
That's my ride.     Group: Members Posts: 2,151 Joined: 17-January 03 From: Redondo Beach, CA Member No.: 166 Region Association: None |
Those are 3/8 inch diameter bolts.
The bare steel plate get welded to the longitudinals near the trunk firewall. Attached image(s) 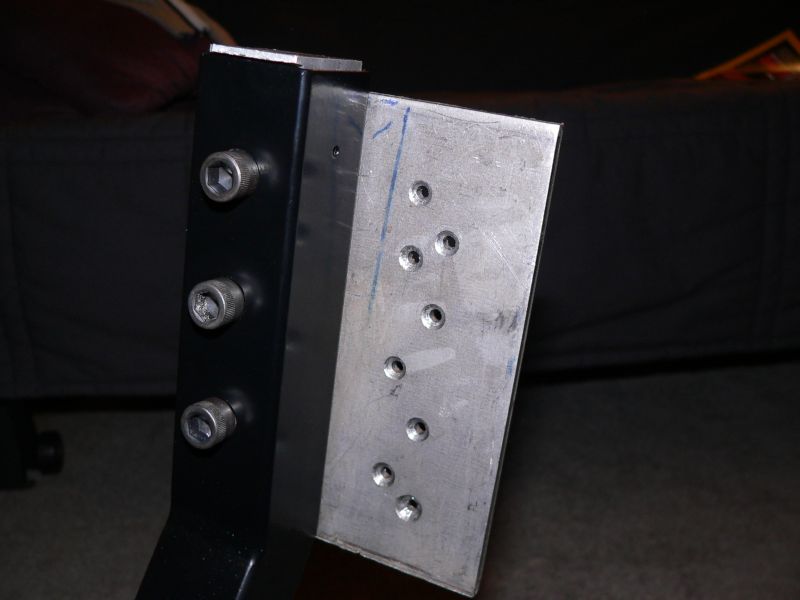
|
| Crazyhippy |
 Feb 6 2006, 09:25 AM Feb 6 2006, 09:25 AM
Post
#256
|
|
Insert witty comment here...    Group: Members Posts: 1,659 Joined: 28-July 05 From: Home of the Coyotes, AZ Member No.: 4,493 Region Association: None |
|
| bondo |
 Feb 6 2006, 01:35 PM Feb 6 2006, 01:35 PM
Post
#257
|
|
Practicing my perpendicular parking     Group: Members Posts: 4,277 Joined: 19-April 03 From: Los Osos, CA Member No.: 587 Region Association: Central California |
Man, I wish I had a tig.
|
| turbo914v8 |
 Feb 6 2006, 03:13 PM Feb 6 2006, 03:13 PM
Post
#258
|
|
Member   Group: Members Posts: 373 Joined: 26-July 03 From: Canada Member No.: 952 |
I have a Tig.
Man I whish I know how to use the Tig. (IMG:http://www.914world.com/bbs2/html/emoticons/confused24.gif) |
| Crazyhippy |
 Feb 6 2006, 07:36 PM Feb 6 2006, 07:36 PM
Post
#259
|
|
Insert witty comment here...    Group: Members Posts: 1,659 Joined: 28-July 05 From: Home of the Coyotes, AZ Member No.: 4,493 Region Association: None |
Learning tig wasn't too tough for me. If you know how to Oxy Acetalene weld, it's very similar.
Find somone local and have them give you a crash course. (IMG:http://www.914world.com/bbs2/html/emoticons/welder.gif) |
| TonyAKAVW |
 Feb 10 2006, 02:51 AM Feb 10 2006, 02:51 AM
Post
#260
|
|
That's my ride.     Group: Members Posts: 2,151 Joined: 17-January 03 From: Redondo Beach, CA Member No.: 166 Region Association: None |
Got some work done tongiht on the engine. I'm starting to get it all put back together. I put the intake manifold and throttle body on, as well as the injectors and runners. Also, the water pipe that conencts one side of the engine to the other. The oil tank is on, as well as the shortened pickup tube. I managed to tighten all the bolts around the perimeter of the oilpan. This was based on a lesson learned from Scott's oilpan where he ran into problems getting a few of the bolts tightened. I put some effort into designing my oil tank mods such that the bolts were accesible, at least by some means...
The pulley on the front needs torqueing down but after that I can install my custom alternator bracket, and the alternator. Anyway, here's the modified pickup tube. I basically cut out something like 1.5 inches of the tube and brazed it back together. Across the bottom of the pickup tube, Bondo welded a piece of welding rod. This is an idea I stole from Outback Motors. They do this so that if the pan gets bashed in, something keeps the intake opening somewhat clear. Attached image(s) 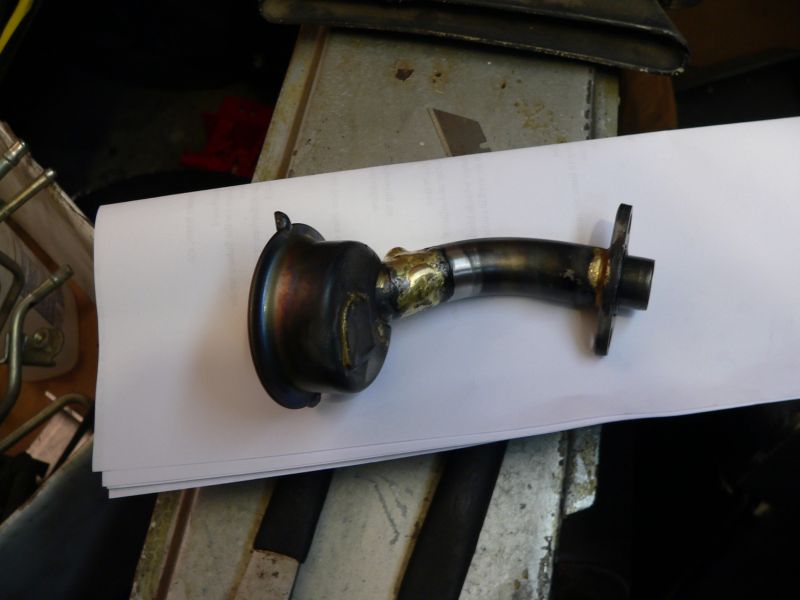
|
  |
1 User(s) are reading this topic (1 Guests and 0 Anonymous Users)
0 Members:

|
Lo-Fi Version | Time is now: 20th April 2025 - 12:32 AM |
Invision Power Board
v9.1.4 © 2025 IPS, Inc.


