|
|

|
Porsche, and the Porsche crest are registered trademarks of Dr. Ing. h.c. F. Porsche AG.
This site is not affiliated with Porsche in any way. Its only purpose is to provide an online forum for car enthusiasts. All other trademarks are property of their respective owners. |
|
|
| Larry.Hubby |
 Sep 20 2017, 12:42 AM Sep 20 2017, 12:42 AM
Post
#1
|
|
Member who doesn't post much, but has a long time in 914s   Group: Members Posts: 189 Joined: 24-November 04 From: Palo Alto, CA Member No.: 3,172 Region Association: Northern California |
In seeking to deliver on my resolve to not butcher the car’s sheet metal, the first problem I tackled was how to mount a compressor in some reasonable way.
I looked first at using a DC motor-driven compressor, such as the one used in the early Toyota Prius, which would’ve allowed mounting the compressor virtually anywhere. Although the battery pack in the Prius is connected to deliver a much higher voltage than 12V, the AC compressor , at least in the early cars, does run on 12V, a power converter being used to step the voltage down appropriately. I know this because the Japanese company that designed the converter for Toyota was showing this unit as an example of their prowess at custom power designs at the Japan Electronics Show in 1998, which I happened to be attending for other reasons. I got to talk with one of their design engineers and learned that the compressor drive motor draws about 90 amps continuously when running and the converter/compressor combination has its own cooling system! This would easily overwhelm the 70-90 amp alternators used on the 911SC and Carrera engines, and rewiring a 911 alternator for roughly twice the stock current might be difficult considering its intimate relationship with the cooling fan and ducting. There was also the fact that the Prius motor/compressor without the power converter cost over $1000 back in 2005. This could clearly be made to work, but the cost and effort involved seemed to me to be significantly greater than that of solving the problem of mounting and driving the compressor from the engine without hacking up the firewall. So, I mentally went back to the traditional method of driving the compressor directly from the engine. As we all know, this is unusually difficult to do on the 914-6 because the front of the engine is nestled into a recess formed in the firewall, making access to the crank pulley potentially difficult. I considered the possibility of mounting the compressor behind the engine and driving it from the rear of the camshaft on the passenger side, using some of the factory hardware from the 930 that drives the auxiliary oil pump for the turbo this way. The camshaft, however, turns at half engine speed, and this would reduce the effective compressor capacity by a factor of two unless a 2:1 step-up were designed into the drive arrangement. Since the pulley size on the typical compressor is five or six inches in diameter, this would require an impractically large pulley on the camshaft. It might be possible to fabricate and mount on the compressor a much smaller drive pulley, preserving the electric clutch, but it would be an even bigger fabrication job than the route I finally chose, considering that there is also less in the way of a convenient mounting location to support the weight of the compressor at the rear than at the front of the engine. I also worried that the intermittent nature of the fairly heavy load from the compressor cycling on and off might perturb the valve timing, but I notice that the 3.6 engines do in fact drive their power steering pumps, which also represent a variable load, in this way, so perhaps this is a needless concern. So, drive from the front of the engine seems the more attractive option. The crank pulley is far enough back that a belt running in the outer groove of a two-groove pulley could avoid interfering with the firewall, but the compressor would then have to be mounted beside rather than above the cylinder head in order to be low enough because of the rearward-slope of the firewall. If one contemplates mounting the compressor on the same side of the engine that the factory did, the driver’s side on the 914, it gets very close to interfering with changing the oil filter, which is already a less-than-rewarding experience due to close quarters. If mounted on the other side of the engine, the compressor has to be partially tucked under the battery shelf. In my case, I’ve already committed the passenger side of the engine to a belt-driven power steering pump, so the driver’s side it is. The compressor can be mounted in essentially the same location that the factory chose for the 911 if it is moved rearward a few inches, and this can be accomplished by using an intermediate jackshaft to relay the belt drive from the crankshaft pulley rearward by the required amount. This is not a new idea. I have seen reference to more than one other 914 AC installation that uses this scheme to avoid having to modify the firewall for clearance. None that I have seen, however, would be mechanically compatible with my particular situation, so I wound up having to design and build everything to do this from scratch. The basic scheme I chose is to mount a small shelf just above the driver’s side chain case in the space normally occupied by one of the heater hose outlets on the early engines, securing it to a strut attached to the front motor mount and a bar attached to the cylinder head, the strut locating it side-to-side and up-and-down, and the bar locating it fore-and-aft. The jackshaft is then mounted on top of this shelf in a manner that allows it to be adjusted side-to-side so that the drive belt from the crankshaft pulley can be adjusted and changed. The bottom of the compressor is also mounted to the bar by a bolt through one of its mounting ears, allowing it to pivot about this point to adjust the secondary belt. The nominal compressor offset to the rear produced by the jackshaft is 2.25-2.375”, depending upon pulley adjustment. A few pictures and drawings will no doubt communicate all this better than my descriptions can. Here’s the front view of the mounting hardware in theory: 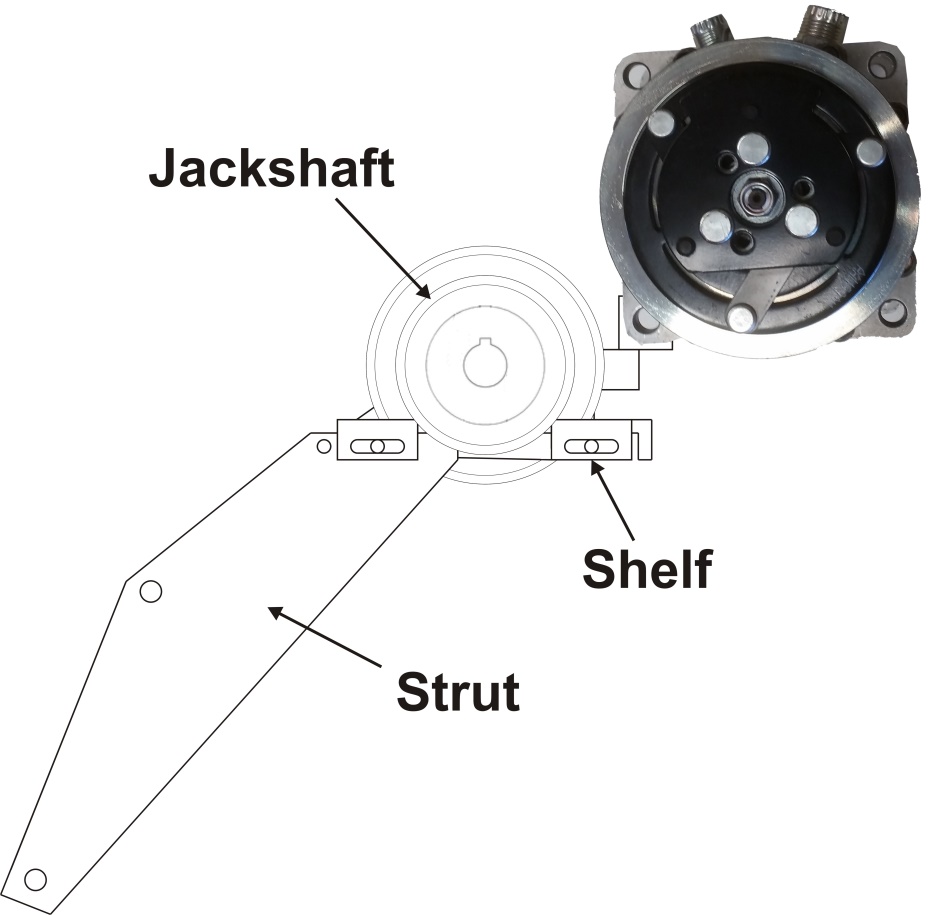 And a photo of it in practice: 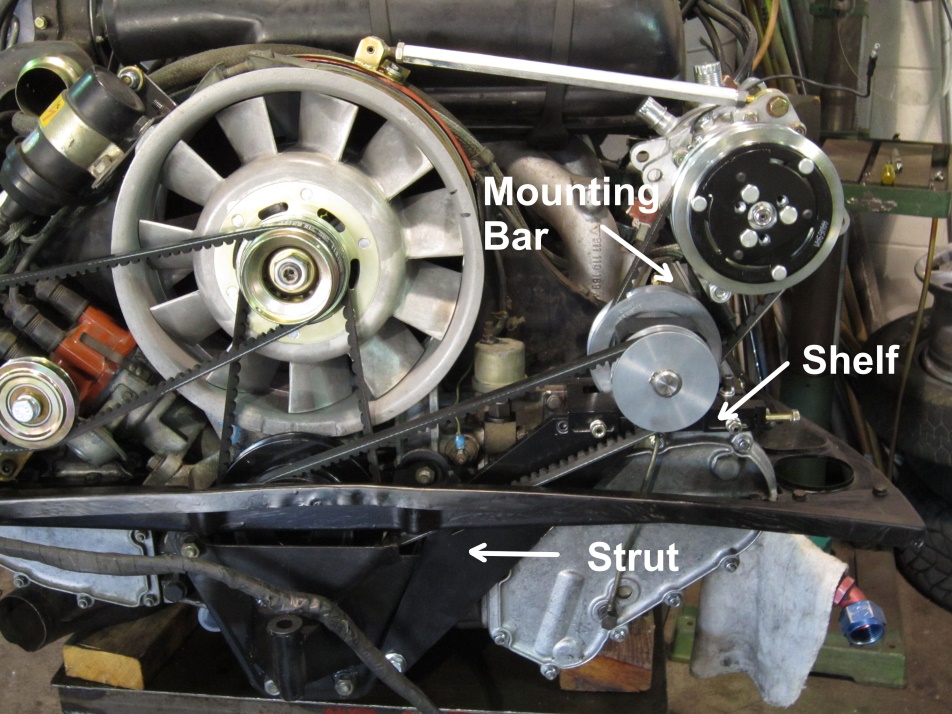 The two side views of the same thing: 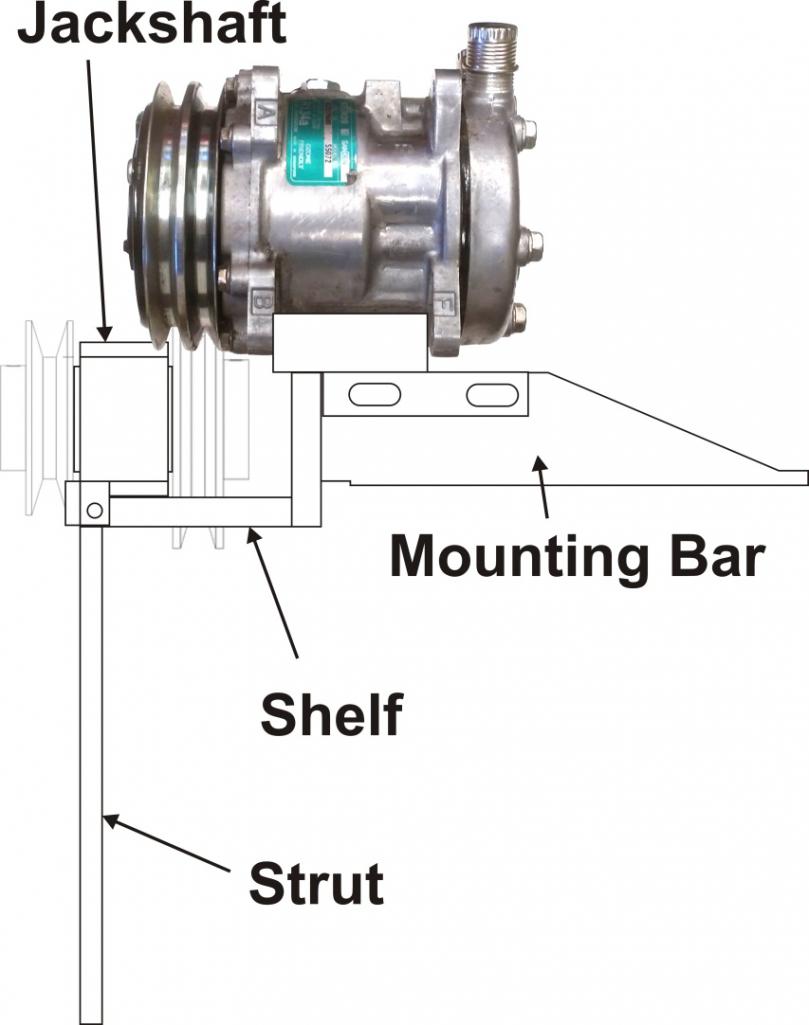 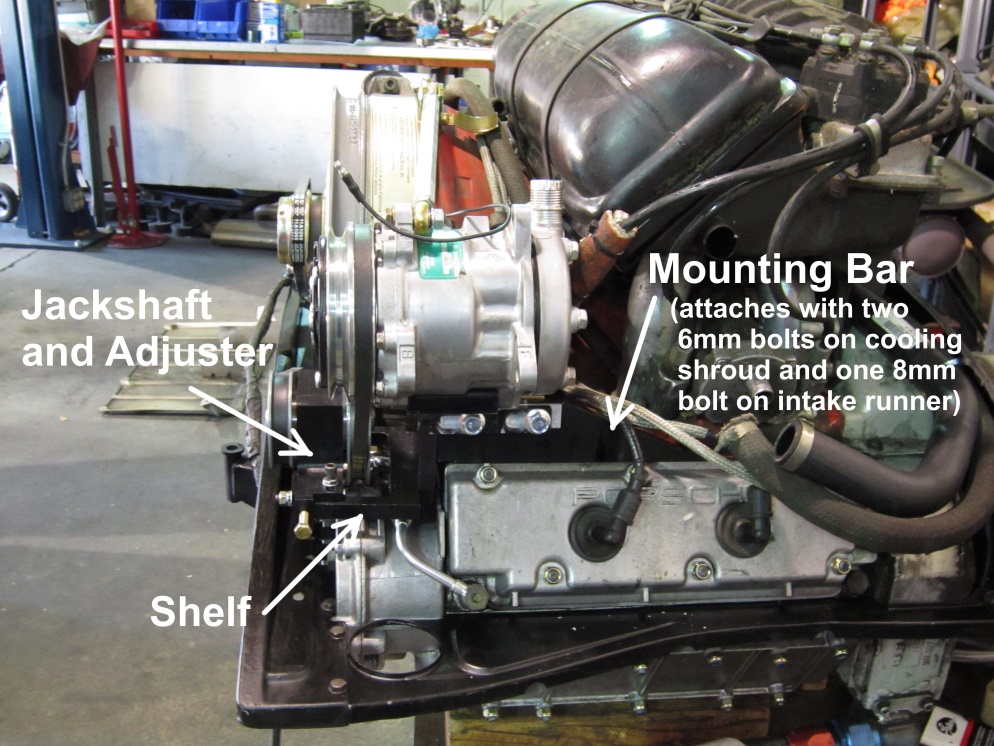 And the top views: 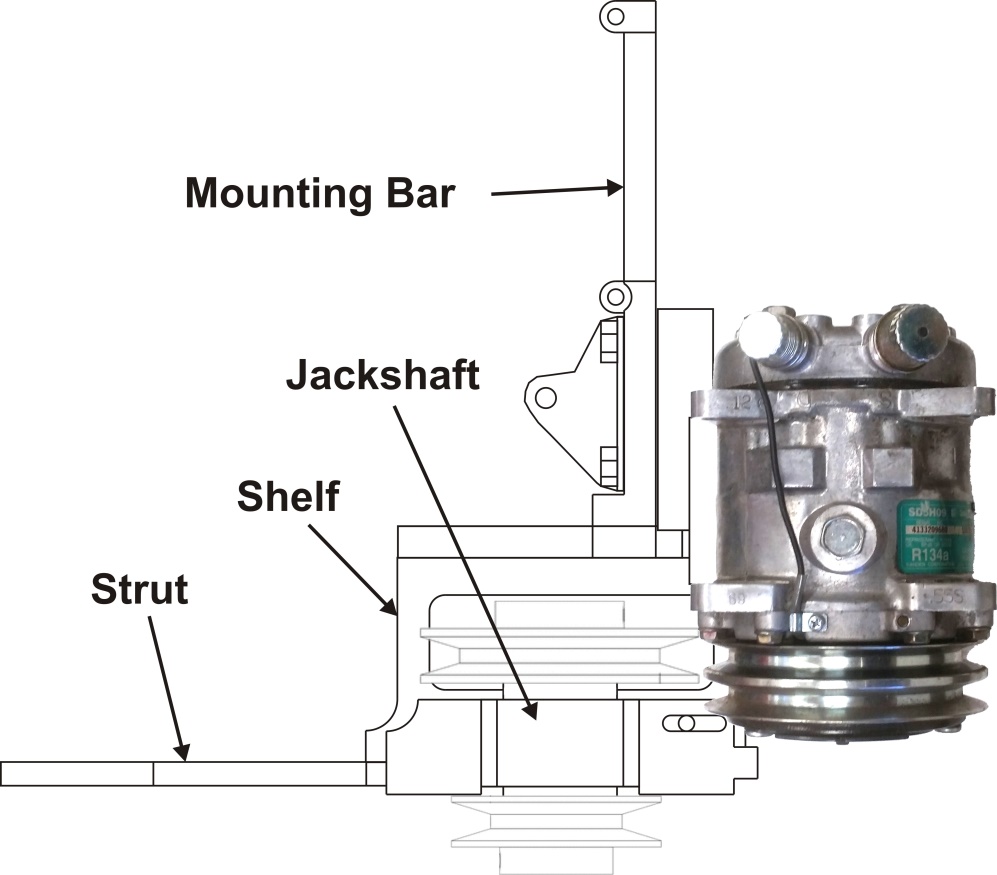 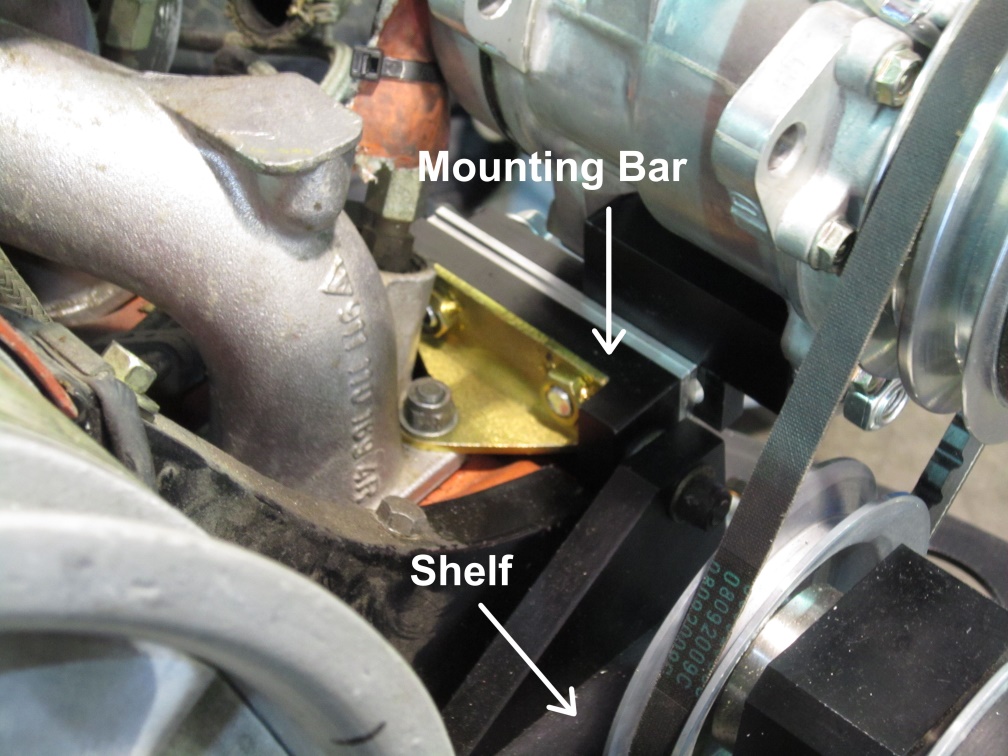 In this configuration the weight of the compressor is borne by cam housing rather than the chain case, which is secured to the cylinder heads by twelve 8mm studs, and ultimately to the engine case by the twelve cylinder studs. There is a twisting moment caused by the fact that the compressor is offset to the outside, and consequently its weight is not directly over the mounting bar. This torque is opposed by the combination of the yellow zinc-coated bracket shown above that picks up one of the intake manifold 8mm mounting studs and the secondary belt itself. The adjusting link that anchors to the top of the engine cooling fan shroud forces the compressor outward to tension the secondary belt. On a car with carburetors it would probably be necessary to rotate the compressor outward by 30-45° to clear them, and to use a different length secondary belt or to shim the compressor mounting block outward by a suitable amount. There is another significant problem with mounting the compressor this way, at least with a car using the factory 914-6 front motor mount, like mine. The stock front mount console, the part that bolts to the engine, does not clear a double groove crank pulley and is not easily modified to do so. So, since I was going to use a stock 911SC crank pulley with two grooves, I found myself stuck building a new front motor mount console in addition to the parts for the rest of the compressor mount. To do this I started with the corresponding part of a 911SC rear motor mount that I bought on eBay: 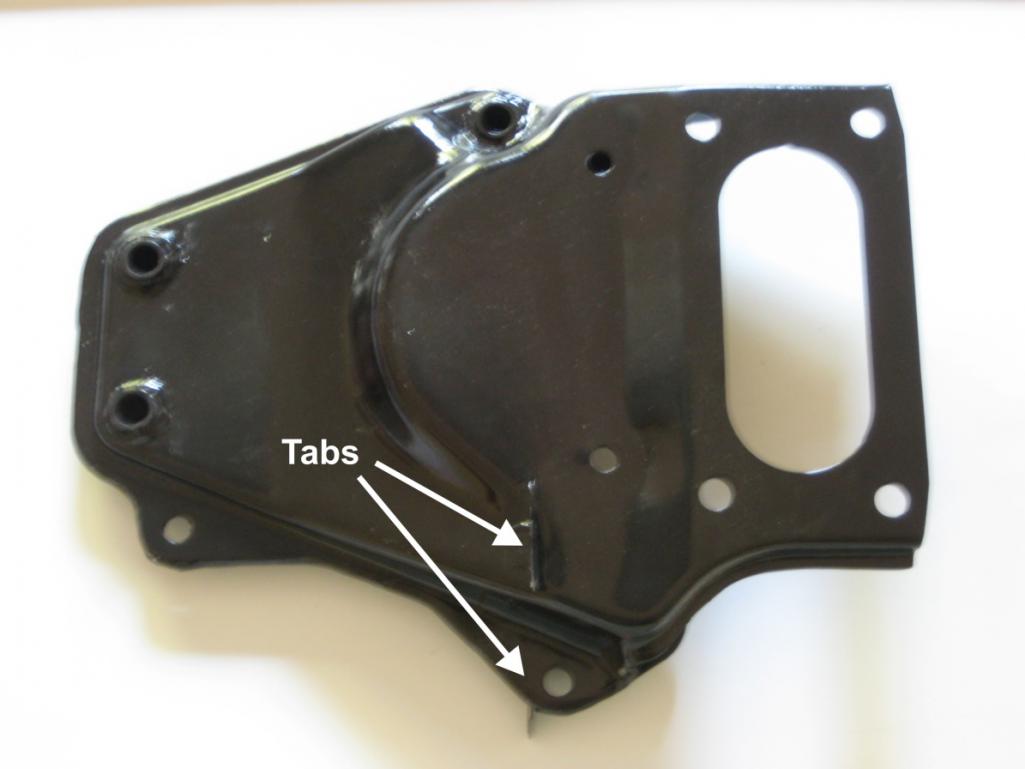 Note the small sheet metal tabs that indicate where the engine shrouding will cross when installed in the car. We cut just above this level, but not all the way through the part. 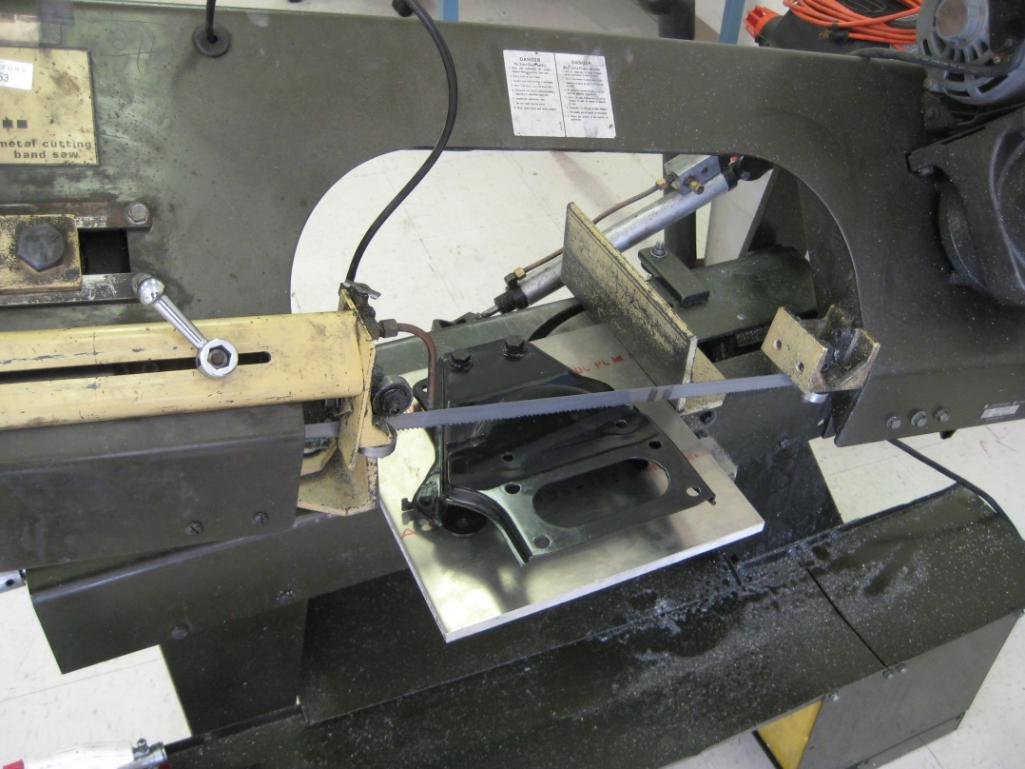 The hole for the upper engine mounting bolt and upper AC mounting ear on the side of the mount need to be preserved, so we finish the cut like this by hand: 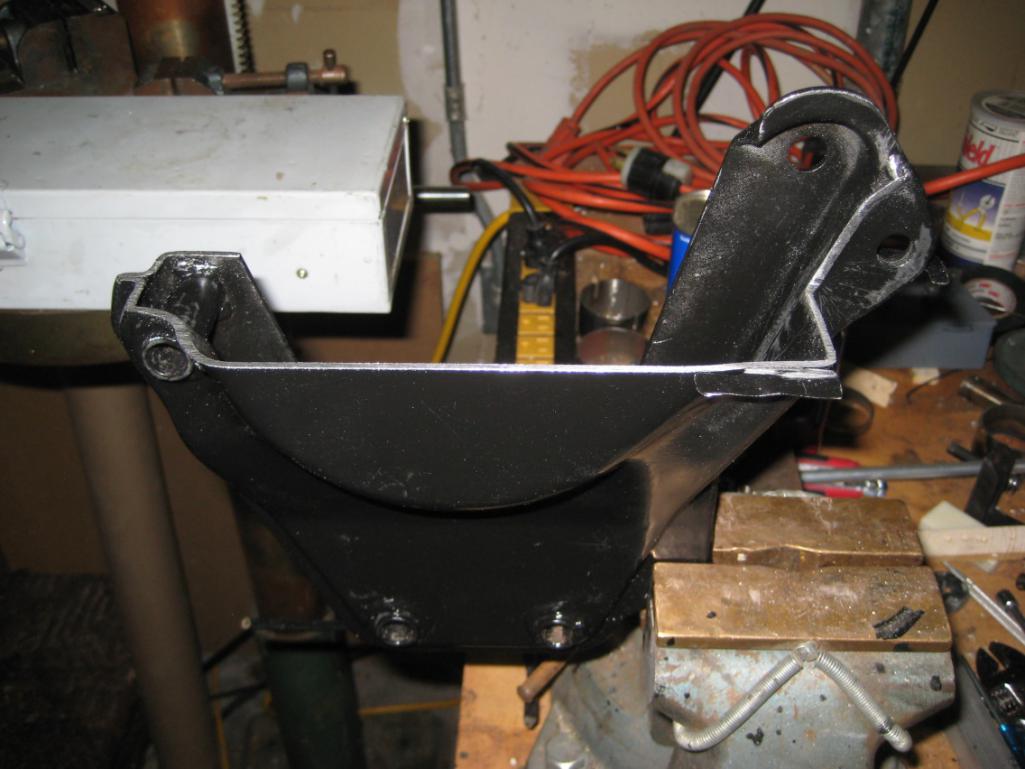 Now we have to add the “horn”, the protrusion that carries the single 12mm mounting bolt that holds the front of the engine up. To do this I had to make two things, the parts to form both the horn itself and the boss through which the mounting bolt will pass, and a jig to hold all these parts in the same spatial relationship as the corresponding parts of the stock 914-6 mount so the whole assembly could be welded. Here are the parts for the horn and the mounting boss: 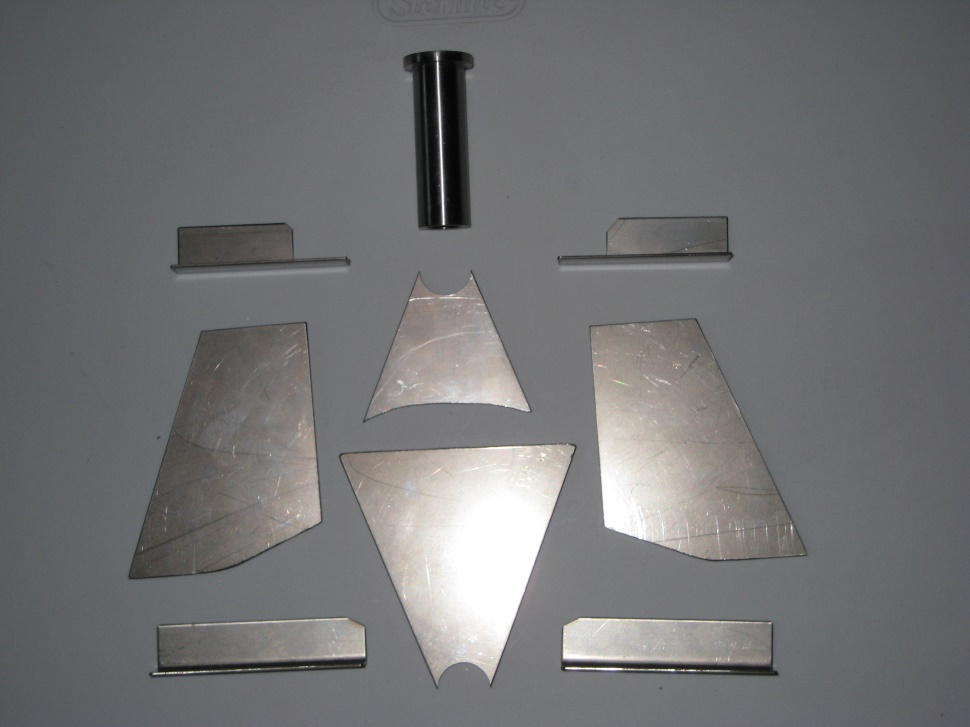 The four large parts in the center form the horn and are made of .090” flat stock, while the four small parts bent at right angles are from thinner .025” sheet metal and are spot welded inside the horn at the corners to hold it together temporarily while the real welds are made. The boss at the top is lathe turned from solid stock. All these parts are 304 stainless steel. The horn parts fit together like this: 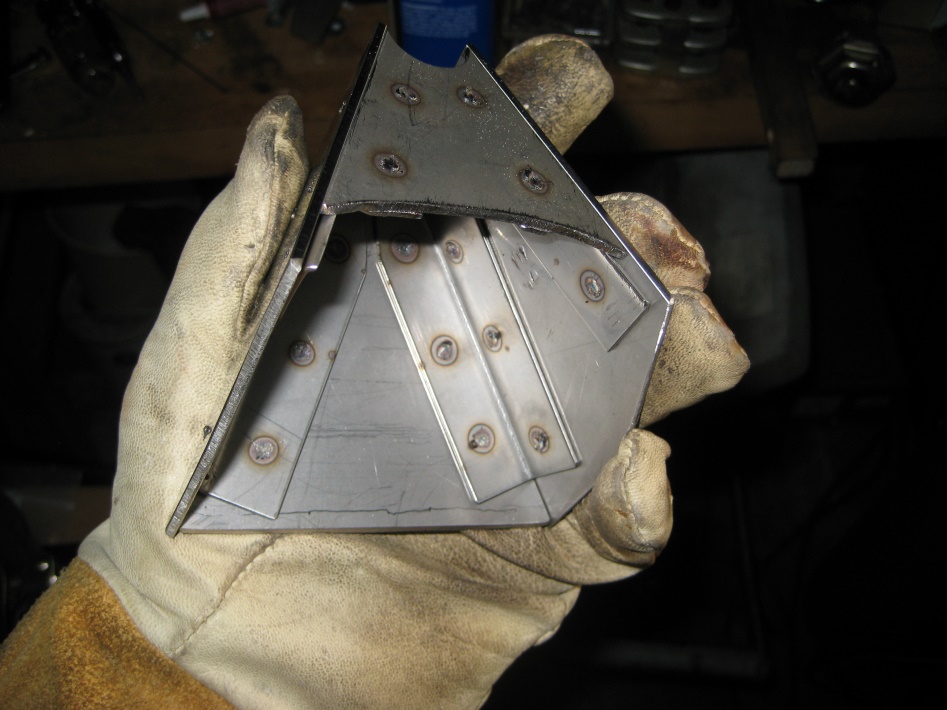 And the whole assembly goes into the welding jig like this: 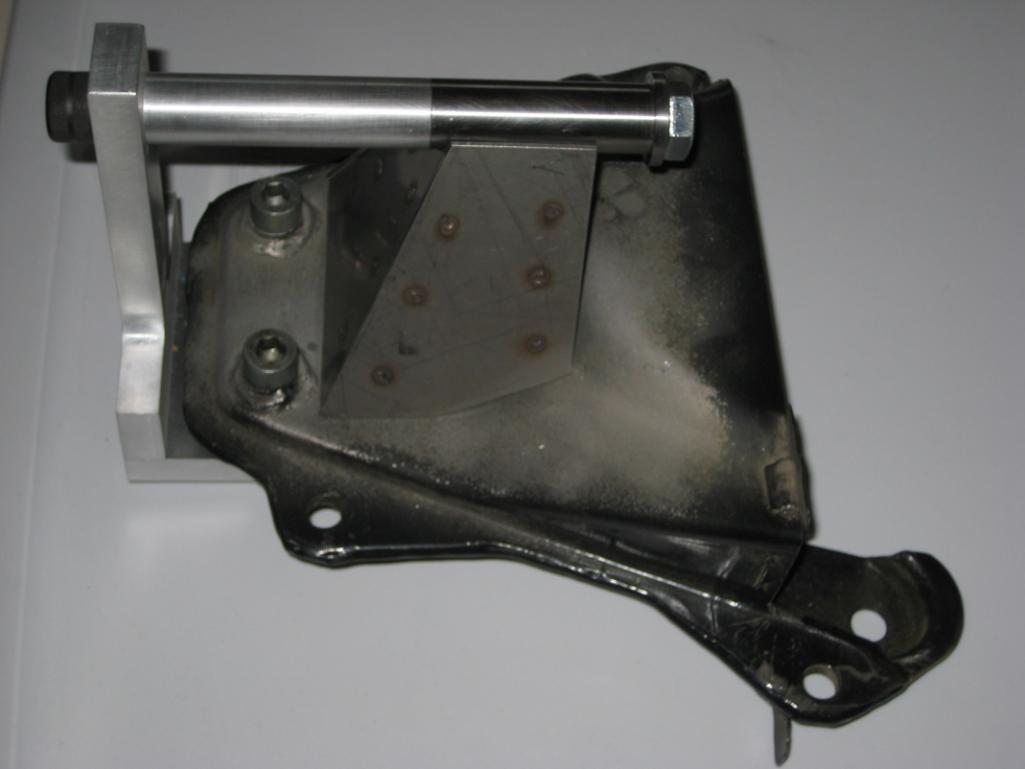 So, now with the 911 piece cleaned down to bare metal, we’re ready to weld: 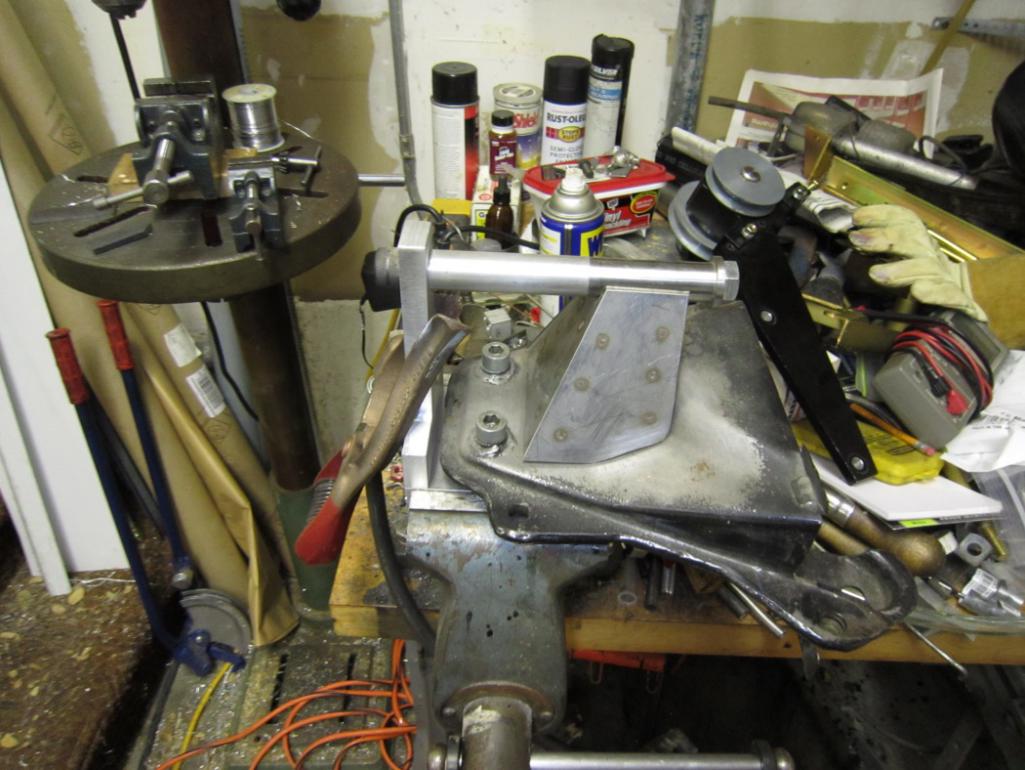 Done. Time for final bead-blast and Por15: 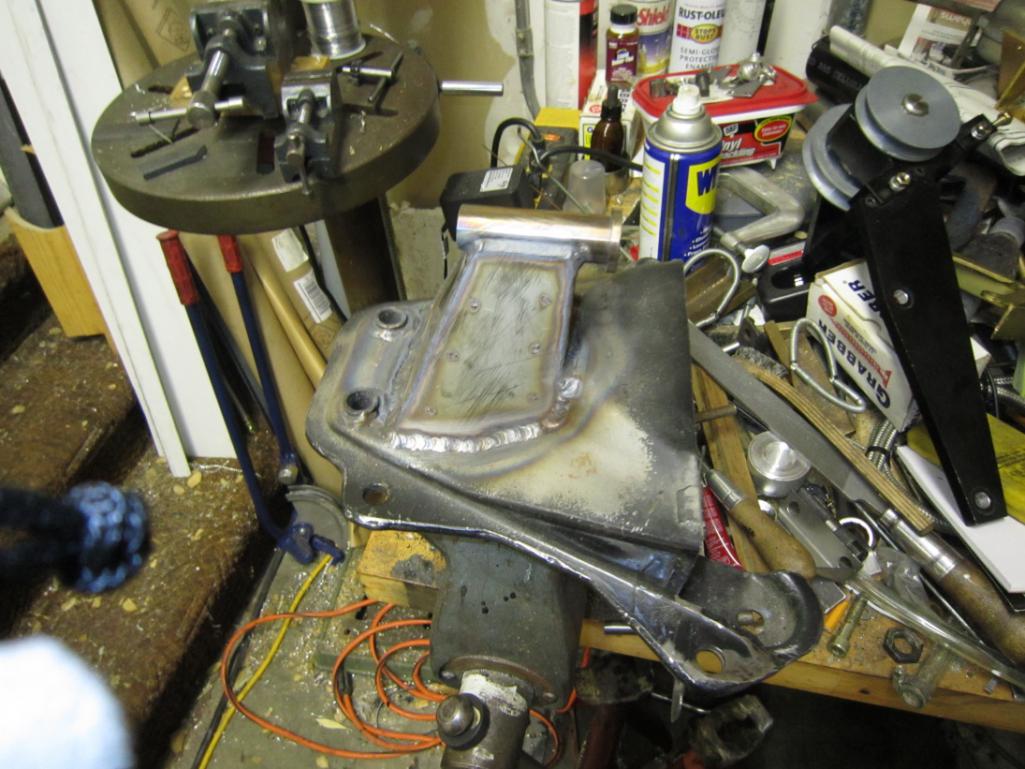 Good penetration welds are essential. If this breaks, the engine falls out front end first – unpleasant under the best of circumstances, extremely so if you happen to be going 90 in the fast lane at the time. 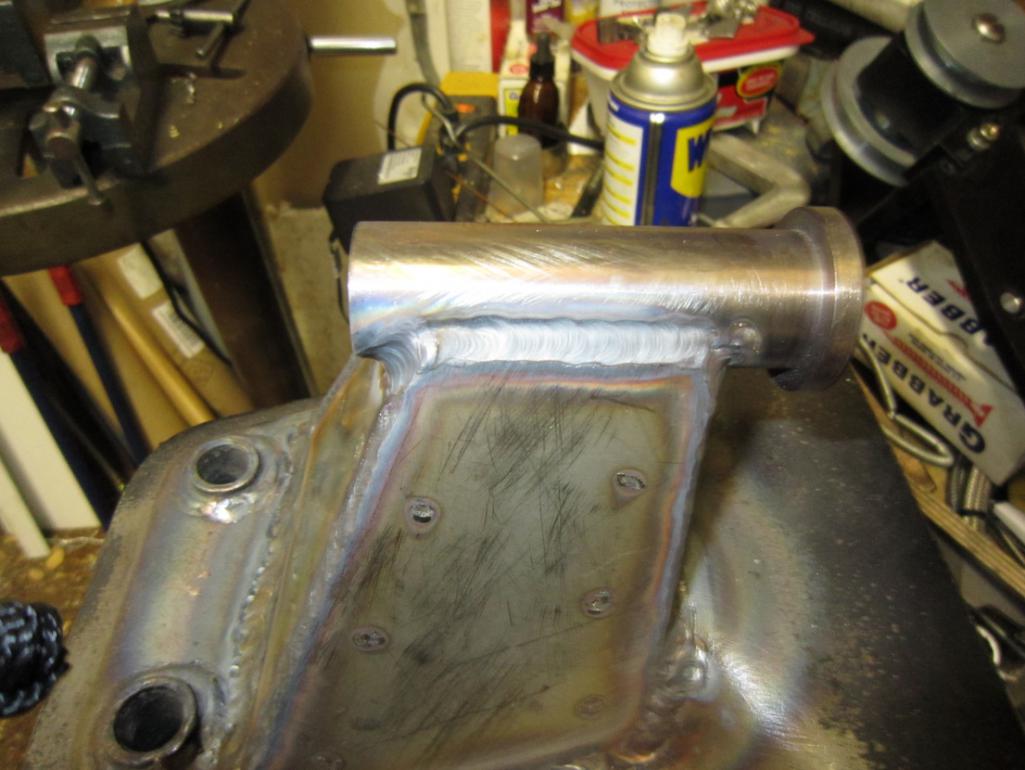 When all of this was first assembled, another problem became obvious: 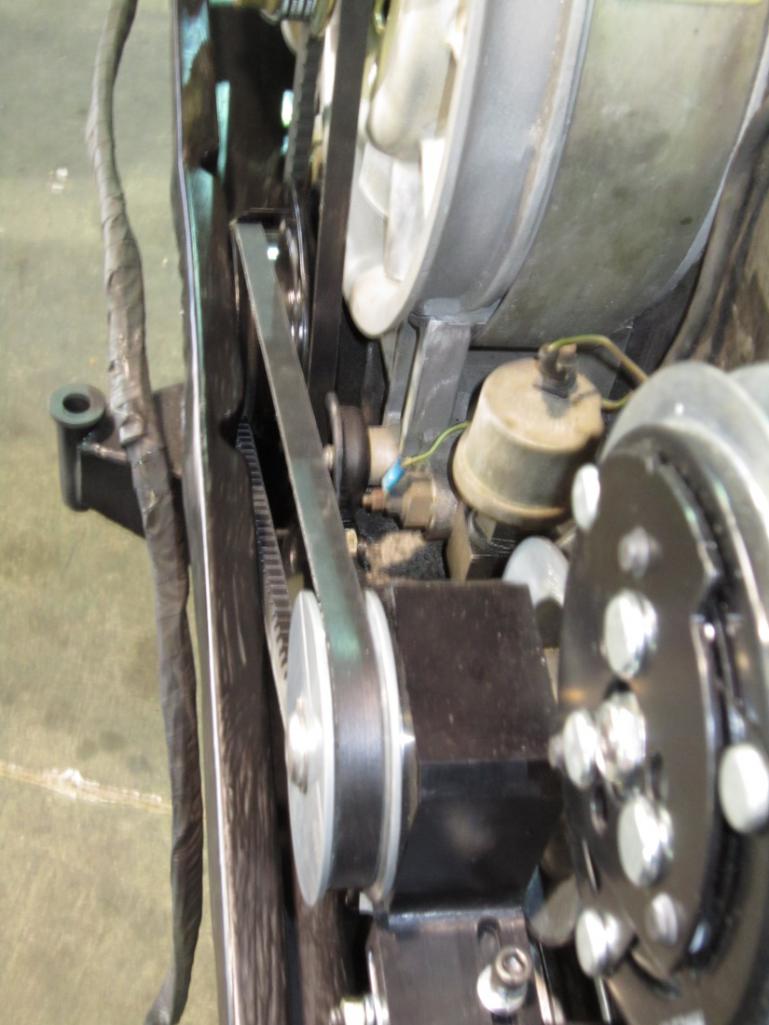 Although the drive belt clears everything, the formed rectangular border on the front of the 914-6 engine sheet metal doesn’t allow the belt to be changed. So, I pulled off the front section and modified the center of it, also splitting it into right and left pieces so they can be easily removed, if necessary, with the engine still in the car: 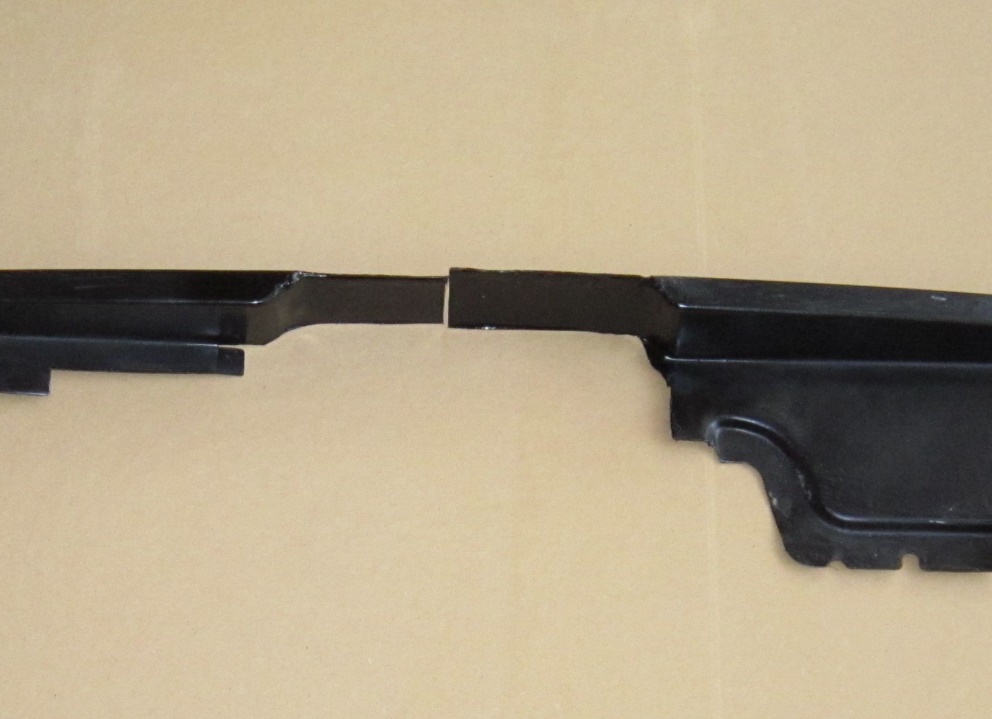 This view of the finished mounting with the engine in the car shows more clearly the clearance at the firewall (heater hose moved aside for clarity): 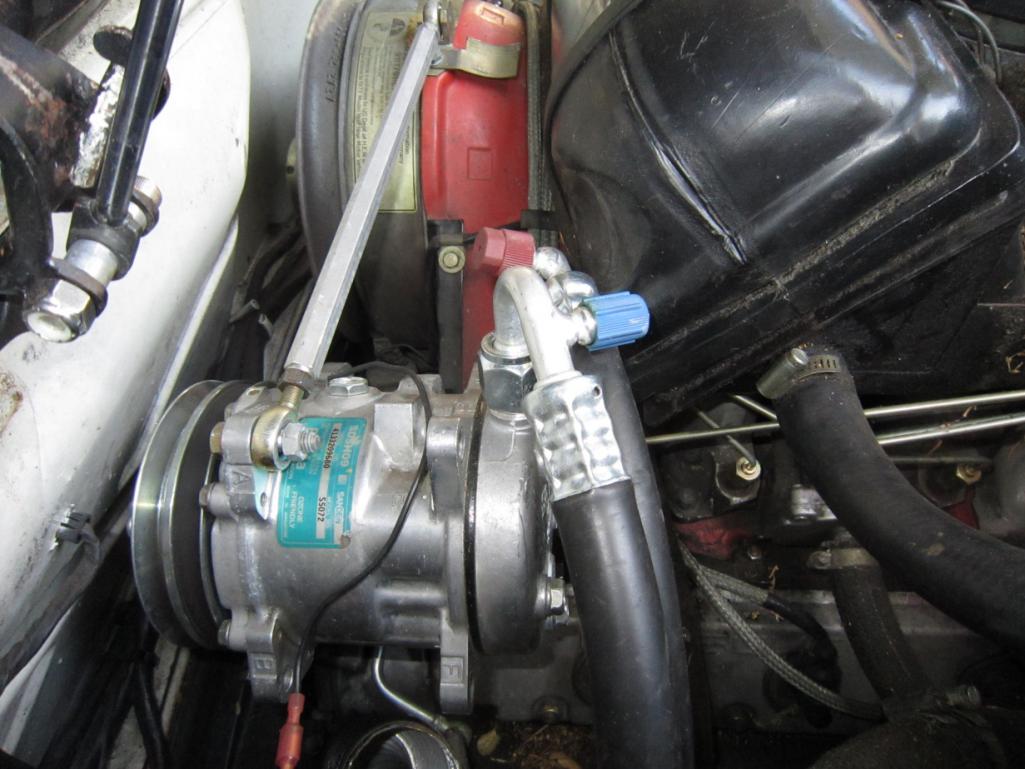 As I said earlier, I used a Sanden 505 compressor, rather than the more common Sanden 508, because the former is physically smaller (about an inch shorter). As you can see in the earlier photo showing a side view of the compressor mounting, the rear of the compressor, which gets fairly hot in use, pressed against one of the plastic injector feed lines. I had wrapped some insulating sleeving around the line to try to protect it, but I wound up replacing the injector lines on that side of the engine with the later metal lines to really solve this problem. A Sanden 508 mounted in the same location would probably interfere with the stock air filter housing on the SC engine, as you can also see in that earlier picture. Even if the compressor itself were to fit, the hoses would have to be routed differently with the 508 because they barely fit when routed as shown with the 505, and in fact required a slight indentation in the air filter housing (just to the right of and slightly above the fittings in the photo above, made simply with a heat gun and a 2” wooden dowel to press the shape into the housing) to clear with even the smaller compressor. The 505 compressor has less capacity than the 508, five cubic inches/revolution vs eight. Some of this can be recovered by over-driving the compressor, since it’s rated for a maximum of 7000rpm, and the jackshaft incidentally provides a convenient way to do this by using different size pulleys on its two ends. I chose a slightly larger pulley on the compressor side vs the engine side that approximately matches the 6300rpm rev limit for the stock 911SC motor to the 7000rpm maximum for the Sanden. The smaller capacity isn’t really a worry, since the cabin volume of the 914 is smaller than that of other cars this compressor is used on, and neither is the rev limit, since most people using the top end of the rev range wouldn’t be using the AC at the same time (at least, I wouldn’t) just because it uses extra power when you’re trying for maximum performance. |
Posts in this topic
 Larry Hubby AC for My Six Conversion Sep 20 2017, 12:42 AM
 mepstein Great post. Thanks for sharing and adding to the 9... Sep 20 2017, 05:38 AM
  |
1 User(s) are reading this topic (1 Guests and 0 Anonymous Users)
0 Members:

|
Lo-Fi Version | Time is now: 21st December 2025 - 01:37 PM |
Invision Power Board
v9.1.4 © 2025 IPS, Inc.


