|
|

|
Porsche, and the Porsche crest are registered trademarks of Dr. Ing. h.c. F. Porsche AG.
This site is not affiliated with Porsche in any way. Its only purpose is to provide an online forum for car enthusiasts. All other trademarks are property of their respective owners. |
|
|
  |
| arne |
 Sep 20 2017, 07:40 PM Sep 20 2017, 07:40 PM
Post
#1
|
|
Serial Rescuer of old vehicles...    Group: Members Posts: 773 Joined: 31-January 17 From: Eugene, Oregon Member No.: 20,799 Region Association: None |
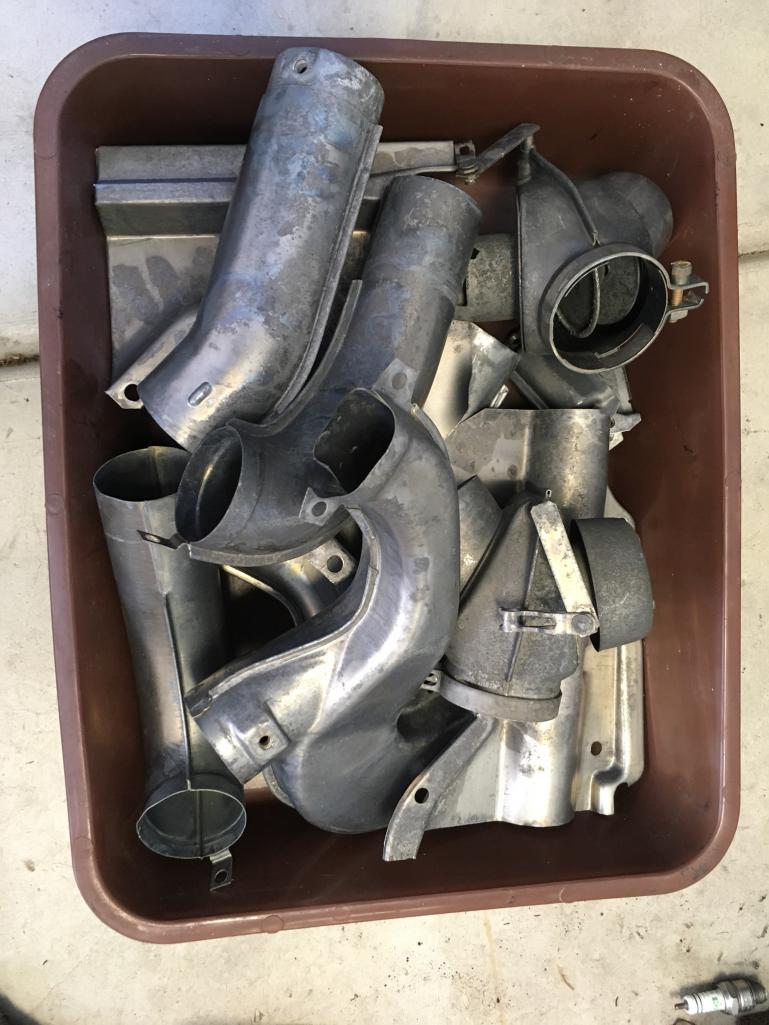
So I removed all the heater tubes and elbows from the heat exchangers months ago when I dropped the engine for oil leak remediation. Had them stripp d and such at the shop that dipped the two deck lids. Now I need to put it all back together, and it looks like a big, raw steel jigsaw puzzle. Does anyone have a diagram or guide as to how it all goes together?
 |
| IronHillRestorations |
 Sep 20 2017, 09:21 PM Sep 20 2017, 09:21 PM
Post
#2
|
|
I. I. R. C.      Group: Members Posts: 6,797 Joined: 18-March 03 From: West TN Member No.: 439 Region Association: None 
|
It's actually very self explanatory once you start putting it together. Except for possibly the front top covers that attach the branch pieces to the impeller housing it will only go together one way.
Before you do any painting, check the threaded holes and clean them up with a tap. Some times you have to weld in new nuts. The J-tubes are notorious for having tabs with weld nuts missing. |
| JeffBowlsby |
 Sep 20 2017, 10:23 PM Sep 20 2017, 10:23 PM
Post
#3
|
|
914 Wiring Harnesses      Group: Members Posts: 8,817 Joined: 7-January 03 From: San Ramon CA Member No.: 104 Region Association: None 
|
RTFWSM. Nice diagrams there.
|
| arne |
 Sep 20 2017, 10:45 PM Sep 20 2017, 10:45 PM
Post
#4
|
|
Serial Rescuer of old vehicles...    Group: Members Posts: 773 Joined: 31-January 17 From: Eugene, Oregon Member No.: 20,799 Region Association: None |
I guess I’ll need to look through the factory manuals again. I didn’t see any diagrams of the heater tubes in the pdf version I have.
|
| troth |
 Sep 20 2017, 11:33 PM Sep 20 2017, 11:33 PM
Post
#5
|
|
Member   Group: Members Posts: 156 Joined: 17-August 16 From: CT/WA Member No.: 20,305 Region Association: None |
I found PET to be helpful.
This is a big PDF, you'll have to scroll a bit to find it, but the exhaust diagram is in there. https://www.porsche.com/all/media/pdf/origi...USA_KATALOG.pdf |
| ndfrigi |
 Sep 21 2017, 12:56 AM Sep 21 2017, 12:56 AM
Post
#6
|
|
Advanced Member     Group: Members Posts: 2,960 Joined: 21-August 11 From: Orange County Member No.: 13,474 Region Association: Southern California 
|
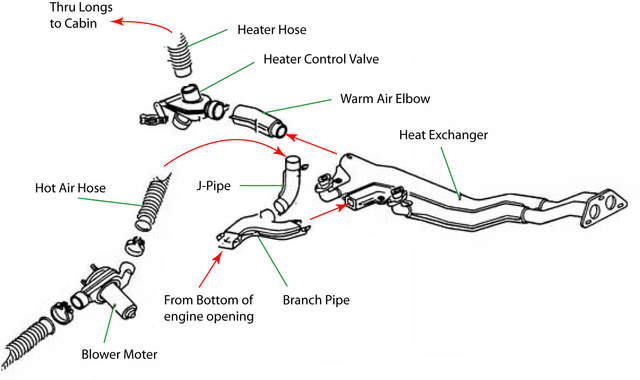 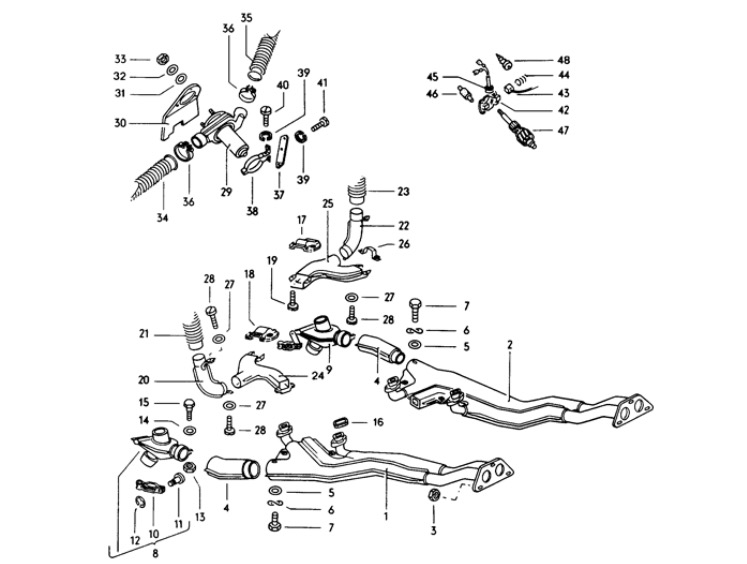 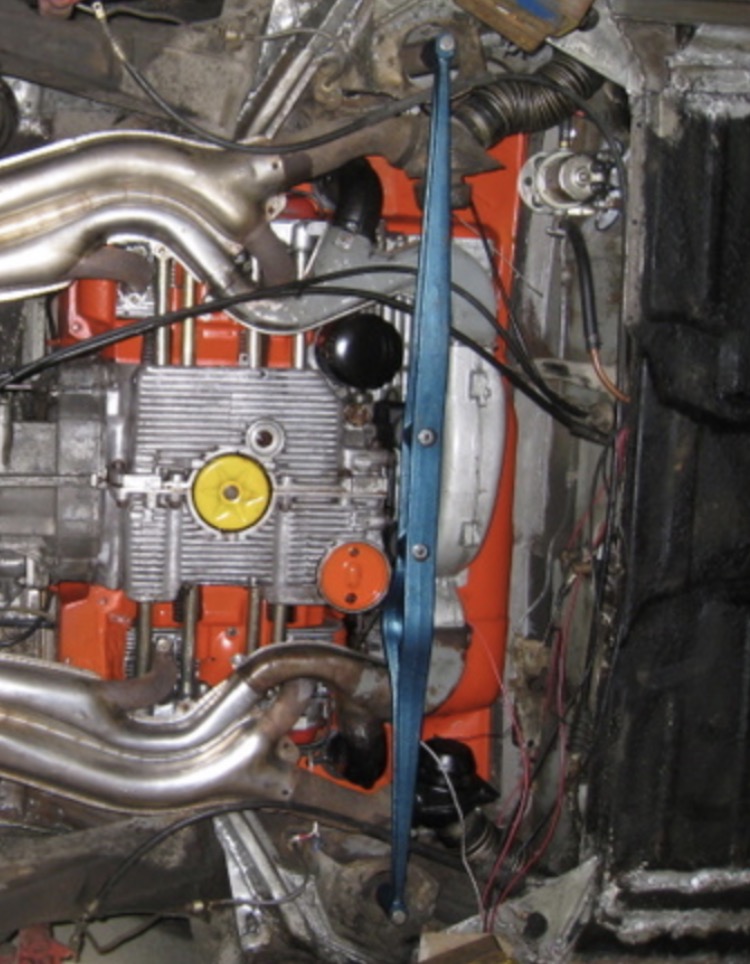 |
| rhodyguy |
 Sep 21 2017, 07:05 AM Sep 21 2017, 07:05 AM
Post
#7
|
|
Chimp Sanctuary NW. Check it out.                Group: Members Posts: 22,209 Joined: 2-March 03 From: Orion's Bell. The BELL! Member No.: 378 Region Association: Galt's Gulch |
Get new grommets/seals for the j-tube tin holes and the clamping pieces (#s 17&18). 914 Rubber has them.
|
| arne |
 Sep 21 2017, 08:32 AM Sep 21 2017, 08:32 AM
Post
#8
|
|
Serial Rescuer of old vehicles...    Group: Members Posts: 773 Joined: 31-January 17 From: Eugene, Oregon Member No.: 20,799 Region Association: None |
These diagrams and pictures will help immensely. Thanks, people!
|
| DRPHIL914 |
 Sep 21 2017, 12:06 PM Sep 21 2017, 12:06 PM
Post
#9
|
|
Dr. Phil      Group: Members Posts: 5,813 Joined: 9-December 09 From: Bluffton, SC Member No.: 11,106 Region Association: South East States 
|
this is the piece on drivers side considered a warm air guide- i just put this jn , but it was a bit tight and had some rubbing on the shift bar- it shouldnt but if it does then you will need to make a bit of a modification- but easily removed - there is a similar one for the other side too- btw that will look nice with all your new clean bits installed! please take some pictures after you are finished!
Attached thumbnail(s) 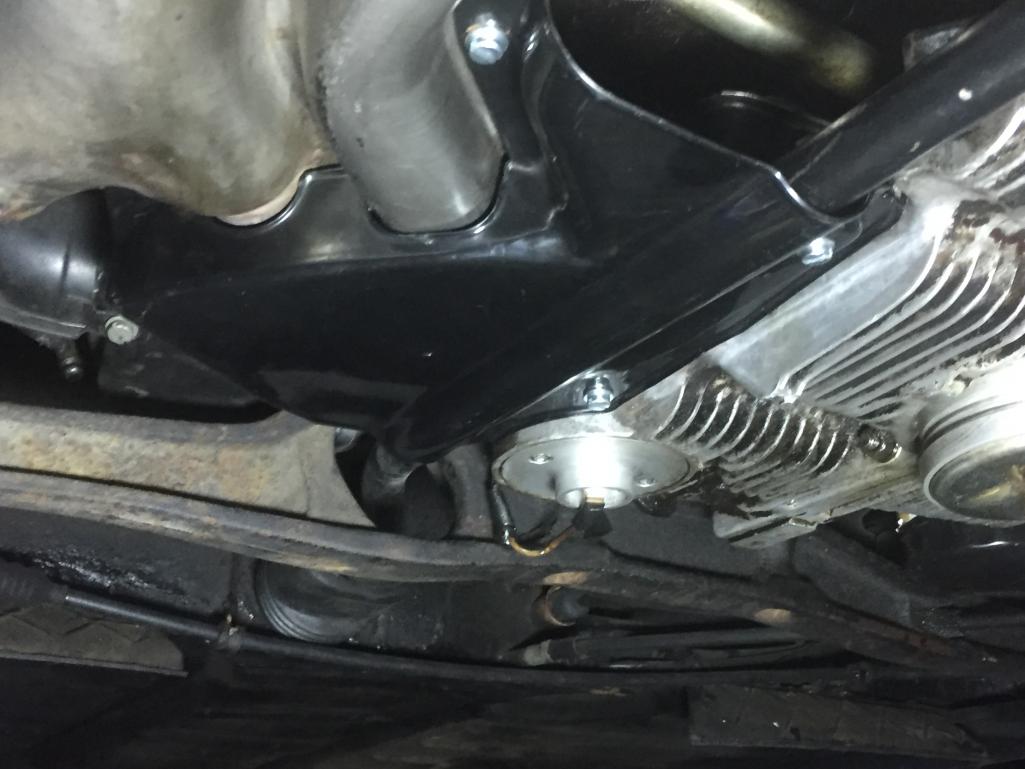
|
| arne |
 Sep 21 2017, 12:10 PM Sep 21 2017, 12:10 PM
Post
#10
|
|
Serial Rescuer of old vehicles...    Group: Members Posts: 773 Joined: 31-January 17 From: Eugene, Oregon Member No.: 20,799 Region Association: None |
How hot do these pieces get? Do I need BBQ or engine paint? Not excited about the possibility of burning paint fumes in the interior.
|
| DRPHIL914 |
 Sep 21 2017, 12:47 PM Sep 21 2017, 12:47 PM
Post
#11
|
|
Dr. Phil      Group: Members Posts: 5,813 Joined: 9-December 09 From: Bluffton, SC Member No.: 11,106 Region Association: South East States 
|
this was powder coated black so no worries there - but yes I would imagine they get pretty hot, so if you paint, use the BBQ or equivalent type paint
|
| Dave_Darling |
 Sep 21 2017, 06:40 PM Sep 21 2017, 06:40 PM
Post
#12
|
|
914 Idiot                Group: Members Posts: 15,080 Joined: 9-January 03 From: Silicon Valley / Kailua-Kona Member No.: 121 Region Association: Northern California 
|
this is the piece on drivers side considered a warm air guide- i just put this jn , but it was a bit tight and had some rubbing on the shift bar... That's a "warm air guide" indeed. But that's from an early tail-shift car; you need the later one where the clearance valley for the rod goes upward above the bar instead of downward. --DD |
| DRPHIL914 |
 Sep 21 2017, 09:06 PM Sep 21 2017, 09:06 PM
Post
#13
|
|
Dr. Phil      Group: Members Posts: 5,813 Joined: 9-December 09 From: Bluffton, SC Member No.: 11,106 Region Association: South East States 
|
yep, sorry i posted the wrong picture Dave, thanks for the correction! i have now the correct one from Rhodyguy. of course since i had the original stuff for 75 on there when i first got the car, and it was shot and had to be pulled, i made the change to the earlier HE, but didnt know i was missing those until much later as well. only recently did i try and source the proper ones and didnt know the difference between the tail and side shift guides. it will work but it did get contact with the shift bar and now i know why .
always learning! ( i did get a 19/25 on Clay's tec quiz and 5/6 on tie break questions- not too bad and i learned some stuff too. |
  |
1 User(s) are reading this topic (1 Guests and 0 Anonymous Users)
0 Members:

|
Lo-Fi Version | Time is now: 27th January 2025 - 09:10 PM |
Invision Power Board
v9.1.4 © 2025 IPS, Inc.


