|
|

|
Porsche, and the Porsche crest are registered trademarks of Dr. Ing. h.c. F. Porsche AG.
This site is not affiliated with Porsche in any way. Its only purpose is to provide an online forum for car enthusiasts. All other trademarks are property of their respective owners. |
|
|
  |
| Superhawk996 |
 Dec 21 2018, 04:10 PM Dec 21 2018, 04:10 PM
Post
#1
|
|
914 Guru      Group: Members Posts: 7,005 Joined: 25-August 18 From: Woods of N. Idaho Member No.: 22,428 Region Association: Galt's Gulch 
|
I purchased my first 914 back in 1987 (1973 1.7L) and had that car for nearly a decade and I personally put over 100,000 miles on it before it ultimately fell victim to a negligent driver that drove into the back end of it at about 40 mph while the vehicle was stopped at a red light. That rear end crash totaled the vehicle but what is amazing is how well it crumpled (early crush zones!) due to the kink in the frame where the halfshafts are. Everyone walked away unharmed.
I replaced it with a 1991 Miata. Great car in its own right but I've always missed my 914. Purchased this "replacement" in May 2018 as a known poster child for a complete right side longitudinal rustoration. This vehicle had been put into storage inside a pole barn around 2004 as far as I can tell. Vehicle initially purchased in non-running condition: Engine couldn't be started. Transmission shift linkage was disconnected Half shafts and CV's were in pieces, and the wheel stubs were not installed therefore the vehicle couldn't even be rolled without risking having the rear wheel separate from within the bearing. Fiberglass laid into the floorpan . . . that can't be a good sign. Vehicle looks great . . . until I got under it. I spent the better part of the summer putting the items above back together and trying to confirm that it would: 1) Run under its own power 2) Drive though the neighborhood and shift though all gears. 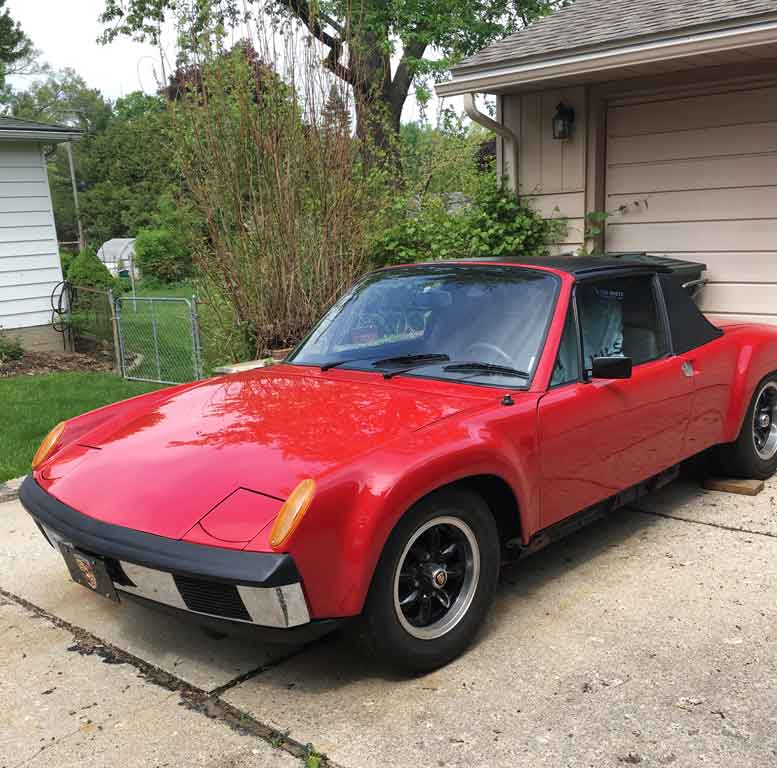 Looks pretty nice eh? Here is what is lurking underneath once the rockers came off. 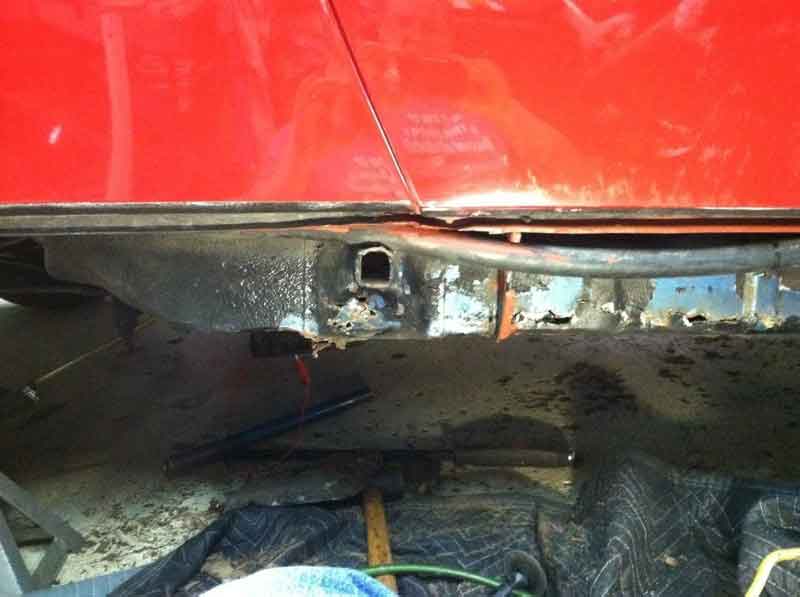 and when I started cutting back the rust. Oh my . . . . 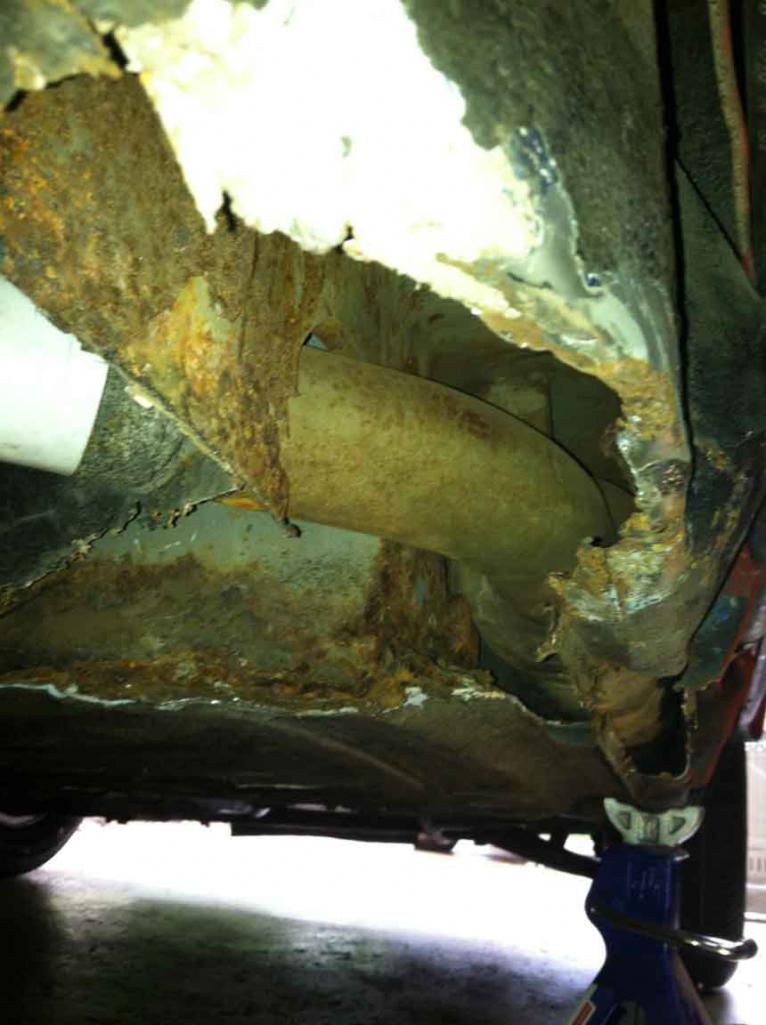 |
| Superhawk996 |
 Dec 21 2018, 05:26 PM Dec 21 2018, 05:26 PM
Post
#2
|
|
914 Guru      Group: Members Posts: 7,005 Joined: 25-August 18 From: Woods of N. Idaho Member No.: 22,428 Region Association: Galt's Gulch 
|
With a new found 914 where else would I go but to the interwebz and I promptly found 914World! Much nicer than the old school 914 newsletters I used to have to subscribe to.
(IMG:style_emoticons/default/cheer.gif) Everything you could ever want to know about 914's at your fingertips all on one place. At least this internet is good for something. Basic Plan: 1) Find someone that has done it before 2) Follow their advice I eventually found Jeff Hail's post on Bringing Out the Dead. Wonderful stuff and top level craftsmanship. It is so rare in these days to find someone so willing to share his skill and knowledge. I spent many hours reading that thread and many others on the site and I finally settled on a course of action. . . . copy Jeff! http://www.914world.com/bbs2/index.php?showtopic=76791 Jeff's posts are so elegant and to the point. And to top it off he offered up a "blueprint" for his build cart. So I copied it . . . (IMG:style_emoticons/default/welder.gif) ruthlessly . . . . down to the paint color. Yellow makes perfect sense to me. Leave it raw, and it rusts. Paint it black and you'll surely smack your head on it having not seen it out of the corner of your eye. 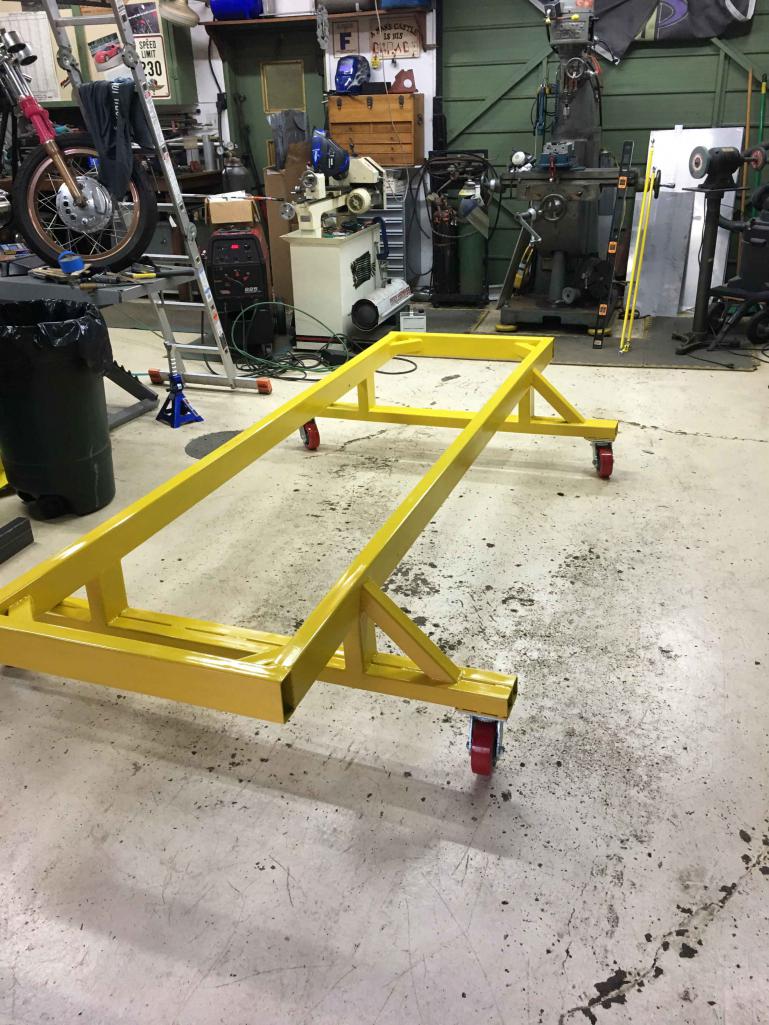 |
| Cairo94507 |
 Dec 21 2018, 06:45 PM Dec 21 2018, 06:45 PM
Post
#3
|
|
Michael           Group: Members Posts: 10,302 Joined: 1-November 08 From: Auburn, CA Member No.: 9,712 Region Association: Northern California 
|
(IMG:style_emoticons/default/welcome.png) Well you found the best place in the world for a 914 owner- The World is here to answer all of your 914 questions and to assist in locating all of those hard to find parts. Welcome and enjoy. (IMG:style_emoticons/default/beerchug.gif) Merry Christmas.
|
| Superhawk996 |
 Dec 21 2018, 06:52 PM Dec 21 2018, 06:52 PM
Post
#4
|
|
914 Guru      Group: Members Posts: 7,005 Joined: 25-August 18 From: Woods of N. Idaho Member No.: 22,428 Region Association: Galt's Gulch 
|
In the process, I also fabricated up some door braces mounting them on the inside of the cowl area to allow the doors to be kept in place to gauge door fits. The upper ties into the B=pillar seat belt attachment. The lower goes to the rear bulkhead.
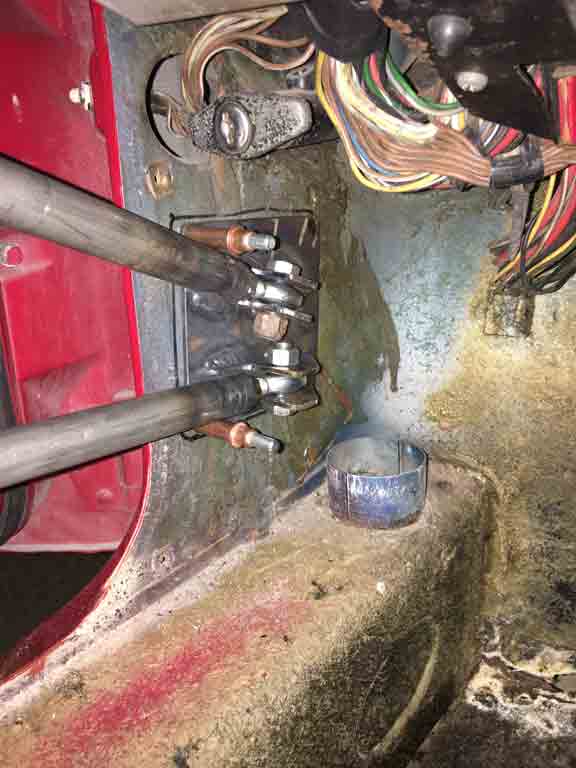 Additional rust excavation revealed that the fiberglass on the floor was a poor attempt to seal up the heavily rusted floorpan. In the picture below you can see clear though the floor pan on the passenger side where it attaches to the longitudinal. 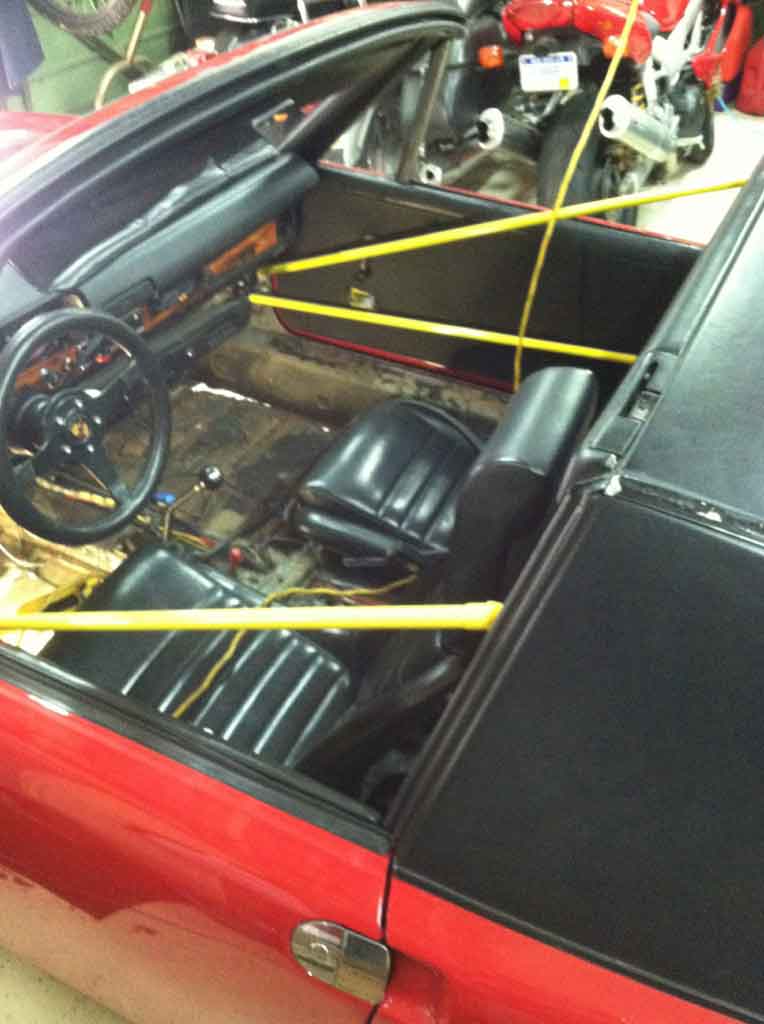 |
| Superhawk996 |
 Dec 21 2018, 07:01 PM Dec 21 2018, 07:01 PM
Post
#5
|
|
914 Guru      Group: Members Posts: 7,005 Joined: 25-August 18 From: Woods of N. Idaho Member No.: 22,428 Region Association: Galt's Gulch 
|
At this point, it became clear that there would be more ordering of sheet metal than I had hoped for when I purchased the car. You know how this goes.
Hoping that maybe just a Engman or Restoration Design clamshell kit might be just enough to get er' back on the road for the summer and then come back at some point in the future to do it right. No such luck! (IMG:style_emoticons/default/headbang.gif) 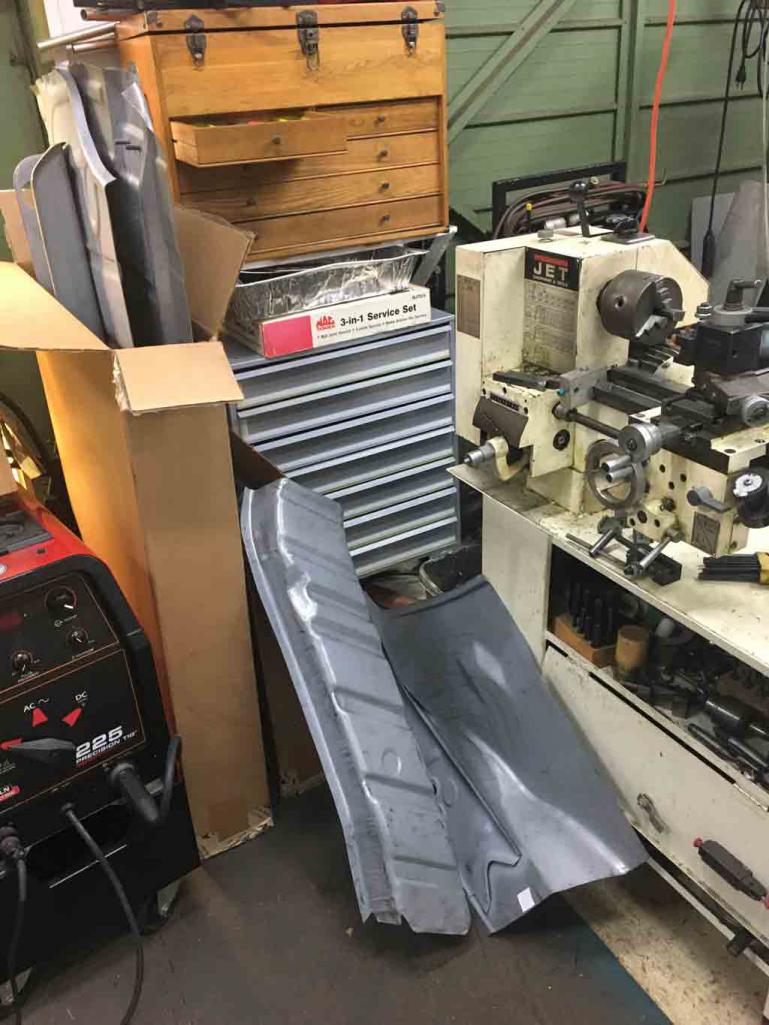 |
| Superhawk996 |
 Dec 21 2018, 07:11 PM Dec 21 2018, 07:11 PM
Post
#6
|
|
914 Guru      Group: Members Posts: 7,005 Joined: 25-August 18 From: Woods of N. Idaho Member No.: 22,428 Region Association: Galt's Gulch 
|
This project started with a few goals in mind:
1) Save a 914 that otherwise might be a candidate for scrap despite how it looks from 20' away. 2) End up with a car of known pedigree. Going out and buying a $20K "rust free" 914 is no guarantee of getting a rust free car. As far as I'm concerned there really isn't such an animal. There are many nice cars out there. However, they all rust from the inside out. Don't get me wrong, I don't want to bag on anyone's car but I've been around 914's long enough to know they all have skeleton's in closet. For me, buying a known basket case is less traumatic than buying a $25K car and then finding out after the fact that someone creatively played a game of hide the rust. 3) Once I have a sound under body, then the possibilities are endless. Ultimately, I'd love to put a six in this car if I can ensure it is square and reasonably sound after fixing it. |
| Superhawk996 |
 Dec 21 2018, 08:07 PM Dec 21 2018, 08:07 PM
Post
#7
|
|
914 Guru      Group: Members Posts: 7,005 Joined: 25-August 18 From: Woods of N. Idaho Member No.: 22,428 Region Association: Galt's Gulch 
|
Alright, so now is probably a good time to plug a couple of vendors. I've been away from 914's for the better part of 20 years. It is so nice to come back and find that the internet has led to a vibrant 914 supply base.
Automobile Atlanta - they have been there since the start and though all my ups and downs as an owner. Good to see that they are still around. Restoration Design. I am honestly impressed with these guys. Not only are they putting out some quality Porsche restoration sheet metal products, but I have a real appreciation for the fact that these guys are real tool and die shop type guys. Love the fact that they are making new parts that weren't even available on my last go round. I'm impressed with everything I've ordered from them so far and the customer service is top notch!! Tangerine Racing. Awesome engine lift attachment for floor jacks. Why didn't I think of this after years of dropping engines as they wobbled around on a 3" diameter jack pad? I'm ashamed of myself! And to top that off, they make the bobbin's to replace the rear trailing arm fasteners. Not only have I broken one off myself in my original car (lots of work getting that out), my "new" car came with one pre-broken! Sure I could make one on the lathe but for the price, I'll gladly pay Tangerine $30 bucks or so and get onto the bodywork that this car so desperately needs. Good job guys! Keep up the great work and thanks for keeping the faith! (IMG:style_emoticons/default/beerchug.gif) |
| Jamie |
 Dec 21 2018, 08:24 PM Dec 21 2018, 08:24 PM
Post
#8
|
|
Senior Member    Group: Members Posts: 1,101 Joined: 13-October 04 From: Georgetown,KY Member No.: 2,939 Region Association: South East States 
|
You obviously know how to weld and have the tools, so dig in and good luck! We'll be watching for progress reports. (IMG:style_emoticons/default/piratenanner.gif)
|
| Superhawk996 |
 Dec 21 2018, 08:25 PM Dec 21 2018, 08:25 PM
Post
#9
|
|
914 Guru      Group: Members Posts: 7,005 Joined: 25-August 18 From: Woods of N. Idaho Member No.: 22,428 Region Association: Galt's Gulch 
|
So what are the skeletons on this car that I've found so far (other than rust!)?
3 coats of paint. Original is Alaska Blue Metallic. Two repaints in red. Currently done in BMW #138 Cinnabar Car was the victim of an A/C install (DPD parts). I'm very torn on this. My original car didn't have A/C. I had many sweaty summer drives on hot black vinyl seats! Now that I'm older and have enjoyed the A/C on the Miata I think it might be nice. On the other hand, the install is pure butchery! 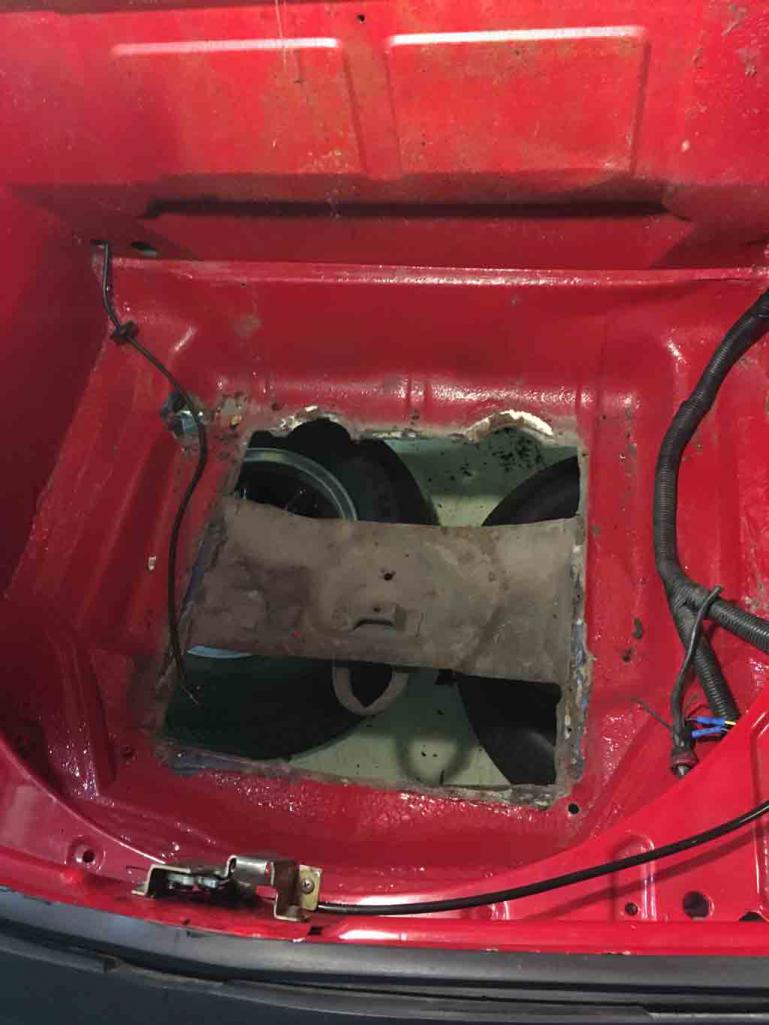 I'm trying to figure out a better way to do this. Maybe route the A/C lines though the tunnel when I have the floor pan off? Maybe do clean bulkhead pass-thru's into the cabin instead of just cutting holes with a hole saw? Same for the York compressor and need to cut the right side engine shelf! No way. There must be a slick way to mount a smaller Sanden compressor and/or do a top side center mount such that the butchery can be avoided. There must be a better way. I've been poking around for ideas but haven'f found the right solution yet. |
| Superhawk996 |
 Dec 21 2018, 08:33 PM Dec 21 2018, 08:33 PM
Post
#10
|
|
914 Guru      Group: Members Posts: 7,005 Joined: 25-August 18 From: Woods of N. Idaho Member No.: 22,428 Region Association: Galt's Gulch 
|
|
| Superhawk996 |
 Dec 21 2018, 08:43 PM Dec 21 2018, 08:43 PM
Post
#11
|
|
914 Guru      Group: Members Posts: 7,005 Joined: 25-August 18 From: Woods of N. Idaho Member No.: 22,428 Region Association: Galt's Gulch 
|
All new vintage vehicle acquisitions come with surprises.
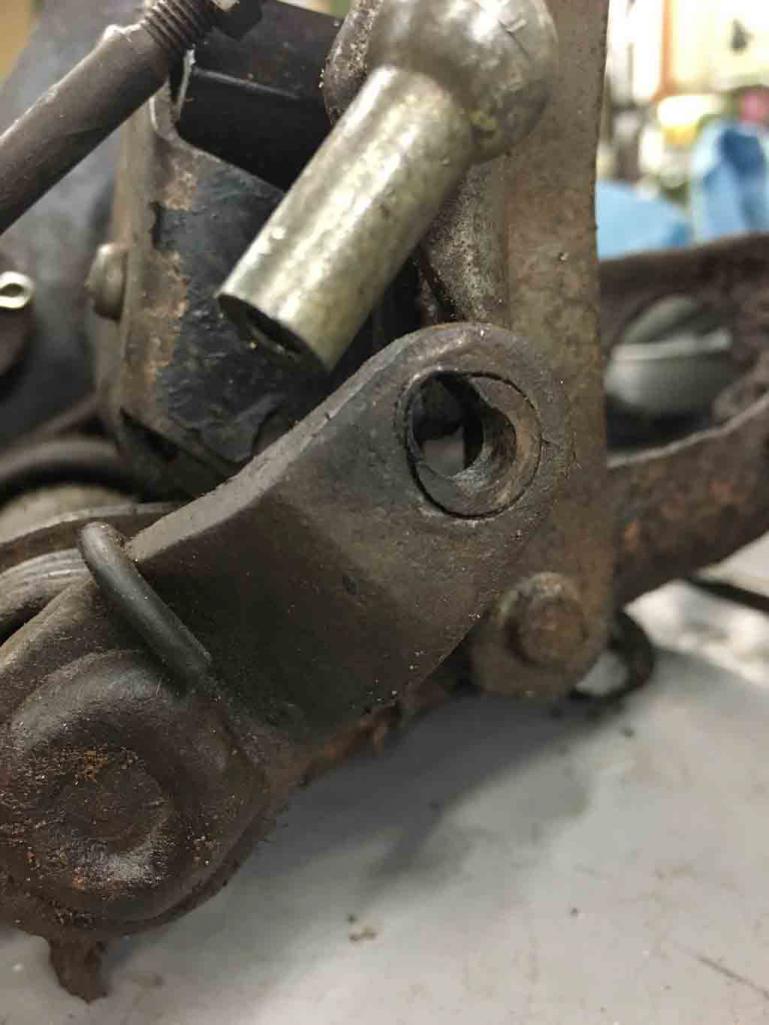
a 45 year old vehicle has typically had unmentionable things done to it. I've seen a lot of shady repairs but this vehicle is providing some new stories. For anyone that might be reading this . . . Please take this as a warning and as a plea, brazing is not to be done on structural elements like the suspension console. if the metal is too thin to weld to, replace it! 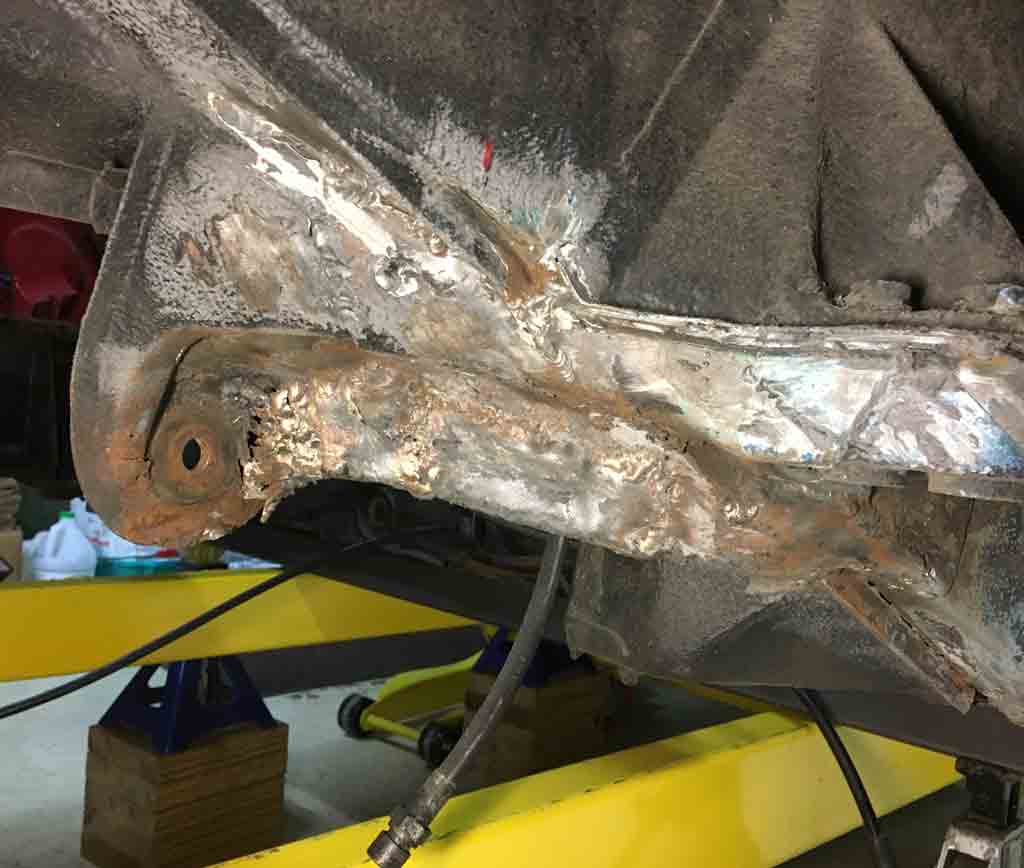 |
| Dave_Darling |
 Dec 21 2018, 08:54 PM Dec 21 2018, 08:54 PM
Post
#12
|
|
914 Idiot                Group: Members Posts: 15,151 Joined: 9-January 03 From: Silicon Valley / Kailua-Kona Member No.: 121 Region Association: Northern California 
|
I'm trying to figure out a better way to do this. Maybe route the A/C lines though the tunnel when I have the floor pan off? There's a thread on here with a super-duper clean install of the AC in the stock cold air box. I know someone will be able to provide the link, hopefully soon. It is really an amazing build. I have heard that you can use a setup like the smog pump pulley to run a modern compressor. Assuming it can hold enough power, that can give you room for the compressor without having to chop the heck out of the engine bay. You will still need to run the lines, though. --DD |
| Superhawk996 |
 Dec 21 2018, 08:55 PM Dec 21 2018, 08:55 PM
Post
#13
|
|
914 Guru      Group: Members Posts: 7,005 Joined: 25-August 18 From: Woods of N. Idaho Member No.: 22,428 Region Association: Galt's Gulch 
|
This was another favorite. Some sort of home made Wheel spacers were glued to the brake rotors.
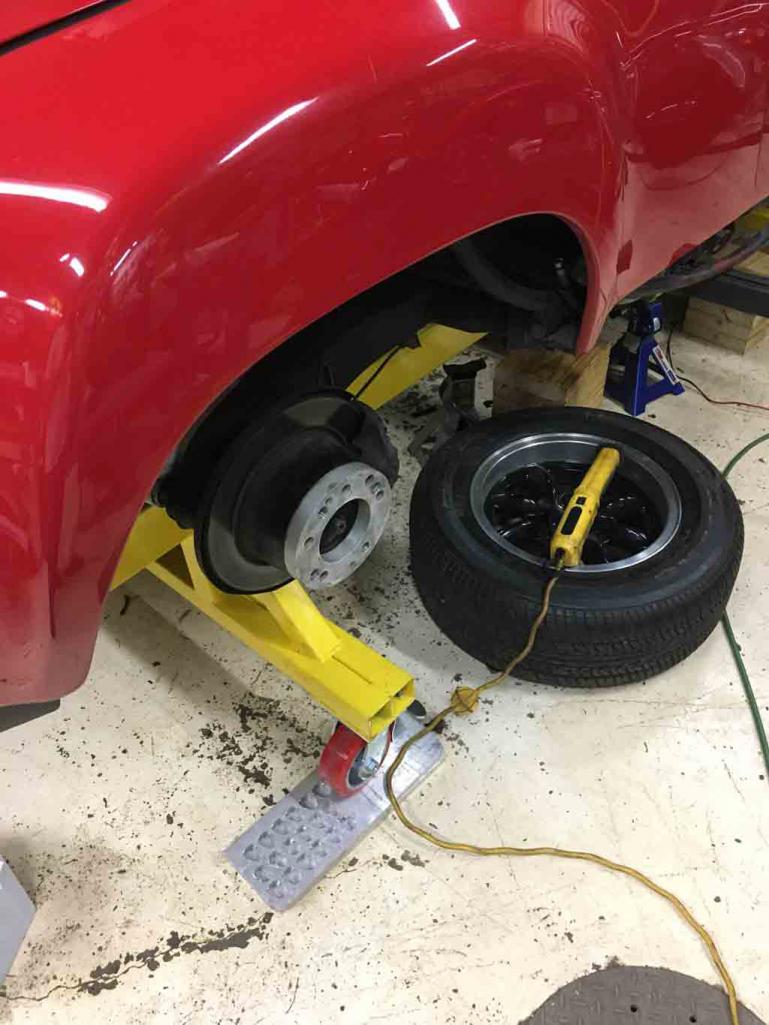 And to top that off, there was probably no more than 10mm of engaged thread on the lugs due to the added width of the spacers. 914's are already challenged with wheel balance since they are lug centric rather than hub centric. Adding in the imbalance of these wheel spaces must have resulted in "interesting" vibrations beyond 50-70 mph. Luckily for me, my only "drive" so far has been limited to a 25 mph drive though the neighborhood once I got the engine running and the driveline back in operational order. Unfortunately, that neighborhood drive also revealed a couple of brakes dragging pretty hard. |
| Superhawk996 |
 Dec 21 2018, 09:08 PM Dec 21 2018, 09:08 PM
Post
#14
|
|
914 Guru      Group: Members Posts: 7,005 Joined: 25-August 18 From: Woods of N. Idaho Member No.: 22,428 Region Association: Galt's Gulch 
|
Also found the driver side suspension console to have some stress cracking that lead to the start of rust. Not entirely surprising now that I suspect the chassis has about 160K miles.
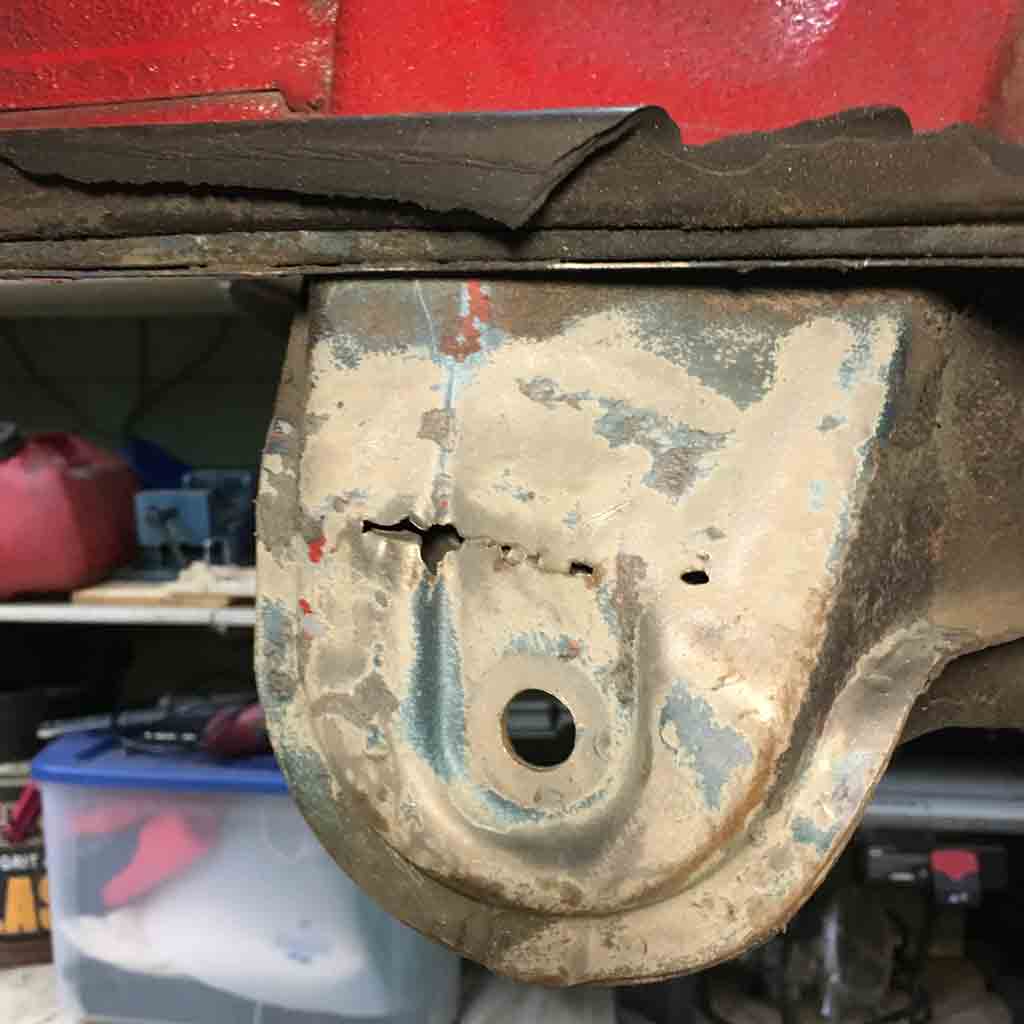 Unfortunately, there is no aftermarket sheet metal to replace the left side. I had a nice e-mail exchange with Restoration Design. It sounds like they are considering tooling up the left side suspension console but that it will take some serious time. I've got to believe that at this point in time, many other "rust free" high mileage 914's are beginning to show their age and have similar stress cracking on the left side. I'm hoping Restoration Design will eventually produce this part. Until then, I'll repair and reinforce it. If you're in need of a left side console, I'd recommend that you reach out to Restoration Design to reinforce the market need for left side suspension console parts!. |
| Superhawk996 |
 Dec 21 2018, 09:31 PM Dec 21 2018, 09:31 PM
Post
#15
|
|
914 Guru      Group: Members Posts: 7,005 Joined: 25-August 18 From: Woods of N. Idaho Member No.: 22,428 Region Association: Galt's Gulch 
|
All right, one last fun post for the evening.
I previously mentioned the fiberglass on the floorpan right? Well, upon getting the right side longitudinal cut out 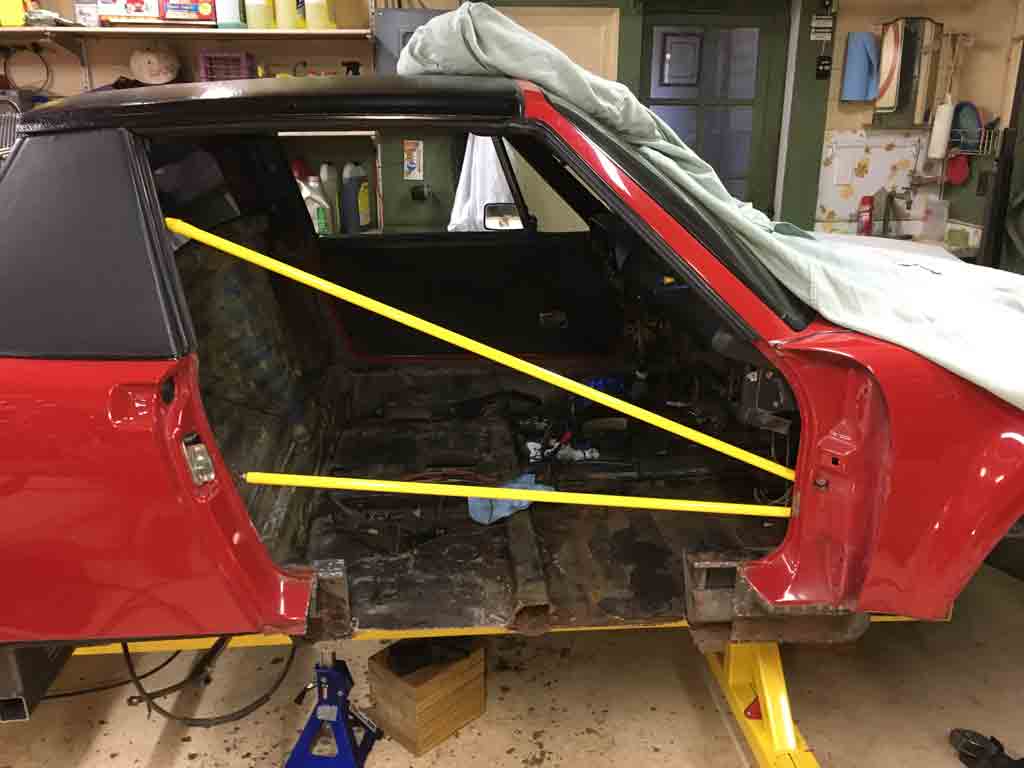 and sectioning the floor, it seems that someone thought they were building a boat. I understand the idea behind using fiberglass to seal up the pinholes in the floor pan. I don't think 1/4" of mat and resin was really necessary. 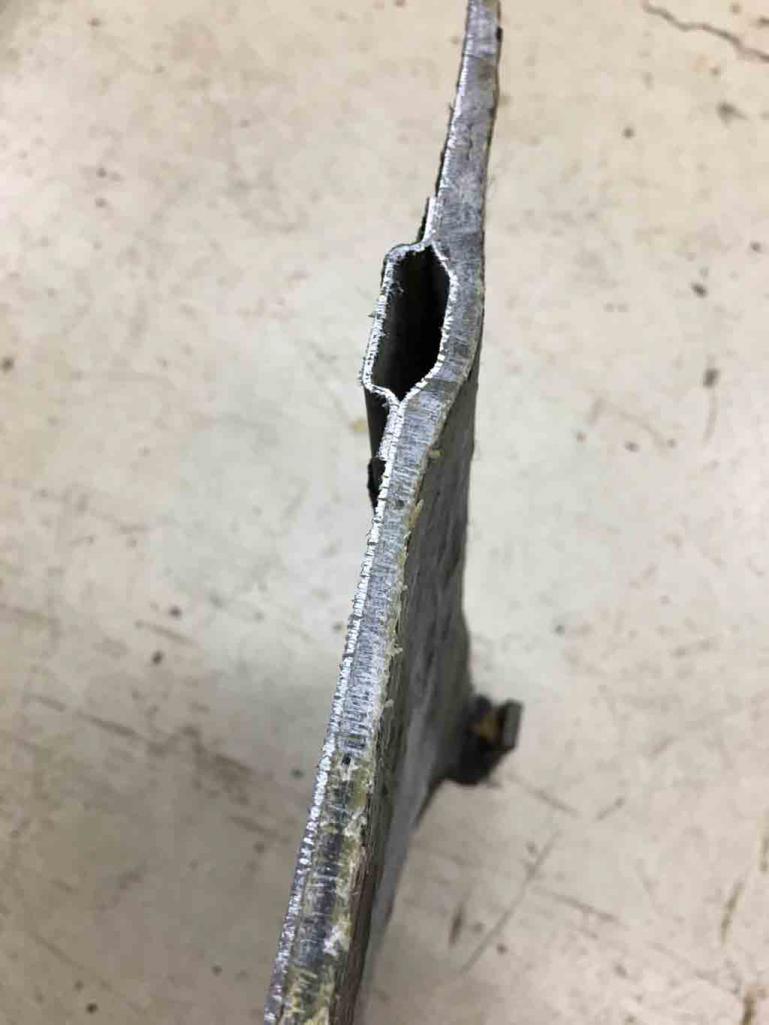 (IMG:style_emoticons/default/WTF.gif) |
| euro911 |
 Dec 22 2018, 06:04 AM Dec 22 2018, 06:04 AM
Post
#16
|
|
Retired & living the dream. God help me if I wake up!      Group: Members Posts: 8,884 Joined: 2-December 06 From: So.Cal. & No.AZ (USA) Member No.: 7,300 Region Association: Southern California 
|
I really enjoy reading these kinds of brutal rustoration threads. Although I've been extremely fortunate that none of the 914s I've purchased were anywhere near this condition (being on the west coast), they did come with some minor age-related issues and/or PO hacks that needed to be dealt with. I'm OK with mechanical things like building motors, changing parts and repairing electrical systems, but I totally lack the welding, bodywork and painting skills some of you fellers have, and am in awe seeing the talent you guys display.
Subscribed to yet another success story in the making (IMG:style_emoticons/default/aktion035.gif) |
| 76-914 |
 Dec 22 2018, 08:51 AM Dec 22 2018, 08:51 AM
Post
#17
|
|
Repeat Offender & Resident Subaru Antagonist           Group: Members Posts: 13,698 Joined: 23-January 09 From: Temecula, CA Member No.: 9,964 Region Association: Southern California 
|
That fiberglass added 40 lb's to the car. I always wonder why people want to dress up a basket case only to have the appearance of a nice care. Looks like she is in the road to a good recovery now. A while back we had a member who knowingly represented a "Polished Turd" as a jewel to an unsuspecting member. That went south in a hurry. (IMG:style_emoticons/default/shades.gif) Looking forward to following your build and (IMG:style_emoticons/default/welcome.png) .
|
| bbrock |
 Dec 22 2018, 09:40 AM Dec 22 2018, 09:40 AM
Post
#18
|
|
914 Guru      Group: Members Posts: 5,269 Joined: 17-February 17 From: Montana Member No.: 20,845 Region Association: Rocky Mountains 
|
(IMG:style_emoticons/default/welcome.png) Anyone crazy enough to save a rusted out basket case is my kind of guy. (IMG:style_emoticons/default/beerchug.gif) Jeff Hail's build has been a great guide for many of us. Looking forward to seeing more of this one.
|
| Superhawk996 |
 Dec 23 2018, 02:25 PM Dec 23 2018, 02:25 PM
Post
#19
|
|
914 Guru      Group: Members Posts: 7,005 Joined: 25-August 18 From: Woods of N. Idaho Member No.: 22,428 Region Association: Galt's Gulch 
|
Thank you for the kind words of encouragement! Will be trying to do some hardcore garage time between Christmas and New Years while I have some time off.
I'll put up some new posts in the coming days. |
| Superhawk996 |
 Dec 23 2018, 10:05 PM Dec 23 2018, 10:05 PM
Post
#20
|
|
914 Guru      Group: Members Posts: 7,005 Joined: 25-August 18 From: Woods of N. Idaho Member No.: 22,428 Region Association: Galt's Gulch 
|
Overall pretty happy with progress so far.
Floor pan and Inner Longitudinal removed. Lots of drilling of spot welds! Used the demo saw to remove more of the passenger side floor. (IMG:style_emoticons/default/sawzall-smiley.gif) 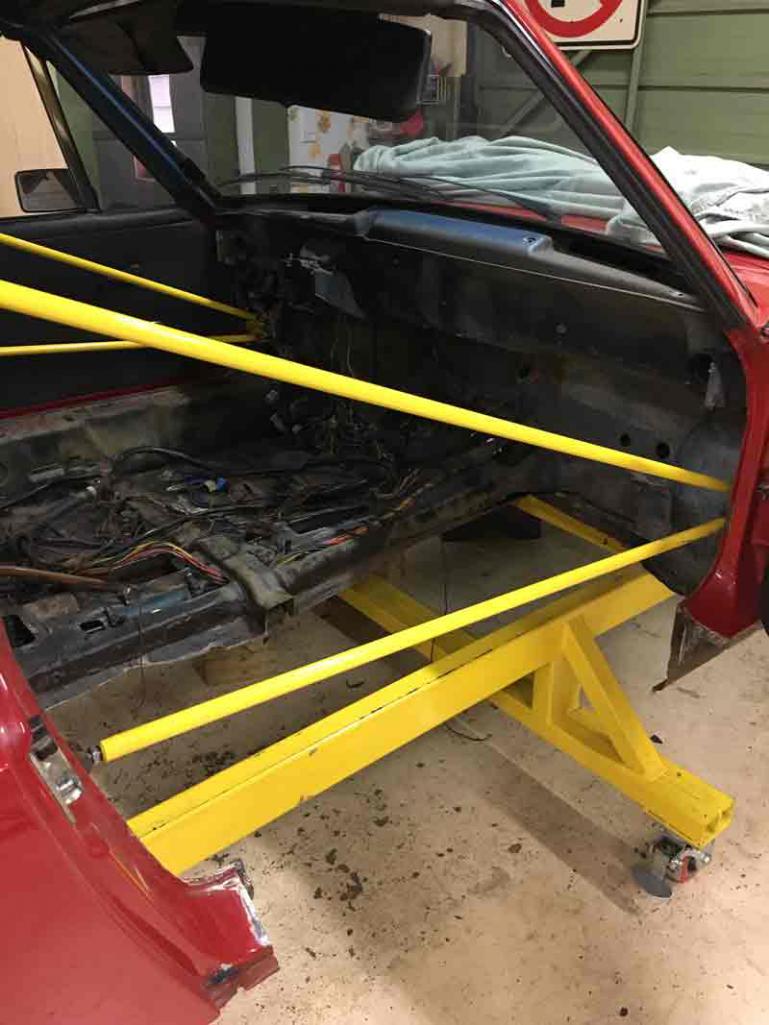 Then put passenger side door back on to gauge door fit. Overall I'm pretty happy. However, it seems the only way to get a decent fit is to shim the bottom hinge slightly (1 washer). I don't recall my old car having any door shims. However, it also seems odd that there is no way to "tilt" the door without using a shim. Overall looks reasonable for a rough fit up but needs a little more tweaking. 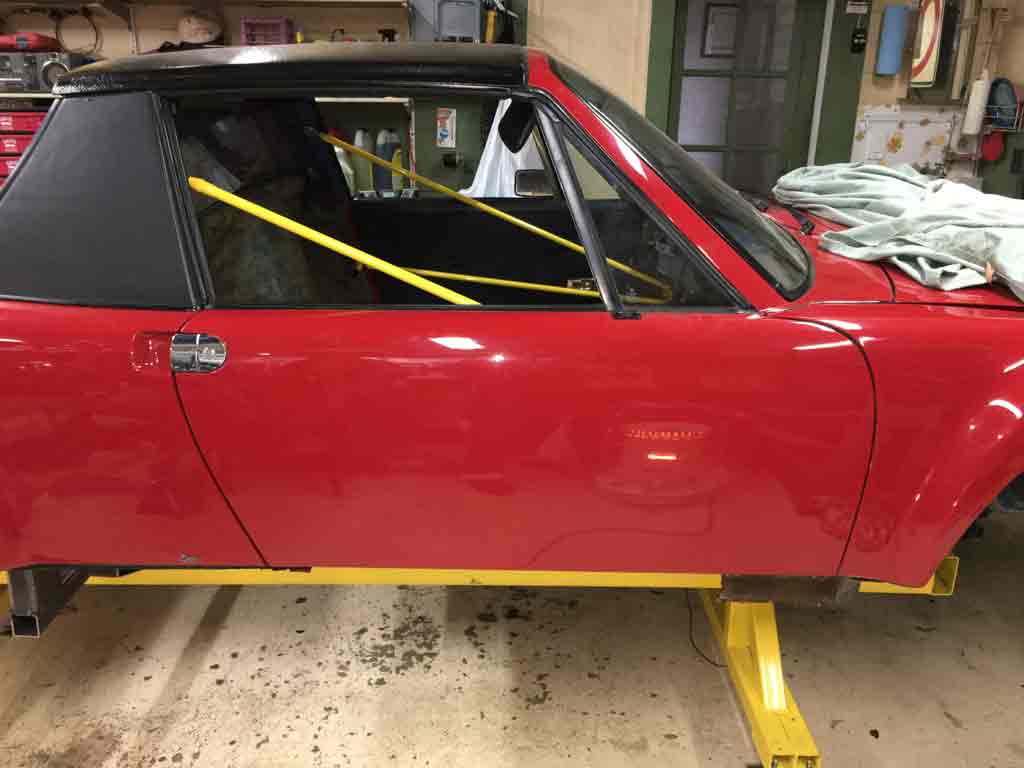 |
  |
1 User(s) are reading this topic (1 Guests and 0 Anonymous Users)
0 Members:

|
Lo-Fi Version | Time is now: 26th April 2025 - 02:07 PM |
Invision Power Board
v9.1.4 © 2025 IPS, Inc.


