|
|

|
Porsche, and the Porsche crest are registered trademarks of Dr. Ing. h.c. F. Porsche AG.
This site is not affiliated with Porsche in any way. Its only purpose is to provide an online forum for car enthusiasts. All other trademarks are property of their respective owners. |
|
|
  |
| mb911 |
 Oct 3 2019, 06:54 PM Oct 3 2019, 06:54 PM
Post
#161
|
|
914 Guru      Group: Members Posts: 7,547 Joined: 2-January 09 From: Burlington wi Member No.: 9,892 Region Association: Upper MidWest 
|
Also know that there is considered "acceptable" levels of porosity with magnesium and welding per all FAA repair manuals which is considered the holy grail of weld repair of magnesium
|
| Superhawk996 |
 Oct 3 2019, 07:27 PM Oct 3 2019, 07:27 PM
Post
#162
|
|
914 Guru      Group: Members Posts: 7,008 Joined: 25-August 18 From: Woods of N. Idaho Member No.: 22,428 Region Association: Galt's Gulch 
|
@mb911
(IMG:style_emoticons/default/agree.gif) You are correct for sure. The porosity in the saddle is less concerning to me since that has a large surface area that the bearing load is shared over. The main thing I don't like is how the end of the shell bearing is left unsupported right there at the case split line. The case will need case savers, the oil bypass modification, and a few broken studs on the transmission end that will need to be repaired anyway so it wasn't as if I was expecting a pristine case. I'll measure case main bearing bores to see if they are oval. If they are still circular then it will be a much tougher call on the welding, case machining, and subsequent line bore that creates its own set of compromises. I would have expected that certain areas of the case would be deemed critical and would be under higher quality control. Just seems odd that they would accept that defect that leaves a portion of the bearing unsupported albeit only slightly. |
| GTSandberg |
 Oct 4 2019, 07:20 AM Oct 4 2019, 07:20 AM
Post
#163
|
|
Member   Group: Members Posts: 63 Joined: 16-August 19 From: Drammen, Norway Member No.: 23,373 Region Association: Europe |
Inspiring thread, lots of knowledge and know how! Always encouraging to see people diving in to even more challenging project than your own (IMG:style_emoticons/default/beerchug.gif)
|
| Superhawk996 |
 Oct 9 2019, 06:49 PM Oct 9 2019, 06:49 PM
Post
#164
|
|
914 Guru      Group: Members Posts: 7,008 Joined: 25-August 18 From: Woods of N. Idaho Member No.: 22,428 Region Association: Galt's Gulch 
|
Continued tear down of the case has finally resulted in a "basket case" engine. No more big parts sitting around. Everything now fits in bins! It's nice to have my limited floor space back.
I got the crank torn down. Still need to measure all the journals. Overall, the bearings are showing wear consistent to a high mileage core. It was purchased with the understanding that it probably had 90K on it. I'd say that is probably accurate based on bearing wear. Crank and crank bearings 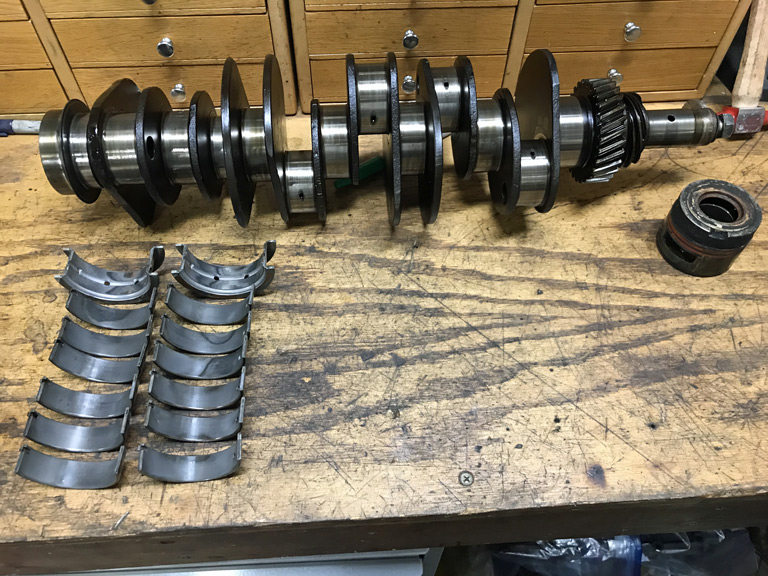 Rod bearings 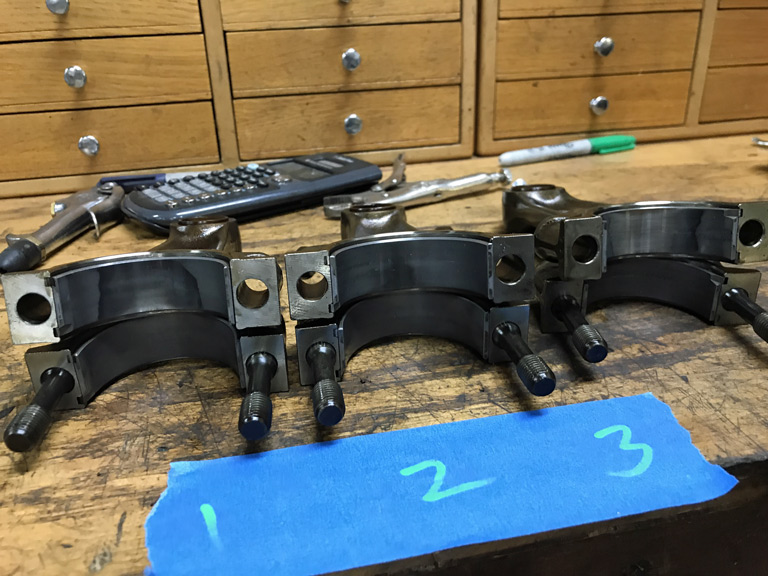 IMS bearings. 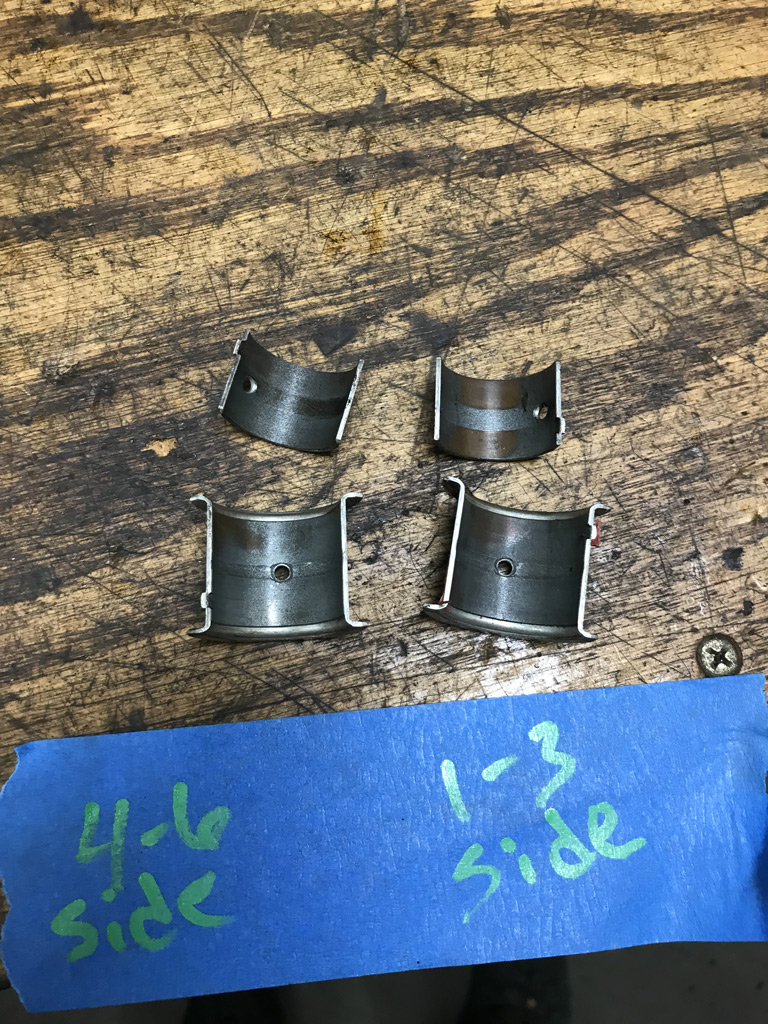 Next step is to get the bulk of the oil residue cleaned up off the case internals and to get it ready for shipping to Ollies. |
| 914forme |
 Oct 10 2019, 07:11 PM Oct 10 2019, 07:11 PM
Post
#165
|
|
Times a wastin', get wrenchin'!     Group: Members Posts: 3,896 Joined: 24-July 04 From: Dayton, Ohio Member No.: 2,388 Region Association: None 
|
You ever thought about picking up another case? I have a few just a few hours south. PM me if you want to talk it over.
|
| porschetub |
 Oct 10 2019, 08:49 PM Oct 10 2019, 08:49 PM
Post
#166
|
|
Advanced Member     Group: Members Posts: 4,803 Joined: 25-July 15 From: New Zealand Member No.: 18,995 Region Association: None |
Looks like that case has been 'fretting" on the bearing saddles,that shows in the main bearing wear,lots of excess point loading due to the case being out of round.
Best to replace the case as the work to fix what you have isn't a good $$$ solution,go for a case half machining and a linebore to resize to std main bearings,you appear to have the skills to do the rest yourself. Good luck. |
| Superhawk996 |
 Oct 13 2019, 09:13 AM Oct 13 2019, 09:13 AM
Post
#167
|
|
914 Guru      Group: Members Posts: 7,008 Joined: 25-August 18 From: Woods of N. Idaho Member No.: 22,428 Region Association: Galt's Gulch 
|
Spent some time wrestling with parts.
I finally got time to get the fan, alternator, and the fan housing separated. 1) Non OEM alternator - when I pulled the fan shroud, I found a SEV Marchal alternator tag sitting on top of the engine. I had hoped as a long shot that maybe the engine would still have the original alternator. No such luck. Generic rebuild. 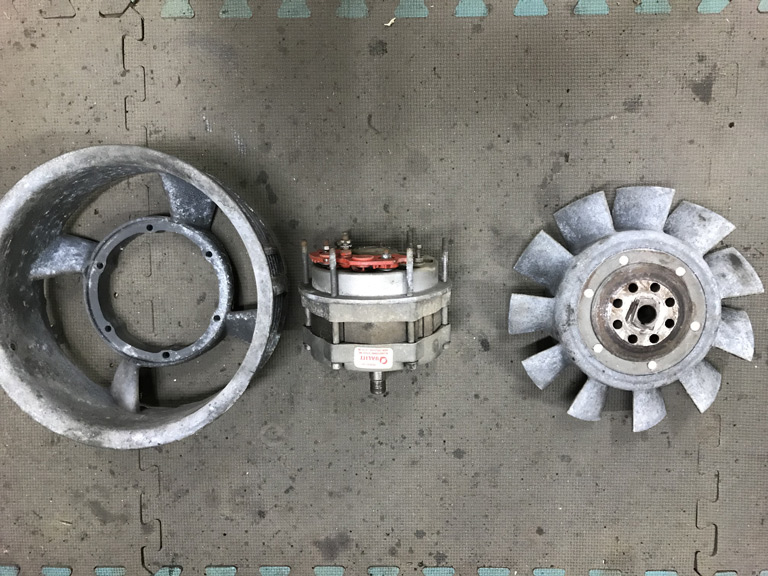 2) I wanted to get a better look at the fan housing cracking. A bit worse than hoped. If anyone has a spare 901.106.101.5R housing sitting around in good shape PM me. Otherwise, this one will likely go to Ben for welding and I'll have to do machine work to clean it back up. 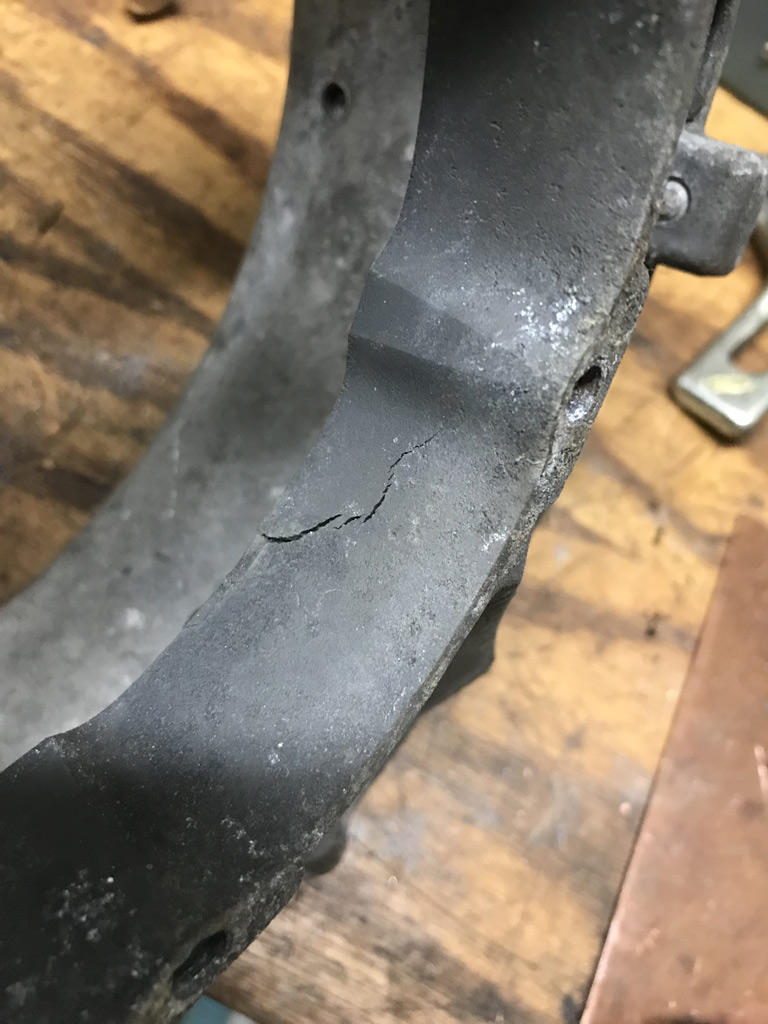 3) Someone savaged the fan hub. It is still useable but it looks like someone went after it with a cut off wheel - probably to clean up botched workmanship when the alternator was replaced. Damn Hacks! 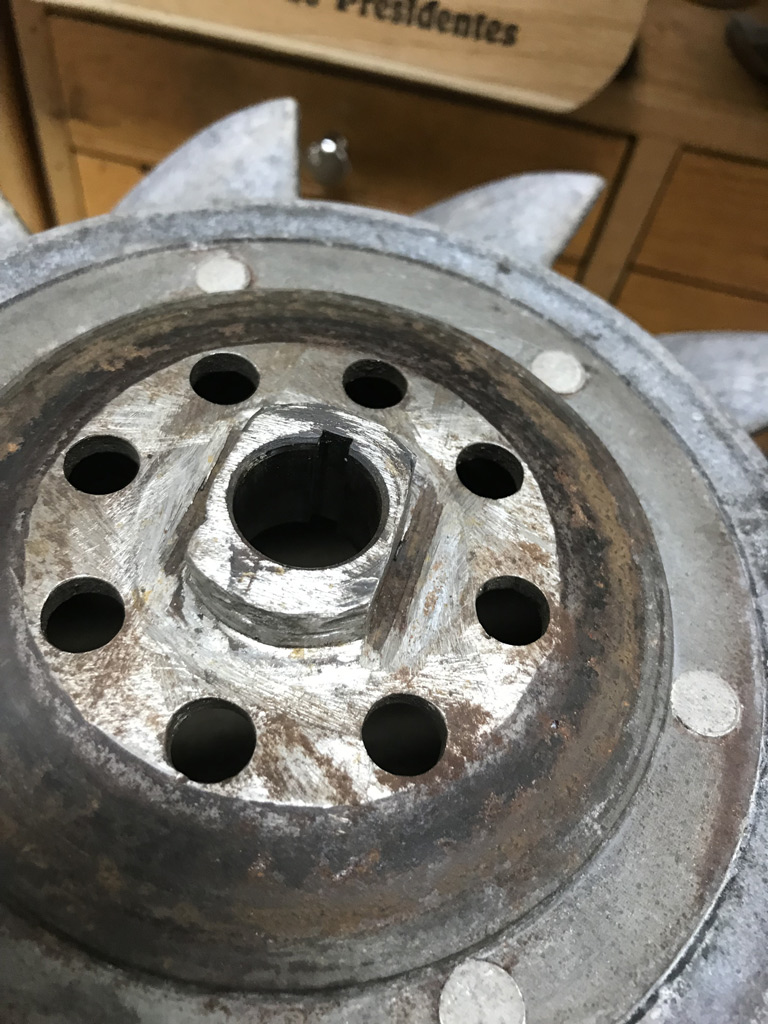 My bet is that some shade tree / low end mechanic is responsible for all this. One blade of the fan has a small chip out of it. Probably from wedging a tool between the fan and the housing to try to loosen the pulley nut rather than using the proper tool. That likely lead to the cracked fan housing which then propagated over time. 45 year old parts! (IMG:style_emoticons/default/dry.gif) |
| Superhawk996 |
 Oct 13 2019, 09:27 AM Oct 13 2019, 09:27 AM
Post
#168
|
|
914 Guru      Group: Members Posts: 7,008 Joined: 25-August 18 From: Woods of N. Idaho Member No.: 22,428 Region Association: Galt's Gulch 
|
Also had more fun than a barrel of monkeys trying to pull broken, damaged and corroded exhaust studs.
So far I'm 7 for 12 but wasted a ton of time trying to get the last 5. I started soaking with penetrating oils 2 weeks ago. All my usual tricks seem to have failed me on the last 5. Ollies charges $22 drill them out,so at this point, it seems more cost effective to just pay the $110 to get them drilled rather than to keep wasting my time. Heck, it would take me longer just to set them up in my mill than the $110 of time is worth. I'm sure Ollies has a nice jig that makes quick work of them. Heads need full rebuild anyway due to bent valves, and valve guides that are worn. 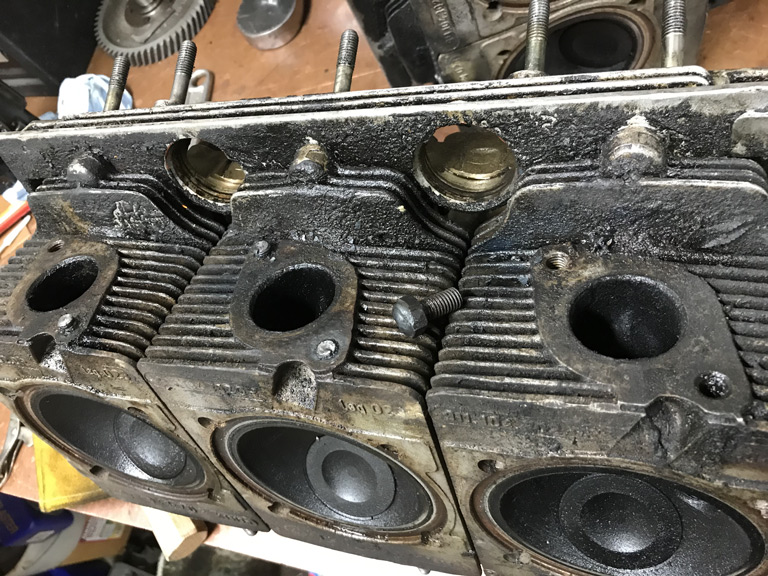 Thought it might be great opportunity to buy another cool tool from Stomski Racing, but, the cost of the tool is more than the cost to have it done by Ollies. Plus Stromski the drill jig counts on having at least one good stud to secure the tool to drill the other. Cool tool though but it is pricey. Would be worth it though if you had to do this under the car. No new tool for me! https://www.stomskiracing.com/products/exha...stud-repair-kit |
| Superhawk996 |
 Oct 13 2019, 09:32 AM Oct 13 2019, 09:32 AM
Post
#169
|
|
914 Guru      Group: Members Posts: 7,008 Joined: 25-August 18 From: Woods of N. Idaho Member No.: 22,428 Region Association: Galt's Gulch 
|
Looks like that case has been 'fretting" on the bearing saddles,that shows in the main bearing wear,lots of excess point loading due to the case being out of round. Best to replace the case as the work to fix what you have isn't a good $$$ solution,go for a case half machining and a linebore to resize to std main bearings,you appear to have the skills to do the rest yourself. Good luck. @porschetub Agree that there is some fretting of the bearings there but that really shouldn't be surprising on a high mileage (90K) case. Problem is I REALLY want the 1973.5 7R case because it matches the vintage of my car. Machining the cases and a line bore back to standard is pretty much a given for these old Mag cases so I'll just roll with the punches and get it fixed properly. Hope to get the case boxed up and ready to ship today. |
| bbrock |
 Oct 13 2019, 11:34 AM Oct 13 2019, 11:34 AM
Post
#170
|
|
914 Guru      Group: Members Posts: 5,269 Joined: 17-February 17 From: Montana Member No.: 20,845 Region Association: Rocky Mountains 
|
Those @#$% exhaust studs. About a third of my head rebuild bill was for extracting and replacing studs and busted engine tin screws. And that was for a /4
Bummer about no new tool. You'll just have to keep playing with the old one. (IMG:style_emoticons/default/lol-2.gif) |
| mepstein |
 Oct 13 2019, 12:09 PM Oct 13 2019, 12:09 PM
Post
#171
|
|
914-6 GT in waiting                Group: Members Posts: 19,849 Joined: 19-September 09 From: Landenberg, PA/Wilmington, DE Member No.: 10,825 Region Association: MidAtlantic Region 
|
Also had more fun than a barrel of monkeys trying to pull broken, damaged and corroded exhaust studs. So far I'm 7 for 12 but wasted a ton of time trying to get the last 5. I started soaking with penetrating oils 2 weeks ago. All my usual tricks seem to have failed me on the last 5. Ollies charges $22 drill them out,so at this point, it seems more cost effective to just pay the $110 to get them drilled rather than to keep wasting my time. Heck, it would take me longer just to set them up in my mill than the $110 of time is worth. I'm sure Ollies has a nice jig that makes quick work of them. Heads need full rebuild anyway due to bent valves, and valve guides that are worn.  Thought it might be great opportunity to buy another cool tool from Stomski Racing, but, the cost of the tool is more than the cost to have it done by Ollies. Plus Stromski the drill jig counts on having at least one good stud to secure the tool to drill the other. Cool tool though but it is pricey. Would be worth it though if you had to do this under the car. No new tool for me! https://www.stomskiracing.com/products/exha...stud-repair-kit We have the entire catalog of Stompski tools. Great stuff. We use the stud tool but most of the time just leave them in and the machine shop removes them while rebuilding the heads. |
| Superhawk996 |
 Oct 13 2019, 05:08 PM Oct 13 2019, 05:08 PM
Post
#172
|
|
914 Guru      Group: Members Posts: 7,008 Joined: 25-August 18 From: Woods of N. Idaho Member No.: 22,428 Region Association: Galt's Gulch 
|
Well each day it seems I have a couple of wins and couple of losses.
Let's cover the win 1st. I finally got the funky 1973.5 2.4L CIS injector cups out of the heads. Turns out they are indeed a press fit. I created a tool from some scrap material that let me pull them with a slide hammer and some gentle heating of the head. 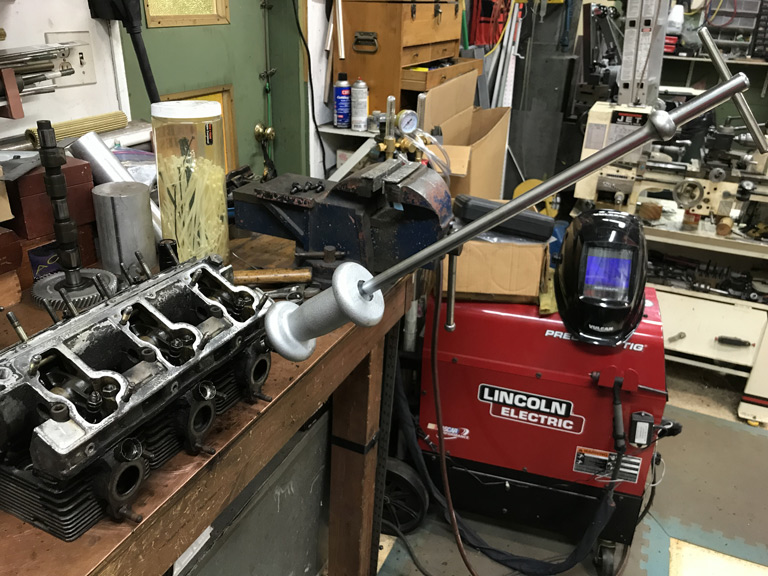 Here are the dimensions of the tool that worked for me just in case it can help someone else down the road. 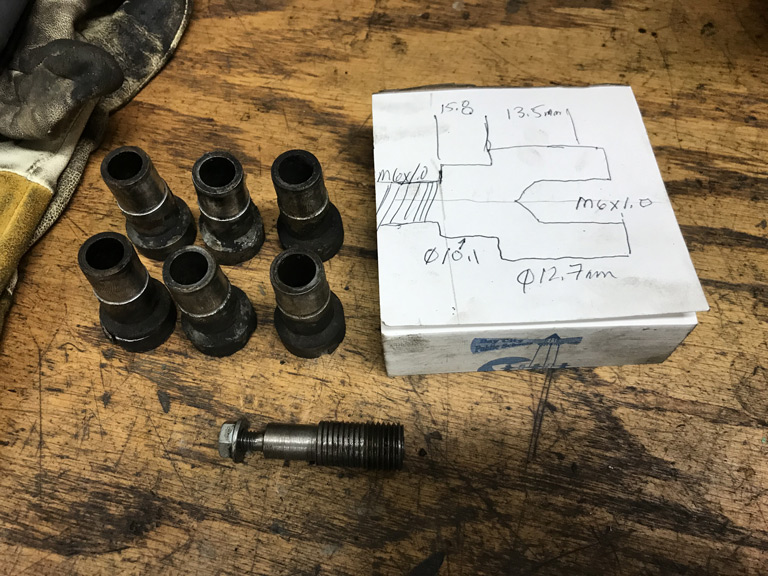 Head without the CIS injector cups. Now I need to start making plans to plug them! 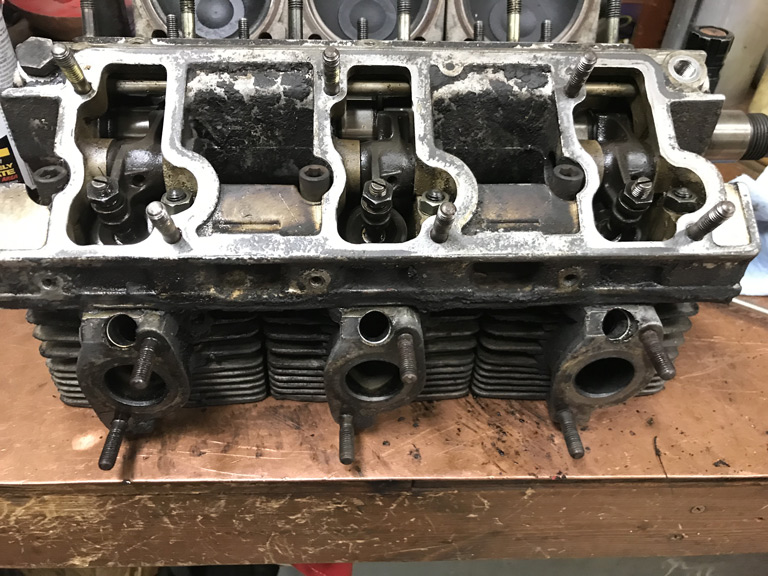 |
| Superhawk996 |
 Oct 13 2019, 05:30 PM Oct 13 2019, 05:30 PM
Post
#173
|
|
914 Guru      Group: Members Posts: 7,008 Joined: 25-August 18 From: Woods of N. Idaho Member No.: 22,428 Region Association: Galt's Gulch 
|
Now for the loss of the day.
In the process of pulling the case studs in preparation for shipment to Ollies the upper engine mount boss cracked. I'll spare you the profanity that was uttered. (IMG:style_emoticons/default/headbang.gif) (IMG:style_emoticons/default/blink.gif) In taking a look at the broken off piece as well as the boss itself, I can see the boss had been cracked for some time. I just manged to finish the job. Magnesium is such a fickle material. The lightweight nature of it is awesome. The fact that it is prone to stress cracking over time . . . well, I guess you have to take the good with the bad. 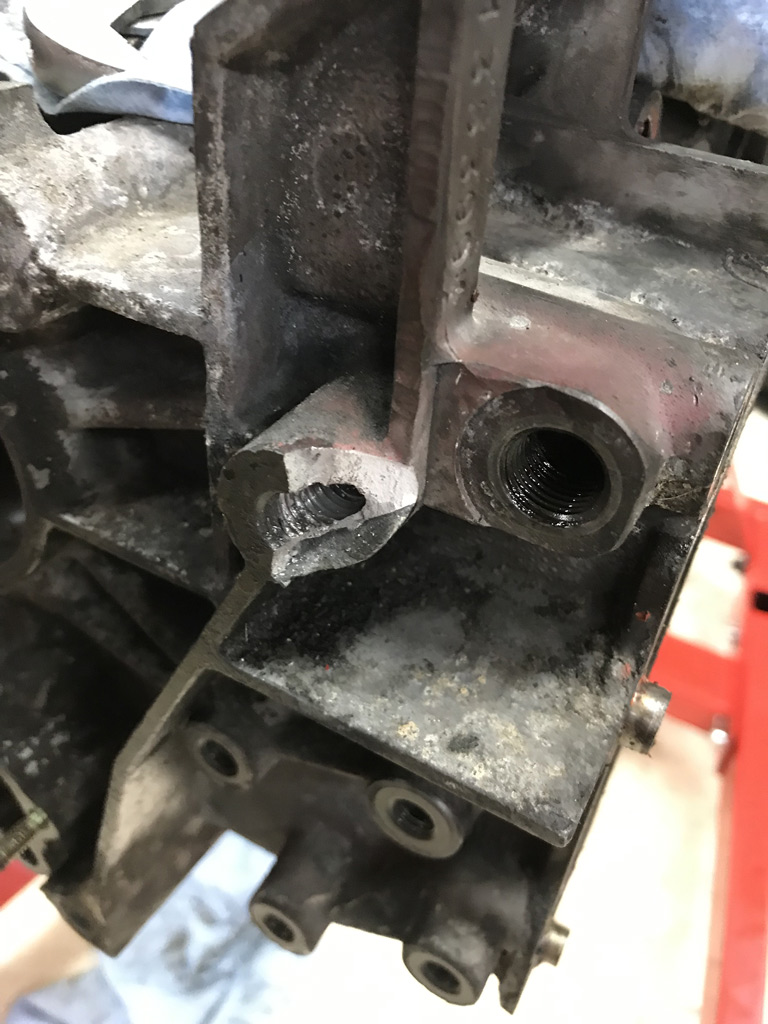 On the broken piece, notice the nice fresh white magnesium that cracked on the right side. Now look at the left. Dark and corroded. 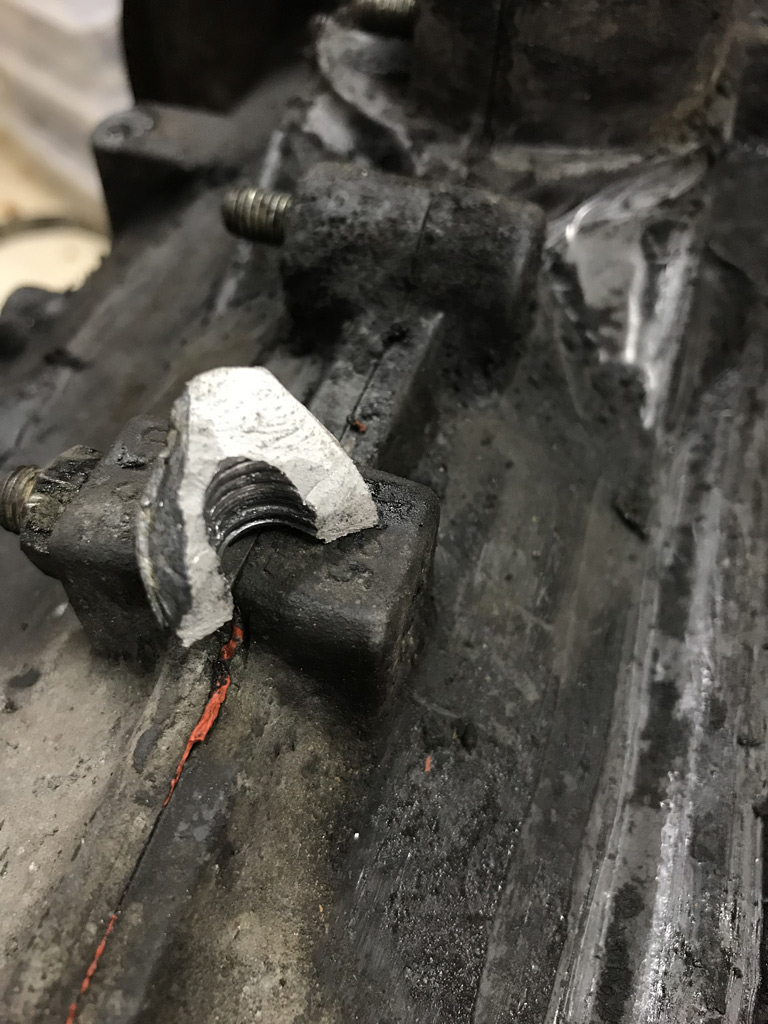 This was a pre-existing stress crack that had been propagating over time. It might be a good thing that it broke now, but, it sure doesn't feel that way. If it had broken after the case machining, I'd be absolutely screwed. The way you can tell it was pre-existing is if you look closely at the dark section, you'll notice a characteristic "beach heading" sort of like the way water creates wavy patterns in the sand at the beach. This is a form of gradual crack propagation. Sort of a gradual erosion pattern over time. Then look at the white section. It's uniform, rough, and granular, sort of like a sugar cube surface. This is characteristic of the instant yield crack that coincided with the "snap" when it broke. Usually I'm looking at these types of failure on parts at work. It hurts more to see it when my wallet is affected. (IMG:style_emoticons/default/lol-2.gif) So off it goes to Ollies, they should be able to weld up the boss, building it back out and then doing a drill, tap, and facing on the boss. What a bummer. I've seen worse repaired. Luckily it will be buried under tin and between the engine and the firewall so I won't have to look at it. (IMG:style_emoticons/default/dry.gif) The case got double boxed up, and it should go off for a final inspection and formal quotation request at some point this coming week. We'll see. (IMG:style_emoticons/default/idea.gif) (IMG:style_emoticons/default/popcorn[1].gif) |
| porschetub |
 Oct 14 2019, 11:40 PM Oct 14 2019, 11:40 PM
Post
#174
|
|
Advanced Member     Group: Members Posts: 4,803 Joined: 25-July 15 From: New Zealand Member No.: 18,995 Region Association: None |
Looks like that case has been 'fretting" on the bearing saddles,that shows in the main bearing wear,lots of excess point loading due to the case being out of round. Best to replace the case as the work to fix what you have isn't a good $$$ solution,go for a case half machining and a linebore to resize to std main bearings,you appear to have the skills to do the rest yourself. Good luck. @porschetub Agree that there is some fretting of the bearings there but that really shouldn't be surprising on a high mileage (90K) case. Problem is I REALLY want the 1973.5 7R case because it matches the vintage of my car. Machining the cases and a line bore back to standard is pretty much a given for these old Mag cases so I'll just roll with the punches and get it fixed properly. Yes not an easy solution,its not like 2.4 cases are thick on the ground and the one you have numbers wise is rather like ''rocking horse shit'' to find. Bugger you have had this bad luck,hope thinks improve some what for you,go well. Hope to get the case boxed up and ready to ship today. |
| Superhawk996 |
 Nov 9 2019, 12:54 PM Nov 9 2019, 12:54 PM
Post
#175
|
|
914 Guru      Group: Members Posts: 7,008 Joined: 25-August 18 From: Woods of N. Idaho Member No.: 22,428 Region Association: Galt's Gulch 
|
Goodies arrived in the mail this week:
Ben fixed my cracked fan shroud for a mere fraction of what I was looking at to replace it with another used part. Welding mag just isn't on my bag of tricks. Ben did a great job of not only welding the mag shroud, but he also clearanced the weld to allow the alternator to fit. I had assumed I'd have to take car of that myself. Thanks Ben! 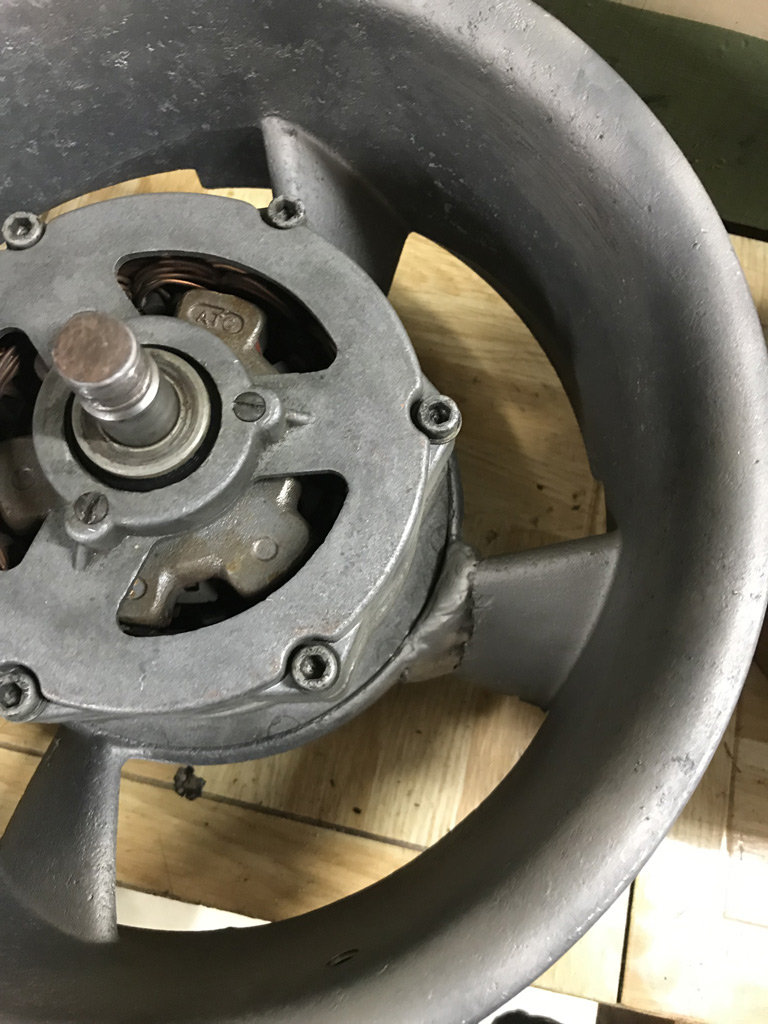 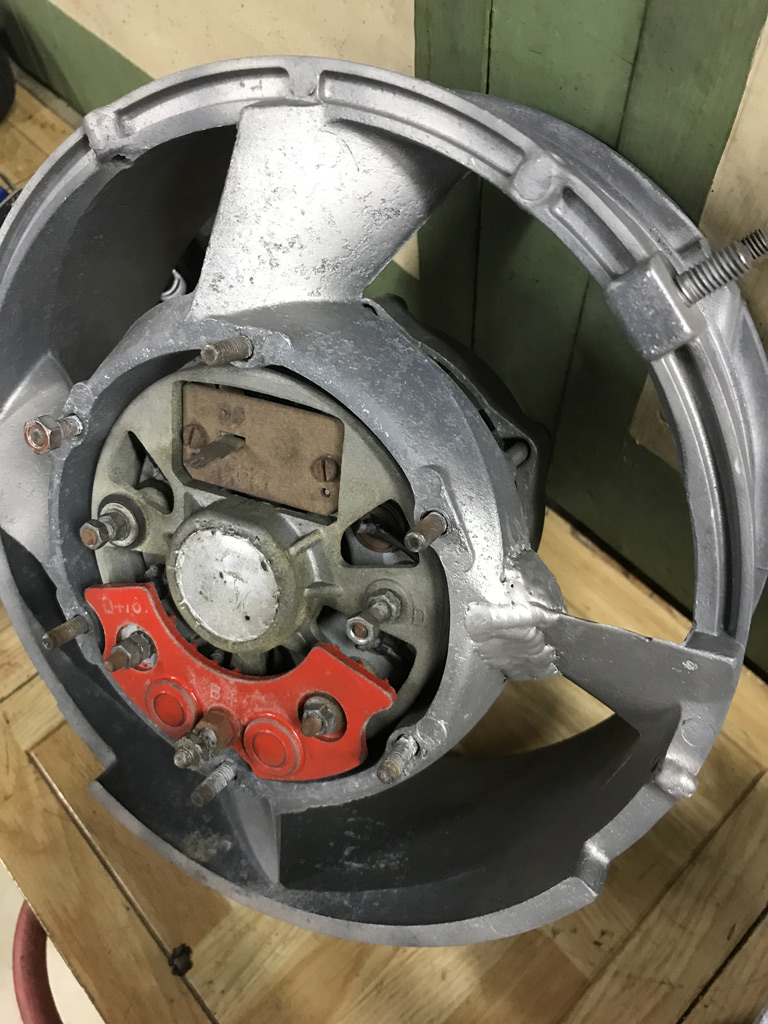 Now before anyone gets their panties in a wad about the size of the weld bead, keep in mind that none of this is easily visible with the fan installed. I would much rather have the strength and extra material from the bead than trying to blend this back purely for cosmetic purposes. Even more so knowing that when this is actually installed in a 914 with the fan facing toward the rear bulkhead you can't see anything. 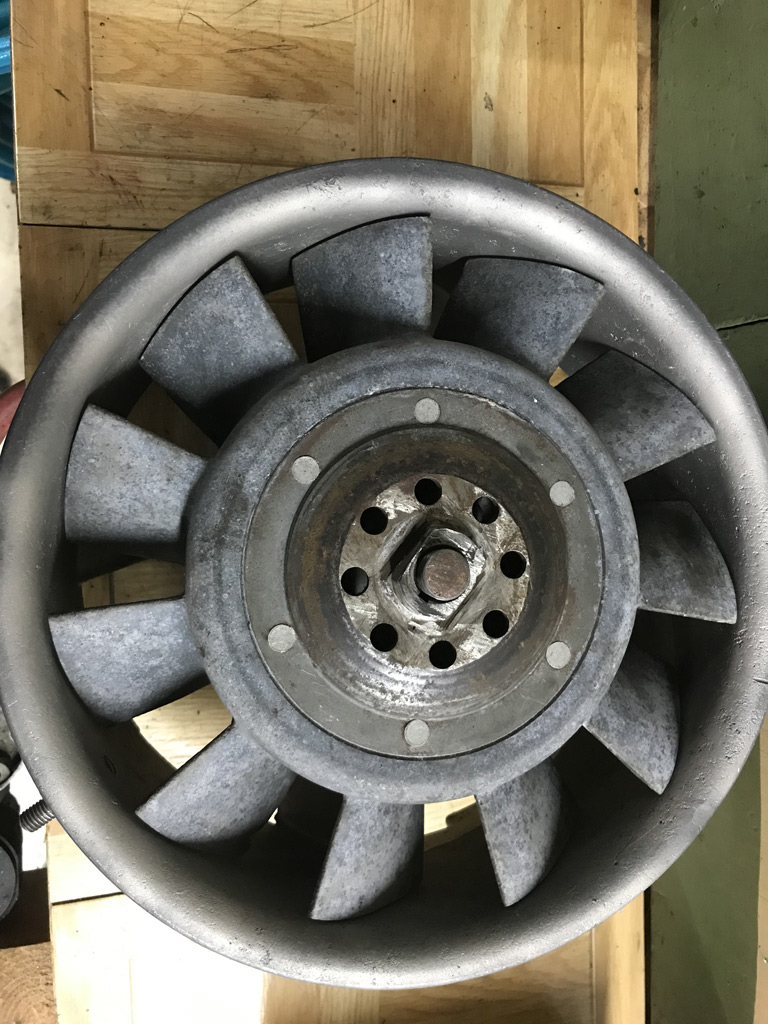 The fan spins perfectly with no contact to the welded shroud. No deformation of significance. Great job Ben! To top that off, I purchased Ben's DIY oil tank kits. Looking forward to putting this little puzzle together! I did a quick bench top mock-up and the pieces are all nicely bent and look like they will fit up well with minimal tweaking. 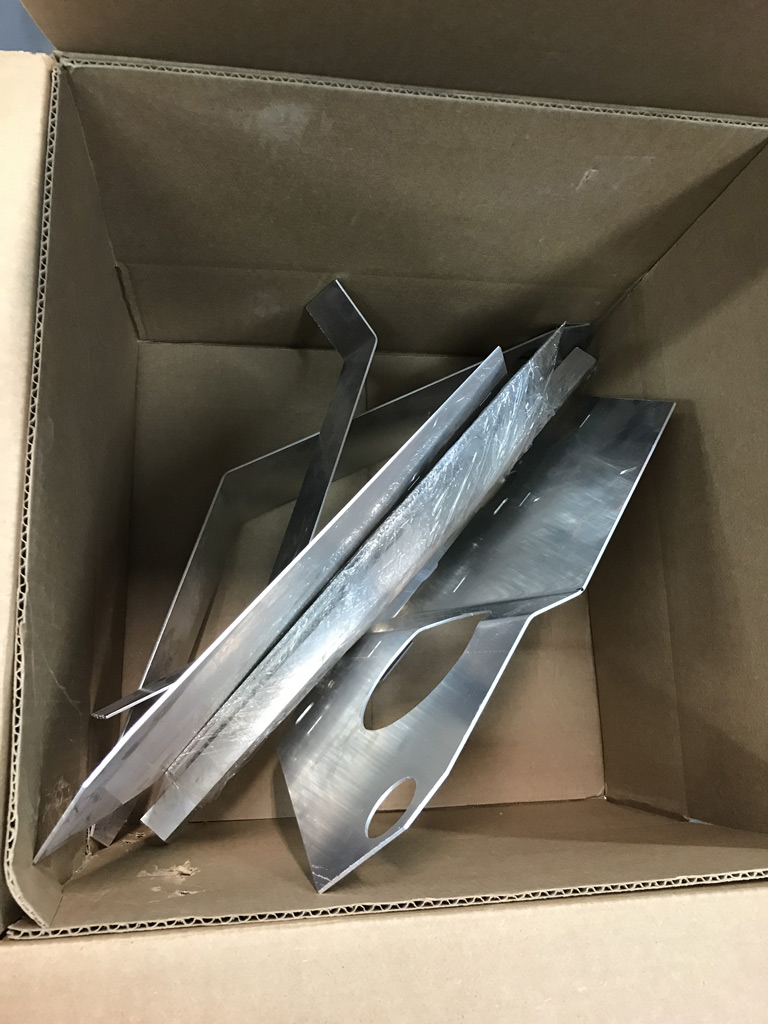 Hat's off to Ben! (IMG:style_emoticons/default/aktion035.gif) (IMG:style_emoticons/default/beerchug.gif) |
| mb911 |
 Nov 9 2019, 01:38 PM Nov 9 2019, 01:38 PM
Post
#176
|
|
914 Guru      Group: Members Posts: 7,547 Joined: 2-January 09 From: Burlington wi Member No.: 9,892 Region Association: Upper MidWest 
|
Glad your happy with it.. The mag welding is always fun.. Porosity is nature of the beast..
I now have to decide on another run of oil tanks or not. |
| mepstein |
 Nov 9 2019, 02:30 PM Nov 9 2019, 02:30 PM
Post
#177
|
|
914-6 GT in waiting                Group: Members Posts: 19,849 Joined: 19-September 09 From: Landenberg, PA/Wilmington, DE Member No.: 10,825 Region Association: MidAtlantic Region 
|
I’ll take mine welded. Thanks Ben.
Attached thumbnail(s) 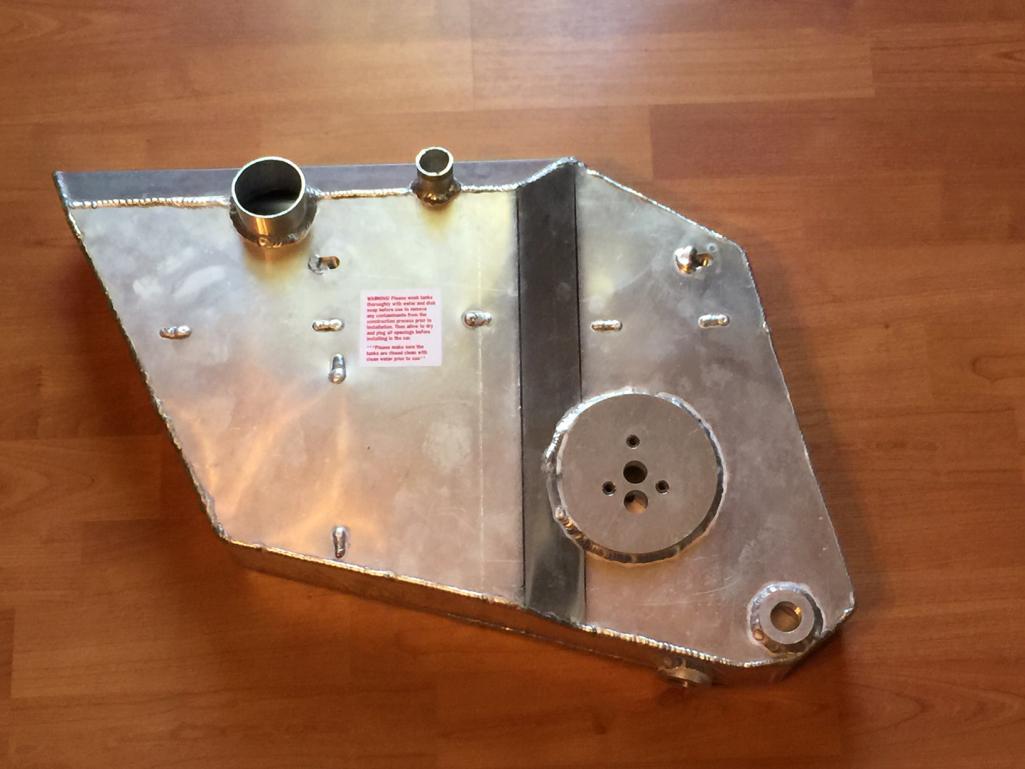
|
| porschetub |
 Nov 9 2019, 03:15 PM Nov 9 2019, 03:15 PM
Post
#178
|
|
Advanced Member     Group: Members Posts: 4,803 Joined: 25-July 15 From: New Zealand Member No.: 18,995 Region Association: None |
Excellent to see the fan housing repaired..many over on Pelican say it can't be done Ben has the skills,one thing I noticed with my housing was the importance of torqueing the mounting strap to spec,my fan had contact because I had done it up to tight,done up correctly the problem was sorted.
911 exhaust studs are bastard things ...1 third of mine were ok,the rest were too rusted @ the threads to reuse,heated and chilled them a few times and most came out,the rest I double nutted and welded the lower nut on,I let them cool and they came out. I went for genuine replacement studs from Pelican and because I had heard conventional nuts loosen after a while I purchased a BMW 8mm "crush" exhaust nuts,they haven't required a retorque yet with my headers. Good luck with your build. |
| mepstein |
 Nov 9 2019, 04:29 PM Nov 9 2019, 04:29 PM
Post
#179
|
|
914-6 GT in waiting                Group: Members Posts: 19,849 Joined: 19-September 09 From: Landenberg, PA/Wilmington, DE Member No.: 10,825 Region Association: MidAtlantic Region 
|
Excellent to see the fan housing repaired..many over on Pelican say it can't be done Ben has the skills,one thing I noticed with my housing was the importance of torqueing the mounting strap to spec,my fan had contact because I had done it up to tight,done up correctly the problem was sorted. 911 exhaust studs are bastard things ...1 third of mine were ok,the rest were too rusted @ the threads to reuse,heated and chilled them a few times and most came out,the rest I double nutted and welded the lower nut on,I let them cool and they came out. I went for genuine replacement studs from Pelican and because I had heard conventional nuts loosen after a while I purchased a BMW 8mm "crush" exhaust nuts,they haven't required a retorque yet with my headers. Good luck with your build. Ben’s been repairing fans and housing for years. He’s also done a 3.2 manifold and a 915 trans case for me. His welding credentials go way beyond small repairs but it’s nice to have his services available. Just wish he was closer so he could weld on my car. |
| Superhawk996 |
 Nov 9 2019, 04:47 PM Nov 9 2019, 04:47 PM
Post
#180
|
|
914 Guru      Group: Members Posts: 7,008 Joined: 25-August 18 From: Woods of N. Idaho Member No.: 22,428 Region Association: Galt's Gulch 
|
I couldn't be happier with Ben's work.
I'm still amazed at how many folks on forums will say that Magnesium can't be welded. I wish I had a proper welding shop, I'd give it a try buy there is just too much clutter in my garage should things go wrong. (IMG:style_emoticons/default/blink.gif) I'll be taking next week off so I hope to get back to some welding on my chassis now that I'm pretty well healed up. I also plan to go up to my father's house and retrieve a coupld of donor 901 transmissions that I stashed there about 20 years ago. They were stored off the ground, under a lean to, and with a vented tarp cover. Not sure anyting in them will be salvageable after 20 years but we'll see. |
  |
2 User(s) are reading this topic (2 Guests and 0 Anonymous Users)
0 Members:

|
Lo-Fi Version | Time is now: 27th April 2025 - 06:08 AM |
Invision Power Board
v9.1.4 © 2025 IPS, Inc.


