|
|

|
Porsche, and the Porsche crest are registered trademarks of Dr. Ing. h.c. F. Porsche AG.
This site is not affiliated with Porsche in any way. Its only purpose is to provide an online forum for car enthusiasts. All other trademarks are property of their respective owners. |
|
|
  |
| Superhawk996 |
 Dec 31 2019, 10:20 AM Dec 31 2019, 10:20 AM
Post
#241
|
|
914 Guru      Group: Members Posts: 7,008 Joined: 25-August 18 From: Woods of N. Idaho Member No.: 22,428 Region Association: Galt's Gulch 
|
I've also been spending some quality time in the hell hole.
Managed to get the wheelhouse inner welded in without moving the outer suspension console pick up points. Pretty happy so far. 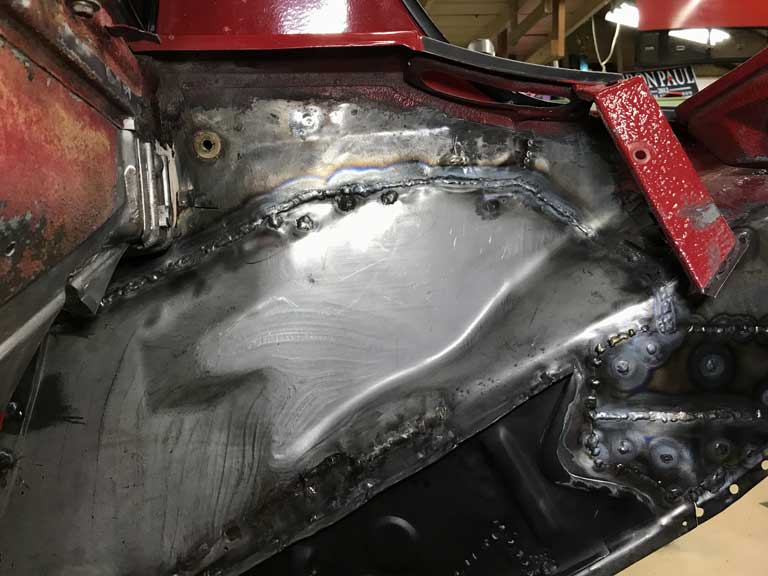 Good weld pentration on the butt weld that will allow the inside engine area to be ground flat but I will leave the bead on the exterior side for strength and it will eventually get covered either with undercoat or possibly reinforced later with the GT stiffening plate kit. 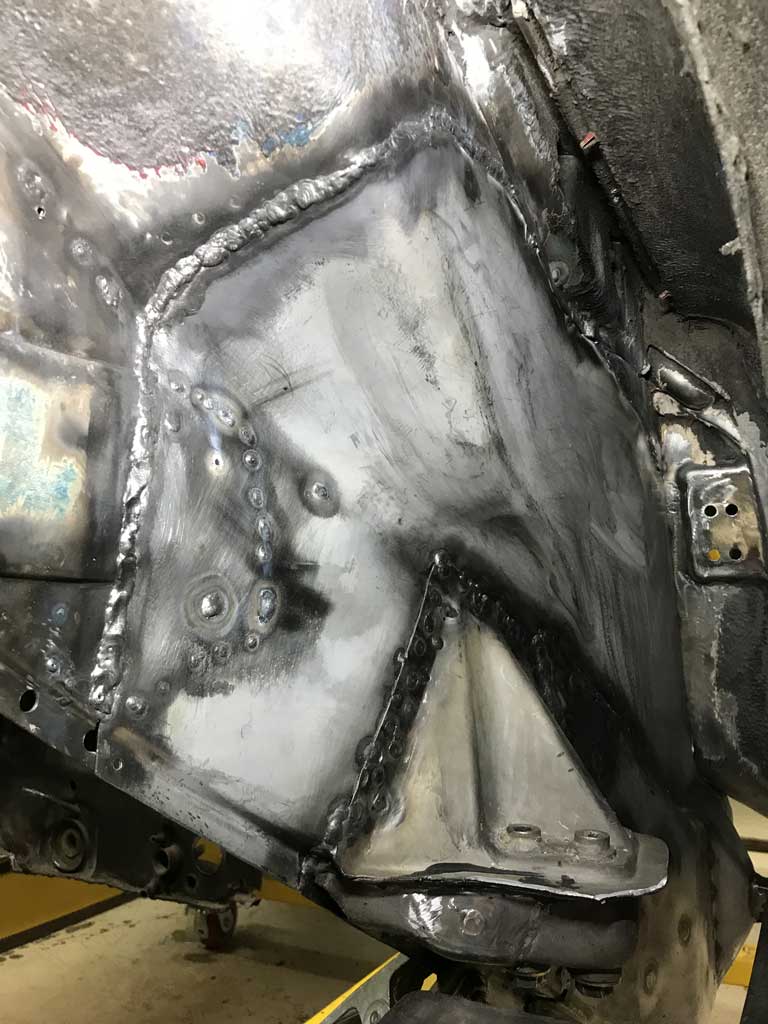 Still need to get the door latch striker welded in today. Things will get trickier as I install the inner C-section of the longitudinal to this wheelhouse. If things dont fit perfectly the C section is much more rigid and will easily pull the flat wheel house sheet metal out of position. |
| bkrantz |
 Dec 31 2019, 09:19 PM Dec 31 2019, 09:19 PM
Post
#242
|
|
914 Guru      Group: Members Posts: 8,346 Joined: 3-August 19 From: SW Colorado Member No.: 23,343 Region Association: Rocky Mountains 
|
I've also been spending some quality time in the hell hole. Managed to get the wheelhouse inner welded in without moving the outer suspension console pick up points. Pretty happy so far.  Good weld pentration on the butt weld that will allow the inside engine area to be ground flat but I will leave the bead on the exterior side for strength and it will eventually get covered either with undercoat or possibly reinforced later with the GT stiffening plate kit.  Still need to get the door latch striker welded in today. Things will get trickier as I install the inner C-section of the longitudinal to this wheelhouse. If things dont fit perfectly the C section is much more rigid and will easily pull the flat wheel house sheet metal out of position. Nice work! Where did you source the inner wheelhouse panel? I need to replace mine, but only above the frame member. |
| Superhawk996 |
 Jan 1 2020, 11:43 AM Jan 1 2020, 11:43 AM
Post
#243
|
|
914 Guru      Group: Members Posts: 7,008 Joined: 25-August 18 From: Woods of N. Idaho Member No.: 22,428 Region Association: Galt's Gulch 
|
Where did you source the inner wheelhouse panel? I need to replace mine, but only above the frame member. @bkrantz AutoAtlanta has them. The upper secion is a bit tricky due to the formations in the metal this piece would be time consuming to fabricate from scratch. Could definately be done with but for the price, you can't beat the time saved vs. fabricating the whole thing from scratch. If you just need the upper, I'd buy this whole piece and just cut off the lower rail you don't need. Probably could resell the balance of the lower to someone in need on Classified Forum as a partial cost offset. If you just need a small section, then you'd be better off to fabricate from scratch. The only thing I can gripe about is the panel has some wrinkling in it that I wish wasn't there. a light skim of filler will hide them. In AA's defense, the panel has quite a bit of die draw and has a complicated form to it and isn't a simple stamping to recreate. I'm sure that the tooling to crate this wasn't cheap and probably either has some wear, and/or the stamping shop doesn't quite have all the details worked out beteen the tension on the binder, the lubrication or any number of other variables involved in stamping a part this complex. I'm grateful it is available. It did fit quite well and only required minimal hammer and dolly work to blend it to my vehicles existing structure. Tthe other caveat was that in my case, it appears that there may be about 0.060" less draw to this panel vs. my original. I had to put .064" of spacer on the back side of my door latch to get the proper alignment of the latch stricker hole and to have it simultaneously touch off the wheel house inner for spot welding. 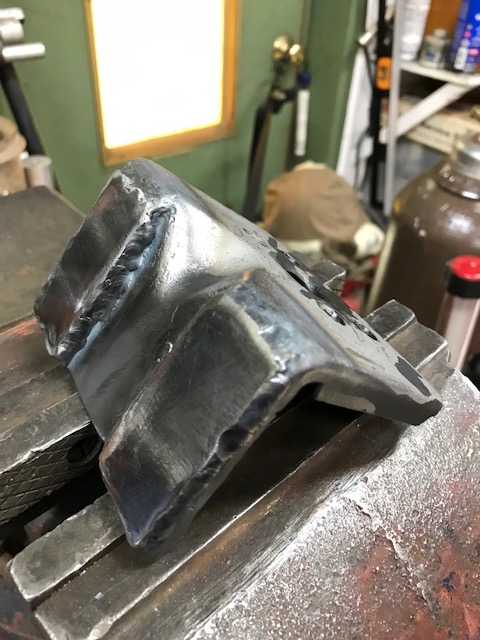 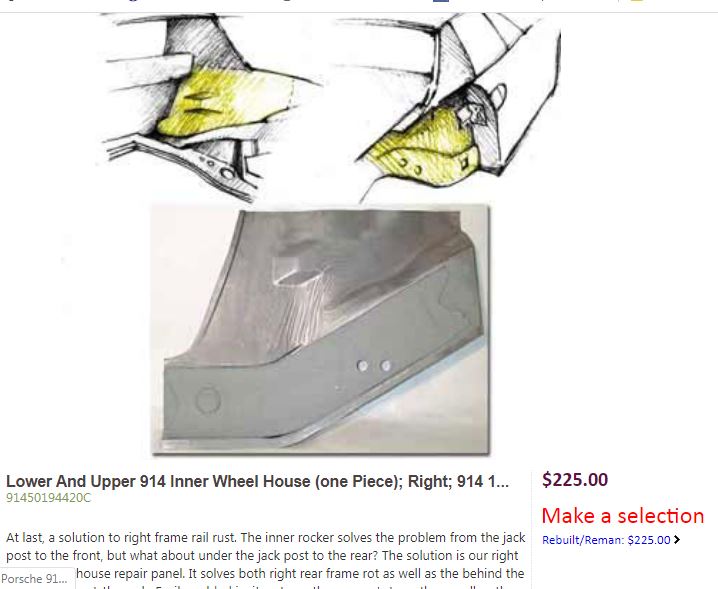 |
| bbrock |
 Jan 1 2020, 11:48 AM Jan 1 2020, 11:48 AM
Post
#244
|
|
914 Guru      Group: Members Posts: 5,269 Joined: 17-February 17 From: Montana Member No.: 20,845 Region Association: Rocky Mountains 
|
I got mine from Restoration Design (right side only) and was happy with the part: http://www.restoration-design.com/store/product/PP331
(IMG:http://www.914world.com/bbs2/uploads_offsite/www.restoration-design.com-20845-1577900913.1.jpg) |
| Superhawk996 |
 Jan 1 2020, 11:57 AM Jan 1 2020, 11:57 AM
Post
#245
|
|
914 Guru      Group: Members Posts: 7,008 Joined: 25-August 18 From: Woods of N. Idaho Member No.: 22,428 Region Association: Galt's Gulch 
|
I got mine from Restoration Design (right side only) and was happy with the part: http://www.restoration-design.com/store/product/PP331 (IMG:http://www.914world.com/bbs2/uploads_offsite/www.restoration-design.com-20845-1577900913.1.jpg) @bbrock . Did it extend up higher to full height or was it just this lower portion only? I originally looked at RD but thought this was only the lower. From @bkrantz post, I think he is looking for the upper portion only. |
| bbrock |
 Jan 1 2020, 12:58 PM Jan 1 2020, 12:58 PM
Post
#246
|
|
914 Guru      Group: Members Posts: 5,269 Joined: 17-February 17 From: Montana Member No.: 20,845 Region Association: Rocky Mountains 
|
I got mine from Restoration Design (right side only) and was happy with the part: http://www.restoration-design.com/store/product/PP331 (IMG:http://www.914world.com/bbs2/uploads_offsite/www.restoration-design.com-20845-1577900913.1.jpg) @bbrock . Did it extend up higher to full height or was it just this lower portion only? I originally looked at RD but thought this was only the lower. From @bkrantz post, I think he is looking for the upper portion only. It is the lower only as seen in the pic. I did do a bit of patchwork in the upper section but the areas I had to do were easy to fabricate. |
| bkrantz |
 Jan 1 2020, 10:31 PM Jan 1 2020, 10:31 PM
Post
#247
|
|
914 Guru      Group: Members Posts: 8,346 Joined: 3-August 19 From: SW Colorado Member No.: 23,343 Region Association: Rocky Mountains 
|
I got mine from Restoration Design (right side only) and was happy with the part: http://www.restoration-design.com/store/product/PP331 (IMG:http://www.914world.com/bbs2/uploads_offsite/www.restoration-design.com-20845-1577900913.1.jpg) @bbrock . Did it extend up higher to full height or was it just this lower portion only? I originally looked at RD but thought this was only the lower. From @bkrantz post, I think he is looking for the upper portion only. Yes, I need only the upper section, with all the compound curve shapes. |
| Daryl32 |
 Jan 25 2020, 01:35 PM Jan 25 2020, 01:35 PM
Post
#248
|
|
Member   Group: Members Posts: 133 Joined: 14-January 20 From: Southern California Member No.: 23,827 Region Association: Southern California |
OK Oscar, you have put my work to shame.... (IMG:style_emoticons/default/sad.gif)
What you are doing is so far out there for a DIY in the garage venture! Hats off to you - (IMG:style_emoticons/default/beerchug.gif) (IMG:style_emoticons/default/first.gif) |
| Superhawk996 |
 Jan 27 2020, 07:19 PM Jan 27 2020, 07:19 PM
Post
#249
|
|
914 Guru      Group: Members Posts: 7,008 Joined: 25-August 18 From: Woods of N. Idaho Member No.: 22,428 Region Association: Galt's Gulch 
|
Lots of work the last 3 weekends in the aptly named Hell Hole.
1st week was prepping the part of the rear longitudinal that attaches to the wheelhouse inner. I nearly forgot to put on the two weld studs that secure the trunk torsion springs. (IMG:style_emoticons/default/sad.gif) 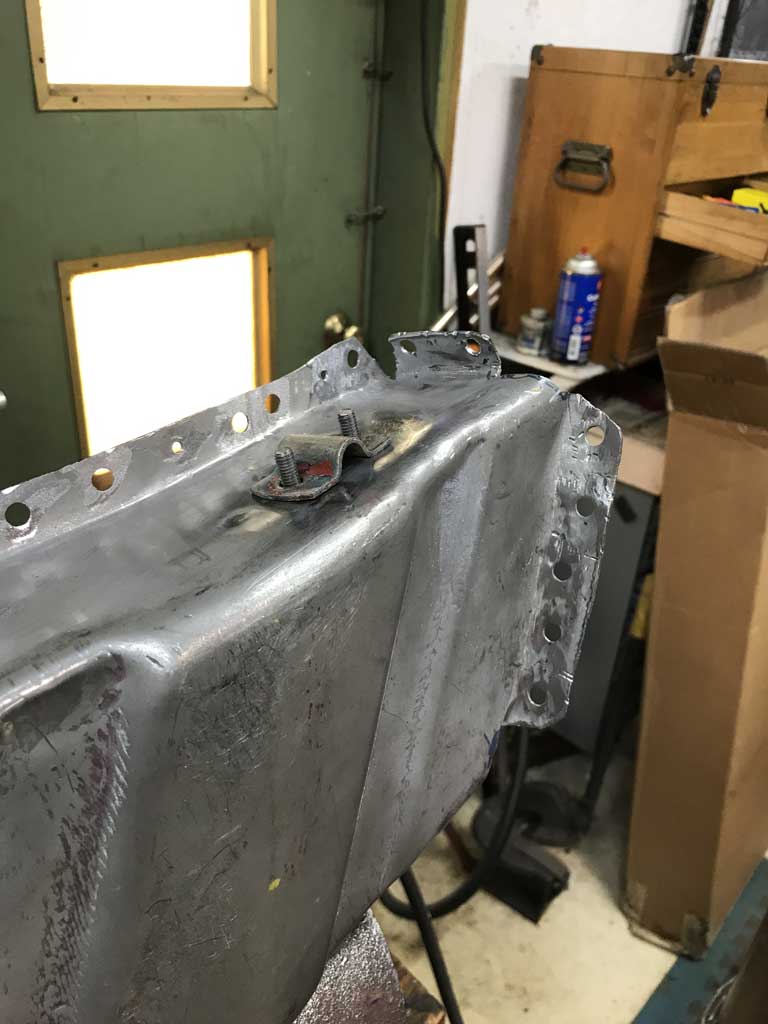 Then there was the obligatory hole drilling for the puddle welds and then painted the inside of the C-section with Eastwood frame coating but masked the weld flanges to keep them clean. 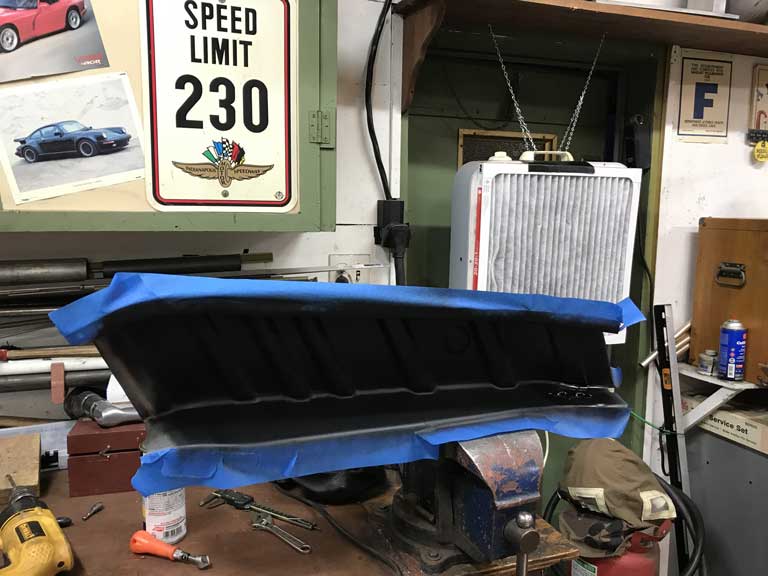 This Eastwood coating really seems to take the heat well and doesn't flake off after the heat of welding in the vicinity but at the same time I'm going really slow and making sure the overall sheet metal outside the immediate weld area doesn't heat up beyond what I can touch with a bare hand. This makes for really slow welding. Of course there was a lot of time spent tweaking fits and getting the frame angle to match the driver side. 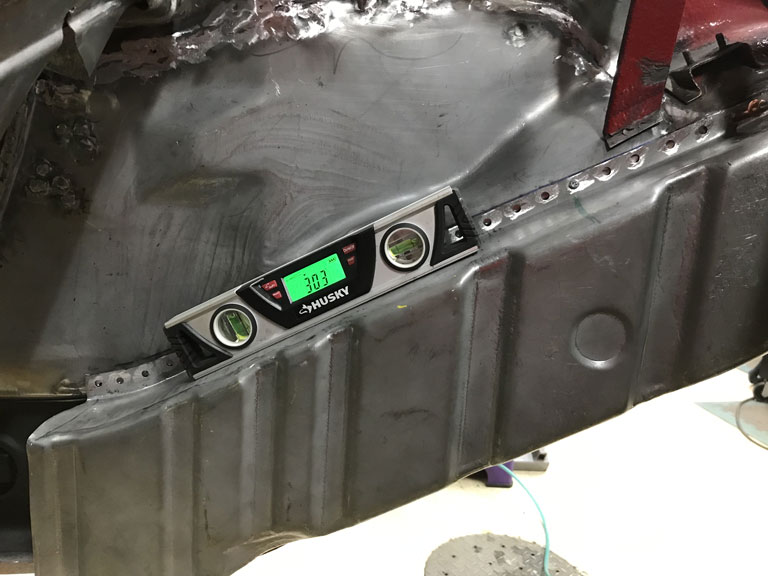 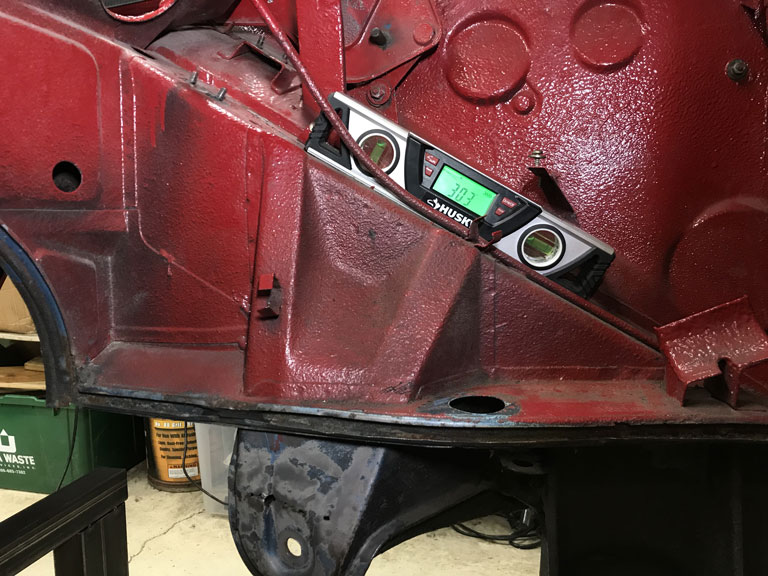 The attachement to the rear of the engine compartment and the front of the rear shock tower is a special kind of hell. 1st the area had to be cut open which of course was done long ago. But even so I ended up not quite gettting the top frame tab where I would have liked. I couldn't close up the air gap between the tab and the shock tower. Trying to do the puddle welds would have just resulted in buring out the flange and/or a giant booger weld. Ultimately I decided to live with this and do a couple little stitches where I had solid metal to metal contact since that little top tab really isn't carrying much load. The side flange and the bottom flange will take most of the load. 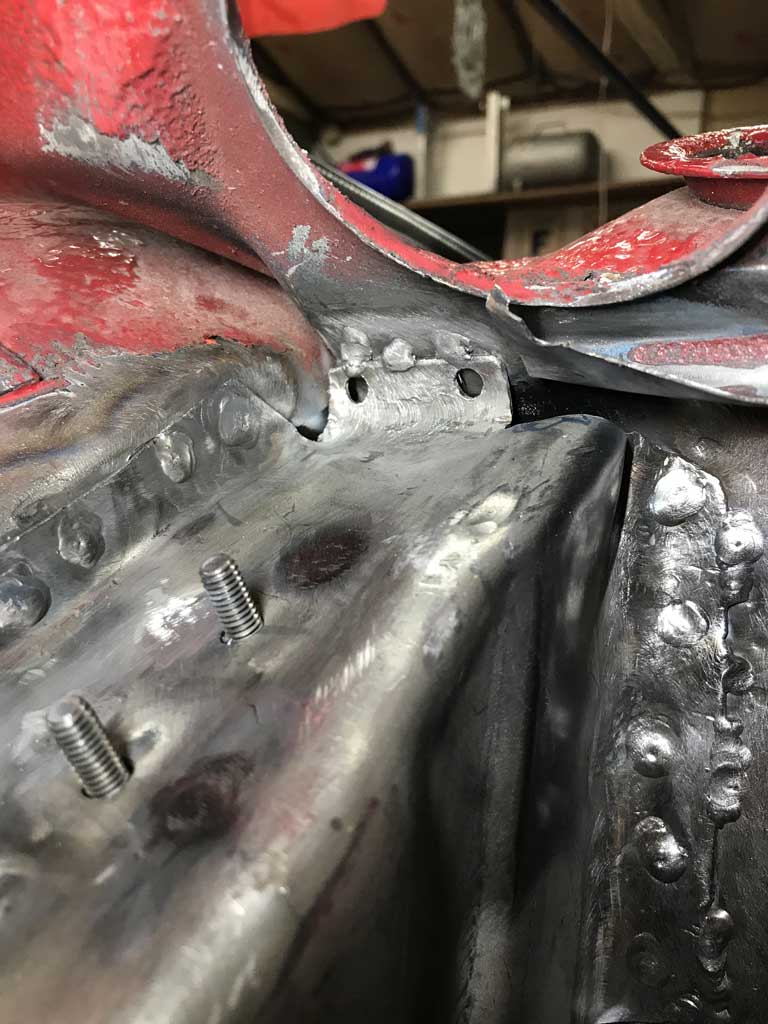 To top all that off, there is very little room inside this box section to manipulate the torch. When it was all done, I dusted the tuna can flap with some Eastwood in anticipation of being able to put that flap back in postion either this week after work or early in the weekend. 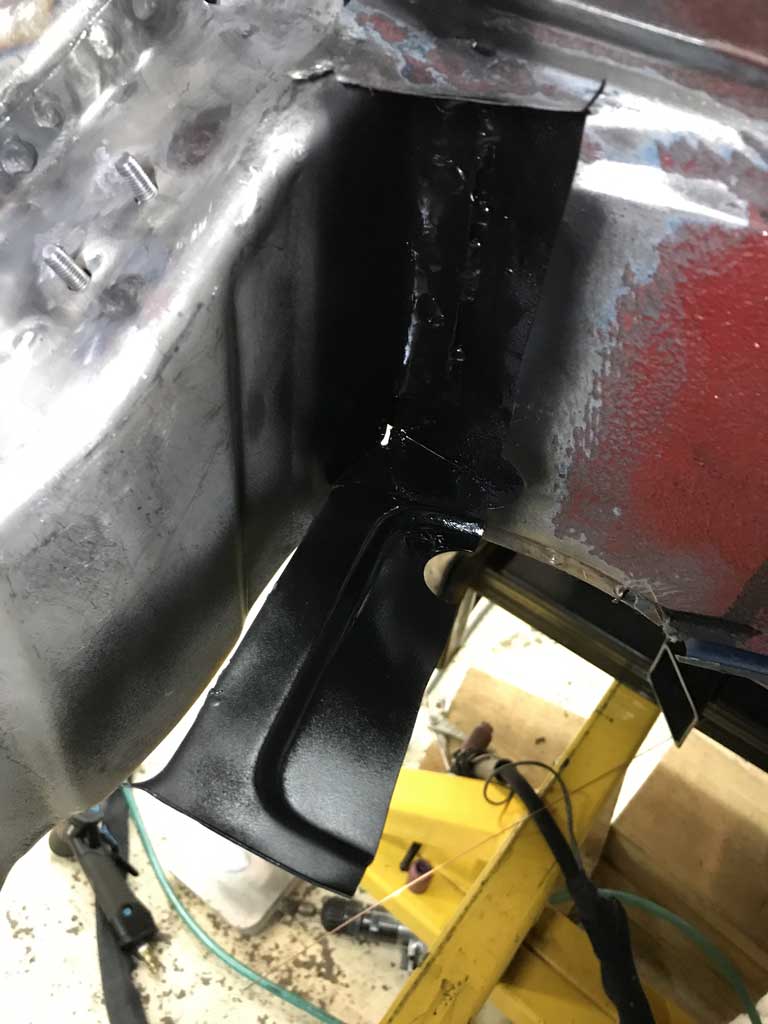 Lots of out of position welding on this section and the need to weld slowly, and constantly monitor the outer rear trailing arm pick up points for movment made this a slow painful ordeal. (IMG:style_emoticons/default/dry.gif) When it was all said and done, the suspension points hadn't moved so I'm going to call this past couple of weeks a success. (IMG:style_emoticons/default/biggrin.gif) |
| bbrock |
 Jan 27 2020, 10:25 PM Jan 27 2020, 10:25 PM
Post
#250
|
|
914 Guru      Group: Members Posts: 5,269 Joined: 17-February 17 From: Montana Member No.: 20,845 Region Association: Rocky Mountains 
|
Nice work. Don't take this the wrong way, but it's nice to see someone of your skill complaining about all those awkward places where there is no room to manipulate the torch. Gawd those were frustrating.
|
| Superhawk996 |
 Jan 28 2020, 08:14 PM Jan 28 2020, 08:14 PM
Post
#251
|
|
914 Guru      Group: Members Posts: 7,008 Joined: 25-August 18 From: Woods of N. Idaho Member No.: 22,428 Region Association: Galt's Gulch 
|
I dont know your 911 2.4 plan, but the 2.4 cis intake ports are tiny..Ollies gonna bore em out ?? Also as you did on the type 4sale case is what I do to the 2.4 cis inj. ports press in a shaft and weld the the top..when porting , smooth transition...lots of irons in the fire.. (IMG:style_emoticons/default/smash.gif) (IMG:style_emoticons/default/beerchug.gif) @sixnotfour Finally decided. Ollies actively working on the heads. 34mm intake and leave exhaust stock. 1973 2.4l spec 911E was 32mm. 911S 36mm. Smallest PMO ITB EFI manifolds are 34mm which is what I plan to use for induction. I don’t want to build a S spec motor so I feel 34mm splits the difference, will breathe a bit better than E spec and will allow me to get to modern FI. Hopefully it all works as planned (IMG:style_emoticons/default/biggrin.gif) |
| Superhawk996 |
 Jan 28 2020, 08:18 PM Jan 28 2020, 08:18 PM
Post
#252
|
|
914 Guru      Group: Members Posts: 7,008 Joined: 25-August 18 From: Woods of N. Idaho Member No.: 22,428 Region Association: Galt's Gulch 
|
Nice work. Don't take this the wrong way, but it's nice to see someone of your skill complaining about all those awkward places where there is no room to manipulate the torch. Gawd those were frustrating. @bbrock . Thanks just trying to keep up with your precedent (IMG:style_emoticons/default/biggrin.gif) Looking forward to some Idaho time and a few days of skiing in the near future! Missing the mountains! (IMG:style_emoticons/default/piratenanner.gif) |
| sixnotfour |
 Jan 28 2020, 08:30 PM Jan 28 2020, 08:30 PM
Post
#253
|
|
914 Wizard           Group: Members Posts: 10,807 Joined: 12-September 04 From: Life Elevated..planet UT. Member No.: 2,744 Region Association: Rocky Mountains 

|
Good choice.... Ive done em all...Right down the middle.....solex cams ...
|
| Superhawk996 |
 Jan 29 2020, 05:50 AM Jan 29 2020, 05:50 AM
Post
#254
|
|
914 Guru      Group: Members Posts: 7,008 Joined: 25-August 18 From: Woods of N. Idaho Member No.: 22,428 Region Association: Galt's Gulch 
|
Good choice.... Ive done em all...Right down the middle.....solex cams ... @sixnotfour Are you running carbs or FI? |
| sixnotfour |
 Jan 29 2020, 10:44 AM Jan 29 2020, 10:44 AM
Post
#255
|
|
914 Wizard           Group: Members Posts: 10,807 Joined: 12-September 04 From: Life Elevated..planet UT. Member No.: 2,744 Region Association: Rocky Mountains 

|
Good choice.... Ive done em all...Right down the middle.....solex cams ... @sixnotfour Are you running carbs or FI? webers,,, |
| Superhawk996 |
 Feb 2 2020, 09:31 AM Feb 2 2020, 09:31 AM
Post
#256
|
|
914 Guru      Group: Members Posts: 7,008 Joined: 25-August 18 From: Woods of N. Idaho Member No.: 22,428 Region Association: Galt's Gulch 
|
Had great aspirations for a weekend of welding but got busy at work and forgot to check how much Argon I had left. Turns out, not enough. Talk about a failure to plan biting me in the butt!
Started to put the flap of the rear engine bulkhead back into place but ran out of argon. (IMG:style_emoticons/default/sad.gif) 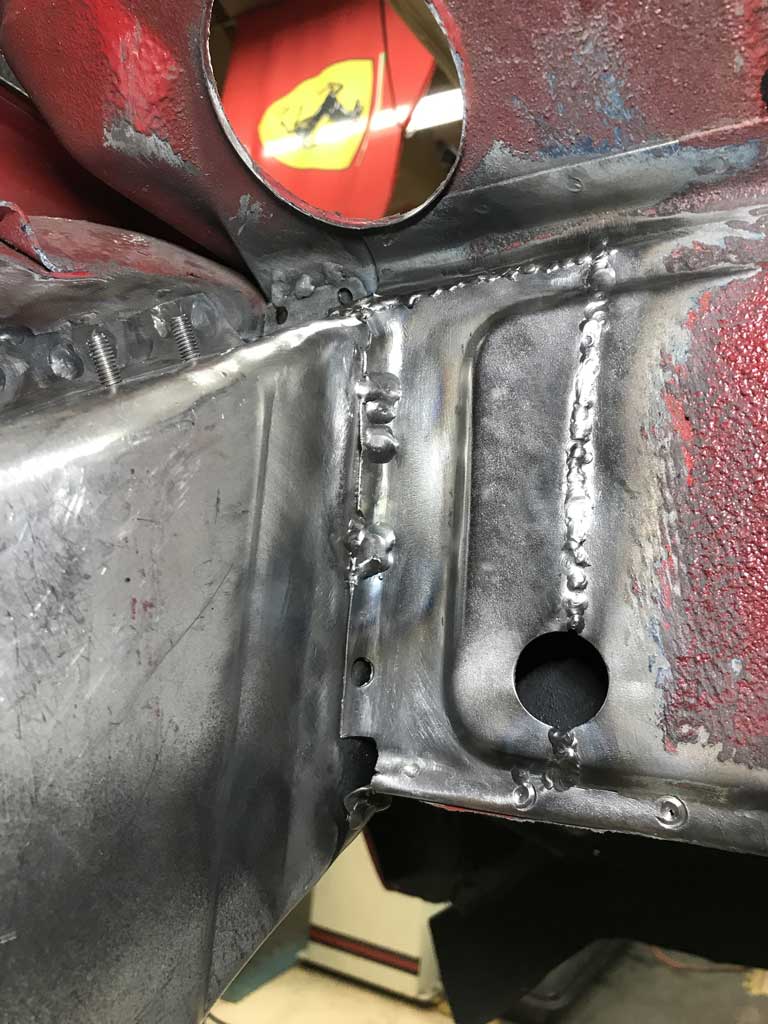 No shortage of other things to do. Heard from Ollie's that my 2.4L mag case is going on vacation to CA for some welding along with some of it's other mag case friends. In talking with them it sounds like they are seeing more and more mag cases that have corrosion, sunken deck registers, and other isssues as they age that require more extensive rework than was the norm say 20 years ago. Was happy to hear that is well underway though! |
| bkrantz |
 Feb 2 2020, 09:18 PM Feb 2 2020, 09:18 PM
Post
#257
|
|
914 Guru      Group: Members Posts: 8,346 Joined: 3-August 19 From: SW Colorado Member No.: 23,343 Region Association: Rocky Mountains 
|
Could be dumber. I went out the other morning, got all set up, and started welding without opening the gas valve. Took me a few minutes to figure out why my weld puddle was splattering.
|
| bbrock |
 Feb 3 2020, 08:14 AM Feb 3 2020, 08:14 AM
Post
#258
|
|
914 Guru      Group: Members Posts: 5,269 Joined: 17-February 17 From: Montana Member No.: 20,845 Region Association: Rocky Mountains 
|
Could be dumber. I went out the other morning, got all set up, and started welding without opening the gas valve. Took me a few minutes to figure out why my weld puddle was splattering. Can't count the number of times I've done that. And while sputtering crappy welds thinking, "what the heck is wrong with this welder now." The answer was always the dumbass holding the nozzle. (IMG:style_emoticons/default/screwy.gif) |
| tygaboy |
 Feb 3 2020, 09:36 AM Feb 3 2020, 09:36 AM
Post
#259
|
|
914 Guru      Group: Members Posts: 5,554 Joined: 6-October 15 From: Petaluma, CA Member No.: 19,241 Region Association: Northern California 
|
Could be dumber. I went out the other morning, got all set up, and started welding without opening the gas valve. Took me a few minutes to figure out why my weld puddle was splattering. Can't count the number of times I've done that. And while sputtering crappy welds thinking, "what the heck is wrong with this welder now." The answer was always the dumbass holding the nozzle. (IMG:style_emoticons/default/screwy.gif) I think I have you beat. I do that so often that as soon as the first weld "fails", I know EXACTLY why! (IMG:style_emoticons/default/headbang.gif) |
| Superhawk996 |
 Mar 8 2020, 06:01 PM Mar 8 2020, 06:01 PM
Post
#260
|
|
914 Guru      Group: Members Posts: 7,008 Joined: 25-August 18 From: Woods of N. Idaho Member No.: 22,428 Region Association: Galt's Gulch 
|
Well February basically slipped away with very little 914 work.
Was traveling for work, a bit of vacation and then manged to get sick on vacation with a really nasty case of Bronchitis. So it's March and time to make some progress. Now that I have the wheelhouse inner and the inner frame rail in place I was able to weld my lower longitudinal bracce back in place in anticipation of putting the inner longitudinal back in place. 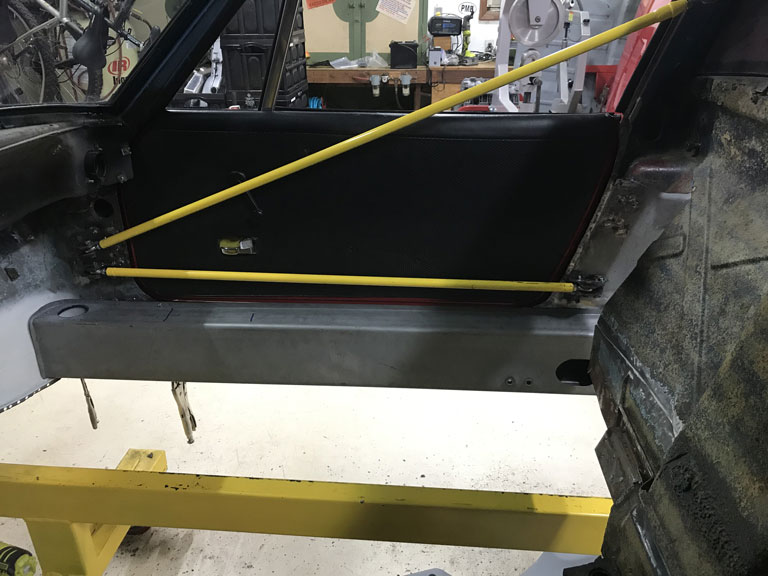 Spent some time evaluating the door gaps 1st with a simple gauge set to 1039mm "h" dimension from the door swith to the door striker plate. 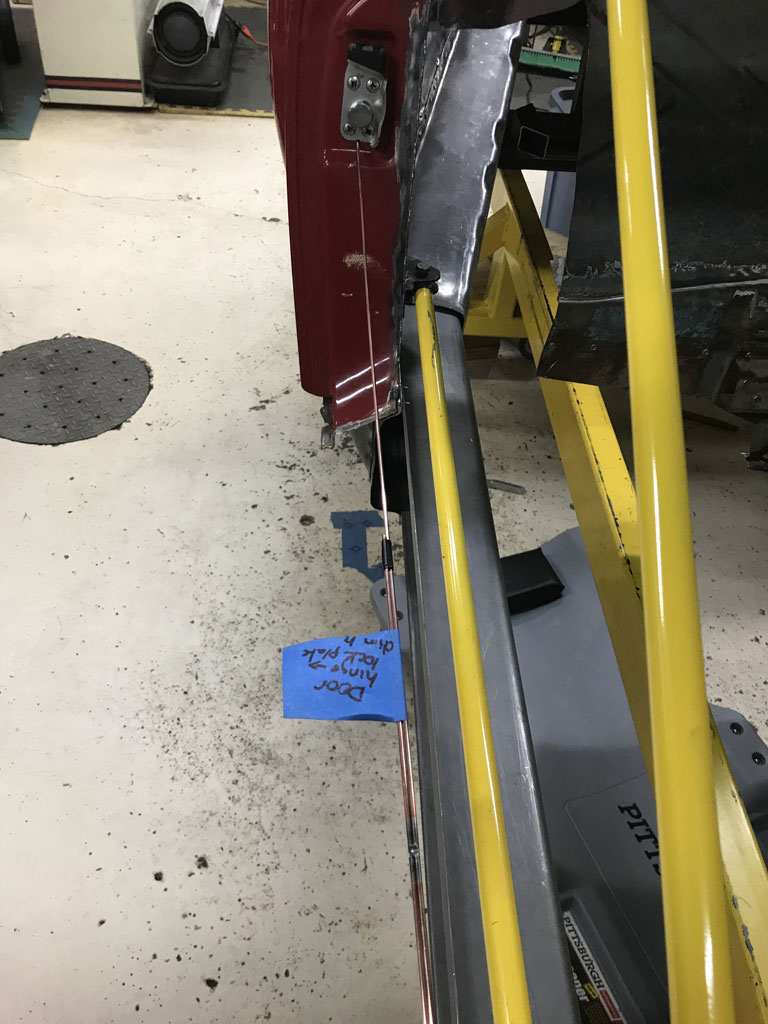 Then finally visual and just measuring to see how consistent I could get them visually. Not too bad. 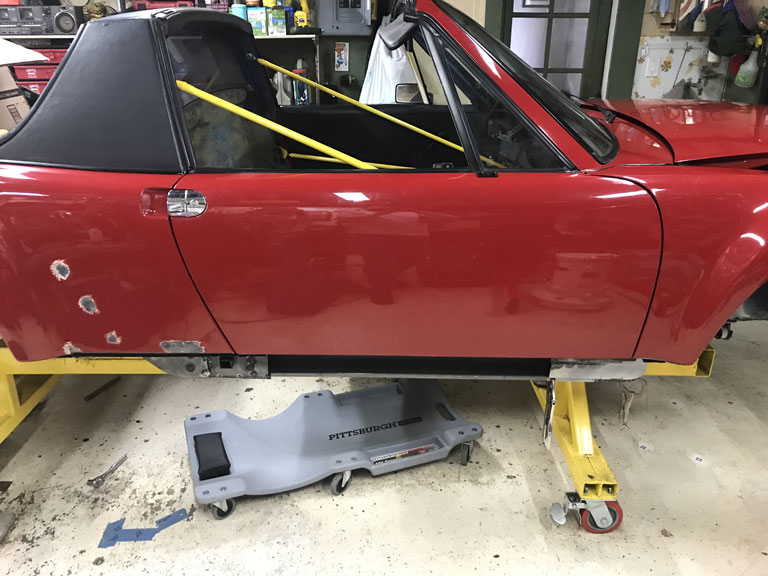 The slow part of this is that after tweaking things, I constantly have to go back and measure the rear suspension console to front suspension dimensions to make sure nothing has moved too far out of whack. Luckily, what I found is that by adding the brace, I was able to pull the lower door opening back to where it was before I welded in the wheelhouse inner and the inner frame inside the hell hole. Started prepping the longitudinal inner by putting the heater tube pipe back in place and painting the inner with Eastwood frame paint. 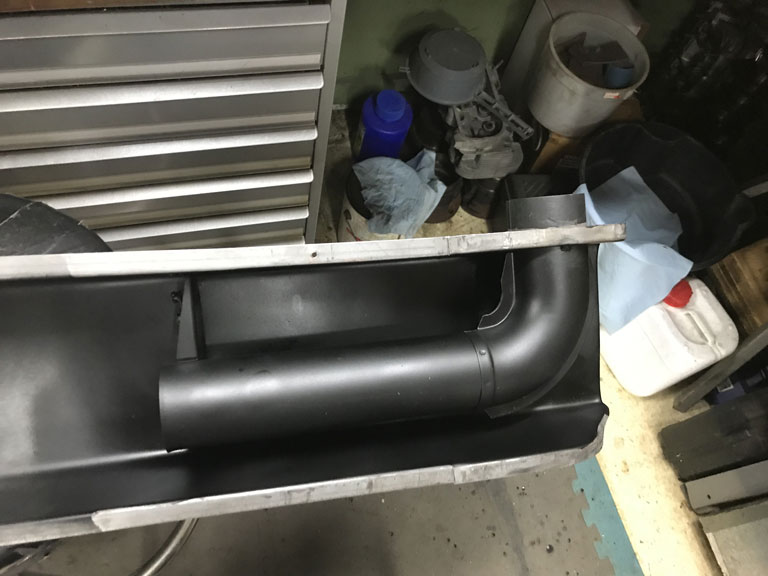 Unfortunately that sort of burned out the day. |
  |
1 User(s) are reading this topic (1 Guests and 0 Anonymous Users)
0 Members:

|
Lo-Fi Version | Time is now: 27th April 2025 - 10:22 PM |
Invision Power Board
v9.1.4 © 2025 IPS, Inc.


