|
|
|
Porsche, and the Porsche crest are registered trademarks of Dr. Ing. h.c. F. Porsche AG.
This site is not affiliated with Porsche in any way. Its only purpose is to provide an online forum for car enthusiasts. All other trademarks are property of their respective owners. |
|
|

  |

| mb911 |
 Apr 30 2020, 11:29 AM Apr 30 2020, 11:29 AM
Post
#321
|
|
914 Guru  Group: Members Posts: 7,794 Joined: 2-January 09 From: Burlington wi Member No.: 9,892 Region Association: Upper MidWest |
QUOTE(Superhawk996 @ Apr 30 2020, 09:02 AM)  QUOTE(FourBlades @ Apr 30 2020, 12:41 PM) Engine is looking great! That should last a long time. Getting a new cooler will be worth it just for not worrying about debris from the old one. Can't wait to see this car on the road! John @FourBlades Thanks John! It's such a long slog starting with a car that should have been scrapped. The encouragement from the forum certainly helps keep me motivated. Work in the short term will consist of the "free" work to fix the rust and replace the sheetmetal which was paid for over a year ago. No worries there. Likewise I have enough already paid for parts to put together one of the 2.0L four cyclinders in my posession at the moment. So the engine work is "free" at this point. Luckily I'm still working for now which is great. However, I don't know for how much longer as the L word is being rumored. The only upside to a layoff would be having time to work on the car with the parts that were previously paid for and sitting on hand. At this point, based on slow progress to date, I'm shooting to be on road next summer. More time on my hands would pull that forward substantially. @superhawk996 I hear you.. I have made amazing progress on my car as I have not been working much and not many people buying parts so lots of free time. |
   |

 
|
| Superhawk996 |
May 3 2020, 12:20 PM
Post
#322
|
|
914 Guru Group: Members Posts: 7,951 Joined: 25-August 18 From: Woods of N. Idaho Member No.: 22,428 Region Association: Galt's Gulch |
As promised, tunnel internals exposed.
 This donor tunnel has a previous clutch tube repair made with a coule of threaded J-hooks. Overall, one of the cleaner repairs i've seen when this breaks loose. 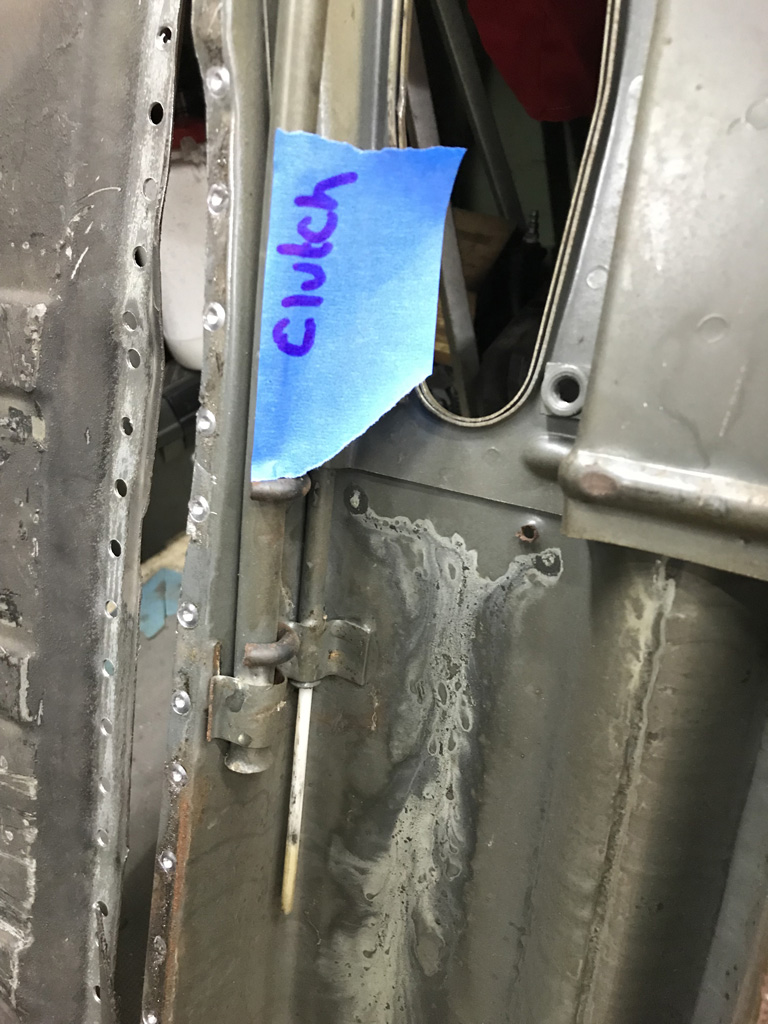 However the mid-tunnel support braket also has been fatigued and cracked. It's hard to say which end broke 1st and which failure led to the other.  When I rebuild the tubes inside this tunnel, I'll do a little bit more reinfocement to make sure this doesn't happen again. |
 |
|
| Superhawk996 |
May 3 2020, 12:26 PM
Post
#323
|
|
914 Guru Group: Members Posts: 7,951 Joined: 25-August 18 From: Woods of N. Idaho Member No.: 22,428 Region Association: Galt's Gulch |
QUOTE(mb911 @ Apr 30 2020, 01:29 PM) I hear you.. I have made amazing progress on my car as I have not been working much and not many people buying parts so lots of free time. @mb911 It is a catch 22 isn't it? Age old truth. You can have time or you can have money. It is rare to have both at the same time. Hopefully this crisis of fear will pass soon. Lot's of innocent folks that just want to make a living out there being harmed by all of this nonsense and thier inability to simply earn a living for themselves and thier family. That way we can all get back to buying those awesome parts from you (IMG:style_emoticons/default/beerchug.gif). |
|
|
|
| mb911 |
May 3 2020, 04:39 PM
Post
#324
|
|
914 Guru Group: Members Posts: 7,794 Joined: 2-January 09 From: Burlington wi Member No.: 9,892 Region Association: Upper MidWest |
QUOTE(Superhawk996 @ May 3 2020, 10:26 AM) QUOTE(mb911 @ Apr 30 2020, 01:29 PM) I hear you.. I have made amazing progress on my car as I have not been working much and not many people buying parts so lots of free time. @mb911 It is a catch 22 isn't it? Age old truth. You can have time or you can have money. It is rare to have both at the same time. Hopefully this crisis of fear will pass soon. Lot's of innocent folks that just want to make a living out there being harmed by all of this nonsense and thier inability to simply earn a living for themselves and thier family. That way we can all get back to buying those awesome parts from you (IMG:style_emoticons/default/beerchug.gif). Thanks for your support.. As you know not getting rich here but it fuels my habit.. Did make progress though again.. Almost have a runnner.. |
|
|
|
| Superhawk996 |
May 3 2020, 04:52 PM
Post
#325
|
|
914 Guru Group: Members Posts: 7,951 Joined: 25-August 18 From: Woods of N. Idaho Member No.: 22,428 Region Association: Galt's Gulch |
QUOTE(mb911 @ May 3 2020, 06:39 PM) Thanks for your support.. As you know not getting rich here but it fuels my habit.. Did make progress though again.. Almost have a runnner.. @Mb911 I watched the YouTube from the walkaround a Saturday or two ago -- Car looks great. You're almost there. It will be so excitiing to see another car saved and on the road! Cant wait to meet you in person one of these days at a midwest meetup when I get mine running! |
|
|
|
| mb911 |
May 3 2020, 07:02 PM
Post
#326
|
|
914 Guru Group: Members Posts: 7,794 Joined: 2-January 09 From: Burlington wi Member No.: 9,892 Region Association: Upper MidWest |
Sounds good..
|
|
|
|
| Superhawk996 |
May 25 2020, 04:55 PM
Post
#327
|
|
914 Guru Group: Members Posts: 7,951 Joined: 25-August 18 From: Woods of N. Idaho Member No.: 22,428 Region Association: Galt's Gulch |
Haven't been posting much progess lately but I continue to chip away at stuff.
Spent some quality time with the sandblaster - what a miserable job. Everytime I do this work, I wonder why I didn't just shop it out. (IMG:style_emoticons/default/screwy.gif) Managed to get some donor sheetmetal stripped down. I was primarily focused on getting the tunnel done. Once you're suited up and ready to deal with the PITA of sand blasting, I try to get as much done in one shot as I can.  Luckily I got it done just before the hot humid weather rolled in - unlike last year! Prepped the donor tunnel with Eastwood frame paint on the inside and Epoxy 2K on the outside.  Metric tubing to rebuild the internals has arrived from Restoration Design but I've been putting that job off for a bit. |
|
|
|
| Superhawk996 |
May 25 2020, 05:03 PM
Post
#328
|
|
914 Guru Group: Members Posts: 7,951 Joined: 25-August 18 From: Woods of N. Idaho Member No.: 22,428 Region Association: Galt's Gulch |
Since parts came back from Ollie's I've been needing to check the line bore and make sure there aren't any issues that need to be addressed.
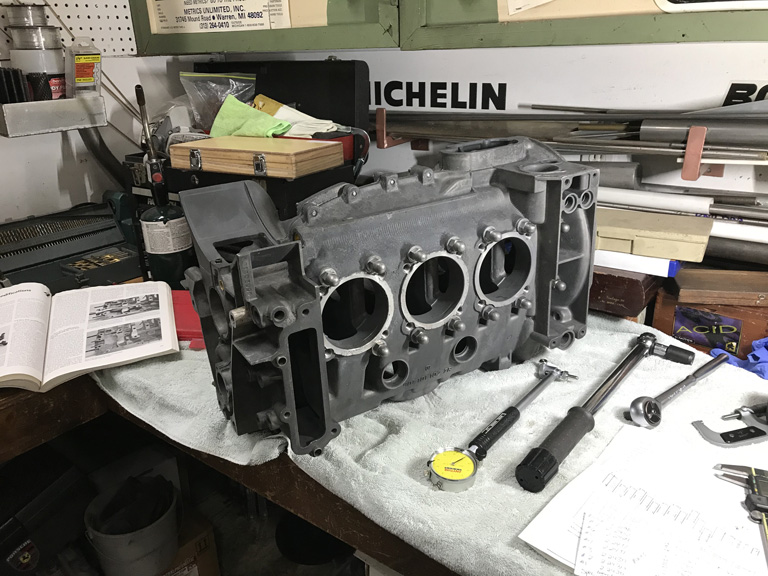 Unfortunately I ran into too much variability from my dial bore gauge. Despite setting it up with gauge blocks I'm having trouble getting the accuracy I need. More accurate bore gauge supposed to be here tomorrow. Generally seems to be nice and circular but according to my dial gauge I'm running a little bit more toward the high side than I had hoped but need to keep in mind that we're working with a 47 year old mag case here. Bore's are nice and round though! |
|
|
|
| Superhawk996 |
May 25 2020, 05:06 PM
Post
#329
|
|
914 Guru Group: Members Posts: 7,951 Joined: 25-August 18 From: Woods of N. Idaho Member No.: 22,428 Region Association: Galt's Gulch |
Next order of business was to meausre the crank while I wait for the new bore gauge.
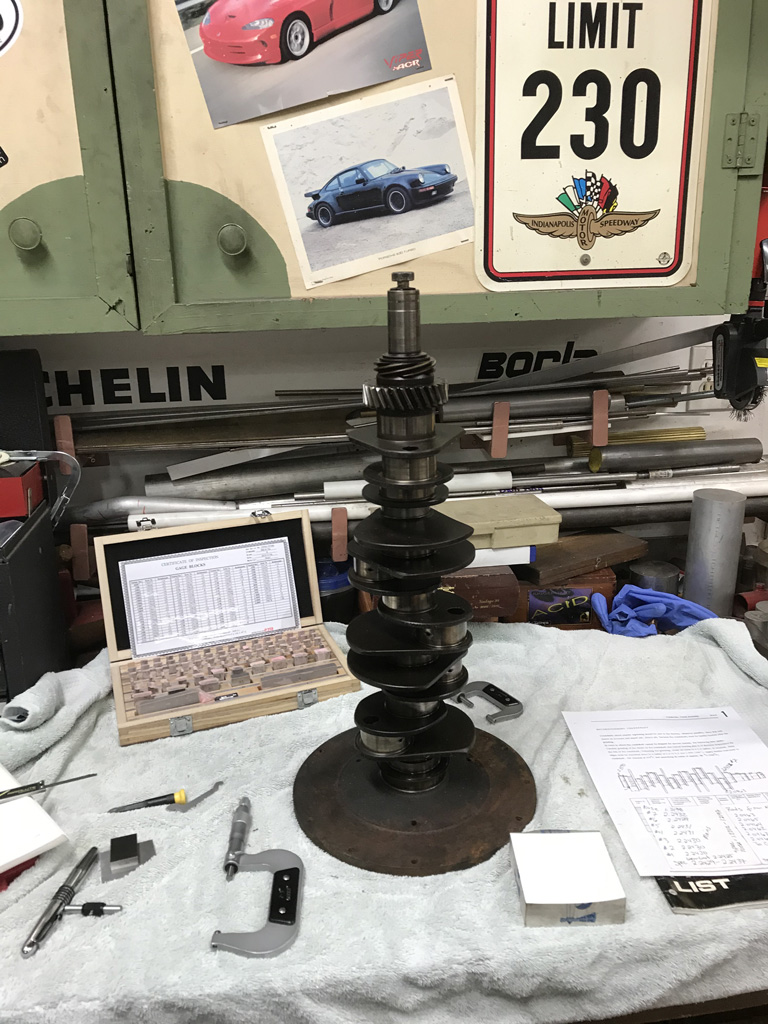 Measurements generally look good. 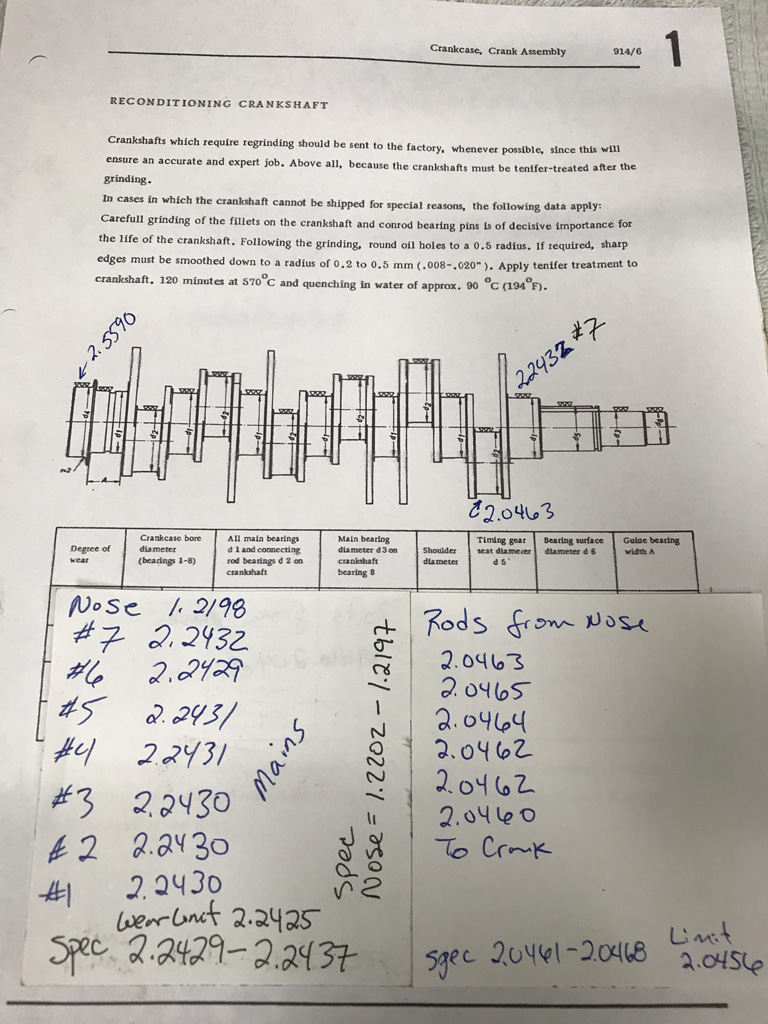 Generally same story here. Measuring above wear limit but a little bit on the lower end. I've got to balance that against the fact that I was using a relatively heavy touch on the Micrometer to get the smaller numbers rather than being light and getting a more appealing number. |
|
|
|
| Superhawk996 |
May 25 2020, 05:12 PM
Post
#330
|
|
914 Guru Group: Members Posts: 7,951 Joined: 25-August 18 From: Woods of N. Idaho Member No.: 22,428 Region Association: Galt's Gulch |
While waiting on the bore gauge, I decided to mount up a set of Glyco bearings and try some plastigauge.
 Coming up with 0.003" clearance which is a bit too loose for my liking. (IMG:style_emoticons/default/barf.gif) Would rather see 0.002" - 0.0025". One option is to try ordering Porsche bearings but I hate to do that since my understanding is that Glyco was OEM supplier but there seem to be a lot of posts over on the bird forum that bearings from Porsche tend to run tigher. Wouldn't be unheard of for supplier to provide better spec parts to the OEM though. Second option is to send the bearings out for specialized coating but that won't be cheap. Third option is to cut the crank undersize but would rather not do that unless absolutely necessary. Forth option - new crank assuming one can be located in better shape than what I already have. We'll see what they measure with the more accurate bore gague but I really don't expect much change beyond a couple of tenths (0.0001"). Getting 0.0005" out via bearing tolerances is feasible but I don't think I'll get 0.001" out that way. Since Porsche bearings are sold individually, I'll likely order 2 half shells and see if there is any promise there without having to go whole hog on a hunch. |
|
|
|
| Superhawk996 |
May 27 2020, 05:35 PM
Post
#331
|
|
914 Guru Group: Members Posts: 7,951 Joined: 25-August 18 From: Woods of N. Idaho Member No.: 22,428 Region Association: Galt's Gulch |
Not feeling any love from the new bore gauge. Accurate - yes. Repeatible - yes. Producing the desired anwer I'd like -- NO!
Well, I've now had the opportunity to measure the line bore and the bearing clearances. The line bore is basically at the top end of the tolerance for the line bore size. I was hoping that it would have been bored at the bottom end. There is only a total tolerance of 0.0017" to work with. I didn't get an inspection sheet from Ollie's so I'll see what they think they bored it to but the bottom line is that I'm generally measuring 0.0005" or so over the upper limit of the line bore spec but I wouldn't put my hand tool accuracy up against a CMM measurement. We'll have to see what Ollies uses and where they think they lined bored it at. My crank on the other hand is clearly toward the bottom end of the tolerance. Actually I'm only 0.0005" - 0.0007" off the Wear Limit. My hope was for a tight line bore and being able to find a workable set of bearings based on some selective fitting. That doesn't appear to be in the cards. Looks like there will be a 0.010" crank grind and the more expensive undersize bearings in my future. (IMG:style_emoticons/default/confused24.gif) Win some, loose some. Bottome line: I'm coming up at 0.004" of measured main bearing clearance using micrometers and a digital bore gauge that are being set, checked, and repeatable with gauge blocks. Too much clearnace to assemble it as-is. Any rework of the crank goes on the back burner for now. Potential COVID induced layoffs are a real possibility for me so expensive work will be put off until I know more. 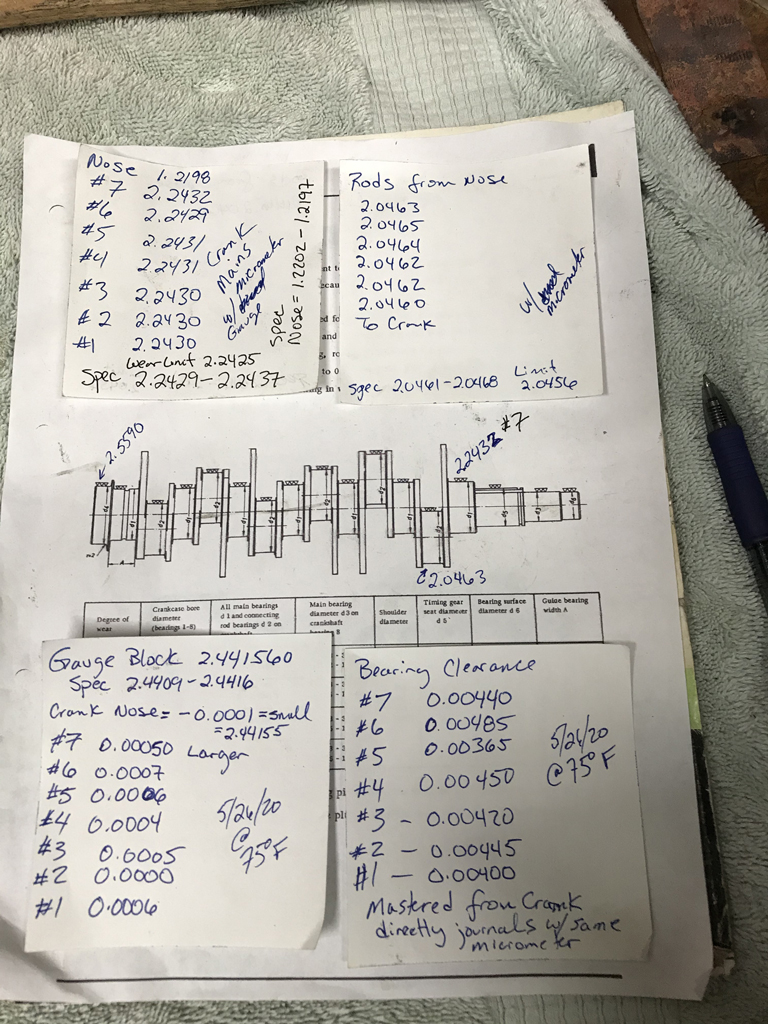 |
|
|
|
| Superhawk996 |
Jul 5 2020, 09:44 AM
Post
#332
|
|
914 Guru Group: Members Posts: 7,951 Joined: 25-August 18 From: Woods of N. Idaho Member No.: 22,428 Region Association: Galt's Gulch |
Well after an extended period of time away from the garage, it's back to the grind . . . literally.
Spent a lot of time on my back yesterday grinding spot welds to remove the floorpan from the driver side longitudinal. It's nice to finally have wide open space. I had been putting off this job for quite a while. Dreaded job, dirty, noisy, and tough working upside down. 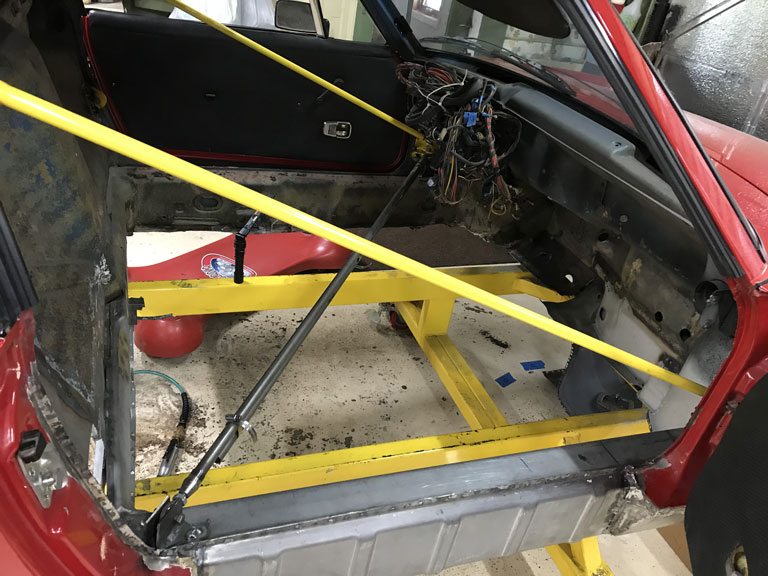 During the removal I discovered that the cross brace in front of the seats was completely eaten away about 3/8" from the driver side long. Luckily the long is completely unaffected. However, it's amazing that someone just fiberglassed over the rust perforation in the cross member as if it had no structural purpose. Simply amazing to me the (IMG:style_emoticons/default/stromberg.gif) that people did to these cars (IMG:style_emoticons/default/slap.gif) (IMG:style_emoticons/default/screwy.gif) I have some localized pinholes in the driver side outer bulkhead near the shift rod. I decided that since the inner bulkhead is trashed at the floor pan, I'd remove the inner in order to gain better access to the outer. Damn rodents had been storing nuts in the area between the panels.  Damn previous owner somewhere along the line though they were making molds. Entire floor pan covered in fiberglass resin made this a dreadful job. My arms are still itching today. The good new is that except for a little resin clean up from the longitudinals and off the wheelhouse, all remnants of fiberglass are gone from the floorpan. 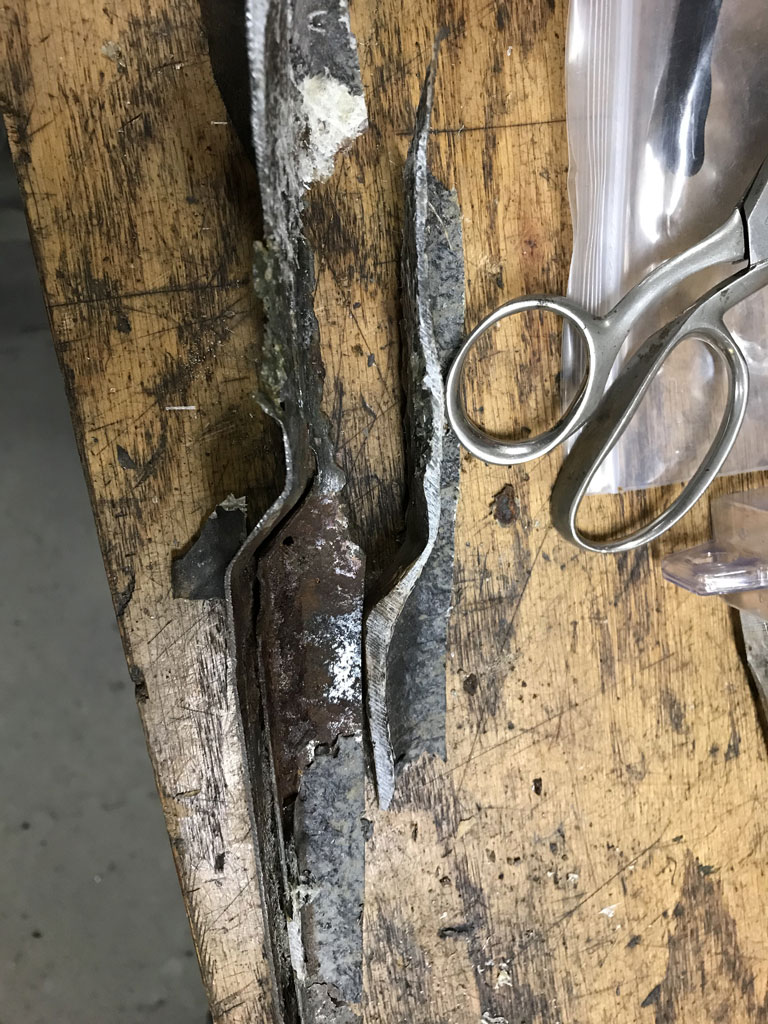 So with the driver side inner bulkhead removed, I can now get clear access to the outer in order to cut out the localized pin holes and replace with new metal from Restoration Design. 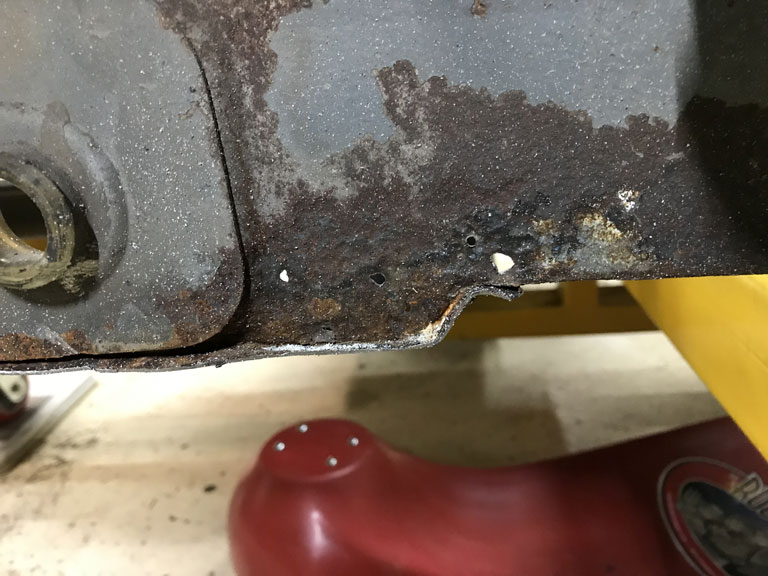  |
|
|
|
| Superhawk996 |
Jul 22 2020, 04:41 PM
Post
#333
|
|
914 Guru Group: Members Posts: 7,951 Joined: 25-August 18 From: Woods of N. Idaho Member No.: 22,428 Region Association: Galt's Gulch |
QUOTE(Superhawk996 @ May 25 2020, 07:12 PM) Since Porsche bearings are sold individually, I'll likely order 2 half shells and see if there is any promise there without having to go whole hog on a hunch. OK so #1 main bearing half shells came in and I thought I'd post the results. This single OEM Porsche main bearing #1 is $75 per ½ shell. $150 for the bearing pair. Not a set – just Porsche OEM bearing #1. (IMG:style_emoticons/default/yikes.gif) I paid $165 for a whole SET of #1 - #7 bearings from Glyco – the OEM manufacturer. I’ve been reading stories on interwebz and the bird forum that Porsche 911 bearings are better and have tighter tolerances. In the nature of a skeptic I wasn’t sure I could believe Web info so I ordered just this one bearing for comparison (IMG:style_emoticons/default/idea.gif) Yup – it’s true. (IMG:style_emoticons/default/headbang.gif) 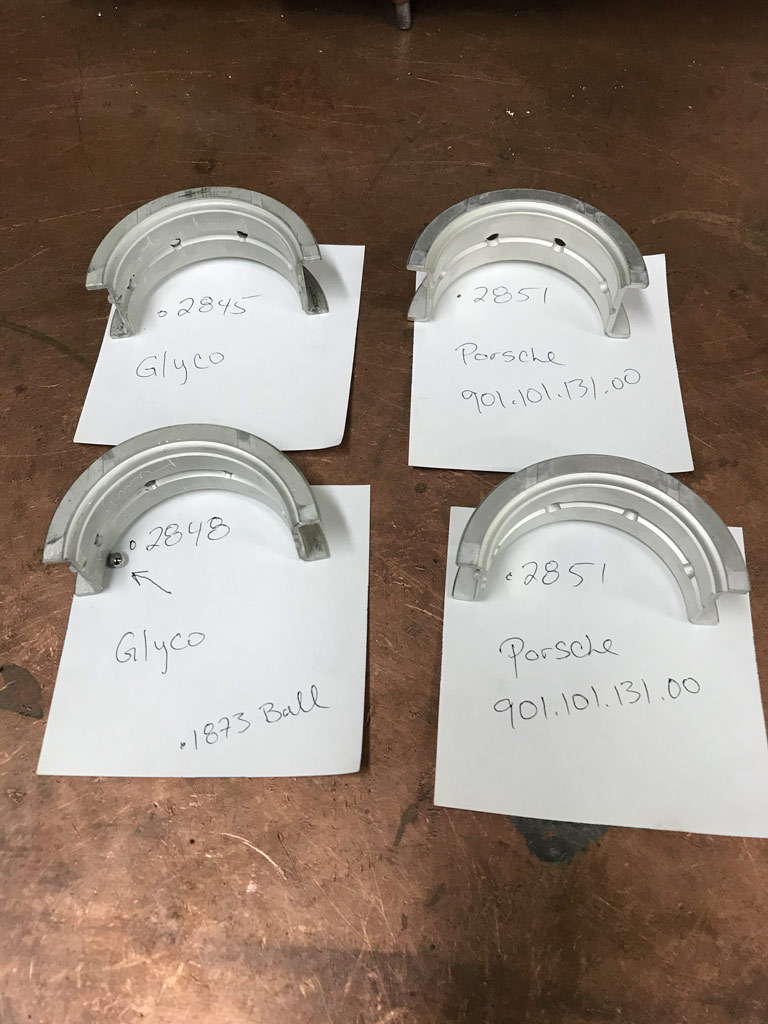 Glyco aftermarket bearing set 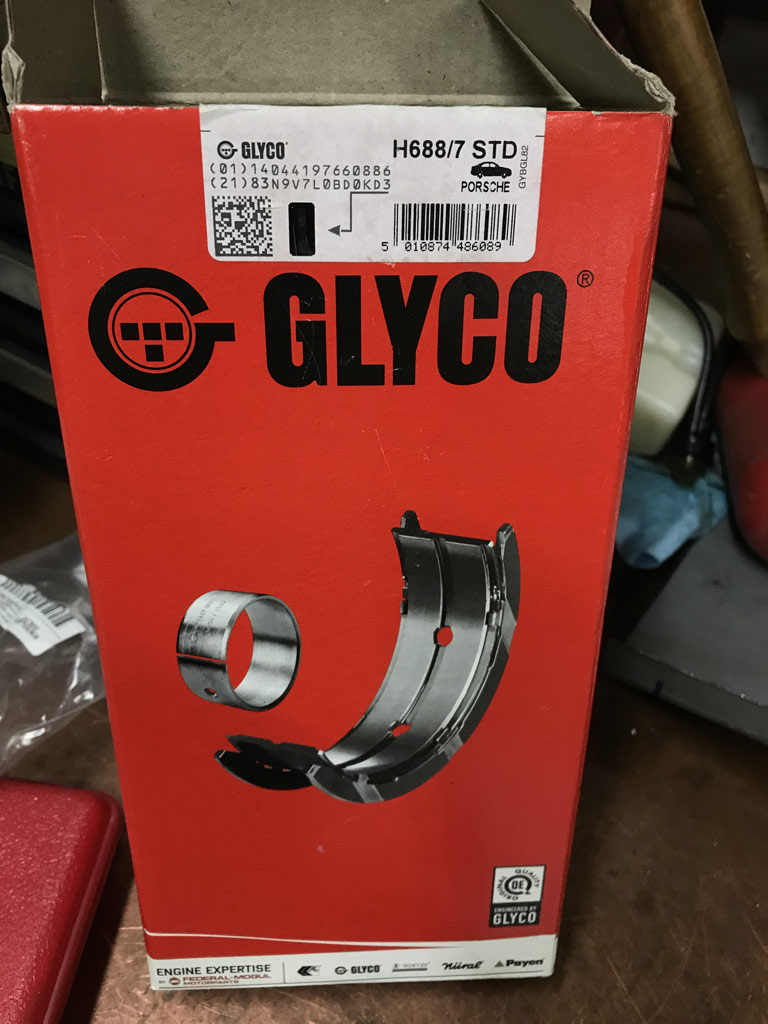 Porsche bearing ordered from Pelican - delivered in Porsche bag, Porsche p/n on bag and on bearing. 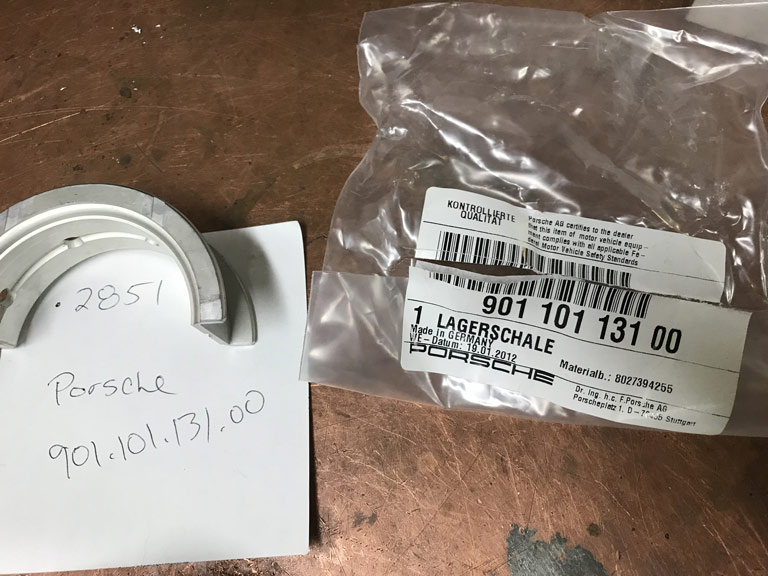 Although the OEM Porsche bearing bears the Glyco makers mark, it has a Porsche part number and different markings. Even the maker mark is slightly different. I'm not suspecting counterfit parts but see it as evidence that these Glyco aftermarket bearings are indeed different. (IMG:style_emoticons/default/confused24.gif) 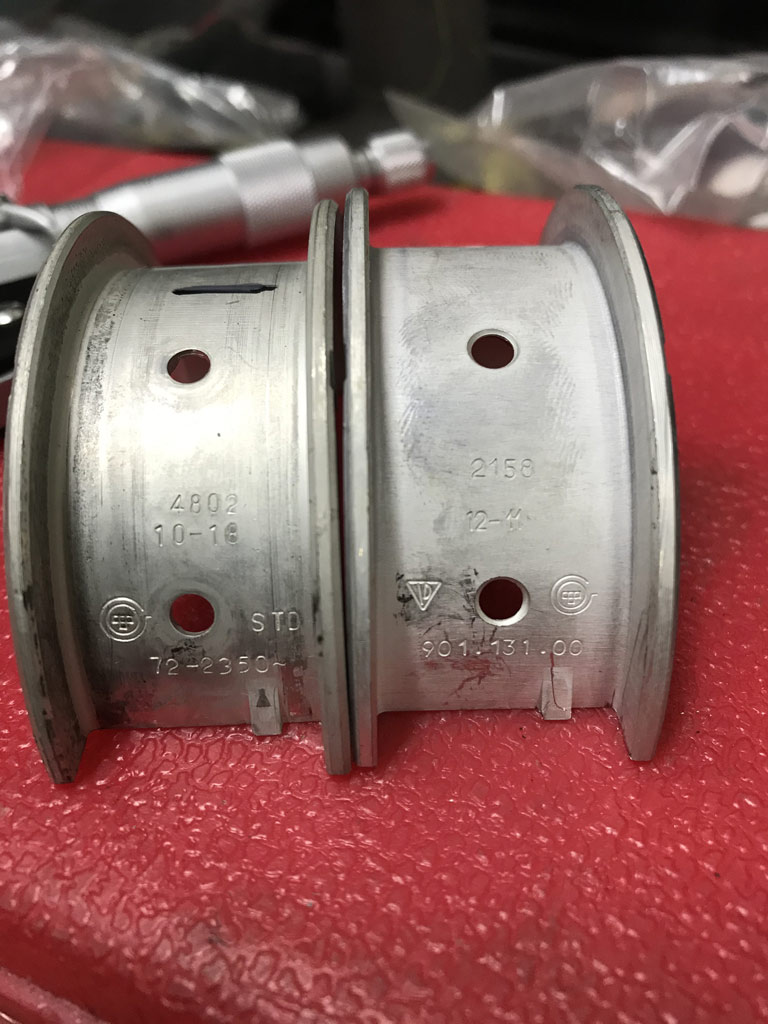 Clearly made in a different plant and/or via different sorting / handling / marking process. More importantly these bearings would give me a tighter fit by around 0.0009” or nearly 0.001”. That is huge. I’d like to target 0.0025”-.003” max but was measuring 0.004”+ on the Glyco bearings with both plastigauge (well really .003” gauge that didn’t appear to crush fully) and the math between bore gauge of the bearing and the crank as mastered off the micrometer used on the crank. Yes - I only measured 1 point on this comparison but it aligns with the postings on the bird forums about differences as posted by those that invested more time measuring two or three points per bearing. Very frustrating. Looks like I may end up having to pony up $850 dollars for the OEM Porsche Bearings. The other option is upgrade pump to 76' 4 rib pump or maybe a 930 pump but that is just counting on pump volume to mask larger clearances that would be present by using the aftermarket bearings. (IMG:style_emoticons/default/wacko.gif) Other option is grind crank undersize and be sure they grind to the high spec and then polish down as needed. Not ideal either. (IMG:style_emoticons/default/shades.gif) Time to think about this a bit more. |
|
|
|
| Dion |
Jul 23 2020, 09:10 AM
Post
#334
|
|
RN Group: Members Posts: 2,931 Joined: 16-September 04 From: Shepherdstown, WV Member No.: 2,766 Region Association: MidAtlantic Region |
Glad to see progress on the chassis.
Sorry about the bearing situation. You’ve done a tremendous amount of research into that. Amazing the price tag on the Porsche OEM bearings. Tough call. I’d have to go with the Porsche ones. Sounds like less of a headache in the long run. Have you looked to see if any deals to be had with EBS Racing? Only a suggestion. When i was working on my 2056 their prices at the time were cheaper than the bird or the dealer. Not sure of today but worth a look maybe. Save some coin. Good luck. |
|
|
|
| barefoot |
Jul 24 2020, 06:16 AM
Post
#335
|
|
Senior Member Group: Members Posts: 1,526 Joined: 19-March 13 From: Charleston SC Member No.: 15,673 Region Association: South East States |
Prepped the donor tunnel with Eastwood frame paint on the inside and Epoxy 2K on the outside.
Metric tubing to rebuild the internals has arrived from Restoration Design but I've been putting that job off for a bit. [/quote] A general question on clutch tube failures. If the tab washer is correctly fitted at the tranny bracket that holds the rotating wheel, all the thrust force on the clutch cable should be absorbed by this attachment and not on the clutch tube ??? There are so many failures of the clutch tube that my guess may not be quite accurate, any insight from experienced builders ? |
|
|
|
| Superhawk996 |
Jul 24 2020, 06:51 AM
Post
#336
|
|
914 Guru Group: Members Posts: 7,951 Joined: 25-August 18 From: Woods of N. Idaho Member No.: 22,428 Region Association: Galt's Gulch |
QUOTE(barefoot @ Jul 24 2020, 08:16 AM) A general question on clutch tube failures. If the tab washer is correctly fitted at the tranny bracket that holds the rotating wheel, all the thrust force on the clutch cable should be absorbed by this attachment and not on the clutch tube ??? There are so many failures of the clutch tube that my guess may not be quite accurate, any insight from experienced builders ? @barefoot The clutch tube has a bent radius as it travels through the tunnel. Your point would be correct IF the cable traveled in a straight line. Given that the clutch cable tunnel tube does have a radius to it, there are side forces imposed on the cluth tube. As you apply tension to the clutch cable, it wants to revert to a straight path, but, of course it can't being constrained by the tube. As it attempts to go straight, it imposes side load on the tunnel tube. In normal use the side load on the tunnel tube is managable. The problem of side force get exaggerated by dragging / unlubed cables, the clutch cable wheel getting bound up and not rotating freely, high force pressure plates, and just plain old fatigue of the brazing over 50 years of use. Remember typical life cycle for a car from this era wasn't even 10 years, 100,000 miles. Picture below should help visualize the radius of the clutch cable guide tube. In the picture you can see two things. 1) The clutch tube has been repaired with the "hook" fix at the front end of the tube. 2) The stamped braket that supports the tube behind the shifter his broken / torn. Hard to say which occurred 1st but it give you a sense that things do fatigue and break either the support braket and/or the tube attachements. 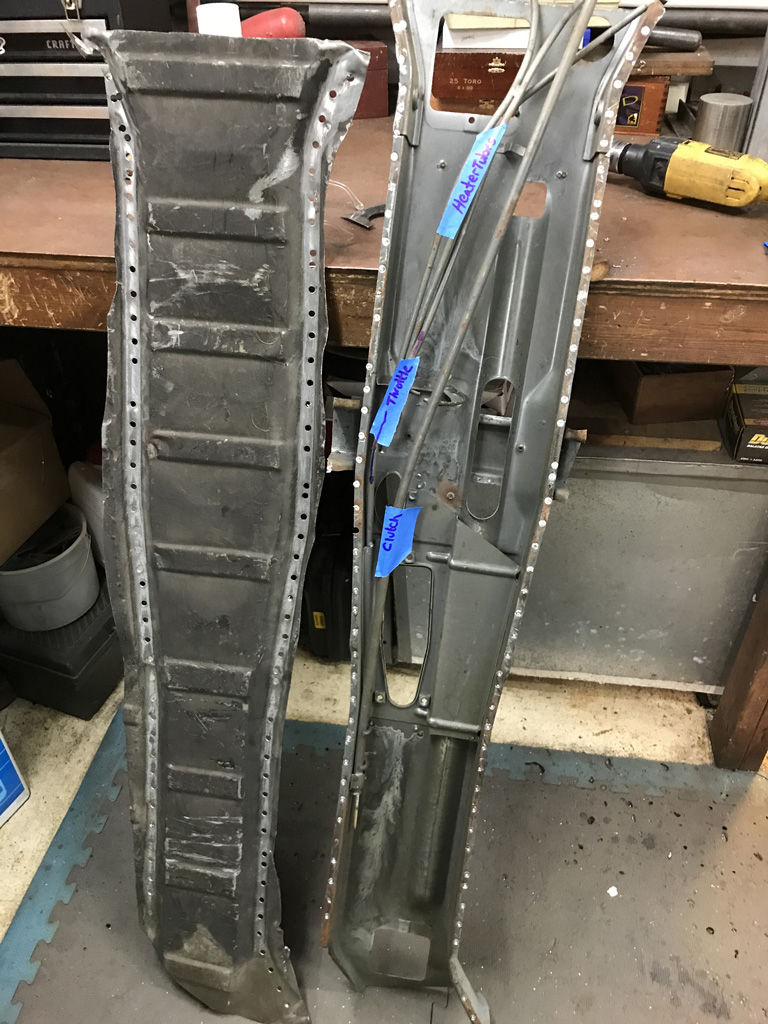 |
|
|
|
| barefoot |
Jul 24 2020, 05:20 PM
Post
#337
|
|
Senior Member Group: Members Posts: 1,526 Joined: 19-March 13 From: Charleston SC Member No.: 15,673 Region Association: South East States |
QUOTE(Superhawk996 @ Jul 24 2020, 08:51 AM) QUOTE(barefoot @ Jul 24 2020, 08:16 AM) A general question on clutch tube failures. If the tab washer is correctly fitted at the tranny bracket that holds the rotating wheel, all the thrust force on the clutch cable should be absorbed by this attachment and not on the clutch tube ??? There are so many failures of the clutch tube that my guess may not be quite accurate, any insight from experienced builders ? @barefoot The clutch tube has a bent radius as it travels through the tunnel. Your point would be correct IF the cable traveled in a straight line. Given that the clutch cable tunnel tube does have a radius to it, there are side forces imposed on the cluth tube. As you apply tension to the clutch cable, it wants to revert to a straight path, but, of course it can't being constrained by the tube. As it attempts to go straight, it imposes side load on the tunnel tube. In normal use the side load on the tunnel tube is managable. The problem of side force get exaggerated by dragging / unlubed cables, the clutch cable wheel getting bound up and not rotating freely, high force pressure plates, and just plain old fatigue of the brazing over 50 years of use. Remember typical life cycle for a car from this era wasn't even 10 years, 100,000 miles. Picture below should help visualize the radius of the clutch cable guide tube. In the picture you can see two things. 1) The clutch tube has been repaired with the "hook" fix at the front end of the tube. 2) The stamped braket that supports the tube behind the shifter his broken / torn. Hard to say which occurred 1st but it give you a sense that things do fatigue and break either the support braket and/or the tube attachements. In my case the clutch tube had seperated form the front of the tunnel and gotten itself onto the WRONG side of the shifter mechanism, Wore a groove into the tube as I got the car. I was able to fashion a clamp from a conduit bracket & bolt it ti the tunnel side. Worked OK after that. Barefoot 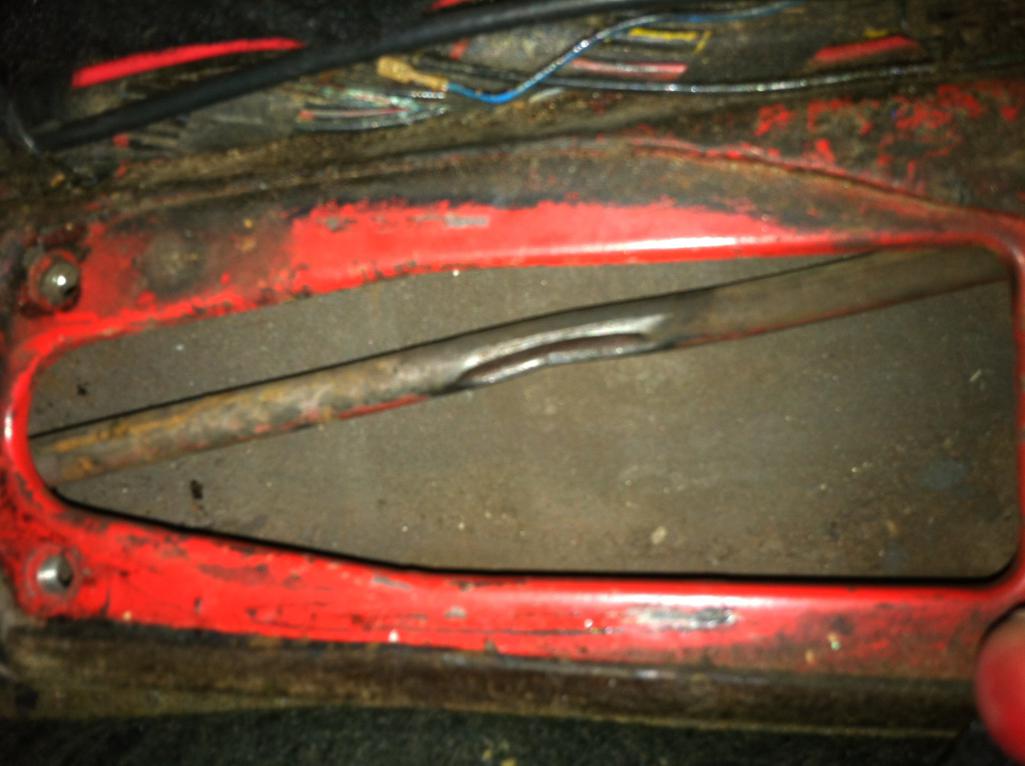 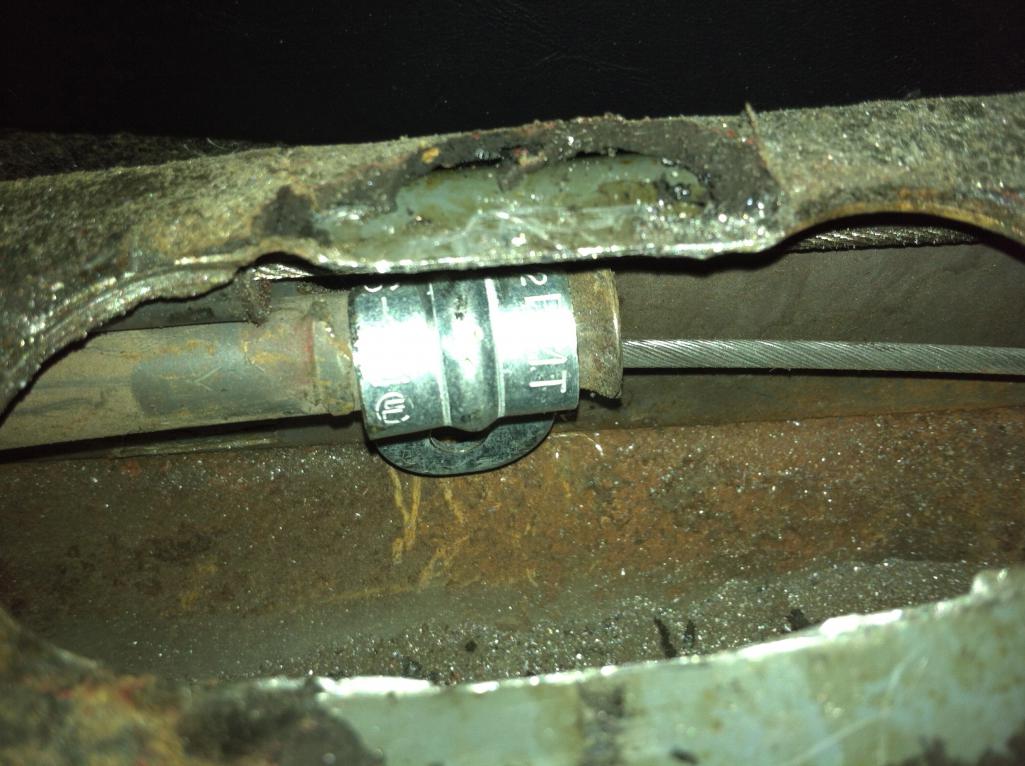 |
|
|
|
| Superhawk996 |
Jul 26 2020, 08:16 AM
Post
#338
|
|
914 Guru Group: Members Posts: 7,951 Joined: 25-August 18 From: Woods of N. Idaho Member No.: 22,428 Region Association: Galt's Gulch |
@barefoot .
That is amazing that it was clunking around in the tunnel and hitting the shifter that long to wear a hole in the clutch tube like that. Good job getting it clamped back down! (IMG:style_emoticons/default/biggrin.gif) |
|
|
|
| Superhawk996 |
Jul 26 2020, 08:23 AM
Post
#339
|
|
914 Guru Group: Members Posts: 7,951 Joined: 25-August 18 From: Woods of N. Idaho Member No.: 22,428 Region Association: Galt's Gulch |
Been a little distracted by side jobs.
Did a repair for my neighbor's tractor for some sort of cover to the hydraulics. Since I occasionally get use of the tractor for winter it was only a fair trade.  OEM part is diecast zinc pot metal. It had broken the ears off the cylindrical portion. Pot metal is a PITA. Can't really weld it per se. However, I do have some Aladdin 3 in 1 rod that comes in handy for pot metal repairs. It is sort of a cross between soldering with an OxyAcetylene torch and brazing. The problem is that the difference between being hot enough to flow the rod and the material just turning into mush is only a few degrees apart. I was able to get it "glued" back together with the Aladdin rod and then remachined it but don't have much confidenece in the long term durability since I don't know what sort of loads are on it. I decided to make a replacment out of 7075 Aluminum. That one should last. (IMG:style_emoticons/default/biggrin.gif)  |
|
|
|
| Superhawk996 |
Jul 26 2020, 08:30 AM
Post
#340
|
|
914 Guru Group: Members Posts: 7,951 Joined: 25-August 18 From: Woods of N. Idaho Member No.: 22,428 Region Association: Galt's Gulch |
The other distraction was trying to fix an AAR valve that had the heater wire intermittently shorting out to the housing. Not Good (IMG:style_emoticons/default/sad.gif)
I tried to set it up in a 4 jaw chuck to peel off some of the metal housing tube that supports the wire where it exits the housing.  Bottom line: Complete failure and waste of several hours of work but at least it fun trying to save it. In the end just as the bit was cutting though the last of the metal tube, it grabbed a few strands of the copper and shredded the little bit of the wire insulation that I had just gotten cleaned off. Having failed, I completely disassembled the AAR down to the internals. (IMG:style_emoticons/default/idea.gif) Looks like this could be ripe for some sort of conversion to have a stepper motor drive the physical AAR valve. Obviously that would require an Arduino or something in there to drive the stepper motor but it could have opportunity to "tune" the AAR as the vehicle warms up. Anyway -- failure for now and something to think about for the future. (IMG:style_emoticons/default/unsure.gif) |
|
|
|
|
1 User(s) are reading this topic (1 Guests and 0 Anonymous Users)
0 Members:

|
Lo-Fi Version | Time is now: 16th July 2026 - 07:51 AM |
Invision Power Board
v9.1.4 © 2026 IPS, Inc.