|
|

|
Porsche, and the Porsche crest are registered trademarks of Dr. Ing. h.c. F. Porsche AG.
This site is not affiliated with Porsche in any way. Its only purpose is to provide an online forum for car enthusiasts. All other trademarks are property of their respective owners. |
|
|
  |
| Superhawk996 |
 Feb 15 2021, 07:33 AM Feb 15 2021, 07:33 AM
Post
#421
|
|
914 Guru      Group: Members Posts: 7,594 Joined: 25-August 18 From: Woods of N. Idaho Member No.: 22,428 Region Association: Galt's Gulch 
|
I hate February
February is the month that never ends . . . even though it's only 28 days long. The temperatures really drop, the snow piles up, the ice dams form on my garage roof from heating it. In order to keep the ice dams under control, I have to rake the snow off the roof. Yup, for you CA guys, roof rakes are a real thing. (IMG:style_emoticons/default/dry.gif) The good news of February is that I now have the floor pan and tunnel completely welded in. That let me move on to getting the seat cross members positioned for welding and I was also able to mock up the seat tracks and tack in the seat hinges. 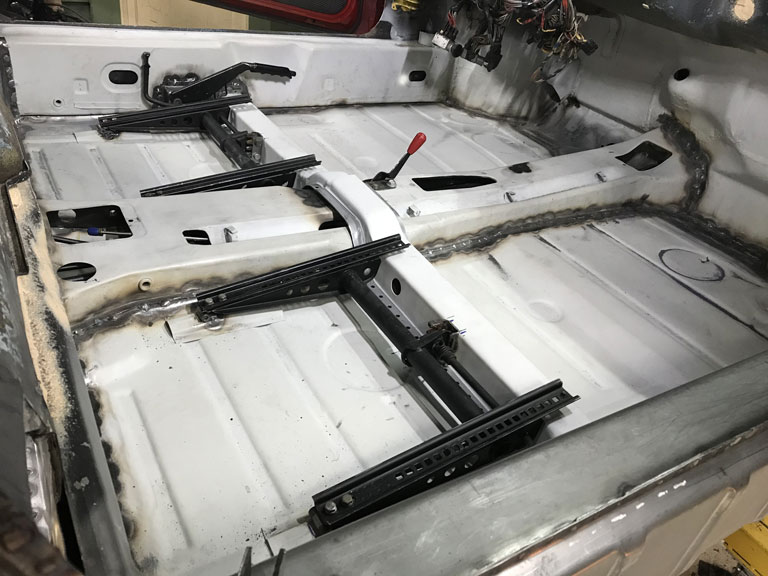 Oh, and then there are those time consuming details that you tend to forget about like locating the parking brake switch that needs to occur after you've already positioned the driver side seat cross member. 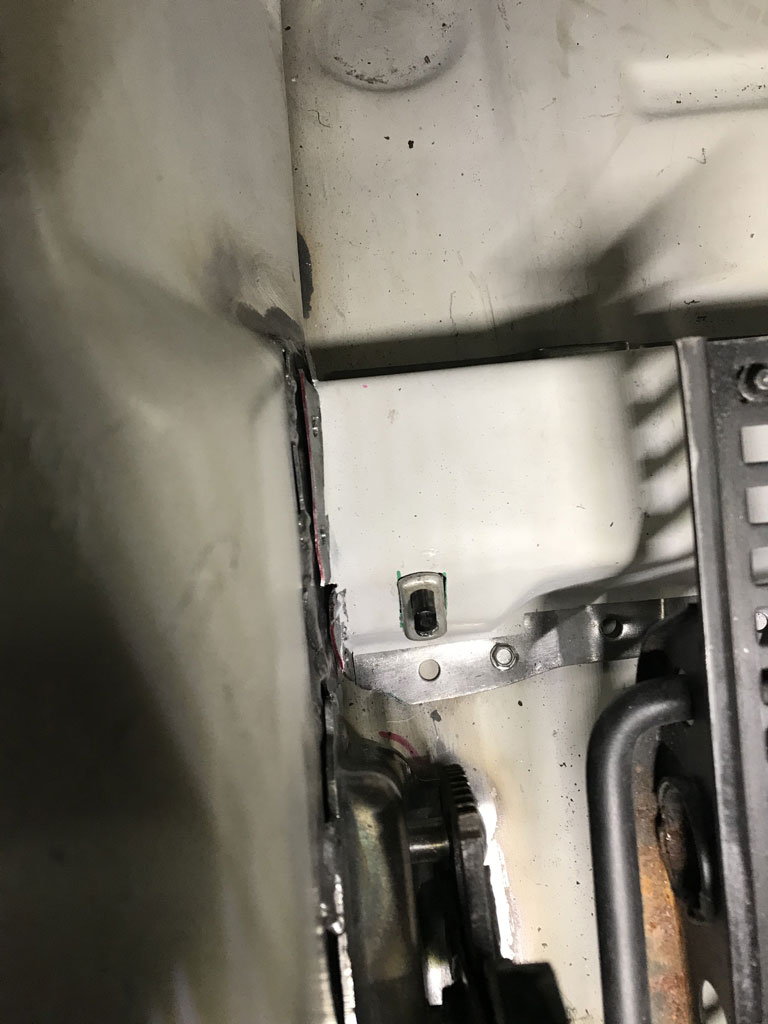 If anyone is interested, I have some donor sheetmetal for the tunnel section that needs to either go to a new home or the trash. I'll post one more time later on in classifieds. 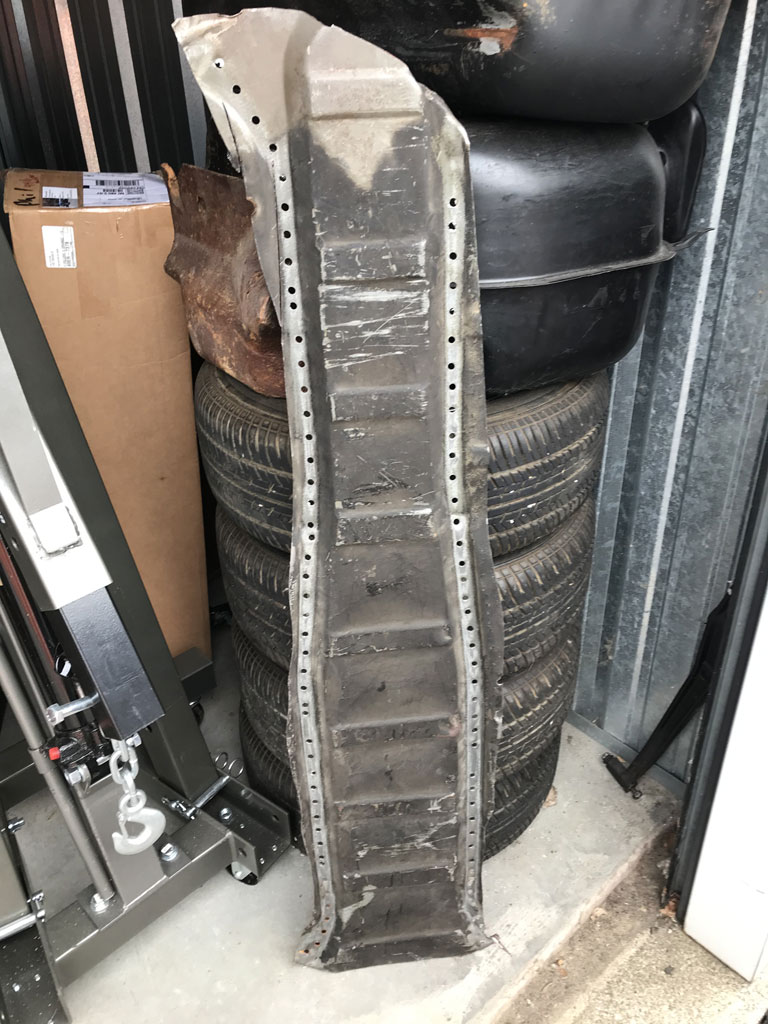 I also have the front tip of a tunnel that connects to the front firewall where the clutch cable and throttle cable exit. Both are unused leftovers from donor sheetmetal. 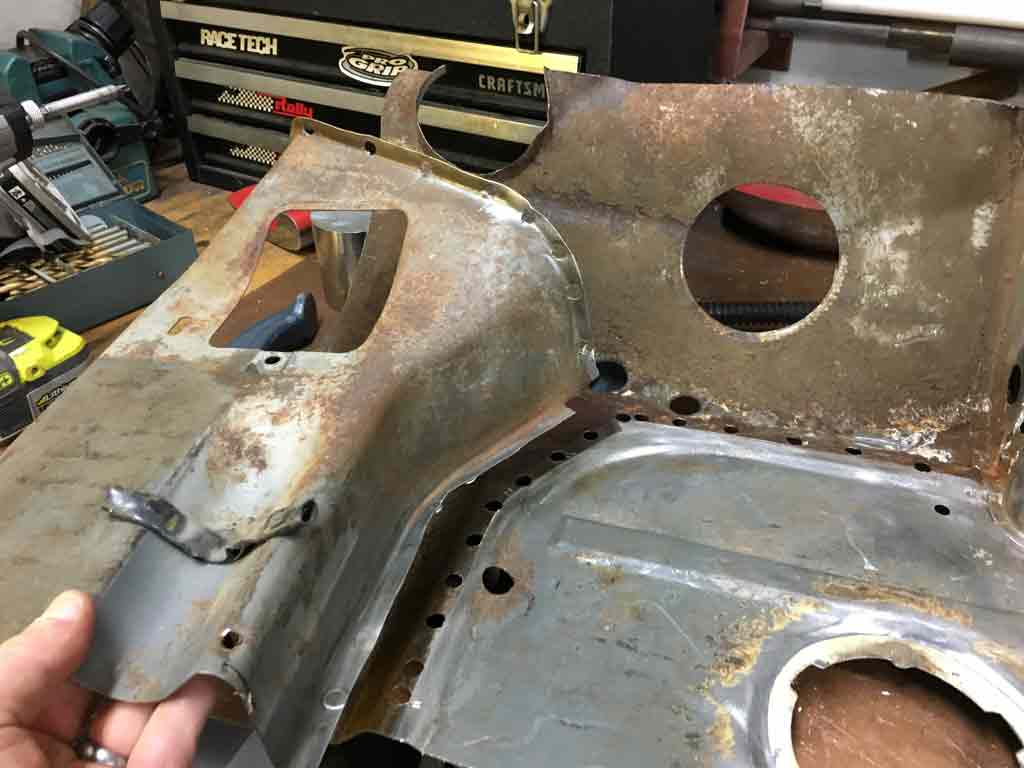 |
| bbrock |
 Feb 15 2021, 08:23 PM Feb 15 2021, 08:23 PM
Post
#422
|
|
914 Guru      Group: Members Posts: 5,269 Joined: 17-February 17 From: Montana Member No.: 20,845 Region Association: Rocky Mountains 
|
Looking good! Somebody is going to want that front tunnel section. I had to do a lot of fabrication up there. That little piece would have saved a lot of time.
|
| 930cabman |
 Feb 23 2021, 03:09 PM Feb 23 2021, 03:09 PM
Post
#423
|
|
Advanced Member     Group: Members Posts: 4,378 Joined: 12-November 20 From: Buffalo Member No.: 24,877 Region Association: North East States 
|
|
| Superhawk996 |
 Feb 25 2021, 06:49 PM Feb 25 2021, 06:49 PM
Post
#424
|
|
914 Guru      Group: Members Posts: 7,594 Joined: 25-August 18 From: Woods of N. Idaho Member No.: 22,428 Region Association: Galt's Gulch 
|
Gratuitous Parts Porn
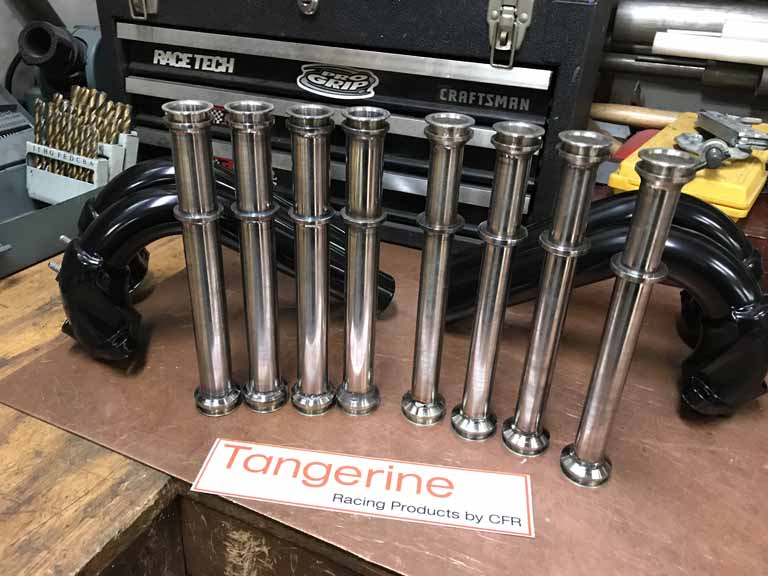 Parts being collected for /4 engine that will hopefully power this chassis down the road this fall. /6 conversion will occur the following winter with a little luck. Inspected & compared to OEM. 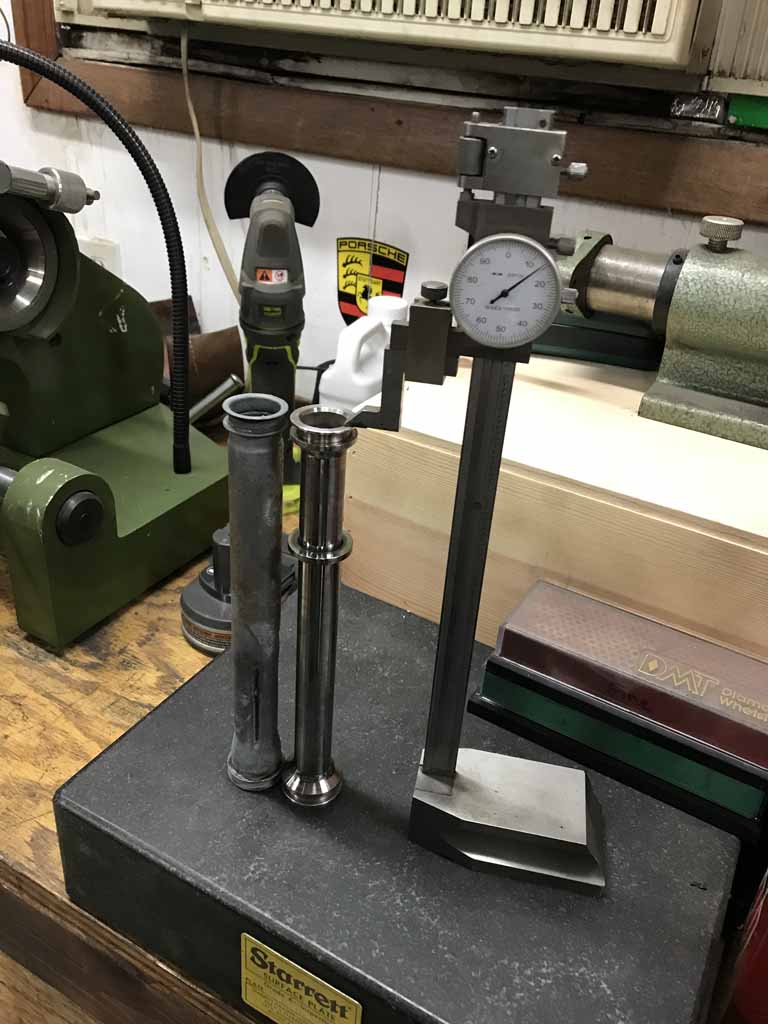 Can't wait to put these to use. Necessary - nope. But come on, these are an example of beautiful hand fabricated parts that will make you want to set valve clearances just so you can spend some time looking at the bottom of the engine. (IMG:style_emoticons/default/laugh.gif) Happy to have the opportunity to support our vendor community! |
| mb911 |
 Feb 25 2021, 06:52 PM Feb 25 2021, 06:52 PM
Post
#425
|
|
914 Guru      Group: Members Posts: 7,703 Joined: 2-January 09 From: Burlington wi Member No.: 9,892 Region Association: Upper MidWest 
|
I know something else that will be boxed up and heading your way. The very last of my original design. Boxing tomorrow afternoon.
|
| Superhawk996 |
 Feb 25 2021, 06:53 PM Feb 25 2021, 06:53 PM
Post
#426
|
|
914 Guru      Group: Members Posts: 7,594 Joined: 25-August 18 From: Woods of N. Idaho Member No.: 22,428 Region Association: Galt's Gulch 
|
I know something else that will be boxed up and heading your way. The very last of my original design. Boxing tomorrow afternoon. (IMG:style_emoticons/default/drooley.gif) (IMG:style_emoticons/default/cheer.gif) That will make me the the proud owner of your 1st 2.0L muffler that will go with this /4 and the last of your original design pipes for the /6. Can't wait to see those! I think they need an autograph! You guys make the rustoration slog bearable. Gotta keep the dream alive - so easy to get lost in the endless puddle welds. |
| bbrock |
 Feb 25 2021, 06:54 PM Feb 25 2021, 06:54 PM
Post
#427
|
|
914 Guru      Group: Members Posts: 5,269 Joined: 17-February 17 From: Montana Member No.: 20,845 Region Association: Rocky Mountains 
|
Can't wait to put these to use. Necessary - nope. But come on, these are an example of beautiful hand fabricated parts that will make you want to set valve clearances just so you can spend some time looking at the bottom of the engine. (IMG:style_emoticons/default/laugh.gif) Happy to have the opportunity to support our vendor community! I'm going to remember this the next time you poke fun at my OCD (IMG:style_emoticons/default/lol-2.gif) They are purty though. |
| Superhawk996 |
 Feb 25 2021, 07:00 PM Feb 25 2021, 07:00 PM
Post
#428
|
|
914 Guru      Group: Members Posts: 7,594 Joined: 25-August 18 From: Woods of N. Idaho Member No.: 22,428 Region Association: Galt's Gulch 
|
I'm going to remember this the next time you poke fun at my OCD (IMG:style_emoticons/default/lol-2.gif) They are purty though. Yeah, I knew I had that coming. (IMG:style_emoticons/default/biggrin.gif) |
| Superhawk996 |
 Feb 28 2021, 06:46 PM Feb 28 2021, 06:46 PM
Post
#429
|
|
914 Guru      Group: Members Posts: 7,594 Joined: 25-August 18 From: Woods of N. Idaho Member No.: 22,428 Region Association: Galt's Gulch 
|
Details are a PITA
It takes way longer to button up the little detals than you think it should. Getting floor pan and the seat cross members installed was a major milestone. But, all the details are killing me. Spent the whole afternoon on the following stuff: 1) Weld in @Bdstone914 's seat comb brackets. These in themselves were a huge timesaver. If I had to make them from scratch that would have taken a couple extra hours. That was about $35 bucks or so that was well spent! 2) After more trial fitting of the seat tracks, I was able to final weld the RD seat hinges to the floor pan 3) Weld in the RD bracket that goes over the parking brake equalizer 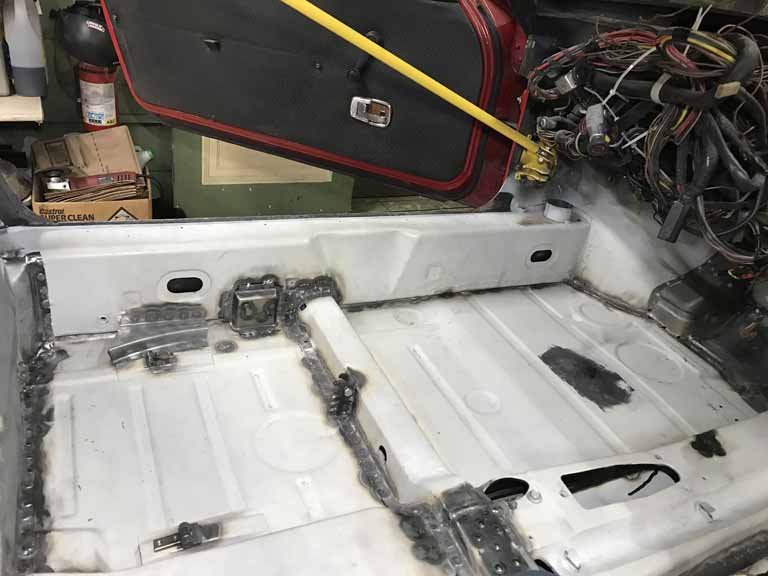 4) Used the shrinking wheel to remove some oil canning from the front of the driver side floor pan 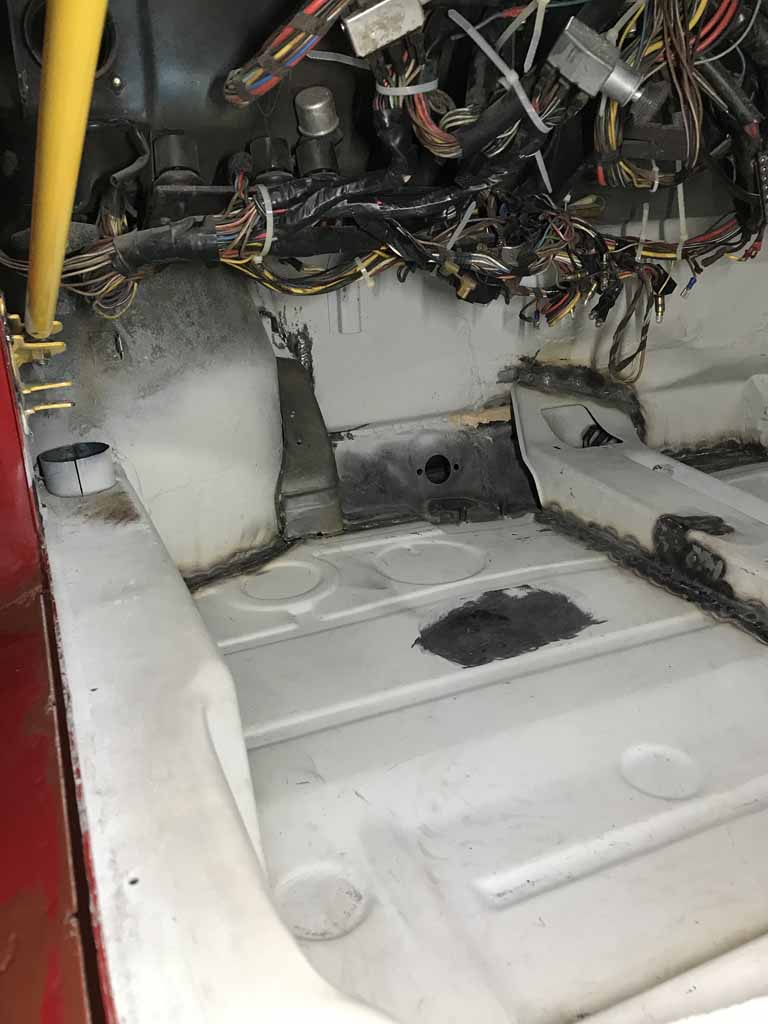 5) Trial fitting and mock up of the wheel house reinforcement that supports the plywood pedal board. This is the LAST job I need to do down in the dreaded pedal box area that aggravates me so much! 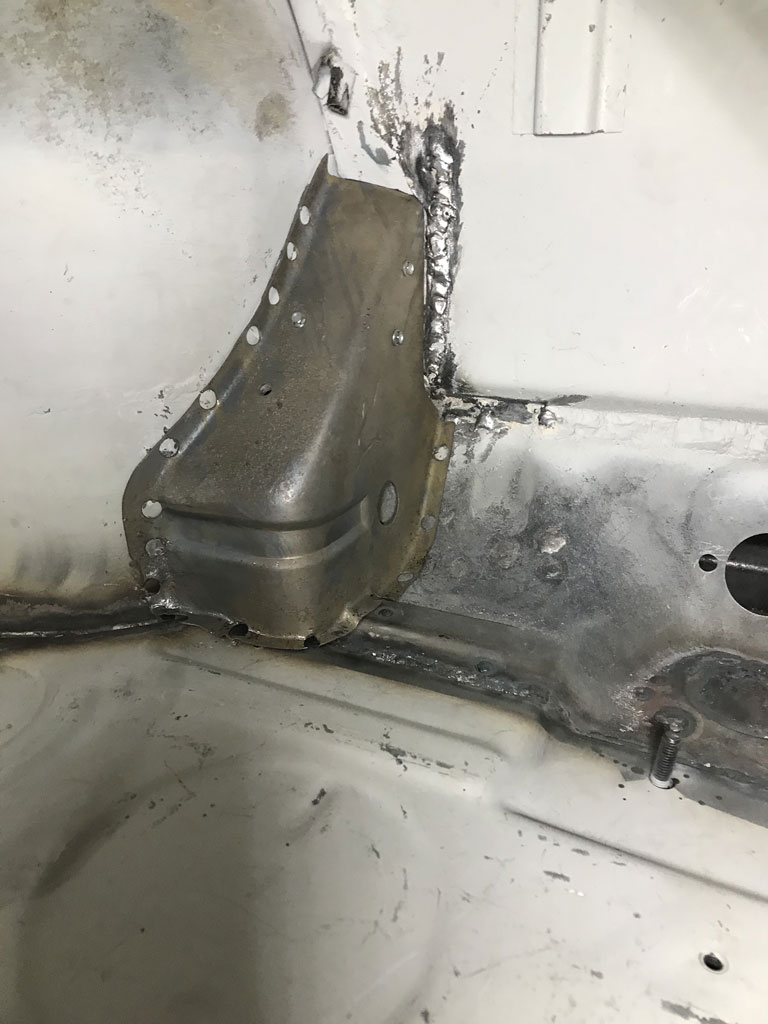 And I didn't even get around to fabrication of the little trim tab that holds the return spring that goes to the park brake equalizer. (IMG:style_emoticons/default/confused24.gif) The good news: Tomorrow is March. Fuch February! Good riddance! Days generally only get warmer from here on out. Was 46F today (IMG:style_emoticons/default/piratenanner.gif) |
| bkrantz |
 Feb 28 2021, 09:31 PM Feb 28 2021, 09:31 PM
Post
#430
|
|
914 Guru      Group: Members Posts: 8,558 Joined: 3-August 19 From: SW Colorado Member No.: 23,343 Region Association: Rocky Mountains 
|
Yeah, the devil (or something nasty) is in the details. But the way you solve the details will prove the ultimate quality of the results. Keep up the good work!
|
| bdstone914 |
 Feb 28 2021, 10:40 PM Feb 28 2021, 10:40 PM
Post
#431
|
|
bdstone914      Group: Members Posts: 5,216 Joined: 8-November 03 From: Riverside CA Member No.: 1,319 |
I have one more pair of the seat adjuster combs. I sold the remainder to Restoration Designs as there cross members dont have them.
|
| bdstone914 |
 Feb 28 2021, 10:47 PM Feb 28 2021, 10:47 PM
Post
#432
|
|
bdstone914      Group: Members Posts: 5,216 Joined: 8-November 03 From: Riverside CA Member No.: 1,319 |
And I didn't even get around to fabrication of the little trim tab that holds the return spring that goes to the park brake equalizer.
Actually that tab has to hole for the cover plate plate. The spring hooks into a loop on the fire wall. @Superhawk996 |
| Superhawk996 |
 Mar 1 2021, 07:11 AM Mar 1 2021, 07:11 AM
Post
#433
|
|
914 Guru      Group: Members Posts: 7,594 Joined: 25-August 18 From: Woods of N. Idaho Member No.: 22,428 Region Association: Galt's Gulch 
|
And I didn't even get around to fabrication of the little trim tab that holds the return spring that goes to the park brake equalizer. Actually that tab has to hole for the cover plate plate. The spring hooks into a loop on the fire wall. @Superhawk996 @bdstone914 Oh (IMG:style_emoticons/default/stromberg.gif) (IMG:style_emoticons/default/wacko.gif) I forgot about that extra cover plate. My car came to me without one. Do you have any for sale? Obviously I could fab one up from scratch but this fall in the category that I'd much rather have OEM metal vs. a hokey homebrew fabrication. |
| 930cabman |
 Mar 1 2021, 07:15 AM Mar 1 2021, 07:15 AM
Post
#434
|
|
Advanced Member     Group: Members Posts: 4,378 Joined: 12-November 20 From: Buffalo Member No.: 24,877 Region Association: North East States 
|
I'm a step behind you Hawk, just starting to get the floors in. It's either right or it's wrong.
|
| Archie |
 Mar 2 2021, 07:35 PM Mar 2 2021, 07:35 PM
Post
#435
|
|
Member   Group: Members Posts: 197 Joined: 23-September 09 From: Western Canada Member No.: 10,844 Region Association: Pacific Northwest |
Gratuitous Parts Porn  Parts being collected for /4 engine that will hopefully power this chassis down the road this fall. /6 conversion will occur the following winter with a little luck. Inspected & compared to OEM.  Can't wait to put these to use. Necessary - nope. But come on, these are an example of beautiful hand fabricated parts that will make you want to set valve clearances just so you can spend some time looking at the bottom of the engine. (IMG:style_emoticons/default/laugh.gif) Happy to have the opportunity to support our vendor community! Nice. Very nice! |
| Superhawk996 |
 Mar 3 2021, 06:26 PM Mar 3 2021, 06:26 PM
Post
#436
|
|
914 Guru      Group: Members Posts: 7,594 Joined: 25-August 18 From: Woods of N. Idaho Member No.: 22,428 Region Association: Galt's Gulch 
|
Rut Roh, I think I'm developing a parts porn addiction.
I hope the wife doesn't find out. 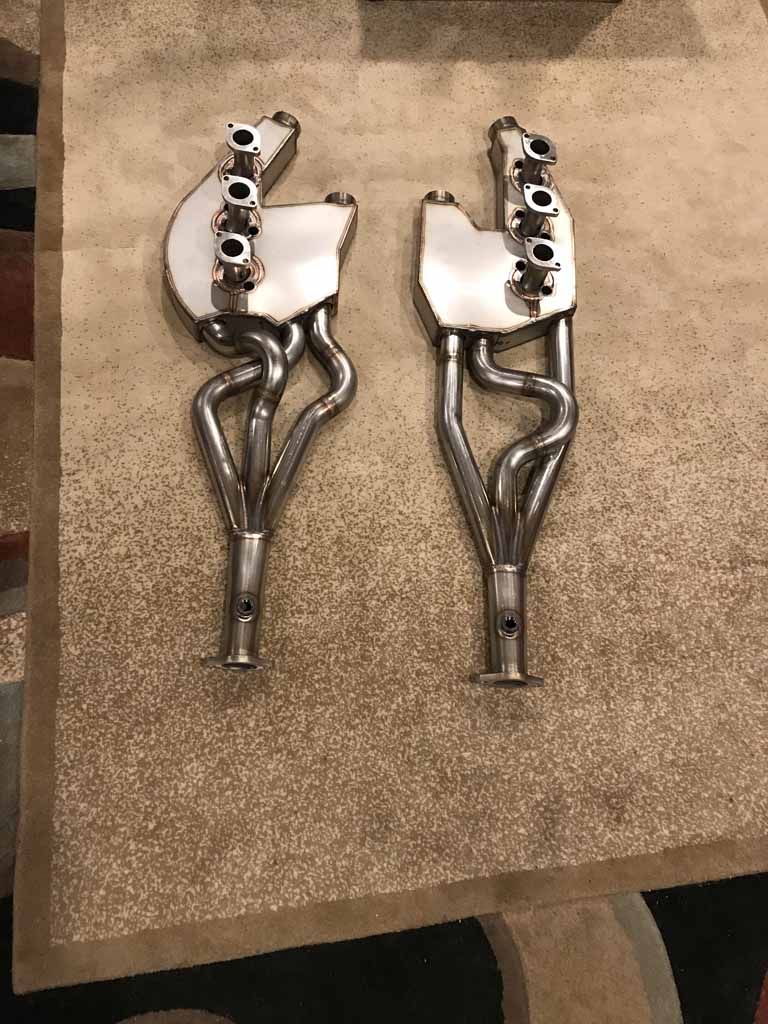 @mb911 - parts recieved in perfect condition. Thanks for making these available to the community! |
| Morph914 |
 Mar 3 2021, 06:31 PM Mar 3 2021, 06:31 PM
Post
#437
|
|
Member   Group: Members Posts: 435 Joined: 22-August 16 From: St Augustine, FL Member No.: 20,326 Region Association: South East States 
|
Oh my! Those are parts porn for sure.
|
| Superhawk996 |
 Mar 8 2021, 07:36 AM Mar 8 2021, 07:36 AM
Post
#438
|
|
914 Guru      Group: Members Posts: 7,594 Joined: 25-August 18 From: Woods of N. Idaho Member No.: 22,428 Region Association: Galt's Gulch 
|
Output from this weekend wasn't very impressive. Somebody stole Saturday. Not sure where it went. (IMG:style_emoticons/default/blink.gif)
I retrieved the pedal board from storage only to discover that it is missing the clutch pedal stop hardware. Sort of amazes me that I took some of this stuff apart so qucikly I didn't notice little details like this that were missing as received. I'll have to post a WTB over in classified and see if someone has a spare. 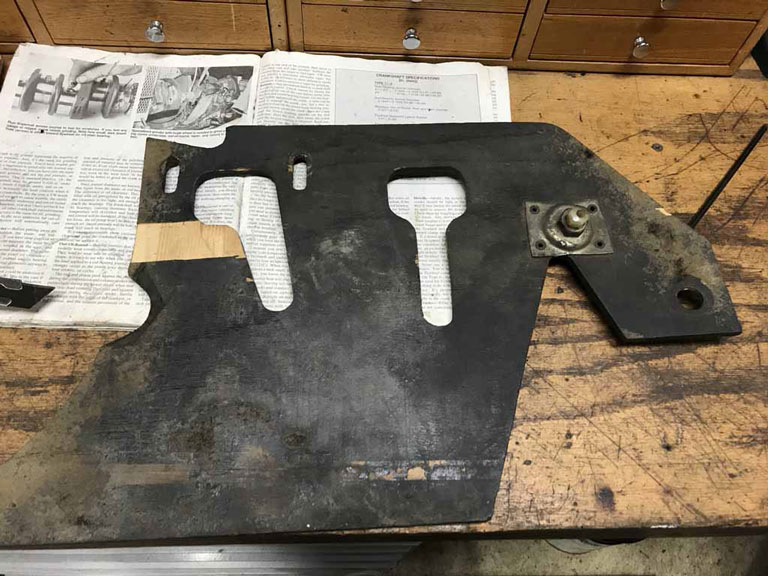 I spent most of Sunday with my body contorted into uncomfortable positions. Having installed the seat cross members and seat comb brackets there are new protrusions in the cabin to deal with and brusing to prove it. Got this bugger welded in with a bunch of puddle welds to tie it back into the original sub that was still rock solid. Flooded the inside with Eastwood Frame coating once it was welded in which is why it's so black around the edges. 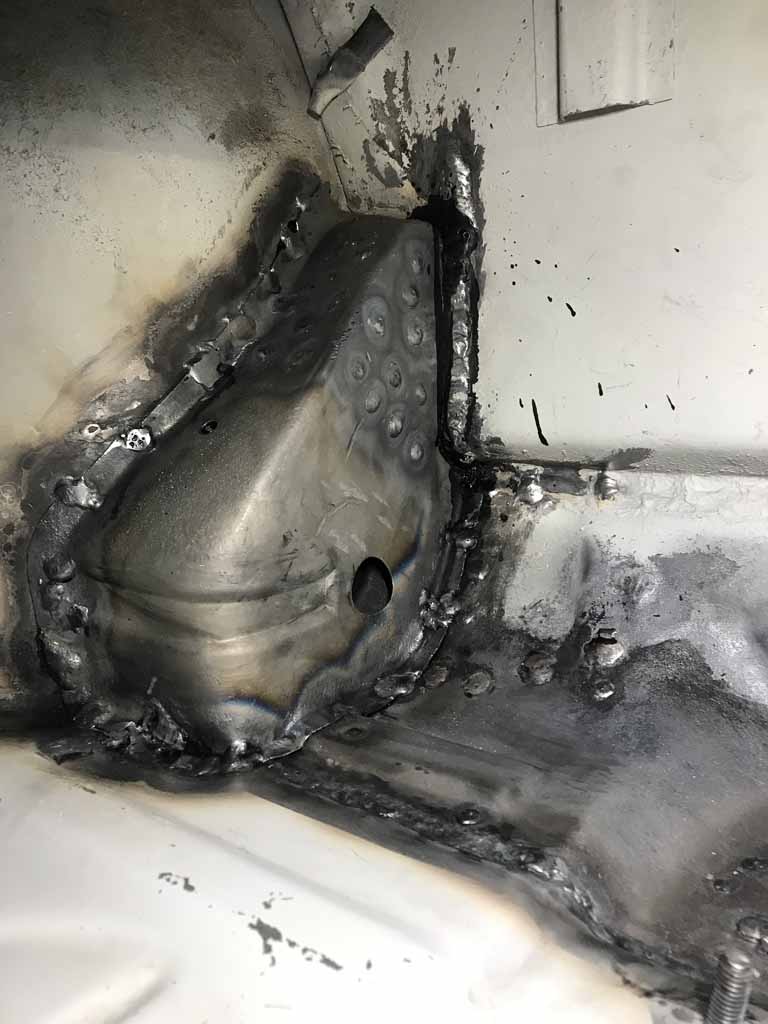 I truly hope this is my last extended excursion down into the pedal box area for welding purposes. Still have some easy work to do like doing the seam sealer, etc. Also need to clean up the entire floorpan and get a fresh coat of 2K primer on it to cover all the new welds for crossmembers, tunnel, etc. That shouldn't be nearly as painful. |
| Superhawk996 |
 Mar 14 2021, 01:58 PM Mar 14 2021, 01:58 PM
Post
#439
|
|
914 Guru      Group: Members Posts: 7,594 Joined: 25-August 18 From: Woods of N. Idaho Member No.: 22,428 Region Association: Galt's Gulch 
|
Color By Numbers
I've been using Spray Max rattle can 2K primer all along with great results. Good adhesion, and super easy to use. Small quantity in the can is perfect for small panel sections. Most importantly, no gun clean up. This weekend was a little science experiment. Previous owner told me car was repainted in BMW Color Code 138 - Cinnabar. So I ordered up some Spray Max 2K single stage color from a paint supplier out in Spokane WA. About $33/can inclusive of shipping. Ordered 3 cans. 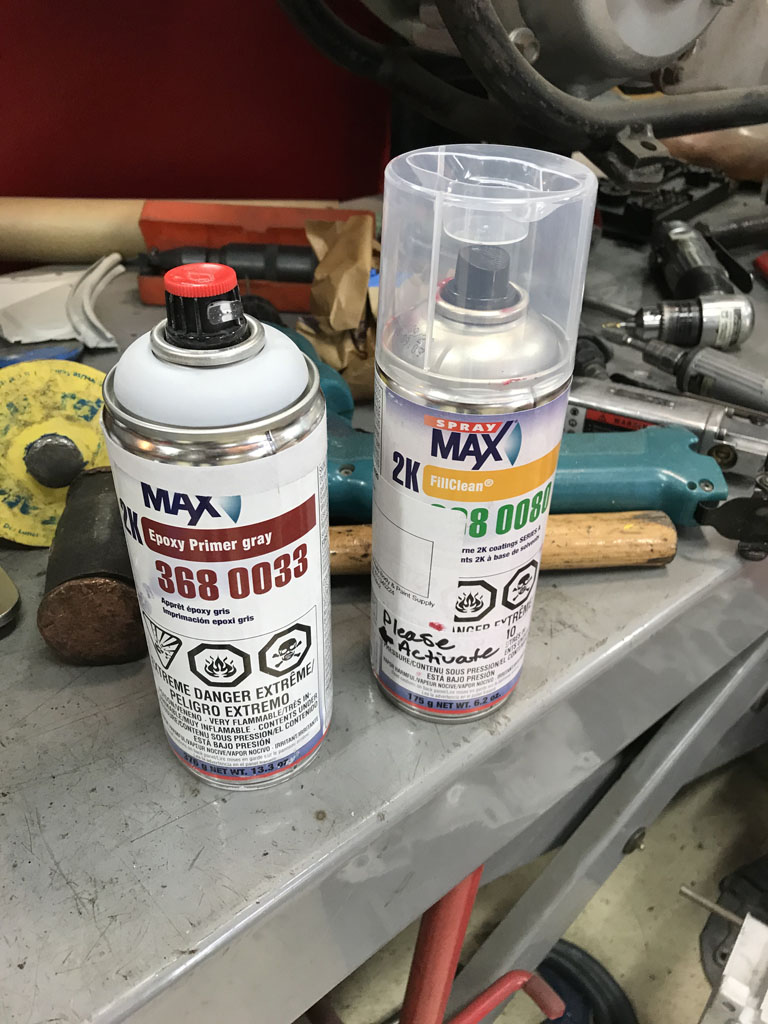 Since I know this car will eventually completely stripped and taken back to OEM color (Alaska Blue Metallic) way off in the future, I'm not terribly concerened about the passenger compartment or engine compartment finish quality. So I figured, let's see how a rattle can catalyzed color works! (IMG:style_emoticons/default/tooth.gif) So last night, I cleaned off any of the primer from weld areas that was heat affected, and did a quick wipe down with PPG degreaser and went to town with a fresh coat of primer to cover all the puddle welds and dusted the rest of the panels. 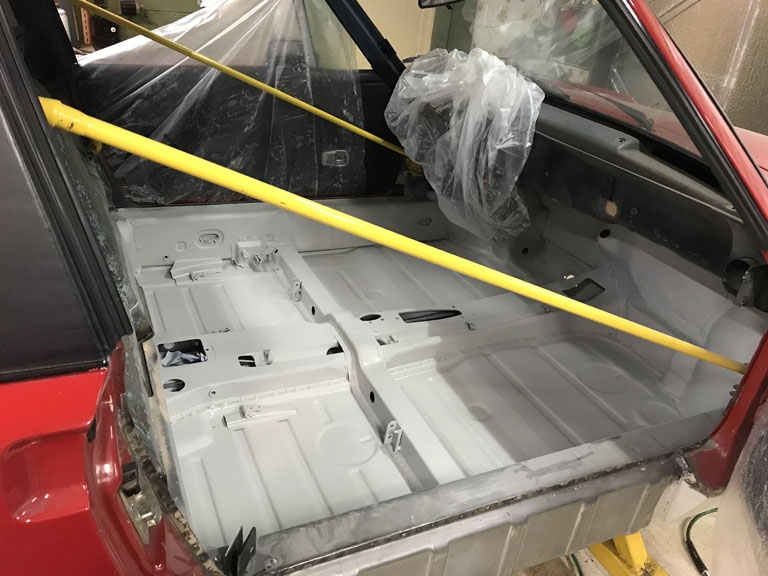 Now on to the fun this morning. Spray Max data sheet says for the 2k primer says "Can be topcoated with all conventional 1K and 2K paints. If the 2K epoxy primer-filler is topcoated after more than 1 day, it must be sanded first. " I took this and ran with it in a way I wouldn't for an exterior panel. I decided I just give it a quick wipe down with a tack cloth and shoot the color -- no sanding. Don't start with me - I'd never do this for a top quality job. (IMG:style_emoticons/default/screwy.gif) Well, all said. I'm pretty happy with how this turned out. Maybe only slightly worse than Maaco. 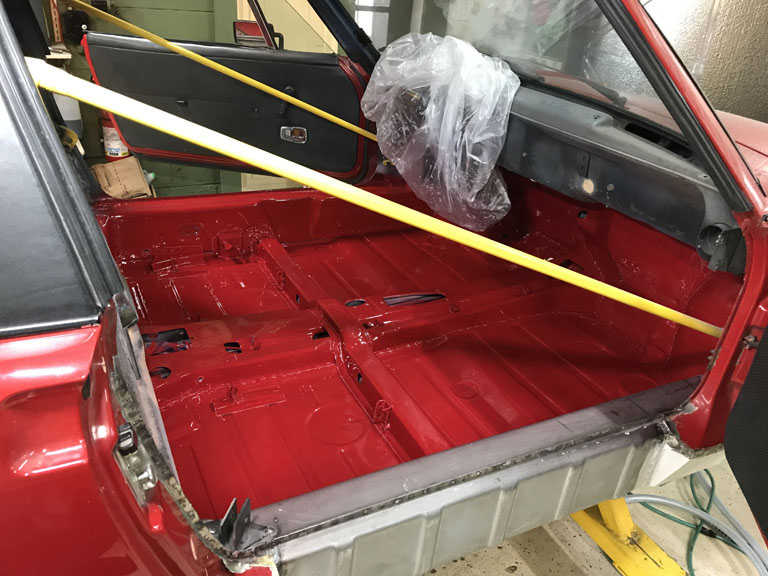 This 1/2 (IMG:style_emoticons/default/bootyshake.gif) quality is not something I'd normally celebrate, but, not bad for a rattle can job. (IMG:style_emoticons/default/stirthepot.gif) There is some dust in it (surely didn't clean the garage) and a couple random fisheyes. Not completly surprised by the fisheyes since I didn't do any sanding nor did I hit it again with PPG degreaser before I spayed the rattle can color. When it's all said and done, most of this gets covered by Dynamat and then carpet so I'm OK with it as a science project. It will all get stripped out again someday. Next up was to see how the color matches. I took the opportunity to just shoot a little primer and color over my previous Fuch up to the rear quarter. Again, this is just a science project. I didn't fill the bondo hole. I didn't feather the paint. And, most obviously, I made no effort to blend the paint area. I wanted the sharp contrast line from masking. I just wanted to get an idea of how close the rattle can paint is to the exterior panel color that could be sun faded to some extent. I'm torn between trying to just do a quick spot repair on this to put it on the road this fall or to send it out for a professional touch up. I'm not great at color matching. I'm an engineer after all. I can barely tell blue from green and my wife is convinced there is some color called Teal between the two. (IMG:style_emoticons/default/wacko.gif) To my eye, this was pretty darn close. It's off a little bit, but, it might be OK until I get back to OEM color. 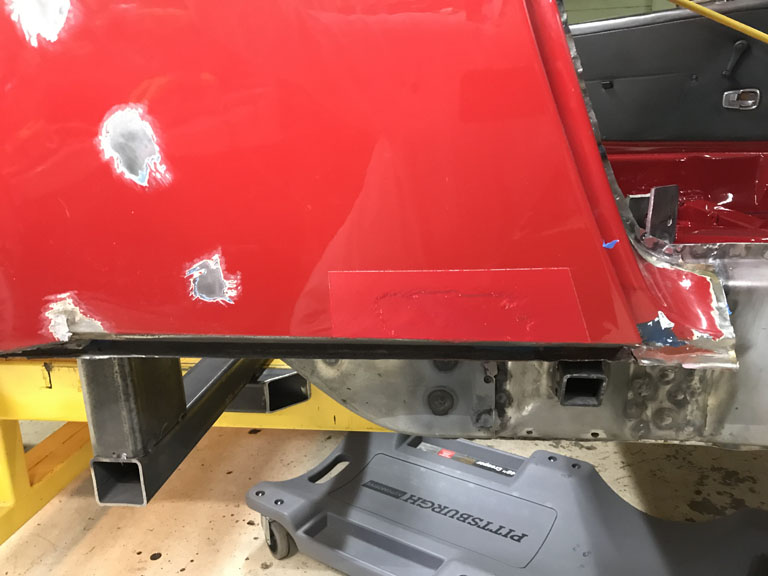 I'm thinking with actual time to do the spot repairs properly, and, with the use of a little Spray Max Spot Blend it will be good enough to drive it this fall. (IMG:style_emoticons/default/idea.gif) I don't like the idea of paying for a professional blend becuase those are never perfect either and ultimately the whole car needs to be stripped and returned to Alaska Blue. Sort of seems like a waste of time (at paint shop) and money. For a Pro shop to do it right, it will have to be blended out into the door and up into the trunk. That's just seems silly for a color I dislike anyway. |
| Superhawk996 |
 Apr 11 2021, 06:16 PM Apr 11 2021, 06:16 PM
Post
#440
|
|
914 Guru      Group: Members Posts: 7,594 Joined: 25-August 18 From: Woods of N. Idaho Member No.: 22,428 Region Association: Galt's Gulch 
|
Stupid 50 year old parts
Didn't have a lot of time this weekend to do big projects so I tried to get parts cleaned up and ready for some distant time in the future when this car might get put together again. Wanted to get a variety of parts ready to go to powder coat but 50 year old abused parts had another plan. First up was cleaning weld spatter from the rear trailing arms. Easy enough. In the process I discovered that one of the trailing arms has a hole in the thru-tube that allows access to the rear caliper adjustment. I can't figure out how this happened. Measuring parts doesn't seem like I'm dealing with a tweaked trailing arm. (IMG:style_emoticons/default/WTF.gif) I'm thinking some one tried to put a hook in there and tie it down and the hook pierced the thinwall tube? (IMG:style_emoticons/default/headbang.gif) I have a fix planned to insert a 1" OD .065" wall tube into this one and then weld it in place. Awaiting tube. A little more measuring too before I do the repair. 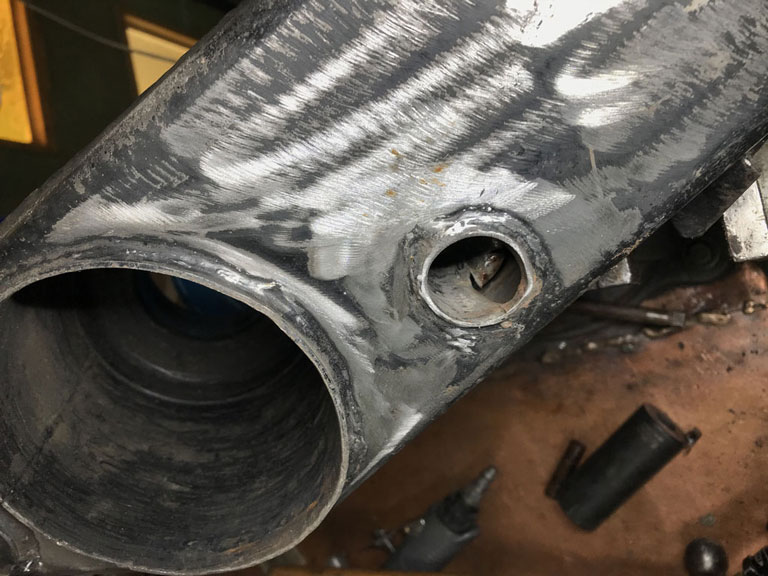 So I retrieved my engine cross bar to get that cleaned up a little. Well turns out that someone must have run it quite a while with a loose bolt. Somehow the through hole is oblong. (IMG:style_emoticons/default/WTF.gif) 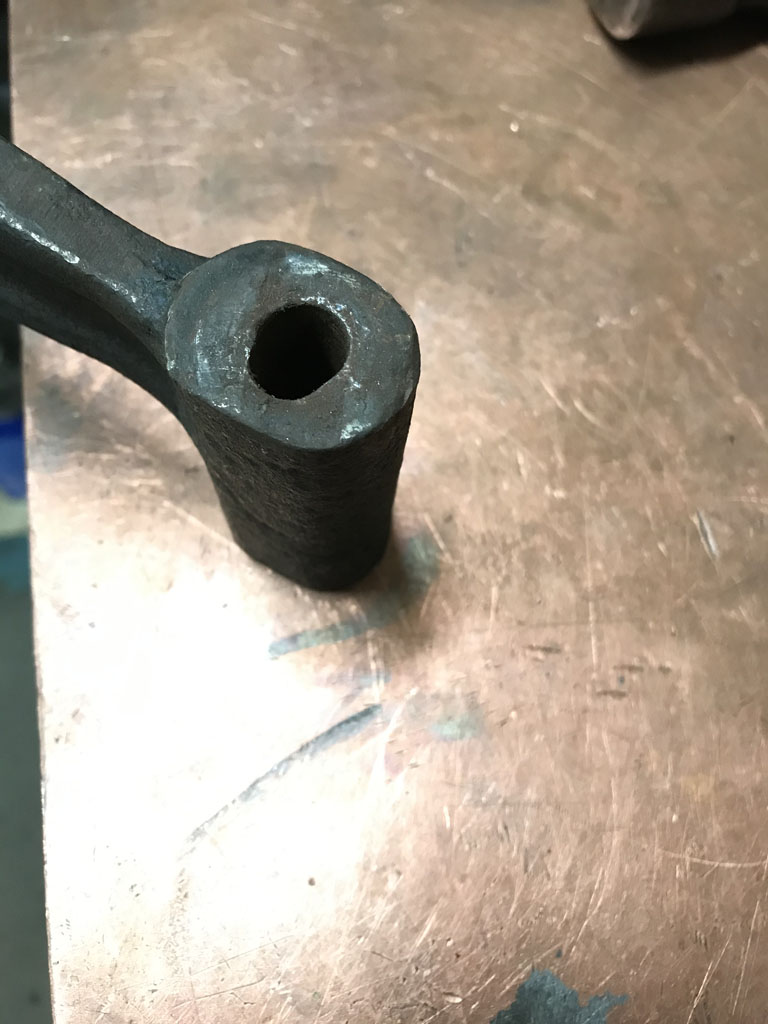 I've got a fix planned. But 1st I thought I had an easier solution. When I bought engine GA000099 it came with a engine bar. But of course it had some damage too. (IMG:style_emoticons/default/blink.gif) Weird thing was it had a bolt sheared off and rusted into it. 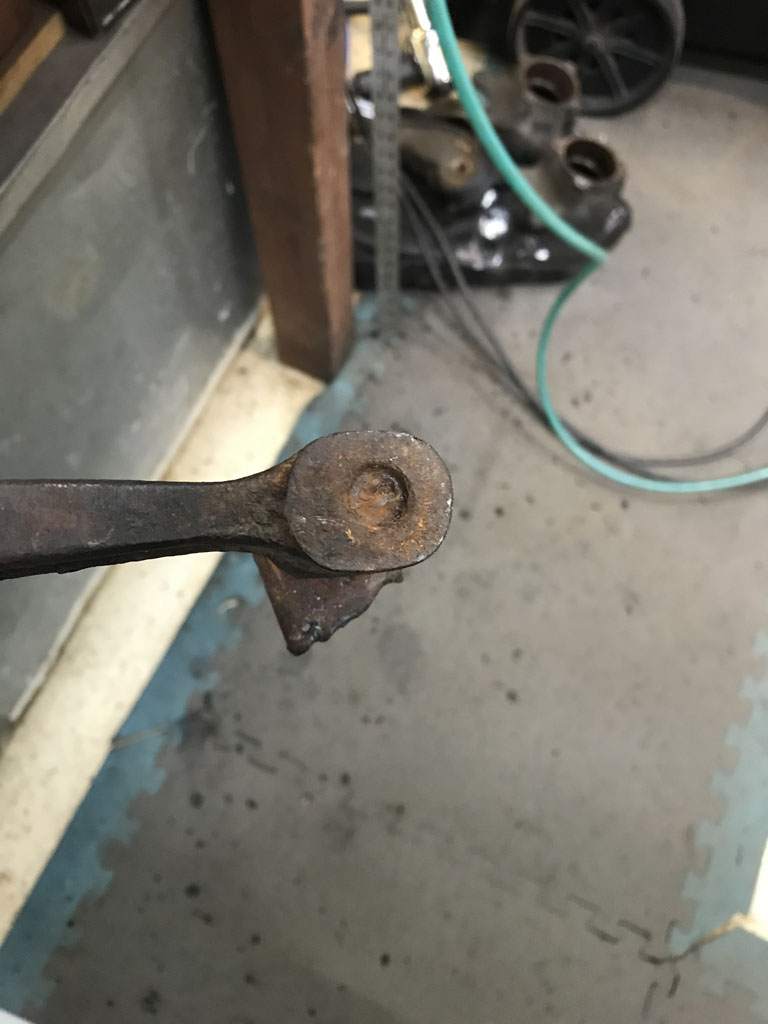 And the top looked like someone might have plasma cut the upper U shaped bracket to free it from the car since the bottom had clearly sheared off. 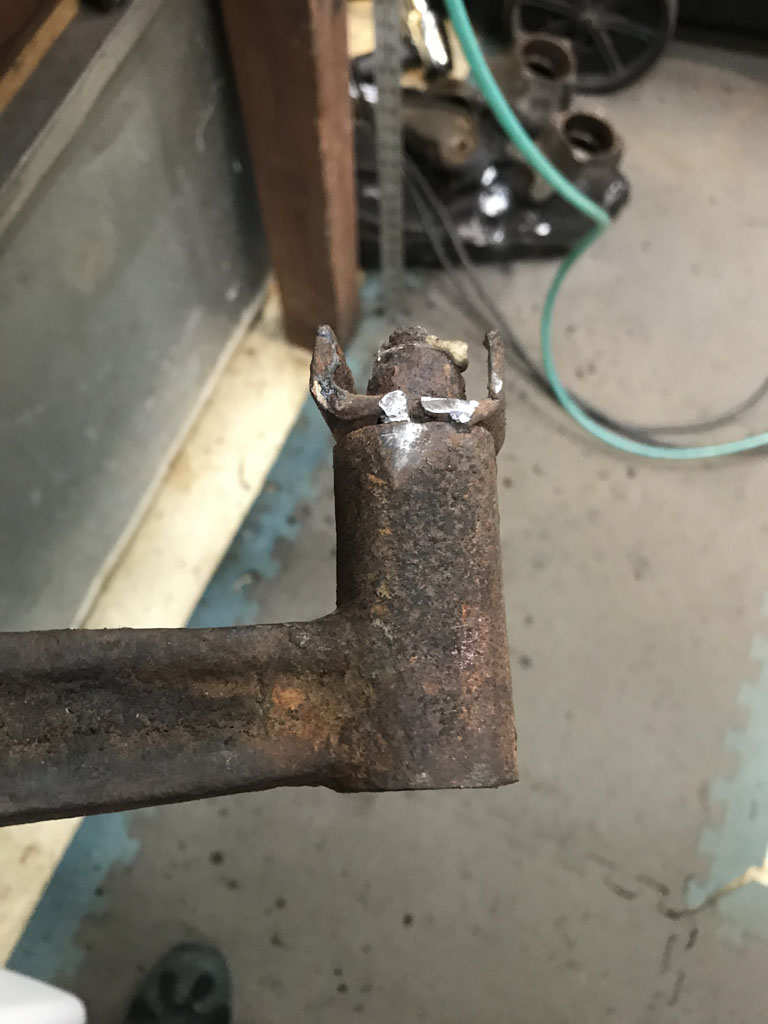 Sort of weird but I figured it would be easy enough to mill out the rusted bolt. Set it up in the mill. Only then did I notice the whole damn bar is bent! (IMG:style_emoticons/default/WTF.gif) 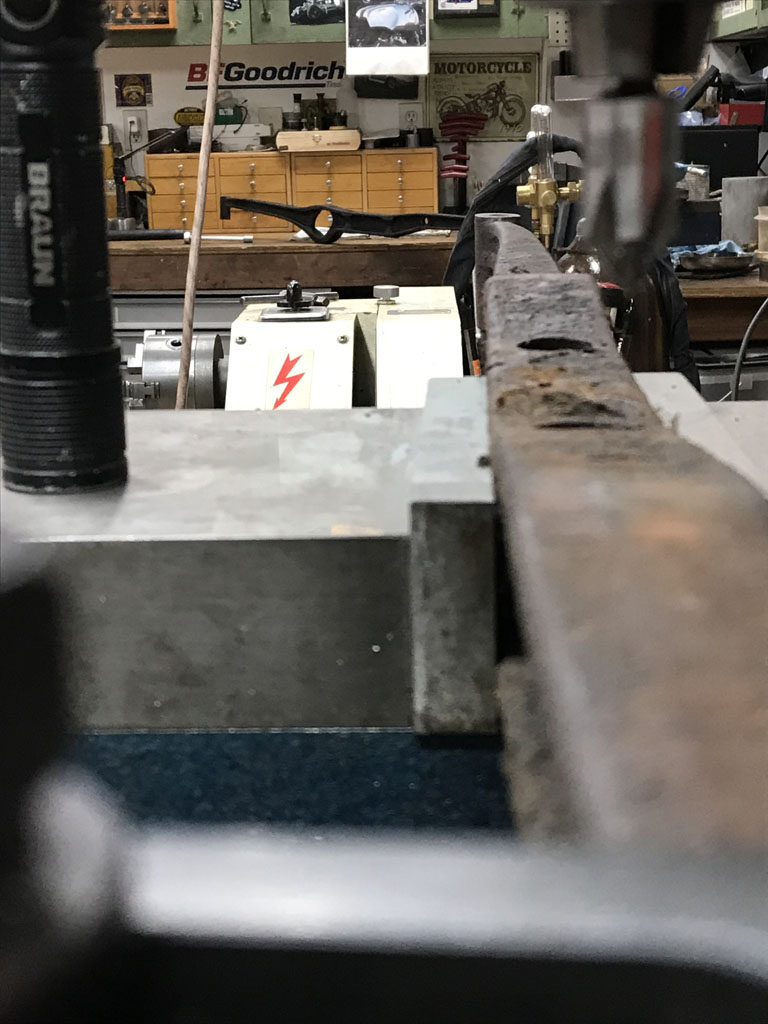 Ugh! (IMG:style_emoticons/default/hissyfit.gif) Well, I guess I'll revert back to fixing the engine bar that came with my car! Will machine up a plug to fill the oblong hole, will weld it in, and then rebore the through hole. Good weeknight project. Maybe by then my 1" OD tube will show up and I can fix the trailing arm. (IMG:style_emoticons/default/welder.gif) Some days . . . (IMG:style_emoticons/default/screwy.gif) |
  |
1 User(s) are reading this topic (1 Guests and 0 Anonymous Users)
0 Members:

|
Lo-Fi Version | Time is now: 20th December 2025 - 06:25 PM |
Invision Power Board
v9.1.4 © 2025 IPS, Inc.


