|
|

|
Porsche, and the Porsche crest are registered trademarks of Dr. Ing. h.c. F. Porsche AG.
This site is not affiliated with Porsche in any way. Its only purpose is to provide an online forum for car enthusiasts. All other trademarks are property of their respective owners. |
|
|
  |
| East coaster |
 Dec 30 2005, 09:33 PM Dec 30 2005, 09:33 PM
Post
#21
|
|
Senior Member    Group: Members Posts: 1,801 Joined: 28-March 03 From: Millville, NJ Member No.: 487 Region Association: None 
|
Thought about putting an extra piece in the corner to beef it and follow the lines of the hood better. If I did this it would be a traingular section on top with a curved section below welded into the trim channel.
Sorry for sh*tty graphic (IMG:http://www.914world.com/bbs2/html/emoticons/barf.gif) Attached image(s) 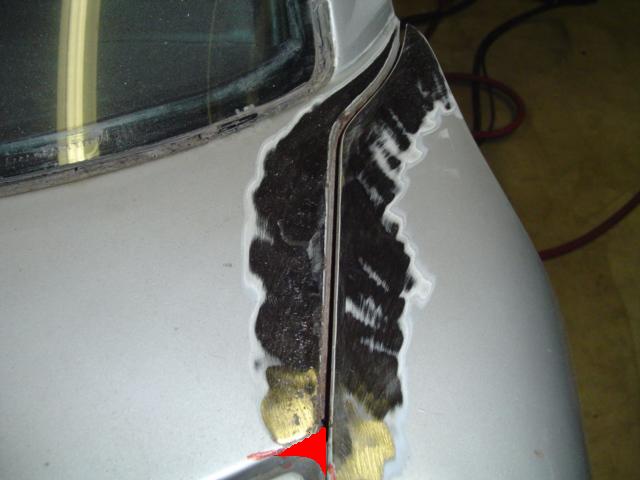
|
| Wilhelm |
 Aug 24 2008, 04:13 AM Aug 24 2008, 04:13 AM
Post
#22
|
|
Member   Group: Members Posts: 408 Joined: 7-September 07 From: Hooterville, OR Member No.: 8,088 Region Association: None |
Bump.......................................................
So for those of you who did this years ago................ Is your crack showing? (IMG:style_emoticons/default/bootyshake.gif) Or is your crack not showing? (IMG:style_emoticons/default/wacko.gif) Almost done with the (miserable) sandblasting and thinking of doing this mod. Thanks |
| Nie Zu Alt |
 Aug 24 2008, 08:10 AM Aug 24 2008, 08:10 AM
Post
#23
|
|
Member   Group: Members Posts: 173 Joined: 1-June 05 From: Centennial, CO Member No.: 4,184 Region Association: Rocky Mountains |
The PO of my car did this 4 years ago based or receipts that came with the car. I'm not sure if it was done with filler or welded. So far, no cracks. He drove the car on dirt roads and I drive the car daily.
(IMG:http://img.photobucket.com/albums/v328/misotuz/VW/Carshow1.jpg) Above is a picture from a carshow at work last week. Mine is the car in the foreground. The silver one in the background is an original '71 Six that is owned by a co-worker |
| FourBlades |
 Aug 24 2008, 09:56 AM Aug 24 2008, 09:56 AM
Post
#24
|
|
From Wreck to Rockin     Group: Members Posts: 2,056 Joined: 3-December 07 From: Brevard, FL Member No.: 8,414 Region Association: South East States 
|
Didn't the 916 come from the factory with these seams welded? I am thinking of doing this too because both sides of my car are rotted big time there. I will try to build up the panels below the way they were done at the factory and then weld in an inch or two filler panel on top. Seems like it would avoid leaks and rusting down the road. John |
| rick 918-S |
 Aug 24 2008, 10:47 AM Aug 24 2008, 10:47 AM
Post
#25
|
|
Hey nice rack! -Celette                Group: Members Posts: 20,840 Joined: 30-December 02 From: Now in Superior WI Member No.: 43 Region Association: Northstar Region 

|
I did mine. I really like the look of the smooth cowl to fender seam. I leaded mine about 15 years ago. It cracked. I hate to admit it but I could see I didn't get a good bond because of all the seam sealer under the fender sucking up the heat as I tried to flow the lead. Then when I re-did the the car in 04 I rushed to get it done for the WCC. I used All-Metal aluminum filler. It cracked before I made it to the event. Then when I went to re-do it again for 05 I had it ground out and ready to weld. When I can home from an out of town trip I discovered someone had stolen my welder while I was out of town. So, All-Metal again. Cracked right away. This time, I have a welder again and it will be fine. Mc Mark posted some photos awhile ago showing a car he did. He bridged the gap with the old tried and true method of a welding rod. It does work and you can do this without cracking.
|
| xperu |
 Aug 24 2008, 01:56 PM Aug 24 2008, 01:56 PM
Post
#26
|
|
TEXAS    Group: Members Posts: 597 Joined: 13-June 06 From: League City Texas Member No.: 6,213 Region Association: None 
|
I'm almost ready to paint my car, the body shop filled the seam with filler without my permission, so I need to remove the filler and install a new seal. How difficult is is to remove the filler; I'm not a body guy; any suggestions? The body shop is out of business, so I am stuck repairing what I got. Thanks Mike
|
| PanelBilly |
 Aug 24 2008, 02:04 PM Aug 24 2008, 02:04 PM
Post
#27
|
|
914 Guru      Group: Members Posts: 5,866 Joined: 23-July 06 From: Kent, Wa Member No.: 6,488 Region Association: Pacific Northwest 
|
Its going to be difficult to take it out and leave an even edge. the filler won't be that difficult yo cut, but I'm sure they spread it out over the entire top surface and then sanded it to a feathered edge. The good news is that the T mold will cover a bit of the edge on both sides. I'd be prepared to refinish the top surface.
Good luck, thaking that step backwards always hurts, but its the right thing to do. You DON'T want to be fixing a crack after the paint is applied. |
| McMark |
 Aug 24 2008, 03:16 PM Aug 24 2008, 03:16 PM
Post
#28
|
|
914 Freak!                Group: Retired Admin Posts: 20,179 Joined: 13-March 03 From: Grand Rapids, MI Member No.: 419 Region Association: None |
Here's the one I did. I haven't heard of any cracking, but I also don't know if this car is even driven much...
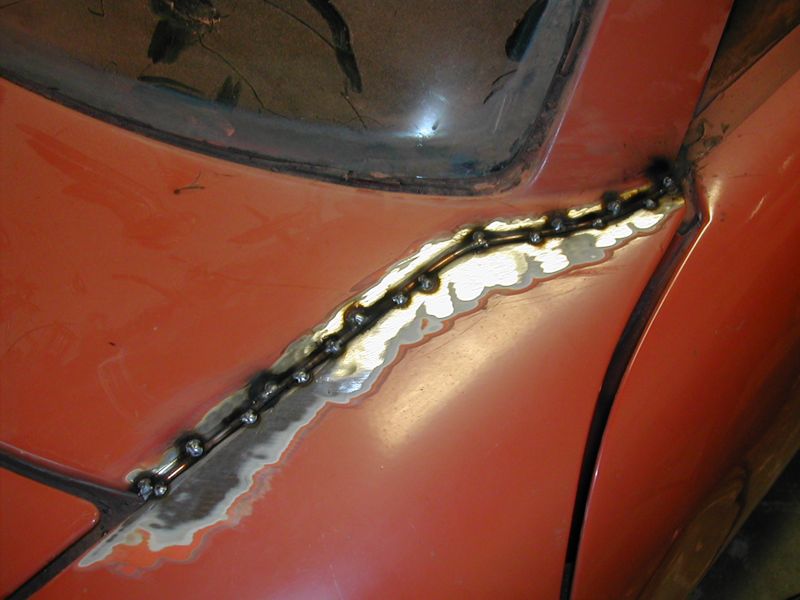 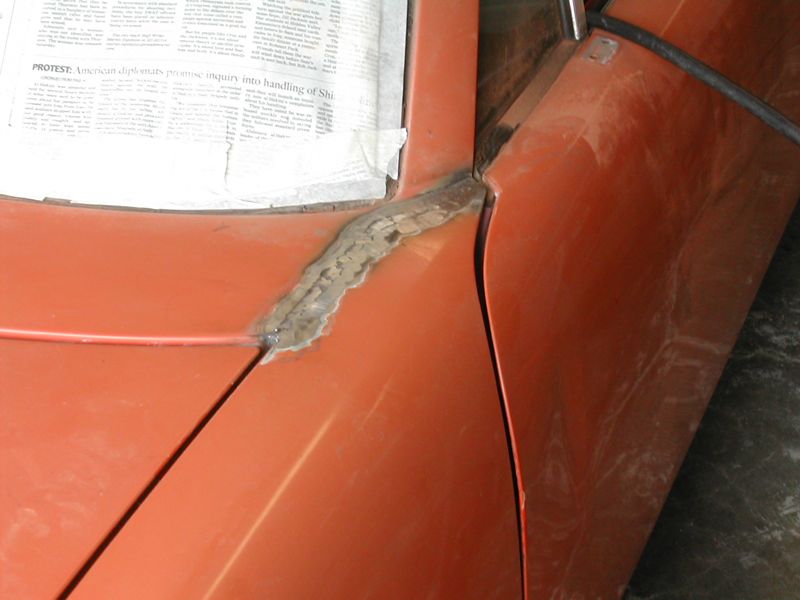 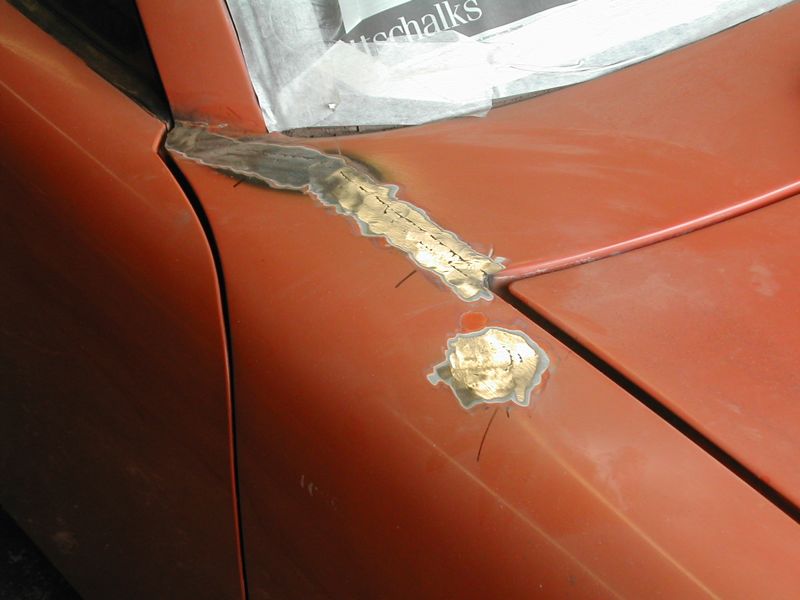 |
| dlestep |
 Aug 24 2008, 04:23 PM Aug 24 2008, 04:23 PM
Post
#29
|
|
I am smilin'...    Group: Members Posts: 890 Joined: 15-January 08 From: Sunrise Florida Member No.: 8,573 Region Association: South East States |
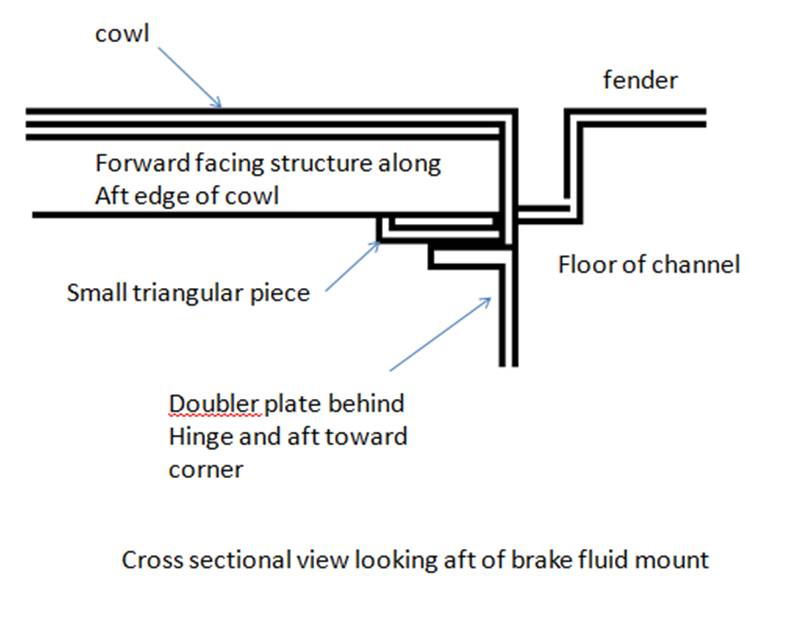 If I may add some information only to map the problem with flexing in this area. This area is constructed out of overlapping pieces, none of which are secured in three planes. The cowling is secured along the forward wall, only a couple of places forward in the channel and the forward edge is secured with only two vertical 25mm "c" channels. their relationship allows the flexing everyone is talking about. Almost all interfaces are hinge points. If you look underneath the cowling toward the a-pillar you will see a doubler plate behind the hinge, and a smaill triangular piece with a structural stiffening bend along its' length. These are the only added structural pieces that the factory supplied. The twisting of the frame during a hard right will try to compress the cowl on the right side and lift the left side. If one wants reduce the flex, it will have to be from below and inboard-outboard around the structure. Filling the seam is a cosmetic approach. Cutting, adding, and bridging with metal along the surface reduces the flex, but the cause in below. All of the intersecting pieces have to be tied to together and the gusseting in a perpendicuar plane will even be stronger. Just my two cents... (IMG:style_emoticons/default/type.gif) |
| xperu |
 Aug 24 2008, 05:21 PM Aug 24 2008, 05:21 PM
Post
#30
|
|
TEXAS    Group: Members Posts: 597 Joined: 13-June 06 From: League City Texas Member No.: 6,213 Region Association: None 
|
Its going to be difficult to take it out and leave an even edge. the filler won't be that difficult yo cut, but I'm sure they spread it out over the entire top surface and then sanded it to a feathered edge. The good news is that the T mold will cover a bit of the edge on both sides. I'd be prepared to refinish the top surface. Good luck, thaking that step backwards always hurts, but its the right thing to do. You DON'T want to be fixing a crack after the paint is applied. Thanks, I'll start removing tonight, good to find out now then later. Mike |
| Rand |
 Aug 24 2008, 05:26 PM Aug 24 2008, 05:26 PM
Post
#31
|
|
Cross Member      Group: Members Posts: 7,409 Joined: 8-February 05 From: OR Member No.: 3,573 Region Association: None |
I prefer just to clean that channel out and hit it with rust-preventative treatment and some good paint. The line isn't so bad. Go with the easiest way to take care of it. JMO.
I have huge respect for some of the guys who have filled it... So no digs. But... Why? Isn't gobbing that seam kinda kludgey? I care about making sure that area won't rust and will take care of THAT. But I don't care to bridge the gap with filler that wasn't meant to be there. Poopy! I mean, really. Why?? (IMG:style_emoticons/default/tongue.gif) If that line really offends you so much, then I guess you can deal with the potential paint nightmare maintenance issues to appease it. Bah. Why? Stirrin' the pot tonight..... |
| davesprinkle |
 Aug 25 2008, 12:34 AM Aug 25 2008, 12:34 AM
Post
#32
|
|
Senior Member    Group: Members Posts: 720 Joined: 13-October 04 From: Berkeley, CA Member No.: 2,943 Region Association: None 
|
I sandblasted the seam and then laid a length of welding rod in the seam as a filler. I then MIG welded across the fender/rod/cowl interface, and added a light coat of body filler. Subsequently, the paint hasn't cracked in 10 years. (In the interest of full disclosure, though, I should say that the car wasn't driven for the first 9 of those years. It now has about 3K miles since the paint job.)
I'm convinced that the factory kept the seam because it freed them from the tyranny of perfect panel alignment when assembling the chassis. The fender beading camouflages any slight misalignment in the cowl and fender. When I welded up my fender seam, I noticed that the top surface of the right fender was ~2mm lower than the cowl. You never noticed the imperfection with the fender bead in place. |
| morgan_harwell |
 Aug 26 2008, 02:42 PM Aug 26 2008, 02:42 PM
Post
#33
|
|
Ha! Finally snuck up on a camera!   Group: Members Posts: 126 Joined: 28-January 03 From: Santa Cruz Mtns., Ca. Member No.: 203 Region Association: Northern California |
DAPO welded up the seams on my 914.
DACO did not get a PPI before buying the Lemon. (IMG:style_emoticons/default/headbang.gif) Seams/no seams, I didn't know any better then. 22 years later, 230K miles later, seams have never cracked(street car, no track events), but DAPO did zero rust-proofing on the underside of seam welds. So, about 10 years after I bought the car the passenger side seam rusted from inside out! |
  |
4 User(s) are reading this topic (4 Guests and 0 Anonymous Users)
0 Members:

|
Lo-Fi Version | Time is now: 14th January 2025 - 10:56 PM |
Invision Power Board
v9.1.4 © 2025 IPS, Inc.


