|
|

|
Porsche, and the Porsche crest are registered trademarks of Dr. Ing. h.c. F. Porsche AG.
This site is not affiliated with Porsche in any way. Its only purpose is to provide an online forum for car enthusiasts. All other trademarks are property of their respective owners. |
|
|
  |
| worn |
 Sep 17 2019, 06:47 PM Sep 17 2019, 06:47 PM
Post
#21
|
|
can't remember     Group: Members Posts: 3,373 Joined: 3-June 11 From: Madison, WI Member No.: 13,152 Region Association: Upper MidWest 
|
[quote name='Frank S' date='Sep 17 2019, 12:47 PM' post='2747922']
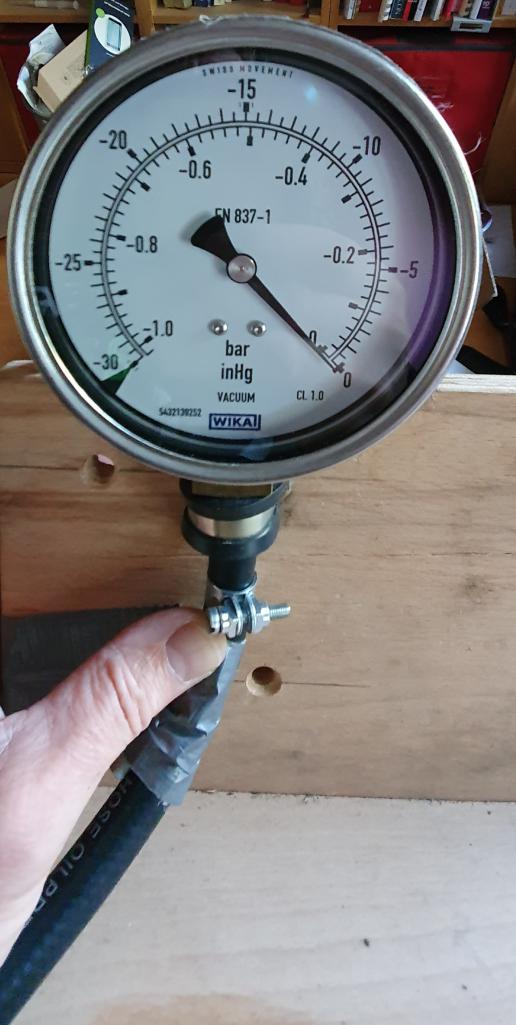
Progress, but it takes a ton of time to fine tune this bugger! [/quote] Went through this with two different engine combos, latest with same combo you are running. Much easier and faster if you measure what you adjust. If you hook up a vacuum gauge, using a T-Piece in front of the MPS and route the hose to the gauge, it's pretty easy to adjust the MPS, as you can clearly see in which region you are running (part load, transition, or full load). Tune for drive ability first, then start to play with idle settings (ignition timing and maybe recalibration of AAR) [/quote] Wow. I thought i was the only one driving with a lot of gauge data input. Looks pretty cool. |
| Frank S |
 Sep 18 2019, 03:32 AM Sep 18 2019, 03:32 AM
Post
#22
|
|
Member   Group: Members Posts: 135 Joined: 15-April 15 From: Wiesbaden, Germany Member No.: 18,632 Region Association: Germany 
|
Also entertaining buying a cooler range of spark plug. Anyone have thoughts there?
[/quote] I'm running NGK BP6RES and they are looking good. Regarding the timing, I run a programmable system. Idles fine between 10 and 12° BTDC with maximum advance of 27° BTDC from 3000 RPM onwards. Had plans to adjust timing on a dyno, but next winter project is to update the engine with a DIY Stealth Megasquirt system, so I never tried to run more advance, I know Jake recommends 28° BTDC but the engine is running cool and strong as it is and I will put it on the Dyno after the upgrade... |
| Frank S |
 Sep 18 2019, 03:39 AM Sep 18 2019, 03:39 AM
Post
#23
|
|
Member   Group: Members Posts: 135 Joined: 15-April 15 From: Wiesbaden, Germany Member No.: 18,632 Region Association: Germany 
|
Wow. I thought i was the only one driving with a lot of gauge data input. Looks pretty cool.
[/quote] Hard to adjust something you can not measure. This is a easy and in-expensive way to tune it quick. Don't need more than 3 hours to adjust it perfect like this. Its a bid of effort to install the unit, but at the end of the day it's saving a lot of time... |
| Superhawk996 |
 Sep 18 2019, 05:20 AM Sep 18 2019, 05:20 AM
Post
#24
|
|
914 Guru      Group: Members Posts: 6,598 Joined: 25-August 18 From: Woods of N. Idaho Member No.: 22,428 Region Association: Galt's Gulch 
|
[quote name='Frank S' date='Sep 17 2019, 04:47 PM' post='2747922']
Progress, but it takes a ton of time to fine tune this bugger! [/quote] Went through this with two different engine combos, latest with same combo you are running. Much easier and faster if you measure what you adjust. If you hook up a vacuum gauge, using a T-Piece in front of the MPS and route the hose to the gauge, it's pretty easy to adjust the MPS, as you can clearly see in which region you are running (part load, transition, or full load). Tune for drive ability first, then start to play with idle settings (ignition timing and maybe recalibration of AAR) [/quote] @Frank S How about posting about your center console setup? Looks interesting. |
| BeatNavy |
 Sep 18 2019, 05:21 AM Sep 18 2019, 05:21 AM
Post
#25
|
|
Certified Professional Scapegoat     Group: Members Posts: 2,944 Joined: 26-February 14 From: Easton, MD Member No.: 17,042 Region Association: MidAtlantic Region 
|
Hard to adjust something you can not measure. This is a easy and in-expensive way to tune it quick. Don't need more than 3 hours to adjust it perfect like this. Its a bid of effort to install the unit, but at the end of the day it's saving a lot of time... Yeah, that looks interesting, and I may try to set something similar up. I like the data, if for no other reason to help understand how things work. Need to find my vacuum gauge and enough correct size vacuum line. It's also helping me that I have three working MPS's: one stock, that I use as a baseline for measurements, and two that I can tune and swap in and out to see the effects. |
| Frank S |
 Sep 18 2019, 10:30 AM Sep 18 2019, 10:30 AM
Post
#26
|
|
Member   Group: Members Posts: 135 Joined: 15-April 15 From: Wiesbaden, Germany Member No.: 18,632 Region Association: Germany 
|
How about posting about your center console setup? Looks interesting.
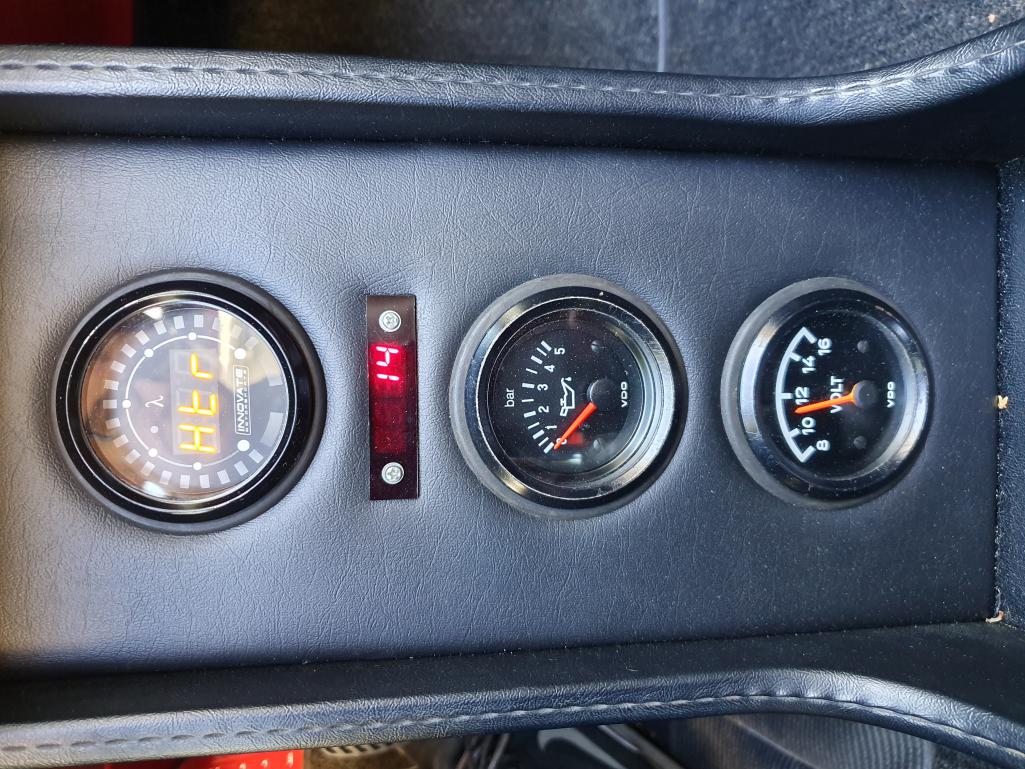
[/quote] Don't want high jack this thread... But here you go: Slightly modified last winter. Moved Oil Temp Gauge up into the instrument cluster. Here from top down: Innovate LC2 Lambda Gauge, modified and fitted into original instrument housing. CHT Gauge. Oil Pressure Gauge, new style fitted also into original instrument housing. Original Voltmeter Gauge.  |
| Frank S |
 Sep 18 2019, 10:31 AM Sep 18 2019, 10:31 AM
Post
#27
|
|
Member   Group: Members Posts: 135 Joined: 15-April 15 From: Wiesbaden, Germany Member No.: 18,632 Region Association: Germany 
|
|
| Frank S |
 Sep 18 2019, 10:43 AM Sep 18 2019, 10:43 AM
Post
#28
|
|
Member   Group: Members Posts: 135 Joined: 15-April 15 From: Wiesbaden, Germany Member No.: 18,632 Region Association: Germany 
|
Hard to adjust something you can not measure. This is a easy and in-expensive way to tune it quick. Don't need more than 3 hours to adjust it perfect like this. Its a bid of effort to install the unit, but at the end of the day it's saving a lot of time... Yeah, that looks interesting, and I may try to set something similar up. I like the data, if for no other reason to help understand how things work. Need to find my vacuum gauge and enough correct size vacuum line. It's also helping me that I have three working MPS's: one stock, that I use as a baseline for measurements, and two that I can tune and swap in and out to see the effects. Rob, as you are running exactly same CR then I do, here my MPS adjustments: 0.83H @ 15 inHG 1.37H @ 4 inHG 1,57H @ 0 inHG Maybe this will help to find a base line. |
| BeatNavy |
 Sep 18 2019, 03:24 PM Sep 18 2019, 03:24 PM
Post
#29
|
|
Certified Professional Scapegoat     Group: Members Posts: 2,944 Joined: 26-February 14 From: Easton, MD Member No.: 17,042 Region Association: MidAtlantic Region 
|
This is excellent information, thanks Frank. Have you ever measured the numbers for a stock 2.0 MPS to baseline your meter? I have noticed that my inductance meter reads the stock MPS significantly lower than what Brad Anders publishes on his website (I know there may be some debate about those numbers, but that's all we have publicly, anyway).
So if I assume your inductance meter would measure the stock MPS (e.g., 043) like Anders, then: 1. 15 inHG. Stock: .71, Yours: .83 (17% higher) 2. 4 inHG. Stock: 1.18, Yours 1.37 (16% higher) 3. 0 inHG. Stock: 1.39, Yours 1.57 (13% higher) I may be able to extrapolate with mine and see how that runs. By way of comparison, a non-molested stock 043 that I have measures as follows: 1. 15 inHG: .7 2. 4 inHG: 1.03 3. 0 inHG: 1.20 It may be my cheap inductance meter, but I can work based on your numbers. Didn't get a chance to work on the car today (IMG:style_emoticons/default/mad.gif) |
| Superhawk996 |
 Sep 18 2019, 03:42 PM Sep 18 2019, 03:42 PM
Post
#30
|
|
914 Guru      Group: Members Posts: 6,598 Joined: 25-August 18 From: Woods of N. Idaho Member No.: 22,428 Region Association: Galt's Gulch 
|
In Franks case I assume he is using the lambda to adjust the MPS and not just relying on MPS inductance. That is why I wanted to see his console better. Am I correct - tuning to lambda?
@Frank S |
| BeatNavy |
 Sep 18 2019, 03:58 PM Sep 18 2019, 03:58 PM
Post
#31
|
|
Certified Professional Scapegoat     Group: Members Posts: 2,944 Joined: 26-February 14 From: Easton, MD Member No.: 17,042 Region Association: MidAtlantic Region 
|
Yeah, I think you do both. You can't just go on MPS numbers, but they are a good starting point, and you fine tune based on what your O2 sensor, and your engine, is telling you.
|
| Superhawk996 |
 Sep 18 2019, 04:06 PM Sep 18 2019, 04:06 PM
Post
#32
|
|
914 Guru      Group: Members Posts: 6,598 Joined: 25-August 18 From: Woods of N. Idaho Member No.: 22,428 Region Association: Galt's Gulch 
|
In your case do you have a wideband lambda sensor to tune to or are you flying seat of the pants?
|
| BeatNavy |
 Sep 18 2019, 04:32 PM Sep 18 2019, 04:32 PM
Post
#33
|
|
Certified Professional Scapegoat     Group: Members Posts: 2,944 Joined: 26-February 14 From: Easton, MD Member No.: 17,042 Region Association: MidAtlantic Region 
|
I do. I didn’t really trust it when I had an exhaust leak, though. I’m also not sure how much I trust what I see with the wideband. That’s why Frank’’s vac gauge setup looks interesting.
|
| Frank S |
 Sep 19 2019, 01:48 AM Sep 19 2019, 01:48 AM
Post
#34
|
|
Member   Group: Members Posts: 135 Joined: 15-April 15 From: Wiesbaden, Germany Member No.: 18,632 Region Association: Germany 
|
This is excellent information, thanks Frank. Have you ever measured the numbers for a stock 2.0 MPS to baseline your meter? I have noticed that my inductance meter reads the stock MPS significantly lower than what Brad Anders publishes on his website (I know there may be some debate about those numbers, but that's all we have publicly, anyway). So if I assume your inductance meter would measure the stock MPS (e.g., 043) like Anders, then: 1. 15 inHG. Stock: .71, Yours: .83 (17% higher) 2. 4 inHG. Stock: 1.18, Yours 1.37 (16% higher) 3. 0 inHG. Stock: 1.39, Yours 1.57 (13% higher) I may be able to extrapolate with mine and see how that runs. By way of comparison, a non-molested stock 043 that I have measures as follows: 1. 15 inHG: .7 2. 4 inHG: 1.03 3. 0 inHG: 1.20 It may be my cheap inductance meter, but I can work based on your numbers. Didn't get a chance to work on the car today (IMG:style_emoticons/default/mad.gif) Hi Rob, good points! I was working with a cheap inductance meter in the beginning too and decided later to buy a expensive one as the cheap one simply couldn't do the job. To be clear about the whole Set Up, I'm using a 043 ECU in combination with the MPS values. From my memory you are running the same Set Up. Stock non-molested 043 MPS values I've measured are: 15 inHG: 0.75 4 inHG: 1.21 0 inHg: 1.49 |
| Frank S |
 Sep 19 2019, 01:56 AM Sep 19 2019, 01:56 AM
Post
#35
|
|
Member   Group: Members Posts: 135 Joined: 15-April 15 From: Wiesbaden, Germany Member No.: 18,632 Region Association: Germany 
|
In Franks case I assume he is using the lambda to adjust the MPS and not just relying on MPS inductance. That is why I wanted to see his console better. Am I correct - tuning to lambda? @Frank S I'm tuning for Lambda. But by using the vacuum gauge you have a much better idea what adjustments are needed. Just to provide an example driving up a slight slope in 4th gear with contstant throttle at 4000 RPM, I thought I might be already in a engine load situation where the full load diaphragm is active, but with the Vacuum gauge you can clearly see, that you are still far away from the transition point (so it's still the main mixture screw sou have to adjust). As I also have more than one MPS I measured the values after final tuning, like this it was easier to adjust the other MPS units. |
| Mark Henry |
 Sep 19 2019, 11:46 AM Sep 19 2019, 11:46 AM
Post
#36
|
|
that's what I do!                Group: Members Posts: 20,065 Joined: 27-December 02 From: Port Hope, Ontario Member No.: 26 Region Association: Canada |
On the RMS leak always give the oil the sniff test.
There's a chance it's tranny oil, input main shaft seal, which has a distinctive smell. |
| BeatNavy |
 Dec 18 2019, 04:51 PM Dec 18 2019, 04:51 PM
Post
#37
|
|
Certified Professional Scapegoat     Group: Members Posts: 2,944 Joined: 26-February 14 From: Easton, MD Member No.: 17,042 Region Association: MidAtlantic Region 
|
Ok, circling back on this to add to the 914World knowledge base.
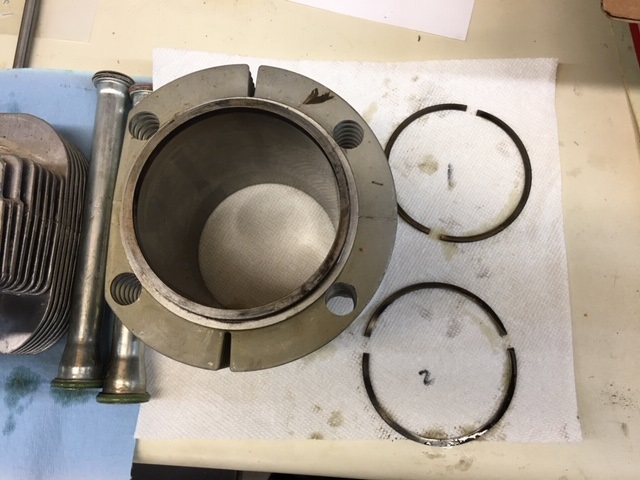
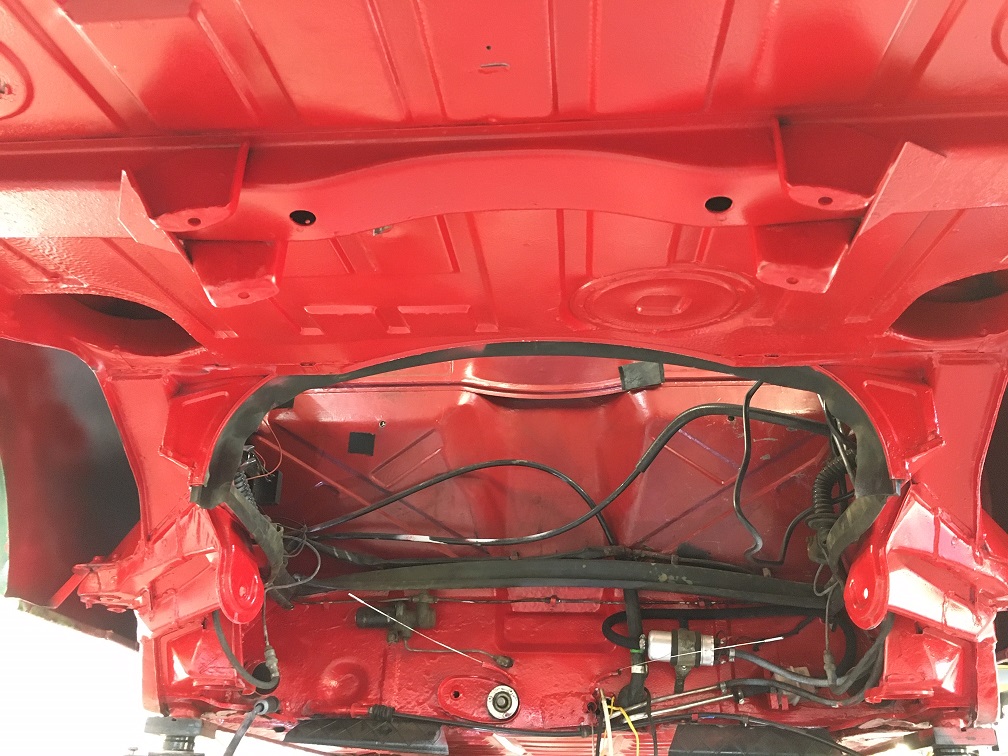
About 6 or 7 weeks ago I was having more trouble starting (and restarting) the car. Finally broke down and did a compression test. Based on the results, I pulled the engine and here's what I had:  YES! Special compression rings that have TWO gaps, not just one! (IMG:style_emoticons/default/blink.gif) Ok, yes -- cylinder #1 had not just one but two broken compression rings. I probably broke at least one when I installed piston in the cylinder a while back. I had cold compression numbers of roughly 60 on #1 and more like 140+ on the others. The broken rings could explain a lot, including elevated oil temps and oil leaks due to all the blow-by. Anyway, I dropped the engine and pulled the heads. I replaced the broken rings and also re-gapped all the #1 rings based on KB's guidance that Tom pointed out in an earlier post in this thread. Also put installed a new RMS (although the old one probably wasn't really bad). Most of the time over the last 6 weeks was spent cleaning up the underbody like I've been meaning to do for years -- removing / replacing undercoating, fixing isolated rust spots, and repainting engine bay and underside of trunk. What a LOT of work, and dirty too (IMG:style_emoticons/default/sad.gif) Finally got the engine back in today, and got her fired up! Too early to say all my drivability and oil temp/oil-leak problems are solved, but I am encouraged so far, and glad to be back on the road (with a nice clean underside) (IMG:style_emoticons/default/aktion035.gif) Several lessons learned: 1. When chasing your tail, break down and do a compression test earlier rather than later. I don't know why I tend to avoid it - it's only a minor PITA but can give good info. 2. I went with Jake's advice on ring gapping (go with out of the box gap) -- which is fine, unless the manufacturer of the product engineered something different. Read the (****) instructions. 3. A type 4 can run surprisingly well on less than 4 full cylinders. 4. This came in handy both for engine drops/installs and installing the HE's and exhaust -- basically just lifted everything in place. If you have a lift and do lots of engine drops, you may want to treat yourself to something like this if you haven't already: (IMG:http://www.914world.com/bbs2/uploads_offsite/images.homedepot-static.com-17042-1576709465.1.jpg) 5. Even with a scissor lift and that cart, pulling the engine is still a PITA. Hope I'm done for a while. Thanks for everyone's help. I'll post more when I get a chance to road test it more. In the meantime, here's my cleaned up butt (it's ok, you can look at it). Not perfect, but much better than before.  |
| Superhawk996 |
 Dec 18 2019, 05:28 PM Dec 18 2019, 05:28 PM
Post
#38
|
|
914 Guru      Group: Members Posts: 6,598 Joined: 25-August 18 From: Woods of N. Idaho Member No.: 22,428 Region Association: Galt's Gulch 
|
Wow.
That's a lot to digest. Thanks for posting and closing the loop and adding to the knowledge base. I was following this thread a while back and was curious what came of things. I know it sucks to post when we've done stupid things. I have my own version of this coming shortly. But we all learn collectively from the success and sometimes failures of others. Underbody looks immaculate. Nice Job. |
| Dion |
 Dec 18 2019, 05:55 PM Dec 18 2019, 05:55 PM
Post
#39
|
|
RN     Group: Members Posts: 2,805 Joined: 16-September 04 From: Audubon,PA Member No.: 2,766 Region Association: MidAtlantic Region 

|
Special rings! :—) Heheheh, Uggh. Glad you found the issue Rob. Hope you work your way through more details successfully. Car chassis looks great underneath. Happy you have a running engine .
|
| rhodyguy |
 Dec 18 2019, 05:59 PM Dec 18 2019, 05:59 PM
Post
#40
|
|
Chimp Sanctuary NW. Check it out.                Group: Members Posts: 22,193 Joined: 2-March 03 From: Orion's Bell. The BELL! Member No.: 378 Region Association: Galt's Gulch |
Putting a floor jack under each control arm will get the chassis way up. Angle the jacks and you can do it alone. With the drivetrain out the rear springs hardly compress. Put dunnage under the jacking donuts. Leave the muffler off.
|
  |
1 User(s) are reading this topic (1 Guests and 0 Anonymous Users)
0 Members:

|
Lo-Fi Version | Time is now: 27th December 2024 - 03:47 AM |
Invision Power Board
v9.1.4 © 2024 IPS, Inc.


